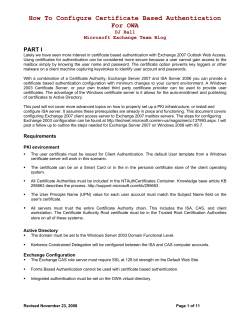
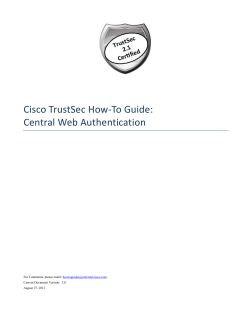
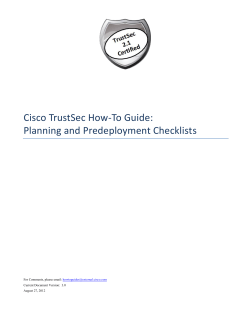
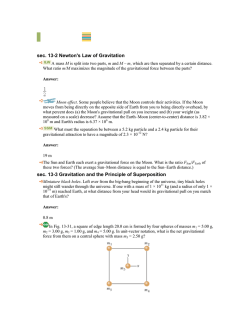
Application Note How to Use RADIUS on Cisco Smart Storage Remote Authentication Dial In User Service (RADIUS) is a networking protocol that provides centralized Authentication, Authorization, and Accounting (AAA) management for computers to connect and use a network service. The Cisco Smart Storage provides the RADIUS server functionality to authenticate users or devices before granting them access to a network and to authorize those users or devices for certain network services. Contents E nable R ADIUS on Y our S mart S torage R outer S ettings 2 5 S et Up a S witc h to W ork with R ADIUS 7 S et Up an Ac c es s Devic e with R ADIUS Authentic ation 11 F or More Information 14 © 2010 Cisco Systems, Inc. All rights reserved. Page 1 of 14 How to Use RADIUS on Cisco Smart Storage E nable R ADIUS on Y our S mart S torage To enable RADIUS on your Smart Storage follow these steps: 1. Choose Applications > RADIUS Server from the Navigation menu. 2. Check the Enable RADIUS Server check box to enable RADIUS server support. A. Check the Grant dial-in access to system user accounts check box. 3. Click Apply to save the settings. 4. Select the RADIUS CLIENTS tab to set up the authorization for an access device, such as a router, a switch, or a wireless access point (WAP). 5. Click Create a New Client from the top right to create an authorization device. 6. Enter the Name, IP address, Prefix Length, and Secret Key information: • Name—Enter a generic name. • IP Address—Enter the IP address of the device you want to authorize. • Prefix Length—Network addresses range. • Shared Key—Secret key for authorization. The secret key must be at least six characters. Use this same secret key and input at the router, switch, or WAP administration configuration parameters for their own RADIUS options. © 2010 Cisco Systems, Inc. All rights reserved. Page 2 of 14 How to Use RADIUS on Cisco Smart Storage 7. Click Apply to save the settings. 8. Select the RADIUS USERS tab to create a user account for authentication. RADIUS users are the specific end points such as PCs and devices actually attempting to connect to and gain access to network resources. 9. Click Create a New User from the top right to create a user account. 10. Enter the Name and Password information: © 2010 Cisco Systems, Inc. All rights reserved. • Username—Enter the new username. • Password—Enter the password for the user. • Verify Password—Re-enter the password for the user. Page 3 of 14 How to Use RADIUS on Cisco Smart Storage 11. Click Apply to save the settings. © 2010 Cisco Systems, Inc. All rights reserved. Page 4 of 14 How to Use RADIUS on Cisco Smart Storage R outer S ettings To configure your router settings, follow these steps. The RVS4000 router is used in this example. 1. Access the RVS4000 router via browser by typing the URL http://192.168.1.1. 2. Log in to the administrator privilege account to access to GUI. 3. Choose L2 Switch > RADIUS from the Navigation menu. 4. Enable RADIUS Mode by selecting Enabled from the drop down list. 5. Enter the RADIUS IP address (Smart Storage server IP address). 6. By default, the RADIUS UDP Port is 1813. If you are using a different port number, ensure that the port matches between the router and the RADIUS server. 7. Enter the RADIUS Secret. This is the secret key defined at the Smart Storage RADIUS server menu. For this application note, enter “rvsradius” in the router configuration. 8. Click Save. By default, all ports are set to Force Authorized which means access is allowed. To access a network port with RADIUS authorization, the Administration State needs to be changed to Auto. The authentication is checked and verified with the RADIUS setup for authorization to access the network. © 2010 Cisco Systems, Inc. All rights reserved. Page 5 of 14 How to Use RADIUS on Cisco Smart Storage This GUI window shows that any device connecting to Port 2 requires a RADIUS user account to authorize network access on the port that is set for RADIUS authentication. © 2010 Cisco Systems, Inc. All rights reserved. Page 6 of 14 How to Use RADIUS on Cisco Smart Storage S et Up a S witc h to W ork with R ADIUS Before you configure the RADIUS setting on your switch, make sure the Smart Storage already has the switch configured as a valid client. The Smart Storage must be configured with all the relevant information of the switch such as Name, IP Address, and the Shared Key to be used between the Smart Storage and the switch for proper RADIUS authentication. See the previous section, “Enable RADIUS on Your Smart Storage,” where the router was set up as a client from the Smart Storage GUI and used as an example. In brief, the client, for example router or switch, is first configured from the Smart Storage RADIUS GUI and then those parameters are transferred to the network clients, for example router or switch. The SG300-10P switch is used in this example. To set up a switch to work with RADIUS follow these steps: 1. Open a GUI browser and log in to the switch. 2. Choose Security > RADIUS from the Navigation menu. From this window, you can add the RADIUS server (Smart Storage) information to the RADIUS table. 3. © 2010 Cisco Systems, Inc. All rights reserved. Click Add to create a new RADIUS server. Page 7 of 14 How to Use RADIUS on Cisco Smart Storage 4. © 2010 Cisco Systems, Inc. All rights reserved. Click Apply to add the RADIUS settings for switch authorization. Page 8 of 14 How to Use RADIUS on Cisco Smart Storage Set Up 802.1x Settings From the Switch For Port Access with RADIUS Authentication To set up the 802.1x settings from the switch for port authentication follow these steps: 1. From your switch GUI, choose Security > 802.1x > Port Authentication from the Navigation menu. Select a port to use with RADIUS authentication and click Edit to modify the settings. 2. Modify the following parameters for authentication: 3. Click Apply to save the settings. 4. Choose Security > 802.1X > Properties. Enable RADIUS by checking the Port-Based Authentication check box. © 2010 Cisco Systems, Inc. All rights reserved. Page 9 of 14 How to Use RADIUS on Cisco Smart Storage 5. Click Apply to save the settings. All ports configured for RADIUS authentication will become effective immediately with this global setting. © 2010 Cisco Systems, Inc. All rights reserved. Page 10 of 14 How to Use RADIUS on Cisco Smart Storage S et Up an Ac c es s Devic e with R ADIUS Authentic ation Any device that has the built-in 802.1x feature can be configured for network access security by using the RADIUS server for authorization. Following are four authentication methods and the steps needed to configure an access device such as a network camera or PC: (1) EAP-MD5, (2) EAP-PEAP, (3) EAP-TLS, (4) EAP-TTLS. To Configure EAP-MD5 Authentication 1. Open a GUI browser and log in to the device. 2. Choose Network Setting > 802.1x from the Navigation menu. 3. Check the Enable 802.1x check box. 4. In EAP Type, select EAP-MD5 from the drop-down list. 5. In Identity, enter the RADIUS user account username. 6. In Password, enter the RADIUS user account password. 7. Click Save. Note: The user account information (Identity and Password) entered into the EAP-MD5 must be an existing account already created on the RADIUS server (Smart Storage) database. If the account is existing on the RADIUS server, the device will be successfully authenticated and allow access to the network via a port on the switch that is configured for RADIUS security settings. To Configure EAP-PEAP Authentication © 2010 Cisco Systems, Inc. All rights reserved. 1. Open a GUI browser and log in to the device. 2. Choose Network Setting > 802.1x from the Navigation menu. 3. Check the Enable 802.1x check box. 4. In EAP Type, select EAP-PEAP from the drop-down list. 5. In Identity, enter the RADIUS user account username. 6. In Password, enter the RADIUS user account password. 7. Select the Inner Authentication Method from the drop-down list. 8. Click Browse to locate a certificate file to upload to the access device. Page 11 of 14 How to Use RADIUS on Cisco Smart Storage Note 1: You can use the default certificate from the RADIUS server (Smart Storage) or a custom certificate from a trusted provider. To download the default certificate, choose Administration > Security from the Navigation menu. Under IMPORT SSL SECURE CERTIFICATE, click Download Certificate. The file is automatically saved as a .crt extension. You need to save the file as a .pem extension in order to upload the file to your device. In this example, the device is a camera. Note 2: If you are using a custom certificate, please ensure the same certificate is uploaded to the Smart Storage server. 9. Click Upload to upload the certificate. 10. Click Save. Note: The user account information (Identity and Password) entered into the EAP-PEAP must be an existing account already created on the RADIUS server (Smart Storage) database. In addition, the Certificate Authority (CA) certificate must be matched with the RADIUS server for authorization. To Configure EAP-TTLS Authentication 1. Open a GUI browser and log in to the device. 2. Choose Network Setting > 802.1x from the Navigation menu. 3. Check the Enable 802.1x check box. 4. In EAP Type, select EAP-TTLS from the drop-down list. 5. In Identity, enter the RADIUS user account username. 6. In Password, enter the RADIUS user account password. 7. Select the Inner Authentication Method from the drop-down list. 8. Click Browse to locate a certificate file to upload to the access device. Note 1: You can use the default certificate from the RADIUS server (Smart Storage) or a custom certificate from a trusted provider. To download the default certificate, choose Administration > Security from the Navigation menu. Under IMPORT SSL SECURE CERTIFICATE, click Download Certificate. The file is automatically saved as a .crt extension. You need to save the file as a .pem extension in order to upload the file to your device. In this example, the device is a camera. © 2010 Cisco Systems, Inc. All rights reserved. Page 12 of 14 How to Use RADIUS on Cisco Smart Storage Note 2: If you are using a custom certificate, please ensure the same certificate is uploaded to the Smart Storage server. 9. Click Upload to upload the certificate. 10. Click Save. To Configure EAP-TLS Authentication 1. Open a GUI browser and log in to the device. 2. Choose Network Setting > 802.1x from the Navigation menu. 3. Check the Enable 802.1x check box. 4. In EAP Type, select EAP-TLS from the drop-down list. 5. In Identity, enter the RADIUS user account username. 6. In Password, enter the RADIUS user account password. 7. Select the Inner Authentication Method from the drop-down list. 8. Click Browse to locate a certificate file and private key files to upload to the access device. Note 1: You can use the default certificate from the RADIUS server (Smart Storage) or a custom certificate from a trusted provider. To download the default certificate, choose Administration > Security from the Navigation menu. Under IMPORT SSL SECURE CERTIFICATE, click Download Certificate. The file is automatically saved as a .crt extension for a certificate and saved as a .key extension for a private key file. You need to save both files as a .pem extension in order to upload the file to your device. In this example, the device is a camera. The CA and Client certificate use the same SSL certificate file for EAP-TLS. Note 2: If you are using a custom certificate, please ensure the same certificate is uploaded to the Smart Storage server. © 2010 Cisco Systems, Inc. All rights reserved. Page 13 of 14 How to Use RADIUS on Cisco Smart Storage 9. Click Save. F or More Information For more information about Cisco Smart Storage Applications, visit the Cisco Small Business Community forum https://www.myciscocommunity.com/community/smallbizsupport/networkstorage OL-23197-01 © 2010 Cisco Systems, Inc. All rights reserved. Page 14 of 14
© Copyright 2026 Paperzz