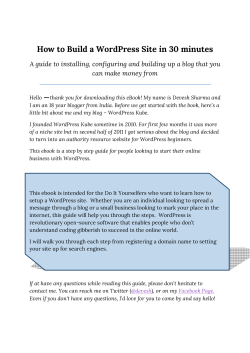
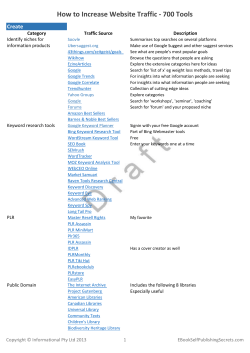
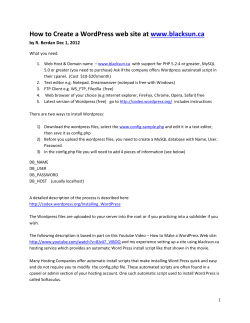
How to Build Small
Business Websites Using
the Thesis WordPress
Theme
by Don Campbell
Check for Updates!
Revision 1.5 - p1
Preface
4
What this book will give you
4
Who is Don Campbell?
4
Make sure you have the latest version!
5
Quick summary of the steps in this eBook
5
Chapter 1: Installing WordPress
6
Hosting WordPress Installations
6
Installing WordPress in Five Minutes or Less
6
Step 1: Log into your BlueHost cPanel interface
7
Step 2: Click the SimpleScripts button
7
Step 3: Select WordPress
7
Step 4: Fill in the 3 fields
7
Step 5: Login to your new site
9
Logging Into the WordPress Admin UI
9
Chapter 2: Installing the Thesis WordPress theme
12
Step 1: Download the Thesis theme
12
Step 2: Upload the theme to your site
12
Step 3: Activate your new theme
14
Chapter 3: Making WordPress look like a website
19
Step 1: Create Your Home Page
19
Step 2: Create a Blog/Articles Page
20
Step 3: Setting Your New Home Page
21
Step 4: Adding Pages To Your Navigation Menu
22
Chapter 4: Filling In and Optimizing Your New Website
23
Replacing the Thesis images in the Multimedia box
23
Setting a background color
23
Adding a Map & Directions Page
24
Adding a Sidebar Widget
25
Check for Updates!
Revision 1.5 - p2
Optimizing Your Website for the Search Engines - SEO
30
Tracking and Measuring Your Website Traffic - Analytics
31
Chapter 5: Small Business Website Examples
33
Chapter 6: Essential WordPress Plugins
36
OpenHook
36
WP-DB Backup
37
Contact form
37
All-In-One-SEO Pack
38
WP-Touch
38
NextGen Gallery
38
Google Analytics Plugin
38
Chapter 7: Get your business listed in Google and Yahoo local business directories40
Chapter 8: Final Thoughts
41
Step by Step Summary
41
Your Feedback is Welcome and Appreciated
41
Full disclosure
41
Please Share This Guide!
41
Appendix: External Resources
42
WordPress How To Resources and Videos
42
Thesis Resources
42
Local Search Optimization Resources
42
Check for Updates!
Revision 1.5 - p3
Preface
What this book will give you
This eBook is a beginner’s guide to using WordPress and the Thesis WordPress Theme
to set up highly effective small business websites that get great local search results.
Small Business owners are in need of a cost-effective way to set up a professional
looking website to help them promote their business in Google and Yahoo local
searches.
I’ve talked to many business owners who have been quoted $2,500, $3,500 and up for a
professional website. And I know others who have paid this much and more for nice
looking websites (and some not-so-nice looking ones!) that don’t bring them any new
customers. They end up being fancy online brochures.
In this guide I’ll show you how to set up an effective website for a small business that
both looks professional, and has the potential for great search results and becoming a
source of new customers from the web.
If you are a small business owner, or a consultant who helps small businesses,
this guide is for you.
Why WordPress, and why Thesis?
One of the keys to top search results is great site architecture and great content.
WordPress is a powerful content management system that fulfills these requirements
and also happens to be free. See Why Use WordPress to Power Your Small Business
Website for more on why WordPress is an excellent choice to power your small business
website.
The Thesis theme is one of the best premium themes available for WordPress. It is a
highly customizable theme with a ton of great features, including some killer SEO
(Search Engine Optimization) capabilities out of the box. See 9 Reasons to use the
Thesis WordPress Theme for some more reasons Thesis is a great way to go.
Who is Don Campbell?
Don is a local search expert based in Silicon Valley. He was an early member of
Interwoven - a highly successful web content management provider and was later the
Technical Evangelist for Microsoft Office Live.
Recognizing the need for small business owners to shift their marketing efforts from the
print yellow pages to the web, he left his corporate job to start his own company,
Expand2Web.
Check for Updates!
Revision 1.5 - p4
Now Don helps small business owners get online and turn their websites into marketing
machines that deliver a steady stream of customers from Google and Yahoo searches.
You can find out more at his blog:
http://www.expand2web.com/blog
Make sure you have the latest version!
I am constantly updating this guide as I get feedback from readers. Make sure to check
the download page on my blog to stay current with the latest version.
This version is 1.5.
Click Here to Check for Updates!
Quick summary of the steps in this eBook
Five Steps To Your Small Business Website:
1. Get WordPress hosting: Click Here
2. Get the Thesis theme: Click Here
3. Set it up (follow instructions in this document)
4. Add call tracking (optional): Click Here
5. Get Listed: Click Here
Check for Updates!
Revision 1.5 - p5
Chapter 1: Installing WordPress
I highly recommend hosting Wordpress on your own domain (rather than signing up for
an account on WordPress.com) for the following reasons:
1. You should have your own domain name for your business. As you’ll see later this
will help you get the best local search results for your business.
2. You have more control over your website, both in terms of look and functionality.
3. You want your website to look like a business website, not a blog.
4. It’s easy to set up your own website using WordPress.
You can get a free WordPress blog from Wordpress.com, and a lot of people ask me
about the difference between this and hosting your own WordPress. For more details on
this topic, see WordPress.com vs WordPress.org - Which One Should I Use?
Hosting WordPress Installations
You can install your own version of WordPress on any host that supports PHP and
MySQL. WordPress is freely available for download here.
But I suggest that you use a hosting provider that permits 1-click installs of WordPress.
This way you don’t have to worry about downloading WordPress, uploading it to your
host, creating the database and editing the configuration files.
For small business websites, BlueHost is a great way to go for WordPress hosting. They
only charge $6.95/month for hosting, and provide these features that are relevant to
the type of sites we are talking about:
•
•
•
•
•
First domain included free (you can also use your own domain if you have one)
One click installation of WordPress with Fantastico or Simple Scripts
Unlimited add-on domains
Ability to install multiple WordPress instances on the same account
Tons of disk space and bandwidth (600GB disk space, 6,000GB bandwidth/
month)
Click Here To Get Your
BlueHost Account
Installing WordPress in Five Minutes or Less
So let’s get to work and show how you can install WordPress quickly. I’ll show you how
do do this with Simple Scripts on BlueHost. Other hosting providers should work much
the same as this.
Check for Updates!
Revision 1.5 - p6
Step 1: Log into your BlueHost cPanel interface
First, go to your hosting provider and log into the administrative interface. Most
providers use an interface called cPanel, like Bluehost does.
Step 2: Click the SimpleScripts button
Find the Simple Scripts icon and click on it to begin your WordPress install.
Step 3: Select WordPress
Select WordPress from the installation options.
Step 4: Fill in the 3 fields
Fill in your basic information to and start the installations.
Check for Updates!
Revision 1.5 - p7
Here are some tips on filling in these fields:
What version of WordPress would you like to install? - Go with the latest
version; at the time of this writing that is WordPress 2.9.1.
Where would you like WordPress installed? - For this field, just choose the
domain that you plan to use for your business, and don’t add any additional directory
after the slash.
If we were setting up a “blog” then we might want to add a directory name like “blog”
there, but in this case we’re going to install WordPress right at the root directory of the
domain, and make it look like a website instead of a blog.
Please give your site a name - Just put the name of your website here. You can
change it later from the WordPress admin UI if you would like.
Check for Updates!
Revision 1.5 - p8
Advanced Configuration - Leave these defaults - it will automatically create the
database (you don’t want to worry about that do you?) and generate an administrator
login for you.
Step 5: Login to your new site
That’s it! Within a minute after you click the “Complete” button, WordPress will be
installed for you and ready to go. Login to your new site by clicking on the link provided
in the results page or the email confirmation.
Note: Write down the username and password on this screen. You should also get an
email confirmation with a link to login to your new website, and a userid and password.
Just make sure you record this information so you know how to get in to your new
website.
Logging Into the WordPress Admin UI
Now you are ready to log into WordPress. You can click on the link in the final screen
after your installation, or just type in http://www.yourdomain.com/wp-admin to
get to the WordPress admin screen. The WordPress admin login screen is shown below.
Check for Updates!
Revision 1.5 - p9
Just enter the username and password that you wrote down after the installation (it was
also emailed to you) and you will be taken to the WordPress Admin UI.
There are a few things we’ll do here to get your site ready to go. These are things that I
do after every WordPress installation.
Check for Updates!
Revision 1.5 - p10
First, you’ll want to change some of the General Settings by selecting Settings on the
left hand side menu. Change the fields highlighted in above - Tagline, E-mail address
and Timezone.
Next, the “Permalinks Structure” of your site. To do this, choose Permalinks on the
left hand menu. Set your permalinks structure to look like the screenshot below.
This makes the urls of your website pages more friendly to the search engines. Now they
will look like: www.sbusinesshome.com/sample-post instead of http://
www.sbusinesshome.com/?p=123.
Check for Updates!
Revision 1.5 - p11
Chapter 2: Installing the Thesis WordPress theme
Step 1: Download the Thesis theme
The theme we are using to build our site is the Thesis WordPress Theme. Thesis is a
“premium” theme that you will need to purchase. At the time I write this, it costs $87,
and is well worth it.
There are many WordPress Themes available, both free and paid, but for purposes of
this walkthrough I’m using the Thesis theme. It is the theme I use on several of my
websites, and is very customizable for what we want to do here.
Click Here to Download Thesis
Step 2: Upload the theme to your site
Note: Starting with WordPress 2.8, you can upload your theme ZIP files in the
WordPress Admin UI without using FTP. Check this video to see how: How To Install
Themes in WordPress 2.8.
If you still want to install using FTP, read this section below.
Once you’ve purchased the theme, you should have a thesis.zip file on your
computer. Unzip that file and you will end up with a folder called “thesis”.
For this next step, you’ll need something called an FTP program. We’ll use this program
to upload it to your hosting provider account.
I’m using a Mac FTP program called Transmit, but there are many free FTP tools
available for both PC and the Mac.
If you don’t have an FTP client already, here are a couple of free options: FileZilla is a
free FTP client program that works on both PC and the Mac. CoreFTP is a free FTP
client for the PC.
Download one of these clients and then go back to your BlueHost cPanel to get the
settings for your new FTP client.
Check for Updates!
Revision 1.5 - p12
Click on FTP Accounts from the main cPanel screen, then click on Configure FTP
Client. You’ll get a screen with your FTP settings on it that looks like this:
Use these to configure your FTP client so you can use it to upload files to your server.
BlueHost provides instant configuration files for Filezilla, CoreFTP and Cyberduck. to
make configuration easy.
Once you are able to connect to your server with your FTP program, upload the thesis
folder from your computer to the public_html/wp-content/themes directory on
the server.
Check for Updates!
Revision 1.5 - p13
When you are done it should look like this:
The classic and default folders you see are the basic themes that come with
WordPress. Your thesis folder should now be right alongside of them.
Step 3: Activate your new theme
Now that you’ve uploaded your theme, you can activate it from within the WordPress
Admin UI.
If you look at your website now by typing your domain name into the browser, it will
look something like this:
Check for Updates!
Revision 1.5 - p14
This is the default theme that comes with WordPress. Our job now is to switch the look
of our website to our new Thesis theme.
To do this, we need to log back in to our WordPress Admin UI. Remember that is
located at: http://www.yourdomainname.com/wp-admin - where you will replace
yourdomainname with your actual domain name.
Once you are logged into the Admin UI, select Appearance on the left hand side menu.
Select the Themes sub-option, and you’ll see all of the themes available for your site.
Check for Updates!
Revision 1.5 - p15
Click on the Thesis theme here, and you will be presented with a Preview window.
Activate the theme.
Now if you visit your website, the Thesis theme is active, and it will look something like
this:
Check for Updates!
Revision 1.5 - p16
Now that we have a basic website up, I want to take you on a tour of the powerful
Thesis Options panels. One of the great things about Thesis, is that it provides the
most complete options panel in the WordPress Admin UI that I have seen from any
theme.
Let’s use this panel to change some of the options for our new website.
In this panel we are going to change the following settings:
1. In the Home Page box, set the Home Page Meta for your home page. Make this a
short and compelling description of why someone would want to visit your website. It
shows up directly beneath your URL in the Google search results.
2.Under Display Option the last choice is Administration, turn off “show edit post
links” and “show edit comment links” by deselecting the check boxes.
3.Uncheck the checkbox in the Feed Link in Nav Menu box in the Navigation Menu
section. Unless you think your site visitors understand what an RSS feed is, you
probably don’t need this distraction on your website. You can turn it on later if you
want.
4.One of the choices on the under Navigation Menu reads “show home page in nav
menu” - you should uncheck this because we will be making a custom home page
in the next section, and if you don’t uncheck this you will end up with two Home link
in your nav menu.
Check for Updates!
Revision 1.5 - p17
Next, go to the Design Options link, right under Thesis Options. This is also
provided by the Thesis theme, and provides a ton of great options for the layout of your
website.
On this panel we’re going to change these options:
1. Under Site Layout: Columns change to a 2 column layout with 540px and 300px
columns.
2.Under Nav Menu change the font to Arial Black so your navigation menu shows up
more prominently.
3.You may also want to change the background color of the current tab so that it is easy
for visitors to know which page they are on. You can change this by setting the
“current background color” to whatever color you want.
Now let’s add some pages and content to your website.
Check for Updates!
Revision 1.5 - p18
Chapter 3: Making WordPress look like a website
Ok, now we’ve got our website up and running. But it looks more like a blog. Normally,
when someone visits your WordPress website they will see a list of your latest blog posts.
Since we are building a business website, we want our home page to look different.
Step 1: Create Your Home Page
So our first step is to create a WordPress “Page” that describes our business and
provides a clear call to action, rather than just listing blog posts.
The way to do this is to go into your WordPress Admin UI (at yourdomainname.com/
wp-admin) and under the Pages menu on the left, select Add New.
Name this page Welcome to Saratoga Chiropractor Gentler Chiropractic (your
business name), and add a nice description of your business in the content section. This
page will become the home page of your new site. Here is an example of what you could
add to your home page:
Check for Updates!
Revision 1.5 - p19
After you’ve entered your content, and before you publish, scroll down to the
Discussion box near the bottom of the page, and uncheck the Allow Comments and
Allow Pings boxes.
Now hit the Publish button to create your page!
Step 2: Create a Blog/Articles Page
Since we are going to change the home page of your blog to be a static page that
describes your business, you’ll want to make another page to publish your articles or
blog content, should you decide to do that later.
Check for Updates!
Revision 1.5 - p20
This is easy - just follow the same procedure as in Step 1 above. Name the Page
Articles or Blog or whatever you want to call it, turn off the Allow Comments and
Allow Pings, and Publish it.
Note: There is no need to put any content in this page,
WordPress will automatically list your recent blog posts
on this page when it is displayed.
This page is important because the key to good search engine rankings is fresh content.
That’s one of the reasons we are using WordPress, because once you get it up and
running it is super-easy to add new content to your site, and WordPress automatically
notifies the search engines that you’ve got new content ready for it to crawl!
Step 3: Setting Your New Home Page
Now we’ll go into the WordPress Settings and set you new home page to display. Go to
the Settings menu on the left hand side of your WordPress Admin UI. Select the
Reading menu item under that, and you’ll see a screen like the one below:
Change the Front page displays radio button to A static page. Select your home
page and articles page in the two drop downs, and hit the Save Changes button.
Now you’ve changed your home page from a standard blog page to your own content!
Check for Updates!
Revision 1.5 - p21
Step 4: Adding Pages To Your Navigation Menu
If you create additional pages on your site, for example a Map & Directions page, Thesis
makes it easy to add that page to your Navigation menu.
Let’s use the Thesis Options panel to tell Thesis we want to display our Articles page
on the navigation menu.
This will give you a list of all the Pages you have created, and all you need to do is check
the ones you want to show up on your navigation menu.
You can also drag and drop your pages in this section to reorder them on your Nav
menu!
Now your navigation menu will be updated automatically for you.
Ok - great work. Now we’ve got a fully functioning website for your business.
In the next chapter we’ll fill out the rest of your site and do some optimizations for the
search engines, and install a plug-in that allows you to measure your website traffic
trends.
Check for Updates!
Revision 1.5 - p22
Chapter 4: Filling In and Optimizing Your New
Website
Let’s further customize our site and make it our own.
In this chapter, we’ll replace the default images that come with Thesis, add a Map &
Directions page with an interactive Google Map, add a Widget to our Sidebar, and learn
about SEO and Analytics for our site.
Replacing the Thesis images in the Multimedia box
Looking at your new website, you’ll notice a box in the upper right hand side of your
website that displays a different image every time you load the page. These images are
pulled from the wp-content/themes/thesis/rotator directory of your theme.
To change these images, all you have to do is FTP to this directory, delete the images in
that directory, and replace them by uploading your own images. Remember you set up
your FTP client in Chapter 2. Click here to go back to those instructions.
I recommend you put images of your storefront, your reception area, and yourself and
your staff if possible. You want to help your visitors get a sense of who you are and make
them feel comfortable with you and your office.
Setting a background color
Under Fonts, Colors and More! in the Thesis Design Options, if you expand the
Body (and Content Area) section you can set a background color for your site.
Change the “site background color” using the color chooser to a color that looks good to
you. I also like to check the “Add a cool shadow effect to your layout” checkbox to make
the page “pop.” Try it out!
Check for Updates!
Revision 1.5 - p23
Adding a Map & Directions Page
Another best practice for a small business website is to have a Map and Directions page.
This makes it easy for your visitors to see exactly where your business is, and get
directions quickly.
Fortunately, Google Maps gives us a way to create a map of our business and add it to
our site.
To get your map, go to http://www.google.com/webelements/maps/ and type in your
business address in the “Marker address” field. You can also customize the label that
will show up on the marker with your business name in the “Marker title” field.
Google will give you an interactive map of your business location.
Check for Updates!
Revision 1.5 - p24
Go to the bottom of the page and copy the HTML. We’ll take this snippet of HTML code
and put it on your website.
Now let’s go to login to your WordPress site. Remember that is at http://
www.yourdomain.com/wp-admin. Once you are logged in, create a new Page, just
like in Chapter 3, Step 1. Name this page Map and Directions, or whatever you
would like it to show up as on the navigation menu of your website.
When editing this page, type in any special instructions that you use to help people find
you, and then switch to HTML editing mode by clicking on the HTML tab on the top
right of the editing box.
While in HTML editing mode, just paste in the HTML snippet that you got from the
Google Maps page.
Turn off Comments and Pings, just as we did when creating our other pages in
Chapter 3, and then hit Publish.
Finally, add this page to your navigation menu in the Thesis Options, just like we did
in Chapter 3 Step 4.
Adding a Sidebar Widget
WordPress has a nice ability to easily add “Widgets” to your sidebar. There are many
pre-made widgets for all kinds of things to add to your website.
Check for Updates!
Revision 1.5 - p25
To see a list of these, go to your WordPress Admin UI and click the Widgets menu item
in the Appearance section of the left hand menu.
Once you click this menu item, you’ll see a list of the widgets that are available.
One of the things that I like to do on a small business website is to add a “Ring Me” or
“Click-to-Call” button. This makes it easy for your visitors to call you, and also
gives you a way to track how many phone calls your website is generating.
There are several services that offer this capability. My favorite is a service called
RingCentral. They provide a virtual phone system service (also called a virtual PBX)
where you can get a local or 800 phone number, and route calls made to this number to
your existing phones with call routing rules.
It’s a very powerful system for small businesses, and is only $9.95/month. Once you
sign up with them you can get a click-to-call button to put on your website. They offer
a free 30-day trial, so click here to try it out. You can always cancel within the trial
period.
So here is the Widgets panel in the WordPress Admin UI.
Check for Updates!
Revision 1.5 - p26
On the left, you see a list of Widgets that you can place in your sidebar. Let’s add a clickto-call button to ours. We want the Text Widget, which allows us to put a widget on our
sidebar with anything we want to it.
Click Add next to the Text Widget and it will be added to the sidebar on the right.
Now click Edit in the blue box of the Widget you just added so we can change the
contents of it. You’ll see a box pop up that allows us to put our own text in there.
Check for Updates!
Revision 1.5 - p27
Put the text Call Today for Your Appointment! in the first text field. In the next text
area we’ll paste the Click-to-Call code that I got from my RingCentral Admin panel.
If you are interested in doing this, I’ve published a video called How To Get Your
Website Visitors to Call You that shows you how to get this code snippet for the Click-toCall button.
If you don’t want to do the call button, you could put any text in here to test out the
widget functionality.
Once you’ve made your changes in this box, click the Done button and the box will
close. Then click the Save Changes button to save the changes you’ve made to your
sidebar.
Now when you view your website, you’ll see the widget we added in the right sidebar.
Now your site should look something like this:
Check for Updates!
Revision 1.5 - p28
Check for Updates!
Revision 1.5 - p29
Optimizing Your Website for the Search Engines - SEO
For most WordPress websites, the All-In-One SEO Pack
plugin is one of the first plugins that I install.
It gives you control over the <title> and meta
description tags for your website, and allows you to
override these for every page or post on your site as well.
But the Thesis theme has this capability built in. You can
set the <title> tag, meta description and meta
keywords for your home page in the Thesis Options
panel.
And for any Page or Post you create, you have total
control over these items on the editing screen too.
For example, on our Map and Directions page, you
should include keywords in the title of that page
indicating the city name and perhaps even cross streets.
You can specify these in the SEO Details and Additional Styles box near the bottom of
the screen where you edit your Post or Page.
Check for Updates!
Revision 1.5 - p30
This is a very powerful capability as you optimize your site for local search engine
rankings!
Tracking and Measuring Your Website Traffic - Analytics
Another very important thing you’ll want to do for your site is to add the free Google
Analytics tool.
This allows you to measure all kinds of things about your site, like how many unique
visitors you have, which keywords they are using to find you, and what pages on your
site are the most popular with your visitors.
It is very important to set this up right away on your website, so that you can measure its
effectiveness over time.
When you go sign up for a Google Analytics account, you will get a small code snippet
that has to be added to every page on your website.
Once again, Thesis comes to the rescue and provides an easy way for us to add this to
our website.
In the Thesis Options panel, you’ll see an area called Software Stats & Scripts that
contains a text area for the header and footer of your site. Anything you put in here will
show up on every page of your website.
We need to put our Google Analytics script in the Footer Scripts area.
Check for Updates!
Revision 1.5 - p31
Now Google Analytics will track all kinds of metrics about your website. You can go back
to http://www.google.com/analytics and log in any time to see how your site is doing.
You can even set it up to email you a report every week, or whatever frequency you like.
Check for Updates!
Revision 1.5 - p32
Chapter 5: Small Business Website Examples
Here are a few examples of small business websites that were built using Thesis. As you
can see, although Thesis starts off pretty “plain” looking, you can create a nice looking
design - simple and direct like the sites below:
http://www.networkwellnesscharlotte.com - Chiropractor in Charlotte, NC
Check for Updates!
Revision 1.5 - p33
http://www.keylargofitness.com - Health & Fitness Club in Columbia, MO
Check for Updates!
Revision 1.5 - p34
http://www.eileenlonergan.com - Internet Marketing Consultant in Marion, MA
Check for Updates!
Revision 1.5 - p35
Chapter 6: Essential WordPress Plugins
One of the great things about WordPress is that you can extend it with all kinds of
functionality with WordPress Plug-ins. There are hundreds of plugins that you can use,
but here I’d like to list a few of the essential ones.
In WordPress 2.7 and above you can search for and install new plug-ins from within the
WordPress Admin UI. In the past, you had to find them in the Plug-in directory,
download them, and then upload them to your WordPress installation. WordPress 2.7+
simplifies this process a lot!
Here are a few of the essential plug-ins that you’ll want to install on your new website.
OpenHook
Another powerful feature of the Thesis WordPress theme is the ability to add “hooks” to
customize where things appear on your site.
You can add something just before your header, or just after. Just before your sidebar
content, or just after your footer. You get the idea.
To do this, you need to know a little bit about coding PHP. There is an excellent tutorial
that Sugarrae made called Thesis Hooks for Dummies.
Then Thesis Ninja Rick Beckman made a WordPress plugin called OpenHook that
simplifies things for you even further. You’ll want to install this plugin because it allows
you to do some powerful things to your website without having to write a line of code!
We’re going to use it to update the footer of our website with our business address. This
way, every page on your site will have your business location - something that will help
you in the local search results in Google and Yahoo.
To install OpenHook, log into your WordPress Admin UI and select the Plugins menu
on the left, and the Add New submenu item underneath it.
Once you are in there, search for OpenHook. You should get a result like this:
Click the Install link to install and activate this plugin.
Check for Updates!
Revision 1.5 - p36
Now you’ll see a new option under the Appearance menu on the left side. You will see
Thesis OpenHook submenu item there. Select it and you will see the options for the
plugin.
Once you are on the OpenHook settings page, you’ll see a bunch of text box entry fields.
You can enter content in these fields that will show up on various places on your
website.
Scroll all the way down to the bottom until you see the field for Footer:
Here, you’ll enter your business address so that it shows up on the footer of every page
on your site. For example, you can copy and paste this code and modify it for your
address:
<p style="float:left;">Our Address: 52 Prospect
Road | San Jose, CA 95129 | 408-335-4000</p>
WP-DB Backup
You should install this plugin, because you can use it to instantly back up your
WordPress database to a ZIP file and download it.
Even better, you can tell it to back up your WordPress database on a schedule - once per
week for example - and email it to you. It’s a great way to back things up automatically.
To get this plugin, just go to your Plugins menu and select Add New, just like you did
before, and search for WP-DB-Backup.
You can also download it here: http://www.ilfilosofo.com/blog/wp-db-backup
Contact form
If you want to add a contact form to your website, Cforms is the best plugin I’ve found.
For some reason this one doesn’t show up when you search for plugins in the admin
panel, but you can download it here: http://www.deliciousdays.com/cforms-plugin
Check for Updates!
Revision 1.5 - p37
You’ll need to use your FTP program like we did when installing the Thesis theme above,
except instead of putting this in wp-content/themes you’ll put it in wp-content/
plugins.
All-In-One-SEO Pack
http://wordpress.org/extend/plugins/all-in-one-seo-pack/
This is an outstanding WordPress plugin for optimizing your site for the search engines.
However, if you are using Thesis 1.4+ you don’t need to install it.
I cover how to use the Thesis SEO functions in Chapter 4.
WP-Touch
http://www.bravenewcode.com/products/wptouch/
WP-Touch is a mobile the=me for your WordPress website. It loads quickly and makes
sure your blog looks great on the iPhone, iPod Touch, Android or Blackberry Storm.
This is a quick and easy way to mobile-enable your website!
NextGen Gallery
http://wordpress.org/extend/plugins/nextgen-gallery/
If you want a great looking image gallery on your website this is a great plugin to go
with. It includes a nice administration back end to handle multiple photos, galleries and
albums.
Google Analytics Plugin
http://wordpress.org/extend/plugins/google-analytics-for-wordpress/
One of the most important things you should do is to track what is going on with your
website. Google Analytics is a very good, free tool for this. But it requires you to add a
JavaScript snippet to every page on your site.
This plugin makes it easy to add this snippet to all your WordPress pages. But once
again, Thesis minimizes the number of plugins you need to worry about and maintain.
Check for Updates!
Revision 1.5 - p38
The Thesis Options panel gives you a text box to enter your Google Analytics code
snippet into, and it takes it from there so you don’t have to worry about it.
I describe how to do this in Chapter 4.
Check for Updates!
Revision 1.5 - p39
Chapter 7: Get your business listed in Google and
Yahoo local business directories
Now that you’ve got a small business website. You need to get it listed in the Local
Business Directories for Google, Yahoo and MSN.
This is probably one of the most effective ways to improve your search
results quickly - to list your business in these directories so you show up when people
search for your type of business in your local area.
Google is constantly adjusting and improving its search algorithms, and one of the areas
that is developing rapidly is “local search.” When someone types a query into the search
box, Google tries to determine if they are looking for a local product or service.
For example, when someone types “plumber” or “chiropractor” into the search box, or
“plumber 95129” or “plumber san diego” Google thinks you might be looking for a
plumber in your area, and so it leads with local plumbers in the search results.
This local search result is sometimes referred to as the 10-Pack. These results float up
before the other natural search results, and even before the paid results in most cases.
The first step in local search optimization, after getting your website is to get your
business listed in here. The profile is free, so take advantage of it.
There is a very cool service to help you do this called GetListed.org. It will check the
directories for you, and help you claim your business listings there.
To get truly great local search results you’ll have to spend some time and work at it, but
building a Thesis based website and getting yourself listed in the local search directories
is a great start.
Check for Updates!
Revision 1.5 - p40
Chapter 8: Final Thoughts
Step by Step Summary
If you are new to WordPress there is a lot to digest in this book. So I want to provide a
summary of the steps involved.
Believe me, if you just follow these 5 simple steps one at a time, you will be amazed at
how easy it really is to build an effective web site, and effective web presence for your
small business using WordPress and Thesis.
Five Steps To Your Small Business Website:
1. Get WordPress hosting: Click Here
2. Get the Thesis theme: Click Here
3. Set it up (follow instructions in this document)
4. Add call tracking (optional): Click Here
5. Get Listed: Click Here
Your Feedback is Welcome and Appreciated
I am always looking for feedback. If you find a mistake, have a suggestion or have an
idea to make it better please let me know! There is a contact form on my blog that you
can use to get in touch with me:
http://www.expand2web.com/blog/contact
Full disclosure
Some of the links in this document are affiliate links. If you need to sign up for
WordPress hosting, get the Thesis theme, or use Call Tracking, I’d appreciate it if you
would use my links. It costs you nothing extra, and I will earn a few bucks to help me
write more tutorials like this!
Please Share This Guide!
This guide is completely free and I would like to have as many people read it as possible.
Please feel free to distribute it - upload it to your blog, email it to your friends share it in
any way you like - all I ask is that you don’t modify or remove the attribution links.
(Licensed under the Creative Commons Attribution License.)
Thank you for reading!
Check for Updates!
Revision 1.5 - p41
Appendix: External Resources
This section contains links to a few of the websites that I find useful. I’ll keep adding to
this in future versions of this guide.
WordPress How To Resources and Videos
• WordPress Websites article and video series on Expand2Web: http://
www.expand2web.com/blog/wordpress-small-business-websites/
• Excellent videos that show how to use WordPress: http://WordPress.tv
• Expand2Web Video Tutorials Channel on YouTube: http://www.youtube.com/
expand2web
• WordPress Plug In Directory - http://wordpress.org/extend/plugins/
• Nice WordPress Publishing How To Video: http://tinyurl.com/cr2c6h
• Sherman Hu’s WordPress Tutorials: http://www.wordpresstutorials.com/
Thesis Resources
• Kingdom Geek: http://rickbeckman.org (Thesis guru)
• Kristaralla: http://www.kristarella.com (Thesis guru)
• ThesisNinja.com: http://www.thesisninja.com (Thesis tutorials)
Local Search Optimization Resources
• GetListed.org - This is a great way to organize your local business listings
• LocalSearchNews.net - Articles written by local search experts
• FriendFeed Room - Local Search Experts - http://friendfeed.com/list/local-searchexperts
Check for Updates!
Revision 1.5 - p42
© Copyright 2026 Paperzz