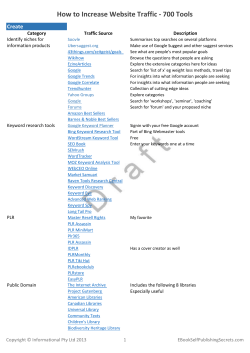
How to Develop Money-Making Niche Sites with WordPress В CoverВ DesignedВ byВ LindaВ fromВ http://ecoversource.com/В What is This Book About В This Ebook is a beginners guide to using the WordPress platform to setup static websites as opposed to the usual blogs that we are so used to with WordPress. The sites in question are small static (using pages and not posts) websites that are optimised towards a particular subject and then monetized using AdSense and affiliate links. However, this Ebook is not about making money – it’s about WordPress. I give the technical details of how to use built in features of WordPress to manage AdSense more easily but there is no information about how to use AdSense effectively. I have listed some resources at the end of the ebook about AdSense. Why Niche Sites and Not Blogs? В By nature a blog is an ongoing conversation with the reader and as such it requires regular updating. A blog can of course be very profitable but it requires constant work. The kind of niche sites that I build with WordPress as I describe in this book can be setup and then simply left alone and require zero maintenance. Thus the overall strategy is to pick a niche that has profitable keywords, build a small website around it and then leave it to bring in search engine traffic. Rinse and repeat to build a collection of sites that bring in a residual income without requiring maintenance. Check For Updates! Revision 1.8 1 Who Is Caroline Middlebrook? В Caroline started blogging about Internet Marketing in August 2007 and has since built up a loyal following on her blog: В http://www.caroline-middlebrook.com/blog/ В Caroline has a technical background in software development and loves to teach others how to overcome technical challenges in order to harness the power of the Internet. This is her first Ebook, and will not be the last! В Make Sure You Have the Latest Version! В At the time of this writing, I am on the fourth revision and as I get more feedback from readers I find myself making changes often. On the download page on my blog I show what theВ currentВ revisionВ is.В В This Revision: 1.6 В Click Here to Check For Updates! Table of Contents В What is This Book About . . . . . . . . . . . . . . . . . . . . . . . . . . . . . . . . . . . . . . . . . . . . . . . . . . . . . . ...............................................1 Why Niche Sites and Not Blogs? . . . . . . . . . . . . . . . . . . . . . . . . . . . . . . . . . . . . . . . . . . . . . . . .........................................1 Who Is Caroline Middlebrook? . . . . . . . . . . . . . . . . . . . . . . . . . . . . . . . . . . . . . . . . . . . . . . . . . ...........................................2 Make Sure You Have the Latest Version ! . . . . . . . . . . . . . . . . . . . . . . . . . . . . . . . . . . . . . . . . ...................................2 Table of Contents . . . . . . . . . . . . . . . . . . . . . . . . . . . . . . . . . . . . . . . . . . . . . . . . . . . . . . . . . . . .....................................................3 Acknowledgements . . . . . . . . . . . . . . . . . . . . . . . . . . . . . . . . . . . . . . . . . . . . . . . . . . . . . . . . . . ......................................................6 Chapter 1: Getting and Installing WordPress . . . . . . . . . . . . . . . . . . . . . . . . . . . . . . . . . . . . . . ....................................7 Hosting WordPress Installations . . . . . . . . . . . . . . . . . . . . . . . . . . . . . . . . . . . . . . . . . . . . . . . . .........................................7 Setting up WordPress with Fantastico . . . . . . . . . . . . . . . . . . . . . . . . . . . . . . . . . . . . . . . . . . . .....................................8 Step 1: Click the Fantastico Button . . . . . . . . . . . . . . . . . . . . . . . . . . . . . . . . . . . . . . . . . . . . . . ....................................8 Step 2: Select WordPress . . . . . . . . . . . . . . . . . . . . . . . . . . . . . . . . . . . . . . . . . . . . . . . . . . . . . ..........................................9 Step 3: Fill in the Required Information . . . . . . . . . . . . . . . . . . . . . . . . . . . . . . . . . . . . . . . . . . . ................................9 Step 4: Finalise the Installation . . . . . . . . . . . . . . . . . . . . . . . . . . . . . . . . . . . . . . . . . . . . . . . . . . . . . . . . . . . . . . . . . . . . . . . . . . . . . . . . . . . . . . 10 Step 5: Login to Your New Site . . . . . . . . . . . . . . . . . . . . . . . . . . . . . . . . . . . . . . . . . . . . . . . . . . . . . . . . . . . . . . . . . . . . . . . . . . . . . . . . . . . . . . 11 Chapter 2: Basic WordPress Administration . . . . . . . . . . . . . . . . . . . . . . . . . . . . . . . . . . . . . . . . . . . . . . . . . . . . . . . . . . . . . . . . . . . . . . . . . 12 Testing Your Site . . . . . . . . . . . . . . . . . . . . . . . . . . . . . . . . . . . . . . . . . . . . . . . . . . . . . . . . . . . . . . . . . . . . . . . . . . . . . . . . . . . . . . . . . . . . . . . . . . . . . . . . . . . . . . 12 Remove the Links in Your Blogrol l . . . . . . . . . . . . . . . . . . . . . . . . . . . . . . . . . . . . . . . . . . . . . . . . . . . . . . . . . . . . . . . . . . . . . . . . . . . . . . . . . . . . 12 Change Your Permalink Structure . . . . . . . . . . . . . . . . . . . . . . . . . . . . . . . . . . . . . . . . . . . . . . . . . . . . . . . . . . . . . . . . . . . . . . . . . . . . . . . . . . . . . 13 Chapter 3: Installing a New Theme . . . . . . . . . . . . . . . . . . . . . . . . . . . . . . . . . . . . . . . . . . . . . . . . . . . . . . . . . . . . . . . . . . . . . . . . . . . . . . . . . . . . . . 16 AdSense-Ready Themes . . . . . . . . . . . . . . . . . . . . . . . . . . . . . . . . . . . . . . . . . . . . . . . . . . . . . . . . . . . . . . . . . . . . . . . . . . . . . . . . . . . . . . . . . . . . . . . . . . 16 Step 1: Download the Theme . . . . . . . . . . . . . . . . . . . . . . . . . . . . . . . . . . . . . . . . . . . . . . . . . . . . . . . . . . . . . . . . . . . . . . . . . . . . . . . . . . . . . . . . 16 Step 2: Upload The Theme To Your Site . . . . . . . . . . . . . . . . . . . . . . . . . . . . . . . . . . . . . . . . . . . . . . . . . . . . . . . . . . . . . . . . . . . . . . . 16 Step 3: Activate the Theme . . . . . . . . . . . . . . . . . . . . . . . . . . . . . . . . . . . . . . . . . . . . . . . . . . . . . . . . . . . . . . . . . . . . . . . . . . . . . . . . . . . . . . . . . . . 17 Chapter 4: Setting up AdSense On Your Site . . . . . . . . . . . . . . . . . . . . . . . . . . . . . . . . . . . . . . . . . . . . . . . . . . . . . . . . . . . . . . . . . . . . . . . 19 Step 1: Sign Up to AdSense . . . . . . . . . . . . . . . . . . . . . . . . . . . . . . . . . . . . . . . . . . . . . . . . . . . . . . . . . . . . . . . . . . . . . . . . . . . . . . . . . . . . . . . . . . . . . 19 Step 2: Get Your AdSense Code . . . . . . . . . . . . . . . . . . . . . . . . . . . . . . . . . . . . . . . . . . . . . . . . . . . . . . . . . . . . . . . . . . . . . . . . . . . . . . . . . . . . . . 19 Step 3: Edit the AdSense Pages of Your Theme . . . . . . . . . . . . . . . . . . . . . . . . . . . . . . . . . . . . . . . . . . . . . . . . . . . . . . . . . . . . . . 19 Chapter 5: WordPress Plugins . . . . . . . . . . . . . . . . . . . . . . . . . . . . . . . . . . . . . . . . . . . . . . . . . . . . . . . . . . . . . . . . . . . . . . . . . . . . . . . . . . . . . . . . . . . . . 23 WordPress Plugin Installation . . . . . . . . . . . . . . . . . . . . . . . . . . . . . . . . . . . . . . . . . . . . . . . . . . . . . . . . . . . . . . . . . . . . . . . . . . . . . . . . . . . . . . . . . . . 23 Essential Plugins for Any Website . . . . . . . . . . . . . . . . . . . . . . . . . . . . . . . . . . . . . . . . . . . . . . . . . . . . . . . . . . . . . . . . . . . . . . . . . . . . . . . . . . . . . 23 Database Backup Plugin . . . . . . . . . . . . . . . . . . . . . . . . . . . . . . . . . . . . . . . . . . . . . . . . . . . . . . . . . . . . . . . . . . . . . . . . . . . . . . . . . . . . . . . . . . . . . . . 23 Automatic Upgrade Plugin . . . . . . . . . . . . . . . . . . . . . . . . . . . . . . . . . . . . . . . . . . . . . . . . . . . . . . . . . . . . . . . . . . . . . . . . . . . . . . . . . . . . . . . . . . . . . 24 All In One SEO Pack Plugin . . . . . . . . . . . . . . . . . . . . . . . . . . . . . . . . . . . . . . . . . . . . . . . . . . . . . . . . . . . . . . . . . . . . . . . . . . . . . . . . . . . . . . . . . . 24 Optional Plugins . . . . . . . . . . . . . . . . . . . . . . . . . . . . . . . . . . . . . . . . . . . . . . . . . . . . . . . . . . . . . . . . . . . . . . . . . . . . . . . . . . . . . . . . . . . . . . . . . . . . . . . . . . . . . . . 25 My Link Order Plugin . . . . . . . . . . . . . . . . . . . . . . . . . . . . . . . . . . . . . . . . . . . . . . . . . . . . . . . . . . . . . . . . . . . . . . . . . . . . . . . . . . . . . . . . . . . . . . . . . . . . . 25 NoFollow Plugin . . . . . . . . . . . . . . . . . . . . . . . . . . . . . . . . . . . . . . . . . . . . . . . . . . . . . . . . . . . . . . . . . . . . . . . . . . . . . . . . . . . . . . . . . . . . . . . . . . . . . . . . . . . . 25 Akismet Spam Filtering Plugin . . . . . . . . . . . . . . . . . . . . . . . . . . . . . . . . . . . . . . . . . . . . . . . . . . . . . . . . . . . . . . . . . . . . . . . . . . . . . . . . . . . . . . . 25 YouTube Brackets Plugin . . . . . . . . . . . . . . . . . . . . . . . . . . . . . . . . . . . . . . . . . . . . . . . . . . . . . . . . . . . . . . . . . . . . . . . . . . . . . . . . . . . . . . . . . . . . . . 26 Chapter 6: Creating Your Site Conten t . . . . . . . . . . . . . . . . . . . . . . . . . . . . . . . . . . . . . . . . . . . . . . . . . . . . . . . . . . . . . . . . . . . . . . . . . . . . . . . . . 27 Site Subject & Monetisation . . . . . . . . . . . . . . . . . . . . . . . . . . . . . . . . . . . . . . . . . . . . . . . . . . . . . . . . . . . . . . . . . . . . . . . . . . . . . . . . . . . . . . . . . . . . . . 27 Typical Structure of Niche Sites . . . . . . . . . . . . . . . . . . . . . . . . . . . . . . . . . . . . . . . . . . . . . . . . . . . . . . . . . . . . . . . . . . . . . . . . . . . . . . . . . . . . . . . . 27 The Role of Blogs in Niche Sites . . . . . . . . . . . . . . . . . . . . . . . . . . . . . . . . . . . . . . . . . . . . . . . . . . . . . . . . . . . . . . . . . . . . . . . . . . . . . . . . . . . . . . . 27 Creating Static Pages . . . . . . . . . . . . . . . . . . . . . . . . . . . . . . . . . . . . . . . . . . . . . . . . . . . . . . . . . . . . . . . . . . . . . . . . . . . . . . . . . . . . . . . . . . . . . . . . . . . . . . . 28 Discussion . . . . . . . . . . . . . . . . . . . . . . . . . . . . . . . . . . . . . . . . . . . . . . . . . . . . . . . . . . . . . . . . . . . . . . . . . . . . . . . . . . . . . . . . . . . . . . . . . . . . . . . . . . . . . . . . . . . . . 29 Page Slugs . . . . . . . . . . . . . . . . . . . . . . . . . . . . . . . . . . . . . . . . . . . . . . . . . . . . . . . . . . . . . . . . . . . . . . . . . . . . . . . . . . . . . . . . . . . . . . . . . . . . . . . . . . . . . . . . . . . . 29 Setting up Your Link Structure . . . . . . . . . . . . . . . . . . . . . . . . . . . . . . . . . . . . . . . . . . . . . . . . . . . . . . . . . . . . . . . . . . . . . . . . . . . . . . . . . . . . . . . . . . 30 Displaying Your Pages in the Sidebar . . . . . . . . . . . . . . . . . . . . . . . . . . . . . . . . . . . . . . . . . . . . . . . . . . . . . . . . . . . . . . . . . . . . . . . . . . . 30 An Introduction to Widgets . . . . . . . . . . . . . . . . . . . . . . . . . . . . . . . . . . . . . . . . . . . . . . . . . . . . . . . . . . . . . . . . . . . . . . . . . . . . . . . . . . . . . . . . . . . . 30 Configuring Your Sidebar . . . . . . . . . . . . . . . . . . . . . . . . . . . . . . . . . . . . . . . . . . . . . . . . . . . . . . . . . . . . . . . . . . . . . . . . . . . . . . . . . . . . . . . . . . . . . . 32 Using the Blogroll To Manage Your Links . . . . . . . . . . . . . . . . . . . . . . . . . . . . . . . . . . . . . . . . . . . . . . . . . . . . . . . . . . . . . . . . . . . . . . 32 Incorporating Affiliate Links . . . . . . . . . . . . . . . . . . . . . . . . . . . . . . . . . . . . . . . . . . . . . . . . . . . . . . . . . . . . . . . . . . . . . . . . . . . . . . . . . . . . . . . . . . . 34 Adding NoFollow to Selected Links . . . . . . . . . . . . . . . . . . . . . . . . . . . . . . . . . . . . . . . . . . . . . . . . . . . . . . . . . . . . . . . . . . . . . . . . . . . . . . . 34 Ordering the Blogroll Links . . . . . . . . . . . . . . . . . . . . . . . . . . . . . . . . . . . . . . . . . . . . . . . . . . . . . . . . . . . . . . . . . . . . . . . . . . . . . . . . . . . . . . . . . . . . 35 Setting the Front Page For Your Site . . . . . . . . . . . . . . . . . . . . . . . . . . . . . . . . . . . . . . . . . . . . . . . . . . . . . . . . . . . . . . . . . . . . . . . . . . . . . . . . 37 Editing Blog Posts . . . . . . . . . . . . . . . . . . . . . . . . . . . . . . . . . . . . . . . . . . . . . . . . . . . . . . . . . . . . . . . . . . . . . . . . . . . . . . . . . . . . . . . . . . . . . . . . . . . . . . . . . . . . . 37 Changing the Name of Your Site . . . . . . . . . . . . . . . . . . . . . . . . . . . . . . . . . . . . . . . . . . . . . . . . . . . . . . . . . . . . . . . . . . . . . . . . . . . . . . . . . . . . . . 38 Chapter 7: Final Thoughts . . . . . . . . . . . . . . . . . . . . . . . . . . . . . . . . . . . . . . . . . . . . . . . . . . . . . . . . . . . . . . . . . . . . . . . . . . . . . . . . . . . . . . . . . . . . . . . . . . . . 39 Applications of This Ebook . . . . . . . . . . . . . . . . . . . . . . . . . . . . . . . . . . . . . . . . . . . . . . . . . . . . . . . . . . . . . . . . . . . . . . . . . . . . . . . . . . . . . . . . . . . . . . . . 39 Your Feedback Appreciated . . . . . . . . . . . . . . . . . . . . . . . . . . . . . . . . . . . . . . . . . . . . . . . . . . . . . . . . . . . . . . . . . . . . . . . . . . . . . . . . . . . . . . . . . . . . . . 39 Please Share This Ebook ! . . . . . . . . . . . . . . . . . . . . . . . . . . . . . . . . . . . . . . . . . . . . . . . . . . . . . . . . . . . . . . . . . . . . . . . . . . . . . . . . . . . . . . . . . . . . . . . . . 39 Appendix 1: Uploading Using FTP . . . . . . . . . . . . . . . . . . . . . . . . . . . . . . . . . . . . . . . . . . . . . . . . . . . . . . . . . . . . . . . . . . . . . . . . . . . . . . . . . . . . . . . . 40 Creating an FTP Site to Connect To . . . . . . . . . . . . . . . . . . . . . . . . . . . . . . . . . . . . . . . . . . . . . . . . . . . . . . . . . . . . . . . . . . . . . . . . . . . . . . . . . 40 Using ALFTP to Transfer Files . . . . . . . . . . . . . . . . . . . . . . . . . . . . . . . . . . . . . . . . . . . . . . . . . . . . . . . . . . . . . . . . . . . . . . . . . . . . . . . . . . . . . . . . . . 41 Appendix 2: External Resources . . . . . . . . . . . . . . . . . . . . . . . . . . . . . . . . . . . . . . . . . . . . . . . . . . . . . . . . . . . . . . . . . . . . . . . . . . . . . . . . . . . . . . . . . . 43 Caroline’s Work . . . . . . . . . . . . . . . . . . . . . . . . . . . . . . . . . . . . . . . . . . . . . . . . . . . . . . . . . . . . . . . . . . . . . . . . . . . . . . . . . . . . . . . . . . . . . . . . . . . . . . . . . . . . . . . . . 43 WordPress Resources . . . . . . . . . . . . . . . . . . . . . . . . . . . . . . . . . . . . . . . . . . . . . . . . . . . . . . . . . . . . . . . . . . . . . . . . . . . . . . . . . . . . . . . . . . . . . . . . . . . . . . 43 WordPress-Ready Web Hosting . . . . . . . . . . . . . . . . . . . . . . . . . . . . . . . . . . . . . . . . . . . . . . . . . . . . . . . . . . . . . . . . . . . . . . . . . . . . . . . . . . . . . . . 43 Google AdSense . . . . . . . . . . . . . . . . . . . . . . . . . . . . . . . . . . . . . . . . . . . . . . . . . . . . . . . . . . . . . . . . . . . . . . . . . . . . . . . . . . . . . . . . . . . . . . . . . . . . . . . . . . . . . . . 43 Search Engine Optimisation . . . . . . . . . . . . . . . . . . . . . . . . . . . . . . . . . . . . . . . . . . . . . . . . . . . . . . . . . . . . . . . . . . . . . . . . . . . . . . . . . . . . . . . . . . . . . . 43 Check For Updates! Revision 1.8 5 В В В В В В В В В В В В В В В Acknowledgements В I’d like to thank the following people for proof-reading the Ebook for me and pointing out various errors and giving me suggestions: Kathy Binns Andy Darley - http://www.andthenhesaid.com/ Hunter Nuttall - http://hunternuttall.com/ LGR - http://www.blog.lgr.ca/ Jason Gilman - http://axodys.com/ Kitty - http://blogkitty.com/blog/ Heather Bayer - http://www.cottageblogger.com/ Shane - http://www.askshane.org/ Clearwater Florida Real Estates - http://www.sandbarstosunsets.com/ Todd Morris - http://candlemonkey.com/ Evan Hadkins - http://www.wellbeingandhealth.net/ Rosie Jones - http://www.lovelifegodsexmoney.com/ Is My Location Online - http://ismylocationonline.com/blog/ Sol Lederman - http://wildaboutmath.com/ Peter Buick - http://www.peterbuick.com/ Andy Beard - http://andybeard.eu/ Tom Leroy - http://imtrip.com/ В В В В В В В В В В В В В В В В В В Chapter 1: Getting and Installing WordPress В First of all realise that if you wish to generate any revenue from your site, you need to host WordPress on your own domain. You cannot use a free hosted WordPress blog due to the conditions that they impose in this section of their FAQ.  • AdSense, Yahoo, Chitika and other ads are not permitted. • Sponsored / paid posts including PayPerPost and ReviewMe are not permitted. • Sponsored / paid links are not permitted. • Text ads are not permitted. В So, not what we want when the site is designed to earn money! Hosting WordPress Installations В WordPress is open source software and is freely downloadable directly from their website here. However, to install from the download directly requires some technical skills. It’s far easier to use a web host that has WordPress support integrated so that it can be set up with a few clicks of the mouse instead. I use BlueHost for all of my WordPress sites. They charge $6.95 per month and here are some of the features that are relevant to hosting niche sites: • First domain included free • 600GB disk space • 6,000GB of transfer bandwidth • 50 MySql Databases • Unlimited add-on domains • Fantastico Script support Let me explain a few concepts here... WordPress is a database driven system and it is based on MySql. Every WordPress installation takes up one MySql database. BlueHost provide 50 such databases in the monthly fee. В Secondly, the add-on domains allow you to host several completely separate domains under a single account, paying only one hosting fee for all of them. You only have to pay for the cost of domain registration! This is extremely useful if you want to set up a whole bunch of niche sites. So for example, my primary domain is caroline-middlebrook.com but I now host another 4 domains on the same account and my monthly fee is still just $6.95. Lastly, that thing called Fantastico – that’s the good stuff; that is what allows us to set up WordPress at the click of a button. Sign up to BlueHost now, for only $6.95 a month. Setting up WordPress with Fantastico В Although I am plugging BlueHost, they are not the only host that uses Fantastico, so if you prefer to use another host that also uses Fantastico (and quite a few of them do) then these instructions will still work for you. Have a look at this screenshot: This is what I see when I log into my BlueHost account. That “cpanel 11” is telling me that they run version 11 of the CPanel software. CPanel is the best hosting software out there and the best hosting companies will use it. CPanel has a lot of options but scroll down until you find the Software section. It looks like this: Step 1: Click the Fantastico Button В I have highlighted the Fantastico button. Click on that. This will take you to the Fantastico navigation screen. Let me take a moment here to explain a little more about what Fantastico actually is. It is basically a wizard for web hosts that knows about many popular pieces of software used by web hosts and allows you to install them with a few clicks. Don’t worry if you don’t understand what all of that means – I’ll walk you through the installation step by step in the following pages. Fantastico is not just for WordPress, it also has support for forums, polls, surveys, wikis and loads more. But for now what we want is WordPress which you can see here: В В В Step 2: Select WordPress В Click on the WordPress link, now for me this shows me the following screen: В В В What you can see here is that I have 4 WordPress installations, the one I haven’t blotted out is my blog at http://www.caroline-middlebrook.com/blog and the other three are for my eyes only :-) Looks like I need to upgrade! I’ll talk about that later too... I’ve also highlighted the “New Installation” link – click on this to start a new WordPress installation. And don’t worry, if anything goes wrong you can just delete it from this screen (use the Remove link) and start over. Step 3: Fill in the Required Information В I’m not going to include all the screenshots for the next sections as it would take up too much space so instead I’ll just walk you through the fields that you need to fill in: Install on Domain В When you first take out hosting presumably you’ll choose a domain to host it on. BlueHost gives you the first domain free. Select this one as the domain to install on. Install in Directory If you are installing your site directly into the root of your new domain then leave this field blank. Note that for my blog, I installed into the /blog/ directory which is now becoming a bit of a nuisance! Remember that if you install into a directory, that directory name becomes part of the URL and if you want your site to be a top-level domain only then you must leave this field blank. You may want to do a little further research on the pros and cons of installing into a root domain versus a directory as some users have reported having more flexibility and less security issues by installing into a directory. For the purposes of demonstration, I am setting up a test site at the following location: http://caroline-middlebrook.com/nichesite/ To set that up I typed in “nichesite” in the install directory field. Admin Access Data You need to provide a username and password. The username could be something simple such as вЂ�admin’ but it doesn’t matter – whatever you like. Of course it is probably best to choose a secure username and password that cannot be easily guessed. Base Configuration The Admin Nickname is a more personal nickname that you give to your administrator user, such as вЂ�Caroline’. The email and site name will be filled in for you but you can change these to your liking. The description is a field which is often used as a вЂ�tagline’ for many themes. It’s not too important and you can change all of these details later so don’t stress over them. Email Account Configuration I just leave this with the default settings and supply a password. Step 4: Finalise the Installation В There is a button at the bottom of this page called “Install WordPress”. Click on that button and you’ll be shown a confirmation screen which will look something like this: Click the “Finish Installation” button and you’re done! The next page will give you a link into your admin area. It always follows the same pattern. Step 5: Login to Your New Site В The link will look like this: http://www.yourdomain.com/WordPress-directory/wp-admin/ Click on that and you’ll see the WordPress login panel which will prompt you for the username and password that you entered earlier in the process. Once logged in you’ll find yourself in the WordPress dashboard which is a screen that you will come to be very familiar with! В В В В В В В В В В В В В В Chapter 2: Basic WordPress Administration В Now that you have your new site set up there are a few things you’ll want to do. A brand new WordPress installation comes with a little bit of default data so that you can see things working but you’ll want to get rid of all these things and put your own data there instead. Testing Your Site В The very first thing you should do is test the site out and see it live! At the top left, next to your site name there is a “View Site” link: Click on that to see what the site looks like. It will probably look something like this: Pretty ugly huh? Never mind, we’ll get to that. Whenever you do something to your site, you can click the View site link to test it. I tend to just keep it open in a different tab and then refresh the resulting page. Remove the Links in Your Blogroll В A blogroll is nothing more than a collection of links. The default WordPress installation put this list in your sidebar meaning that these become site-wide links. Now if this niche of yours is here to earn money then you do not want to be linking out unnecessarily. Somewhere along the way the standard links have changed. In today’s installation I notice that all the links are now linking to various WordPress pages such as Plugins / Documentation etc. This is very new. Only a couple of weeks ago I did a WordPress installation for a friend and it was pointing to people mysteriously called вЂ�Alex’! From your Dashboard, one of the top level menu items is вЂ�Blogroll’: Click on this link to see all the links in your blogroll. Now if you have a regular site or blog you may well want one of these. However this guide is for a money making niche site that is focused on earning money so drop it! There’s actually two ways you can do this. One way is to click вЂ�Delete’ on all of the links on this page. You should do this. You can also remove the blogroll from the sidebar (I’ll cover the sidebar later) but that only solves the problem on your current theme which you will change so it is best to delete the links. Plus, I sometimes use this Blogroll as an easy way of adding an internal linking structure to my static pages – also explained later! For now, delete them and move on. Change Your Permalink Structure В A permalink is a short word for вЂ�permanent link’. Every blog post and every static page and many other items within WordPress all have a permanent link on your website. By default, WordPress uses a dynamic structure that simply allocates a page a number. For example, I have just clicked on that Hello World post that comes as default, and this is what I see in my address bar: This is BAD. Why? Because in order to maximise search engine traffic you will want to ensure that the permalinks on your site have your keywords in them. Plus, it’s just not friendly to your users. Here’s an example of a recent post I put on my blog, this is the permalink: http://www.caroline-middlebrook.com/blog/zen-to-done-Ebook-review/ Looking at that you know exactly what the post is about. But the default permalinks give no indication of the content of that page. I’ve told you why to change your permalinks, and now to tell you how: From the Dashboard, click on Options and then from the lower layer of the menu, click Permalinks: There are three main choices, none of which are suitable! Thankfully, you can also specify a custom setting which I have indicated in the above screenshot. In case you cannot see that clearly, here is it: /%postname%/ What that means is that it will simply use the name (Title really) of your page / post as the url. Spaces are converted into dashes as you saw in my earlier example. Type in the structure as shown and then click the “Update Permalink Structure” button on the right: Now when I refresh the page I was looking at, my address bar has changed: Ahh, much better and more search engine and people friendly. Something else that I feel I should mention here is that permalinks are not meant to be changed. By their nature they are designed to be a permanent link to a particular post or page on the site. This means that if you change your structure at some point in the future, any existing links will break. Once you get your site indexed in the search engines and start gaining inbound links, you would destroy your traffic in an instant by changing your permalink structure so take the time to get it right the first time. В В В В В В В В В В В В В В В В В В В В В В В В В В В В В В В В В В В В В В В Chapter 3: Installing a New Theme В Right now the site is pretty ugly, and one of the main reasons to go with WordPress is the sheer amount of superb themes that are available both free and paid. Now as this is a free guide I’m going to concentrate on just free themes. AdSense-Ready Themes В As this niche site is designed to make money I am making the assumption that you will use AdSense somewhere on the site. Now of course AdSense works better on some sites than others but there is probably very little reason not to use at least one or two ad units somewhere on the site. There are a number of plugins that make this job easier, but what is even easier than that is a theme designed with AdSense built in. DoshDosh has put together a collection of 18 AdSense-Ready themes and I am going to walk you through the installation of my favourite one, which is DoshDosh’ own – ProSense. By all means click on the above link and read through the accompanying documentation to get an idea of what it is about but I’m going to walk you through the process step-by-step. Step 1: Download the Theme В I am going to download the rather nice Blue version of ProSense. Download this anywhere to your computer and unzip it. If you are unfamiliar with zip files I highly recommend ALZip which is completely free, very easy to use, and comes with good documentation. Unzipping the files will give you a folder called вЂ�ProSense-Blue’ containing a whole bunch of other files. Don’t worry, we don’t need to do much with those. Step 2: Upload The Theme To Your Site В Right now this theme is sitting on your computer and it needs to be sitting on your server. We’ll also need to upload files to the server when we cover plugins so I have included an appendix on uploading just in case you not familiar with it. If any of the instructions in this section are confusing, please read Appendix 1 later on in the book. Connect to your host. If you are using BlueHost you will see something like this: The directory /blog is my blog which I’m sure you all know and love! Recall that when I created the niche site WordPress installation I put it in a directory under my main domain – this is what you can see in the graphic. Inside there are the various WordPress folders and the one we are interested in right now is: /nichesite/wp-content/themes/ Upload the entire ProSense-Blue folder (or whichever theme you have chosen to use) into there. WordPress comes with a couple of themes by default but once you have uploaded your folder you should see something like this in the contents of the themes folder: Step 3: Activate the Theme В So the theme is on your server, now you just have to switch it on. Go back to your Dashboard (I won’t keep putting Dashboard screenshots in here as I’m sure you’re getting the hang of it by now!) and click on Presentation and then Themes. You should see a preview of the new theme under Available Themes. Just click on it and then refresh your site – it’s that easy! Much better! And this is one of the things I love about WordPress – you can upload as many themes as you like and simply switch between them at the click of a button to try them out! There are a few things to notice about this particular theme: • There is an RSS button already installed for you • There is a search box already set up for you • There are already AdSense Ads Okay watch out for that third one! Yes there are ads there already, that’s why it’s an AdSense-Ready theme. However, until we’ve done a little more work, YOU are NOT getting paid for those Ads! I imagine the theme creator is. So that very nicely brings me onto the next chapter... В В В В В В В В В В В В Chapter 4: Setting up AdSense On Your Site В This chapter will give you a quick guide to setting up an AdSense account if you don’t already have one and I’ll show you how to get your own AdSense code onto your new niche site so that your clicks are not being paid to somebody else. AdSense is very easy to setup but unfortunately the vast majority of people who sign up for an account never even make the minimum payment! I heartily recommend that you download the $5 Mini-Site Formula report by Josh Spaulding. It’s free and it shows you how to properly monetize the kinds of mini sites that I show you how to build in this ebook. Josh knows a lot more about AdSense than I do :-) Step 1: Sign Up to AdSense В Surf over to http://www.google.com/AdSense and click this nice looking button: Now I have already signed up to AdSense so I’m going to have to leave it up to you to figure out the actual signup process. Step 2: Get Your AdSense Code В Usually, you would need to go through some set up procedure in order to configure the adunits that you want to display on your site. This can be time consuming, especially when you’ve got to figure all the colours that work best and so on. This is why I use an AdSense-Ready theme for my niche sites – I simply don’t have to do any of that stuff because it’s all built into the theme. All you have to do is plug in your publisher code. Once you are logged in, look across the top and select “My Account”. This will bring up a whole bunch of information that you put in when you signed up. Scroll right down to the bottom and look for the last section entitled “Property Information”: That piece of text starting with “ca-pub” and all the numbers is your publisher code. Copy this into notepad or something. You’re going to need it. Step 3: Edit the AdSense Pages of Your Theme В This section only applies if you have been following along with the guide so far and you are using one of the ProSense themes. Other themes may work differently. From your WordPress dashboard click on Presentation and then Theme Editor. Your current theme will be pre-selected and the editor window will show the content of one of the files which is most likely to be style.css. Now don’t worry if you don’t understand what any of this means. All you need to do in here is edit a few files to change the Google AdSense publisher number to your own one which you identified in Step 2. One of the reasons that I use the ProSense theme is that it makes it so easy to identify exactly which files to edit. Look at the list of files to the right of the screen, it should look something like this: I have highlighted the files that you need to edit. The theme creators have very conveniently prefixed the file names with вЂ�AdSense_’ to make it super-easy to pick them out. But that’s not all, they have also made the files easy to edit too. To edit a file click on it, so in this example I’ll start at the top which if the file “AdSense_homepage_linkunit.php”: Look for the following line: google_ad_client = “pub-some-long-number”; All you need to do is replace the string in quotes with your code that you found in step 2 of this section. Once you’ve changed the code make sure you save the changes by clicking on the “Update File” button underneath the editor: Once you’ve done that for all the files, any AdSense ads that appear are now credited to YOUR account. Make sure that you do not click your own ads under any circumstances as that is strictly against the rules and you will be banned from the AdSense system. Another word about AdSense – the rules state that a maximum of three units can be used on any single page and of course if an ad unit is in a sidebar then it is on every page of the site. If you use a proper AdSense-ready theme such as ProSense, this takes care of that for you but if you are editing the files be careful not to add extra units that would violate the rules. Chapter 5: WordPress Plugins В Another one of the huge benefits of WordPress over other similar platforms is the sheer number and usefulness of the plugins that are freely available for it. There are some plugins that you should always install for any kind of website. WordPress Plugin Installation В Now before I start with the plugins themselves I first want to go over the actual installation procedure as it is the same for all plugins. You will need to upload the plugin files to your server so check out Appendix 1 if you are not sure how to do this. Connect to your host as you did when uploading your theme, but this time you want to look for the following folder: /nichesite/wp-content/plugins/ Simply upload all plugins into that folder. Some plugins are very simple and are one single php file in which case you can put that straight into the root of the plugins folder. Other plugins come with multiple files and are usually housed in their own folder. If this is the case, upload the folder so that it sits underneath the plugins folder. Either way, WordPress always finds them – it’s clever like that! Many plugins that you download come packaged in Zip files and if this is the case you will first need to extract the files before uploading as WordPress will not detect them if they are still zipped. To check that the plugins have been found, from your Dashboard click on the Plugins tab. By default you will see two non-activated plugins that are installed for you – Akismet and Hello Dolly. Hello Dolly is a bit of humour and I just delete it. To delete a plugin you simply delete the file from your plugins folder. I’ll come back to Akismet in a little while. Essential Plugins for Any Website Database Backup Plugin В As I mentioned before, WordPress is a database driven system. One of the downsides of that is that if anything happens to your database and it becomes corrupt you can kiss goodbye to your website! So the very first thing you should install is this backup plugin which is found here: http://www.ilfilosofo.com/blog/wp-db-backup/ Activate the plugin (click the вЂ�Activate’ link to the right of the plugin description) and then from the main Dashboard click Manage and then Backup. There are a variety of options. What I do personally is configure it to email me a backup file every day. I use Googlemail for my email, which has unlimited storage so this effectively means that I have a backup of my database for every single day of its existence. Scroll down to the section marked “Scheduled Backup”. Note that it is set to вЂ�Never’ by default. Change it to “Once Daily”. To the right you will see a text box into which you must specify the email to send the backup to. Type in your email and then hit the submit button at the bottom right of the screen. That’s all there is to it. Automatic Upgrade Plugin В The WordPress software gets updated quite often and to upgrade your website manually can be a bit fiddly. Thankfully, there is a very helpful plugin that does all the work for us. Download it here: http://techie-buzz.com/WordPress-plugins/WordPress-automatic-upgrade-plugin.html Once this plugin is activated from your Dashboard click Manage and then Automatic Upgrade. Click on the automatic upgrade option to get started. Note that you won’t need to do this when you first install your site as you’ll be on the latest version. When a new version of WordPress is released a message is shown on your Dashboard telling you that you need to upgrade. All In One SEO Pack Plugin В This pack makes it a little easier to make your site SEO (Search Engine Optimisation) friendly. Though I have to admit that I don’t use it that much as I find that the changes that WordPress have made recently have been pretty good and the defaults do quite well. Still, you should take every edge you can so download the plugin here: http://WordPress.org/extend/plugins/all-in-one-seo-pack/ This plugin allows you to add custom Title, Description and Keywords into the header section of your pages and posts. To test it out from your Dashboard go to Manage and then Posts. You should still have the sample “Hello World” post there. To the right, click the edit link to be taken to the main WordPress editor. Scroll down a little and you will see this: Fill these in as you please for the pages and posts that you write. For your site to generate any search engine traffic you need to know about SEO. The absolute SEO master is a guy called Aaron Wall. He literally wrote the book on SEO so go check that out. Optional Plugins В Depending on what you want to do with your site you may want to also consider the following plugins: My Link Order Plugin В In Chapter 6 I am going to show you a technique to manage the links on your site using the Blogroll feature of WordPress. One difficulty with the Blogroll is that it is not easy to explicitly order the links within it – unless you have the following plugin: http://geekyweekly.com/mylinkorder Install this plugin and I’ll explain how to use it in the next chapter. However note that to make the plugin work you have to edit one of the theme files so if that’s on the techy side for you then skip this plugin. NoFollow Plugin В If you plan on including affiliate links in your niche site then install this plugin. I’ll explain what it is for and how to use it in the next chapter. http://blogtactics.com/plugins/ It’s called the вЂ�BlogTactics NoFollow Plugin’ Akismet Spam Filtering Plugin В This plugin is only strictly necessary if you plan to allow comments to be placed on your site by other users. If you do have comments then you’ll definitely need this (there are other spam plugins but this one works pretty well for me and it comes pre-installed). Having said that, I am told that even if comments are not enabled for your posts, spam comments still manage to find their way into your database which can be prevented by using Akismet. No download is necessary as it comes with WordPress by default. However, you do need to get a key to make it work. To get your API key visit the following link: http://WordPress.com/api-keys/ Sign up and they email you a key. Now I have been using the same key for all of my WordPress sites – not sure if that’s supposed to be the way it works. Activate the plugin from your Dashboard and you’ll see a warning message appear at the top: Click on the link in that warning message and you’ll be shown the configuration screen for Akismet which looks like this: Simply copy in the key you were sent in the email and click Update options. All done. YouTube Brackets Plugin В This plugin is only necessary if you plan on embedding any YouTube videos on your site. Personally I find that a little video here and there really livens up a website so I do try to include them. Usually when embedding YouTube videos you have to copy in some complicated code but this doesn’t work with WordPress as by default it is not supported and it screws up your site. With this plugin you can simply use the following format within your posts: [youtube=http://www.youtube.com/watch?v=PeJKQuvmDro] I actually explain all of this in more detail in a blog post that I wrote: Embedding YouTube Clips Into WordPress Without the Hassle Chapter 6: Creating Your Site Content В At this point you have installed WordPress, made it AdSense-Ready and installed some essential plugins. That’s all the boring administration out of the way so now you can get down to creating the content. In this section I’m not going to tell you what to write, but how you can use WordPress to organise the structure of your site. Site Subject & Monetisation В As I mentioned in the introduction to this book, the emphasis here is on the technical aspects of using WordPress and not so much the money-making aspect of it. However, I do feel that this subject needs a little elaboration. One of the advantages of using WordPress is that it has a mechanism called вЂ�pinging’ which ensures that services such as Google will be notified when you update your site. The idea then is to pick a topic (I have used fishing for the example site that I build here), do some keyword research using a tool such as Keyword Elite in order to find high-traffic / lowcompetition keywords and then build pages that are optimised towards those keywords. Over time the pages that you create will begin to rank in Google and other search engines and the traffic will start to flow. In order to make money you will need to monetise your pages. Now the subject of monetisation is a whole Ebook in itself. I am not an expert on the monetization aspect but my friend Josh Spaulding is. He has written an excellent free report called the $5 Mini-Site Formula which complements this Ebook perfectly. It doesn’t have any technical details of how to build the site but it tells you just how to pick your niche which will result in the high paying AdSense ads getting displayed on your site, and how to optimize them properly. Typical Structure of Niche Sites В Most niche sites that are designed to make money have just a few static pages of content that are highly optimised towards a particular keyword and are heavily loaded with ads. The idea is to be able to draw search engine traffic that will click through to those ads. For the site to be of value to your visitors, you need content. How much you need is highly debatable. I would say that you need a minimum of five pages to make the site worthwhile. There isn’t really an upper limit but if you find yourself with enough content for more than about 20 pages then you have the makings of an authority site on your hands! The Role of Blogs in Niche Sites В As I have alluded to several times, the reason I prefer to base the site around static pages is that it makes the site maintenance free. However, if you wish to put in more work there is nothing stopping you from also including a blog in your niche site and in fact it carries a few advantages if you choose to do so. Advantages of Having a Blog • Regular content will give Google a reason to crawl your site more often • Google likes sites with a regular dose of fresh content so it can help your rankings • Adding a blog gives you an RSS feed which you can publicise separately • That RSS feed can also be used to freshen external pages (advanced tactic) • It makes the site look more up-to-date and interactive to your visitors Disadvantages of Having a Blog • You need to update it on a fairly regular basis or the site looks вЂ�dead’ • If you have a bunch of sites it can become a time sink to update all the blogs I think what this really boils down to is how many sites you plan to have. I know people who make their living by creating a niche site, populating it with 5-20 pages of content and then just leaving it. They then simply repeat this process over and over so over time they are building themselves a huge number of assets which do not require maintenance. That is the basic strategy that I am advocating as a starting point with this book. If this is a strategy that you plan to adopt, then it may not be a good idea to include a blog on every site. On the other hand, these blogs are only really here to provide a bit of fresh content for Google – you’re not trying to be the next ProBlogger here so the content can be short and quick to produce. I have a blog on one of my niche sites and the posts only take me about 10 minutes to create unlike the ones on my personal blog that typically take 1-3 hours each! Plus I don’t update my niche blog every day – once a week would be fine. So to crunch a few numbers, let’s say it took 10 minutes to create a post, you could update six blogs in an hour. 6 x 8 = 48 so in a day you could update 48 blogs. Of course that is not a terribly realistic calculation but you get the idea. You will need to decide the kind of time it would take to write the blog posts that would be needed for your particular site and weigh up the benefits accordingly. Of course another consideration is whether or not you would have anything to blog about. Some niches have news and others don’t so really you have to look at all the factors and choose. Creating Static Pages В It’s extremely easy to create a static page in WordPress but there are a couple of things to look out for. From your Dashboard, click Write and then Write Page. For the purposes of demonstration I’m going to use some PLR (Private Label Rights) material to create some content for this niche site of mine. I’ve chosen the subject of fishing as I have a bunch of articles I can use. Discussion В Now when you write your page have a look at the options on the right of the screen, and drop down the one labelled Discussion: Allow Comments will allow users to type in comments to this post. Allow Pings will display a special type of comment known as a trackback (as far as I am aware, вЂ�pings’ and вЂ�trackbacks’ can be used interchangeably) when somebody else links to this post. Note that these two options are on by default and I have disabled them both. There is a very good reason for this. Your static pages are the backbone of your SEO work for this niche site. Now in this Ebook I’m not trying to teach you SEO – but I want to warn you of anything that could sabotage your efforts. You want your pages to be highly optimised towards your chosen keyword phrase. But if you allow comments and trackbacks, you have no control over that content. If somebody posts a load of crap in the comments (and they will!) then it will dilute the message of your page so turn them off! Page Slugs В Recall when we set up the site that we used a permalink structure that uses the title of the page or post. This can be a problem for SEO. We want our titles to appeal to humans so that they get clicked on in the search engine results pages but we want the URL to be keywordfriendly. Sometimes the two do not mix all that well. One of the articles I have used it called “7 Tips on Finding a Fishing Guide”. This is a nice title for human readers but if the keyword I am optimising for is “finding a fishing guide” then the three words at the beginning are somewhat redundant. I could change the title of course but we can also use a WordPress feature called the Page Slug. Have a look over the right and drop down the Page Slug section: The page slug is simply the URL of that page. You can see here that I typed in my own slug which is very similar to what would have been created by default except that I dropped the first three words. Setting up Your Link Structure В What we have done so far is created a bunch of static pages but what we want to do now is have links to them permanently displayed on the sidebar. That way, no matter what page or blog post the visitor arrives at, he can see all of your pages which makes the site look content-rich, which is good. Displaying Your Pages in the Sidebar В At this point I have created 5 static pages (they are pretty crap but this is just for demonstration purposes!) Now these are automatically displaying in my sidebar but there are a couple of issues. Look at the screenshot: First of all notice that the one with the tips on finding a fishing guide is a little too long and wraps around. Now this isn’t really too much of a problem because there is a dotted line separating each entry but personally I find this messy looking. The problem here is that this page list is generated automatically for you and the title you see here is the exact title you used for the page. You can’t change this without changing your page title which you don’t want to do. A second problem is that there is an About page mixed in there. Whilst it is probably a good idea to have an About page somewhere, notice that this list is alphabetical order so because I have a page starting with a number, my about page turns up in the middle of my fishing articles which is not ideal. Basically this boils down to the problem that we are relying on a generated widget to display this information. I haven’t talked about widgets yet but there is not much to it. The sidebar you see on your site is made up of a number of widgets that are built into the WordPress theme and using the Widget editor you can simply drag and drop widgets as you see fit which is very nice. An Introduction to Widgets В What is a widget? A widget is some kind of functionality that can be used with WordPress that has been packaged up into a self contained unit. A WordPress theme that supports widgets allows you to use the drag & drop facility to add them to your site. Not all themes support Widgets but ProSense does which is another reason why I use it. Now what I do here is to use another widget – the Blogroll that I spoke about earlier for managing my internal link structure. First let me show you where these widgets are. From your dashboard click on Presentation and then on Widgets. This particular theme has two sidebars defined: Sidebar 1 is your big skyscraper AdSense block so you’ll want to leave that alone. What we want to do is fiddle with Sidebar 2 which is the one on the right that has lots of different widgets in it. Now look underneath this area and you’ll see available widgets. Let me take a moment to explain what all of these are: Akismet – Displays statistics about how much spam has been captured on your site. Pointless if you ask me! Archives – Allows your visitors to access your blog post archives. Calendar – Shows a calendar in which each day that you wrote a blog post is highlighted. This is probably not necessary for a niche site (or any site really!) Categories 1 – When you write blog posts they are filed under a category. This plugin will display a list of categories in use as links to the posts in that category. Links – Displays your blogroll. This is what we’re going to use to create our list of internal (or external) pages. Meta – Displays the login / logout section currently shown at the bottom of the sidebar. Personally I find this very useful as a way of logging into my sites so I always have this as the last widget in my sidebar. Note that it’s only useful for you, not your visitors so you need to make a judgement call as to whether or not to include it. Pages – A list of all pages. This is what we’ve seen so far. Recent Comments – As you would expect, a summary of the recent comments received. Probably not suitable for a niche site. Recent Posts – Shows links to the last few blog posts that you’ve made. May be useful if you want to show some activity on the site. RSS 1 – Shows the RSS button to allow visitors to subscribe to the feed. For the ProSense theme the button is already built into the header so it’s not needed in the sidebar. Search – Allows visitors to search your site. Always a useful tool to provide. This is currently the first widget on the sidebar – personally I’d move it lower down as you want your own links shown higher up on the page. Tag Cloud – This is a new feature of WordPress. In addition to filing blog posts under a certain category, you can now tag a post with any number of tags that again make it more search engine friendly. A tag cloud shows all of the tags used. This is nice for proper blogs but probably not for niche sites – too distracting. Text 1 – This is a special widget that allows you to put in any text you like including HTML. This is very useful and allows you to create your own links etc. Configuring Your Sidebar В To configure the sidebar, simply drag the widgets from the bottom section in the sidebar box above and then click the Save Changes button. Here is what mine looks like now: The problem I have now is that there are no links so that item doesn’t actually appear on the site and it just shows the search and the meta section. Using the Blogroll To Manage Your Links В To have complete control over the links you display in the sidebar you would use a Text widget and put HTML in there to display the exact links you want. However, not everybody has enough knowledge of HTML to do this so using the Blogroll is a nice non-techie way of doing it. Just a quick note – the Pages widget does allow some customisation such as the ability to exclude certain pages which would solve the About page problem, but by using the Blogroll we can add links that we could not otherwise do and this will become useful if your monetisation strategy incorporates affiliate links as I’ll explain later on. Click on Blogroll from your Dashboard. We saw this already when we deleted the default links: We need to get some links into the Blogroll. Click on the “Add links” link to get started. However, before you start adding them, take a look at the Categories area to the right of the screen: Notice that we have a category called “Blogroll” already defined and that it is checked which means that any new links will automatically be filed under that category. Instead, choose a better name, I’m going to use “Fishing Articles” and add that as a category. Now when you add your links you can choose your own title, URL and description. The title will become the anchor text of the link which means that it will help that page rank in the search engines for the title you provide. I’ll make the assumption that each page you build is targeted towards some keyword phrase so here you need to try and make the link title incorporate the keyword phrase too. The URL is the permalink to the pages you created. Click on the links in your site and copy them from the address bar. The description doesn’t show up so I tend to leave that blank. Now if you just got rid of your pages from your sidebar like I just did then you can always quickly pop back to your Widget editor and temporarily put the pages widget back in so you can access the pages to get hold of the links :-) Okay I have added links to my five pages and removed the pages widget (to remove a widget simply drag it from the sidebar back down to the bottom area) and my sidebar now has this section at the top: Do you see how the category is used as the header here? That’s why I didn’t want to use the default title of вЂ�Blogroll’. Incorporating Affiliate Links В Look again at the last screenshot – do you notice that there are six articles and not five? What’s the odd one out? Well this site is actually live so you can take a look for yourself: http://caroline-middlebrook.com/nichesite/ Have a look at the article called “Fly Fishing for Beginners”. This is not an article at all! It’s an affiliate link! I’m not going to go into details of affiliate marketing as that is really a topic for another book but I wanted to show you why I use the blogroll for my sidebar rather than the pages widget. You can add any link you like in this way and I have put the affiliate link right in the middle of all the other articles. Sneaky? Perhaps. But that’s the whole point of a money making niche site! I do this on my current niche site and it’s a good way of getting clicks through to the affiliate. Having said that, if the affiliate program does not match the content of your niche site then those clicks are unlikely to convert for you so be sensible with this strategy! Adding NoFollow to Selected Links В Google has recently done a crackdown on paid links and has begun to penalize websites that it suspects have been selling them by reducing their PageRank which can hurt search engine rankings. Since then it has become generally accepted practice to explicitly mark links that are not designed to be followed by Google – this includes advertisements, affiliate links and other such revenue-generating links. So far most of the links we have created have pointed at a page containing an article targeted towards a keyword phrase and so we want the link to be followed to help it rank in the search engines for the title we used for the link. However, if we mix in affiliate links as I did in the previous section, it can be wise to prevent Google from following that link as it is not a static page but a dynamic link to an affiliate product. There is a mechanism for that called вЂ�no follow’. Rather than explain the technicalities of the no-follow tag, I’ll instead just show you a plugin that allows you to mark a link as no-follow and show you how to use the plugin. Install the BlogTactics NoFollow Links plugin from the following page if you have not already done so: http://blogtactics.com/plugins/ Now go back to the Blogroll links and click the вЂ�Edit’ link on the right of the screen for the link you wish to add the no-follow tag to. Expand the вЂ�Link Relationship (XFN) section and check the box marked вЂ�nofollow’ as shown below: Save the changes to the link and you’re done. Ordering the Blogroll Links В By default, the built in WordPress Blogroll widget has a few options for ordering the links within it such as by name but it is not easy to have complete control. If you have a little technical knowledge and are comfortable modifying one of the theme files then continue reading the rest of this section. If not then skip to the next section. Ok Install the following plugin if you have not already done so: http://geekyweekly.com/mylinkorder Click on the Blogroll link from your dashboard and in the menu bar underneath you’ll see a new option called вЂ�My Link Order’: Click on that link and then click on the button вЂ�Order Links in this Category’: This button will bring up a page showing the links that you have in that category and will allow you to simply drag and drop them as desired. Remember that affiliate link I mentioned? I have dragged that to the top as links near the top tend to get clicked on more. Once you’re done ordering the links you’ll need to click the button at the bottom: In order for this plugin to work you need to edit the sidebar.php file in the ProSense theme. The exact change to make is as follows (taken from the plugin instructions): Modify sidebar template to use correct function (additional parameters seperated by ampersands): <?php wp_list_bookmarks(’orderby=order&category_orderby=order’);?> If you have a problem with it not ordering, make sure you have a plain “&” and not “& amp;” between the parameters which could happen if you copy straight out of the browser. Also make sure quotes are plain straight ones, some people have had problems when copying and pasting code out of the browser and PHP chokes on the bad quote character. Setting the Front Page For Your Site В By default, WordPress assumes that your site is a blog. What I have done so far is created a bunch of static pages but they sit in the sidebar only. When you go to the home page of site, you see the latest blog post which is currently still the Hello World default post. So what if you decide not to include a blog? No problem, WordPress makes it easy for you to display a static page instead of blog posts as your front page. From your Dashboard select Options and then Reading. You’ll see the following section at the top: As you can see, by default it shows your latest post but you can select a static page instead. The drop-down will show all of the static pages you have created. So if you decide not to use a blog then you would create a static page, perhaps called Home, and set that as your front page. And that’s all there is to it! Editing Blog Posts В With the niche site that I have been using for demonstration purposes throughout the Ebook I have left the default setting of displaying blog posts but now I’ll edit that post to make it into a welcome message for the site: From the WordPress Dashboard select Manage and then Posts. You’ll see a list of blog posts which by default will just have the single Hello world post listed. Look to the right and click the Edit link and then you’ll be in the standard WordPress editor. Note that all blog posts automatically have the Discussion options switched on by default and as I am using this particular blog post as a simple welcome message for the site I have turned those options off. In fact, even if I choose to keep a blog for my niche site I would almost certainly still turn off the discussion options because of the SEO implications that I mentioned earlier. Plus it avoids the headache of having to deal with comment spam. A word of warning when editing posts – remember the page slugs that I mentioned earlier? If you edit the title of a post or page, Wordpress does NOT automatically edit the slug – you have to do that yourself. So you can see that in actual check out the post I just edited: http://caroline-middlebrook.com/nichesite/hello-world/ As you can see, the original slug remains “hello-world”, even though I have edited the title. Changing the Name of Your Site В Notice that the URL of the site I have created is вЂ�nichesite’. In hindsight this is probably not the best choice as I have used fishing as the subject material for the content. However, although I cannot change the URL I can change the name of the site. From the WordPress dashboard click on Options and then the General tab. The very first field is Blog title – edit that. Also underneath this field is a Tagline. This is a single line description of the site and may or may not be included in the theme of your blog. The ProSense theme does support it. You can now see the new Title and Tagline in action below: Chapter 7: Final Thoughts В Applications of This Ebook В This Ebook has been written with the intention of walking you through the set up of a new WordPress powered niche site. However, much of the content can be applied to any kind of WordPress site or blog and of course you can also use the techniques in this book to monetise an existing blog. The basic premise is to create static pages that are not dated, not cluttered with comments and are highly targeted towards a particular keyword and then monetised with relevant ads. Put half a dozen pages like this together on a single topic and you have yourself a mini-site but of course there is nothing to stop you from adding such pages to any existing WordPress site using the instructions given. Your Feedback Appreciated В When I first released this Ebook I made it available for download from my blog and invited my blog readers to read it and send me their feedback. The initial feedback that I received was very valuable and I have credited those people at the front of the book. I am always looking for feedback. If you find a mistake, have a suggestion or have an idea for another Ebook you think you’d like me to write then please let me know! I have a contact form on my blog that you can use to get in touch with me: http://www.caroline-middlebrook.com/blog/contact/ Please Share This Ebook! В This book is completely free and as such I would like to get as many readers to it as possible. Please feel free to distribute it – upload it to your blog, email it to your friends, share it on peer to peer networks and so on. Thanks for reading :-) Appendix 1: Uploading Using FTP В You need to be able to upload files both for uploading of themes and for plugins. It’s a little techie and is an area where some beginners get stuck. First of all download ALFTP (it’s free) and install it. Creating an FTP Site to Connect To When you first load ALFTP it comes with some popular FTP sites in its database but you need to create an entry for managing your own site. Click the Add Site button and give it a name. Here is what my site info looks like for my main blog: Let me walk you through the various fields that you need to fill in: FTP Address This is your domain name. User ID / Password Be careful here as these are the user ID and password that have been issued to you by your web host and are NOT the same as the admin user for your WordPress blog. Remote Directory In the example above I have used вЂ�public_html’. Many websites are housed in a folder named that way. You may need to check with your web host for the exact folder to put in here. Notice that nowhere is the folder name вЂ�blog’ included. See under my domain name I actually manage several websites – including this fishing site that I have been building for this book. By logging in to the root of my domain I can access any of my websites from a single login. Alternatively I could also set up different FTP logins for each individual website that is housed under my domain. The reason I do it this way is that all of my sites are managed by WordPress so I tend to copy around themes and plugins from one site to another which saves me a lot of time. Download Directory This is a path on your local computer. It is optional, you can just leave it blank for now but by default I store files for my blog in a particular folder on my computer and tend to put everything there. Other Fields Fields such as the port can just be left at their default values. Using ALFTP to Transfer Files В When you connect to an FTP site you will see something similar to the screen shot which I have annotated below: The top section labelled Remote Area shows the files that are on the server. These are live on the web. The Local Area shows the files that are on your computer. In the bottom section are panels that show various status messages and the progress of file transfers. Notice that the local and remote areas look pretty much like a Windows Explorer window and they work in the same way. To navigate around the folders simply expand them and click on them as you would in Explorer. To upload a file from your computer to the server you can simply drag from the local area into the remote area. For full instructions press the F1 key within the program to bring up the help file. Appendix 2: External Resources Caroline’s Work Caroline’s Blog: http://www.caroline-middlebrook.com/blog/ Download Page for This Book: http://www.caroline-middlebrook.com/blog/niche-sites-wp/ Fishing Facts Niche Site: http://caroline-middlebrook.com/nichesite/ WordPress Resources Main WordPress Website: http://WordPress.org/ WordPress Documentation: http://codex.WordPress.org/Main_Page WordPress Downloads: http://WordPress.org/download/ WordPress Plugin Directory: http://WordPress.org/extend/plugins/ ProSense Theme: http://www.doshdosh.com/prosense-AdSense-ready-seo-theme/ WordPress Theme Viewer: http://themes.WordPress.net/ Blog-Fix – Technical Help for Bloggers: http://blog-fix.com/ WordPress-Ready Web Hosting BlueHost: http://www.kqzyfj.com/click-2587436-10376736?sid=nichebook Google AdSense AdSense Arbitrage (free ebook): http://www.carolinemiddlebrook. com/blog/files/AdsenseArbitrage-BradCallen-40p.pdf The $5 Mini-Site Formula (free ebook): http://www.5dollarformula.com/ Search Engine Optimisation The SEO Book by Aaron Wall: http://www.seobook.com/2467.html Keyword Elite Software: http://cmiddlebro.bryxen4.hop.clickbank.net/?tid=WPBOOK В
© Copyright 2026 Paperzz