PaperCut Xerox Secure Access
Manual
Contents
1
2
Overview ............................................................................................................. 3
1.1
Consistency: ................................................................................................. 3
1.2
Integration: ................................................................................................... 3
1.3
Rate of development:.................................................................................... 3
1.4
Vendor Neutral: ............................................................................................ 3
1.5
Security: ....................................................................................................... 3
Installation ........................................................................................................... 4
2.1
Xerox Device Compatibility ........................................................................... 4
2.2
Requirements ............................................................................................... 4
2.3
Card Reader support .................................................................................... 5
2.3.1
Network Card Readers .......................................................................... 5
2.3.2
USB Card Readers ................................................................................ 5
2.1
EFI Fiery Network Controller Support ........................................................... 6
2.2
Setup Procedure – 7655 etc ......................................................................... 7
2.2.1
Introduction ............................................................................................ 7
2.2.2
Networking/Firewall Configuration.......................................................... 7
2.2.3
Enable the HTTPS/SSL protocol ............................................................ 7
2.2.4
Enable SNMP v3 support ....................................................................... 8
2.2.5
Configure the Network Accounting Options ............................................ 9
2.2.6
Create/setup the Xerox device in PaperCut ......................................... 11
2.2.7
Enable Xerox Secure Access Authentication ....................................... 12
2.2.8
(Optional) Additional Network Security ................................................. 17
2.3
3
Setup Procedure – 7345, etc ...................................................................... 18
2.3.1
Introduction .......................................................................................... 18
2.3.2
Networking/Firewall Configuration........................................................ 18
2.3.3
Enable the HTTPS/SSL protocol .......................................................... 18
2.3.4
Enable SNMP v3 support ..................................................................... 18
2.3.5
Configure the Network Accounting Options .......................................... 19
2.3.6
Create/setup the Xerox device in PaperCut ......................................... 20
2.3.7
Enable Xerox Secure Access authentication ........................................ 21
2.3.8
(Optional) Enable network card reader................................................. 22
2.3.9
(Optional) Additional Network Security ................................................. 22
Post-install testing ............................................................................................. 24
Copyright В© 2014 PaperCut Software International Pty. Ltd., All Rights Reserved.
1 of 38
PaperCut –Xerox Embedded Manual
4
5
6
2014-04-29
3.1
Test Preparation ......................................................................................... 24
3.2
Scenario 1: Standard copying ..................................................................... 25
3.3
Scenario 2: Copying with account selection ................................................ 26
3.4
Scenario 3: Print release ............................................................................ 27
3.5
Scenario 4: Scanning and faxing ................................................................ 28
Configuration ..................................................................................................... 30
4.1
Device Function .......................................................................................... 30
4.2
Authentication Methods .............................................................................. 30
4.3
Configuring Swipe Card Readers ............................................................... 31
4.4
Single Sign On (SSO) ................................................................................. 32
Known Limitations and Security ......................................................................... 32
5.1
Zero Stop.................................................................................................... 32
5.2
Fax Tracking ............................................................................................... 32
5.3
User Interface ............................................................................................. 33
5.4
Bypassing the System ................................................................................ 34
5.5
Card Reader support for authentication ...................................................... 34
Advanced Configuration .................................................................................... 34
6.1
Config Editor ............................................................................................... 34
6.2
Setting an explicit PaperCut Server Network Address ................................ 35
7
How it works ...................................................................................................... 37
8
FAQ & Troubleshooting ..................................................................................... 37
Copyright В© 2014 PaperCut Software International Pty. Ltd., All Rights Reserved.
2 of 38
PaperCut –Xerox Embedded Manual
2014-04-29
This manual covers Xerox Secure Access setup. For general PaperCut MF
documentation, please see the PaperCut MF manual.
1
Overview
This manual provides an overview of the installation, configuration and operation of
PaperCut’s embedded software MFD (Multi-Function Device) solutions. Today’s
MFDs are smarter – they have touch screens and offer the ability to run applications
directly on the device. The goal of PaperCut Software’s embedded MFD solution is
to leverage these smart devices and to provide walk-up copier users with the same
set of rich application features provided in the print control area. These include:
п‚·
п‚·
п‚·
п‚·
п‚·
End user authentication including integration with single sign-on environments
Monitoring and control of photocopying, scanning and faxing (quotas,
charging, allocation and logging)
Allocation of copying, scanning and faxing to accounts/departments/costcenters/projects
Release jobs from a hold/release queue (secure printing)
Group based access control: Limit access to the device to members of
selected user groups.
Highlights of the embedded solution include:
1.1 Consistency:
The embedded solutions are developed in-house by the PaperCut Software
development team. This ensures that the copier interface is consistent with the
workstation print interface, meaning users only have to learn one system.
1.2 Integration:
PaperCut is a single integrated solution where print, internet and copier control are all
managed in the one system. Users have a single account and administrators have
the same level of reporting and administration for all services. The embedded
solution interacts with the PaperCut server using a Service Oriented Architecture
(SOA) and web services based protocols.
1.3 Rate of development:
PaperCut is developed under a release-often policy where new features are made
available to users as soon as they are complete. Unlike hardware based solutions,
new versions can be delivered to users regularly as software updates.
1.4 Vendor Neutral:
PaperCut remains true to its vendor neutral stance. All embedded solutions are
equal and support all server OS’s including Windows, Linux and Mac.
1.5 Security:
A large percentage of PaperCut’s user base is in Education environments where
security is important. All embedded solutions are developed with security in mind.
Where security objectives can’t be satisfied, any deficiencies are fully disclosed.
Copyright В© 2014 PaperCut Software International Pty. Ltd., All Rights Reserved.
3 of 38
2 Installation
This section covers the installation of the PaperCut embedded application for
compatible Xerox devices. The embedded application will allow the control, logging
and monitoring of walk-up off-the-glass MFD usage and may serve as a print release
station for network prints (for information on just tracking network printing see the
PaperCut user manual).
2.1 Xerox Device Compatibility
This document covers devices that support the devices that support Xerox Secure
Access feature. Xerox Secure Access (XSA) allows the MFP to communicate with
the PaperCut server to authenticate users to use the MFP device.
For recent Xerox MFP’s that support the Extensible Interface Platform version
2 or higher, we recommend that you instead use the PaperCut embedded
application for Xerox Secure Access EIP2.
Most recent Xerox MFPs will support the Xerox Secure Access feature. This can be
verified by checking for the “Xerox Secure Access” function in the device
authentication options on the device web interface.
The list of devices that support Xerox Secure Access can be found on the following
page (click on the “Compatible Products” tab section):
http://www.office.xerox.com/software-solutions/xerox-secure-access/enus.html
To track the device usage the Xerox Network Accounting module must also be
enabled (Network Accounting is also known as JBA accounting). The “Network
Accounting” module is often included with the device, but for some devices it is
necessary to have this enabled by your Xerox supplier. Please contact your Xerox
supplier for details.
Secure print release and find-me printing is also supported on Xerox devices. The
administrator has the option to automatically release all pending jobs when the user
logs in, or of giving the user the option to release these documents at the time of
login.
NOTE: The FujiXerox devices available in the Asia-Pacific region do not support
Xerox Secure Access. These devices can instead make use of the Network
Accounting features to control access to the copier. See the PaperCut Xerox
Network Accounting Embedded manual for information.
2.2 Requirements
Ensure that the following points are checked off before getting started:
п‚·
п‚·
п‚·
PaperCut is installed and running on your network. Please see the
�Introduction -> Quick Start Guide’ section of the PaperCut user manual for
assistance.
Your Xerox MFD requires support for the “Xerox Secure Access”
authentication method.
Your Xerox MFD requires that the “Network Accounting” is installed/enabled
including off-box authentication support. (Network accounting is also known
as JBA accounting.) You may need to contact Xerox to enable this
functionality.
Copyright В© 2014 PaperCut Software International Pty. Ltd., All Rights Reserved.
4 of 38
PaperCut –Xerox Embedded Manual
п‚·
п‚·
п‚·
2014-04-29
Have available the network name and IP address of the system running
PaperCut (e.g. the print server).
Ensure that the Xerox MFD is connected to the network.
Have available the network address of the Xerox MFD. It is recommended
that the MFD is configured with a static IP.
2.3 Card Reader support
PaperCut supports using swipe card for authentication at the copier. This is often
more convenient than entering username/password or ID/pin numbers to login.
Xerox devices can support 2 general classes of card readers:
п‚·
п‚·
Network card readers (i.e. not physically connected to the MFP. The
PaperCut server communicates with these over the network)
USB card readers (some recent Xerox devices with updated firmware now
support a limited number of USB card readers – contact Xerox for details).
The Network Card Reader option will work with any Xerox device supporting “Xerox
Secure Access”.
2.3.1 Network Card Readers
Network card readers may be used on any Xerox device. PaperCut supports two
cost effective network card readers:
п‚·
п‚·
Elatec TWN3 with the TCP Converter
RFIdeas Ethernet card readers
These readers are available directly from the card reader distributors and PaperCut
Authorized Solution Centers in your region.
These network card readers are located on the MFP device and are connected to the
network. When a user swipes their card at the reader the card number is sent to the
PaperCut server for validation. If the card number is valid the user will be granted
access to the MFP.
2.3.2 USB Card Readers
Xerox updated their platform in late 2011 to support USB card readers through Xerox
Secure Access. At the present time (April 2012) only a subset of current devices
support USB card readers and they may require firmware upgrades, and include:
п‚·
п‚·
п‚·
ColorQube 9301/9302/9303 (firmware 061.180.221.31500 and above)
WorkCentre 5735/5740/5745/5755/5765/5775/5790 (firmware
061.132.222.03800 and above)
WorkCentre 7525/7530/7535/7545/7556 (firmware 061.121.221.29800 and
above).
The following card readers are supported by Xerox:
п‚·
п‚·
Proximity card readers – RFIdeas, Elatec TWN3, HID OmniKey 525/5325
Magstripe card readers – Magtek and “IDTech MiniMag”
Copyright В© 2014 PaperCut Software International Pty. Ltd., All Rights Reserved.
5 of 38
PaperCut –Xerox Embedded Manual
2014-04-29
2.1 EFI Fiery Network Controller Support
The configuration of an EFI Fiery Network Controller with the Xerox MFP’s controller
is also supported for this embedded solution. To ensure it works, however, it is
necessary to use the same xadmin username/password on the Fiery controller as the
Xerox MFP. This will ensure that the SNMP v3 messages will be forwarded from the
Fiery controller onto the Xerox MFP; if this is not done then you will likely see error
messages of the form: “Unable to discover SNMPv3 Engine ID of Xerox device”.
Copyright В© 2014 PaperCut Software International Pty. Ltd., All Rights Reserved.
6 of 38
PaperCut –Xerox Embedded Manual
2014-04-29
2.2 Setup Procedure – 7655 etc
2.2.1 Introduction
This procedure describes the process of setting up Xerox Secure Access on newer
models such as Xerox 7655. The specific steps, screen layouts and button/label
names can differ between device models. However the general process is the same
for all supported devices.
NOTE The screens and menus shown in this document differ between device
models. The menus may be located and named slightly differently on different
devices. See section 2.5 for prior models.
2.2.2 Networking/Firewall Configuration
Ensure that your networking/firewall configuration allows:
п‚·
п‚·
inbound connections from the Xerox devices to the PaperCut server on ports
9191 and 9192.
outbound connections from the PaperCut server to the Xerox device on ports
80 and 443.
2.2.3 Enable the HTTPS/SSL protocol
Xerox Secure Access requires the use of HTTPS/SSL for communications. This must
be enabled before completing any of the subsequent steps.
This involves generating an SSL certificate for the device:
1. Login to the device’s web admin.
2. Navigate to Properties->Security->Machine Digital Certificate Management
3. Press "Create New Self Signed Certificate".
4. Complete the required information
5. Press Apply.
Now enable the HTTP/SSL/TLS protocol:
Copyright В© 2014 PaperCut Software International Pty. Ltd., All Rights Reserved.
7 of 38
PaperCut –Xerox Embedded Manual
2014-04-29
1. Navigate to Properties->Connectivity->Protocols->HTTP
2. Enable the "Secure HTTP (SSL)" option
3. Press Apply
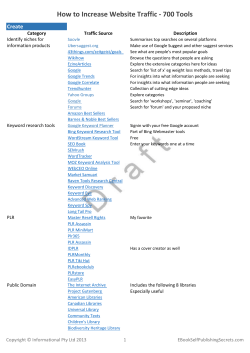
2.2.4 Enable SNMP v3 support
The Xerox Secure Access feature is configured by PaperCut using SNMP v3. This
protocol must be enabled before configuring the Xerox device in PaperCut.
1. Login to the device’s web admin.
2. Navigate to Properties -> Connectivity -> Protocols -> SNMP Configuration.
3. Enable the SNMP v3 option and press "Apply".
4. Go back to the SNMP page and press the "Edit SNMP v3 properties" button.
5. Enable the "Administrator" account.
Copyright В© 2014 PaperCut Software International Pty. Ltd., All Rights Reserved.
8 of 38
PaperCut –Xerox Embedded Manual
2014-04-29
6. Enter the authentication and privacy passwords. Take note of this and the
username (usually “Xadmin”) as these will be required later with the
configuration of the device in PaperCut.
7. Press Apply to save the changes.
2.2.5 Configure the Network Accounting Options
The following Network Accounting options should be changed to integrate with Xerox
Secure Access:
1. At the copier, Press the Login/Out button
2. Login with the following account information:
Username: admin
Password: 1111
3. Press the Machine Status button
Copyright В© 2014 PaperCut Software International Pty. Ltd., All Rights Reserved.
9 of 38
PaperCut –Xerox Embedded Manual
2014-04-29
4. Select the Tools tab at the top
5. Select Accounting button on the left
6. Select Accounting Mode on the right panel
7. Select the Network Accounting button on the left
8. Then select Code Entry Validation on the right
Copyright В© 2014 PaperCut Software International Pty. Ltd., All Rights Reserved.
10 of 38
PaperCut –Xerox Embedded Manual
2014-04-29
9. Select Disabled on the Code Entry Validation screen and press Save
10. Press Save then press the LogOut/In button to Logout
Once these settings are changed you might need to reboot the Xerox for them to
have an effect. The device usually prompts you when a reboot is required.
2.2.6 Create/setup the Xerox device in PaperCut
1. Log in to the PaperCut administration interface using a web browser (e.g.
http://papercut-server:9191/admin ).
2. Navigate to �Options -> Advanced’ and ensure the option �Enable external
hardware integration’ is enabled.
3. Press �Apply’.
4. Navigate to the �Devices’ tab.
5. Click “Create Device” action from the left.
Copyright В© 2014 PaperCut Software International Pty. Ltd., All Rights Reserved.
11 of 38
PaperCut –Xerox Embedded Manual
2014-04-29
6. Select the "Xerox (Xerox Secure Access)" device type.
7. Enter a descriptive name for the device under “Device name”.
8. Enter the Xerox device’s IP address under “Hostname/IP”.
9. Optionally enter location/department information.
10. Enter the admin username and password and privacy password (those
entered in the SNMPv3 settings on the MFP). NOTE: The username is casesensitive and is usually “Xadmin”.
11. Under “Function” tick the options you would like to enable. E.g. “Track &
control copying”.
12. Click “OK”.
At this point PaperCut should try to connect to the device to configure various options
over SNMP. The page displayed after the device is created displays the device
status. If there are problems communicating with the device then the status will show
an error message. Press the "Refresh" link next to the status to see if the status is
updated.
2.2.7 Enable Xerox Secure Access Authentication
At this point the Xerox Secure Access can be enabled:
1. Login to the device’s web admin.
2. Navigate to Properties->Security->Authentication Configuration.
3. Select Next.
Copyright В© 2014 PaperCut Software International Pty. Ltd., All Rights Reserved.
12 of 38
PaperCut –Xerox Embedded Manual
2014-04-29
4. Change Device User Interface Authentication to Xerox Secure Access and
press Next
5. Click on Configure for Device User Interface Authentication
Copyright В© 2014 PaperCut Software International Pty. Ltd., All Rights Reserved.
13 of 38
PaperCut –Xerox Embedded Manual
2014-04-29
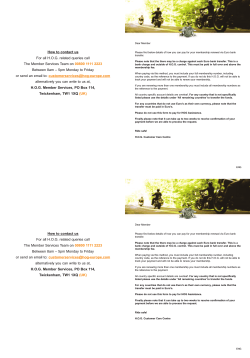
6. Click on Manually Override Settings
7. Verify that the correct PaperCut Server IP Address is listed
8. Change Log In Methods to Xerox Secure Access + alternate on-screen
authentication method
9. Change Accounting Information to Automatically apply Accounting Codes
from the server then press Save
Copyright В© 2014 PaperCut Software International Pty. Ltd., All Rights Reserved.
14 of 38
PaperCut –Xerox Embedded Manual
Copyright В© 2014 PaperCut Software International Pty. Ltd., All Rights Reserved.
2014-04-29
15 of 38
PaperCut –Xerox Embedded Manual
2014-04-29
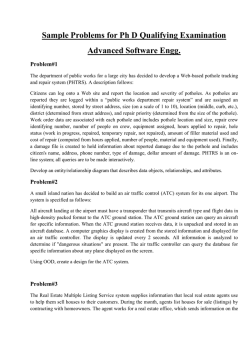
10. Change the Services Pathway setting to Locked. This locks access to the
copier functions unless the user is logged in
NOTE: On newer devices the Pathway Options screen may look different
Copyright В© 2014 PaperCut Software International Pty. Ltd., All Rights Reserved.
16 of 38
PaperCut –Xerox Embedded Manual
2014-04-29
such as the screen below
You may need to reboot the device for the settings to take effect.
Once the device is rebooted the device should display a screen to login. Perform
testing and verify you can login and that copies are tracked by PaperCut.
2.2.8 (Optional) Additional Network Security
The MFP communicates with the PaperCut server over the network (e.g. to
authenticate users or release print jobs). To provide an additional level of security,
PaperCut may be configured to only allow device connections from a restricted range
of network addresses. This ensures that only approved devices are connected to the
PaperCut server.
By default PaperCut will allow device connections from any network address. To
restrict this to a subset of IP addresses or subnets:
1. Logon to the PaperCut administration web interface at http://<papercutserver>:9191/admin
2. Go to the Optionsпѓ Advanced tab and find the “Security” section.
3. In the “Allowed device IP addresses” field enter a comma-separated list of
device IP addresses or subnets (in the format <ip-address>/<subnet-mask>).
4. Press the “Apply” button.
5. Test the devices to ensure they can continue to contact the PaperCut server.
Copyright В© 2014 PaperCut Software International Pty. Ltd., All Rights Reserved.
17 of 38
PaperCut –Xerox Embedded Manual
2014-04-29
2.3 Setup Procedure – 7345, etc
2.3.1 Introduction
This procedure describes the process of setting up Xerox Secure Access on older
devices such as a Xerox 7345. The specific steps, screen layouts and button/label
names can differ between device models. However the general process is the same
for all supported devices.
NOTE 1: The screens and menus shown in this document differ between device
models. The menus may be located and named slightly differently on different
devices.
2.3.2 Networking/Firewall Configuration
Ensure that your networking/firewall configuration allows:
п‚·
п‚·
inbound connections from the Xerox devices to the PaperCut server on ports
9191 and 9192.
outbound connections from the PaperCut server to the Xerox device on ports
80 and 443.
2.3.3 Enable the HTTPS/SSL protocol
Xerox Secure Access requires the use of HTTPS/SSL for communications. This
must be enabled before completing any of the subsequent steps.
This involves generating an SSL certificate for the device:
1.
2.
3.
4.
Login to the device’s web admin.
Navigate to Properties->Security->Machine Digital Certificate Management
Press "Create New Self Signed Certificate".
Leave default options and press "Apply"
Now enable the HTTP/SSL/TLS protocol:
1.
2.
3.
4.
5.
6.
7.
Navigate to Properties->Security->SSL/TLS Settings
Enable the "HTTP – SSL / TLS Communication" option
Verify that the “Verify Remote Server Certificate” option is Disabled.
Press Apply
Navigate to Properties->Connectivity->Protocols->HTTP
Enable the "Secure HTTP (SSL)" option
Press Apply
2.3.4 Enable SNMP v3 support
The Xerox Secure Access feature is configured by PaperCut using SNMP v3. This
protocol must be enabled before configuring the Xerox device in PaperCut.
1.
2.
3.
4.
5.
Login to the device’s web admin.
Navigate to Properties->Connectivity->Protocols->SNMP Configuration.
Enable the SNMP v3 option and press "Apply".
Go back to the SNMP page and press the "Edit SNMP v3 properties" button.
Enable the "Administrator" account.
Copyright В© 2014 PaperCut Software International Pty. Ltd., All Rights Reserved.
18 of 38
PaperCut –Xerox Embedded Manual
2014-04-29
6. Enter the authentication and privacy passwords. Take note of this and the
username (usually “Xadmin”) as these will be required later with the
configuration of the device in PaperCut.
7. Press Apply to save the changes.
2.3.5 Configure the Network Accounting Options
The following Network Accounting options should be changed to integrate with Xerox
Secure Access:
п‚·
п‚·
п‚·
п‚·
п‚·
Login to the device web admin.
Navigate to Properties->Accounting->Accounting Configuration.
Change the Accounting Type to: Network Accounting.
Set the "Verify User Details" setting to "Off".
IMPORTANT: Set "Customize User Prompts" to "Display User ID & Account
ID Prompts". If both “prompts” are not enabled, jobs may not be tracked
properly.
п‚·
Press the "Apply" button.
Copyright В© 2014 PaperCut Software International Pty. Ltd., All Rights Reserved.
19 of 38
PaperCut –Xerox Embedded Manual
2014-04-29
Once these settings are changed you might need to reboot the Xerox for them to
have an effect. The device usually prompts you when a reboot is required.
2.3.6 Create/setup the Xerox device in PaperCut
13. Log in to the PaperCut administration interface using a web browser (e.g.
http://papercut-server:9191/admin ).
14. Navigate to �Options -> Advanced’ and ensure the option �Enable external
hardware integration’ is enabled.
15. Press �Apply’.
16. Navigate to the �Devices’ tab.
17. Click “Create Device” action from the left.
18. Select the "Xerox (Xerox Secure Access)" device type.
19. Enter a descriptive name for the device under “Device name”.
20. Enter the Xerox device’s IP address under “Hostname/IP”.
21. Optionally enter location/department information.
22. Enter the admin username and password and privacy password (those
entered in the SNMPv3 settings on the MFP). NOTE: The username is casesensitive and is usually “Xadmin”.
23. Under “Function” tick the options you would like to enable. E.g. “Track &
control copying”.
24. Click “OK”.
At this point PaperCut should try to connect to the device to configure various options
over SNMP. The page displayed after the device is created displays the device
Copyright В© 2014 PaperCut Software International Pty. Ltd., All Rights Reserved.
20 of 38
PaperCut –Xerox Embedded Manual
2014-04-29
status. If there are problems communicating with the device then the status will show
an error message. Press the "Refresh" link next to the status to see if the status is
updated.
2.3.7 Enable Xerox Secure Access authentication
At this point the Xerox Secure Access can be enabled:
1. Login to the device web admin.
2. Navigate to Properties->Security->Authentication Configuration.
3. Set the Login Type to "Xerox Secure Access".
4. Press "Apply" to save the settings.
5. In Properties->Security->Authentication Configuration, press the "Next" button
and then the "Device Access" button.
6. Change the "All Services Pathway" setting to "Locked". This locks access to
the copier functions unless the user is logged in.
7. Navigate to Properties->Security->Remote Authentication Servers->Xerox
Secure Access Settings.
8. Enable the "Local Login" option. (On some devices this option is called
“Allow Local Interface Initiation”)
Copyright В© 2014 PaperCut Software International Pty. Ltd., All Rights Reserved.
21 of 38
PaperCut –Xerox Embedded Manual
2014-04-29
9. Enable the "Get Accounting Code" option. (On some devices this is option is
called “Accounting codes provided by server”).
10. Press the "Apply" Button.
You may need to reboot the device for the settings to take effect.
Once the device is rebooted the device should display a screen to login. Perform
testing and verify you can login and that copies, etc are tracked by PaperCut.
2.3.8 (Optional) Enable network card reader
This section describes how to configure a network card reader for authentication at
the MFP. For more information on the supported card readers see Section 2.3 Card
Reader support.
To enable the network card reader:
1. Log in to the PaperCut administration interface using a web browser (e.g.
http://papercut-server:9191/admin ).
2. On the “Devices” tab, select the MFP device.
3. Under the “Authentication Methods” option, enable the “Swipe Card”
authentication option.
4. Select the “Enable network card reader” option.
2.3.9 (Optional) Additional Network Security
The MFP communicates with the PaperCut server over the network (e.g. to
authenticate users or release print jobs). To provide an additional level of security,
PaperCut may be configured to only allow device connections from a restricted range
of network addresses. This ensures that only approved devices are connected to the
PaperCut server.
By default PaperCut will allow device connections from any network address. To
restrict this to a subset of IP addresses or subnets:
Copyright В© 2014 PaperCut Software International Pty. Ltd., All Rights Reserved.
22 of 38
PaperCut –Xerox Embedded Manual
2014-04-29
6. Logon to the PaperCut administration web interface at http://<papercutserver>:9191/admin
7. Go to the Optionsпѓ Advanced tab and find the “Security” section.
8. In the “Allowed device IP addresses” field enter a comma-separated list of
device IP addresses or subnets (in the format <ip-address>/<subnet-mask>).
9. Press the “Apply” button.
10. Test the devices to ensure they can continue to contact the PaperCut server.
5. Enter the network address and the port of the network card reader.
6. Press “OK” or “Apply” to save the changes.
7. At this point PaperCut will establish the connection to the card reader. The
status of the connection to the network card reader is displayed below the
settings. If there is a problem connecting to the card reader any errors will be
displayed here.
Copyright В© 2014 PaperCut Software International Pty. Ltd., All Rights Reserved.
23 of 38
PaperCut –Xerox Embedded Manual
2014-04-29
3 Post-install testing
After completing installation and basic configuration it is recommended to perform
some testing of the common usage scenarios. This important for two reasons:
1. To ensure that the embedded application is working as expected
2. To familiarize yourself with the features and functionality of PaperCut and the
embedded application.
This section outlines four test scenarios that are applicable for most organizations.
Please complete all the test scenarios relevant for your site.
3.1 Test Preparation
To complete these tests it is recommended you use two test users so that each can
be configured differently. These users are:
п‚·
п‚·
�testusersimple’ – is used to perform basic copier monitoring and control and
to perform print release tests.
�testuseradvanced’ – is used to perform copier monitoring and control with the
account selection enabled (i.e. to charge copying to
accounts/departments/cost-centers/etc).
If you have existing users that can be used for these tests, then they can be used
instead.
To setup these users in PaperCut:
1. Create the �testusersimple’ and �testuseradvanced’ users in your Active
Directory or LDAP directory.
2. Login to the PaperCut’s admin web interface
3. Go to the “Options->User/Group sync” page and press “Synchronize Now”.
4. Once the sync is complete, the users will be added to PaperCut.
The next step is to configure the users. To configure �testusersimple’:
1. In PaperCut, select the “Users” tab
2. Select the �testusersimple’ user.
3. Set the user’s balance to $50.00 and verify the account is set to “Restricted”.
4. Verify that this user is set to “Automatically charge to personal account” in the
“Account selection” options.
Copyright В© 2014 PaperCut Software International Pty. Ltd., All Rights Reserved.
24 of 38
PaperCut –Xerox Embedded Manual
2014-04-29
5. Press the “OK” button to save.
To configure �testuseradvanced’:
1. In PaperCut, select the “Users” tab
2. Select the �testuseradvanced’ user.
3. Change the “Account Selection” option to “Standard account selection popup”
and enable all the account selection options.
4. Press the “OK” button to save.
3.2 Scenario 1: Standard copying
Standard copying involves monitoring/charging printing to a user’s personal account.
This is the most commonly used for student printing or basic staff monitoring. Users
can also be configured for unrestricted printing, which is commonly used for
staff/employee use.
At the photocopier:
1. The photocopier should be displaying a screen to prompt the user to login.
Follow the prompts to login.
2. When prompted username (�testusersimple’) and password in the login fields.
3. At this point the copier will be enabled for usage.
4. Follow the onscreen instructions and perform some test copying, i.e. press
the “Copy” key on the device and perform a copy as normal.
5. Once completed copying press the “Logout” button on the device’s keypad.
Back in the PaperCut application verify that the copier activity was recorded and the
user’s account deducted.
1. Log in to PaperCut.
2. Select the device from the “Devices” tab.
3. Select the “Job Log” tab. This will list all recent copying activity on the copier.
The copying just performed as the test user should be listed. Verify the
details of the copy job that was just performed.
4. Click on the user’s name in the user column to view the user’s account details
Copyright В© 2014 PaperCut Software International Pty. Ltd., All Rights Reserved.
25 of 38
PaperCut –Xerox Embedded Manual
2014-04-29
5. Select the “Job Log” tab to display all print/copy activity for the user.
6. Select the “Transaction History” tab and verify that the cost of the
photocopying was deducted from the user’s account.
3.3 Scenario 2: Copying with account selection
For this test the Account ID prompt has to have been enabled as described in the
“Installation” chapter of this manual.
Firstly a test account should be created:
Log into PaperCut, select the “Accounts” tab.
Select the “Create a new account…” action link on the left.
Enter an account name “Test Account 1”.
Enter PIN/Code “2233”.
Select the “Security” tab and allow all users to access that account by adding
the “[All Users]” group.
6. Press “OK”.
1.
2.
3.
4.
5.
At the photocopier:
1. The photocopier should be displaying a screen to prompt the user to login.
Follow the prompts to login.
2. When prompted username (�testuseradvanced’) and password in the login
fields.
3. The user will then be prompted to enter the account code/PIN. Enter the
account code of “2233” to select the “Test Account 1” created earlier.
4. At this point the copier will be enabled for usage. Follow the onscreen
instructions and perform some test copying. I.e. press the “Copy” key on the
device and perform a copy as normal.
5. Once completed copying press “Logout” button.
Back in the PaperCut application verify that the copier activity was recorded and the
user’s account deducted.
1. Log in to PaperCut
2. Select the device from the “Devices” tab
3. Select the “Job Log” tab. This will list all recent copying activity on the copier.
The copying just performed as the test user should be listed.
4. Verify the details of the job (i.e. that the job was charged to the selected
account).
5. In the log details, click on the “Charged To” account name to view the
account’s details.
6. Selecting the “Job Log” tab will display all print/copy activity for the account,
and will show the test photocopying that was performed.
Copyright В© 2014 PaperCut Software International Pty. Ltd., All Rights Reserved.
26 of 38
PaperCut –Xerox Embedded Manual
2014-04-29
3.4 Scenario 3: Print release
The embedded application may also be used for print release. For full description of
PaperCut hold/release queues and release stations, please read the PaperCut
manual.
Skip this scenario if hold/release queues will not be used at your site.
To perform print release testing a hold/release queue must be enabled:
п‚·
п‚·
п‚·
п‚·
In PaperCut, select the “Printers” tab.
Select the print queue (i.e. not the �device’) for the Xerox MFD that will be
used for testing.
Enable the “Hold/release queue” option.
Press OK/Apply to save the changes. All printing to this queue will now be
held until released by a user.
The photocopier device must also be enabled as a “Print Release Station”:
1.
2.
3.
4.
In PaperCut, select the “Devices” tab.
Select the Xerox MFD device.
Under “Device Function” tick “Enable release station”.
Select the print queue that was enabled for hold/release above. The Xerox
device will allow jobs on the selected queues to be released.
5. Press “OK” to save.
6. Login to a computer workstation as �testusersimple’.
7. Print a few jobs to the print queue that was configured above. The jobs will
be held in the hold/release queue.
8. Confirm that the jobs are held, by checking that the jobs are listed in the
“Printers -> Jobs Pending Release” page of the PaperCut administration
interface.
9. Confirm that the username is �testusersimple’.
At the device:
Copyright В© 2014 PaperCut Software International Pty. Ltd., All Rights Reserved.
27 of 38
PaperCut –Xerox Embedded Manual
2014-04-29
1. Login to the device as “testusersimple” as described above.
2. Upon successful login you will be prompted whether to release the waiting
print jobs. Select the “Yes” button to release the jobs to print.
3. The jobs will begin to print to the destination printer.
4. Once completed press the “Logout” button on the device keypad.
3.5 Scenario 4: Scanning and faxing
Xerox devices can also scan documents and send them by email. If a phone line is
attached, they can send faxes. You can enable tracking scanning and faxing. Users
can be prevented from scanning or faxing when they are out of credit.
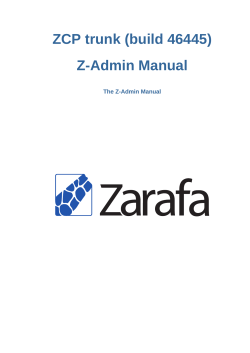
To enable tracking of scans and faxes:
1. In PaperCut, select the “Devices” tab.
2. Select the MFD device.
3. Under “Device function” tick “Track & control scanning” and tick “Track &
control faxes”.
4. Select the charging type “advanced” in both cases and set some numbers for
page costs and thresholds. The cost after the threshold should be lower than
the standard cost as it represents a volume discount. As an example, the
screen shot below shows that the first page of a fax is charged at $0.20 and
any subsequent page at $0.10.
At the photocopier, log in and scan a few documents and send a few faxes. At the
end, make sure to press the “Logout” button on the device’s keypad.
In the PaperCut administration interface verify that the scan and fax activities were
recorded and the user’s account was deducted. This can be done as follows:
1. Log in to the PaperCut administration interface.
2. Select the device from the “Devices” tab.
3. Select the “Job Log” tab. This will list all recent activity on the copier,
including copying, scanning and faxing. The jobs just performed as the test
user should be listed. Verify the details of the jobs that were just performed.
Copyright В© 2014 PaperCut Software International Pty. Ltd., All Rights Reserved.
28 of 38
PaperCut –Xerox Embedded Manual
2014-04-29
4. Click on the user’s name in the user column to view the user’s account
details.
5. Select the “Job log” tab to display all activity for the user.
6. Select the “Transaction History” tab and verify that the cost of the scans and
faxes was deducted from the user’s account.
Copyright В© 2014 PaperCut Software International Pty. Ltd., All Rights Reserved.
29 of 38
PaperCut –Xerox Embedded Manual
2014-04-29
4 Configuration
After completing the Installation section and registering the device with PaperCut, it will have
been configured with reasonable default settings that are suitable for most environments.
This section covers how to change the default settings. All the following settings are
available via the device’s �Summary’ tab in the PaperCut administration interface.
4.1 Device Function
The device function setting defines which functions will be available on the device and how it
will be used. Not all function settings are supported on all devices.
Each device function is discussed in the following table.
Device Function
Description
Track & control copying
The device will track walk-up off-the-glass copying.
Track & control scanning
The device will track scanning such as scan-to-email or scanto-file.
Track & control faxing
The device will track the sending of faxes.
Enable release station
The device will act as a print release station.
4.2 Authentication Methods
PaperCut supports a number of different ways to authenticate users who walk-up to the
devices to perform copying. The default authentication method is username and password
authentication.
The available authentication methods can be modified in the �External Device Settings ->
Authentication methods’ section.
Authentication methods available for a device
Not all authentication methods are supported on all devices. A grayed-out option indicates
that the option is not supported on this device.
Copyright В© 2014 PaperCut Software International Pty. Ltd., All Rights Reserved.
30 of 38
PaperCut –Xerox Embedded Manual
2014-04-29
Each authentication method is discussed in the following table.
Authentication
Method
Description
Username and
password
The user may use their domain/network username and password
to log into the device.
Identity number
The user may log in with their identity number. Identity numbers
are convenient when usernames are long or cumbersome to enter.
For example, rather than entering a username like
�john.smith.001’, it may be more convenient to enter an employee
ID of �1234’. See the PaperCut user manual for information about
user identity numbers, including importing identity numbers from
an external source.
Identity number ->
Require PIN
When a user logs in with their identity number, they must also
provide their associated PIN. This provides additional security for
identity number logins.
Automatically login as
user
Specifies that this device should always automatically log in as the
given user. This option overrides all other authentication methods
Description of authentication methods
4.3 Configuring Swipe Card Readers
Swipe cards contain numbers which are used to identify users according to the card number
configured in the User Details screen under “Card/Identity” number. Some readers report
information in addition to the number encoded on the card, such as checksums. PaperCut
can treat these cases in two ways:
п‚·
п‚·
A typical case is the checksum being reported after the card number, separated by
an equals sign, such as in 5235092385=8. PaperCut can handle this case by default;
it will extract the number before the equal sign as the card number: 5235092385.
For some cases, a “regular expression” may be required that will filter the card
number from the complete string of characters reported by the card reader.
Documentation on regular expressions can be found on the Internet, e.g. at
www.regular-expressions.info.
o The regular expression must be fashioned so that the card number is
returned as the first match group.
o Usually one regular expression will be used for all the devices managed by
PaperCut; this must be entered in the “Config editor (advanced)” which you
will find on the Options tab under Actions. The key is called “ext-device.cardno-regex”.
o The global setting however can be overridden on a per-device basis: The key
“ext-device.card-no-regex” can also be found on the “Advanced Config” tab in
the device details screen. This setting will override the global setting unless
the keyword “GLOBAL” is specified.
o PaperCut developers will gladly assist in producing a regular expression
when supplied with a few sample outputs from your card reader. Please
contact PaperCut support.
Copyright В© 2014 PaperCut Software International Pty. Ltd., All Rights Reserved.
31 of 38
PaperCut –Xerox Embedded Manual
o
2014-04-29
If you would like to write your own regular expressions, here are some
examples:
 Use the first 10 characters (any character): (.{10})
 Use the first 19 digits: (\d{19})
 Extract the digits from between the two “=” characters in
“123453=292929=1221”: \d*=(\d*)=\d*
4.4 Single Sign On (SSO)
No further configuration is required as PaperCut passes all the known information about the
logged in user to the MFP at the time of login such as the Full Name, email address, and
more. This information can then be used by other components on the MFP (or possibly other
3rd party applications).
One example is that when you use the scanner functionality, the MFP can use your email
address, provided by PaperCut, to simplify scan-to-me style work-flows.
5 Known Limitations and Security
The Xerox environment has a number of limitations that have impacted on functionality and
security.
5.1 Zero Stop
In an ideal implementation, PaperCut would be able to control exactly how many pages a
user can copy and always prevent the user from overdrawing their account. The Xerox
Secure Access / Network Accounting environment has some limitations in controlling
copying.
PaperCut will only enable the copier when an authorized user has authenticated at the
device (and has enough credit to begin copying). If a restricted user attempts to login and
they have no available credit, they will be denied access to photocopying. However, the
Xerox environment has the following limitation:
п‚·
Once the user starts copying it is not possible to forcibly stop the copying and log
them out of the system.
The implication of this limitation is:
п‚·
Restricted users with available credit can start copying and continue copying even
once they have used their credit. Their copier usage will still be recorded in
PaperCut and the cost will be deducted from their account (which will go into
negative balance).
NOTE: PaperCut will forcibly logout the user if the user’s job completes and they have no
credit remaining. PaperCut can only force them out after the job is completed. This is
because we are only informed of completed jobs, and it’s only after the job is charged that
the user’s credit will be reduced.
This is a limitation of the Xerox Secure Access and Network Accounting module.
5.2 Fax Tracking
Many Xerox MFPs do not log sent faxes in the Network Accounting / JBA logs. On these
devices PaperCut will cannot track any outbound faxes.
Copyright В© 2014 PaperCut Software International Pty. Ltd., All Rights Reserved.
32 of 38
PaperCut –Xerox Embedded Manual
2014-04-29
Please check with Xerox whether your device model supports fax tracking via Network
Accounting.
The following list of Xerox devices that do and do not support tracking faxes (at the time of
writing 25th Jan 2013.
Devices NOT supporting tracking faxes:
п‚·
п‚·
п‚·
п‚·
п‚·
п‚·
п‚·
п‚·
п‚·
п‚·
п‚·
п‚·
п‚·
п‚·
п‚·
п‚·
п‚·
п‚·
п‚·
п‚·
ColorQube 8700
ColorQube 8900
ColorQube 9201/9202/9203
ColorQube 9301/9302/9303
Phaser 3635MFP
WorkCentre 232/238
WorkCentre 245/255
WorkCentre 265/275
WorkCentre 4250
WorkCentre 4260
WorkCentre 5030/5050
WorkCentre 5135/5150
WorkCentre 5632/5638
WorkCentre 5645/5655
WorkCentre 5665/5675/5687
WorkCentre 5735/5740/5745/5755
WorkCentre 5765/5775/5790
WorkCentre 6400
WorkCentre 7525/7530/7535/7545/7556
WorkCentre 7655/7665/7675
Devices supporting tracking faxes (those using Fuji-Xerox controller):
п‚·
п‚·
п‚·
п‚·
п‚·
п‚·
п‚·
п‚·
п‚·
WorkCentre 7120/7125
WorkCentre 7132
WorkCentre 7232/7242
WorkCentre 7328/7335/7345/7346
WorkCentre 7425/7428/7435
Xerox Color 550/560
WorkCentre 5222
WorkCentre 5225/5230
WorkCentre 5325/5330/5335
If your device is not listed, please check with Xerox on whether the device supports tracking
faxes.
5.3 User Interface
The interface displayed during the user login process has some limitations. The Xerox
Secure Access features allow us to display any number of screens with either one of the
following features:
п‚·
п‚·
A text input field (which can be optionally masked for password input)
A prompt with “Yes” and “No” buttons.
Copyright В© 2014 PaperCut Software International Pty. Ltd., All Rights Reserved.
33 of 38
PaperCut –Xerox Embedded Manual
2014-04-29
These limitations restrict the richness and flexibility that we can provide in the login process.
This is a limitation of the Xerox Secure Access system.
5.4 Bypassing the System
It is important that the administrators take care to prevent users from bypassing the system
and directly accessing the copier.
To ensure the system is secure administrations should take the following precautions:
п‚·
The copier’s built in admin password should be changed from the default and always
kept secure.
5.5 Card Reader support for authentication
PaperCut does support network card readers that support common card formats. For more
information contact the PaperCut Authorized Solution Center in your region.
The Xerox Secure Access environment has begun to start supporting USB card readers (as
of late 2011). Support for USB card readers is only available on some MFP devices with
the latest firmware. Some devices (like the WC53XX require an additional plugin install
available from Xerox). Xerox will be gradually rolling out support for USB card readers
across their device range. Contact Xerox for information on what devices and firmware is
required for USB card reader support.
6 Advanced Configuration
6.1 Config Editor
The common configuration options for a device in PaperCut are available on the device’s
�Summary’ tab, and are discussed in more detail in the Configuration section. This section
covers the more advanced or less common configuration options which are available via the
�Advanced Config’ tab.
Config name
Description
ext-device.card-selfassociation.usesecondary-cardnumber
Select whether user self-association should occupy the primary or
secondary card number. It overrides the global setting unless the
keyword "GLOBAL" is specified. This is useful when there is a mix of
different non-configurable card readers that read different numbers
from an ID card.
Set to "Y" to use the secondary card number, "N" to use the primary
card number. Default: "GLOBAL" to defer to the global configuration
option.
ext-device.xerox.limitreference.paper-size
and
ext-device.xerox.limitreference.duplex
PaperCut will deny device access to restricted users who do not
have enough balance to copy. To determine if a user has enough
balance to copy a reference copy is required. By default PaperCut
checks if the user has enough balance to copy one single sided
Letter (North America) or A4 (worldwide) page. In some situations it
may be desirable to change the reference copy, such as when the
device allows smaller page sizes like A5.
Default for ext-device.xerox.limit-reference.duplex: N (No)
Default for ext-device.xerox.limit-reference.paper-size in North
Copyright В© 2014 PaperCut Software International Pty. Ltd., All Rights Reserved.
34 of 38
PaperCut –Xerox Embedded Manual
2014-04-29
America: Letter
Default for ext-device.xerox.limit-reference.paper-size worldwide: A4
ext-device.xerox.logininstruction
Defines the text to display on the initial login screen displayed by the
Xerox device. If set to “DEFAULT” PaperCut will set this message
based on the authentication settings of the device.
IMPORTANT: The Xerox device has very limited support for nonASCII characters. If you have problems please only use ASCII
characters.
ext-device.xerox.jobdownload-after-loginperiod-secs
The number of seconds between PaperCut downloading/polling the
device job logs after the user is logged in. The default for this is
every 10 seconds. The minimum this can be set to is 5 seconds.
Default: DEFAULT (which allows PaperCut to choose the most
appropriate time – usually 10 seconds).
ext-device.xerox.authuser-prefix
When user’s login to the Xerox their credentials like username (and
password if provided) are passed to the Xerox device by PaperCut.
This allows the device to use these credentials for other
authentication. E.g. To authenticate the use when using the “Scan
to Home” features.
In some environments, the username must be prefixed with the
windows domain for this to work properly. This setting allows the
domain to be prefixed to the username so that the user does not
need to enter it manually.
For example, if this setting this set to: “DOMAIN\” and the user
names “john” log’s in, PaperCut will pass the username
“DOMAIN\john” to the Xerox.
extdevice.xerox.card.m
agstripe-track-no
When a USB Magstripe card reader is used, the card data can be
found on one of 3 tracks. Typically the track of interest is track
number 2. This configuration parameter specifies a comma
separated list of track numbers to look at in order to retrieve the card
data. For example if the list was: 2, 3 then it would look to see if
there was data for track 2 and if there wasn’t then it would look to
see if there was data for track 3. If it can’t find any valid track data,
then it will show an error message on the Xerox Panel and a more
detailed message in the logs. Note: Prior to PaperCut 13.4, this list
can only contain one value.
Default: 2 (by default only look at the data associated with track 2)
6.2 Setting an explicit PaperCut Server Network Address
The copier connects to the PaperCut server to validate user credentials, display print jobs for
release, etc. The device makes inbound network connections to the PaperCut server using
a network address of the PaperCut server. By default PaperCut will use the server’s IP
address (if the server has multiple IPs (i.e. multi-homed) then PaperCut will select one of
them), but on some networks this address may not be publicly accessible from other parts of
the network.
If the PaperCut server has a “public” IP address or DNS name then you can this can be used
instead, which allows the copiers to use the “public” network address instead of the IP
address that PaperCut detects. To do this:
Copyright В© 2014 PaperCut Software International Pty. Ltd., All Rights Reserved.
35 of 38
PaperCut –Xerox Embedded Manual
п‚·
п‚·
п‚·
п‚·
п‚·
п‚·
2014-04-29
Login to PaperCut
Go to the "Options" tab.
Select "Config Editor (advanced)", from the action links on the left.
Find the "system.network-address" setting.
Enter the public network address for the PaperCut server.
Press the "Update" button next to the setting and confirm the setting is updated.
To have this change take effect immediately, restart the PaperCut Application Server service
(i.e. on Windows use: Control Panel->Admin Tools->Services).
Copyright В© 2014 PaperCut Software International Pty. Ltd., All Rights Reserved.
36 of 38
PaperCut –Xerox Embedded Manual
2014-04-29
7 How it works
The following section gives a brief overview of the internal workings of PaperCut’s on-board
solution for Xerox devices. It’s provided as background information and may be useful for
technical administrators troubleshooting problems.
Typical function workflow:
1. A user logs into the MFP via the panel. The MFP is configured to contact PaperCut
(via SOAP web sevices) to verify login information.
2. The user ID and password is validated and devices access is granted as appropriate.
3. If “release jobs on login” is enabled any waiting jobs are immediately queued for
printing. (called secure print release or find-me printing)
4. If the user performs any device functions such as Copy, Fax or Scan, these are
recorded against the user ID in the device’s onboard logs.
5. At regular periods (e.g. every minute) PaperCut contacts the device looking for new
log entries (logs are downloaded via HTTP using JBA network accounting).
6. Any new log entries are analyzed and recorded in PaperCut’s usage database. Any
cost associated with the usage is charged from the user’s account (or their selected
Shared Account).
8
FAQ & Troubleshooting
PaperCut shows an error status for the device. What could cause this?
In the “Devices” list the Xerox device may appear with an error status (hover your mouse
over the status to see the full status message). The status message will help understand
the cause of the error. The most common cause of problems is due to a networking issue,
to resolve:
п‚·
п‚·
п‚·
Verify that the device network address (or IP) is entered correctly in PaperCut
Verify that networking and firewalls allow PaperCut to establish a connection to the
device on TCP ports 80 and 443 and UDP port 161 for SNMP.
Verify that networking and firewall settings allow the device to establish connections
to the PaperCut server on ports 9191 and 9192.
Another common cause of errors is that “Network Accounting / JBA” has not been
enabled/configured on the device. Ensure that the Network Accounting is enabled as
described in section 2.1.
Another possible cause of problems is if the device firmware does not support the “Off-box
validation” features required by PaperCut. This feature should be available for recent Xerox
copiers supporting “Network Accounting”, however sometimes a firmware upgrade is
required.
How often does PaperCut poll for accounts?
Account validation is done in real-time using the Xerox authentication web services methods.
Hence and changes made to Shared Accounts, user rights, or user passwords are available
immediately.
Copyright В© 2014 PaperCut Software International Pty. Ltd., All Rights Reserved.
37 of 38
PaperCut –Xerox Embedded Manual
2014-04-29
How often does PaperCut poll for job activity?
After PaperCut detects a login it will check for the completion of the job(s) every 2 minutes.
Hence on average the job will appear in, and be charged by PaperCut on average no longer
than a minute after the job completes and the user logs out of the copier.
During no activity, the copier status is checked every 10 minutes.
Can I use a hostname rather than an IP address in the URL’s when configuring the
release station settings?
Using a hostnames relies on the MFD using your DNS and ensuring that your DNS is
correctly configured. The quickest failsafe option is to use the server’s IP. If you have
advanced networking skills, you may wish to investigate using a hostname.
The device displays an error when authenticating the user.
The most likely cause of problems is that the device cannot establish a connection to the
PaperCut server. Make sure that your networking/firewalls allow network connections from
the device to the PaperCut server on ports 9191 and 9192.
Also ensure that the device SSL/HTTPS options are enabled. Ensure that the option to
“Verify the remote server certificate” is disabled.
If your PaperCut server has multiple IP addresses or you use NAT on your network, see
section 6.2 on how to explicitly configure the PaperCut server’s network address.
I see an error on the Xerox LCD screen?
This may indicate networking issue, a configuration issue, or maybe a software bug. Recheck your settings and restart the MFD (i.e. power off and power on the copier). If
problems continue, contact PaperCut Support.
PaperCut is not tracking copy/scan/fax jobs.
If the App Log message is also mentioning “Invalid Job details” then it may be caused by not
enabling the following two items in the device’s web admin page (CWIS):
1. Automatically apply accounting codes from the server.
2. User Accounting Display Prompts for both the user ID and the account ID.
PaperCut is tracking the copy/scan/fax jobs to the personal account instead of the
specified shared account.
Please ensure that the Accounting Display Prompts are set for both the user ID and the
account ID.
Copyright В© 2014 PaperCut Software International Pty. Ltd., All Rights Reserved.
38 of 38
© Copyright 2026 Paperzz