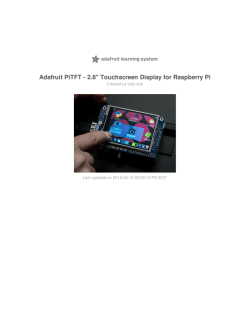
Adafruit PiTFT - 2.8" Touchscreen Display for Raspberry Pi
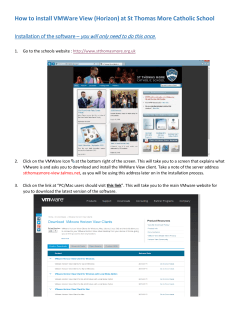
Created by lady ada
Last updated on 2015-03-13 05:30:15 PM EDT
Guide Contents
Guide Contents
Overview
Assembly
Easy Install
Ready to go image
DIY Installer script
Detailed Installation
Before you start
Download & Install Kernel
Touchscreen Install & Calibrate
Setting up the Touchscreen
Running evtest
AutoMagic Calibration Script
Manual Calibration
X Calibration
Using the Console
Turn off Console Blanking
Playing Videos
How To Play Videos
Converting/Resizing Videos
Displaying Images
Extras!
Controlling the backlight
Tactile switch as power button
Making it easier to click icons in X
Boot to X Windows on PiTFT
Gesture Input
2
4
8
15
15
15
20
21
21
30
30
32
33
35
36
40
43
44
44
46
50
52
52
53
54
56
58
Installation
Usage
58
58
FAQ
Downloads
62
66
© Adafruit Industries
https://learn.adafruit.com/adafruit-pitft-28-inch-resistive-touchscreendisplay-raspberry-pi
Page 2 of 67
Schematic & Layout
© Adafruit Industries
https://learn.adafruit.com/adafruit-pitft-28-inch-resistive-touchscreendisplay-raspberry-pi
66
Page 3 of 67
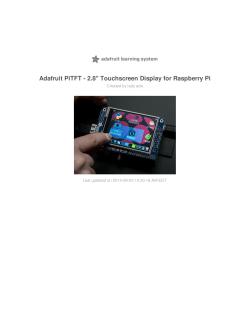
Overview
Is this not the cutest little display for the Raspberry Pi? It features a 2.8" display with 320x240 16-bit
color pixels and a resistive touch overlay. The plate uses the high speed SPI interface on the Pi and
can use the mini display as a console, X window port, displaying images or video etc. Best of all it
plugs right in on top!
It's designed to fit nicely onto the Pi Model A or B but also works perfectly fine with the Pi 2 or Model
B+ as long as you don't mind the PCB overhangs the USB ports by 5mm
© Adafruit Industries
https://learn.adafruit.com/adafruit-pitft-28-inch-resistive-touchscreendisplay-raspberry-pi
Page 4 of 67
This design uses the hardware SPI pins (SCK, MOSI, MISO, CE0, CE1) as well as GPIO #25 and
#24. All other GPIO are unused. Since we had a tiny bit of space, there's 4 spots for optional slim
tactile switches wired to four GPIOs, that you can use if you want to make a basic user interface.
For example, you can use one as a power on/off button.
We bring out GPIO #23, #22, #21, and #18 to the four switch locations!
© Adafruit Industries
https://learn.adafruit.com/adafruit-pitft-28-inch-resistive-touchscreendisplay-raspberry-pi
Page 5 of 67
To make it super easy for use: we've created a custom kernel package based of off Notro's
awesome framebuffer work, so you can install it over your existing Raspbian (or derivative) images
in just a few commands.
© Adafruit Industries
https://learn.adafruit.com/adafruit-pitft-28-inch-resistive-touchscreendisplay-raspberry-pi
Page 6 of 67
This tutorial series shows you how to install the software, as well as calibrate the touchscreen, splay
videos, display images such as from your PiCam and more!
© Adafruit Industries
https://learn.adafruit.com/adafruit-pitft-28-inch-resistive-touchscreendisplay-raspberry-pi
Page 7 of 67
Assembly
This tutorial page is for PiTFT that came as a kit. If your PiTFT is already assembled, skip this
step!
Before you start check that you have the parts you need: an assembled PiTFT plate with the 2.8"
screen, extra tall female header and the 2x13 IDC socket. Note that it is normal for the screen to be
'loose' - this is so its easier for you to solder the connector on!
© Adafruit Industries
https://learn.adafruit.com/adafruit-pitft-28-inch-resistive-touchscreendisplay-raspberry-pi
Page 8 of 67
Check also on the back that the TFT is attached and that the flex connector is seated into the
onboard FPC socket.
The easiest way to attach the header is if you have
a Raspberry Pi as a 'stand' - make sure its
powered off & unplugged!
© Adafruit Industries
https://learn.adafruit.com/adafruit-pitft-28-inch-resistive-touchscreendisplay-raspberry-pi
Page 9 of 67
Plug the extra tall female header into the GPIO port
on the Pi as shown. Make sure its seated nice and
flat
Place the PiTFT shield on top so all the pins stick
through the connector on the side. Gently flip the
TFT so its off to the side and wont be in your way
while you solder
Heat up your soldering iron, and grab some solder.
Start by tack-soldering one of the corners while
pressing on the plate to make it sit flat. Once you
have one or two pins done you can continue to
solder each of the pins.
© Adafruit Industries
https://learn.adafruit.com/adafruit-pitft-28-inch-resistive-touchscreendisplay-raspberry-pi
Page 10 of 67
Before attaching the display, check that all the pins
are soldered nicely and there's no bridging, cold
© Adafruit Industries
https://learn.adafruit.com/adafruit-pitft-28-inch-resistive-touchscreendisplay-raspberry-pi
Page 11 of 67
solder, shorts, or unsoldered pins.
Now we can attach the screen. Remove the two
thin tape cover strips.
Line up the screen on the white outline, make sure
there's some space from the header you just
soldered in and the metal sides of the screen. As
long as you don't really press down on the screen
you can reposition it once or twice.
© Adafruit Industries
https://learn.adafruit.com/adafruit-pitft-28-inch-resistive-touchscreendisplay-raspberry-pi
Page 12 of 67
Once you have the screen so it is definitely not
touching the header, you can gently press on the
sides to secure the tape.
If the protective plastic cover is still on the screen
you can press it against a clean table from above.
That way you will really securely attach it!
If you want to attach an Adafruit Cobbler or similar,
you can solder in the optional 2x13 IDC on the
bottom of the screen as shown here. This will keep
the top side clean and flat. Solder in all 26 pins
The picture shows a 2x13 male header. We've
since updated this product to include an IDC socket
so it's easier to add a cobbler. Both will work,
though!
© Adafruit Industries
https://learn.adafruit.com/adafruit-pitft-28-inch-resistive-touchscreendisplay-raspberry-pi
Page 13 of 67
You can attach a 26-pin IDC cable just make sure
the pin 1 indicator is on the right as indicated in this
photo - there's also a #1 marking on the PCB!
© Adafruit Industries
https://learn.adafruit.com/adafruit-pitft-28-inch-resistive-touchscreendisplay-raspberry-pi
Page 14 of 67
Easy Install
The PiTFT requires kernel support and a couple other things to make it a nice stand-alone display.
We have a detailed step-by-step setup for hackers who want to tweak, customize or understand the
PiTFT setup. If you just want to get going, check out the following for easy-install instructions!
Ready to go image
If you want to start with a fresh image, we have one for Raspbian - click here to download it and
install into a new SD card. Unzip and follow the classic SD card burning tutorials
(http://adafru.it/aMW)
Download PiTFT 2.8" Resistive Image
for Pi 1 and Pi 2 (March 3, 2015)
http://adafru.it/eIo
This image is customized for the RESISTIVE touch 2.8" TFT, also known as PID #1601! Not
for PID #1983
Previous images:
Raspbian 2014/06/20-based image (http://adafru.it/dSM)
Raspbian 2014/09/09-based image (http://adafru.it/e12)
DIY Installer script
If you don't want to download an image, you can run our installation package helper from inside
your existing Raspbian install. It will download the kernel add-ons, and configure your Pi for PiTFT
joy
The helper is available for perusal here (http://adafru.it/eIn) if you are interested in how it works
To download and run it, simply run the following commands:
curl -SLs https://apt.adafruit.com/add | sudo bash
sudo apt-get install -y adafruit-pitft-helper
The first command adds apt.adafruit.com to your repository list, so you can grab code directly from
adafruit's servers
© Adafruit Industries
https://learn.adafruit.com/adafruit-pitft-28-inch-resistive-touchscreendisplay-raspberry-pi
Page 15 of 67
The second does the actual download and installation, it'll take a while because there's a lot of
software to replace for PiTFT support
© Adafruit Industries
https://learn.adafruit.com/adafruit-pitft-28-inch-resistive-touchscreendisplay-raspberry-pi
Page 16 of 67
© Adafruit Industries
https://learn.adafruit.com/adafruit-pitft-28-inch-resistive-touchscreendisplay-raspberry-pi
Page 17 of 67
It's normal for the Pi to pause at this step for up to 20 minutes, theres a lot of kernel software
to replace
OK now the kernel is installed, all you have to do is run the helper which will configure the kernel
device tree overlays and add the few configurations to make the console show up, etc.
sudo adafruit-pitft-helper -t 28r
This will install the "2.8 Resistive" type of PiTFT into the current install.
At the end you will be prompted on whether you want the text console to appear on the PiTFT.
Answer Y or N depending on your personal desires!
© Adafruit Industries
https://learn.adafruit.com/adafruit-pitft-28-inch-resistive-touchscreendisplay-raspberry-pi
Page 18 of 67
You will also be prompted on whether you want one of the tactile buttons to act as an 'on off' switch.
Answer Y or N depending on your personal desires!
Thats it!
Run sudo reboot to try out your fancy new PiTFT :)
© Adafruit Industries
https://learn.adafruit.com/adafruit-pitft-28-inch-resistive-touchscreendisplay-raspberry-pi
Page 19 of 67
Detailed Installation
If you've grabbed our Easy Install image, or use the script, this step is not required, it's already
done! This is just for advanced users who are curious on how to configure and customize the
kernel install
In the next few steps we'll cover the detailed installation procedure. Chances are, you should grab
the Easy Install image or script. If you have some interest in the details of how we install the PiTFT
setup, read on!
In order to add support for the 2.8" TFT and touchscreen, we'll need to install a new Linux Kernel.
Lucky for you, we created a kernel package that you can simply install over your current Raspbian
(or Raspbian-derived) install instead of needing a whole new image. This makes it easier to keep
your install up-to-date.
To use our kernel .deb files you must be using Raspbian or derivative. This wont work with Arch or
other Linux flavors. As Raspbian is the official OS for the Pi, that's the only Linux we will support!
© Adafruit Industries
https://learn.adafruit.com/adafruit-pitft-28-inch-resistive-touchscreendisplay-raspberry-pi
Page 20 of 67
Others can recompile their own kernel using our patchfile (http://adafru.it/cY2), but we have no
tutorial or support or plans for such.
Before you start
You'll need a working install of Raspbian with network access. If you need help getting that far,
check out our collection of Pi tutorials (http://adafru.it/aWq).
We'll be doing this from a console cable connection, but you can just as easily do it from the direct
HDMI/TV console or by SSH'ing in. Whatever gets you to a shell will work!
Also, run sudo apt-get update !
To run these all the setup and config commands you'll need to be logged into a proper
Terminal - use ssh, a console cable, or the main text console (on a TV). The WebIDE console
may not work.
Download & Install Kernel
The only way we're distributing the PiTFT kernel packages right now is thru apt.adafruit.com so
you'll still need to run:
curl -SLs https://apt.adafruit.com/add | sudo bash
To add apt.adafruit.com to your list of software sources
© Adafruit Industries
https://learn.adafruit.com/adafruit-pitft-28-inch-resistive-touchscreendisplay-raspberry-pi
Page 21 of 67
Then install the kernel with
sudo apt-get install -y adafruit-pitft-helper
This will take a up to 20 minutes so go make a sandwich or coffee. It takes longer than it used to
because there's now 2 kernels (v6 and v7 arm) and 2 kernel module directories.
© Adafruit Industries
https://learn.adafruit.com/adafruit-pitft-28-inch-resistive-touchscreendisplay-raspberry-pi
Page 22 of 67
© Adafruit Industries
https://learn.adafruit.com/adafruit-pitft-28-inch-resistive-touchscreendisplay-raspberry-pi
Page 23 of 67
OK since you're not going to run the helper, lets add the device tree overlay manually. Edit
/boot/config with
sudo nano /boot/config
and add the following lines at the end:
[pi1]
device_tree=bcm2708-rpi-b-plus.dtb
[pi2]
device_tree=bcm2709-rpi-2-b.dtb
[all]
dtparam=spi=on
dtparam=i2c1=on
dtparam=i2c_arm=on
dtoverlay=pitft28r,rotate=90,speed=32000000,fps=20
© Adafruit Industries
https://learn.adafruit.com/adafruit-pitft-28-inch-resistive-touchscreendisplay-raspberry-pi
Page 24 of 67
Save the file. Now we'll just reboot to let it all sink in.
sudo shutdown -h now (if you don't have the TFT installed, shutdown, place the TFT on
the Pi and re-power)
or
sudo reboot (if you have the TFT plate installed already)
When the Pi restarts, the attached PiTFT should start out all white and then turn black. That means
the kernel found the display and cleared the screen. If the screen did not turn black, that means that
likely there's something up with your connection or kernel install. Solder anything that needs
resoldering!
Now that you're rebooted, log back in on the console/TV/SSH. There's nothing displayed on the
screen yet, we'll do a test to make sure everything is perfect first!
Run the following commands to startx on the /dev/fb1 framebuffer, a.k.a PiTFT screen:
© Adafruit Industries
https://learn.adafruit.com/adafruit-pitft-28-inch-resistive-touchscreendisplay-raspberry-pi
Page 25 of 67
sudo mv /usr/share/X11/xorg.conf.d/99-fbturbo.conf ~
export FRAMEBUFFER=/dev/fb1
startx
You should see the Pi desktop show up on the TFT! Congrats, you've completed the first test
perfectly.
Hit Control-C in the console to quit the X server so we can continue configuration
Next up we'll add support for the touch screen automatically on boot. Edit the module list with
sudo nano /etc/modules
and add stmpe-ts on a line at the end
© Adafruit Industries
https://learn.adafruit.com/adafruit-pitft-28-inch-resistive-touchscreendisplay-raspberry-pi
Page 26 of 67
Save the file and reboot the Pi with sudo reboot and look at the console output (or run dmesg in
the console window after logging in) you will see the modules install. Look in particular for the
STMPE610 detection and the ILI9340 screen frequency as highlighted here
We can set up the touchscreen for rotate=90 configuration by doing the following (for more delicate
calibration or for other rotate=XX values, see the next section)
Create the directory and new calibration configuration file:
sudo mkdir /etc/X11/xorg.conf.d
© Adafruit Industries
https://learn.adafruit.com/adafruit-pitft-28-inch-resistive-touchscreendisplay-raspberry-pi
Page 27 of 67
sudo nano /etc/X11/xorg.conf.d/99-calibration.conf
and enter in the following lines, then save.
Section "InputClass"
Identifier
"calibration"
MatchProduct "stmpe-ts"
Option "Calibration" "3800 200 200 3800"
Option "SwapAxes"
"1"
EndSection
You can now try to run X again with
FRAMEBUFFER=/dev/fb1 startx
Type Control-C to quit X
If you don't ever want to have to type FRAMEBUFFER=/dev/fb1 before startx, you can make it a
default state by editing your profile file: sudo nano ~/.profile and adding
export FRAMEBUFFER=/dev/fb1
© Adafruit Industries
https://learn.adafruit.com/adafruit-pitft-28-inch-resistive-touchscreendisplay-raspberry-pi
Page 28 of 67
near the top and saving the file. Then reboot to reload the profile file. It will now always assume you
want to use /dev/fb1
© Adafruit Industries
https://learn.adafruit.com/adafruit-pitft-28-inch-resistive-touchscreendisplay-raspberry-pi
Page 29 of 67
Touchscreen Install & Calibrate
If you've grabbed our Easy Install image, or use the script, this step is not required, it's already
done! This is just for advanced users who are curious on how to configure and customize the
touchscreen
Setting up the Touchscreen
Now that the screen is working nicely, we'll take care of the touchscreen. There's just a bit of
calibration to do, but it isn't hard at all.
Before we start, we'll make a udev rule for the touchscreen. That's because the eventX name of
the device will change a lot and its annoying to figure out what its called depending on whether you
have a keyboard or other mouse installed.
Run
© Adafruit Industries
https://learn.adafruit.com/adafruit-pitft-28-inch-resistive-touchscreendisplay-raspberry-pi
Page 30 of 67
sudo nano /etc/udev/rules.d/95-stmpe.rules
to create a new udev file and copy & paste the following line in:
SUBSYSTEM=="input", ATTRS{name}=="stmpe-ts", ENV{DEVNAME}=="*event*", SYMLINK+="input/touchscreen"
Remove and re-install the touchscreen with
sudo rmmod stmpe_ts; sudo modprobe stmpe_ts
Then type ls -l /dev/input/touchscreen
It should point to eventX where X is some number, that number will be different on different setups
since other keyboards/mice/USB devices will take up an event slot
© Adafruit Industries
https://learn.adafruit.com/adafruit-pitft-28-inch-resistive-touchscreendisplay-raspberry-pi
Page 31 of 67
There are some tools we can use to calibrate & debug the touchscreen. Install the "event test" and
"touchscreen library" packages with
sudo apt-get install evtest tslib libts-bin
Running evtest
Now you can use some tools such as sudo evtest /dev/input/touchscreen which will let you see
touchscreen events in real time, press on the touchscreen to see the reports.
© Adafruit Industries
https://learn.adafruit.com/adafruit-pitft-28-inch-resistive-touchscreendisplay-raspberry-pi
Page 32 of 67
AutoMagic Calibration Script
© Adafruit Industries
https://learn.adafruit.com/adafruit-pitft-28-inch-resistive-touchscreendisplay-raspberry-pi
Page 33 of 67
If you rotate the display you need to recalibrate the touchscreen to work with the new screen
orientation. You can manually run the calibration processes in the next section, or you can run a
small Python script which will automatically set a default touchscreen calibration based on the
screen orientation.
This helper is automatically installed for you but if you'd like you can check it out here on
github (http://adafru.it/eIu)
Run it at the command line with sudo adafruit-pitft-touch-cal
it will try to figure out what display you have installed and the rotation it's set up for
By default the script will attempt to read the screen orientation by examining the PiTFT module
configuration with modprobe. If the script can read the orientation it will print out the current
orientation, the current touchscreen calibration values, and the new touchscreen calibration values
baesd on the current orientation. Before updating the calibration the script will ask you to confirm
that you'd like to make the change. Press y and enter to confirm.
Try using this default calibration script to easily calibrate your touchscreen display. Note that the
calibration values might not be exactly right for your display, but they should be close enough for
most needs. If you need the most accurate touchscreen calibration, follow the steps in the next
section to manually calibrate the touchscreen.
© Adafruit Industries
https://learn.adafruit.com/adafruit-pitft-28-inch-resistive-touchscreendisplay-raspberry-pi
Page 34 of 67
Manual Calibration
If the "automagic" calibration technique isn't working for you, or you have some other setup where
you need to carefully calibrate you can do it 'manually'
You will want to calibrate the screen once but shouldn't have to do it more than that. We'll begin by
calibrating on the command line by running
sudo TSLIB_FBDEVICE=/dev/fb1 TSLIB_TSDEVICE=/dev/input/touchscreen
ts_calibrate
follow the directions on the screen, touching each point. Using a stylus is suggested so you get a
precise touch. Don't use something metal, plastic only!
You should see five crosshair targets. If you see less than that, the touchscreen probably
generated multiple signals for a single touch, and you should try calibrating again.
© Adafruit Industries
https://learn.adafruit.com/adafruit-pitft-28-inch-resistive-touchscreendisplay-raspberry-pi
Page 35 of 67
Next you can run sudo TSLIB_FBDEVICE=/dev/fb1 TSLIB_TSDEVICE=/dev/input/touchscreen
ts_test which will let you draw-test the touch screen. Go back and re-calibrate if you feel the screen
isn't precise enough!
X Calibration
You can also calibrate the X input system but you have to use a different program called
xinput_calibrator
You can do this if the calibration on the screen isnt to your liking or any time you change the
rotate=XX module settings for the screen. Since the screen and touch driver are completely
separated, the touchscreen doesn't auto-rotate
Normally you'd have to compile it but we have a ready to go package for you so run:
© Adafruit Industries
https://learn.adafruit.com/adafruit-pitft-28-inch-resistive-touchscreendisplay-raspberry-pi
Page 36 of 67
sudo apt-get install -y xinput-calibrator
Before you start the xinput_calibrator you will need to delete the old calibration data so run
sudo rm /etc/X11/xorg.conf.d/99-calibration.conf
Before running startx and the calibrator - otherwise it gets really confused!
Now you'll have to run the xcalibrator while also running X. You can do this by startx and then
opening up the terminal program and running the xinput_calibrator command (which is
challenging to do on such a small screen) OR you can do what we do which is run startx in a
SSH/Terminal shell and then run the xinput_calibrator from the same shell, which requires the
following command order:
FRAMEBUFFER=/dev/fb1 startx &
DISPLAY=:0.0 xinput_calibrator
Follow the directions on screen
Once complete you'll get something like:
© Adafruit Industries
https://learn.adafruit.com/adafruit-pitft-28-inch-resistive-touchscreendisplay-raspberry-pi
Page 37 of 67
Run sudo nano /etc/X11/xorg.conf.d/99-calibration.conf and copy the
Section "InputClass"
Identifier
"calibration"
MatchProduct "stmpe-ts"
Option "Calibration" "172 3763 3769 164"
Option "SwapAxes"
"1"
EndSection
or whatever you got, into there. You can quit X if you want by typing fg to bring that command into
the foreground, and then Control-C to quit.
Depending on the 'rotation' of the screen, when you do this calibration, you may need to
comment out the SwapAxes part with a # and/or swap the numbers around so looks like:
Option "Calibration" "119 3736 3850 174"
to
Option "Calibration" "3736 119 174 3850"
Your touchscreen is now super calibrated, hurrah!
© Adafruit Industries
https://learn.adafruit.com/adafruit-pitft-28-inch-resistive-touchscreendisplay-raspberry-pi
Page 38 of 67
© Adafruit Industries
https://learn.adafruit.com/adafruit-pitft-28-inch-resistive-touchscreendisplay-raspberry-pi
Page 39 of 67
Using the Console
If you've grabbed our Easy Install image, or use the script, this step is not required, it's already
done! This is just for advanced users who are curious on how to configure and customize the
console
One fun thing you can do with the display is have it as your main console instead of the HDMI/TV
output. Even though it is small, with a good font you can get 20 x 40 of text. For more details, check
out https://github.com/notro/fbtft/wiki/Boot-console (http://adafru.it/cXQ)
First up, we'll update the boot configuration file to use the TFT framebuffer /dev/fb1 instead of the
HDMI/TV framebuffer /dev/fb0
sudo nano /boot/cmdline.txt
you can also edit it by putting the SD card into a computer and opening the same file.
© Adafruit Industries
https://learn.adafruit.com/adafruit-pitft-28-inch-resistive-touchscreendisplay-raspberry-pi
Page 40 of 67
At the end of the line, find the text that says rootwait and right after that, enter in:
fbcon=map:10 fbcon=font:VGA8x8 then save the file.
On the next boot, it will bring up the console.
Note that the kernel has to load up the display driver module before it can display anything
on it so you won't get the rainbow screen, a NooBs prompt, or a big chunk of the kernel
details since the module is loaded fairly late in the boot process.
I think the VGA8x8 font is a bit chunky, you probably want 12x6 which is what is shown in the photo
above. To change the font, run sudo dpkg-reconfigure console-setup and go thru to select
Terminus 6x12
© Adafruit Industries
https://learn.adafruit.com/adafruit-pitft-28-inch-resistive-touchscreendisplay-raspberry-pi
Page 41 of 67
© Adafruit Industries
https://learn.adafruit.com/adafruit-pitft-28-inch-resistive-touchscreendisplay-raspberry-pi
Page 42 of 67
Turn off Console Blanking
You may notice the console goes black after 30 minutes, this is a sort of 'power saving' or
'screensaver' feature. You can disable this by editing /etc/kbd/config and setting the blank time to
0 (which turns it off)
BLANK_TIME=30
© Adafruit Industries
https://learn.adafruit.com/adafruit-pitft-28-inch-resistive-touchscreendisplay-raspberry-pi
Page 43 of 67
Playing Videos
How To Play Videos
You can play many types of videos on the screen, using mplayer you don't even need to run X and
you can script the movies to play using Python. We'll show you how to just play one video for now.
To demo, we'll use an mp4 of Big Buck Bunny for 320 pixel wide screens. Below we show you how
to create/resize videos, but to make it easy, just download our version with:
wget http://adafruitdownload.s3.amazonaws.com/bigbuckbunny320p.mp4 (http://adafru.it/cXR)
The video is 30MB which is a lot if you haven't expanded your SD card yet. Before you do this,
run sudo raspi-config to expand the SD card so you don't run out of space!
If you don't have mplayer yet, run
© Adafruit Industries
https://learn.adafruit.com/adafruit-pitft-28-inch-resistive-touchscreendisplay-raspberry-pi
Page 44 of 67
sudo apt-get update
sudo apt-get install mplayer
to install it. It may take a few minutes to complete
OK now you just have to run
mplayer -vo fbdev2:/dev/fb1 -x 240 -y 320 -framedrop bigbuckbunny320p.mp4
if your video is not sized for 320 wide, you may need to add a -zoom after -framedrop so that it will
resize - note that this is quite taxing for the Pi, so it may result in a choppy or mis-synced video!
© Adafruit Industries
https://learn.adafruit.com/adafruit-pitft-28-inch-resistive-touchscreendisplay-raspberry-pi
Page 45 of 67
Converting/Resizing Videos
It's possible to play full length videos on the TFT plate, but since the screen is small and the Pi cant
use hardware accelleration to play the videos its best to scale them down to 320x240 pixels. This
will be easier for the Pi to play and also save you tons of storage space. For this demo, we'll be
using the famous Big Buck Bunny (http://adafru.it/cXS) video, which is creative commons and also
very funny!
You can download it from the link above, we'll be using the 720p AVI version.
© Adafruit Industries
https://learn.adafruit.com/adafruit-pitft-28-inch-resistive-touchscreendisplay-raspberry-pi
Page 46 of 67
To do the conversion itself, we suggest HandBrake (http://adafru.it/cXT) which works great and is
open source so it runs on all operating systems! Download and install from the link. Then run the
installed application and open up the AVI file from before. The app will pre-fill a bunch of information
about it.
© Adafruit Industries
https://learn.adafruit.com/adafruit-pitft-28-inch-resistive-touchscreendisplay-raspberry-pi
Page 47 of 67
Under Destination click Browse... to select a new MP4 file to save. Then under Picture change the
Width to 320 (the height will be auto-calculated)
Click START to begin the conversion, it will take a minute or two.
© Adafruit Industries
https://learn.adafruit.com/adafruit-pitft-28-inch-resistive-touchscreendisplay-raspberry-pi
Page 48 of 67
That's it! You now have a smaller file. Don't forget to play it on your computer to make sure it plays
right before copying it to your Pi
© Adafruit Industries
https://learn.adafruit.com/adafruit-pitft-28-inch-resistive-touchscreendisplay-raspberry-pi
Page 49 of 67
Displaying Images
You can display every day images such as GIFs, JPGs, BMPs, etc on the screen. To do this we'll
install fbi which is the frame buffer image viewer (not to be confused with the FBI agency!)
sudo apt-get install fbi will install it
Grab our lovely wallpaper with
wget http://adafruitdownload.s3.amazonaws.com/adapiluv320x240.jpg (http://adafru.it/cXU)
© Adafruit Industries
https://learn.adafruit.com/adafruit-pitft-28-inch-resistive-touchscreendisplay-raspberry-pi
Page 50 of 67
and view it with
sudo fbi -T 2 -d /dev/fb1 -noverbose -a adapiluv320x240.jpg
That's it!
© Adafruit Industries
https://learn.adafruit.com/adafruit-pitft-28-inch-resistive-touchscreendisplay-raspberry-pi
Page 51 of 67
Extras!
Controlling the backlight
There's a 4-LED backlight on the TFT and it draws ~75mA at all times. There might be times you'd
like to save some power and turn off the backlight. The screen and touchplate will still work, you just
can't see anything. We designed the board with the STMPE610 touchscreen controller which has 2
extra GPIO and tied one of them to the transistor that controls the backlight. You can use the
command line to control the backlight.
Start by getting access to the GPIO by making a device link
sudo sh -c "echo 508 > /sys/class/gpio/export"
ls -l /sys/class/gpio
Once you verify that you see GPIO #508, then you can set it to an output, this will turn off the
display since it will output 0 by default
sudo sh -c "echo 'out' > /sys/class/gpio/gpio508/direction"
Then turn the display back on with
sudo sh -c "echo '1' > /sys/class/gpio/gpio508/value"
or back off
sudo sh -c "echo '0' > /sys/class/gpio/gpio508/value"
© Adafruit Industries
https://learn.adafruit.com/adafruit-pitft-28-inch-resistive-touchscreendisplay-raspberry-pi
Page 52 of 67
Tactile switch as power button
Its a good idea to safely turn off your Pi with a good sudo shutdown -h now but that often means
pulling out a keyboard or connecting to the console. With our kernel we added a cool module that
will let you turn any GPIO into a power button. Since there's a couple of tactile switches right there
on the front, lets turn one into a power button. Press once to properly turn off the pi, press again to
start it up. Isn't that nice?
We'll be using GPIO #23, the left-most button. You can use any of them or other GPIO but #23's our
favorite number anyways.
You will have to grab a pack of slim tactile switches (http://adafru.it/1489) or otherwise solder in a
button
Add rpi_power_switch to /etc/modules and save
Now create a new conf file or edit our existing one with
sudo nano /etc/modprobe.d/adafruit.conf
and enter in the line
© Adafruit Industries
https://learn.adafruit.com/adafruit-pitft-28-inch-resistive-touchscreendisplay-raspberry-pi
Page 53 of 67
options rpi_power_switch gpio_pin=23 mode=0
Of course, change the gpio_pin setting to some other # if you wish. mode=0 means its a
pushbutton not a switch. If you happen to install an on/off switch, use mode=1
To make it active immediately run sudo modprobe rpi_power_switch
Making it easier to click icons in X
If you want to double-click on icons to launch something in X you may find it annoying to get it to
work right. In LXDE you can simply set it up so that you only need to single click instead of double.
From LXDE launch the file manager (sorry these pix are grayscale, still figuring out how to
screenshot the framebuffer!)
© Adafruit Industries
https://learn.adafruit.com/adafruit-pitft-28-inch-resistive-touchscreendisplay-raspberry-pi
Page 54 of 67
Then under the Edit menu, select Preferences
Then select Open files with single click and close the window (you'll need to drag it over to get to
the X button
© Adafruit Industries
https://learn.adafruit.com/adafruit-pitft-28-inch-resistive-touchscreendisplay-raspberry-pi
Page 55 of 67
Boot to X Windows on PiTFT
To enable booting straight to X windows on the PiTFT follow the steps below. First make sure a
display configuration which would conflict is not present by executing in a terminal on the Pi:
sudo mv /usr/share/X11/xorg.conf.d/99-fbturbo.conf ~
Don't worry if the command fails with an error that the file doesn't exist. This failure is normal and
should happen on a good PiTFT install. You can ignore it and move on.
Next run the command below to open the nano text editor as root and create the
file /usr/share/X11/xorg.conf.d/99-pitft.conf:
sudo nano /usr/share/X11/xorg.conf.d/99-pitft.conf
When the editor loads to a blank file, copy in the text below:
Section "Device"
Identifier "Adafruit PiTFT"
Driver "fbdev"
Option "fbdev" "/dev/fb1"
EndSection
Then save the file by pressing Ctrl-O and then enter, and finally exit by pressing Ctrl-X.
The step above will create a configuration file which tells X windows that it should use the PiTFT
framebuffer (located at /dev/fb1) by default when it runs.
At this point you can use the raspi-config tool to enable booting to desktop just like normal on the Pi.
Run the following command:
sudo raspi-config
Then pick the Enable Boot to Desktop/Scratch option and choose if you want to boot to the
console, desktop, or scratch environment. After exiting the tool and rebooting you should see the Pi
load X windows on the PiTFT after (be patient it can take around 30 seconds to load).
If you want to disable booting to X, just use the raspi-config command again to choose the console
boot option.
© Adafruit Industries
https://learn.adafruit.com/adafruit-pitft-28-inch-resistive-touchscreendisplay-raspberry-pi
Page 56 of 67
© Adafruit Industries
https://learn.adafruit.com/adafruit-pitft-28-inch-resistive-touchscreendisplay-raspberry-pi
Page 57 of 67
Gesture Input
With the PiTFT touchscreen and xstroke (http://adafru.it/dD0) you can enter text in applications by
drawing simple character gestures on the screen! Check out the video below for a short
demonstration and overview of gesture input with xstroke:
Installation
Unfortunately xstroke hasn't been actively maintained for a few years so there isn't a binary
package you can directly install. However compiling the tool is straightforward and easy with the
steps below. Credit for these installation steps goes to mwilliams03 at
ozzmaker.com (http://adafru.it/dD1).
First install a few dependencies by opening a command window on the Pi and executing:
sudo apt-get -y install build-essential libxft-dev libxpm-dev libxtst-dev
Now download, compile, and install xstroke by executing:
cd ~
wget http://mirror.egtvedt.no/avr32linux.org/twiki/pub/Main/XStroke/xstroke-0.6.tar.gz
tar xfv xstroke-0.6.tar.gz
cd xstroke-0.6
./configure
make
sudo make install
If the commands above execute successfully xstroke should be installed. If you see an error
message, carefully check the dependencies above were installed and try again.
Once xstroke is installed you will want to add a couple menu shortcuts to start and stop xstroke.
Execute the following commands to install these shortcuts:
wget https://github.com/adafruit/PiTFT_Extras/raw/master/xstroke.desktop
wget https://github.com/adafruit/PiTFT_Extras/raw/master/xstrokekill.desktop
sudo cp xstroke*.desktop /usr/share/applications/
Usage
To use xstroke I highly recommend using a plastic stylus instead of your finger. Also calibrate the
touchscreen for X-Windows (http://adafru.it/dD2) so you have the best control over the cursor
possible.
© Adafruit Industries
https://learn.adafruit.com/adafruit-pitft-28-inch-resistive-touchscreendisplay-raspberry-pi
Page 58 of 67
Don't use a ballpoint pen or sharp metal stylus as it could scratch or damage the touchscreen!
Start X-Windows on the PiTFT and open the LXDE menu by clicking the icon in the lower left corner.
Scroll up to the Accessories menu at the top and notice the new XStroke and XStroke Kill
commands.
Click the XStroke menu option to start xstroke. You should see a small pencil icon appear on the
bottom right side of the screen. The pencil icon means xstroke is running, however by default it's not
yet looking for gesture input.
Open an application that takes text input, such as LXTerminal. To enable gesture input click the
xstroke pencil icon. You should see the pencil turn green and the text 'abc' written over top of the
icon. You might need to click the icon a few times to get the click to register in the right spot.
When xstroke is looking for gesture input you can drag the mouse cursor in a gesture anywhere on
the screen to send specific key strokes. Here's a picture of the possible gestures you can send:
© Adafruit Industries
https://learn.adafruit.com/adafruit-pitft-28-inch-resistive-touchscreendisplay-raspberry-pi
Page 59 of 67
(credit to Carl Worth for the image above)
To draw a gesture from the above image, press anywhere on the screen, start from the circle in the
gesture, and follow the gesture pattern towards the arrow. As you draw a gesture you should see a
blue line displayed that shows what you've drawn. Lift up the stylus when you get to the end of the
gesture at the arrow. If xstroke recognizes the gesture it will send the appropriate key press to the
active window. Try drawing a few characters from the image above to get the hang of writing
gestures.
A few very useful gestures are backspace (which deletes a character), return/enter, and space. To
draw a backspace gesture just draw a line going from the right side of the screen to the left side.
The gesture for return/enter is a diagonal line from the top right to bottom left. Finally a space is a
straight line from the left to the right.
Note that when xstroke is looking for gestures you might not be able to click or control the cursor as
you normally would expect. To stop xstroke's gesture recognition carefully press the xstroke pencil
icon again until the 'abc' text disappears. I've found this process can be a little finicky as the icon is
© Adafruit Industries
https://learn.adafruit.com/adafruit-pitft-28-inch-resistive-touchscreendisplay-raspberry-pi
Page 60 of 67
very small and any movement will be interpreted as a gesture. Use a light touch and try a few times
to click the icon.
If you get stuck completely and can't disable xstroke by clicking the icon, connect to the Raspberry
Pi in a terminal/SSH connection and run 'killall xstroke' (without quotes) to force xstroke to quit. The
normal way to stop xstroke is to navigate to the Accessories -> XStroke Kill command, but you
might not be able to do that if xstroke is listening for gesture input.
Have fun using xstroke to control your Pi by writing gestures on the PiTFT screen!
© Adafruit Industries
https://learn.adafruit.com/adafruit-pitft-28-inch-resistive-touchscreendisplay-raspberry-pi
Page 61 of 67
FAQ
My PiTFT used to work, now it doesn't!
Did you do an apt-get upgrade ? this command blows away the PiTFT kernel which means that
you will no longer have PiTFT support, you will have to redo the easy-install steps to reinstall
the kernel
My PiTFT works for a bit and then I get a black screen with a short line of white pixels in one
corner
Sounds like you tried to configure your Pi to 'boot straight to X', that is, start up the graphics
interface on boot. This doesn't work by default because the Pi operating system is not expecting
a PiTFT so it boots to the HDMI output. See below for how to set up your Pi to boot to X on the
PiTFT
To 'fix' this, you can either connect an HDMI monitor, then in a terminal window run sudo raspiconfig and configure the Pi to boot to the command line not X! If you do not have an HDMI
monitor, you can also try a console cable
How can I force the Pi to bring up X on the HDMI/TV monitor?
Use the fb0 framebuffer when you want to display stuff on the HDMI/TV display, for example:
FRAMEBUFFER=/dev/fb0 startx
will use the HDMI/TV framebuffer for X windows instead of the PiTFT
That doesn't work! I can't get X on HDMI!
If both
FRAMEBUFFER=/dev/fb0 startx &
and
FRAMEBUFFER=/dev/fb1 startx &
wind up showing the GUI on your PiTFT, enter the following instruction from the command line:
sudo mv /usr/share/X11/xorg.conf.d/99-fbturbo.conf ~
I'm tring to run startx and I get FATAL: Module g2d_23 not found.
don't forget you have to remove the turbo file!
sudo mv /usr/share/X11/xorg.conf.d/99-fbturbo.conf ~
Why doesn't the tactile button on GPIO #21 work?
On some older PiTFTs we had one of the buttons labeled #21 - that's the original RasPi name
for that pin. If you're using a V2 (chance is, you are!) that is now called #27.
All the PiTFT's we ship now have the button labeled #21 and #27
I want better performance and faster updates!
You can change the SPI frequency (overclock the display) by editing /boot/config.txt and
© Adafruit Industries
https://learn.adafruit.com/adafruit-pitft-28-inch-resistive-touchscreendisplay-raspberry-pi
Page 62 of 67
changing the dtoverlay options line to:
dtoverlay=pitft28r,rotate=90,speed=62000000,fps=25
Or whatever you like for speed, rotation, and frames-per-second. BUT, here's the thing, the Pi
only supports a fixed number of SPI frequencies. So tweaking the number a little won't do
anything. The kernel will round the number to the closest value. You will always get frequencies
that are 250MHz divided by an even number. Here's the only SPI frequencies this kernel
supports
15,625,000
17,857,142
20,833,333
25,000,000
31,250,000
41,666,666
62,500,000
(a.k.a 16000000 = 16 MHz)
(a.k.a. 18000000 = 18 MHz)
(a.k.a 21000000 = 21 MHz)
(= 25 MHz)
(a.k.a 32000000 = 32MHz)
(a.k.a 42000000 = 42MHz)
(a.k.a 62000000 = 62MHz)
So if you put in 48000000 for the speed, you won't actually get 48MHz, you'll actually only get
about 42MHz because it gets rounded down. We tested this display nicely with 32MHz and we
suggest that. But you can put in 42MHz or even try 62MHz and it will update faster
You can tweak fps (frames per second) from 20 to 60 and frequency up to 62MHz for tradeoffs
in performance and speed. Reboot after each edit to make sure the settings are loaded properly.
There's a trade off that if you ask for higher FPS you're going to load the kernel more because
it's trying to keep the display updated.
How can I take screenshots of the little screen?
We took the screenshots for this tutorial with
(http://adafru.it/diV)fbgra (http://adafru.it/diV)b (http://adafru.it/diV)
wget http://fbgrab.monells.se/fbgrab-1.2.tar.gz (http://adafru.it/diW)
tar -zxvf fbgrab*gz
cd fbgrab/
make
./fbgrab screenshot.png
© Adafruit Industries
https://learn.adafruit.com/adafruit-pitft-28-inch-resistive-touchscreendisplay-raspberry-pi
Page 63 of 67
How do I automatically boot to X windows on the PiTFT?
Once you have a PiTFT installation setup you can add a custom X windows configuration to use
the PiTFT by default. Then you can use the normal raspi-config boot to console/desktop options
to control if the Pi boots to a console or desktop. See the detailed instructions on this page of
the guide (http://adafru.it/e1s) for more information.
My screen isn't working/works erratically/looks funny
Check to make syre that the flat flex cable is fully seated in the connetor and the 'ears' are
pushed in to secure it. See the picture for what it should look like:
© Adafruit Industries
https://learn.adafruit.com/adafruit-pitft-28-inch-resistive-touchscreendisplay-raspberry-pi
Page 64 of 67
© Adafruit Industries
https://learn.adafruit.com/adafruit-pitft-28-inch-resistive-touchscreendisplay-raspberry-pi
Page 65 of 67
Downloads
The latest kernel fork that adds all the TFT, touchscreen, and other addons is here on
github (http://adafru.it/dcA)
Datasheet for the 'raw' 2.8" TFT display (http://adafru.it/d4m)
Schematic & Layout
© Adafruit Industries
https://learn.adafruit.com/adafruit-pitft-28-inch-resistive-touchscreendisplay-raspberry-pi
Page 66 of 67
© Adafruit Industries
Last Updated: 2015-03-13 05:30:16 PM EDT
Page 67 of 67
© Copyright 2026 Paperzz