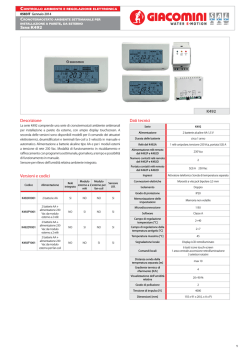
PROGRAMMATORE PER CRONOTERMOSTATO K470H
PROGRAMMER FOR CHRONOTHERMOSTAT K470H
K471
italiano
pag. 2
english
pag. 8
Leggere attentamente queste istruzioni prima di installare il dispositivo e conservarle per
successive consultazioni ed allegarla al dispositivo qualora sia ceduto a terzi.
La chiave programmabile K471 è compatibile con la porta USB di qualsiasi PC, mentre invece il
cavetto con il connettore Mini-USB è utilizzabile esclusivamente per il collegamento con la porta
di programmazione dei cronotermostati K470H.
Non collegare altri dispositivi dotati di porta Mini-USB per evitare il danneggiamento irreversibile
del dispositivo.
K471 non si presta all’uso come memoria di massa portatile.
1 DESCRIZIONE PRODOTTO
LED verde
Connettore Mini-USB
per cronotermostato
K470H
Connettore USB
per connessione PC
LED rosso
2 INSTALLAZIONE
Inserire il connettore USB in una porta USB libera del PC.
Se la chiave è collegata correttamente, il LED rosso si accende e sullo schermo compare una
finestra di dialogo.
Accedere alla cartella, selezionare “Programmatore_start” ed avviare il software direttamente
dalla chiave.
La procedura può durare alcuni minuti.
Il LED verde lampeggia segnalando lo scambio dati tra il PC e la chiave.
A seconda della configurazione di sistema, è possibile che la finestra di dialogo di cui sopra non
compaia automaticamente. Ciò può avvenire per i seguenti motivi:
l’auto esecuzione non è attiva oppure il sistema operativo non supporta l’esecuzione automatica
dei dispositivi USB ad es. Windows 7.
In tal caso, procedere aprendo la cartella del supporto dati con il nome “Programmatore” in “Esplora
risorse” ed avviare il software facendo clic su “Programmatore_start”.
2
italiano
Una volta estratta K471 mantiene i dati salvati in una memoria non volatile.
La chiave è dotata di una “riserva di carica” che accumula energia ed alimenta l’orologio
incorporato fornendo un’autonomia di 7 ore (lasciare inserita la chiave per almeno 1 min.).
L’orologio è inizializzato nel corso del collegamento al PC e permette, oltre alla programmazione
dei profili, l’impostazione dell’ora esatta sul cronotermostato K470H. Una volta esaurita la riserva
di carica, sarà sempre possibile scaricare i profili orari sul cronotermostato K470H, ma in tal caso
l’impostazione di data ed ora correnti dovrà essere effettuata manualmente tramite menù.
3 CREAZIONE DEI PROFILI AMBIENTE
Il primo avvio del software, il profilo ambiente “P01” è impostato con i valori predefiniti di
fabbrica.
IMPOSTARE UNA FASCIA ORARIA COMFORT
Per definire una fascia oraria di riscaldamento COMFORT posizionare il puntatore sull’ora d’inizio
e muovere la rotella di scorrimento del mouse. Girare la rotella verso l’alto o verso il basso per
impostare la fine della fascia oraria (la fine della fascia oraria può essere impostata anche tramite i
tasti “freccia destra” o “freccia sinistra” della tastiera).
Ripetere gli stessi passaggi per definire le prossime fasce orarie e gli altri giorni della settimana.
Con gli appositi pulsanti posti sopra la barra oraria è possibile organizzare la settimana in singoli
giornate oppure in raggruppamenti alternativi: Lu–Ve uguale, Lu-Do uguale, Sa-Do uguale.
MODIFICARE UNA FASCIA ORARIA COMFORT
Per modificare una fascia oraria di riscaldamento COMFORT, posizionare il puntatore del mouse
all’interno dell’area rossa della fascia in questione ed agire sulla rotella del mouse per aumentare o
ridurre la durata della fascia stessa. Per modificarne l’inizio, agire nello stesso modo tenendo però
premuto sulla tastiera il tasto Shift ñ.
ANNULLARE UNA FASCIA ORARIA COMFORT
Per annullare una fascia oraria di riscaldamento COMFORT posizionare il puntatore sulla fascia in
questione e premere il pulsante destro del mouse. Sullo schermo compare un menu contestuale
che permette, tra l’altro, di annullare la fascia oraria selezionata.
italiano
3
4 DESCRIZIONE INTERFACCIA GRAFICA DEL SOFTWARE
E DELLE PRINCIPALI FUNZIONI
L’istogramma rappresenta la programmazione settimanale delle fasce orarie di riscaldamento
COMFORT ed ECONOMY; i giorni della settimana sono rappresentati orizzontalmente (da
sinistra verso destra, iniziando dalle ore 0:00) uno sotto l’altro.
4
italiano
italiano
5
visualizza le
informazioni di stato
ed i suggerimenti
operativi testuali.
Barra di stato:
sono disponibili oltre
alla scheda principale
“Programma
settimanale”
le schede “Ferie” e
“Panoramica”.
Selezione delle
altre schede:
scelta profili da
programmare,
duplicare o annullare
con i tasti “Duplica “ e
“Annulla tutto”.
Profilo ambiente:
ECONOMY
COMFORT
Sezione profili ambiente:
Menu scelta funzioni:
tasto per eseguire il salvataggio
del profilo o delle modifiche
effettuate.
i tasti permettono di scegliere l’organizzazione
settimanale in fasce per singoli giorni,
per giorni feriali, per week-end ecc.
www.giacomini.com
Salva:
Organizzazione della settimana:
5 ALTRE FUNZIONI
MENU CONTESTUALE
Nella sezione profilo ambiente dello schermo, cliccando con il pulsante destro del mouse, compare
un menu i cui comandi consentono di annullare o impostare una fascia oraria di COMFORT.
ASSEGNARE UN NOME AI DIVERSI PROFILI AMBIENTE
Per facilitarne l’identificazione, ciascuno dei 10 profili ambiente può essere salvato con un nome
specifico ad esempio: cucina, soggiorno etc.
IMPOSTARE LA TEMPERATURA “COMFORT” ED “ECONOMY”
Le temperature di COMFORT (Tmax) ed ECONOMY (Tmin) possono essere impostate, con
risoluzione di 0,5°C, agendo sui cursori delle rispettive caselle.
IMPOSTARE UN VALORE DI “OFFSET”
La temperatura di una determinata zona del locale può differire da quella di riferimento misurata
in corrispondenza del radiatore. Se, ad esempio, invece dei 21°C impostati ne vengono rilevati
soltanto 19, l’utente può selezionare un valore di offset pari a 2 °C.
PROTEZIONE BAMBINI
Per ciascun profilo è possibile abilitare o meno la funzione “protezione bambini” per evitare
improprie operatività sul cronotermostato K470H.
FERIE
In questa scheda è possibile definire le giornate o gli intervalli di ferie pianificati, in corrispondenza
dei quali il cronotermostato regolerà la temperatura in base ai valori di ECONOMY impostati in
questa sezione.
PANORAMICA
In questa scheda viene visualizzata una panoramica dei profili impostati.
STAMPA
Con questa funzione è possibile visualizzare una panoramica della programmazione dei profili ed
eventualmente stamparla.
PROTEZIONE PROGRAMMA CON PASSWORD
Nel menù “File” è possibile impostare una password di protezione.
La password sarà richiesta al successivo avvio del software. Se si dimentica la password, rivolgersi
al ns. servizio tecnico.
6
italiano
6 SALVATAGGIO PROFILI NELLA CHIAVE
Completata la programmazione o la modifica dei profili ambiente, salvare le modifiche
apportate sulla chiave cliccando su “Salva” oppure selezionando il comando “Salva” del menu
“File”. Estrarre quindi la chiave dalla porta USB. N.B. Salvare sempre il profilo ambiente impostato
selezionando l’apposito tasto funzione del menu.
7 TRASFERIMENTO PROFILO AL CRONOTERMOSTATO
Per trasferire il profilo settimanale il cronotermostato
deve già essere installato sulla valvola. Vedi istruzioni
d’uso del cronotermostato K470H.
Inserire il connettore Mini-USB del K471 nel
connettore presente sul cronotermostato K470H.
Sul
visualizzatore
del
cronotermostato,
scompariranno le normali indicazioni ed apparirà la
scritta P01, (Profilo ambiente 1).
Selezionare con la rotella del cronotermostato il
profilo che si vuole impostare, scegliendo l’indice
numerico del profilo tra quelli programmati con il software.
Premendo il tasto PROG, i parametri del profilo che è stato selezionato vengono trasferiti dalla
chiave al cronotermostato. A programmazione conclusa, sul display compaiono le normali
visualizzazioni. Se per 10 sec. non viene scorsa la lista dei profili ambiente il display ritornerà a
visualizzare le consuete indicazioni. In tal caso, se necessario, estrarre ed inserire nuovamente
la chiave.
8 DATI TECNICI
Conforme alle norme tecniche EN55014-1:2006, EN55022:2006,
EN55024:1998+A1:2001+A2:2003, EN61000-4-2, EN61000-4-2/01, EN61000-4-3, EN 61000-43/06+A1 e conforme alla Direttiva 2004/108/CE;
Alimentazione: 5 Vcc max. 100 mA via porta USB;
Porta seriale verso PC: USB 1.1 o 2.0
Porta seriale verso K470H: interfaccia e protocollo proprietari;
Requisiti di sistema: Windows XP® o superiore
Segnalazioni locali: 2 LEDs
Grado di protezione: IP30
Temperatura di esercizio: 0÷50 °C
Temperatura di stoccaggio: -20÷70 °C
Involucro in ABS trasparente.
italiano
7
Read these instructions carefully before installing the device, and keep them for future
consultation. Remember to pass them on with the device if it is ceded to third parties.
The programmable key K471 is compatible with the USB port of any PC, but the cable with
the Mini-USB connector can only be used for connecting to the programming port of the
chronothermostat K470H.
Do not connect any other devices fitted with a Mini-USB port, as this could irreversibly damage
the device.
The K471 cannot be used as a portable mass memory.
1 DESCRIPTION OF THE PRODUCT
Green LED
Mini-USB connector
for chronothermostat
K470H
USB connector
for PC connection
Red LED
2 INSTALLATION
Insert the USB connector in a free USB port on the PC.
If the key is correctly inserted, the red LED will light up and a dialogue window will appear on
the screen.
Access the folder and select “Programmer_start”, then launch the software directly from the
key.
This procedure may take a few minutes.
The green LED will flash, indicating the exchange of data between the PC and the key.
Depending on the system configuration, the above-mentioned dialogue window may not
appear automatically. This is because:
the auto-run function is not active, or the operating system (e.g. Windows 7) does not support
the automatic execution of USB devices.
In this case, open the data support folder with the name “Programmer” in “File Explorer” then
launch the software by clicking on “Programmer_start”.
8
english
After being taken out, the K471 keeps the stored data in a non-volatile memory.
The key has a “charge reserve” that accumulates energy and powers the built-in clock, ensuring 7
hours of autonomy (leave the key inserted for at least 1 min).
The clock is initialised during the connection to the PC and allows you not only to programme the
profiles but also set the exact time on the chronothermostat K470H. Once the charge reserve is
consumed, you can still upload the hourly profiles onto the chronothermostat K470H but, in this
case, the current date/time must be manually set via the menu.
3 CREATING AMBIENT PROFILES
When the software is first launched, the “P01” ambient profile is set with the pre-defined factory
values.
SETTING A COMFORT TIME BAND
To define a time band for COMFORT heating, position the cursor on the start time and move the
scroll wheel of the mouse. Turn the wheel upwards or downwards to set the end of the time band
(which can also be set via the “right arrow” or “left arrow” key on the keyboard).
Repeat the same steps to define the subsequent time bands and the other days of the week. Use
the relevant buttons beneath the time bar to organise the week into single days or groups: MonFri the same, Mon-Sun the same, Sat-Sun the same.
MODIFYING A COMFORT TIME BAND
To modify a COMFORT heating time band, position the cursor inside the red area of the band in
question and turn the mouse wheel to increase or reduce the duration of that band. To alter the
start time, perform the same operation but hold down the Shift ñ key on the keyboard.
ANNULLING A COMFORT TIME BAND
To annul a COMFORT heating time band, position the cursor on the band in question and press
the right-hand mouse button. A context menu will appear on the screen; amongst other things, it
allows you to annul the selected time band.
english
9
4 DESCRIPTION OF THE GRAPHIC SOFTWARE INTERFACE
AND ITS MAIN FUNCTIONS
The histogram represents the weekly programming of the COMFORT and ECONOMY heating
time bands; the days of the week are listed horizontally (from left to right, starting at 0:00), one
beneath the other.
10
english
english
11
shows status
information and
operating tips
Status bar:
apart from the main
“Weekly program” card,
there are also
“Holidays” and
“Overview” cards
Selecting other cards:
use the “Duplicate“
and “Annul all” keys to
choose the profiles to
programme, duplicate
or annul
Ambient profile:
ECONOMY
COMFORT
Ambient profile section:
Function menu:
use this key to save the profile or
modifications
use these keys to organise the week into time
bands for single days, weekdays, weekends, etc.
www.giacomini.com
Saving:
Organising the week:
5 OTHER FUNCTIONS
CONTEXT MENU
In the "ambient profile" section of the screen, you can click with the right-hand mouse button to
draw up a menu whose commands are used to set or annul a COMFORT time band.
ASSIGNING A NAME TO THE VARIOUS AMBIENT PROFILES
To make it easier to identify them, each of the 10 ambient profiles can be saved with a specific
name. For example: kitchen, living room, etc.
SETTING THE “COMFORT” AND “ECONOMY” TEMPERATURES
The COMFORT (Tmax) and ECONOMY (Tmin) temperatures can be set - with a resolution of 0,5
°C - via the cursors of the respective boxes.
SETTING AN “OFFSET” VALUE
The temperature in a specific area of the room may differ from the reference temperature measured
on the radiator. If, for example, a value of 21 °C is set but the real temperature is just 19 °C, the user
can select an offset value of 2 °C.
CHILD PROTECTION
For each profile, you can enable or disable the “child protection” function to avoid any improper
use of the chronothermostat K470H.
HOLIDAYS
On this card you can define scheduled holiday days or periods, during which the
chronothermostat will adjust the temperature on the basis of the ECONOMY values set in this
section.
OVERVIEW
This card gives an overview of the set profiles.
PRINTING
With this function you can see an overview of the profile programming and, if necessary, print it.
PROTECTING THE PROGRAM WITH A PASSWORD
In the “File” menu, you can set a protection password.
This password will be requested at the next software start-up. If you forget the password,
contact our technical service.
12
english
6 SAVING PROFILES ON THE KEY
After programming or modifying the ambient profiles, save the modifications on the key by
clicking on “Save” or selecting the “Save” command in the “File” menu, then remove the key
from the USB port. NB: always save the set ambient profile by selecting the relevant function
key of the menu.
7 TRANSFERRING A PROFILE TO THE CHRONOTHERMOSTAT
To transfer the weekly profile, the chronothermostat
must already be installed on the valve. Refer to the
user instructions for the chronothermostat K470H.
Insert the Mini-USB connector of the K471 in the
connector on the chronothermostat K470H.
The standard information will disappear from the
chronothermostat display, replaced by P01 (Ambient
profile 1).
Using the chronothermostat wheel, select the
required ambient profile; choose the numerical index
of the profile from those previously programmed with the software.
When you press the PROG key, the parameters of the selected profile are transferred from the key
to the chronothermostat. When the programming procedure has been completed, the standard
information will return on the display. If the list of ambient profiles is not viewed within 10
seconds, the display will resume the usual indications. In this case (and if necessary), take the
key out and then insert it again.
8 TECHNICAL DATA
Compliance with technical standards EN55014-1:2006, EN55022:2006,
EN55024:1998+A1:2001+A2:2003, EN61000-4-2, EN61000-4-2/01, EN61000-4-3, EN 61000-43/06+A1, and with Directive 2004/108/EC
Power supply: 5 Vdc max. 100 mA via USB port
Serial port to PC: USB 1.1 or 2.0
Serial port to K470H: proprietary interface and protocol
System requisites: Windows XP® or higher
Local signalling: 2 LEDs
Protection degree: IP30
Working temperature: 0÷50 °C
Storage temperature: -20÷70 °C
Casing in transparent ABS
english
13
14
15
Giacomini S.p.A.
Via per alzo, 39
28017 San Maurizio d’Opaglio, Novara
℡ +39 0322 923372
6 +39 0322 923255
* [email protected]
www.giacomini.com
Novembre 2013
November 2013
Prodotto progettato per Giacomini S.p.A. da F.C.
Product designed for Giacomini S.p.A. by F.C.
© Copyright 2026 Paperzz