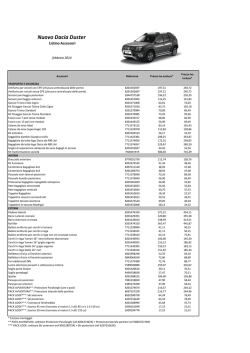
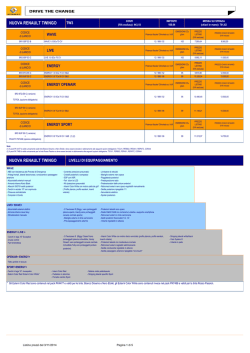
Art.-Nr.: 16528
Mini Lithium Power Pack mit Starthilfe
DE
GB
F
I
NL
BEDIENELEMENTE, CONTROL ELEMENTS, ELEMENTS DE SERVICE, ELEMENTI DI COMANDO, BEDIENINGSELEMENTEN
DE
1.
2.
3.
4.
1.
5.
6.
7.
Aktivierungstaste
Batteriestandsanzeige
USB-Anschluss
12V-Gleichstromanschluss
(EINGANG – Ladeanschluss für Netzteil)
12V Ausgang
19V Ausgang
LED-Arbeitsleuchte
8.
9.
10.
2.
11.
12.
13.
Anschluss für Starthilfekabel
Starthilfekabel
Adapter für verschiedene Smartphones,
Tablets, etc., sowie diverse Netzstecker
Anschlusskabel für Adapter
12V-Adapterkabel/Stecker
230V-Netzadapter 1.
2.
3.
4.
1.
5.
6.
7.
Activation button
Battery state of charge display
USB connection
12 V DC connection
(INPUT – charging connection for power pack)
12 V output
19 V output
LED working lamp
8.
9.
10.
2.
11.
12.
13.
Connection for starting aid cable
Starting aid cable
Adaptor for various mobile phones,
tablets, etc., and various plugs
Connecting cable for adaptor
12 V adaptor cable/plug
230 V mains adaptor
GB
FR
7.
8.
9.
10.
5.
6.
Touche d'activation
Affichage d'état de batterie
Connexion USB
Raccord de courant continu 12 V
(ENTREE - raccord de chargement pour le bloc
d'alimentation)
Sortie 12 V
Sortie 19 V
1.
2.
3.
4.
1.
5.
6.
7.
Tasto di attivazione
Indicatore dello stato della batteria
Porta USB
Presa per corrente continua da 12 V
(INGRESSO – connettore per la carica dell’alimentatore)
Uscita 12V
Uscita 19V
Lampada LED da lavoro
8.
9.
10.
2.
11.
12.
13.
Connettore per il cavo ausiliario per l’avviamento
Cavo ausiliario per l’avviamento
Adattatore per diversi smartphone, tablet, ecc. e
svariate spine elettriche
Cavo di collegamento per l’adattatore
Cavo adattatore/connettore da 12V
Adattatore di rete da 230V
1.
2.
3.
4.
1.
5.
6.
7.
Activeringsknop
Indicator van de accustand
USB-aansluiting
12V-gelijkstroomaansluiting
(INGANG – laadaansluiting voor adapter)
12V-uitgang
19V-uitgang
LED werklamp
8.
9.
10.
2.
11.
12.
13.
Aansluiting voor starthulpkabel
Starthulpkabel
Adapter voor verschillende smartphones,
tablets enz. en diverse netstekkers
Aansluitkabel voor adapter
12V-adapterkabel/stekker
230V-netadapter
1.
2.
3.
4.
1.
Lampe de travail à voyant DEL
Raccord pour le câble de démarrage
Câble de démarrage
Adaptateur pour différents Smartphones, tablettes, etc.
ainsi que diverses fiches secteur
11. Câble de raccordement pour l'adaptateur
12. Fiche/câble adaptateur 12 V
13. Adaptateur de réseau 230 V
I
NL
DE EINLEITUNG
Vielen Dank, dass Sie sich für das Mini Lithium Power Pack 16528 mit Starthilfe entschieden haben. Mit Hilfe des Mini Lithium Power Packs
ist die Starthilfe eines PKW mit zu schwacher Batterie bequem und problemlos möglich. Zusätzlich bietet Ihnen das Power Pack weitere
nützliche Funktionen, z.B. eine praktische LED-Arbeitsleuchte beim Wechsel eines Rades in der Nacht.
Der eingebaute USB-Anschluss des Mini Lithium Power Packs ermöglicht es, das Gerät als netzunabhängige Spannungsversorgung für
Handy, Tablet und ähnliche Geräte einzusetzen. Über den 12V-Ausgang ist der Betrieb von kleinen Geräten auf 12V-Basis möglich.
SICHERHEITSHINWEISE
Bei der internen Batterie des Mini Lithium Power Packs handelt es sich um einen Lithium-Akku, dieser Akku ist wartungsfrei und nicht
austauschbar.
Batterien erzeugen während des Ladens und der Starthilfe explosive Gase. Um das Risiko einer Explosion zu reduzieren, vermeiden Sie
Feuer und Funkenschlag in der Nähe der Batterien. Lesen Sie bitte vor jeder Nutzung des Gerätes diese Anleitung und die
Sicherheitshinweise des Batterie-Herstellers sorgfältig durch.
Beachten Sie auch die speziellen Hinweise des Herstellers auf der Fahrzeugbatterie!
Benutzen Sie das Mini Lithium Power Pack nur zur Starthilfe bei Fahrzeugen mit Blei-Säure-Batterien. Es ist nicht vorgesehen, dauerhaft
elektrische Nieder-Volt-Systeme über die Klemmen zu betreiben, während das Power Pack an der Netzstromversorgung angeschlossen ist.
Das Power Pack ist kein Spannungswandler. Versuchen Sie niemals Trocken-Zellen-Batterien, wie sie im Haushalt Verwendung finden, zu
laden. Diese Batterien können explodieren und großen Schaden anrichten.
•
•
•
•
•
•
•
•
•
•
Wenn Sie mit Blei-Säure-Batterien arbeiten, sollte immer eine zweite Person in der Nähe sein, um bei Unfällen, z.B. mit
Batteriesäure, zu Hilfe zu kommen.
Frisches Wasser und Seife sollte immer in ausreichender Menge in unmittelbarer Nähe vorhanden sein.
Tragen Sie immer eine Komplettschutzbrille. Kleidung wird durch Säureeinwirkung beschädigt. Haut wird durch Säure verätzt.
Tragen Sie entsprechende Schutzkleidung. Vermeiden Sie jede Berührung der Augen, während Sie an der Batterie arbeiten.
Wenn Batteriesäure in Kontakt mit der Haut oder Kleidung gelangt, behandeln Sie die entsprechenden Stellen sofort mit Wasser
und Seife. Suchen Sie umgehend den Arzt auf, wenn trotz Waschen Hautirritationen oder Schmerzen an den betreffenden Stellen
auftreten. Wenn Säure die Augen berührt, spülen Sie umgehend die Augen mindestens zehn Minuten mit fließendem, kaltem
Wasser, und suchen Sie anschließend umgehend den nächsten Arzt auf.
Rauchen, Feuer und offenes Licht sind in der Nähe einer Batterie verboten. Explosionsgefahr.
Legen Sie keinerlei Werkzeug auf der Batterie ab, da sonst die Gefahr eines Kurzschlusses besteht.
Wenn Sie mit Blei-Säure-Batterien arbeiten, sollten Sie sämtlichen Schmuck ablegen, da sonst die Gefahr eines Kurzschlusses
besteht.
Verwenden Sie keine losen Kabel in der Nähe der Starthilfe-Zangen des Gerätes. Sie könnten einen Kurzschluss in der Batterie
des Gerätes und somit eine Explosion verursachen.
Die Klemmzangen dürfen auf keinen Fall aneinandergehalten werden oder sich berühren, da sonst durch Funkenflug
Feuergefahr und Explosionsgefahr besteht.
Aus Kurzschlüssen kann eine Überhitzung des Akkus resultieren, die zu einer Explosion führen kann.
LIEFERUMFANG
Vor Inbetriebnahme des Gerätes überprüfen Sie den Lieferumfang:
1. Mini Lithium Power Pack mit Starthilfekabel
2. 230V Wechselstrom-Ladegerät
3. Betriebsanleitung (dieses Dokument)
4. 12V/Gleichstrom-Adapterkabel/Stecker
5. Adapter für verschiedene Smartphones, Tablets, etc., sowie diverse Netzstecker.
TECHNISCHE DATEN
Für 12 Volt-Batterien
USB Anschluss
1 x 12 Volt Steckdose
1 x 19 Volt Steckdose
Abmessungen (LxBxH)
Gewicht
Kapazität der Zellen
Starthilfe 12 Volt: 200A (400A Peak)
5V 2A
12V 2A
19V 3,5A
ca. 16 x 7,5 x 2,8 cm
ca. 430 g
12000 mAh
VOR DER ERSTEN BENUTZUNG
1. Vor der ersten Benutzung muss das Mini Lithium Power Pack zunächst vollständig aufgeladen werden. Das Power Pack sollte
möglichst nach jeder Verwendung wiederaufgeladen, und danach mindestens in einem Zyklus von 3 Monaten nachgeladen
werden.
2. Das Starthilfegerät niemals unaufgeladen lagern. Durch Tiefentladung wird das Gerät zerstört.
3.
4.
Es stehen verschiedene Möglichkeiten zur Verfügung, die Batterie zu laden:
Das Gerät kann durch den Anschluss des mitgelieferten Netzadapters an eine Schutzkontaktsteckdose mit 230 Volt Netzspannung
aufgeladen werden.
Hilfsweise kann das Power Pack auch über die 12V-Steckdose Ihres PKW (Zigarettenanzünderdose) unter Verwendung des
Zigarettenanzünder-Adapters geladen werden.
AUFLADEN MIT NETZADAPTER
Den Anschluss des Netzadapters (13) in den Gleichstromanschluss (4) des Power Packs stecken, dann den Netzanschlussstecker mit der
230V Steckdose verbinden.
Die blaue Batteriestandsanzeige (2) leuchtet teilweise auf, immer eine LED blinkt und zeigt somit den aktuellen Ladezustand an.
Das Mini Lithium Power Pack so lange aufladen, bis alle LED der Batteriestandsanzeige konstant leuchten. Der Netzadapter kann nun vom
Power Pack und der 230V Steckdose entfernt werden. Für eine maximale Lebensdauer der Batterie sollte das Starthilfegerät nach jedem
Gebrauch wieder aufgeladen und spätestens alle 3 Monate nachgeladen werden.
AUFLADEN MIT 12-VOLT-ADAPTER
Den 12V-Adapter (12) in den Gleichstromanschluss (4) des Power Packs stecken, den 12V-Anschluss mit dem Zigarettenanzünderanschluss Ihres Fahrzeugs verbinden.
Anschließend verhält sich das Power Pack genau so wie beim Aufladen mit Netzadapter. Jedoch kann die Geschwindigkeit des
Ladevorgangs variieren je nachdem ob der Motor des Fahrzeugs gestartet ist, Zustand der Fahrzeugbatterie, etc.
STARTHILFE
Vor Anschließen des Starthilfegeräts an die Batterie IMMER folgende Kontrollen ausführen:
• Sicherstellen, dass die Fahrzeugzündung und die gesamte Zusatzausrüstung wie Beleuchtung, Radio etc. ausgeschaltet sind.
•
•
Sicherstellen, dass die Fahrzeugbatterie eine Spannung von 12V hat und nicht beschädigt ist.
Sicherstellen, dass die Batterieanschlüsse sauber sind und die Anschlusskabel fest verschraubt sind.
1. Vor Anschluss der Starthilfekabel die Fahrzeugzündung ausschalten.
2. Darauf achten, dass sich die rote positive (+) Polzange und die schwarze negative (-) Polzange nicht berühren.
3. Sicherstellen, dass der gesamte Bereich gut belüftet ist.
Wichtig: In dieser Phase ist das Starthilfekabel(9) noch nicht mit dem Power Pack verbunden.
4. Die rote positive (+) Polzange zuerst an den positiven (+) Batterieanschluss klemmen. Die Polzange und die Zuleitung dürfen keine
beweglichen Teile oder Kraftstoffleitungen berühren.
5. Die schwarze negative (-) Polzange an den negativen (-) Batterieanschluss anklemmen.
6. Verbinden Sie nun das Starthilfekabel (9) mit dem Power Pack, öffnen Sie dafür die Abdeckung des Starthilfeanschlusses (8).
7. Den Zündschlüssel für maximal 6 Sekunden auf „an“ drehen, das Fahrzeug sollte nun starten. Startet der Motor nicht nach ein paar
Sekunden, die Zündung ausschalten und vor einem weiteren Versuch mindestens 3 Minuten warten.
8. Nachdem der Motor angesprungen ist, entfernen Sie das Starthilfekabel vom Power Pack.
9. Anschließend die schwarze, negative (-) Polzange zuerst von der Fahrzeugbatterie abnehmen, dann die rote positive (+) Polzange.
10. Nach Gebrauch die Kabel und das Power Pack gut verstauen, verschließen Sie die Abdeckung des Starthilfeanschlusses wieder.
3
11. Nach Gebrauch das Starthilfegerät wie unter AUFLADEN beschrieben aufladen.
12. Den Ladestand der Batterie regelmäßig prüfen, indem die Aktivierungstaste gedrückt wird.
ACHTUNG: DURCH DAS ANLASSEN MIT STARTHILFE KÖNNEN ELEKTRONISCHE BAUTEILE BESCHÄDIGT WERDEN. ZIEHEN
SIE IMMER DAS HANDBUCH DES FAHRZEUGHERSTELLERS ZU RATE UM ZU BESTIMMEN, WELCHE VORSICHTSMASSNAHMEN
GEGEBENENFALLS GETROFFEN WERDEN MÜSSEN.
LED-ARBEITSLEUCHTE
Zum Betrieb der LED-Arbeitsleuchte aktivieren Sie zunächst das Gerät über die Aktivierungstaste (1). Das Power Pack leuchtet auf und
zeigt Ihnen den aktuellen Ladezustand an. Drücken Sie nun erneut die Aktivierungstaste und halten diese für einige Sekunden gedrückt.
Sobald die LED aufleuchtet, können Sie die Taste loslassen.
Des Weiteren verfügt die Arbeitsleuchte noch über zwei weitere Leuchtvarianten. Drücken Sie nun kurz auf die Aktivierungstaste um in den
2. Zustand zu wechseln (schnelles Blinken), mit einem weiteren kurzen Druck auf die Taste wechseln Sie in den 3. Modus. Die Lampe blinkt
nun abwechselnd kurz und schnell.
Mit einem erneuten kurzen Druck schalten Sie die Lampe aus.
Einige Minuten nachdem Sie die Lampe nicht mehr benutzen schaltet sich das Power Pack selbstständig aus.
USB- ANSCHLUSS und 12V/19V-ANSCHLUSS
Zum Betrieb des USB-Anschlusses aktivieren Sie zunächst das Gerät über die Aktivierungstaste (1). Anschließend können Sie den USBAnschluss (3) wie gewohnt benutzen. Verwenden Sie dazu die beiliegenden Adapter oder die Adapter die zu ihrem
Handy/Smartphone/Tablet/etc. gehören.
Einige Minuten nachdem Sie den USB-Anschluss oder den 12V/19V-Anschluss nicht mehr benutzen schaltet sich das Power Pack
selbstständig aus.
LADESTATUS
Wird die Aktivierungstaste gedrückt, wird der Batterieladestatus angezeigt. Während des Nachladens wird dies dauerhaft angezeigt.
Ist der Ladezustand des Power Packs zu niedrig, ist ein Aktivieren über die Aktivierungstaste nicht mehr möglich. Laden Sie das Power
Pack nun nach.
WARTUNG
Vor Gebrauch des Starthilfegeräts immer überprüfen, dass die Kabel unbeschädigt und die Polzangen sauber und frei von Korrosion sind.
Das Gerät sauber halten, dazu mit einem trockenen Tuch abwischen. Keine Lösungsmittel oder scharfen Reinigungsmittel verwenden.
AUFBEWAHRUNG
Das Starthilfegerät stets in aufgeladenem Zustand halten. Siehe Abschnitt „AUFLADEN“. Das Power Pack trocken und möglichst bei
Zimmertemperatur lagern, vor Frost und hohen Temperaturen schützen.
Versuchen Sie NIEMALS, das Gerät selbst zu reparieren. Reparaturen an Elektrogeräten dürfen nur von ausgebildetem Fachpersonal
vorgenommen werden. Bei Problemen mit dem Gerät kontaktieren Sie Ihren Händler vor Ort. Ihr Starthilfegerät ist für eine lange und
problemlose Laufzeit entwickelt worden. Sollten aber nach sorgfältigem Befolgen der Anweisungen dieses Handbuchs Probleme auftreten,
bringen Sie das Gerät zu Ihrem Händler vor Ort.
ENTSORGUNG
Das Power Pack ist ein Elektrogerät. Ein defektes Elektrogerät muss bei den örtlichen Sammelstellen für Elektro- und Elektronikschrott
entsorgt werden und gehört nicht in den Hausmüll.
4
GB Item No.: 16528
Mini lithium power pack with starting aid
INTRODUCTION
We are delighted that you have opted for the Mini lithium power pack 16528 with starting aid. With the help of the Mini lithium power pack,
starting aid for a car with a weak battery is convenient and no problem. In addition, the power pack has a number of other useful functions
such as a practical LED working lamp to help you change a wheel in the dark.
The USB connection included in the mini lithium power pack makes it possible to use the appliance as an independent power supply for
mobile phone, tablet and other similar appliances. Small 12 V devices can also be operated from the 12 V output.
SAFETY INSTRUCTIONS
The internal battery of the mini lithium power pack is a rechargeable maintenance-free lithium battery which is not replaceable.
When being charged and during starting assistance, batteries generate explosive gases. To reduce the risk of an explosion, avoid fire and
sparks in the vicinity of the batteries. Each time before use of the device, read these instructions and the safety instructions of the battery
manufacturer through with care.
Observe too the manufacturer's special instructions on the vehicle battery.
Only use the mini lithium power pack as a starting aid for vehicles fitted with lead-acid batteries. It is not designed for operating low-voltage
appliances via the connections for long periods while the power pack is connected to the mains supply. The power pack is not a voltage
converter. Never attempt to recharge dry cell batteries, as used in many households. These batteries are capable of exploding and causing
a considerable amount of damage.
•
•
•
•
•
•
•
•
•
•
When you are working with lead-acid batteries, there should always be a second person in the vicinity to give assistance in the
case of an accident, for example with battery acid.
An adequate supply of fresh water and soap should also be available close at hand.
Always wear full goggles. Clothing can be damaged by the effects of acid, and skin can be burned. Wear appropriate protective
clothing and avoid any contact with the eyes whilst you are working on the battery.
When battery acid comes into contact with the skin or clothing, treat the affected parts immediately with soap and water. If despite
washing, skin irritation or pain occurs in the affected spot, seek medical advice without delay. If acid splashes in the eyes,
immediately flush the eye(s) affected for at least ten minutes with cold running water, then seek out the nearest available doctor
without further delay.
Smoking, fire and naked lights are prohibited in the vicinity of batteries due to the danger of explosion.
Never place any tool on the battery as this may cause a short circuit.
When working with lead-acid batteries, you should remove all jewellery as this may also cause a short circuit.
Do not use any loose wires in the vicinity of the starting aid clips of the appliance as they may cause a short circuit in the battery in
the appliance which may lead to an explosion.
The clips must on no account be held against each other or contact each other as this may cause sparking, leading to a
fire hazard or risk of an explosion.
Short circuits may also cause overheating of the battery leading to an explosion.
PACKING LIST
1. Mini lithium power pack with starting aid cable
2. 230 V AC charger unit
3. Instructions for use (this document)
4. 12 V DC adaptor cable/plug
5. Adaptor for various mobile phones, tablets, etc., as well as a variety of plugs.
TECHNICAL DATA
For 12 V batteries
USB connection
1 x 12 V socket
1 x 19 V socket
Dimensions (LxBxH)
Weight
Capacity of the cells
Starting aid 12 V: 200 A (400 A peak)
5 V 2A
12 V 2A
19 V 3.5A
approx. 16 x 7.5 x 2.8 cm
approx. 430 g
12000 mAh
BEFORE FIRST USE
1. Before first being used, the mini lithium power pack must be completely charged. The power pack should be recharged if possible
every time it is used, and thereafter it should be topped up at least every three months.
2. Never store the starting aid appliance without it having been charged. Deep discharge will damage it beyond repair.
3.
4.
5.
There are various possibilities available for charging the battery:
the appliance can be charged by connecting it with the mains power pack supplied into a shockproof 230 V mains socket.
As a back-up, the power pack can also be charged via the 12 V socket of your car (cigarette lighter socket), using the cigarette
lighter adaptor.
5
CHARGING WITH THE MAINS POWER PACK
Plug the mains power pack (13) connection into the DC connection (4) of the power pack, then plug the mains plug into the 230 V socket.
The blue battery state-of-charge display (2) lights up partly, one LED is always flashing and thus shows the current charge condition.
Charge the mini lithium power pack until all LEDs in the battery state-of-charge display are continuously lit. The mains adaptor can now be
unplugged from the power pack and from the 230 V socket. For a maximum battery service life, the starting aid should be recharged every
time it is used and topped up at least every three months.
CHARGING WITH THE 12 VOLT ADAPTOR
Plug the 12 V adaptor (12) into the DC connection (4) of the power pack, connecting the 12 V connection with the cigarette lighter
connection in your car.
After this, the power pack behaves exactly the same as when it is being charged with the mains adaptor. The speed of charging however
can vary according to whether the car engine is running, the condition of the car battery, etc.
STARTING AID
Before connecting the starting aid to the battery ALWAYS carry out the following checks:
• make sure that the car ignition and all accessories – lights, radio etc. – are switched off.
•
•
make sure that the car battery is a 12 V battery and that it is undamaged.
make sure that the battery terminals are clean and that the connections are firmly screwed in place.
1.
2.
3.
Before attaching the starting aid cable, switch off the car ignition.
Take care that the red positive (+) terminal clamp and the black negative (-) clamp do not come into contact.
Make sure that the entire area is well ventilated.
Important: in this phase the starting aid cable (9) is not yet connected to the power pack.
4. First attach the red positive (+) terminal clamp to the positive (+) battery connection. The terminal clamp and the lead must not be
permitted to touch any moving parts or petrol lines.
5. Connect the black negative (-) terminal clamp to the negative (-) battery terminal.
6. Now connect the starting aid cable (9) to the power pack, opening the cover of the starting aid connection (8).
7. Turn the ignition key and hold it "on" for six seconds as a maximum; the car should start. If the motor fails to start after a few
seconds, turn the ignition off and then wait for at least three minutes before trying again.
8. When the motor has started, remove the starting aid cable from the power pack.
9. Then remove the black, negative (-) terminal clamp first from the car battery, then the red positive (+) terminal clamp.
10. After use, pack the cable and the power pack carefully, closing the cover of the starting aid connection.
11. After use, recharge the starting aid as described under CHARGING.
12. Check the state of charge of the battery regularly by pressing the Activation button.
WARNING: STARTING WITH THE STARTING AID MAY CAUSE DAMAGE TO ELECTRONIC COMPONENTS. ALWAYS CONSULT
THE CAR MANUFACTURER'S HANDBOOK TO DETERMINE WHAT SAFETY PRECAUTIONS IT MAY BE NECESSARY TO TAKE.
LED WORKING LAMP
To operate the LED working lamp, first activate the appliance by pressing the activation button (1). The power pack lights up and shows the
current state of charge. Now press the activation button again and keep it pressed for a few seconds.
As soon as the LED lights up, you can release the button.
The working lamp has two further lighting modes. A short press on the activation button switches it into mode 2, when it flashes quickly. With
a further short press on the button, you switch into mode 3. The lamp now blinks briefly and quickly alternately.
With a further short press on the button, the lamp is switched off.
A few minutes after you finish using the lamp, the power pack switches itself off automatically.
USB CONNECTION and 12 V/19 V CONNECTION
To operate the USB connection, activate the appliance first using the activation button (1). Then you can use the USB connection (3) in the
usual way. Use either the adaptor supplied or the adaptor which belongs to your mobile phone/smart phone/tablet/etc.
A few minutes after you finish using the USB connection or the 12 V/19 V connection, the power pack switches itself off automatically.
STATE OF CHARGE
If the activation button is pressed, the battery charge state will be displayed. While being recharged, this is shown continuously.
If the state of charge of the power pack is too low, activation using the activation button is not possible. You must now recharge the power
pack.
6
MAINTENANCE
Before using the starting aid, always check that the cable is undamaged and that the terminal clamps are clean and free of corrosion. Always
keep the appliance clean, wiping it over with a dry cloth. Use no solvents or aggressive cleaning agents.
STORAGE
Always store the starting aid in a charged condition. See section "CHARGING". Store the power pack dry, if possible at room temperature
and protected from frost or high temperatures.
NEVER attempt to repair the appliance yourself. Repairs to electrical appliances may only be carried out by properly-trained specialists. In
case of problems contact your local dealer. Your starting aid has been developed to have a long and trouble-free service life. If problems
arise despite your carefully following the instructions in this handbook, please take the appliance to your local dealer.
DISPOSAL
The power pack is a piece of electrical equipment. A defective electrical appliance must be disposed of at the local collection point for
electrical and electronic scrap and does not belong in the domestic waste.
F Article n°: 16528
Mini bloc d’alimentation lithium avec aide au démarrage
INTRODUCTION
Nous vous remercions d'avoir acheté le mini bloc d’alimentation lithium 16528 avec aide au démarrage. Ce mini-bloc d’alimentation lithium
vous sera d'une grande aide pour faire démarrer facilement une voiture dont la batterie est trop faible. De plus ce bloc met à votre
disposition d'autres fonctions très utiles, par exemple une lampe de travail à voyant DEL, vraiment pratique pour changer une roue pendant
la nuit.
La connexion USB intégrée au mini-bloc d’alimentation lithium permet d'utiliser l'appareil comme une alimentation en courant indépendante
du réseau, pour des portables, tablettes et appareils semblables. La sortie 12 V permet d'exploiter de petits appareils sur une base 12 V.
CONSIGNES DE SECURITE
La batterie interne du mini bloc d'alimentation au lithium est formée d'un accumulateur lithium ; cet accumulateur ne nécessite aucun
entretien et n'est pas interchangeable.
Les batteries produisent des gaz explosifs pendant le chargement et l'aide au démarrage. Pour réduire le risque d'une explosion, évitez
d'avoir du feu et la formation d'étincelles à proximité des batteries. Lisez attentivement cette directive ainsi que les consignes de sécurité du
fabricant de la batterie avant toute utilisation de l'appareil.
Tenez également compte des instructions spéciales du fabricant de la batterie du véhicule !
Utilisez le mini-bloc d’alimentation lithium uniquement pour l'aide au démarrage de véhicules équipés de batteries au plomb-acide. Ce bloc
n'est pas prévu pour faire travailler durablement, via les bornes, des systèmes électriques basse tension pendant que le bloc d'alimentation
est connecté au réseau d'alimentation en énergie secteur. Le bloc d'alimentation n'est pas un transformateur de tension. N'essayez jamais
de charger des batteries de cellules sèches, comme on peut en trouver sur certains appareils ménagers. Ces batteries peuvent exploser et
causer de graves dommages.
•
•
•
•
•
•
•
•
•
•
Lorsque vous travaillez avec des batteries au plomb-acide, une deuxième personne doit toujours se tenir à proximité pour venir à
l'aide en cas d'accident, par exemple avec l'acide de la batterie.
Ayez toujours de l'eau fraîche et du savon disponibles et en quantité suffisante à proximité immédiate.
Portez toujours des lunettes de protection complètes. Les habits sont endommagés par l'action de l'acide. La peau est corrodée par
l'acide. Portez des vêtements protecteurs appropriés. Evitez tout contact avec les yeux pendant que vous travaillez sur la batterie.
Si de l'acide de la batterie vient en contact avec la peau ou des habits, lavez immédiatement les zones concernées avec de l'eau
et du savon. Si malgré cela, des irritations de la peau ou des douleurs aux emplacements touchés apparaissent, consultez
immédiatement un médecin. Si de l'acide vient en contact avec les yeux, rincez immédiatement les yeux pendant au moins dix
minutes avec de l'eau courante, froide, et consultez ensuite immédiatement un médecin.
Il est interdit de fumer, d'avoir des feux ou des lumières ouvertes à proximité d'une batterie. Danger d'explosion.
Ne posez aucun outil sur la batterie : risque d'un court-circuit.
Si vous travaillez avec des batteries au plomb-acide, retirez tous vos bijoux : risque d'un court-circuit
N'utilisez aucun câble non fixé à proximité des pinces d'aide au démarrage de l'appareil. Cela pourrait déclencher un court-circuit
dans la batterie de l'appareil et donc une explosion.
Les pinces de serrage ne doivent, en aucun cas, être placées l'une à côté de l'autre ou se toucher : risques d'étincelles et
donc d'incendie et danger d'explosion.
Les courts-circuits peuvent entraîner une surchauffe de l'accumulateur, ce qui peut générer une explosion.
CONTENU DE LA LIVRAISON
Avant la mise en service de l'appareil, contrôlez le contenu de la livraison :
1. Mini-bloc d’alimentation lithium avec câble de démarrage
2. Chargeur 230 V de courant alternatif
3. Instructions d'emploi (ce document)
4. Fiche/câble adaptateur de courant secteur
5. Adaptateur pour différents Smartphones, tablettes, etc. ainsi que diverses fiches secteur.
7
DONNEES TECHNIQUES
Pour batteries 12 volts
Connexion USB
Prise électrique 1 x 12 volts
Prise électrique 1 x 19 volts
Dimensions (LxlxH)
Poids
Capacité des cellules
Aide au démarrage 12 Volt: 200A (pointe 400A )
5V 2A
12V 2A
19V 3,5A
Environ 16 x 7,5 x 2,8 cm
Environ 430 g
12000 mAh
AVANT LA PREMIERE UTILISATION
1. Avant la première utilisation, le mini-bloc d’alimentation lithium doit être chargé entièrement. Après chaque utilisation, le bloc
d’alimentation doit être rechargé ; il doit aussi être rechargé tous les 3 mois.
2. Ne jamais stocker l'appareil d'aide au démarrage non chargé. L'appareil est définitivement mis hors service en cas de décharge
totale.
3.
4
Vous disposez de différentes possibilités pour charger la batterie :
L'appareil peut être chargé par raccordement de l'adaptateur de réseau, fourni à la livraison, via un socle de prise de courant de
sécurité avec une tension de réseau 230 V.
Une autre possibilité consiste à charger le bloc d’alimentation via la prise 12 V de votre prise allume-cigarettes de votre voiture, en
utilisant l'adaptateur d'allume-cigarettes.
CHARGEMENT AVEC ADAPTATEUR RESEAU
Insérer le raccord de l'adaptateur de réseau (13) dans le raccord de courant continu (4) du bloc d’alimentation puis connecter la prise de
branchement secteur à la prise de courant 230 V.
L'affichage d'état de batterie est indiqué en bleu (2) tandis qu'un voyant DEL clignote et affiche ainsi l'état de chargement actuel.
Charger le mini-bloc d’alimentation lithium jusqu'à ce que le voyant DEL de l'affichage d'état de la batterie reste allumé sans clignoter. Vous
pouvez maintenant retirer l'adaptateur de réseau du bloc d’alimentation ainsi que la prise de courant 230 V. Pour une durée de vie maximale
de la batterie, l'appareil d'aide au démarrage doit être rechargé après chaque utilisation et au plus tard tous les 3 mois.
CHARGEMENT AVEC ADAPTATEUR 12 VOLTS
Insérer l'adaptateur 12 V (12) dans le raccord de courant continu (4) du bloc d’alimentation, connecter le raccord 12 V à la sortie de la prise
allume-cigarettes de votre véhicule.
Le bloc d’alimentation se comporte alors comme pendant un chargement avec l'adaptateur de réseau. Cependant la vitesse de chargement
peut varier en fonction des conditions : le moteur du véhicule tourne, état de la batterie de véhicule, etc.
AIDE AU DEMARRAGE
Avant de connecter l'appareil d'aide au démarrage à la batterie, TOUJOURS effectuer les contrôles suivants :
• S'assurer que l'allumage du véhicule et tous les équipements supplémentaire tels que le système d'éclairage, la radio, sont éteints.
•
S'assurer que la batterie de véhicule dispose d’une tension de 12 V et n'est pas endommagée.
•
S'assurer que les raccords de batterie sont propres et que les câbles de raccordement sont vissés solidement.
1. Avant de raccorder les câbles de démarrage, mettre hors service l'allumage du véhicule.
2. Faire attention à ce que la pince à pôle rouge positive (+) et la pince à pôle négative noire (-) ne se touchent pas.
3. S'assurer que toute la zone est bien ventilée.
Important : durant cette phase, le câble de démarrage (9) n'est pas encore connecté au bloc d’alimentation.
4. Relier d'abord la pince à pôle rouge positive (+) au raccord de batterie positif (+). La pince à pôle et le câble ne doivent toucher aucune
partie mobile ou conduite de carburant.
5. Connecter la pince à pôle noire négative (+) au raccord de batterie négatif (-).
6. Connectez maintenant le câble de démarrage (9) au bloc d’alimentation. Pour ce faire ouvrez le couvercle du raccord d'aide au
démarrage (8).
7. Tournez maintenant la clé de contact pendant un maximum de 6 secondes ; le véhicule doit démarrer. Si le moteur ne démarre au bout
de quelques secondes, déconnectez l'allumage et attendez au moins 3 minutes avant d'effectuer un autre essai.
8. Dès que le moteur a démarré, retirez le câble de démarrage du bloc d’alimentation.
9. Déconnectez ensuite les pinces à pôle d'avec la batterie du véhicule, d'abord la noire puis la rouge.
10. Après avoir bien fixé les câbles et le bloc d’alimentation, refermez le couvercle du raccord d'aide au démarrage.
11. Après utilisation, toujours CHARGER l'appareil d'aide au démarrage tel que décrit précédemment
12. Vérifiez régulièrement l'état de chargement de la batterie en appuyant sur la touche d'activation.
ATTENTION : PENDANT LE DEMARRAGE EN UTILISANT l'AIDE AU DEMARRAGE, LES COMPOSANTS ELECTRONIQUES
PEUVENT ETRE ENDOMMAGES. TOUJOURS LIRE LE MANUEL DU FABRICANT DE VEHICULE AFIN DE CONNAITRE LES
MESURES DE PRECAUTION EVENTUELLES A PRENDRE.
8
LAMPE DE TRAVAIL VOYANT DEL
Pour utiliser la lampe de travail à voyant DEL, commencez par mettre en service l'appareil en appuyant sur la touche d'activation (1). Le bloc
d’alimentation s'allume et vous montre l'état de chargement actuel. Maintenant, appuyez de nouveau sur la touche d'activation pendant
plusieurs secondes.
Dès que le voyant DEL s'allume, vous pouvez relâcher la touche.
La lampe de travail dispose en plus de deux autres modes de luminosité. Appuyez maintenant brièvement sur la touche d'activation pour
passer au 2ème mode (clignotement rapide), puis en appuyant encore une fois sur la touche, vous changez pour le 3ème mode.
Maintenant, la lampe clignote encore plus vite.
Avec une nouvelle et courte pression, vous éteignez la lampe.
Après quelques minutes de non-utilisation de la lampe, le bloc d’alimentation s'éteint automatiquement de lui-même.
CONNEXION USB et CONNEXION 12V/19V
Pour utiliser la connexion USB, activez d'abord l'appareil au moyen de la touche d'activation (1). Vous pouvez utiliser ensuite la connexion
USB (3) de la manière habituelle. Pour ce faire, utilisez en plus les adaptateurs ci-joints ou les adaptateurs de votre portable, Smartphone /
tablette, etc.
Après quelques minutes de non-utilisation de la connexion USB, le bloc d’alimentation s'éteint automatiquement de lui-même.
ETAT DE CHARGEMENT
En appuyant sur la touche d'activation, on affiche l'état de la batterie. Pendant le rechargement, cet état est affiche en permanence.
Si l'état de chargement du bloc d’alimentation est trop bas, il n'est plus possible d'utiliser la touche d'activation. Il faut alors charger le bloc
d’alimentation.
MAINTENANCE
Avant d'utiliser l'appareil d'aide au démarrage contrôlez toujours que les câbles sont intacts et les pinces à pôles sont propres et non
corrodées. Maintenir l'appareil propre, en l'essuyant avec un chiffon sec. Ne pas utiliser de solvant ou d'agent de nettoyage agressif.
STOCKAGE
Conserver l'appareil d'aide au démarrage toujours en état chargé. Cf. section "CHARGEMENT". Stocker le bloc d’alimentation au sec et à la
température ambiante, le protèger du froid et des températures élevées.
N'essayez JAMAIS de réparer vous-même l'appareil. Les réparations des appareils électriques ne peuvent être exécutées que par du
personnel spécialisé et formé. En cas de problèmes avec l'appareil, contactez votre commerçant sur place. Cet appareil d'aide au
démarrage a été développé pour fonctionner longtemps et sans problèmes. Cependant, si après avoir bien respecté les instructions de ce
manuel, des problèmes apparaissaient, rapportez l'appareil à votre commerçant sur place.
MISE AUX DECHETS
Le bloc d’alimentation est un appareil électrique. Un appareil électrique défectueux doit être déposé dans une déchèterie locale pour être
traité comme ferraille électrique et électronique et non pas jeté dans les ordures ménagères. I
N. art.: 16528
Mini Power Pack al litio con avviatore
INTRODUZIONE
La ringraziamo per aver optato per il Mini Power Pack 16528 con avviatore. Con l’aiuto del Mini Power Pack è possibile avviare in modo
comodo e facile un’auto con una batteria non sufficientemente carica. Il Power Pack Le offre inoltre altre funzioni utili come, p.es. una pratica
lampada LED da lavoro se deve cambiare una ruota di notte.
La porta USB installata nel Mini Lithium Power Pack consente di utilizzare l’apparecchio come alimentatore di tensione indipendente dalla
rete per cellulari, tablet e apparecchiature simili. L’uscita da 12 V consente il funzionamento di piccoli apparecchi dello stesso voltaggio.
AVVERTENZE SULLA SICUREZZA
La batteria interna del Mini Power Packs al litio è un accumulatore al litio che non richiede manutenzione e non può essere sostituito.
Durante la carica e l’avviamento ausiliario le batterie generano gas esplosivi. Per ridurre il pericolo di esplosioni evitare fuochi e scintille nei
pressi delle batterie. Prima dell’uso dell’apparecchio leggere attentamente queste istruzioni e le avvertenze sulla sicurezza del produttore
della batteria.
Osservare anche le avvertenze speciali del produttore riportate sulla batteria del veicolo!
9
Usare il Mini Power Pack al litio come avviatore solo per veicoli con batterie all’acido di piombo. Non è previsto il funzionamento permanente
di sistemi elettrici a basso voltaggio attraverso i morsetti mentre il Power Pack è collegato all’alimentazione di corrente della rete. Il Power
Pack non è un trasformatore di tensione. Non cercare mai di caricare batterie a secco, come quelle usate in casa. Queste batterie possono
esplodere e causare gravi danni.
•
•
•
•
•
•
•
•
•
•
Quando si lavora con batterie all’acido di piombo, nei pressi dovrebbe sempre trovarsi un’altra persona che può prestare aiuto in
caso di incidenti, p.es. con l’acido delle batterie.
Nelle immediate vicinanze dovrebbe essere sempre a disposizione una quantità sufficiente di acqua fresca e sapone.
Indossare sempre occhiali di protezione integrale. Gli indumenti vengono danneggiati dall’azione dell’acido, la pelle viene corrosa
dall’acido. Indossare un abbigliamento di protezione adatto. Quando si lavora sulla batteria, evitare qualsiasi contatto con gli occhi.
Se l’acido della batteria viene in contatto con la pelle o gli indumenti, trattare immediatamente le parti interessate con acqua e
sapone. Consultare immediatamente un medico se, nonostante la pulizia, i punti interessati presentano irritazioni cutanee o
dolgono. Se l’acido viene in contatto con gli occhi, sciacquarli immediatamente per almeno 10 minuti con acqua fresca corrente e
poi recarsi senza indugio dal medico più vicino.
Nelle vicinanze delle batterie è vietato fumare e usare fuochi e fiamme libere. Pericolo di esplosione.
Non appoggiare mai utensili sulla batteria. Pericolo di cortocircuito.
Quando si lavora con batterie all’acido di piombo, si dovrebbero togliere tutti i gioielli. Pericolo di cortocircuito.
Non usare cavi allentati nei pressi dei morsetti per l’avviamento. Potrebbero causare un cortocircuito nella batteria dell’apparecchio
e quindi un’esplosione.
I morsetti non devono mai essere avvicinati o venire in contatto tra loro, poiché a causa della formazione di scintille esiste
pericolo di incendio e di esplosione.
I cortocircuiti possono causare un surriscaldamento dell’accumulatore che può provocare esplosioni.
VOLUME DELLA FORNITURA
Prima della messa in funzione dell’apparecchio controllare il volume della fornitura:
1. Mini Power Pack al litio con cavo per l’avviamento tramite collegamento alla batteria
2. Caricabatterie a corrente alternata da 230V
3. Istruzioni per l’uso (questo documento)
4. Cavo adattatore per corrente continua/connettore da 12 V
5. Adattatore per diversi smartphone, tablet, ecc. e svariate spine elettriche
DATI TECNICI
Per batterie da 12 volt
Porta USB
1 presa da 12 volt
1 presa da 19 volt
Dimensioni (L x l x h)
Peso
Capacità delle celle
Avviatore da 12 volt: 200A (400A Peak)
5V 2°
12V 2°
19V 3,5°
ca. 16 x 7,5 x 2,8 cm
ca. 430 g
12000 mAh
PRIMA DELL’USO INIZIALE
1. Prima dell’uso iniziale il Mini Power Pack al litio deve essere caricato completamente. Il Power Pack dovrebbe essere ricaricato
dopo ogni utilizzo e in seguito almeno ogni 3 mesi.
2. L’apparecchio ausiliario per l’avviamento deve essere carico anche se non viene utilizzato. Una scarica totale distrugge
l’apparecchio.
3.
4.
Per caricare la batteria esistono diverse possibilità:
l’apparecchio può essere caricato collegando l’adattatore di rete in dotazione a una presa con messa a terra con tensione di rete
230 volt.
All’occorrenza il Power Pack può essere caricato anche attraverso la presa da 12V dell’auto (presa dell’accendisigari) usando il
relativo adattatore.
CARICA CON L’ADATTATORE DI RETE
Inserire il collegamento dell’adattatore di rete (13) nella presa per corrente continua (4) del Power Pack, poi collegare il connettore di
allacciamento alla rete con la presa da 230V.
L’indicatore blu dello stato della batteria (2) si illumina in parte, lampeggia sempre un LED che indica così lo stato attuale della batteria.
Caricare il Mini Power Pack al litio fino a quando tutti i LED dell’indicatore dello stato della batteria su illuminano permanentemente. Ora si
può togliere l’adattatore di rete dal Power Pack e dalla presa da 230V. Per la durata massima della batteria, l’apparecchio ausiliario per
l’avviamento dovrebbe essere ricaricato dopo ogni utilizzo e al più tardi ogni 3 mesi.
CARICA CON ADATTATORE DA 12-VOLT
Inserire l’adattatore da 12V (12) nella presa per corrente continua (4) del Power Packs, collegare il connettore da 12V con la presa
dell’accendisigari del veicolo.
In seguito il Power Pack si comporta esattamente come durante la carica con l’adattatore di rete. La velocità del processo di carica può
tuttavia variare. Questo dipende dal fatto che il motore sia acceso, dallo stato della batteria del veicolo ecc.
10
AVVIATORE
Prima di collegare l’apparecchio ausiliario per l’avviamento effettuare SEMPRE i seguenti controlli:
• Assicurarsi che l’accensione dell’auto e tutti gli accessori sussidiari come luci, radio ecc siano spenti.
•
Assicurarsi che la batteria del veicolo abbia una tensione di 12V e non sia danneggiata.
•
Assicurasi che gli attacchi della batteria siano puliti e il cavo di allacciamento sia avvitato saldamente.
1.
2.
3.
Prima dell’allacciamento del cavo ausiliario per l’avviamento spegnere l’accensione del veicolo.
Assicurarsi che il morsetto del polo positivo rosso (+) e quello del polo negativo nero (-) non vengano in contatto tra loro.
Assicurarsi che l’intera zona sia ben ventilata.
Importante: in questa fase il cavo ausiliario per l’avviamento (9) non è ancora collegato con il Power Pack.
4. Fissare prima il morsetto del polo positivo rosso (+) all’attacco positivo della batteria (+). Il morsetto e il cavo di alimentazione non
devono toccare parti mobili o tubi di alimentazione del carburante.
5. Fissare il morsetto del polo negativo nero (-) all’attacco negativo della batteria.
6. Ora collegare il cavo ausiliario per l’avviamento (9) con il Power Pack. A tal fine aprire la copertura del connettore
dell’ausilio per l’avviamento (8).
7. Girare la chiave di accensione per massimo 6 secondi su “ON”. Ora il veicolo dovrebbe avviarsi. Se il motore non si accende, dopo
alcuni secondi spegnere l’accensione e attendere almeno 3 minuti prima di effettuare un nuovo tentativo.
8. Dopo l’avvio del motore, staccare il cavo ausiliario per l’avviamento dal Power Pack.
9. In seguito staccare prima il morsetto del polo negativo nero (-) dalla batteria del veicolo e poi il morsetto del polo positivo rosso (+).
10. Dopo l’uso riporre con cura il cavo e il Power Pack e richiudere la copertura del connettore dell’ausilio per l’avviamento.
11. Dopo l’uso dell’apparecchio ausiliario per l’avviamento, caricarlo come descritto sotto CARICA.
12. Controllare regolarmente lo stato della carica della batteria premendo il tasto di attivazione.
ATTENZIONE: L’ACCENSIONE CON L’AVVIATORE PUÒ DANNEGGIARE COMPONENTI ELETTRONICI. PER DETERMINARE QUALI
MISURE PRECAUZIONALI DEVONO ESSERE EVENTUALMENTE ADOTTATE, CONSULTARE SEMPRE IL MANUALE DEL
PRODUTTORE DEL VEICOLO.
LAMPADA LED DA LAVORO
Per il funzionamento della lampada LED da lavoro attivare prima l’apparecchio tramite il tasto di attivazione (1). Il Power Pack si illumina
indicando lo stato attuale della carica. Ora ripremere il tasto di attivazione e tenerlo premuto per alcuni secondi.
- Non appena il LED si accende, si può rilasciare il tasto.
o
La lampada da lavoro dispone inoltre di altre due variazioni di luce. Ora premere brevemente il tasto di attivazione per passare al 2 stato
a
(lampeggiamento veloce). Con un’altra breve pressione sul tasto si passa alla 3 modalità. Ora la lampada lampeggia alternativamente in
modo breve e veloce.
Con un’ulteriore pressione la lampada si spegne.
Se la lampada non viene più utilizzata, il Power Pack si spegne automaticamente dopo alcuni minuti.
PORTA USB e CONNETTORE da 12V/19V
Per il funzionamento della porta USB attivare prima l’apparecchio tramite il tasto di attivazione (1). In seguito si può utilizzare la porta USB
(3) come di consueto. A questo scopo usare gli adattatori acclusi o quelli appartenenti al proprio cellulare/smartphone/tablet/ecc.
Se la porta USB o il connettore da 12V/19V non vengono più utilizzati, il Power Pack si spegne automaticamente dopo alcuni minuti.
STATO DELLA CARICA
Se viene premuto il tasto di attivazione, viene visualizzato lo stato della carica della batteria. Durante il processo di ricarica, lo stato viene
visualizzato permanentemente.
Se la carica del Power Packs è troppo bassa, l’attivazione attraverso il relativo tasto non è più possibile. Ora ricaricare il Power Pack.
MANUTENZIONE
Prima dell’uso dell’apparecchio ausiliario per l’avviamento controllare sempre che i cavi non siano danneggiati e i morsetti dei poli siano
puliti e non corrosi.
Mantenere l’apparecchio pulito usando un panno asciutto. Non usare solventi o detergenti aggressivi.
CONSERVAZIONE
Mantenere l’apparecchio ausiliario per l’avviamento sempre carico. Vedi paragrafo “CARICA”. Conservare il Power Pack in un luogo asciutto
e possibilmente a temperatura ambiente, proteggere dal gelo e dalle alte temperature.
Non cercare MAI di riparare personalmente l’apparecchio. Le riparazioni di apparecchi elettrici devono essere eseguite solo da personale
specializzato appositamente addestrato. In caso di problemi con l’apparecchio contattare il rivenditore locale. L’apparecchio ausiliario per
11
l’avviamento è stato progettato per una lunga durata senza problemi. Se nonostante una scrupolosa osservanza delle istruzioni di questo
manuale dovessero nascere problemi, portare l’apparecchio dal rivenditore locale.
SMALTIMENTO
Il Power Pack è un apparecchio elettrico. Un apparecchio elettrico difettoso deve essere smaltito presso i punti di raccolta locali per
apparecchi elettrici ed elettronici fuori uso e non con i rifiuti domestici.
NL
Art.-nr.: 16528
Mini Lithium Power Pack met starthulp
INLEIDING
Hartelijk dank dat u voor het Mini Lithium Power Pack 16528 met starthulp gekozen hebt. Met behulp van het Mini Lithium Power Pack is de
starthulp voor een personenwagen met een te zwakke accu comfortabel en probleemloos mogelijk. Bovendien biedt het Power Pack u nog
meer nuttige functies, bijv. een praktische LED-werklamp om ’s nachts een wiel te vervangen.
Door de ingebouwde USB-aansluiting van het Mini Lithium Power Pack kan het apparaat als netonafhankelijke spanningsbron voor mobiele
telefoon, tablet en dergelijke gebruikt worden. Via de 12V-uitgang is het gebruik van kleine apparaten op 12V-basis mogelijk.
VEILIGHEIDSVOORSCHRIFTEN
De interne accu van het Mini Lithium Power Pack is een onderhoudsvrije lithiumaccu die niet vervangen kan worden.
Accu’s produceren tijdens het laden en de starthulp explosieve gassen. Om het risico van een explosie te beperken, dient u vuur en vonken
in de buurt van de accu’s te vermijden. Lees voor het gebruik van dit apparaat aandachtig de handleiding en de veiligheidsvoorschriften van
de fabrikant van de accu.
Neem ook de speciale instructies van de fabrikant van de voertuigaccu in acht!
Gebruik het Mini Lithium Power Pack uitsluitend als starthulp bij voertuigen met loodzuuraccu’s. Het is niet raadzaam om permanent
elektrische laagspanningssystemen via de klemmen te gebruiken, terwijl het Power Pack op de netstroomtoevoer aangesloten is. Het Power
Pack is geen spanningstransformator. Probeer nooit drogecelbatterijen, zoals ze in het huishouden gebruikt worden, te laden. Deze
batterijen kunnen exploderen en grote schade aanrichten.
•
•
•
•
•
•
•
•
•
•
Als u met loodzuurbatterijen werkt, moet altijd een tweede persoon in de buurt zijn om bij ongevallen, bijv. met batterijzuur, te
helpen.
Proper water en zeep moeten altijd in voldoende grote hoeveelheid in de onmiddellijke omgeving beschikbaar zijn.
Draag altijd een complete veiligheidsbril. Kleding wordt door de inwerking van zuren beschadigd. Bij huidcontact kunnen ernstige
letsels ontstaan. Draag passende veiligheidskleding. Vermijd alle oogcontact terwijl u met de accu werkt.
Als het accuzuur in contact komt met de huid of de kleding behandelt u de overeenkomstige plaatsen onmiddellijk met water en
zeep. Raadpleeg onmiddellijk een arts als er ondanks wassen huidirritatie of pijn op de desbetreffende plaatsen optreedt. In geval
van oogcontact spoelt u de ogen onmiddellijk gedurende ten minste tien minuten met koud stromend water en raadpleegt u daarna
onmiddellijk een arts.
Roken, brand en open licht zijn verboden in de buurt van een accu. Explosiegevaar.
Leg geen gereedschap op de accu, dit kan kortsluiting veroorzaken.
Draag geen juwelen als u met loodzuuraccu’s werkt, dit kan kortsluiting veroorzaken.
Gebruik geen losse kabels in de buurt van de starthulpklemmen van het apparaat. Ze kunnen een kortsluiting in de accu van het
apparaat en dus een explosie veroorzaken.
De klemmen mogen in geen geval tegen elkaar gehouden worden of elkaar aanraken omdat door vonken brand- en
explosiegevaar ontstaat.
Kortsluiting kan tot oververhitting van de accu leiden en een explosie veroorzaken.
LEVERINGSOMVANG
Controleer voor de ingebruikname van het apparaat de leveringsomvang:
1. Mini Lithium Power Pack met starthulpkabel
2. 230V-wisselstroom-laadapparaat
3. Handleiding (dit document)
4. 12V-gelijkstroom-adapterkabel/stekker
5. Adapter voor verschillende smartphones, tablets enz. en verschillende netstekkers.
TECHNISCHE GEGEVENS
Voor 12 volt-accu’s
USB-aansluiting
1 x 12 volt stopcontact
1 x 19 volt stopcontact
Afmetingen (l x b x h)
Gewicht
Capaciteit van de cellen
Starthulp 12 volt: 200A (400A Peak)
5V 2A
12V 2A
19V 3,5A
ca. 16 x 7,5 x 2,8 cm
ca. 430 g
12 000 mAh
12
VOOR HET EERSTE GEBRUIK
1. Voor het eerste gebruik moet het Mini Lithium Power Pack eerst volledig opgeladen worden. Het Power Pack moet indien mogelijk
na ieder gebruik opnieuw opgeladen en daarna ten minste om de 3 maanden bijgeladen worden.
2. Het starthulpapparaat nooit onopgeladen opbergen. Door diepontlading wordt het apparaat beschadigd.
3.
4.
De accu kan op verschillende manieren opgeladen worden:
Het apparaat kan door de aansluiting van de bijgeleverde netadapter op een veiligheidsstopcontact met 230 volt netspanning
opgeladen worden.
Het Power Pack kan ook via het 12V-stopcontact van uw voertuig (sigarettenaansteker) met behulp van de adapter voor de
sigarettenaansteker geladen worden.
OPLADEN MET NETADAPTER
De aansluiting van de netadapter (13) op de gelijkstroomaansluiting (4) van het Power Pack steken, dan de netstekker met het
230V-stopcontact verbinden.
De blauwe indicator (2) licht deels op, één LED knippert altijd en toont zo de actuele laadtoestand.
Het Mini Lithium Power Pack zo lang opladen, tot alle LEDs van de indicator constant branden. De netadapter kan nu van het Power Pack
en het 230V-stopcontact losgekoppeld worden. Voor een maximale levensduur van de accu moet het starthulpapparaat na ieder gebruik
weer opgeladen en ten minste om de 3 maanden bijgeladen worden.
OPLADEN MET 12-VOLT-ADAPTER
De 12V-adapter (12) in de gelijkstroomaansluiting (4) van het Power Pack steken, de 12V-aansluiting met de aansluiting van de
sigarettenaansteker van uw voertuig verbinden.
Daarna gedraagt het Power Pack zich precies zoals bij het opladen met de netadapter. De snelheid van het laden kan echter variëren
naargelang de motor van het voertuig gestart is, in functie van de toestand van de voertuigaccu enz.
STARTHULP
Voor het aansluiten van het starthulpapparaat op de accu ALTIJD de volgende controles uitvoeren:
• Ervoor zorgen, dat de voertuigontsteking en de volledige bijkomende uitrusting zoals verlichting, radio enz. uitgeschakeld zijn.
•
•
Ervoor zorgen, dat de voertuigaccu een spanning van 12V heeft en niet beschadigd is.
Ervoor zorgen, dat de accuaansluitingen schoon zijn en de aansluitkabels goed vastgeschroefd zijn.
1.
2.
3.
Voor de aansluiting van de starthulpkabel de voertuigontsteking uitschakelen.
Ervoor zorgen, dat de rode positieve (+) klem en de zwarte negatieve (-) klem elkaar niet aanraken.
Ervoor zorgen, dat de omgeving goed geventileerd is.
Belangrijk: in deze fase is de starthulpkabel (9) nog niet met het Power Pack verbonden.
4. De rode positieve (+) klem eerst op de positieve (+) accuaansluiting klemmen. De klem en de toevoerkabel mogen geen
beweegbare delen of brandstofleidingen aanraken.
5. De zwarte negatieve (-) klem op de negatieve (-) accuaansluiting klemmen.
6. Verbind nu de starthulpkabel (9) met het Power Pack, open daarvoor de afdekking van de starthulpaansluiting (8).
7. De contactsleutel gedurende maximaal 6 seconden op ‘aan’ zetten, het voertuig zou nu moeten starten. Indien de motor na enkele
seconden niet start, schakelt u de ontsteking uit en wacht u ten minste 3 minuten alvorens u nogmaals probeert.
8. Nadat de motor aangesprongen is, verwijdert u de starthulpkabel van het Power Pack.
9. Daarna eerst de zwarte, negatieve (-) klem van de voertuigaccu wegnemen, vervolgens de rode positieve (+) klem.
10. Na gebruik de kabels en het Power Pack opbergen en de afdekking van de starthulpaansluiting weer sluiten.
11. Na gebruik het starthulpapparaat opladen zoals bij OPLADEN beschreven.
12. De laadtoestand van de accu regelmatig controleren door de activeringsknop in te drukken.
OPGELET: DOOR HET STARTEN MET STARTHULP KUNNEN ELEKTRONISCHE ONDERDELEN BESCHADIGD WORDEN.
RAADPLEEG ALTIJD HET HANDBOEK VAN DE VOERTUIGFABRIKANT OM TE BEPALEN, WELKE VEILIGHEIDSMAATREGELEN
EVENTUEEL GENOMEN MOETEN WORDEN.
LED-WERKLAMP
Om de LED-werklamp te gebruiken activeert u eerst het apparaat via de activeringsknop (1). Het Power Pack licht op en toont u de huidige
laadtoestand. Druk nu nogmaals op de activeringsknop en houd de knop gedurende enkele seconden ingedrukt.
Zodra de LED oplicht, kunt u de knop loslaten.
e
Bovendien beschikt de werklamp nog over twee andere lichtvarianten. Druk nu kort op de activeringsknop om naar de 2 toestand te
e
schakelen (snel knipperen). Door nogmaals kort op de knop te drukken schakelt u naar de 3 modus. De lamp knippert nu afwisselend kort
13
en snel.
Door nogmaals kort te drukken schakelt u de lamp uit.
Enkele minuten nadat u de lamp niet meer gebruikt schakelt het Power Pack automatisch uit.
USB-AANSLUITING en 12V/19V-AANSLUITING
Om de USB-aansluiting te gebruiken activeert u eerst het apparaat via de activeringsknop (1). Daarna kunt u de USB-aansluiting (3) zoals
gewoonlijk gebruiken. Gebruik daarvoor de bijgevoegde adapter of de adapter die bij uw mobiele telefoon/smartphone/tablet enz. hoort.
Enkele minuten nadat u de USB-aansluiting of de 12V/19V-aansluiting niet meer gebruikt schakelt het Power Pack automatisch uit.
LAADSTATUS
Als de activeringsknop ingedrukt wordt, wordt de acculaadstatus getoond. Tijdens het bijladen wordt dit permanent getoond.
Als de laadtoestand van het Power Pack te laag is, is activeren via de activeringsknop niet meer mogelijk. Laad het Power Pack nu bij.
ONDERHOUD
Voor gebruik van het starthulpapparaat altijd controleren, of de kabels onbeschadigd en de klemmen schoon en vrij van corrosie zijn. Veeg
het apparaat na gebruik met een droge doek schoon. Geen oplosmiddelen of scherpe reinigingsmiddelen gebruiken.
BEWARING
Het starthulpapparaat altijd in opgeladen toestand houden. Zie hoofdstuk ‘OPLADEN’. Het Power Pack droog en indien mogelijk bij
kamertemperatuur bewaren, tegen vorst en hoge temperaturen beschermen.
Probeer het apparaat NOOIT zelf te repareren. Reparaties aan elektrische apparaten mogen uitsluitend door opgeleid en gespecialiseerd
personeel uitgevoerd worden. Bij problemen met het apparaat neemt u contact op met uw plaatselijke verkoper. Uw starthulpapparaat werd
voor een lange en probleemloze gebruiksduur ontwikkeld. Indien echter na zorgvuldig naleven van de aanwijzingen in dit handboek
problemen optreden, brengt u het apparaat naar uw plaatselijke verkoper.
VERWIJDERING
Het Power Pack is een elektrisch apparaat. Een defect elektrisch apparaat moet naar de plaatselijke inzamelplaatsen voor elektrisch en
elektronisch schroot gebracht worden en hoort niet thuis bij het huishoudelijk afval.
KONTAKTINFORMATIONEN, CONTACT INFORMATION, INFORMATIONS DE CONTACT, INFORMAZIONI SUI CONTATTI,
CONTACTINFORMATIE
EAL GmbH
Otto-Hausmann-Ring 107
42115 Wuppertal
Deutschland
Telefon: +49 (0)202 42 92 83 0
Telefax: +49 (0)202 2 65 57 98
Internet: www.eal-vertrieb.com
E-mail: [email protected]
© EAL GmbH, 16528, Ma13
14
15
© Copyright 2026 Paperzz