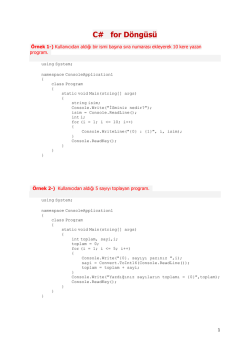
NXC5500
Quick Start Guide
Wireless LAN Controller
Installation der Hardware | Установка оборудования
Instalación del hardware | Maskinvaruinstallation
Installation du matériel | 硬 件 安 装
Installazione hardware | 硬體安裝
Hardware Installation
P1 ~ P6
USB
CONSOLE
Op
tio
PoE
INTERNET
1
AP
2
Op
tio
na
l
na
l
3
AC
INPUT
4
1
Connect to a PC for initial configuration.
Connect to a modem/router for Internet access.
Connect to a PoE switch to supply power over
Ethernet to a managed AP.
Schließen Sie das Gerät für die Erstkonfiguration
an einen PC an. Schließen Sie das Gerät für den
Internetzugriff an ein Modem/einen Router an.
Schließen Sie das Gerät an einen PoE-Schalter an,
um einen Managed-AP über die
Netzwerkverbindung mit Strom zu versorgen.
Conectar al PC para la configuración inicial.
Conectar al módem/router para el acceso a
Internet. Conectar al conmutador PoE para
suministrar energía por Ethernet a un PA
administrado.
Connecter à un PC pour la configuration initiale.
Connecter à un modem/routeur pour accéder à
Internet. Connecter à un commutateur PoE pour
alimenter par câble Ethernet à un point d'accès
géré.
Connettere a un PC per la configurazione iniziale.
Connettere ad un modem/router per l'accesso a
Internet. Connettere ad uno switch PoE per
alimentare tramite Ethernet un PA gestito.
Подключитесь к компьютеру для проведения
первичной настройки. Подключитесь к
модему/маршрутизатору для доступа в
Интернет. Подключите коммутатор PoE для
подачи питания к управляемой ТД по кабелю
Ethernet.
Anslut till en dator för grundinställning. Anslut till
ett modem/en router för Internet-åtkomst. Anslut
till en PoE-brytare för att få stöm via Ethernet till
en hanterad AP.
1/2
2
To configure the NXC5500 using
commands, connect the
CONSOLE port to a PC with the
included RJ-45-to-DB-9 cable.
Um den NXC5500 mit Befehlen zu
konfigurieren, verbinden Sie den
CONSOLE (KONSOLE) Anschluss
mit dem beiliegenden
RJ-45-auf-DB-9 Kabel mit einem
PC.
Para configurar el NXC5500 con
comandos, conecte el puerto
CONSOLE (CONSOLA) a un PC
con el cable RJ-45 a DB-9 incluido.
Pour configurer le NXC5500 à
l'aide des commandes, connectez
le port CONSOLE à un PC avec le
câble RJ-45 à DB-9 inclus.
Per configurare l'unità NXC5500
usando comandi, collegare la
porta CONSOLE al PC con il cavo
RJ-45-a-DB-9 allegato.
Для настройки NXC2500 с
помощью командной строки
подключите порт CONSOLE
(консоль) к компьютеру с
помощью переходного кабеля
RJ-45—DB-9.
För att konfigurera kommandona i
NXC5500 ansluter du
CONSOLE-porten (konsol) till en
dator med den medföljande
RJ-45-till-DB-9-kabeln.
连接到 PC 以进行初始配置。连接到调制解调器/路
由器以访问因特网。连接到 PoE 交换机,通过以太
网向受管 AP 供电。
要使用命令配置 NXC5500,请通过
附带的 RJ-45 转 DB-9 电缆将
CONSOLE(控制台)端口连接到
PC。
連接電腦進行初步設定。連接數據機/路由器以連接
網際網路。 連接 PoE 交換機,透過乙太網路供電給
受管理的 AP。
若要使用命令設定 NXC5500,請使
用 RJ-45 對 DB-9 纜線連接
CONSOLE (控制台) 埠與電腦。
3
Connect a USB storage device to one
USB port to store system logs,
diagnostic files, packet captures or
system core dump files.
Schließen Sie ein USB-Speichergerät an
einen USB-Anschluss an, um
Systemprotokolle, Diagnosedateien,
Paketerfassungen oder System
Core-Dump-Dateien zu speichern.
Conecte un dispositivo de
almacenamiento USB a un puerto USB
para guardar los registros del sistema,
archivos de diagnóstico, capturas de
paquetes o archivos de volcado del
núcleo del sistema.
Connectez un périphérique de stockage
USB à un port USB pour stocker les
journaux système, les fichiers de
diagnostic, les captures de paquets ou
les fichiers core dump du système.
Collegare un dispositivo di archiviazione
USB ad una porta USB per memorizzare
log di sistema, file diagnostici, pacchetti
acquisiti e file core dump di sistema.
Подключите USB устройство к порту
USB для сохранения системных
журналов, файлов диагностики,
файлов перехвата пакетов,
дамп-файлов ядра системы.
Anslut en USB-lagringsenhet till en
USB-port för att lagra systemloggar,
diagnostiska filer, paketlagringar och
system core dump-filer.
将 USB 存储设备连接到一个 USB 端口来
存储系统日志、诊断文件、捕捉的信息包
或系统核心转储文件。
請將 USB 儲存裝置連接至 USB 埠,儲存
系統紀錄、診斷檔案、封包擷取或系統核
心傾印檔。
Connect to an appropriate
power source and set the
power switch to the ON
position.
4
Schließen Sie eine
geeignete
Stromversorgung an und
stellen Sie den
Ein/Aus-Schalter in die
Position ON.
Conecte a una fuente de
alimentación adecuada y
ajuste el interruptor de
alimentación a la posición
ON.
Connectez-vous à une
source d'alimentation
appropriée et mettez
l'interrupteur
d'alimentation sur la
position ON.
Collegare ad una sorgente
di alimentazione adeguata
e impostare l'interruttore
di accensione in posizione
ON.
Подсоедините
прилагаемый шнур
питания и переключите
выключатель питания в
положение ON.
Anslut till lämplig
strömkälla och ställ in
strömbrytaren på
ON-positionen.
连接到适当的电源并将电源
开关设置在 ON 位置。
連接合適的電源,將開關切
換至 ON 位置。
Copyright © 2014 ZyXEL Communications Corp. All Rights Reserved
Erstkonfiguration | Первоначальная настройка
Configuración inicial | Initial konfiguration
Configuration initiale | 初 始 配 置
Configurazione iniziale | 初始設定
Initial Configuration
1
2
Open your web browser.
Starten Sie Ihren Webbrowser.
Abra su explorador de web.
Ouvrez votre navigateur web.
Aprire il browser.
Откройте ваш веб-браузер.
Öppna din webbläsare.
打开 web 浏览器。
開啟您的網頁瀏覽器。
Log in and go to:
• Configuration > Network > Interface > VLAN to change the NXC5500’s default IP address.
• Configuration > Object > AP Profile to configure wireless security for your wireless APs.
Melden Sie sich an, und gehen Sie zu:
• Configuration (Konfiguration) > Network (Netzwerk) > Interface (Schnittstelle) > VLAN,
um die IP-Standardadresse des NXC5500 zu ändern.
• Configuration (Konfiguration) > Object (Objekt) > AP Profile (AP-Profil), um die
Wireless-Sicherheit des Wireless-AP zu konfigurieren.
Iniciar sesión e ir a:
• Configuration > Network > Interface > VLAN (Configuración > Red > Interfaz > VLAN)
para cambiar la dirección IP predeterminada del NXC5500.
• Configuration > Object > AP Profile (Configuración > Objeto > Perfil PA) para configurar la
seguridad inalámbrica de sus PAs inalámbricos.
Connectez-vous et allez à :
• Configuration > Network > Interface > VLAN (Configuration > Réseau > Interface >
VLAN) pour modifier l'adresse IP par défaut du NXC5500.
• Configuration > Object > AP Profile (Configuration > Objet > Profil AP) pour configurer la
sécurité sans fil pour vos points d'accès sans fil.
Effettuare l'accesso e andare a:
•Configuration > Network > Interface > VLAN (Configurazione > Rete > Interfaccia > VLAN)
per modificare l'indirizzo IP predefinito dell'unit NXC5500.
•Configuration > Object > AP Profile (Configurazione > Oggetto > Profilo PA) per
configurare la sicurezza wireless per i PA wireless.
Авторизуйтесь и перейдите к:
• Чтобы изменить базовый IP-адрес NXC5500, выберите Configuration > Network >
Interface > VLAN (Конфигурация > Сеть > Интерфейс > VLAN).
• Для настройки защиты радиосвязи ваших беспроводных ТД выберите Configuration >
Object > AP Profile (Конфигурация > Объект > Профиль АР).
Logga in och gå till:
• Configuration > Network > Interface > VLAN (Konfiguration > Nätverk > Gränssnitt >
VLAN) för att ändra standard-IP-adressen för NXC5500.
• Configuration > Object > AP Profile (Konfiguration > Objekt > AP-profil) för att
konfigurera trådlös säkerhet för dina trådlösa AP:er.
登录并转到:
• Configuration > Network > Interface > VLAN(配置 > 网络 > 接口 > VLAN),更改
NXC5500 的默认 IP 地址。
• Configuration > Object > AP Profile(配置 > 对象 > AP 配置文件),配置无线 AP 的无线安
全性。
登入前往:
• 設定 (Configuration) > 網路 (Network) > 介面 (Interface) > VLAN,修改 NXC5500 的預設
IP 位址。
• 設定 (Configuration) > 物件 (Object) > AP 設定組合 (AP Profile),設定無線 AP 的網路安全性
。
Default Login Details
Standard-Anmeldedaten | Данные для входа по умолчанию
Detalles de inicio de sesión predeterminados | Standarduppgifter för inloggning
Informations de connexion par défaut | 默认登录详细信息
Dettagli sull'accesso predefinito | 預設的登入詳細資訊
IP Address: 192.168.1.1
User Name: admin
Password: 1234
For more information, please refer to the User's Guide at www.zyxel.com.
Rackmontage | Монтаж в стойке
Montaje en bastidor | Hyllmontering
Montage en rack | 机 架 安 装
Montaggio su rack | 機架安裝
Rack Mounting
2
1
Rack-mounting screws that come with the rack.
Mitgelieferte Schrauben für die Rackmontage.
Tornillos de montaje en bastidor incluidos en el bastidor.
Vis pour montage en rack fournies avec le rack.
Viti di montaggio su rack che vengono fornite con il rack.
Винты для стоечного монтажа из комплекта креплений стойки.
Rack-monteringsskruvar som levereras med rackenheten.
机架附带的机架安装螺丝。
隨附於機架的安裝螺絲。
M4 flat head screws (included).
M4 Senkkopfschrauben (im Lieferumfang enthalten).
Tornillos de cabeza plana M4 (incluidos).
Vis à tête plate M4 (incluses).
Viti M4 a testa piatta (incluse).
Винты M4 с плоской головкой (в комплекте).
M4 skruvar med platt huvud (ingår).
M4 平头螺丝(附带)
M4 平頭螺絲 (已含)
Wichtige Information | Важная информация
Información importante | Viktig information
Information importante | 重要信息
Informazioni importanti | 重要資訊
Important Information
Go to www.zyxel.com to view this product's documentation and certifications.
Gehen Sie auf www.zyxel.com, um die Dokumentationen und Zertifizierungen dieses Produktes anzusehen.
Visite www.zyxel.com para ver la documentación y certificaciones de este producto.
Pour une documentation complète et plus de renseignements sur les certifications, rendez-vous sur le site
www.zyxel.com.
Visita www.zyxel.com per visualizzare la documentazione e le certificazioni del prodotto.
Для просмотра документации и сертификатов по данному продукту перейдите на страницу www.zyxel.com.
Besök www.zyxel.com för att ta del av denna produkts dokumentation och certifieringar.
请点击www.zyxel.com查找产品文档和认证信息。
請前往www.zyxel.com參閱此產品的相關文件及認證。
ENGLISH | DEUTSCH | ESPAÑOL | FRANÇAIS | ITALIANO | РУССКИЙ | SVENSKA | 简体中文 | 繁體中文
2/2
EU Importer: ZyXEL Communications A/S∣Generatorvej 8D, 2730 Herlev∣http://www.zyxel.dk
US Importer: ZyXEL Communications, Inc∣1130 North Miller Street Anaheim, CA 92806-2001∣http://www.us.zyxel.com
Copyright © 2014 ZyXEL Communications Corp. All Rights Reserved
© Copyright 2026 Paperzz