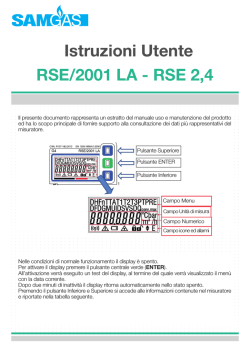
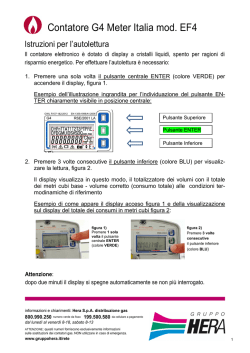
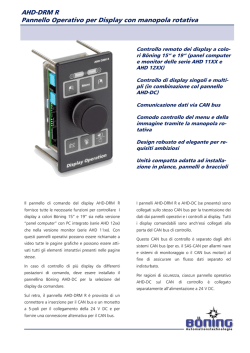
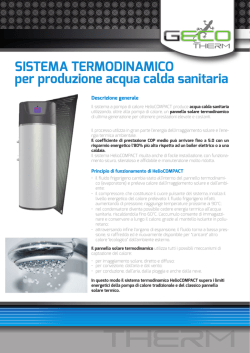
PANNELLO
DI CONTROLLO
REMOTO REC 07
REMOTE CONTROL
PANEL REC 07
MANUALE UTENTE
MANUALE
INSTALUSER
MANUAL
MURALI
DA ESTER-
IT
Gentile cliente,
Beretta, da sempre impegnata a soddisfare le richieste della propria Clientela,
pone tutta la sua esperienza e competenza nella realizzazione di tutti i
suoi apparecchi.
Per consentirLe di familiarizzare con la Sua nuova caldaia e farLe apprezzare con la massima soddisfazione i vantaggi del riscaldamento autonomo e della produzione istantanea di acqua calda, abbiamo realizzato questo
manuale di semplice consultazione.
Le chiediamo di leggerlo attentamente, perchè seguendo le nostre informazioni ed i nostri consigli potrà utilizzare correttamente il Suo nuovo
apparecchio e provvedere ad una sua puntuale manutenzione.
Al termine della lettura, lo conservi con cura, potrà esserLe utile per ogni
ulteriore consultazione.
Per qualsiasi ulteriore necessità, potrà contattare il nostro “SERVIZIO
CLIENTI”.
Telefonando al 199.13.31.31 (vedi tariffe sul retro copertina), potrà mettersi in contatto con uno dei nostri operatori qualificati, che sarà in grado
di fornirLe tutte le informazioni sul funzionamento del Suo apparecchio
e sulla nostra intera gamma di prodotti e servizi e che sarà pronto per
accogliere tutti i Suoi suggerimenti ed osservazioni.
In caso di assenza dei nostri operatori, una messaggeria telefonica accoglierà la Sua chiamata per permetterci di risponderLe appena possibile.
Le ricordiamo che Beretta dispone di un’Organizzazione di Assistenza
composta da personale qualificato pronto ad intervenire ad ogni Sua chiamata.
Per contattare il Centro di Assistenza Tecnica a Lei più vicino, potrà telefonare al numero 199.12.12.12 (vedi tariffe sul retro copertina) che La
metterà in contatto con il Centro di Assistenza Tecnica operante nella
Sua zona.
UK
Dear Client,
Beretta has always been committing itself to comply with the demands of
its own Clients and uses all its experience and competence for the realization
of all its appliances.
We made this advisory manual in order to let you become familiar with
your new boiler and appreciate with maximum satisfaction the advantages
of autonomous heating and instantaneous hot water production.
Please read carefully because, following our information and advice, you
would be able to use properly your new appliance and provide for its
proper maintenance.
Having finished reading, you should keep it with care; it could be useful
for a later consultation.
IT
Il pannello di controllo remoto è conforme a:
- Direttiva Compatibilità Ettromagnetica 89/336/CEE
- Direttiva Bassa Tensione 73/23/CEE
0694
INDICE
1 INFORMAZIONI GENERALI
pag.
5
2 ACCENSIONE
pag.
8
3 UTILIZZO DEL PANNELLO DI CONTROLLO REMOTO
3.1 Funzioni base (coperchio chiuso)
3.1.1 Scelta del modo di fuzionamento
Funzione estate
Funzione inverno
Funzionamento manuale - TERMOSTATO AMBIENTE
Funzionamento notturno
Funzionamento automatico CRONOTERMOSTATO
3.1.2 Selettore correzione temperatura ambiente impostata
3.1.3 Interruzione del tempo di riscaldamento
Pausa
Vacanze
3.1.4 Funzione di sblocco
pag.
pag.
pag.
pag.
pag.
pag.
pag.
pag.
pag.
pag.
pag.
pag.
pag.
10
10
11
11
11
11
12
12
13
13
13
14
16
3.2 Funzioni avanzate (coperchio aperto)
3.2.1 Impostazione della lingua
3.2.2 Selezione dei menu disponibili
3.2.3 Modifica dei dati preimpostati
3.2.4 Descrizione dei menu
UTENTE
VISUALIZZARE
ORA+GIORNO
PROGR-RISC (PROGRAMMAZIONE RISCALDAMENTO)
PROGR-ACS (PROGRAMMA ACQUA CALDA SANITARIA)
pag.
pag.
pag.
pag.
pag.
pag.
pag.
pag.
pag.
pag.
17
18
19
19
20
20
21
22
22
27
4 SPEGNIMENTO
pag. 31
5 ANOMALIE
pag. 32
6 VARIE
pag. 36
In alcune parti del manuale sono utilizzati i simboli:
ATTENZIONE = per azioni che richiedono particolare cautela ed adeguata
preparazione
VIETATO =
per azioni che NON DEVONO essere assolutamente eseguite
3
UK
The remote control panel complies with the following Directives:
- Electromagnetic compatibility Directive 89/336/CEE
- Low-voltage Directive 73/23/CEE
0694
CONTENTS
1 GENERAL INFORMATION
2 SWITCHING ON
3 USING THE REMOTE CONTROL PANEL
3.1 Basic functions (board cover closed)
3.1.1 Selecting the operating mode
Summer mode
Winter mode
Manual operating mode - ROOM THERMOSTAT
Night operating mode
Automatic operating mode PROGRAMMABLE
ROOM THERMOSTAT
3.1.2 Selector for adjusting the room temperature set
3.1.3 Interrupting the heating schedule
Pause
Absence
3.1.4 Unblocking function
3.2 Advanced functions (board cover open)
3.2.1 Setting the language
3.2.2 Selecting the menus available
3.2.3 Adjusting the preset data
3.2.4 Description of menus
USER
DISPLAY
TIME+DAY
HIG-PROG (CH program setting)
HOTW-PROG (DHW program setting)
“
“
“
“
“
“
“
“
“
“
“
“
“
“
“
“
12
13
13
13
14
16
17
18
19
19
20
20
21
22
22
27
4 SWITCHING OFF
5 FAULTS
6 MISCELLANEOUS
“
“
“
31
32
36
page 5
“
6
“
10
“
10
“
11
“
11
“
11
“
11
“
12
In some parts of the manual, these symbols are used:
ATTENTION = for actions that require particular caution and proper
training
FORBIDDEN = for actions that MUST NOT be performed
IT
UK
1 INFORMAZIONI GENERALI
1 GENERAL INFORMATIONS
PER UN USO CORRETTO DEL PANNELLO DI
CONTROLLO REMOTO VI INVITIAMO A LEGGERE ATTENTAMENTE IL CONTENUTO DEL
PRESENTE MANUALE.
AVVERTENZE
1) Il pannello di controllo remoto deve essere installato nel locale a voi più accessibile per il controllo della temperatura
ambiente (generalmente è il soggiorno).
2) Per consentire una più agevole lettura del
display, il pannello di controllo deve essere posizionato, come prevedono le
normative, a 1,5 metri da terra.
3) Il pannello di controllo remoto è alimentato in bassa tensione direttamente dalla caldaia. Al suo interno è comunque presente una batteria tampone che garantisce il mantenimento delle impostazioni
utente anche in caso di black-out o di interruzione del collegamento caldaia.
4) Il pannello di controllo deve essere tassativamente tenuto lontano da fonti di calore o da correnti d’aria: queste possono
compromettere la bontà delle rilevazioni
del termostato ambiente incorporato nel
pannello stesso.
5) Non aprire per nessun motivo il pannello: il suo funzionamento non necessita
di alcuna manutenzione.
6) Non eseguire pressioni sul vetro del display
a cristalli liquidi: tale operazione potrebbe
danneggiare il vetro stesso e causare problemi di visualizzazione.
7) Per la pulizia del display servirsi esclusivamente di un panno asciutto: eventuali infiltrazioni potrebbero danneggiare i
cristalli liquidi.
MODALITÀ DI UTILIZZO
Il pannello di controllo remoto prevede tre
modalità di utilizzo:
1) TERMOSTATO AMBIENTE
Il pannello di controllo si preoccupa di
mantenere costante la temperatura dell’ambiente secondo i parametri inseriti
dall’utente.
2) CRONOTERMOSTATO
In questo caso sarà per voi possibile una
gestione più raffinata del riscaldamento
domestico in quanto potrete decidere
come e quando la caldaia entrerà in funzione per riscaldare gli ambienti.
3) CONTROLLO CALDAIA
In questa modalità di utilizzo il pannello
di controllo permette di gestire il funzionamento della caldaia senza controllo
della temperatura ambiente. In questo
caso è necessario utilizzare un termostato
ambiente esterno.
FOR A PROPER USE OF THE REMOTE
CONTROL PANEL, PLEASE READ
CAREFULLY THE ENTIRE CONTENTS OF
THIS MANUAL.
WARNINGS
1) The remote control panel has to be
installed in the room most accessible
for checking the temperature of the
environment (normally the living room).
2) In order to read the display more easily,
the remote control panel has to be
placed, according to standards, at a
height of 1.5 metres from the floor.
3) The control panel is supplied with lowvoltage directly by the boiler.
Nevertheless, it contains a buffer
battery, which guarantees the maintenance of the user settings even when
there is a blackout or a break in the
boiler connection.
4) It is essential that the control panel
be kept away from heat sources and
draughts: these may affect the accuracy of the room thermostat incorporated in the panel
5) Do not attempt to open the panel: it
requires no maintenance.
6) Do not press against the surface of the
liquid crystal display: this could damage
the surface itself and cause viewing
problems.
7) To clean the display, simply wipe with
a dry cloth: any infiltrated liquid could
damage the liquid crystals.
HOW TO USE
The remote control panel has three
operating modes:
1) ROOM THERMOSTAT
The control panel keeps the temperature of the environment constant,
based on the settings made by the user.
2) PROGRAMMABLE
ROOM
THERMOSTAT
In this mode, advanced settings are
available; you can decide how and
when the boiler will switch on to heat
up the environment.
3) BOILER CONTROL
In this mode, the control panel works
only with the boiler controls; it does
not control the temperature of the
environment. For that, you should use
an external room thermostat.
5
IT
COSA VISUALIZZA IL DISPLAY
E
F
G H
A
B
C
D
I
J
K
A - Zona per messaggi di testo e visualizzazione ora
B - Orologio 24h per visualizzazione del programma riscaldamento
attuale
C - Simbolo di comunicazione con caldaia, indica che è in corso uno scambio
di dati tra caldaia e pannello controllo remoto
D - Simbolo di funzione vacanze attiva
E - Simbolo di bruciatore acceso in riscaldamento o sanitario
F - Simbolo protezione antigelo attiva
G - Simbolo di modifica: indica che è possibile variare i valori impostati
H - Freccia indicante il numero del giorno corrente
I - Gradi centigradi
J - Visualizzazione dei valori impostati
K - Simboli indicanti il modo di funzionamento
Stand-by/OFF (il riscaldamento e l’acqua calda sono spenti, solo la
funzione antigelo resta attiva)
Funzionamento automatico - cronotermostato
Funzionamento manuale (riscaldamento continuo a temperatura
impostata - T-AMB1) - termostato ambiente
In programmazione riscaldamento i simboli corrispondono a:
1° fascia oraria di funzionamento
2° fascia oraria di funzionamento
3° fascia oraria di funzionamento
Funzionamento notturno (riscaldamento a temperatura ridotta)
Funzionamento estivo (riscaldamento spento, solo acqua calda)
UK
DESCRIPTION OF DISPLAY
E
F
G H
A
B
C
D
I
J
K
A - Text messages and time display field
B - Daily current heating schedule
C - Communication with the boiler symbol, indicates that there is an
exchange of data between the boiler and the remote control panel
D - Absence function symbol
E - Symbol for burner operating in the heating or sanitary function
F - Anti-freeze protection symbol
G - Modification symbol: indicates that the values set may be
modified
H - Arrow indicating the current day number
I - Centigrade degrees
J - Displaying the values set
K - Operating mode symbols
Stand-by/OFF (the heating and domestic hot water are off, only
the anti-freeze function is active)
Automatic operating mode – programmable room thermostat
Manual operating mode (continuous heating at selected temperature - T-ROOM 1) - room thermostat
For the heating schedule, the symbols correspond to:
1st operating time band
2nd operating time band
3rd operating time band
Night operating mode (reduced temperature heating)
Summer operating mode (heating off, domestic hot water only)
7
IT
UK
2 ACCENSIONE
2 SWITCHING ON
Con lo sportellino del pannello di
controllo remoto chiuso, premere
il tasto
fino a visualizzare il tipo
di funzionamento desiderato, estao inverno
(il
te
display visualizza uno dei modi di
funzionamento invernale disponibili - vedi paragrafo “Funzione inverno”).
With the board cover closed, push
the
button until you see on the
display the desired operating
mode, summer
or winter
-
Il pannello di controllo remoto si attiva nello stato in
cui si trovava prima dello spegnimento: se si trovava nella funzione
, si
inverno
riaccenderà in inverno; se si trovava in estate
, si
attiverà in questo
stato.
- (the display shows one of
the available winter operating
modes - see section “Winter
operating mode”).
PAUSE
PAUSE
La caldaia effettuerà la fase di avviamento e resterà in funzione fino
a quando saranno raggiunte le temperature impostate.
Nel caso si verificassero anomalie
di accensione o di funzionamento,
la caldaia effettuerà un “arresto di
sicurezza” e sul pannello di controllo verrà visualizzato un codice anomalia.
AUTO MAN
AUTO MAN
The
remote
control panel
starts up in the
operating mode
in which was set
to work before it
was switched off:
if it was in winter
, it
mode
starts up in winter
mode; if it was in
summer mode
, it starts up in
summer mode.
The boiler will start up and continue to operate until the selected
temperatures are reached.
If faults occur on starting or
operating, the boiler will make a
“safety stop” and a fault code will
appear on the display.
Per ripristinare le
condizioni di av- PAUSE
AUTO I MAN
viamento:
+
- premere contemporaneaRESET
mente i tasti
PAUSE+ AUTOMAN sul pannello di controllo remoto.
To reset the
boiler:
- press the PAUSE
and
AUTOMAN buttons
simultaneously
on the remote
control panel.
IT
UK
Il ripetersi di blocchi suggerisce
l’intervento del Centro di Assistenza Tecnica.
Per informazioni dettagliate
riferirsi al capitolo “Anomalie”.
If the blocking fault occurs over
again, contact the Service
Center.
For detailed information, see
section “Faults”.
ATTENZIONE
Il pannello di controllo remoto
svolge funzioni diverse a seconda che lo sportellino frontale
sia aperto o chiuso.
ATTENTION
The remote control panel carries
out different functions,
depending on the board cover
being open or closed.
A coperchio chiuso sono disponibili le funzioni base che consentono all’utente di accendere e spegnere la caldaia, scegliere il tipo di funzionamento
desiderato e sbloccare la caldaia
dopo un’anomalia.
With the board cover closed,
basic functions are available,
which allow the user to switch
on or off the boiler, choose the
desired operating mode and
unblock the boiler when a fault
occurred.
Molto interessante è la presenza del selettore di modifica della
temperatura ambiente, che permette di correggere in maniera molto semplice e veloce, il
valore di temperatura ambiente
impostato di ± 5°C.
It is very interesting the presence
of the selector for adjusting the
room temperature, which
facilitates the correction of the
room temperature set with ±
5°C.
A coperchio aperto sono disponibili funzioni più avanzate
come, per esempio, modifica
delle
temperature,
impostazione del programma
riscaldamento e altro (vedi capitolo dedicato).
With the board cover open,
advanced functions are
available, as for instance
regulating temperatures, setting
the heating schedule and others
(see dedicated chapter).
9
UK
IT
3 UTILIZZO
DEL 3 USING THE REMOTE
CONTROL PANEL
PANNELLO
DI
CONTROLLO REMOTO
3.1 Funzioni base
(coperchio chiuso)
3.1 Basic functions
(board cover closed)
Testo pausa/vacanze
Pause/holiday button
Acceso/Spento
Estate/Inverno
On/Off
Summer/Winter
Funzionamento manuale/automatico
Manual/Automatic operating mode
Reset anomalie (premere contemporaneamente i due tasti)
Resetting faults (press both keys
simultaneously)
±5°C rispetto alla temperatura ambiente impostata
±5°C given the room temperature set
Con il coperchio chiuso sono attivi i se- With the cover closed, the following
buttons are enabled:
guenti tasti:
Acceso/spento, selezione regimi di
On/Off, selects the operating mode
funzionamento
Pause/Vacanze (Interruzione del tempo
di riscaldamento)
PAUSE
Pause/Absence (interrupts the
heating schedule)
Nella funzione inverno consente AUTO I MAN
la scelta dei modi di funzionamento: manuale, notturno e automatico
In winter mode, selects the
operating mode: manual, night or
automatic
Premuti contemporaneamen- PAUSE AUTO I MAN Pressed simultaneously, they
te generano uno sblocco del+
unblock the boiler (RESET)
la caldaia (RESET)
RESET
Selector for adjusting the room
temperature set with ±5°C.
°C
Selettore per la correzione di ±5°C
della temperatura ambiente impostata.
-
+
IT
UK
3.1.1 Scelta del modo di 3.1.1 Selecting the operating
mode
funzionamento
SUMMER MODE
FUNZIONE ESTATE
Domestic
hot
Solo acqua sanitawater only.
ria. Per attivare la
To select summer
funzione estate,
operating mode,
premere il tasto
press the
fino a
button until you
visualizzare sul
see on the display
display il simbolo
AUTO MAN
PAUSE
the symbol “ “.
“ “. Per modificare i valori di temperatura ac- To adjust the domestic hot
qua sanitaria riferirsi al MENU water temperature, see USER
UTENTE (paragrafo 3.2.4. sezio- MENU (paragraph 3.2.4. “TDHW” dedicated section).
ne dedicata “T-ACS”).
FUNZIONE INVERNO
WINTER MODE
Acqua calda sanitaria + riscalda- Domestic hot water + heating.
mento. Per attivare la funzione inTo select the winter operating
”.
verno premere il tasto “
” button.
mode, press “
Per operare la scelta del tipo di
To select the desired winter
funzionamento invernale, premere
operating mode, press the
il tasto AUTO/MAN fino a
AUTO/MAN button until you see
visualizzare sul display il simbolo
the corresponding symbol on
corrispondente alla funzione dethe display.
siderata. Il display visualizza uno
The display shows one of the
dei tre modi di funzionamento inavailable winter operating
vernale disponibili:
modes:
Funzionamento manuale
Manual mode
Quando sul display è attivo il
simbolo “ ”, il pannello di con- When the symbol “ ” is
trollo remoto funziona come displayed, the remote control
panel operates as ROOM
TERMOSTATO AMBIENTE.
THERMOSTAT.
Nella funzione
the “ ”
T-AMB1/T-ROOM DES 1 In
“ ” si ha un tipo
operating
mode,
di funzionamento
the boiler works
“manuale”, cioè
“manually”, that is
indipendente dalto
say
le fasce orarie imindependently of
postate nella prothe time bands set
grammazione riAUTO MAN
PAUSE
scaldamento (pain the heating
ragrafo 3.2.4. sezione dedicata schedule (paragraph 3.2.4. HIGPROGR-RISC). Otteniamo che il PROG dedicated section). As a
riscaldamento funziona in conti- result, the heating works
nuo alla temperatura scelta continuously at the selected
(vedi MENU UTENTE).
Per modificare il valore di tem- temperature (see USER MENU).
peratura ambiente, riferirsi al To modify the room temperacapitolo “Modifica dei dati ture, see section “Adjusting the
preimpostati” paragrafo 3.2.3, preset data” paragraph 3.2.3,
“T-ROOM” dedicated section.
sezione dedicata “T-AMB”.
11
IT
UK
Funzionamento Notturno
Night operating mode
Quando sul display è attivo il sim- When the “ ” symbol is displayed,
bolo “ ”, il riscaldamento è spento. the heating is off.
Il funzionamento si attiverà solo se The heating function will enable
la temperatura ambiente scende only if the room temperature falls
al di sotto delle temperatura ridotta below the reduced temperature set
(T-REDUCED - see
impostata (T-RIDOTUSER
MENU,
TA - vedi MENU T-RIDOTTA/T-REDUCED
paragraph 3.2.4).
UTENTE, paragrafo
To
adjust
the
3.2.4).
reduced temperatuPer modificare il vare values, see chapter
lori di temperatura ri“Adjusting the preset
dotta, riferirsi al capidata” paragraph
tolo “Modifica dei
AUTO MAN
PAUSE
3.2.3., “T-REDUCED”
dati preimpostati” paragrafo 3.2.3., sezione dedicata “T- dedicated section).
RIDOTTA”).
Funzionamento automatico
Automatic operating mode
Quando sul display è
When the “ ” is
attivo il simbolo “ ”,
displayed, the remoil pannello di controllo
te control panel
remoto funziona
operates
as
c
o
m
e
PROGRAMMABLE
CRONOTERMOSTATO
R
O
O
M
secondo le fasce oraAUTO MAN
PAUSE
THERMOSTAT, given
rie impostate in prothe heating time
grammazione riscaldamento.
bands scheduled. The time bands
Le fasce orarie sono 3 e si identifi- are three and they identify with
cano con i simboli:
the symbols:
Per la loro programmazione riferirsi al paragrafo 3.2.4 sezione dedi- To adjust them, see the paragraph
3.2.4 “HIG-PROG” dedicated
cata “PROGR-RISC”.
Con la funzione “ “ si ha un fun- section.
zionamento “automatico” della In the “ “ operating mode, the
boiler works “automatically”.
caldaia.
Per modificare i valori di tempera- To adjust the room temperature
tura ambiente, riferirsi al capitolo values, see chapter “Adjusting the
“Modifica dei dati preimpostati” pa- preset data” paragraph 3.2.3., “Tragrafo 3.2.3., sezione dedicata “T- ROOM” dedicated section.
AMB”).
To return to the
Per ritornare al
automatic
funzionamento
operating mode
automatico, dopo
after a period of
un periodo funm a n u a l
zionamento in
functioning, you
manuale, è necesneed to press the
AUTO MAN
PAUSE
sario agire sul tabutton AUTO/
sto AUTO/MAN
MAN until the
fino a visualizzare nuovamendisplay shows the
te sul display il simbolo “ ”.
“ ” symbol.
IT
UK
3.1.2 Selettore correzione 3.1.2 Selector for adjusting
temperatura ambiente
the room temperature
impostata
set
Nei modi di funzioIn the manual and
namento manuale
a u t o m a t i c
e automatico, il rioperating modes,
scaldamento dithe
heating
pende dalle temfunction depends
perature ambiente
on the room temimpostate.
°C
perature values set.
Queste temperatuThese values can be
re possono essere
adjusted with ± 5°C
modificate di ± 5°C
by turning the
agendo sul selettore
selector – see figu- vedi figura.
re.
+
Per correggere la
To adjust the temselettore
correzione
temperatura opetemperatura ambiente (± 5°C) perature, proceed
rare come segue: selector for adjusting the room
as follows:
- ruotare
il
temperature (± 5°C)
- to increase the
selettore verso
temperature set, turn the
destra per incrementare la
selector to the right,
temperatura impostata,
to decrease the temperature
- ruotare il selettore verso sinistra
set, turn the selector to the left.
per diminuire il valore.
It is not possible to use the
Non è possibile utilizzare il
selector for adjusting the
selettore per modificare la
domestic hot water tempetemperatura dell’acqua sarature.
nitaria.
The modification does not
La correzione non influisce
produce any effect on the
sulla temperatura ridotta
reduced temperature set
impostata (funzionamento
(night operating mode).
notturno).
PAUSE
AUTO MAN
AUTO MAN
3.1.3 Interruzione del tempo 3.1.3 Interrupting the heating
schedule
di riscaldamento
PAUSE
PAUSA
La procedura di PAUSA è atti- The PAUSE function is active
only in the
and
va solo nel funzionamento
operating
e
.
mode.
Durante questa
During this phase,
fase la caldaia rethe boiler does not
sterà spenta e si
operate and it will
riaccenderà quanstart over when
do saranno termithe PAUSE time
nate le ore di
AUTO MAN
PAUSE
band set is finished
PAUSA impostate
o quando la temperatura am- or when the room temperatubiente scende al di sotto di re falls under the reduced temperature set.
quella ridotta.
13
IT
UK
Premendo una volta
If you press the PAUSE button once, the
il tasto PAUSE, il
display shows four
display visualizza al
zeros in the room
posto della temperatemperature field.
tura ambiente quattro zeri.
If, for 5 sec. from
AUTO MAN
PAUSE
the first pressing you
Se entro 5 sec.
do not make any
dalla prima presmodification, the panel exits
sione del tasto PAUSE non si
the function.
effettua alcuna modifica, il pannello esce dalla funzione.
If you press the PAUSE button
another time, you
Premendo una seconcan move on to set
da volta il tasto PAUthe interruption time
SE è possibile iniziabands, which can
re ad impostare le ore
reach a maximum of
di interruzione. fino ad
24 hours. The display
un massimo di 24 ore.
appears as in figure.
Il display si presenta
AUTO MAN
PAUSE
Each pressing of the
come in figura.
PAUSE
button
Ogni pressione del pulsante PAUSE increases the interruption time
aumenta l’interruzione di + 1 ora. band with 1 hour.
Ogni pressione del tasto AUTO-MAN Each pressing of the AUTO/MAN
diminuisce l’interruzione di -1 ora. button decreases the interruption
time band with 1 hour.
Il programma “PAUSA” si attiva
subito dopo l’impostazione delle The “PAUSE” function enables
ore di PAUSA e termina al loro sca- right after the PAUSE hours are
set and disables when they are
dere.
Per uscire dalla funzione PAUSA, over.
prima della fine del tempo imposta- To exit the PAUSE function before
to, è necessario premere il tasto “ “, the time set is over, you have to
dopo alcuni secondi la scritta PAU- press the “ “ button; after some
seconds the PAUSE word disappears
SA scompare.
from the display.
Ripremere il tasto “ ” per posizionarsi sulla funzione desiderata. Press again the “ ” button to select
the function desired.
VACANZE
Per attivare il programma è necessario
posizionarsi in regime
invernale, e superare
le 24 ore di PAUSA
nel seguente modo:
- dalla funzione inverno premere il tasto PAUSE. Il
display visualizza al
posto della temperatura ambiente
quattro zeri.
PAUSE
AUTO MAN
PAUSE
AUTO MAN
ABSENCE
To
enable
the
function, you have to
set the system in
winter mode and
overtake the 24
hours PAUSE in the
following way:
in winter mode
press the PAUSE
button. The display
shows four zeros in
the room temperature field.
IT
UK
- p r e m e r e
- press the PAUripetutamente
SE
button
PAUSE per inirepeteadly to
ziare ad impostart setting
stare le ore di
t
h
e
interruzione.
interruption
Superate le 24
hours.
AUTO MAN
PAUSE
ore sul display
Once the 24
scomparirà la
hours
are
scritta PAUSA.
overtaken, the
Sul display appaPAUSE word
re
DURATA
will disappear
VACAN e il numefrom
the
ro dei giorni di
display.
AUTO MAN
PAUSE
assenza (ad esemThe
display
pio. 01).
shows HOLIDAY DUR and the
Se non si effettua alcuna number of days of absence (for
impostazione, dopo 3 sec. example 01).
dalla visualizzazione delIf you do not make any
la scritta DURATA VACAN,
setting, after 3 sec. from
il pannello esce automatidisplaying HOLIDAY DUR,
camente dalla programthe panel automatically
mazione.
exits the programming.
Con il pulsante PAUSE è possi- With the PAUSE button, you can
bile incrementare la durata dei increase the number of vacation
giorni di vacanza.
days.
Con il pulsante AUTO/MAN è With the AUTO/MAN button,
possibile decrementare la du- you can decrease the number
rata dei giorni di vacanza.
of vacation days.
Per rendere operativa la pro- To enable the function, wait 3
grammazione attendere circa seconds, the panel memorizes
3 sec, il pannello memorizza i the data set.
dati impostati.
On the display appears “ ”.
Sul display compare “ ”.
The panel enters
Il pannello si pooff mode.
siziona nello stato spento.
T
h
e
Il program“ABSENCE”
ma “ VAfunction will
CANZE” si
enable right
attiva immeAUTO MAN
PAUSE
after
the
diatamente
values are set.
dopo aver impostato i valori.
The function always disables
Il termine della programat 24.00 of the last day
mazione è sempre alle ore
scheduled.
24.00 dell’ultimo giorno di
If
you
want to disable the
programmazione.
Holiday function before it was
Per
interrompere scheduled to stop, press the” ”
anticipatamente la funzione button.
Vacanze, premere il tasto” ”. The “ ” symbol disables.
Il simbolo “ ” si disattiva.
Select the desired operating
Selezionare il tipo di funzionamode.
mento desiderato.
15
IT
UK
3.1.4 Funzione di sblocco
3.1.4 Funzione di sblocco
Premendo contemporaneamente i Pressing simultaneously the buttons
tasti
PAUSE AUTO I MAN
+
è possibile ripristinare il
funzionamento della
caldaia dopo un arresto dovuto ad un’anomalia di funzionamento.
Durante questa funzione il display
visualizza la scritta
RESET e il simbolo
“ “ lampeggiante.
Dopo alcuni istanti la
scritta RESET scompare, appaiono nuovamente per alcuni secondi il codice anomalia e il simbolo “ “,
dopodiché la caldaia
riprende il normale
funzionamento.
RESET
PAUSE
PAUSE
PAUSE
Se dopo un arresto di sicurezza, la caldaia effettua la fase
di accensione e riprende il regolare funzionamento, l’arresto
è riconducibile ad una situazione
casuale. Il ripetersi di blocchi suggerisce l’intervento del Centro
di Assistenza Tecnica.
È possibile effettuare fino a 5
tentativi di sblocco in 15 minuti, dopo di ciò agire sul tasto azzeramento direttamente in caldaia.
Per la descrizione delle anomalie fare riferimento al capito 5
“Anomalie”.
you can reset the boiler
after a safety stop
caused
by
a
functioning fault.
During this function,
the display shows the
word RESET and the
“ “ flashing symbol.
AUTO MAN
After
some
moments, the word
RESET dissapears, the
fault code and the
“ “ symbol appear
again for some
AUTO MAN
seconds and then the
RESET
boiler starts to work
normally.
AUTO MAN
If, after a safety stop, the boiler
starts over to work normally,
the blocking is due to a casual
situation. If the blockings
repeat, you should call the
Service Center.
You can make up to 5
unblocking attempts in 15
minutes, after that press the
OFF/Reset button directly on
the boiler.
For faults description, please
refer to chapter 5 “Faults”.
IT
UK
3.2 Funzioni avanzate
(coperchio aperto)
3.2 Advanced functions
(board cover open)
Ricerca o modifica valore
Searches or modifies value
Accesso ai menu di regolazione
Selezione di un dato da modificare
Conferma di un dato impostato
Access the adjusting menus
Selects data to be adjusted
Confirms that data is set
Aprendo il coperchio del pannello di controllo remoto si ha
accesso diretto alle modalità di
Controllo o Impostazione.
In questa modalità si possono
modificare i parametri sia del
pannello di controllo remoto sia
della caldaia e visualizzare i dati
dell'impianto.
I tasti precedentemente descritti nella sezione coperchio chiuso, funzioni base, assumono le
seguenti nuove funzioni.
Pulsante ENTER consente la:
- selezione del menu
- selezione di un dato da modificare
- memorizzazione del nuovo
valore.
Pulsante "+".
Consente la ricerca o la modifica di un valore impostato.
Pulsante "-".
Consente la ricerca o la modifica di un valore impostato.
Caricamento impianto (premere
contemporaneamente i due tasti)
Fills up the installation (press both
buttons simultaneously)
By opening the board cover, you
can access Control or Settings
mode directly.
In this mode, you can adjust
parameters of either the remote control panel or the boiler
and see the installation data.
The buttons described previously
in the section “board cover
closed, basic functions”, acquire
the following new functions.
The ENTER button permits:
- selecting the menu
- selecting data to be modified
- memorizing the new value.
The "+" button.
Permits searching or adjusting
a value set.
The "-" button.
Permits searching or adjusting
a value set.
17
IT
UK
3.2.1 Impostazione della lingua 3.2.1 Setting the language
All'apertura del coBy opening the board
perchio, solo dopo
cover, only after each
ogni interruzione di
power
supply
alimentazione elettriinterruption of the reca del pannello di
mote control panel,
controllo remoto, viethe display shows the
+
ENTER
ne visualizzata la linlanguage set.
gua impostata.
The language set by
La lingua impostata
the manufacturer is
dal costruttore è
ITALIANO.
l’ITALIANO.
If the language
Se
la
lingua
d i s p l a y e d
+
visualizzata è quella ENTER
corresponds to the
desiderata, premere
one you desire, press
2 volte ENTER per
ENTER twice to move
proseguire.
on.
Alle
successive
If you reopen the
riaperture del coperdashboard cover
chio,
il
display ENTER
successively, the
+
visualizzerà la scritta
display will show the
"UTENTE".
word “USER”.
Se
la
lingua
If the language
visualizzata non cordisplayed does not
risponde a quella decorrespond to the
siderata modificarla ENTER
one you desire,
+
come segue:
adjust it as follows:
- subito dopo l’apertura del coper- - right after you open the board,
chio, premere ENTER.
press ENTER . The current
language and the “ “ symbol
Sul display compaiono la lingua
appear on the display.
corrente e il simbolo “ “.
- premere i tasti +/-, per scegliere - press the +/-, buttons to select
the language; here are the ones
la lingua; di seguito elenchiamo
available:
quelle disponibili:
ITALIANO
ITALIANO
PORTUGUES
PORTUGUES
POLSKI
POLSKI
CROATIAN
CROATIAN
CESKY
CESKY
LIETUVISKAI
LIETUVISKAI
LATVIESU
LATVIESU
SLOVENSKY
SLOVENSKY
MAGYAR
MAGYAR
DEUTSCH
DEUTSCH
ENGLISH
ENGLISH
FRANCAIS
FRANCAIS
NEDERLANDS
NEDERLANDS
ESPANOL
ESPANOL
- confermare la scelta premendo - confirm the selection by pressing
ENTER.
ENTER.
IT
UK
3.2.2 Selezione dei menu di- 3.2.2 Selecting the menus
sponibili
available
Con il pulsante +/
- è possibile scorrere i menu disponibili, di seguito
elencati:
U T E N T E :
+
ENTER
impostazione di
valori da parte
dell'utente.
VISUALIZZARE:
visualizzazione
delle temperature
e dei valori dell'im+
ENTER
pianto (in questo
menu non è possibile modificare
i valori visualizzati).
ORA-GIORNO: impostazione dell'ora e del giorno della settimana.
PROGR-RISC: impostazione del
programma di riscaldamento.
TECNICO: impostazione dei
parametri (a cura dell’installatore).
Per accedere ad un menu premere ENTER.
With the +/buttons, you can
run through the
menus available,
presented below:
USER:
setting
values, made by
user.
D I S P L A Y :
displaying
temperatures and
installation data
(in this menu it is
not possible to
modify the values displayed).
TIME-DAY: setting the hour and
day of the week.
HIG-PROG setting the heating
schedule.
EXPERT: setting parameters,
made exclusively by the Service
Center.
Press ENTER to go to a menu.
3.2.3 Modifica dei dati
preimpostati
3.2.3 Adjusting the preset
data
Per modificare i valori impostati
nei singoli menu procedere
come di seguito descritto:
- dopo aver scelto il MENU
come sopra descritto ed esservi entrati, scegliere il parametro da modificare agendo con i tasti + o -, quindi
- premere il pulsante ENTER
per confermare la scelta. La
comparsa sul display del simbolo “ “ indica che è possibile modificare il valore
- modificare il valore del parametro impostato, agendo
con i tasti + o -.
- premere il pulsante ENTER
per confermare la modifica.
Il nuovo valore viene memorizzato e sul display si spegne il simbolo “ “.
Se non si desidera memorizzare il nuovo valore impostato,
chiudere il coperchio di servizio
del pannello di controllo remoto prima di premere ENTER.
To adjust the values set in each
menu, proceed as follows:
- after you selected and entered
the MENU in the way it is
written above, with the + or
- buttons select the parameter
to be adjusted, then
- press ENTER to confirm the
selection. The display of the
“ “ symbol indicates that it
is possible to modify the value
- adjust the value of the
parameter set by pressing the
+ or - buttons.
- press ENTER to confirm the
modification. The new value
is memorized and the “ “
symbol dissappears from the
display.
If you do not want the remote
control panel to memorize the
new value set, close the
dashboard cover before
pressing ENTER.
19
IT
3.2.4 Descrizione dei menu
UK
3.2.4 Description of menus
UTENTE
USER
Nel menu utente è possibile impostare i seguenti valori:
- T-ACS 1 (35°C-60°C): la temperatura desiderata dell'acqua calda
sanitaria. La temperatura desiderata per la prima fascia oraria in caso di programma acqua
calda sanitaria (PROGR-ACS), vedi
pag. 27.
- T-ACS 2 (35°C-60°C): la temperatura desiderata per la seconda fascia oraria in caso di programma acqua calda sanitaria
(PROGR-ACS).
- T-ACS 3 (35°C-60°C): la temperatura desiderata per la terza fascia oraria in caso di programma acqua calda sanitaria
(PROGR-ACS).
- TEMP-AMB 1 (5°C-40°C): la temperatura comfort in caso di funzionamento manuale (vedi funzionamento manuale - pag. 11)
La temperatura desiderata per
la prima fascia oraria in caso di
programmazione riscaldamento
(PROGR-RISC), vedi pag. 22.
- TEMP-AMB 2 (5°C-40°C): la temperatura desiderata per la seconda fascia oraria.
- TEMP-AMB 3 (5°C-40°C): la
temperatura desiderata per la
terza fascia oraria.
- T-RIDOTTA (5°C-40°C): la temperatura desiderata per il funzionamento notturno e per lo stato
di PAUSA.
- T-VACANZA: la temperatura desiderata per il periodo di vacanza
- INDIETRO: consente di tornare al
menu UTENTE.
Per variare i valori impostati seguire
quanto descritto nel paragrafo
“Modifica dei valori impostati”.
In the user menu, you can set the
following values:
- T-DHW 1 (35°C-60°C): desired
domestic hot water temperature. Desired temperature for the
first time band in case of
domestic hot water schedule
(HOTW-PROG), see page 27.
- T-DHW 2 (35°C-60°C): desired
temperature for the second time
band in case of domestic hot
water schedule (HOTW-PROG).
- T-DHW 3 (35°C-60°C): desired
temperature for the third time
band in case of domestic hot
water schedule (HOTW-PROG).
- T-ROOM DES 1 (5°C-40°C): comfort
level temperature in case of manual
operating mode (see manual
operating mode – page 11)
Desired temperature for the first
time band in case of heating
schedule (HIG-PROG), see page
22.
- T-ROOM DES 2 (5°C-40°C):desired
temperature for the second time
band.
- T-ROOM DES 3 ( 5 ° C - 4 0 ° C ) :
desired temperature for the third
time band.
- T-REDUCED (5°C-40°C): desired
temperature for night operating
mode and for PAUSE mode.
- T-ABSENCE: desired temperature
for holiday mode
- RETURN: permits returning to
USER menu.
To change the values set, follow
the indications in the paragraph
“Adjusting the values set”.
IT
UK
VISUALIZZARE
DISPLAY
Nel menu visualizzare è possibile scorrere i seguenti valori che
si riferiscono alle temperature
lette istantaneamente:
- T ESTERNA: si visualizza la
temperatura esterna, solo se
alla caldaia è stata collegata
una sonda esterna.
Premendo il tasto ENTER si
visualizza il valore massimo di
temperatura ed l’ora in cui è
stato registrato.
Premendo + e - vengono
visualizzati i valori massimo
e minimo e l’ora in cui sono
stati registrati.
Premendo ENTER si ritorna al
menu VISUALIZZARE.
- T-AMBIENTE: visualizzazione
della temperatura ambiente
[°C].
Premendo ENTER viene
visualizzata la temperatura ambiente impostata (T-AMB1).
Premendo + e - vengono
visualizzati i valori massimo
e minimo e l’ora in cui sono
stati registrati.
Premendo ENTER si ritorna al
menu T-AMBIENTE.
- T-ACS: visualizzazione della
temperatura in tempo reale
dell'acqua calda [°C].
Premendo ENTER viene
visualizzata la temperatura
attuale desiderata.
Premendo ENTER si ritorna al
menu T-ACS.
- T-MANDATA: visualizzazione
della temperatura di mandata della caldaia [°C].
Premendo ENTER viene
visualizzata la temperatura
calcolata.
Premendo ENTER si ritorna al
menu T-MANDATA.
- MODULAZIONE: visualizzazione
della potenza attuale della caldaia [%].
- TEMPO BRUC: visualizzazione
delle ore di lavoro bruciatore.
Premendo ENTER viene azzerato il valore memorizzato.
Premendo ENTER si ritorna al
menu TEMPO--BRUC.
In displaying menu, you can run
through the following values,
which refer to instantaneously
recorded temperatures:
- T-OUTSIDE: displaying the
external temperature, only if
an external probe was
connected to the boiler.
By pressing ENTER, the display
shows the maximum temperature value and the hour
when it has been recorded.
By pressing + and - the display
shows the maximum and
minimum values and the hour
when they have been
recorded.
By pressing ENTER, you return
to the DISPLAY menu.
- T-ROOM: displaying the room
temperature [°C].
By pressing ENTER, the display
shows the room temperature set (T-ROOM DES 1).
By pressing + and - the display
shows the maximum and
minimum values and the hour
when they have been
recorded.
By pressing ENTER, you return
to the T-ROOM menu.
- T-DHW: displaying domestic
hot water real-time temperature [°C].
By pressing ENTER, the display
shows the current desired
temperature.
By pressing ENTER, you return
to the T-DHW menu.
- T-BOILER: displaying the boiler
delivery temperature [°C].
By pressing ENTER, the display
shows the calculated temperature.
By pressing ENTER, you return
to the T-BOILER menu.
- MODULATION: displaying the
boiler current working
efficiency [%].
- BURNER TIME: displaying the
burner working hours.
By pressing ENTER, you cancel
the memorized value.
By pressing ENTER you return
to the BURNER--TIME menu.
21
IT
UK
- ACCENS BRUC: visualizzazione del - BURNER START: displaying the
burner start-ups number.
numero di accensioni effettuate
By pressing ENTER, you cancel
dal bruciatore caldaia.
the memorized value.
Premendo ENTER viene azzeraBy pressing ENTER, you return
to il valore memorizzato.
to the Information menu.
Premendo ENTER si ritorna al
menu Informazioni.
- WATER PRESS: displaying the
boiler water pressure.
- PRESS ACQUA: visualizzazione
della pressione acqua in caldaia. - RETURN: permits returning to
the DISPLAYING menu.
- INDIETRO: consente di tornare
al menu VISUALIZZARE.
ORA+GIORNO
TIME+DAY
Dal menu ORA+GIORNO effettuare le seguenti operazioni:
- Premere il pulsante ENTER.
Il display visualizza l’ora corrente e il simbolo ” “.
- Con + e - impostare l’ora corretta.
Tenendo premuto il pulsante +
o - i minuti scorrono a passi di
15 minuti: 15, 30, 45.
- Premere ENTER per confermare.
- Il display visualizzerà il giorno corrente e il numero corrispondente:
lunedì
01
martedì
02
mercoledì 03, ecc.
- Con i pulsanti + o - impostare il
giorno desiderato.
- Premere ENTER per confermare.
- Il display si posiziona sul menu
ORA+GIORNO visualizzando le
nuove impostazioni memorizzate.
In TIME+DAY menu, perform the
following operations:
- Press ENTER.
The display shows the current
hour and the ” “ symbol.
- With + and - set the right hour.
By pressing continously + or - the
minutes elapse by 15 minutes
stages: 15, 30, 45.
- Press ENTER to confirm.
- The display shows the current
day and the corresponding
number:
Monday
01
Tuesday
02
Wednesday 03, etc.
- With the + or - set the desired day.
- Press ENTER to confirm.
- The display returns to the
TIME+DAY menu, displaying the
new memorized settings.
ENTER
+
-
ENTER
+
-
ENTER
+
PROGR-RISC (programmazione HIG-PROG (heating schedule)
Permits programming three 24
riscaldamento)
Permette di programmare tre fasce orarie
di funzionamento
nelle 24 ore.
Ad ogni fascia oraria
viene associata una
temperatura ambien- ENTER
+
te impostata nel
menu UTENTE (TEMP-AMB 1, 2, 3).
-
hours operating
time bands.
Each time band is
assigned a room
temperature set in
USER menu (TROOM DES 1, 2, 3).
-
IT
UK
Per impostare le fasce orarie
procedere come segue:
- posizionarsi su PROGR-RISC
- premere il pulsante ENTER,
il display visualizzerà il primo
giorno della settimana
- con i tasti + e - selezionare
uno dei programmi disponibili di seguito descritti:
- Giornaliero: si possono programmare singolarmente i
giorni della settimana. Il
display visualizza i singoli
giorni: lunedì, martedì, mercoledì, ecc.
- Feriale: si possono programmare contemporaneamente i giorni della settimana
(da Lunedì al Venerdì) e diversificare il Sabato e la Domenica
- Sab-Dom: si programmano
solo il Sabato e la Domenica
- Settimanale: si possono programmare contemporaneamente tutti i giorni della
settimana (da Lunedì alla
Domenica).
To set the time bands, proceed
as follows:
- go to HIG-PROG
- press ENTER and the display
will show the first day of the
week
- with the + and - buttons select
one of the available programs,
described below:
- Daily: you can schedule each
day of the week separately.
The display will show each
day: Monday, Tuesday,
Wednesday, etc.
- Holiday: you can schedule
week days at the same time
(Monday to Friday) and
Saturday and Sunday
differently
- Sat-Sun: you schedule only
Saturday and Sunday
- Weekly: you can schedule all
the days of the week at the
same time (Monday to
Sunday).
+
ENTER
Scegliere un programma, quindi premere ENTER per confermare.
Il display per pochi secondi si presenta come in fig. A, dopodiché
si presenta come in fig. B.
ENTER
+
-
+
ENTER
-
A
La programmazione delle fasce
orarie incomincia sempre con
un orario di accensione (ON)
contraddistinto dal simbolo
-
Select a schedule, then press
ENTER to confirm.
For a few seconds, the display
will appear as in figure A, after
that as in figure B.
ENTER
+
-
B
The time bands programming
phase always begins with a starting
timetable (ON), identified with the
symbol
and finishes with an
23
IT
UK
e termina con un orario di spegni- ending timetable (OFF), identified with
mento (OFF) col simbolo .
the symbol .
Le 3 fasce orarie si presentano sul
display con i seguenti simboli:
1)
ON
OFF
ON
OFF
2)
3)
ON
OFF
Impostare l’orario di funzionamento
(ON) con i tasti + e -, quindi premere
il pulsante ENTER per confermare. Il
display si presenta come in figura.
ENTER
+
-
The 3 time bands are expressed on
the display by the following symbols:
1)
ON
OFF
ON
OFF
2)
3)
ON
OFF
Set the starting timetable (ON) by
pressing the + and – buttons and
the press ENTER to confirm.
The display appears as in figure.
ENTER
+
-
Impostare l’orario di spegnimen- Set the ending timetable (OFF) by
to (OFF) con i tasti + e -, quindi pressing the + and - buttons and
premere ENTER per confermare. the press ENTER to confirm.
Durante la fase di OFF la caldaia è in regime notturno ,
quindi si accenderà solo se la
temperatura scende al di sotto del valore di T-RIDOTTA impostato (vedi menu UTENTE
paragrafo 3.2.4).
During the OFF phase, the
boiler is in night operating
mode and it will switch on
only if the temperature falls
under the T-REDUCED value
set (see USER menu,
paragraph 3.2.4).
Stabilito l’orario di spegnimento Once you set down the ending
premere il tasto ENTER. Il display timetable, press ENTER.
The display appears as in figure.
si presenta come in figura.
Procedere nello stesso modo per im- Proceed the same way to set the
,
.
,
. subsequent time bands
postare le fasce successive
ENTER
+
-
ENTER
+
-
ENTER
+
-
ENTER
+
-
Al termine della programmazione
premere i tasti + o - per posizionarsi sulla voce INDIETRO e uscire dal menu PROGR-RISC.
After you finished programming,
press the + or - button to go to
RETURN and exit the HIG-PROG
menu.
IT
UK
Per interrompere in qualsiasi
momento la procedura di programmazione delle fasce orarie, chiudere il coperchio del
pannello. I valori impostati non
vengono memorizzati.
To stop at any moment the time
bands programming, close the
cover of the panel.
The values set will not be
memorized.
È possibile escludere la programmazione riscaldamento di una
o più fasce. Per far ciò operare
come segue:
- impostare una fascia: esemON OFF come
pio
indicato in precedenza
- premere ENTER
- nella seconda fascia superare le 24 ore con il tasto +. Il
display visualizza i segmenti
al posto dell’orario, vedi figura
- premere ENTER per confermare. Con questa operazione abbiamo escluso la seconda fascia del programma riscaldamento
- nella terza fascia le 24 ore
con il tasto +. Il display
visualizza i segmenti al posto
dell’orario
- premere ENTER per confermare.
Con questa operazione abbiamo escluso la terza fascia del
programma riscaldamento.
La caldaia funzionerà secondo
la fascia oraria impostata e resterà spenta negli altri periodi.
ENTER
+
-
Ad ogni fascia oraria impostata nel menu PROGR-RISC, viene automaticamente associata
la relativa temperatura ambiente (T-AMB 1, 2, 3):
T-AMB1
T-AMB2
T-AMB3
You may exclude the heating
schedule from one or more time
bands. To do so, proceed as
follows:
- set a time band: example
ON OFF as previously
indicated
- press ENTER
- for the second time band
overtake the 24 hours by
pressing the + button. The
display shows segments
instead of the timetable, see
the figure
- press ENTER to confirm. By
doing this operation, you
excluded the second time
band from the heating
schedule
- for the third time band
overtake the 24 hours by
pressing the + button. The
display shows segments
instead of the timetable
- press ENTER to confirm.
By doing this operation, you
excluded the third time band
from the heating schedule.
The boiler will operate according
to the time band set and will
stay off the rest of the time.
ENTER
+
-
The relative room temperature
is automatically assigned to each
time band set in the HIG-PROG
menu (T-ROOM DES 1, 2, 3):
T-ROOM DES 1
T-ROOM DES 2
T-ROOM DES 3
25
IT
UK
Le temperature ambiente di default
sono settate a 20°C, ma è possibile modificarle come già spiegato
nel paragrafo 3.2.4 “Descrizione dei
menu” sezione dedicata ”UTENTE”.
Se le temperature ambiente sono
state personalizzate/modificate, i
programmi si assoceranno a questi nuovi valori.
The default room temperatures are
set for 20°C, but you may adjust
them, as already explained in
paragraph 3.2.4 “Description of
menus” “USER” dedicated section.
If the room temperatures were
personalized/modified,
the
programs are assigned these new
values.
ESEMPIO DI PROGRAMMAZIONE
Si desidera avere nell’arco della giornata tre periodi di riscaldamento:
- fascia 1: dalle ore 6.30 alle 8.30,
temperatura desiderata 20°
- fascia 2: dalle 12.00 alle 15.00,
temperatura desiderata 18°
- fascia 3: dalle 17.00 alle 23.00,
temperatura desiderata 24°.
Nel MENU PROGR-RISC impostare
le fasce orarie.
Nel MENU UTENTE impostare le
temperature volute:
T-AMB1 20°C
T-AMB2 18°C
T-AMB3 24°C
L’andamento temperature/fasce orarie sarà come indicato nel grafico.
EXAMPLE OF PROGRAMMING
We consider that you want to set three
heating time bands in 24 hours:
- time band 1: from 6.30 to 8.30,
desired temperature 20°
- time band 2: from 12.00 to 15.00,
desired temperature 18°
- time band 3: from 17.00 to 23.00,
desired temperature 24°.
In HIG-PROG MENU set the time
bands.
In USER MENU set the desired
temperature:
T-ROOM DES 1 20°C
T-ROOM DES 2 18°C
T-ROOM DES 3 24°C
The progress of temperature/time
bands will be as shown in the diagram.
°C
temperature/temperatures
T-AMB3
T-ROOM DES 3
fascia 3
time band 3
24
23
22
fascia 1
time band 1
21
T-AMB1
20
T-ROOM DES 1
fascia 2
time band 2
19
T-AMB2
18
T-ROOM DES 2
17
16
T-RIDOTTA
T-REDUCED
15
6.30
ON
8.30
OFF
12.00
ON
15.00
OFF
17.00
ON
23.00
OFF
fasce orarie/time bands
È possibile impostare temperature uguali per fasce orarie diverse:
es. T-AMB-1 = T-AMB-2.
Non è possibile sovrapporre le fasce orarie.
You may set even temperatures for
different time bands: eg. T-ROOM
DES 1= T-ROOM DES 2.
It is not possible to overlay the time
bands.
ora
hour
IT
UK
PROGR-ACS (programma ac- HOTW-PROG (domestic hot
qua calda sanitaria)
water schedule)
Permette di programmare tre fasce
orarie di funzionamento nelle 24 ore.
Ad ogni fascia oraria viene associata
una temperatura ENTER
+
sanitaria impostata
nel menu UTENTE (TEMP-ACS 1,
2, 3).
Questa funzione è attiva solo
in caso di caldaie con bollitore.
Se il bollitore è munito di sonda, è possibile impostare la
temperatura desiderata, in
caso di bollitore con termostato la temperatura dell’acqua deve essere impostata sul
bollitore stesso.
Per impostare le fasce orarie
procedere come segue:
- posizionarsi su PROGR-ACS
- premere il pulsante ENTER,
il display visualizzerà il primo
giorno della settimana
- con i tasti + e - selezionare
uno dei programmi disponibili di seguito descritti:
- Giornaliero: si possono programmare singolarmente i
giorni della settimana. Il display
visualizza i singoli giorni: lunedì,
martedì, mercoledì, ecc.
- Feriale: si possono programmare contemporaneamente i
giorni della settimana (da Lunedì al Venerdì) e diversificare il Sabato e la Domenica
- Sab-Dom: si programmano
solo il Sabato e la Domenica
- Settimanale: si possono programmare contemporaneamente tutti i giorni della
settimana (da Lunedì alla
Domenica).
ENTER
+
-
P e r m i t s
programming three
operating time
bands during the 24
hours. Each time
band is assigned a
sanitary temperature set in the USER
menu (T-DHW 1, 2, 3).
This function is enabled only
for boilers with water tanks.
If the water tank is
equipped with probe, you
can set the desired temperature; for boilers with
thermostat, you have to set
the water temperature
directly on the boiler.
To set the time bands, proceed
as follows:
- go to HOTW-PROG
- press ENTER, the display will
show the first day of the week
- with the + and - buttons select
one of the available schedules
described below:
- Daily: you can schedule each
day of the week separately.
The display will show each
day: Monday, Tuesday,
Wednesday, etc.
- Holiday: you can schedule
week days at the same time
(Monday to Friday) and
Saturday and Sunday
differently
- Sab-Dom: you schedule only
Saturday and Sunday
- Weekly: you can schedule all
the days of the week at the
same time (Monday to
Sunday).
ENTER
+
-
Scegliere un programma, quindi Select a program and then press
premere ENTER per confermare. ENTER to confirm.
27
IT
UK
Il display per pochi secondi si For a few seconds, the display will
presenta come in fig. A, dopodiché appear as in figure A, after that
si presenta come in fig. B.
as in figure B.
+
ENTER
A
-
La programmazione delle fasce orarie incomincia sempre con un orario
di
accensione
(ON)
contraddistinto dal simbolo
e termina con un orario di spegnimento (OFF) col simbolo .
Le 3 fasce orarie si presentano sul
display con i seguenti simboli:
1)
ON
OFF
2)
ON
OFF
3)
ON
OFF
Impostare l’orario di funzionamento (ON) con i tasti + e -, quindi
premere il pulsante ENTER per
confermare. Il display si presenta
come in figura.
ENTER
+
-
+
-
+
B
-
The time bands programming
always begins with a starting
timetable (ON) identified with the
symbol
and finishes with an
ending timetable (OFF) identified
with the symbol .
The three time bands are expressed
on the display by the following
symbols:
1)
ON
OFF
2)
ON
OFF
3)
ON
OFF
Set the starting timetable (ON) by
pressing the + and - buttons and
the press ENTER to confirm. The
display appears as in figure.
ENTER
Impostare l’orario di spegnimento (OFF) con i tasti + e -, quindi
premere ENTER per confermare.
Durante la fase di OFF viene
inibita la preparazione dell’acqua calda sanitaria in caldaia.
Stabilito l’orario di spegnimento
premere il tasto ENTER. Il display
si presenta come in figura.
Procedere nello stesso modo per
,
impostare le fasce successive
.
ENTER
ENTER
+
-
Set the ending timetable (OFF) by
pressing the + and - buttons and
the press ENTER to confirm.
During the OFF phase, the
preparation of domestic hot
water is stopped.
Once you set down the ending
timetable, press ENTER. The display
appears as in figure.
Proceed the same way to set the
,
subsequent time bands
.
ENTER
+
-
IT
UK
+
ENTER
-
Al termine della programmazione premere i tasti + o - per posizionarsi sulla voce INDIETRO
e uscire dal menu PROGR-ACS.
Per interrompere in qualsiasi
momento la procedura di programmazione delle fasce orarie, chiudere il coperchio del
pannello. I valori impostati
non vengono memorizzati.
È possibile escludere la programmazione sanitario di una
o più fasce. Per far ciò operare come segue:
- impostare una fascia: esemON OFF come
pio
indicato in precedenza
- premere ENTER
- nella seconda fascia superare
le 24 ore con il tasto +. Il display
visualizza i segmenti al posto
dell’orario, vedi figura
- premere ENTER per confermare. Con questa operazione abbiamo escluso la seconda fascia del programma
sanitario
- nella terza fascia le 24 ore con
il tasto +. Il display visualizza i
segmenti al posto dell’orario
- premere ENTER per confermare.
Con questa operazione abbiamo escluso la terza fascia del
programma sanitario.
La caldaia funzionerà secondo
la fascia oraria impostata e resterà spenta negli altri periodi.
ENTER
+
-
Ad ogni fascia oraria impostata nel menu PROGR-ACS, viene automaticamente associata
la relativa temperatura acqua
sanitaria (T-ACS 1, 2, 3):
+
ENTER
-
After you finished programming,
press the + or - button to go to
RETURN and exit the HOTWPROG menu.
To stop at any moment the time
bands programming, close the
cover of the panel. The values
set will not be memorized.
You may exclude the sanitary
schedule from one or more time
bands. To do so, proceed as
follows:
- set a time band: example
ON OFF as
previously indicated
- press ENTER
- for the second time band
overtake the 24 hours by
pressing the + button. The
display shows segments instead
of the timetable, see figure
- press ENTER to confirm. By
doing this operation, you
excluded the second time
band from the sanitary
schedule
- for the third time band
overtake the 24 hours by
pressing the + button. The
display shows segments
instead of the timetable
- press ENTER to confirm.
By doing this operation, you
excluded the third time band
from the sanitary schedule.
The boiler will operate according
to the time band set and it will
stop the other periods.
ENTER
+
-
The relative domestic hot water
temperature is automatically
assigned to each time band set
in the HOTW-PROG menu (TDHW 1, 2, 3):
29
IT
UK
T-ACS1
T-ACS2
T-ACS3
Le temperature sanitarie di default
sono settate a 50°C, ma è possibile modificarle come già spiegato
nel paragrafo 3.2.4 “Descrizione dei
menu” sezione dedicata ”UTENTE”.
Se le temperature sanitarie sono
state personalizzate/modificate, i
programmi si assoceranno a questi nuovi valori.
ESEMPIO DI PROGRAMMAZIONE
Si desidera avere nell’arco della
giornata tre periodi di preparazione
dell’acqua sanitaria:
- fascia 1: dalle ore 6.30 alle 8.30,
temperatura desiderata 45°
- fascia 2: dalle 12.00 alle 15.00,
temperatura desiderata 50°
- fascia 3: dalle 17.00 alle 23.00,
temperatura desiderata 48°.
Nel MENU PROGR-ACS impostare
le fasce orarie.
Nel MENU UTENTE impostare le
temperature volute:
T-ACS1 45°C
T-ACS2 50°C
T-ACS3 48°C.
L’andamento temperature/fasce orarie sarà come indicato nel grafico.
fascia 2
time band 2
°C
temperature/temperatures
T-ACS2
T-DHW2
T-ACS3
T-DHW3
T-ACS1
T-DHW1
T-DHW1
T-DHW2
T-DHW3
The default domestic hot water
temperatures are set for 50°C, but
you may adjust them as already
explained in paragraph 3.2.4
“Description of menus”, “USER”
dedicated section. If the domestic hot
water
temperatures
were
personalized/modified, the programs
are assigned these new values.
EXAMPLE OF PROGRAMMING
We consider that you want to set three
sanitary time bands in 24 hours:
- time band 1: from 6.30 to 8.30,
desired temperature 45°
- time band 2: from 12.00 to 15.00,
desired temperature 50°
- time band 3: from 17.00 to 23.00,
desired temperature 48°.
In HOTW-PROG MENU set the time
bands.
In USER MENU set the desired
temperatures:
T-DHW1 45°C
T-DHW2 50°C
T-DHW3 48°C.
The progress of temperature/time
bands will be as shown in the diagram.
50
fascia 3
time band 3
48
46
fascia 1
time band 1
44
42
40
38
36
34
6.30
ON
8.30
OFF
12.00
ON
15.00
OFF
17.00
ON
23.00
OFF
fasce orarie/time bands
È possibile impostare temperature uguali per fasce orarie diverse
es. T-ACS-1 = T-ACS-2. Non è possibile sovrapporre le fasce orarie.
You may set even temperatures for
different time bands: eg. T-DHW1 = T-DHW-2. It is not possible to
overlay the time bands.
ora/
hour
IT
4 SPEGNIMENTO
UK
4 SWITCHING OFF
Spegnimento per brevi periodi Switching off for short periods
In the event of
In caso di brevi
short periods of
assenze premere
absence, press the
il tasto “ ” sul
“ ” button on the
pannello remoto
remote control
- con coperchio
panel – with the
chiuso - per speboard cover closed
gnere la caldaia.
AUTO MAN
PAUSE
– to switch off the
Il display si presenboiler. The display will appear
terà come in figura.
Il pannello di controllo remoto as in figure.
mantiene tutte le impostazioni The remote control panel keeps
all the settings memorized.
memorizzate.
In questo modo lasciando atti- This way, leaving the power
ve l’alimentazione elettrica e l’ali- supply and the gas supply on,
mentazione del combustibile, la the boiler is protected by the
caldaia è protetta dai sistemi: systems:
- Antigelo di caldaia: quando - Anti-freeze: when the water
temperature in the boiler falls
la temperatura dell’acqua di
below safety values, the
caldaia scende al di sotto dei
circulation pump enables and
valori di sicurezza si attiva il
the burner starts at minimum
circolatore e il bruciatore alla
power, in order to restore the
minima potenza per riportare
water temperature to safety
la temperatura dell’acqua a
values (35 °C).
valori di sicurezza (35 °C).
- Anti-freeze from remote control
- Antigelo da REC (vedi libretpanel (see installer’s manual).
to installatore).
- Circulation pump anti- Antibloccaggio circolatore: un
blocking: an operating cycle
ciclo di funzionamento si atstarts at every 24 h.
tiva ogni 24 h.
Switching off for long periods
Spegnimento per lunghi periodi In case of long periods of
In caso di assenze prolungate absence, press the“ ”button on
premere, sul pannello di con- the remote control panel – with
trollo remoto, il tasto“ ”per board cover closed - to switch
spegnere la caldaia.
off the boiler.
Posizionare l’interruttore gene- Turn the general system switch
rale dell’impianto su “spento”. to “OFF”.
Chiudere quindi il
Then, close the
rubinetto del gas
gas tap placed
posto sotto la calunder the boiler,
daia, ruotandolo
by turning it
clockwise. In this
in senso orario.
case, the antiIn questo caso i
freeze and antisistemi antigelo e
rubinetto gas
blocking systems
antibloccaggio
chiuso
are disabled.
sono disattivati.
gas tap closed
Drain the heating
Svuotare l’impiansystem or suitably
to termico oppure proteggerlo
adeguatamente con liquido protect it with a good make of
anti-freeze.
anticongelante di buona marca. Drain the hot water system.
Svuotare l’impianto sanitario.
31
IT
5 ANOMALIE
UK
5 FAULTS
Quando si presenta
When a functioning
un’anomalia di funziofault occurs, the
namento, sul display si
display shows a
visualizzeranno un
flashing fault code
codice lampeggiante e
and the ” “ symbol.
il simbolo ” “.
To reset the boiler
Per ripristinare il funafter a fault occurred,
AUTO MAN
PAUSE
zionamento della calpress the PAUSE and
daia dopo un’anoma- PAUSE
AUTO I MAN AUTO MAN buttons
lia, premere contemsimultaneously for
poraneamente i tasti
about 3 seconds, see
+
PAUSE e AUTO MAN
paragraph “3.1.4
RESET
per circa 3 secondi,
Unblocking function”.
vedi paragrafo “3.1.4
During this operation,
Funzioni di sblocco”.
the display shows the
Durante questa operaword RESET and the
zione
il
display
” “ flashing symbol
(see paragraph 3.1.4
visualizza la scritta
Unblocking function).
RESET ed il simbolo
AUTO MAN
PAUSE
“ lampeggiante
”
RESET
(vedi paragrafo 3.1.4
Funzioni di sblocco).
If, after a safety stop, the boiler
Se dopo un arresto di sicurezstarts over to operate
za, la caldaia effettua la fase
normally, the blocking is due
di accensione e riprende il reto a casual situation. If the
golare funzionamento, l’arresto
blockings repeat, you should
è riconducibile ad una situazione
call the Service Center.
casuale. Il ripetersi di blocchi suggerisce l’intervento del Centro
di Assistenza Tecnica.
ANOMALIA E20
FAULT E20
Nel caso sul display
Whether the E20 code
venga visualizzato l'alappears on the
larme E20.
display.
Se la procedura di
If resetting succeeds,
reset si conclude posithe
E20
code
tivamente, sul display
dissapears from the
AUTO MAN
PAUSE
scompare il codice E20.
display.
Se l’anomalia permane, premere il If the fault persists, press the
tasto per spegnere la caldaia e chia- button to switch off the boiler and
mare il Centro di Assistenza Tecnica. call the Service Center.
ANOMALIA E41
FAULT E41
Nel caso in cui sul
Whether the E41 fault
display
venga
(lack of water)
visualizzata l'anomalia
appears on the
E41, mancanza acqua,
display, you may
è possibile attivare la
enable the filling
AUTO MAN
PAUSE
procedura di riempioperation in the
mento nel seguente modo:
following way:
MODELLI C.S.I.:
C.S.I. MODELS:
- aprire il coperchio
- open the cover
- premere contemporaneamente - press the + and – buttons
i tasti + e - per alcuni secondi.
simultaneously for a few seconds.
IT
UK
Se la procedura di riempimento
automatico si conclude positivamente, sul display scompare il codice 41. Se l’anomalia permane
si trasforma in anomalia definiti+
va 40. In questo caso, prima di
procedere al riempimento dell’impianto, sbloccare la caldaia premendo contemporaneamente i tasti PAUSE e
AUTO MAN per circa 3 secondi.
MODELLI R.S.I.
- premere il tasto “ ” per spegnere la caldaia
- chiedere l’intervento del Centro di Assistenza Tecnica.
Se la procedura di riempimento automatico si conclude positivamente, sul display
si spegne la scritta E41.
Il ripetersi di blocchi suggerisce l’intervento del Centro di Assistenza Tecnica.
ANOMALIA E43
(solo per modelli Exclusive Boiler Green)
La visualizzazione di “E43” indica che la
caldaia sta effettuando il ciclo di sfiato
automatico della durata di circa 2 minuti. Premendo contemporaneamente i
tasti PAUSE e AUTO MAN per circa 3 secondi è possibile interrompere il ciclo.
ENTER
IT
If the automatic filling
operation succeeds, the E41
code dissapears from the
display. If the fault persists, it
changes into definitive fault 40.
In this case, first unblock the
boiler by pressing the PAUSE
and AUTO MAN buttons simultaneously
for about 3 seconds and after that proceed
to fill up the installation.
R.S.I. MODELS:
- press the button “ ” to switch off the
boiler
- call the Service Center.
If the automatic filling operation succeeds,
the E41 code dissapears from the display.
In the event of repeated blockings,
you should call the Service Center.
FAULT E43
(only for Exclusive Boiler Green models)
The display of “E43” indicates that the
boiler is making the automatic air
discharge cycle, which takes about 2
minutes. By pressing the PAUSE and AUTO
MAN buttons simultaneously for about 3
seconds, you can interrupt the cycle.
DESCRIZIONE ANOMALIA
cod. anom.
EXCLUSIVE - EXCLUSIVE SINTHESI
BLOCCO MANCANZA FIAMMA (D)
E 10
FIAMMA PARASSITA (D)
E 11
TERMOSTATO LIMITE (D)
E 20
TERMOSTATO BRUCIATORE (D) (MIX C.S.I. - R.S.I. - SINTHESI C.S.I.)
E 21
TERMOSTATO FUMI (D) (C.A.I. - R.A.I.)
E 22
SCARICO FUMI O PRESSOSTATO ARIA (inizio ciclo) (D) (MIX C.S.I.-R.S.I.-SINTHESI)
E 30
SCARICO FUMI O PRESSOSTATO ARIA (in ciclo) (T) (MIX C.S.I.-R.S.I.-SINTHESI)
E 31
PRESSIONE IMPIANTO INSUFFICIENTE (D)
E 40
PRESSIONE IMPIANTO INSUFFICIENTE (T)
E 41
TRASDUTTORE PRESSIONE ACQUA (D)
E 42
SCHEDA ELETTRONICA (D)
E 50-59
SONDA SANITARIO 1 (T) (R.A.I.-R.S.I. solo con bollitore con sonda)
E 60
ANOMALIA CICLO MINIACCUMULO (T) (MICROCAI - MICROMIX)
E65
SONDA PRIMARIO (T)
E 71
TERMOSTATO BASSA TEMPERATURA (T)
E 77
PRESENZA CONDENSA (D) (SINTHESI C.S.I.)
E 92
PRESENZA CONDENSA (T) (SINTHESI C.S.I.)
E 93
SENSORE CONDENSA CIRCUITO APERTO/MANCANZA
E94
COLLEGAMENTO SCHEDA BE01 (D) (SINTHESI C.S.I.)
SENSORE CONDENSA O CIRCUITO APERTO (T) (SINTHESI C.S.I.)
E 95
KOMPAKT
BLOCCO MANCANZA FIAMMA (D)
E 10
FIAMMA PARASSITA (D)
E 11
TERMOSTATO LIMITE (D)
E 20
TERMOSTATO BRUCIATORE (C.S.I.)
E 21
TERMOSTATO FUMI (C.A.I.)
E 22
SCARICO FUMI O PRESSOSTATO ARIA (inizio ciclo) (D) (MIX C.S.I.)
E 30
SCARICO FUMI O PRESSOSTATO ARIA (in ciclo) (T) (MIX C.S.I)
E 31
PRESSIONE IMPIANTO INSUFFICIENTE (D)
E 40
33
PRESSIONE IMPIANTO INSUFFICIENTE (T)
TRASDUTTORE PRESSIONE ACQUA (D)
SCHEDA ELETTRONICA (D)
SONDA SANITARIO 1 (T)
SONDA PRIMARIO (T)
TERMOSTATO BASSA TEMPERATURA (T)
EXCLUSIVE GREEN - MICROGREEN - BOILER GREEN
BLOCCO MANCANZA FIAMMA (D)
FIAMMA PARASSITA (T)
RITENTATIVO ACCENSIONE (T)
PRESSIONE MINIMA INGRESSO GAS (T)
PRESSIONE MINIMA INGRESSO GAS (D)
FIAMMA PRESENTE SENZA RAGIONE IN STAND-BY (D)
TERMOSTATO LIMITE/TERMOSTATO BRUCIATORE
SONDA FUMI CORTO CIRCUITO (D)
SONDA FUMI MASSIMA TEMPERATURA (D)
SONDA MANDATA TEMPERATURA LIMITE (D)
SONDA MANDATA TEMPERATURA LIMITE (T)
SONDA RITORNO TEMPERATURA LIMITE (D)
SONDA RITORNO TEMPERATURA LIMITE (T)
DIFFERENZIALE SONDA RITORNO-MANDATA (D)
SONDA FUMI CIRCUITO APERTO (D)
SCARICO FUMI O PRESSOSTATO ARIA (inizio ciclo) (D)
SCARICO FUMI O PRESSOSTATO ARIA (in ciclo) (T)
VENTILATORE IN CICLO (basso numero di giri) (D)
VENTILATORE (inizio ciclo) (D)
VENTILATORE (fine ciclo) (T)
SCARICO FUMI O PRESSOSTATO ARIA (in ciclo) (T)
VENTILATORE IN CICLO (alto numero di giri) (D)
SCARICO FUMI O PRESSOSTATO ARIA (in ciclo) (D)
PRESSIONE IMPIANTO INSUFFICIENTE (D)
PRESSIONE IMPIANTO INSUFFICIENTE (T)
TRASDUTTORE PRESSIONE ACQUA (D)
CICLO DI SFIATO (BOILER GREEN)
SCHEDA ELETTRONICA (D)
SONDA SANITARIO 1 (GREEN R.S.I. solo con bollitore con sonda) (T)
ANOMALIA CICLO MINIACCUMULO (MICROGREEN) (T)
SONDA PRIMARIO CORTO CIRCUITO/APERTA (D)
SONDA MANDATA SOVRATEMPERATURA (T)
SONDA RITORNO CORTO CIRCUITO/APERTA (D)
TERMOSTATO BASSA TEMPERATURA (T)
DIFFERENZIALE MANDATA/RITORNO (T)
DIFFERENZIALE MANDATA/RITORNO (D)
ANOMALIA DI SISTEMA (D)
ANOMALIA DI SISTEMA (T)
ANOMALIA DI SISTEMA (D)
ANOMALIA DI SISTEMA (T)
CONDENSA O SENSORE DI CONDENSA (D)
CONDENSA O SENSORE DI CONDENSA (T)
SENSORE DI CONDENSA O CIRCUITO APERTO (D)
SENSORE DI CONDENSA O CIRCUITO APERTO (T)
D = definitivo
T = temporaneo
UK
E 41
E 42
E 50-59
E 60
E 71
E 77
E 10
E 11
E 12
E 13
E 14
E 15
E 20
E 21
E 22
E 24
E 25
E 26
E 27
E 28
E 29
E 30
E 31
E 33
E 34
E 35
E 36
E 37
E 38
E 40
E 41
E 42
E 43
E 50-59
E 60
E 65
E 70
E 71
E 72
E 77
E 78
E 79
E 80
E 81
E 82
E 83
E 92
E 93
E 94
E 95
FAULT DESCRIPTION
fault code
EXCLUSIVE - EXCLUSIVE SINTHESI
FLAME FAILURE BLOCK (D)
E 10
PARASITE FLAME (D)
E 11
LIMIT THERMOSTAT (D)
E 20
BURNER THERMOSTAT (D) (MIX C.S.I. - R.S.I. - SINTHESI C.S.I.)
E 21
FUMES THERMOSTAT (D) (C.A.I. - R.A.I.)
E 22
FUMES OUTLET OR AIR PRESSURE SWITCH (cycle start) (D) (MIX C.S.I.-R.S.I.-SINTHESI)
E 30
FUMES OUTLET OR AIR PRESSURE SWITCH (in cycle) (T) (MIX C.S.I.-R.S.I.-SINTHESI)
E 31
INSUFFICIENT INSTALLATION PRESSURE (D)
E 40
INSUFFICIENT INSTALLATION PRESSURE (T)
E 41
WATER PRESSURE TRANSDUCER (D)
E 42
ELECTRONIC BOARD (D)
E 50-59
SANITARY PROBE 1 (T) (R.A.I.-R.S.I. only with water tank with probe)
E 60
MINITANK CYCLE FAULT (T) (MICROCAI - MICROMIX)
E65
PRIMARY PROBE (T)
LOW TEMPERATURE THERMOSTAT (T)
CONDENSATION PRESENT (D) (SINTHESI C.S.I.)
CONDENSATION PRESENT (T) (SINTHESI C.S.I.)
OPEN CIRCUIT CONDENSATION SENSOR/MISSING CONNECTION
WITH BE01 ELECTRONIC BOARD (D) (SINTHESI C.S.I.)
CONDENSATION SENSOR OR OPEN CIRCUIT (T) (SINTHESI C.S.I.)
KOMPAKT
FLAME FAILURE BLOCK (D)
PARASITE FLAME (D)
LIMIT THERMOSTAT (D)
BURNER THERMOSTAT (C.S.I.)
FUMES THERMOSTATI (C.A.I.)
FUMES OUTLET OR AIR PRESSURE SWITCH (cycle start) (D) (MIX C.S.I.)
FUMES OUTLET OR AIR PRESSURE SWITCH (in cycle) (T) (MIX C.S.I)
INSUFFICIENT INSTALLATION PRESSURE (D)
INSUFFICIENT INSTALLATION PRESSURE (T)
WATER PRESSURE TRANSDUCER (D)
ELECTRONIC BOARD (D)
SANITARY PROBE 1 (T)
PRIMARY PROBE (T)
LOW TEMPERATURE THERMOSTAT (T)
EXCLUSIVE GREEN - MICROGREEN - BOILER GREEN
FLAME FAILURE BLOCK (D)
PARASITE FLAME (T)
RE-ATTEMPT IN PROGRESS (T)
MINIMUM GAS INPUT PRESSURE (T)
MINIMUM GAS INPUT PRESSURE (D)
FLAME PRESENT IN STAND-BY FOR NO REASON (D)
LIMIT THERMOSTAT/BURNER THERMOSTAT
SHORT CIRCUIT FUMES PROBE (D)
MAXIMUM TEMPERATURE FUMES PROBE (D)
LIMIT TEMPERATURE DELIVERY PROBE (D)
LIMIT TEMPERATURE DELIVERY PROBE (T)
LIMIT TEMPERATURE RETURN PROBE (D)
LIMIT TEMPERATURE RETURN PROBE (T)
DIFFERENTIAL DELIVERY-RETURN PROBE (D)
FUMES PROBE OPEN CIRCUIT (D)
FUMES OUTLET OR AIR PRESSURE SWITCH (cycle start) (D)
FUMES OUTLET OR AIR PRESSURE SWITCH (in cycle) (T)
VENTILATOR IN CYCLE (low number of rotations) (D)
VENTILATOR (cycle start) (D)
VENTILATOR (cycle end) (T)
FUMES OUTLET OR AIR PRESSURE SWITCH (in cycle) (T)
VENTILATOR IN CYCLE (high number of rotations) (D)
FUMES OUTLET OR AIR PRESSURE SWITCH (in cycle) (D)
INSUFFICIENT INSTALLATION PRESSURE (D)
INSUFFICIENT INSTALLATION PRESSURE (T)
WATER PRESSURE TRANSDUCER (D)
AIR DISCHARGE CYCLE (BOILER GREEN)
ELECTRONIC BOARD (D)
SANITARY PROBE 1 (GREEN R.S.I. only with water tank with probe) (T)
MINITANK CYCLE FAULT (MICROGREEN) (T)
SHORT CIRCUIT/OPEN PRIMARY PROBE (D)
OVER-TEMPERATURE DELIVERY PROBE (T)
SHORT CIRCUIT/OPEN RETURN PROBE (D)
LOW TEMPERATURE THERMOSTAT (T)
DELIVERY/RETURN DIFFERENTIAL T)
DELIVERY/RETURN DIFFERENTIAL (D)
SYSTEM FAULT (D)
SYSTEM FAULT (T)
SYSTEM FAULT (D)
SYSTEM FAULT (T)
CONDENSATE OR CONDENSATION SENSOR (D)
CONDENSATE OR CONDENSATION SENSOR (T)
CONDENSATION SENSOR OR OPEN CIRCUIT (D)
CONDENSATION SENSOR OR OPEN CIRCUIT (T)
D = definitive
T = temporary
E 71
E 77
E 92
E 93
E94
E 95
E 10
E 11
E 20
E 21
E 22
E 30
E 31
E 40
E 41
E 42
E 50-59
E 60
E 71
E 77
E 10
E 11
E 12
E 13
E 14
E 15
E 20
E 21
E 22
E 24
E 25
E 26
E 27
E 28
E 29
E 30
E 31
E 33
E 34
E 35
E 36
E 37
E 38
E 40
E 41
E 42
E 43
E 50-59
E 60
E 65
E 70
E 71
E 72
E 77
E 78
E 79
E 80
E 81
E 82
E 83
E 92
E 93
E 94
E 95
35
UK
6 VARIE
6 MISCELLANEOUS
Il pannello di controllo remoto è alimentato elettricamente dalla caldaia.
In caso di interruzione della linea di comunicazione tra pannello remoto e caldaia o in mancanza di alimentazione elettrica, il display digitale si spegne totalmente.
The remote control panel is supplied with
electric power by the boiler.
If there is a breakdown in the
communication line between the remote panel and the boiler or there is no power
supply, the digital display shuts off
completely.
Il pannello è dotato di una memoria interna a lunga durata che ha lo scopo di
mantenere memorizzati tutti i programmi impostati, tranne l’impostazione dell’ora e del giorno.
The panel is equipped with a long duration
internal memory with the purpose of
memorizing all the schedules set, except
hour and day settings.
Via Risorgimento, 13 - 23900 Lecco (LC)
Servizio Clienti 199.13.31.31*
Assistenza Tecnica Numero Unico 199.13.31.31*
www.berettaclima.it
Beretta si riserva di variare le caratteristiche e i dati riportati nel presente fascicolo in qualunque momento e senza preavviso,
nell’intento di migliorare i prodotti.
Questo fascicolo pertanto non può essere considerato come contratto nei confronti di terzi.
*Costo della chiamata da telefono fisso: 0,15 euro/min. IVA inclusa, da lunedì a venerdì dalle 08.00 alle 18.30, sabato dalle
08.00 alle 13.00.Negli altri orari e nei giorni festivi il costo è di 0,06 euro./min. IVA inclusa.
Da cellulare il costo è legato all’Operatore utilizzato.
Cod. 10029853 - 10/10 - Ed. 4
IT
© Copyright 2026 Paperzz