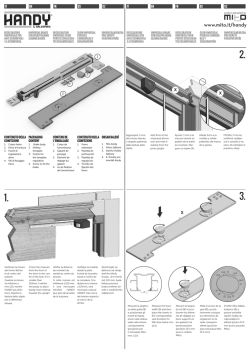
IT
EN
FR
ES
CZ
IT
EN
FR
ES
CZ
product and patended by
®
Doors & Security
www.mito.it/handy
DECELERATORE
UNIVERSALE PER
ANTE SCORREVOLI
E A SCOMPARSA
UNIVERSAL BRAKE
FOR DISAPPEARING
SLIDING DOORS
DECELERATEUR
UNIVERSEL POUR
PORTES COULISSANTES ESCAMOTABLES
SLOW UNIVERSAL
PUERTAS
CORREDERAS Y
DESAPARICIÓN
UNIVERZÁLNÍ BRZDA
PRO SKRYTÉ
POSUVNÉ DVEŘE
DECELERATORE
UNIVERSALE PER
ANTE SCORREVOLI
E A SCOMPARSA
UNIVERSAL BRAKE
FOR DISAPPEARING
SLIDING DOORS
DECELERATEUR
UNIVERSEL POUR
PORTES COULISSANTES ESCAMOTABLES
SLOW UNIVERSAL
PUERTAS CORREDERAS Y
DESAPARICIÓN
UNIVERZÁLNÍ BRZDA
PRO SKRYTÉ
POSUVNÉ DVEŘE
2.
1
3
4
X
X
2
CONTENUTO DELLA PACKAGING
CONFEZIONE
CONTENT
CONTENU DE
L’EMBALLAGE
CONTENUTO DELLA OBSAH BALENÍ
CONFEZIONE
1. Corpo freno
2. Dima di foratura
3. Inserti di
regolazione
dima
4. Viti di fissaggio
freno
1.
1.
1. Brake body
2. Drilling
template
3. Inserts for
the template
regulation
4. Screw to fix the
brake
Corps de
l’amortisseur
2. Gabarit de
perçage
3. Elément de
réglage du
gabarit
4. vis de fixation
de l’amortisseur
Freno
retenedor
2. Plantilla de
perforación
3. Plantilla de
regulación
4. Tornillo de
fijación del
freno
1. Tělo brzdy
2. Vrtací šablona
3. Stavěcí vložky
šablony
4. 6. Šrouby pro
montáž brzdy
Aggiungere 3 mm.
alla misura rilevata
e segnare partendo
dalla battuta dello
stipite.
Add 3mm to the
measured dimension and mark it
starting from the
jamb upright.
Ajouter 3 mm à la
mesure relevée en
partant de la butée
du montant. Marquer ce repère (X).
Añada 3mm a la
medida y señale
partiendo del marco
de la jamba.
Přičtěte 3 mm ke
změřené vzdálenosti a označte ji na
rámu (X) vzhledem k
pravému okraji.
3.
1.
X
Verificare la misura
dal fronte dell’anta al centro del
bullone.
Qualora la misura
sia inferiore a
mm.120, inserire
HANDY più all’interno rispetto la
battuta dello stipite
per la differenza
rilevata.
Check the measure
from the front of
the door to the centre of the bolt. If it is
smaller than
120mm, it will be
necessary to place
handy more internal
towards the upright
Vérifier la distance
du montant du
vantail au centre du
boulon.
Si cette mesure est
inférieure à 120 mm,
il sera nécessaire
d’insérer
HANDY
plus près de la butée
de la huisserie.
Verifique la medida
desde la parte
frontal de la puerta
hasta el centro de
la cerradura. Si la
distancia es menor
a 120mm, será
necesario colocar
HANDY más cerca
del interior respecto
al marco de la
jamba.
Zkontrolujte vzdálenost od okraje
dveří ke středu
šroubu. Je-li menší,
než 120 mm, bude
třeba posunout
brzdu směrem dovnitř o rozdíl těchto
vzdáleností.
Misurare la larghezza della guida (B)
e posizionare gli
inserti di regolazione sulla relativa
sede nella misura
corrispondente.
(posizione per
Controelaio Mito
mm. 13,5)
Measure the track
width (B) and then
place the inserts in
the corresponding
seat (position for
Mito box-frame mm
13,5)
Mesurer la largeur
du rail (B) et positionner les éléments de réglage sur
leurs supports en
les ajustant à la
bonne position.
(position 13,5 mm
pour le châssis
Mito).
Mida el ancho de la
guía (B) y posteriormente coloque
los elementos de
regulación en la
sede correspondiente (posición
para estructura Mito
13,5 mm).
Změřte šířku žlábku
kolejnice (B) a
potom umístěte
stavěcí vložky do
odpovídajících
zářezů (pozice 13.5
mm je pro pouzdra
Mito).
IT
EN
FR
ES
CZ
IT
EN
FR
ES
CZ
5.
4.
X
Inserire il freno e
fissarlo con le viti in
dotazione.
Insert the brake and
fix it with supplied
screws.
Insérer l’amortisseur
et le fixer avec les
vis fournies.
Inserte el freno y
fíjelo con los tornillos suministrados.
6.
[email protected]
Posizionare la dima
di foratura allineando il riferimento
segnato al punto
X (vedi pagina precedente) e segnare
le forature. Forare
con punta diamtro
mm.2,5.
Place the drilling
template aligning
the marked size to
the to the x point
(see the previous
page) and make
the marks for holes.
Make the holes
using a drill bit with
diameter mm 2,5.
Positionner le gabarit de perçage en
alignant les points
de repère (X) (voir la
page précédente).
Repérer les perçages. Percer avec une
mèche de 2,5 mm
de diamètre.
Coloque la plantilla
de perforación alineada en referencia
al punto X señalado
(véase la página
anterior) y haga las
marcas para los
agujeros. Realice
los orificios con una
broca de diámetro
2,5 mm.
Umístěte vrtací
šablonu a zarovnejte ji se značkou
(X) na rámu.
Označte místa pro
vrtání a vyvrtejte díry
vrtákem o průměru
2.5 mm.
IT- per porte con peso superiore a 30 kg è necessario inserire il pistone supplementare (optional)
EN- for doors weighing more than 30 kg it is necessary to insert the additional piston (optional)
FR- pour portes pesant plus de 30 kg, il est nécessaire d’insérer le piston supplémentaire (optional)
ES- para puertas con peso superior a 30 kg, es
necesario insertar el pistón adicional (optional)
CZ- pro dveře o hmotnosti více než 30 kg, je nutné
vložit další píst (optional)
Prima di chiudere
l’anta, caricare il
pistone in posizione
di lavoro.
Chiudere l’anta.
Before closing the
door, put the brake
as shown in the
picture. Close the
door.
Avant de fermer la
porte charger le
piston en position
de travail.
Fermer la porte.
Připevněte brzdu
dodanými šrouby.
Antes de cerrar la
puerta, cargue el
freno tal y como se
indica en la imagen.
Cierre la puerta.
Před uzavřením
dveří nastavte píst
brzdy do pracovní
pozice, jak je naznačeno na obrázku.
Zavřete dveře.
IT
EN
FR
ES
CZ
IT
EN
FR
ES
CZ
product and patended by
®
Doors & Security
www.mito.it/handy
DECELERATORE
UNIVERSALE PER
ANTE SCORREVOLI
E A SCOMPARSA
UNIVERSAL BRAKE
FOR DISAPPEARING
SLIDING DOORS
DECELERATEUR
UNIVERSEL POUR
PORTES COULISSANTES ESCAMOTABLES
SLOW UNIVERSAL
PUERTAS
CORREDERAS Y
DESAPARICIÓN
UNIVERZÁLNÍ BRZDA
PRO SKRYTÉ
POSUVNÉ DVEŘE
DECELERATORE
UNIVERSALE PER
ANTE SCORREVOLI
E A SCOMPARSA
UNIVERSAL BRAKE
FOR DISAPPEARING
SLIDING DOORS
DECELERATEUR
UNIVERSEL POUR
PORTES COULISSANTES ESCAMOTABLES
SLOW UNIVERSAL
PUERTAS CORREDERAS Y
DESAPARICIÓN
UNIVERZÁLNÍ BRZDA
PRO SKRYTÉ
POSUVNÉ DVEŘE
min. 30
min. 120
MINIMUM SIZE
TAILLE MINIMUM
TAMAÑO MÍNIMO
MINIMÁLNÍ
VELIKOST
In figura sono riportate le misure minime necessarie per
l’installazione. Rientrano ampiamente
nelle specifiche di
ogni
controtelaio
se posato secondo
le indicazioni consigliate dal produttore.
The figure shows
the minimum dimensions needed
for installation. Are
largely the specifications of each subframe if laid according
to the instructions
recommended by
the manufacturer.
L’image montre les
dimensions minimales nécessaires à l’installation. Elles sont
en grande partie les
caractéristiques de
tous le chàssis si
posé conformément aux instructions
recommandées par
le fabricant.
La figura muestra las
dimensiones mínimas necesarias para la
instalación. Son en
gran parte las especificaciones de cada
subtrama si establecido de acuerdo
con las instrucciones recomendadas
por el fabricante.
Obrázek
ukazuje
minimální rozměry
potřebné pro instalaci. Jsou do
značné míry specifikace každého pomocného
rámu-li
splněny v souladu s
pokyny, které doporučuje výrobce.
mm. 51
mm. 22
DIMENSIONI
MINIME
mm. 12
mm. 48
mm. 217
© Copyright 2026 Paperzz