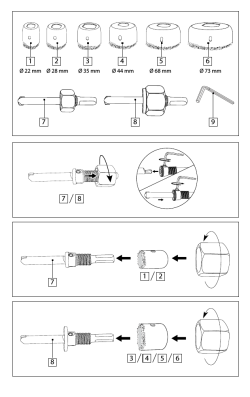
Gebrauchsanweisung
D
Schraubendreher
Bitte diese Gebrauchsanweisung vor dem Produkteinsatz ausführlich lesen.
Für Schäden, die durch Nichtbeachtung dieser Gebrauchsansweisung entstehen, lehnt der Hersteller jede
Haftung ab.
1. Produktbeschreibung
Die Schraubendreher sind in unterschiedlichen Ausführungen für Schrauben aus dem bredent-Programm anzuwenden.
2. Indikation
Die Schraubendreher sind für folgende Produkte anzuwenden:
Schraubendreher lang, Schraubendreher kurz, Schraubendreher Winkelstück, Schraubendreher-Set:
- Schrauben des Security-Lock-Systems
- Friction Splint FS1
- Titanschrauben des Brückenteilungsgeschiebes oc, Vario-Soft 3 Brückenteilungsgeschiebe,
Werkzeugsatz für individuelle Verschraubungen 1,4 und 1,6, Verschraubungs-Set teilkonfektioniert,
- Kugelkopfschrauben vks-oc / sg austauschbare Kugel 2,2
- Vario Compress 1 und Vario Compress 2
- Universelles Verbindungselement
Schraubendreher is
Vario-Kugel-Snap vks-oc rs Ø 2,2 mm Abutments
Schraubendreher Kugelkopfschraube
- Kugelkopfschrauben vks-oc / sg austauschbare Kugel 1,7
5. Processing
5.1 Screwdriver, short
The short screwdriver is used for tightening the screws described under item 2 on the model and in the patient‘s mouth.
When used in the mouth, the screwdriver must be attached to the operator’s wrist with a chain to prevent aspiration/
inhalation. The torque must not exceed 20 Ncm. The knurled side of the handle on the short screwdriver
has an additional function:
The square aperture can be used for removing the retention screw (Security-Lock system, bridge sectioning attachment
OC, screw set) from the thread after casting.
5.2 Screwdriver, long
The long screwdriver is used for tightening the screws described under item 2 on the model and in the patient’s mouth.
The torque must not exceed 20 Ncm.
5.3 Screwdriver, contra-angle
The contra-angle screwdriver is used for tightening the screws described under item 2 in the patient’s mouth. When
using the contra-angle screwdriver, it is advisable to use a torque controller set to 20 Ncm. A higher torque value may
cause the contra-angle screwdriver or screw to shear off.
5.4 Screwdriver, stud screw
The stud screw screwdriver is used for tightening the stud screws vks oc/sg 1.7 exchangeable studs on the model and
also in the patient’s mouth. When used in the mouth, the screwdriver must be attached to the operator’s wrist with a
chain to prevent aspiration/inhalation. The torque must not exceed 20 Ncm.
5.5 Please note
Bredent will not accept any liability if these products are used incorrectly or the recommended torque is exceeded.
6. Care (disinfecting, cleaning and sterilizing)
After the use, the tools must be placed into a drill bath containing a suitable disinfecting and cleaning solution. Then
the tools are cleaned manually under running water resp. in the ultrasonic cleaning unit or in the thermodisinfector.
After completing the cleaning process, the tools must be dried immediately using soft textile cloth or a compressed air
gun. After disinfecting and cleaning, the tools are sterilized in the
autoclave, chemoclave or in the hot-air sterilizer. Prior to sterilizing, the tools must be put into a container/receptacle
suitable for sterilization or into a suitable foil. After sterilizing, the tools require dry and dust-free storage in the container/receptacle or the foil.
3. Kontraindikation
Nach gegenwärtigem Kenntnisstand sind keine Kontraindikationen bekannt.
4. Lagerungs- und Haltbarkeitshinweise
Die Schraubendreher sind trocken in einem geeigneten Bohrerständer oder in einer Schublade aufzubewahren.
5. Verarbeitung
5.1 Schraubendreher kurz
Mit dem Schraubendreher kurz werden die unter Punkt 2 genannten Schrauben sowohl auf dem Modell wie auch im
Mund festgezogen. Beim Einsatz im Munde ist der Schraubendreher mit einer Sicherungskette am Handgelenk gegen
Aspiration zu sichern. Dabei darf ein Drehmoment von 20 Ncm nicht überschritten werden. Der Schraubendreher kurz
hat an der geriffelten Griffseite eine zusätzliche Funktion:
Mit der Vierkantöffnung kann die Fixationsschraube (Security-Lock-System, Brückenteilungsgeschiebe OC; Verschraubungsset teilkonfektioniert) nach dem Guss aus dem Gewinde gelöst werden.
5.2 Schraubendreher lang
Mit dem Schraubendreher lang werden die unter Punkt 2 genannten Schrauben sowohl auf dem Modell wie auch im
Mund festgezogen. Dabei darf ein Drehmoment von 20 Ncm nicht überschritten werden.
5.3 Schraubendreher Winkelstück
Mit dem Schraubendreher Winkelstück werden die unter Punkt 2 genannten Schrauben im Mund angezogen. Für die
Anwendung des Schraubendrehers Winkelstück wird die Benutzung eines Torc-Controllers mit einem Drehmoment von 20
Ncm empfohlen. Ein höherer Wert kann zum Abscheren des Schraubendrehers Winkelstück oder der Schraube führen.
5.4 Schraubendreher Kugelkopfschraube
Mit dem Schraubendreher Kugelkopfschraube werden die Kugelkopfschrauben vks oc/sg 1,7 austauschbare Kugel sowohl
auf dem Modell wie auch im Mund festgezogen. Beim Einsatz im Munde ist der Schraubendreher mit einer Sicherungskette
am Handgelenk gegen Aspiration zu sichern. Dabei darf ein Drehmoment von 20 Ncm nicht überschritten werden.
5.5 Hinweis
Bei unsachgemäßem Einsatz bzw. eine Überschreitung des empfohlenen Drehmoments wird von bredent keine Haftung
übernommen.
6. Pflege (Desinfektion, Reinigung und Sterilisation)
Die Instrumente sind in ein Bohrerbad mit geeigneter Desinfektions- und Reinigungsflüssigkeit zu legen. Anschließend
sollen die Instrumente manuell unter fließendem Wasser bzw. im Ultraschallbad oder im Thermodesinfektor gereinigt
werden. Nach Beendigung des Reinigungsverfahrens die Instrumente sofort mit weichen Textiltüchern oder Druckluftpistolen trocknen. Nach der Desinfektion und Reinigung der Instrumente mit Autoklaven, Chemieklaven oder im
Heißluftsterilisator sterilisieren. Die Instrumente vor der Sterilisation in ein keimdichtes sterilisationsgerechtes Behältnis
oder eine sterilisationsgerechte Folie geben. Nach der Sterilisation die Instrumente in dem Behältnis oder der Folie
trocken und staubfrei lagern.
7. Sonstige Hinweise
Diese Gebrauchsanweisung entspricht dem aktuellen Stand der Technik und unseren eigenen Erfahrungen. Das Produkt darf nur in der unter Punkt 2 beschriebenen Indikation verwendet werden. Der Anwender ist für den Einsatz des
Produktes selbst verantwortlich. Für fehlerhafte Ergebnisse wird nicht gehaftet, da der Hersteller keinen Einfluss auf
die Verarbeitung hat. Eventuell dennoch auftretende Schadenersatzansprüche beziehen sich ausschließlich auf den
Warenwert unserer Produkte.
7. Additional information
These instructions for use are based on state-of-the-art methods and equipment and our own experience. The product
may only be used for the indication described under item 2. The user himself is responsible for processing the product.
Liability for incorrect results shall be excluded since the manufacturer does not have any influence on further processing.
Any occurring claims for damages may only be made up to the value of our products.
Mode d'emploi
Tournevis
F
Veuillez lire attentivement ce mode d’emploi avant utilisation.
Le fabricant décline toute responsabilité pour tout dommage qui résulterait de la non observation de ce mode
d’emploi.
1. Description du produit
Il y a différents types de tournevis pour les vis du programme bredent.
2. Indications
Les tournevis s’emploient avec les produits suivants :
- les tournevis longs, tournevis courts, tournevis contre-angles, kit de tournevis
- les vis du système Security Lock
- le Friction Splint FS1
- les vis en titane du connecteur vissé pour bridges oc, le connecteur vissé pour bridges Vario-Soft 3
- le kit d’instruments pour vissages individuels 1,4 et 1,6, le kit de vissage en préfabrication partielle
- les vis à tête sphérique vks-oc / sg sphères remplaçables 2.2
- Vario Compress 1 et Vario Compress 2
- les éléments de connexion universels
- les tournevis is
- le Vario-Kugel-Snap vks.oc rs piliers de 2,2 mm de Ø
- les tournevis pour vis à tête sphérique
- les vis à tête sphérique vks-oc /sg à sphère interchangeables 1,7
3. Contre-indications
Selon nos connaissances actuelles des contre-indications ne sont pas connues.
4. Stockage et conservation
Les tournevis doivent être stockés au sec, dans un porte-fraises ou un tiroir approprié.
5. Mise en oeuvre
Instructions for use
GB
Screwdriver
Before using the product, please read instructions for use carefully.
The manufacturer will not accept any liability for damage resulting from non-compliance with these
instructions for use.
1. Description of the product
The screwdrivers are available in various types and used for screws from the product range of bredent.
2. Indication
The screwdrivers are used for the following products:
Screwdriver, long, screwdriver, short, screwdriver, contra-angle, screwdriver set:
- Screws of the Security-Lock system
- Friction Splint FS1
- Titanium screws of the bridge sectioning attachment oc, Vario-Soft 3 bridge sectioning attachment,
Set of tools for individual screw connections 1.4 and 1.6, screw set, partly preassembled
- Stud screws vks-oc / sg exchangeable stud 2.2
- Vario Compress 1 and Vario Compress 2
- Universal connecting element
Screwdriver is
- Vario-Stud-Snap vks-oc rs ø 2.2 mm abutments
- Screwdriver stud screw
- Stud screws vks-oc / sg exchangeable stud 1.7
3. Contraindication
Based on the current state of knowledge there are no known contraindications.
4. Storage and durability information
The screwdrivers must be stored under dry conditions in a suitable bur stand or a drawer.
5.1 Tournevis court
Le tournevis court sert à fixer les vis mentionnées au point 2, aussi bien sur le modèle qu’en bouche. Lors d’une utilisation
en bouche, il faut attacher le tournevis à une chaîne de sécurité que l’on passe au poignet afin d’éviter toute aspiration.
Dans ce cas, le couple ne doit pas dépasser 20 Ncm. Le manche rainuré du tournevis court possède une autre fonction:
par l’ouverture à quatre pans, on peut retirer la vis de fixation de la partie filetée après la coulée (système Security Lock,
connecteur vissé pour bridge OC, jeu de vis préfabriquées).
5.2 Tournevis long
Le tournevis long s’emploie pour fixer les vis mentionnées au point 2, aussi bien sur le modèle qu’en bouche. Il ne faut
pas dépasser un couple de 20 Ncm.
5.3 Tournevis contre-angle
Le tournevis contre-angle s’emploie pour fixer en bouche les vis mentionnées au point 2. Avec ce tourne-vis, il est
conseillé d’utiliser un contrôleur de couple doté d’un couple de 20 Ncm. Une valeur supérieure peut cisailler le tournevis
contre-angle ou la vis.
5.4 Tournevis vis à tête sphérique
Ce tournevis permet de visser les sphères interchangeables des vis à tête sphérique vks oc/sg 1,7 aussi bien sur le modèle
qu‘en bouche. Lors de sa mise en œuvre en bouche, il est à attacher à une chaîne que l’on passe au poignet afin d’éviter
toute aspiration. Ne pas dépasser un couple de 20 Ncm.
5.5 Observation
En cas d’utilisation non conforme ou de dépassement du couple conseillé, Bredent est dégagé de toute responsabilité.
6. Entretien (Désinfection, nettoyage et stérilisation)
Les instruments sont à placer dans un bain pour fraises contenant les liquides de désinfection et de net-toyage appropriés. Ensuite, désinfecter les instruments à la main sous l’eau courante ou bien dans un bain aux ultrasons ou dans un
appareil de désinfection thermique. Après avoir terminé le nettoyage, immédia-tement sécher les instruments avec des
serviettes en tissu doux ou des pistolets à pression. Après la dé-sinfection et le nettoyage des instruments dans l’autoclave
ordinaire, l’autoclave chimique ou le stérilisateur à air chaud, procéder à la stérilisation. Avant la stérilisation les mettre
dans un récipient étanche aux ger-mes et approprié à la stérilisation ou dans un film spécial pour stérilisation. Après la
stérilisation, conserver les instruments dans le récipient ou le film au sec et à l’abri de la poussière.
7. Divers
Ce mode d’emploi est basé sur les connaissances techniques actuelles et sur nos propres expériences. Le produit doit
uniquement être utilisé selon l’indication décrite au paragraphe 2. L’utilisateur est lui-même responsable de l’utilisation
du produit. N’ayant aucune influence sur sa mise en œuvre, le fabricant ne sau-rait être tenu responsable de résultats
défectueux ou non satisfaisants. Toute indemnisation éventuelle se limitera à la valeur du produit.
Weissenhorner Str. 2 · 89250 Senden · Germany · Tel. (+49) 0 73 09 / 8 72-22 · Fax (+49) 0 73 09 / 8 72-24
www.bredent.com · e-mail [email protected]
I
Cacciavite
Folleto de instrucciones
Destornillador
E
Leggere attentamente le informazioni sul prodotto prima dell’utilizzo.
Rogamos lean antes de usar el producto detenidamente la hoja de instrucciones.
Il produttore non si assume alcuna responsabilità per danni, dovuti all’inosservanza delle presenti istruzioni
d’uso.
Por daños producidos por no tener en cuenta esta hoja de instrucción, el fabricante no se hace responsable.
1. Descrizione del prodotto
I cacciaviti possono essere utilizzati per diversi tipi di viti, presenti nel programma vendite bredent.
2. Indicazioni
I cacciaviti possono essere utilizzati per i seguenti prodotti:
Cacciavite lungo, cacciavite corto, cacciavite per contrangolo, set di cacciaviti:
Viti del Sistema Security Lock:
Friction Splint FS1
Viti al titanio degli attacchi di collegamento oc, degli attacchi di collegamento Vario-Soft
Kit strumentario per collegamenti individuali 1,4 e 1,6, set di viti preconfezionato,
Sfera in titanio vks-oc / sg, sfera sostituibile 2,2
Vario Compress 1 e Vario Compress 2
Elemento di connessione universale
Cacciavite is
Vario-Kugel-Snap vks-oc rs � 2,2 mm abutment
Cacciavite per attacco a sfera sostituibile
Attacco a sfera vks-oc / sg, attacco a sfera sostituibile 1,7
3. Controindicazioni
In base allo stato attuale delle conoscenze non sono note controindicazioni.
4. Avvertenze per la conservazione e la durata
I cacciaviti devono essere conservati in un luogo asciutto, in un apposito supporto od in un cassetto.
5. Lavorazione
5.1 Cacciavite corto
Il cacciavite corto è utilizzato per il fissaggio delle viti elencate al punto 2, sia su modello che sul paziente.
Nell’impiego sul paziente il cacciavite dovrà essere fissato al polso per mezzo di una catenella che ne im-pedisca
l’involontario ingerimento. Non si deve superare un momento torcente pari a 20 Ncm.
Il cacciavite corto ha un’impugnatura scanalata con una funzione aggiuntiva:
l’apertura quadrangolare, che permette di svitare dal filetto la vite di fissaggio (Sistema Security Lock, at-tacco di
collegamento OC, set di viti preconfezionato) dopo la fusione.
5.2 Cacciavite lungo
Il cacciavite lungo è utilizzato per il fissaggio delle viti elencate al punto 2 sia su modello che sul paziente.
Non si deve superare un momento torcente pari a 20 Ncm.
5.3 Cacciavite per contrangolo
Il cacciavite per contrangolo, con angolare, è utilizzato per il fissaggio delle viti elencate al punto 2 sul pa-ziente. Per
l’impiego di questo cacciavite si consiglia l’uso di un Torc-Controller con un momento torcente pari a 20 Ncm. Un valore
più elevato potrebbe comportare la rottura del cacciavite con angolare o della vite stessa.
5.4 Cacciavite per sfera sostituibile
Con il cacciavite per la sfera sostituibile, le sfere in titanio vks oc/sg 1,7 vengono fissate sia sul modello che nel cavo
orale. Quando si utilizza il cacciavite nel cavo orale, assicurarlo al polso con una catenella, onde evitare un accidentale
ingerimento. Non superare un momento torcente di 20 Ncm.
5.5 Avvertenza
La Bredent non si assume alcuna responsabilità nel caso in cui si faccia un uso improprio dello strumento o si superi il
momento torcente consigliato.
6. Manutenzione (disinfezione, pulizia e sterilizzazione)
Mettere a bagno gli strumenti in appositi liquidi disinfettanti e detergenti. Successivamente gli strumenti vanno risciacquati
manualmente sotto l’acqua corrente o si esegue una pulizia in bagno ad ultrasuoni o nell’apparecchio per la disinfezione
termica. Al termine della fase di pulizia, gli strumenti devono essere subito asciugati con un panno o con una pistola
ad aria compressa. Dopo la disinfezione e la pulizia gli strumenti vanno sterilizzati in autoclave, autoclave chimico o ad
aria calda. Prima di essere sterilizzati, gli strumenti devono essere riposti in appositi contenitori per sterilizzazione od
avvolti con della pellicola da sterilizzazione. Dopo la sterilizzazione fare asciugare gli strumenti,nei loro contenitori o
ancora avvolti nella pellicola, in un luogo privo di polveri.
7. Ulteriori avvertenze
Questi istruzioni d’uso si basano sullo stato attuale della tecnica e su nostre esperienze. Il prodotto deve essere utilizzato solo in base alle indicazioni descritte al punto 2. L’utente è personalmente responsabile dell’utilizzo del prodotto.
Il produttore non si assume responsabilità per risultati non conformi, poiché non ha alcuna influenza sulle lavorazioni
successive. Nel caso in cui, tuttavia, fosse richiesto un risarcimento dei danni, questo sarà commisurato esclusivamente
al valore commerciale dei nostri prodotti.
1. Descripción de producto
Los destornilladores se pueden obtener en diferentes formatos para los tornillos del programa de bredent.
2. Indicaciones
Los destornilladores se usan para los siguientes productos:
- Destornillador largo, destornillador corto, destornillador para contra-ángulo, surtido de destornilladores:
Destornillador del sistema Security Lock
Fricción Splint FS1
Tornillos de titanio para el atache de partición de puentes oc, Vario-Soft 3 atache de partición de puente, set de terrajas
Multidrill 1,4 y 1,6, Set de tornillos de partición de puentes individual
Cabeza de bola con rosca vks-oc/ sg intercambiable 2,2
Vario Compress 1 y 2
Elementos de unión universal
Destornillador is
Bola Vario Snap vks-rs 2,2mm Aditamentos
Destornillador para cabeza de bola con rosca
Cabeza de bola con rosca vks oc/sg intercambiable 1,7
3. Contraindicaciones
Según los últimos conocimientos no s han encontrado ninguna contraindicación conocida.
4. Almacenaje y caducidad
Se deberá almacenar los destornilladores en un soporte de fresas adecuado o en el cajón.
5. Modo de empleo
5.1 Destornillador corto
Con el destornillador corto se atornillaran como destornillaran los tornillos descritos en el punto 2 tanto del modelo
como de boca. Si se utiliza en boca deberá ser sujetado el destornillador corto con una cadena a la muñeca para evitar
ser aspirada por la aspiración en boca.
No se deberá sobrepasar el momento de torsión de los 20 Ncm. La parte áspera del destornillador corto tiene otra
función:
Por la apertura hexagonal se podrán liberar los tornillos de fijación (del sistema Security Lock,
Atache de partición de puentes OC, set con rosca para confección parcial) una vez se haya sido colado y soltado de
la rosca.
5.2 Destornillador largo
Con el destornillador largo se podrán destornillar como atornillar los tornillos sobre el modelo como en boca, descritos
en el punto 2. el momento de torsión no se deberá sobrepasar los 20 Ncm.
5.3 Destornillador para contra ángulo
Con este destornillador para contra ángulo se podrá atornillar como destornillar en boca los tornillos descritos en el
punto 2.
Para su correcta utilización se deberá utilizar un Torc-Controllers de 20Ncm para evitar una rotura del destornillador
o del tornillo.
5.4 Destornillador para cabeza con rosca
Con el destornillador se desenroscarán las cabezas de bola con rosca vks oc/sg 1,7 del modelo como de la boca. Si se
coloca se deberá asegurar el destornillador con una cadena a la muñeca para evitar que se aspire el destornillador. No
se deberá sobrepasar los 20Ncm a la hora de enroscar.
5.5 Consejos
bredent no asume ninguna responsabilidad al respecto si no se tiene en cuenta el momento de torsión y se sobre pasa.
6. Consejos de desinfección
Los instrumentos se deberán incluir en el baño para instrumentos donde se incluirá el líquido de desinfección y limpieza.
A continuación se deberá limpiar manualmente bajo abundante agua corriente o en el ultrasonido o en el desinfectante
térmico. después de haber desinfectando secar de inmediato los instrumentos con un paño textil blando o con aire
comprimido.
Una vez se haya terminado de secar se deberá colocar en el autoclave, autoclave químico o esterilizador por aire caliente.
Introducir los instrumentos en las bolsas correspondientes para esterilizar. Después de la esterilización colocar y almacenar
los instrumentos en la bandeja o en el folio en lugar seco y sin polvo.
7. Otros consejos
La información sobre el producto se acoge a los últimos resultados y experiencias sobre el mismo. Por ello aconsejamos
antes de su uso leer de nuevo la información sobre el producto. Todos los consejos con respecto a su manipulación se basan
en nuestra propia experiencia y solo se podrá ver como información orientativa. Nuestros productos están constantemente
en desarrollo. Nos reservamos el derecho de cualquier cambio en su construcción y composición.
Weissenhorner Str. 2 · 89250 Senden · Germany · Tel. (+49) 0 73 09 / 8 72-22 · Fax (+49) 0 73 09 / 8 72-24
www.bredent.com · e-mail [email protected]
000795EX-20091215
Istruzioni per l‘uso
© Copyright 2026 Paperzz