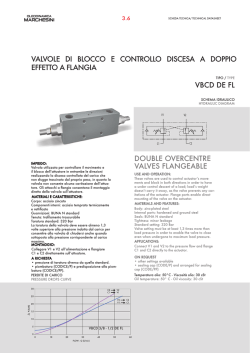
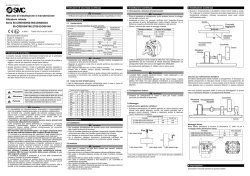
ApriLINEARE
1
2
A
19
19
Ø 5 n°3
3,5
17,5
17,5
20
9,5 9,5
B
3
4
38,5
M8
20,6
Ø 6 PASSANTE
Ø 6 THROUGH-HOLE -TROU PASSANT Ø 6
DURCHGANGLHCH Ø 6 - AGUJERO PASANTE Ø 6
11
4
11
4,8
4,8
13
Ø5
19
Ø5
7,5
18
7,5
30
50
19
13
15
53,5
19
Ø5 Ø5
19
45
Ø 5 n°3 FORI
3 Ø 5 HOLES - 3 TROUS Ø 5
3 LÖCHER Ø 5 - 3 AGUJEROS Ø 5
5
A
D
B
C
6
A Apri LINEARE 230 V
Neutro, Neutral, Neutre,
Mittelleiter, Neutro
230 V
Fase, Phase, Phase,
Phase, Fase
B Apri LINEARE 24 V
1
2
ApriLINEARE
ATTUATORE A CREMAGLIERA
I
DESCRIZIONE
Attuatore elettrico in alluminio anodizzato con movimento lineare a cremagliera provvisto di fine corsa elettronico, grado di protezione IP 65, con possibilità di collegamento
in parallelo, condensatore antidisturbo, completo di staffa in alluminio anodizzato e attacco all’infisso in acciaio zincato. La cremagliera è in acciaio C43 zincato, di sezione
quadra 10x10. La scatola di contenimento dell’apparato motore è in ABS antiurto, composta da due pezzi con guarnizioni di tenuta. Provvisto di cavo di alimentazione collegato
direttamente all’interno dell’attuatore. A richiesta: cremagliera in acciaio inox. Numerose staffe per diversi tipi di applicazione.
1
2
FORNITURA DI SERIE
1
2
3
4
5
6
7
8
Attuatore
Perno di fissaggio staffa anteriore
Staffa anteriore
Dado esagonale
Vite
Dado autobloccante
Perno anteriore a occhiello
Attacco ant. infisso
Qt. 1
Qt. 2
Qt. 1
Qt. 1
Qt. 1
Qt. 1
Qt. 1
Qt. 1
Montare il perno anteriore alla cremagliera.
Fissare l’attuatore, con perni in dotazione, sulla staffa. Fissare il perno
anteriore sull’attacco all’infisso.
Queste istruzioni sono intese con l’attuatore installato come da figura 5 (D).
Assicurarsi che l’attuatore raggiunga correttamente le posizioni di intervento fine corsa
senza ostacoli.
N.B. L’attuatore viene fornito in posizione di finecorsa di chiusura.
6
Dimensioni e ingombri degli accessori standard.
4
L’attuatore Apri ha la possibilità di essere fissato anche sulla parte posteriore.
L’installazione deve essere effettuata con il serramento in posizione di chiusura.
COLLEGAMENTO ELETTRICO
Verificare l’esatta sezione dei cavi di alimentazione che devono essere opportunamente dimensionati in base all’assorbimento dell’attuatore.
Dimensioni e posizioni di fissaggio con accessori standard.
A
installazione complanare al serramento.
B
installazione su mensola di sostegno (optional) o su piano di appoggio
esistente.
3
5
C
D
A
B
Attuatore con alimentazione 230 volt c.a. ± 5%
Cavo 1 = Blu - comune
Cavo 2 = Marrone - chiude
Cavo 3 = Nero - apre
Cavo 4 = Giallo/Verde - massa
Attuatore con alimentazione 24 volt c.c. ± 15%
Cavo 1 = Azzurro (+apre,- chiude) Cavo 2 = Marrone
N.B. Si consiglia per la sicurezza dell’impianto, l’utilizzo di un pulsante instabile (uomo
presente) oppure l’alimentazione temporizzata per il tempo necessario alla manovra.
INSTALLAZIONE
AVVERTENZE:
A
Non toccare la cremagliera quando è in movimento.
Non toccare od entrare nel raggio di azione della finestra durante il movimento.
Attenzione: la finestra deve essere dotata di braccetti di sicurezza adeguati al peso
dell’infisso.
Scollegare l’alimentazione elettrica durante l’installazione e la manutenzione.
N.B.: La finestra può essere apribile e richiudibile manualmente, disconnettendo la
motorizzazione dall’infisso.
B
Tracciare la mezzeria dei serramento. Fissare l’attacco all’infisso utilizzando viti di fissaggio idonee al materiale dell’infisso (per il montaggio in
infissi di alluminio utilizzare viti autofilettanti di 4,8x16 UNI6954 od equivalenti, verificando sempre il corretto fissaggio secondo le norme di buona tecnica).
Occorre aggiungere in prossimità dell’infisso una targhetta adesiva di
“ATTENZIONE ORGANI IN MOVIMENTO”.
Fissare la staffa supporto attuatore allineata con l’attacco all’infisso, inoltre l’altezza deve essere tale che l’attuatore risulti perpendicolare al
serramento.
NOTA PER LA MANUTENZIONE:
Verificare periodicamente (ogni anno) il buono stato delle cerniere; la tenuta dell’attacco all’infisso e lo stato generale del serramento.
ApriLINEARE
RACK ACTUATORS
GB
DESCRIPTION
Anodized aluminium electric with linear movement fitted with electronic limit switch, IP 65 protection rating, with parallel connection interference-free capacitor, complete with anodized
aluminium bracket and galvanized steel frame block. The 10x10 square section rack is made of galvanized C43 steel. The motor housing box is made of shockproof ABS, composed
of two parts complete with sealing gaskets. The power supply cable provided is connected directly inside the actuator. On request: stainless steel rack. Many brackets for different types
of applications.
1
2
3
STANDARD EQUIPMENT
1
2
3
4
5
6
7
8
Actuator
Front bracket retaining pin
Front bracket
Hexagon nut
Screw
Self-locking nut
Front eyelet pin
Front frame block
D
Qty
Qty
Qty
Qty
Qty
Qty
Qty
Qty
1
2
1
1
1
1
1
1
Dimensions and fixing positions with standard accessories.
A
Installation flush with window.
B
Installation on a support bracket (optional) or on existing support surface.
Fix the actuator to the bracket with the pins provided. Close the window by
applying pressure so as to ensure that the gaskets hold, then fix the front pin
of the block to the window.
The instructions refer to an actuator installed according to fig. 5 (D). Ensure that the
actuator reaches the limits switch positions correctly and with no obstacles.
N.B. The actuator is supplied with limit switch in the closing position, with the window
closed.
6
ELECTRICAL CONNECTION
Check that the section of the power cable is adequate for the actuator power
requirements.
A
Dimension of standard accessories.
B
4
Actuator with 230 volt. A.C. ± 5%
Cable 1 = Blue - common
Cable 2 = Brown - closing
Cable 3 = Black - opering
Cable 4 = Yellow/Green - earth
Actuator with 24 volt. D.C. ± 15%
Cable 1 = Light blue (+opening,-closing)
Cable 2 = Brown
The Apri actuator may also be fixed on the back.
N.B. To ensure system safety, we recommend using a spring-return push button (person
present) or timed power supply set for the necessary operatingtime.
The actuator must be installed when window is closed.
WARNING:
5
INSTALLATION
A
B
C
Mark the centre line on the window. Fix the block to the window using
screws suitable for the material the window is made of. For installation in
aluminium frames use UNI 6954 4.8 X 16 self-tapping screws or the equivalent,
make sure they are properly fastened.
Place a “BEWARE OF MOVING PARTS” sticker near the frame.
Fix the actuator’s support bracket and the fixing device to the window so
that they are in line. Their height must be adjusted so that the actuator is
perpendicular to the window.
Fix the front pin to the rack.
Do not touch the rack when it is motion.
Do not touch or stand inside the window range when it is moving.
Caution: the window must be provided with safety arms adequate to the frame weight.
Disconnect the electricity supply during installation and maintenance.
N.B.: The window may be opened manually and closed once you have disconnected the
motor from the frame.
MAINTENANCE TIPS:
Periodically check (once a year) to make sure that the hinges are in good condition and
that the connection to the frame is secure.
ApriLINEARE
ACTIONNEURS A CREMAILLERE
F
DESCRIPTION
Actionneur électrique en aluminium anodisé, à mouvement linéaire à crémaillère avec fin de course électronique, degré de protection IP 65, possibilité de branchement en parallèle,
condensateur antiparasites, livré avec un étrier en aluminium anodisé et attache de fixation au châssis en acier zingué. Crémaillère en acier C43 zingué, de section carrée 10x10. Le
boîtier contentant le moteur est en ABS antichoc ; il se compose de deux pièces et est muni de joints d’étanchéité. Câble d’alimentation relié directement à l’intérieur de l’actionneur.
Sur demande : crémaillère en acier inox. Nombreux étriers pour les différents types d’application.
1
D
EQUIPEMENT STANDARD
1
2
3
4
5
6
7
8
2
Actionneur
Axe de fixation étrier avant
Etrier avant
Ecrou hexagonal
Vis
Ecrou auto-bloquant
Axe avant à oeillet
Attache avant sur châssis
Q.té 1
Q.té 2
Q.té 1
Q.té 1
Q.té 1
Q.té 1
Q.té 1
Q.té 1
Fixer l’actionneur à l’étrier à l’aide des chevilles fournies à cet effet. Fixer
l’axe avant à l’attache du châssis.
Ces instructions se réfèrent à un actionneur installé comme le montre la fig. 5 (D). Vérifier
que l’actionneur atteint les positions de fin de course sans rencontrer d’obstacles.
N.B. L’actionneur est livré en position de fin de course de fermeture, le vantail fermé.
6
BRANCHEMENT ELECTRIQUE
Vérifier le diamètre des fils qui doit être suffisant pour l’absorption électrique de
l’actionneur.
A
Dimensions et positions de fixation avec accessoires standards.
A
installation dans le plan du vantail.
B
installation sur étagère de support (en option) ou sur plan d’appui existant.
B
3
Dimensions et encombrements des accessoires standards.
4
L’actionneur Apri peut être fixé également sur la partie arrière.
Actionneur alimenté en 230 volts c.a. ± 5%
Fil 1 = Bleu - commun
Fil 2 = Marron - ferme
Fil 3 = Noir - ouvre
Fil 4 = Jaune/Vert - terre
Actionneur alimenté en 24 volts c.c. ± 15%
Fil 1 = Ciel (+ouvre,-ferme)
Fil 2 = Marron
N.B. Pour la sécurité de l’installation, il est conseillé d’utiliser d’un bouton instable
(dispositif “homme mort”) ou bien d’un temporisateur de l’alimentation pendant le temps
nécessaire pour la manoeuvre.
L’installation doit être effectuée avec le vantail en position de fermeture.
AVERTISSEMENTS :
5
INSTALLATION
A
B
C
Repérer le centre du vantail. Fixer l’attache sur le châssis à l’aide de vis de
fixation adaptées au matériau du châssis. Pour la pose sur des menuiseries
aluminium, utiliser des vis-tarauds de 4,8x16 UNI 6954 ou équivalentes et
vérifier si la fixation est effectuée dans les régles de l’art.
Il faut appliquer près de l’huisserie une plaquette adhésive indiquant
“ATTENTION ORGANES EN MOUVEMENT”.
Fixer l’étrier de support de l’actionneur dans l’axe de l’attache préalablement
fixée au châssis, la hauteur doit être telle que l’actionneur soit en position
perpendiculaire par rapport au vantail.
Monter l’axe avant sur la crémaillère.
Ne touchez pas la crémaillère lorsqu’elle est en mouvement.
Ne touchez pas la fenêtre et n’entrez pas dans son rayon d’action pendant qu’elle est en
mouvement.
Attention: la fenêtre doit être munie de supports de sécurité correspondant au poids du
châssis.
Coupez le courant au moment de l’installation et de l’entretien.
N.B. On peut ouvrir et fermer la fenêtre manuellement, en débranchant la motorisation de
l’huisserie.
CONSEILS D’ENTRETIEN :
Contrôlez régulièrement (tous les ans) le bon état des charnières, la fixation de l’attache
sur l’huisserie et l’état général de la menuiserie.
ApriLINEARE
ZAHNSTANGENANTRIEBE
D
BESCHREIBUNG
Elektroantrieb aus eloxiertem Aluminium mit linearem Zahnstangentrieb und elektronischem Endschalter, Schutzart IP 65, Parallelschaltung möglich, Entstörkondensator,
komplett mit eloxiertem Aluminiubügel und Flügelbock aus verzinktem Stahl. Die Zahnstange aus verzinktem Stahl C43 hat einen quadratischen Querschnitt von 10x10. Das
Motorengehäuse aus stoßfesten ABS besteht aus zwei Teilen mit Dichtungen. Das Zuleitungskabel ist direkt im Innem des Antriebs angeschlossen. Auf Anfrage: Zahnstange aus
Edelstahl. Zahlreiche Bügel für verschiedene Anwendungsarten.
1
2
SERIENMÄSSIGER LIEFERUMFANG
1
2
3
4
5
6
7
8
Antrieb
Vorderzapfen
Vordere Konsole
Sechskantmutter
Schraube
Selbstsichemde Mutter
Vorderzapfen mit Öse
Vorderer Flügelbock
1 St.
2 St.
1 St.
1 St.
1 St.
1 St.
1 St.
1 St.
Abmessungen und Befestigungsstellen mit Standardzubehör.
A
Flächenbündige Installation an das Fenster.
B
Installation auf Stützkonsole (Option) oder bestehende Stützebene.
D
Den Antrieb mit dem mitgelieferten Zapfen auf den Flügelbock montieren. Den
Vorderzapfen am Flügelbock befestigen.
Diese Anweisungen verstehen sich für einen wie in Abb. (D) montierten Antrieb.
Versichem Sie Sich, daß der Antrieb seine Endlage unbehindert erreicht.
Hinweis: Der Antrieb wird in Schließendstellung geliefert, das Fenster ist geschlossen.
6
STROMANSCHLUSS
Den Querschnitt des Zuleitungskabels prüfen, der der Stromaufanahme des Antriebs
angepaßt sein muß.
A
B
3
Abmessungen und Platzbedarf des Standardzubehörs.
4
Der Antrieb Apri kann auch auf der Rückseite befestigt werden.
Antrieb 230 Volt Ws ± 5%
Kabel 1 = Blau - gemeins.Leiter
Kabel 2 = Braun - schließt
Kabel 2 = Schwarz - öffnet
Kabel 4 = Gelb/Grün - Masse
Antrieb 24 Volt Gs ± 15%
Kabel 1 = Blau blue (+öffnet,-schließt)
Kabel 2 = Braun
Hinweis: Zur Sicherheit der Anlage empfiehlt sich die Verwendung einer nicht rastenden
Drucktaste (Totmannschaltung), oder einer zeitgesteuerte Speisung für die zur Betätigung
notwendige Zeit.
Die Installation muß bei geschlossenem Fenster erfolgen.
5
UNBEDINGT BEACHTEN:
INSTALLATION
A
B
C
Die Mittellinie des Fensters anzeichnen. Den Flügelbock mit für das Material
des Fensters geeigneten Schrauben anschrauben. Zur Montage auf
Aluminiumfenster selbstschneidende Schrauben 4,8x16 UNI 6954 oder
vergleichbare verwendet; die korrekte Befestigung muß technisch überpruftt
werden.
Ein Klebeschild mit der Aufschrift “ACHTUNG, TEILE IN BEWEGUNG” muß
neben dem Fenster angebracht werden.
Die Schiebekonsole mit dem Flügelbock gefluchtet montieren. Die Höhe muß
so gewählt werden, daß der Antrieb senkrecht zum Fenster steht.
Den Vorderzapfen auf die Zahnstange montieren.
Die Zahnstange nicht berühren, solange sie in Bewegung ist.
Das Fenster nicht berühren, solange es in Bewegung ist bzw. nicht in den Bewegungsradius
greifen.
Achtung: Das Fenster muß mit Sicherheitsarmen versehen werden, die dem Gewicht des
Fensters angepaßt sind.
Wahrend der Installation und Wartung die Spannungsversorgung unterbrechen.
Das Fenster kann von Hand geöffnet und geschlossen werden, wenn der Antrieb nicht mit
dem Fenster verbunden ist.
WARTUNGSHINWEISE:
Regelmäßig (jedes Jahr) den Zustand der Scharniere, die Befestigung am Fenster und
den allgemeinen Zustand des Fensters prüfen.
ApriLINEARE
ACTUADORES DE CREMALLERA
E
DESCRIPCIÓN
El actuador électrico de aluminio anodizado con movimiento lineal de cremallera equipado con fin de carrera electrónico, grado de protección IP 65, con posibilidad de conexión en
paralelo, condensador autirruído, equipado con estribo de aluminio anodizado y unión al bastidor de acero cincado. La cremallera es de acero C43 cincado de sección cuadrada 10x10.
La caja que contiene el aparato motor es de ABS antichoque, formada por dos piezas con juntas de estanqueidad. Equipado con cable de alimentación conectado directamente dentro
del actuador. Sobre pedido: cremallera de acero inoxidable. Muchos estribos para distintos tipos de empleo.
1
EQUIPAMIENTO DE SERIE
1
2
3
4
5
6
7
8
Actuador
Perno de sujeción estribo anterior
Estribo anterior
Tuerca hexagonal
Tornillo
Tuerca de seguridad
Perno anterior de argolla
Unión anterior para marco
continuación fijar el perno anterior en la unión al quicio.
Estas instrucciones se refieren sólo al actuador instalado como en la figura (D).
Asegurarse de que el actuador alcance correctamente las posiciones de activación del
fin de carresa sin obstáculos.
NOTA. El actuador se suministra en la posición de fin de carrera de cierre, con el
cerramiento cerrado.
1 Pz.
2 Pz.
1 Pz.
1 Pz.
1 Pz.
1 Pz.
1 Pz.
1 Pz.
6
CONEXIÓN ELÉCTRICA
Verificar la sección exacta de los cables de alimentación que deben ser
oportunamente dimensionados en base a la absorción del actuador.
2
Dimensiones y posiciones de sujeción con accesorio estándar.
A
instalación coplanar el cerramiento.
B
instalación en repisa de soporte (opcional) o sobre plano de apoyo.
A
3
Dimensiones y espacio ocupado por los accesorios estándares.
B
4
El actuador Apri tiene la posibilidad de ser fijado también por la parte posterior.
La instalación debe ser efectuada con el cerramiento en posición de cierre.
5
Actuador con alimentación 230 volt c.a. ± 5%
Cable 1 = Azul - común
Cable 2 = Marrón- cierra
Cable 3 = Negro - abre
Cable 4 = Amarillo/verde - masa
Actuador con alimentación 24 volt c.c. ± 15%
Cable 1 = Azul (+abre, -cierre)
Cable 2 = Marrón
NOTA. Para la seguridad de la instalación se aconseja utilizar un pulsador inestable
(hombre presente) o la alimentación temporizada para el tiempo necesario y la maniobra.
INSTALACIÓN
ADVERTENCIAS:
A
No tocar la cremallera cuando está en movimiento.
No tocar o entrar en el área de trabajo de la ventana durante el movimiento.
Atención: la ventana tiene que estar equipada con brazos de seguridad adecuados al
peso del marco.
Desconectar la alimentación eléctrica durante la instalación y el mantenimiento.
NOTA. La ventana se puede abrir y cerrar manualmente, desconectando la motorización
del marco.
B
C
D
Marcar la línea de centro del cerramiento. Fijar la unión al marco utilizando
tornillos de fijación idóneos al material del marco. (Para el montaje de marcos
de aluminio utilizar tornillos autorroscantes de 4,8x16 UNI 6954 o equivalentes
verificando la correcta fijación según las normas de buena técnica).
Es necessario colocar, cerca del marco, una placa adhesiva que ponga:
“ATENCIÓN PARTES EN MOVIMIENTO”.
Fijar el estribo de soporte del actuador alineado con la unión en el marco,
además la altura debe ser tal que el actuador resulte perpendicular al
cerramiento.
Montar el perno anterior en la cremallera.
Fijar el actuador, con los pernos en dotación, en el estribo. Cierrar el cerramiento
con una presión tal que garantice la estanqueidad de las guarniciones a
I
GB
NOTAS PARA EL MANTENIMIENTO:
Verificar periódicamente (cada año) el buen estado de las cremalleras, la solidez de la
fijación al marco y el estado del cerramiento.
Sono sconsigliate le applicazioni con uso intensivo.
Not recommended for intensive use.
F
Emploi intensif déconseillé.
D
Für intensiven Gebrauch ungeeignet.
E
Se desaconsejan aplicaciones para uso intensivo.
ApriLINEARE
I
Caratteristiche tecniche
Forza di spinta e trazione:
Corse disponibili standard:
Collegabile in parallelo:
Velocità di traslazione:
Tensione:
Corrente:
Consumo:
Frequenza
Fine corsa:
Grado di protezione:
Certificazioni:
GB
Specifications
Thrust and traction force:
Standard available travels:
Parallel connection:
Linear speed:
Voltage:
Current:
Consumption:
Frequency
Limit switch:
Protection rating:
Certificates:
F
650 N
(200 N = versione speedy
per finestre scorrevoli)
170, 230, 350, 550, 750 mm
(fino a 1350 mm per
finestre scorrevoli)
SI
8 mm/sec
(30 mm/sec = versione speedy
per finestre scorrevoli)
230 Volt c.a.
24 Volt c.c.
0,09 Ampere
0,8 Ampere
20 Watt
50 Hz
Elettronico
lP 65
CE
650 N
(200 N = speedy version for
sliding windows)
170, 230, 350, 550, 750 mm
(up to 1350 mm for sliding
windows)
YES
8 mm/sec
(30 mm/sec = speedy version
for sliding windows)
230 Volt A.C.
24 Volt D.C.
0.09 Ampere
0,8 Ampere
20 Watt
50 Hz
electronic
IP 65
CE
D
Technische Daten
Druck-und Zugkraft:
Standardhübe:
Parallelschaltbar:
Laufgeschwindigkeit:
Betriebsspannung:
Stromstärke:
Stromverbrauch:
Frequenz:
Endschalter:
Schutzart:
Zertifizierungen:
E
650 N
(200 N = Version Speedy
für Schiebefenster)
170, 230, 350, 550, 750 mm
(bis 1350 mm für
Schiebefenster)
JA
8 mm/sek.
(30 mm/sek. = Version Speedy
für Schiebefenster)
230 Volt Ws
24 Volt Gs
0,09 Ampere
0,8 Ampere
20 Watt
50 Hz
elektronisch
IP 65
CE
Datos técnicos
Fuerza de empuje y tracción:
Carreras disponibles estándares:
Conexión en paralelo:
Velocidad lineal:
Tensión:
Corriente:
Consumo:
Frecuencia:
Fin de carrera:
Grado di protección:
Certificaciones:
650 N
(200 N vérsion speedy
para ventanas correderas)
170, 230, 350, 550, 750 mm
(hasta 1350 mm
para ventanas correderas)
SI
8 mm/seg
(30 mm/seg = versión speedy
para ventanas correderas)
230 Voltios c.a. 24 Voltios c.c.
0,09 Amperios 0,8 Amperios
20 vatios
50 Hz
electrónico
IP 65
CE
Caractéristiques techniques
Force de poussée et de traction :
Courses standard disponibles :
Branchement en parallèle :
Vitesse de translation :
Tension :
Courant :
Consommation :
Fréquence :
Fin de course :
Degré de protection :
Certifications :
650 N
(200 N = version speedy pour
fenêtres coulissantes)
170, 230, 350, 550, 750 mm
(jusqu’à 1350 mm pour
fenêtres coulissantes)
OUI
8 mm/s
(30 mmis = version speedy
fenêtres coulissantes)
230 V c.a.
24 Volt c.c.
0,09 Ampere
0,8 Ampere
20 Watts
50 Hz
électronique
IP 65
CE
I
Tutti i dati sono stati redatti e controllati con la massima cura, ma non possiamo accettare responsabilità per eventuali errori od omissioni.
Ci riserviamo di apportare quelle modifiche che sono connesse ai progressi tecnologici.
GB
These specifications have been written and checked with the greatest care and attention and are correct at the time of writing.
Errors and omissions excepeted. The company operates a policy of continuous improvement and reserves the right to make
changes without prior notice.
F
Toutes les données ont été rédigées et contrôlées avec le plus grand soin. Nous n'assumons aucune responsabilité en cas d'erreurs
éventuelles ou d'omissions. Nous nous réservons le droit d'apporter des modifications liées au progrès technologique.
D
Alle Daten wurden sorgfältigst ausgearbeitet und überprüft. Für eventuelle Fehler oder Auslassungen übernehmen wir keine Verantwortung.
Wir behalten uns vor, Änderungen vorzunehmen, welche mit der technologischen Entwicklung im Zusammenhang stehen.
E
Todos los datos han sido redactados y comprobados con la máxima atención. RIB no es responsable en caso de errores u
omisiones. Nos reservamos el derecho de hacer modificaciones consiguientes al progreso tecnológico.
E
D
F
GB
I
Istruzioni di montaggio
Fitting instructions
Montage
Montageanweisung
Instrucciones de montaje
(A4536000 rev. 0 - 02/2002)
ATTUATORI A CREMAGLIERA
RACK ACTUATORS
ACTIONNEURS A CREMAILLERE
ZAHNSTANGENANTRIEBE
ACTUADORES DE CREMALLERA
Apri LINEARE
I
Consigli
• Si consiglia di far eseguire l’installazione dei Prodotti Aprimatic da personale specializzato nel settore e che dia garanzie di adeguata competenza tecnica.
• Si consiglia di effettuare periodicamente un collaudo per constatare il buon funzionamento dell’impianto con una frequenza non superiore a mesi dodici, in impianti speciali è consigliato ogni sei mesi. In caso di incertezze
o dubbi interpellare il Servizio di Assistenza Tecnica.
AVVERTENZE
• Verificare che i componenti del sacramento consentano la completa corsa di funzionamento dell’attuatore. In caso contrario si possono creare danni agli elementi sollecitati o allo stesso attuatore.
• L’attuatore può provocare lesioni! Ha una forza di trazione e spinta di 650 N. I fissaggi e i punti di attacco degli accessori devono essere adeguati per sopportare queste sollecitazioni.
• Il serramento deve essere provvisto di adeguati sistemi per il sostegno e la sicurezza dello stesso, l’attuatore non può essere considerato parte di sostegno o sicurezza dei serramento.
• Nelle applicazioni con altezza dal suolo inferiore a 2,5 m., utilizzare la logica di comando a uomo presente.
GB
D
HINWEISE
• Prüfen Sie, daß die Bestandteile des Fensters den vollen Öffnungs- und Schließweg des Antriebs zulassen.
Ist dies nicht der Fall, können die beanspruchten Elemente oder der Antrieb selbst beschädigt werden.
• Der Antrieb kann Verletzungen verursachen. Er hat eine Zug- und Schubkraft von 650 N. Die Befestigungen
und Anschlußpunkte müssen für diese Kräfte bemessen sein.
Das Fenster muß mit angemessenen Befestigungs- und Sicherheitssystemen ausgerüstet sein, der Antrieb
kann nicht als Befestigungs- und Sicherheitselement des Fensters betrachtet werden.
Bei Anwendungen mit einer Höhe von weniger als 2,5 m vom Boden die Totmannschaltung verwenden.
WARNING
• Check that no parts of the window block the full run of the actuator. Should this happen, damage may be
caused to the elements involved or to the actuator itself.
• The actuator can cause lesions! Its push and pull force is 650 N. The fixings and attachment points must be
capable of withstanding the stress they are subject to.
The window must be adequately supported and fitted with a safety system, as the actuator cannot be regarded
as a support or safety device.
Applications at less than 2.5 m from ground level must use “person-present” operating logic.
•
Reccomandations
• We reccomend that Aprimatic products are installed by qualified specialists who can provide adequate
proof of technical competence.
We reccomend testing the plant periodically, at least once a year, to ensure its correct functioning. Special
plants should be tested every six months.
If you have any queries, do contact the After-Sales Service Department
•
•
•
•
Empfehlngen
• Es ist empfehlenswert, die Installation der Produkte Aprimatic durch einen erfahrenen Fachmann in
diesem Bereich ausführen zu lassen.
Es ist empfehlenswert, mindestens alle zwölf, bei Sonderanlagen alle sechs Monate, eine periodische
Funktionsprüfung der Anlage durchzüfuhren.
Im Zweifelsfalle wenden Sie sich an den technischen Kundendiest.
•
•
•
F
E
Recommandations
• Il est conseillé de faire installer les produits Aprimatic à des techniciens specialisés dans le secteur et
possédant les compétences techniques requises
• Il est conseillé de procéder à intervalles réguliers (ne dépassant pas 12 mois, 6 mois en cas d'installations
spéciales) à un contrôle du fonctionnement de l'installation.
En cas d'incertitude ou de doutes, faire appel au Service d'Assistance Technique.
•
AVERTISSEMENTS
• Vérifier que les pièces formant le vantail n'opposent aucune résistance à l'actionneur sur l'integralité de sa
course. Si c’est le cas, ces pièces voire l'actionneur risquent d'être endommagés.
• L'actionneur peut provoquer des blessures ! La traction et la poussée qu'il exerce correspondent à 650 N.
Les fixations et les points d'attache des accessoires doivent pouvoir supporter ces contraintes.
• Le vantail doit être muni des systèmes de support et de sécurité prévus à cet effet ; l'actionneur ne peut en
aucun cas assurer cette fonction.
Pour les installations à une hauteur du sol inférieure à 2,5 m, utiliser la logique de commande “homme mort”.
•
Consejos
• Se aconseja encargar la instalación de los Productos Aprimatic a personal especializado en el sector y
que dé garantías de adecuada competencia técnica.
• Se aconseja efectuar periódicamente una prueba para constatar el buen funcionamento del equipo con una
frecuencia no superior a doce meses, en equipos especiales, se aconseja cada seis meses.
• En el caso de incertidumbres o dudas consultar el Servicio de Asistencia Técnica.
ADVERTENCIAS
• Verificar que los componentes del cerramiento permitan la carrera completa de funcionamiento del actuador.
En caso contrario se pueden causar daños a los elementos sometidos a esfuerzo o al mismo actuador.
• ¡El actuador puede provocar lesiones! Tiene una fuerza de tracción y empuje de 650 N. Los anclajes y los
puntos de unión de los accesorios deben ser adecuados para soportar estas solicitaciones.
• El cerramiento debe estar dotado de adecuados sistemas para el soporte y la seguridad del mismo. El
actuador no puede ser considerado elemento de soporte o seguridad del cerramiento.
En las aplicaciones con una altura desde el suelo inferior a 2,5 m. utilizar la lógica de mando “hombre
presente”.
•
© Copyright 2026 Paperzz