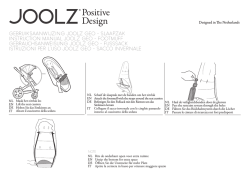
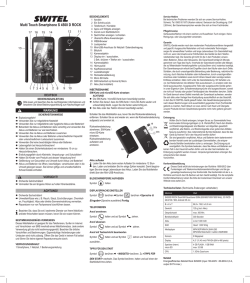
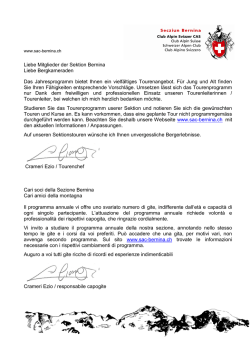
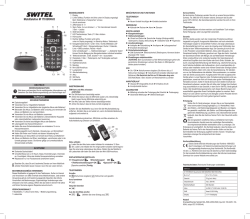
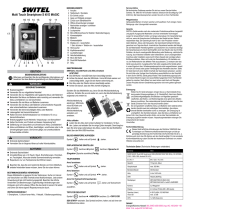
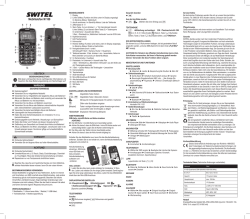
VORSICHT! Drohende Gehörschäden! Vermeiden Sie ein längeres Hören auf voller Hörerlautstärke. Kombi-Set DC 60012 Combo Telefonbasis 4 17 14 18 11 ACHTUNG! 9 2 3 8/9 16 3.1 Hörer 16 7 13 5 Verbindungskabel Mobilteil 1 Für die Wandmontage wechseln Sie die untere Plattform wie oben gezeigt. 2 3 4 5 6 7 8 9 10 11 12 Ladeschale 17 13 14 15 DEUTSCH Bedienungsanleitung Bitte lesen und beachten Sie die nachfolgenden Informationen und bewahren Sie diese Bedienungsanleitung zum Nachschlagen auf! WARNUNG! Sicherheitshinweise Explosionsgefahr! Verwenden Sie nur mitgelieferte Netzteile! Verwenden Sie nur mitgelieferte oder typgleiche Akkus oder Batterien! Behandeln Sie Akkus und Batterien stets vorsichtig und verwenden Sie Akkus und Batterien nur wie beschrieben. Verwenden Sie nie Akkus und Batterien zusammen. Verwenden Sie nie Akkus oder Batterien unterschiedlicher Kapazität oder unterschiedli chem Ladezustand zusammen. Verwenden Sie keine beschädigten Akkus oder Batterien. Erstickungsgefahr durch Kleinteile, Verpackungs- und Schutzfolien! Halten Sie Kinder vom Produkt und dessen Verpackung fern! Gefährdung von Gesundheit und Umwelt durch Akkus und Batterien! Akkus und Batterien nie öffnen, beschädigen, verschlucken oder in die Umwelt gelangen lassen. Sie können giftige und umweltschädliche Schwermetalle enthalten. Bei Stromausfall kann mit dem Telefon nicht telefoniert werden. Halten Sie für Notfälle ein schnurgebundenes Telefon bereit, welches ohne externe Stromversorgung arbeitet. Benutzen Sie das Telefon nicht in der Nähe von medizinischen Geräten. Eine Beeinflussung kann nicht völlig ausgeschlossen werden. Drohende Sachschäden! Umwelteinflüsse wie z. B. Rauch, Staub, Erschütterungen, Chemikali- en, Feuchtigkeit, Hitze oder direkte Sonneneinstrahlung vermeiden. Reparaturen nur von Fachpersonal durchführen lassen. Zur Freischaltung von Zusatzdiensten wenden Sie sich bitte an Ihren Netzbetreiber. MENÜSTRUKTUR UND FUNKTIONEN DES MOBILTEILS TELEFONBUCH ►NEUER EINTRAG ►EINTRÄGE ►EINTRÄGE ÄNDERN ►LÖSCHEN ►ALLE LÖSCHEN ►DIREKT SPEICHER Beispiel: Speichern im Direkt Speicher: (Es gibt 2 Direktwahl-Speicherplätze (Taste 1 & 2) im Telefonbuch. Ein langer Druck auf die entsprechende Taste wählt die Nummer direkt) OK Menü TELEFONBUCH DIREKT SPEICHER OK [Wählen Sie Taste 1 oder 2] OK [Keine Nummer] Menü OK [Name NUMMER ÄNDERN Setzen Sie die Akkus gemäß Abbildung ein. ACHTUNG! Die Akkus oder das Telefon können beschädigt werden. Achten Sie darauf, dass die Akkus korrekt eingelegt sind. Schalten Sie das Telefon aus, bevor Sie die Akkufachab- deckung entfernen. Schalten Sie es erst wieder ein, wenn die Akkufachabdeckung installiert ist. Akkus aufladen Laden Sie die Akkus beim ersten Aufladen für mindestens 12 Stunden und laden und entladen Sie diese einige Zyklen komplett. Damit begünstigen Sie eine lange Lebensdauer der Akkus. Stellen Sie das Mobilteil in die Ladeschale. Verpackungsinhalt 1 Telefonbasis, 1 Hörer, 1 Verbindungskabel, 2 Netzteile, 1 Mobilteil, 1 Ladeschale, 1 Telefonanschlusskabel, 2 Akkus, 1 Bedienungsanleitung An: Verbindung zur Basisstation ist gut. Blinkt: Keine Verbindung zur Basisstation. An: Batteriekapazität voll. Blinkt: Laden Sie die Akkus. An: Sie führen ein Gespräch. Blinkt: Sie erhalten gerade einen Anruf. An: Anrufe in der Anruferliste Blinkt: Neue Anrufe in der Anruferliste Klingelton ist aus. Der Wecker ist eingeschaltet. An: Freisprechmodus aktiviert Das Telefonbuch wird angezeigt An: Es gibt weitere Auswahlmöglichkeiten oder Informationen An: Tastensperre ist aktiviert An: Das Mikrofon der Telefonbasis is aus Bedienelemente 1 Hörmuschel 2 Display 3 Mobilteil: Rauf: Anrufliste (CID), Lautstärke erhöhen Runter: Telefonbuch, Lautstärke verringern Im Menü navigieren (rauf / runter) Telefon Basis: Rauf: Anrufliste (CID), Im Menü navigieren (rauf / runter) Links: Telefonbuch, Rechts: Wahlwiederholung 3.1 Lautsprecher Lautstärke +/- während eines Gesprächs ändern Ruftonlautstärke +/- im Standby-Modus ändern 4 Mobilteil: OK, Bestätigen einer Aktion Telefon Basis: OK, Bestätigen einer Aktion, 3 Sek. drücken um Zeit und Datum einzustellen 5 Mobilteil: Hörer abnehmen / Anruf tätigen / Freisprechen ein / aus Telefon Basis: Im Standby-Modus drücken für Freisprechen Während eines Gesprächs Freisprechen ein- / ausschalten 6 Menü öffnen 7 Tastensperre (2 Sek. drücken) Mikrofon ein / aus 8 9 Mobilteil: Back, Menüeintrag löschen / zurück, Zeichen und Eingaben löschen, Drücken und halten, um zwischen Telefonname und Zeit zu wechseln. Telefon Basis: Zurück zum vorherigen Menüpunkt Löschen des letzten Zeichens 10 Auflegetaste, Menü verlassen, halten, um Mobilteil ein-/ausschalten 11 „R“-Signaltaste, Annehmen eines zweiten Anrufs (anbieterabhängig) 12 Wahlwiederholung, Anrufliste wird geöffnet 13 Tonruf ein-/ausschalten 14 INT, Drücken, um ein Intern- oder Konferenzgespräch zu führen 15 Mikrofon 16 Anschlussbuchsen für Verbindungskabel 17 Anschlussbuchse Netzteil 18 Telefonbuchse INBETRIEBNAHME Telefonleitung anschließen Telefonkabel mit der Telefonbuchse (18) verbinden Telefonkabel mit der Telefondose verbinden Hörer und Telefonbasis mit dem Verbindungskabel (16) verbinden Netzteil anschließen Kabel des Netzteils mit der Basisstation (17) verbinden Netzteil in eine ordnungsgemäß installierte Netzsteckdose stecken DISPLAYSYMBOLE DARSTELLUNGEN UND SCHREIBWEISEN Abgebildete Taste drücken 2 Sek. Abgebildete Taste 2 Sekunden drücken Menüpunkt / Eintrag mit ▲▼markieren / auswählen [Beispiel] Einstellungen Ziffern oder Buchstaben eingeben Texte in eckigen Klammern geben Anweisungen etwas auszuwählen oder eine Eingabe zu tätigen Darstellung eines Displaysymbols (Beispiel) Displaytext (Beispiel) FUNKTIONEN AN DER TELEFONBASIS BENUTZEN DES TELEFONBUCHS (Hinweis: Es können nur Nummern gespeichert werden.) Speichern einer Nummer 2 sec. [Nummer eingeben] OK Ändern einer Nummer [Nummer auswählen] 2 sec. [ alle Ziffern löschen oder letzte Ziffer löschen, neue Ziffer eingeben] OK Löschen einer Nummer [Nummer auswählen] Alle Nummern löschen OK 2 sec. OK Eine Nummer aus der Anruferliste speichern (CLIP) [Nummer auswählen] 2 sec. OK Eine Nummer aus der Wahlwiederholungsliste speichern [Nummer auswählen] 2 sec. OK Nummer aus der Wahlwiederholungs- oder Anrufliste löschen oder [Nummer auswählen] OK Pflegehinweise Gehäuseoberflächen mit einem weichen und fusselfreien Tuch reinigen. Keine Reinigungs- oder Lösungsmittel verwenden. Garantie SWITEL-Geräte werden nach den modernsten Produktionsverfahren hergestellt und geprüft. Ausgesuchte Materialien und hoch entwickelte Weitere Bearbeitung im Menü Telefonbuch analog obigem Beispiel. Technologien sorgen für einwandfreie Funktion und lange Lebensdauer. Ein Garantiefall liegt nicht vor, wenn die Ursache einer Fehlfunktion des Geräts bei dem Telefonnetzbetreiber liegt. Die Garantie gilt nicht für die PERSÖNLICHE EINSTELLUNGEN in den Produkten verwendeten Batterien, Akkus oder Akkupacks. Die ►MOBILTEIL NAME ►MOBILTEIL TÖNE ►SPRACHE ►AUTO Garantiezeit beträgt 24 Monate, gerechnet vom Tage des Kaufs. Innerhalb AUFLEGEN der Garantiezeit werden alle Mängel, die auf Materialoder HerstellungsBeispiel: Auto Auflegen fehler zurückzuführen sind, kostenlos beseitigt. Der Garantieanspruch (Diese Funktion ermöglicht das Beenden des Telefonats durch Einstellen erlischt bei Eingriffen durch den Käufer oder durch Dritte. Schäden, die des Mobilteils in die Ladestation, ohne die Auflegetaste zu betätigen. Im durch unsachgemäße Behandlung oder Bedienung, natürliche Abnutzung, Auslieferungszustand ist die Funktion auf ON gestellt.) durch falsches Aufstellen oder Aufbewahren, durch unsachgemäßen AnOK Menü PERS-EINST AUTO-AUFL schluss oder Installation sowie durch höhere Gewalt oder sonstige äußere OK [wählen Sie ein / aus] OK Einflüsse entstehen, fallen nicht unter die Garantieleistung. Wir behalten uns vor, bei Reklamationen die defekten Teile auszubessern, zu ersetzen Weitere Bearbeitung im Menü Persönliche Einstellungen analog obigem oder das Gerät auszutauschen. Ausgetauschte Teile oder ausgetauschte Beispiel. Geräte gehen in unser Eigentum über. Schadenersatzansprüche sind ausgeschlossen, soweit sie nicht auf Vorsatz oder grober Fahrlässigkeit des UHR & WECKER Herstellers beruhen. Sollte Ihr Gerät dennoch einen Defekt innerhalb der ►DATUM / ZEIT ►FORMAT ►WECKER ►WECKTON Garantiezeit aufweisen, wenden Sie sich bitte unter Vorlage Ihrer KaufquitBeispiel: Datum / Zeit einstellen tung ausschließlich an das Geschäft, in dem Sie Ihr SWITEL-Gerät gekauft DATUM / ZEIT Menü OK haben. Alle Gewährleistungsansprüche nach diesen Bestimmungen sind UHR & WECKER ausschließlich gegenüber Ihrem Fachhändler geltend zu machen. Nach OK [Datum eingeben] OK [Zeit eingeben] OK Ablauf von zwei Jahren nach Kauf und Übergabe unserer Produkte können Weitere Bearbeitung im Menü Uhr & Wecker analog obigem Beispiel. Gewährleistungsrechte nicht mehr geltend gemacht werden. eingeben] OK Bestimmungsgemäß verwenden Dieses Telefon ist geeignet für das Telefonieren innerhalb eines Telefonnetzes. Jede andere Verwendung gilt als nicht bestimmungsgemäß. Beachten Sie örtliche Vorschriften und Bestimmungen. Eigenmächtige Veränderungen oder Umbauten sind nicht zulässig. Öffnen Sie das Gerät in keinem Fall selbst und führen Sie keine eigenen Reparaturversuche durch. Service-Hotline Bei technischen Problemen wenden Sie sich an unsere Service-Hotline. Schweiz: Tel. 0900 00 1675 (Kosten national, Swisscom bei Drucklegung: CHF 2,60/min). Bei Garantieansprüchen wenden Sie sich an Ihren Fachhändler. [Nummer eingeben] OK Entsorgung ERWEITERTE EINSTELLUNGEN Wollen Sie Ihr Gerät entsorgen, bringen Sie es zur Sammelstelle ►PIN ÄNDERN ►ANMELDUNG ►ABMELDEN ►ZURÜCKSETZEN Ihres kommunalen Entsorgungsträgers (z. B. Wertstoffhof). Nach ►AUTO VORWAHL ►RÜCKRUFZEIT ►WAHLVERFAHREN dem Elektro- und Elektronikgerätegesetz sind Besitzer von Altgerä►1. RUFTON ten gesetzlich verpflichtet, alte Elektro- und Elektronikgeräte einer Beispiel: Pin ändern getrennten Abfallerfassung zuzuführen. Das nebenstehende Symbol ERW-EINST OK Menü PIN ÄNDERN bedeutet, dass Sie das Gerät auf keinen Fall in den Hausmüll werfen dürfen! OK [Geben Sie 0000 ein] OK [Geben Sie einen neuen PIN ein] Sie sind gesetzlich verpflichtet, Akkus und Batterien beim batte OK rievertreibenden Handel sowie bei zuständigen Sammelstellen, die entsprechende Behälter bereitstellen sicher zu entsorgen. Die Beispiel: Zurücksetzen Entsorgung ist unentgeltlich. Die Symbole bedeuten, dass Sie Akkus und ZURÜCKSETZEN ERW-EINST Menü OK Batterien auf keinen Fall in den Hausmüll werfen dürfen und sie über OK [Bestätigen] OK (ACHTUNG: Alle persönlichen Einstellungen Sammelstellen der Entsorgung zugeführt werden müssen. Verpackungs und Listen gehen verlohren) materialien entsorgen Sie entsprechend den lokalen Vorschriften. Beispiel: Anmelden (Sie können bis zu 4 Mobilteile an einer Basis betreiben. Mitgelieferte Konformitätserklärung Mobilteile sind werkseitig vorangemeldet.) Dieses Gerät erfüllt die Anforderungen der Richtlinie 1999/5/EG Drücken und halten Sie die INT Taste an der Telefonbasis (14) für 5 über Funkanlagen und Telekommunikationsendeinrichtungen und Sek. Danach drücken Sie: die gegenseitige Anerkennung ihrer Konformität. Die Konformität ANMELDEN ERW-EINST Menü OK mit der o. a. Richtlinie wird durch das CE-Zeichen auf dem Gerät bestätigt. Für die komplette Konformitätserklärung nutzen Sie bitte den kostenlosen OK [Geben Sie den PIN 0000 ein] OK Download von unserer Website www.switel.com. Beispiel: Makeln / Verbinden / Konferenzgespräch Technische Daten (Technische Änderungen vorbehalten) Während eines internen Gesprächs haben Sie folgende Optionen: [Das interne Gespräch wird beendet und der externe Anruf wird Merkmal Wert angenommen.] DC 60012C Reichweite: Aussen max. 300 m, Innen max. 50 m INT [Das interne Gespräch wird gehalten und Sie können mit dem B x H x T (Mobilteil) 55 x 170 x 30 mm externen Teilnehmer sprechen. Drücken Sie INT nochmals, wechseln Gewicht (Mobilteil) 135 g (incl. Batterie) Sie zwischen extern und intern] INT 2 Sek. [Die 3er-Konferenz ist hergestellt] Gesprächszeit 8 Stunden [Während eines internen Gesprächs verbinden Sie das externe Bereitschaftszeit 150 Stunden Gespräch mit dem 2. Mobilteil.] Weitere Bearbeitung im Menü Erweiterte Einstellungen analog obigem Beispiel. Ladezeit 15 Stunden Akkus 2 x 400mAH NiMH 1.2V Temperaturbereich -20 °C to 60 °C B x H x T (Telefonbasis) 170 x 75 x 200 mm Gewicht (Telefonbasis) 565 g (inkl. Hörer) Netzteil Energieeffizientes Netzteil S003IV0600050 (input AC 100-240V ~50-60Hz, output DC 6V/500mA) und S003IV0600015 (input AC 100-240V ~50-60Hz, output 6V/150mA) für Ladeschale. Menaces de troubles de l‘audition ! Évitez une écoute trop longue à fort volume sonore. Kit téléphone DC 60012 Combo Socle du téléphone 4 17 14 18 11 ATTENTION ! 9 2 3 Menaces de dommages matériels. Évitez des influences provenant de l‘environnement telles que fumée, poussière, vibrations, produits chimiques, humidité, grande chaleur ou ensoleillement direct. Faire exécuter les réparations uniquement par du personnel spécialisé et qualifié. 8/9 16 3.1 Combiné filaire 16 7 13 5 Cordon du combiné Combiné sans fil 1 Pour le montage mural supprimer le fond et le placer sur l‘autre côté, comme indiqué ci-dessus. 2 3 4 5 6 7 8 9 10 11 12 Chargeur 17 13 14 15 FRANÇAIS Mode d’emploi Veuillez lire et observer les informations suivantes et conserver ce mode d‘emploi afin de pouvoir le consulter en cas de besoin! Consignes de sécurité Risque d‘explosion ! N‘utilisez que les blocs secteur faisant partie du coffret ! N‘utilisez que les piles ou batteries vendues avec les appareils ou de types semblables ! Traitez toujours les piles et batteries avec prudence et utilisez-les uniquement comme décrit sur leur emballage. N‘utilisez jamais de piles et batteries ensemble. N‘utilisez jamais de piles et batteries de capacité ou d‘état de charge différents. N‘utilisez pas de piles ou batteries endommagées. Risque d‘étouffement lié à des éléments de petite taille, des films d‘emballage et de protection ! Tenez les enfants à l‘écart du produit et de son emballage ! Risque pour la santé de l‘être humain et l‘environnement lié aux piles et batteries ! Ne jamais ouvrir, endommager, avaler les piles et batteries ou faire pénétrer leur contenu dans l‘environnement. Ils peuvent contenir des métaux lourds toxiques et polluants. En cas de panne de courant, vous ne pouvez pas téléphoner avec le téléphone. Tenez à votre disposition, pour parer à de telles situations, un téléphone filaire fonctionnant sans alimentation externe en courant. N’utilisez pas ce téléphone à proximité d’appareils médicaux. Leur influence ne peut pas être entièrement exclue. Adressez-vous également à lui pour la déconnexion de ces services. UTILISATION CONFORME AUX PRESCRIPTIONS Ce téléphone convient pour téléphoner à l’intérieur d’un réseau téléphonique. Toute autre utilisation est considérée comme non conforme aux prescriptions. Tenez compte des règlements et dispositions locaux. Toute modification ou transformation arbitraire est interdite. N‘ouvrez en aucun cas l‘appareil et n‘essayez pas de le réparer vous-même. STRUCTURE ET FONCTIONS MENU DE LA COMBINÉ REPERTOIRE ►NOUV. ENTREE ►LISTE ►MODIFIER ►SUPPRIMER ►SUPPRIMER TOUT ►MEM. DIRECTE Exemple: Sauver Mémoire directe: (Il ya 2 mémoires à accès direct (Touche 1 et 2) dans le répertoire. Un appui long sur les touches en mode veille composera automatiquement le numéro de téléphone enregistré.) MEM DIRECTE MENU OK REPERTOIRE OK [Sélectionner la touche 1 ou 2] OK [Aucun numéro] Insérez les piles comme représenté sur la figure. ATTENTION ! Les piles rechargeables ou le téléphone peuvent être endom magés. Assurez-vous que les piles sont insérées correctement. Éteig nez votre téléphone avant de retirer le cache du compartiment à piles. Rallumez-le lorsque vous avez remis le chargeur. Charger les piles rechargeables Lorsque vous chargez les piles pour la première fois, chargezles pendant au moins 12 heures et chargez-les et déchargezles complètement pendant quelques cycles. Elles dureront ainsi plus longtemps. Posez le combiné sur la base. ICÔNES À L’ÉCRAN Constant: La liaison avec la base est bonne. Clignotant: La liaison avec la base s’interrompt. CONTENU DU COFFRET 1 Socle du téléphone, 2 Bloc secteur, 1 Combiné filaire, 1 Cordon du combiné, 1 Combiné sans fil, 1 Chargeur, 1 Câble de raccordement téléphonique, 2 Piles rechargeables, 1 Mode d’emploi Constant: Affichage de la capacité des piles. Clignotant: Chargez les piles rechargeables. Constant: Vous téléphonez. Clignotant: Le téléphone sonne ELÉMENTS DE COMMANDE 1 Écouteur 2 Écran du combiné 3 Combiné: Haut: Afficher les appels (CID), Augmenter le volume (+) Bas: Répertoire, Diminution le volume (-) Naviguer dans le menu (haut / bas) Socle: Haut: Afficher les appels (CID), Naviguer dans le menu (haut / bas) Gauche: Repertoire, Droite: Liste de recomposition 3.1 Augmenter / diminuer le volume du haut-parleur pendant un appel Augmenter / diminuer le volume de la sonnerie en mode veille 4 Combiné: OK, appuyez sur pour confirmer l‘opération Socle: OK, appuyez sur pour confirmer l‘opération Appuyez 3 sec. pour régler l‘heure et la date 5 Combiné: Décrocher / passer un appel / Fonction mains-libres Basculer entre le haut-parleur et le mode de réception Socle: En mode veille: Appuyez pour le mode mains-libres Basculer entre le haut-parleur et le mode de réception 6 Ouvrir le menu 7 Activer / désactiver le verrouillage du clavier (2 sec.) Microphone activer / désactiver 8 9 Combiné: BACK annuler une entrée de menu Appuyez sur la touche pour reculer le chiffre ou de caractère Appuyez et maintenez enfoncé pour basculer entre le nom du combiné et de la date / heure en mode veille Socle: Revenir au niveau précédent quand dans le menu. Supprimer le dernier numéro de l‘entrée ou de la lettre 10 Mode veille, Appuyer pour allumer / éteindre le téléphone (2 sec.). Appuyez sur pour quitter le mode de menu 11 „R“- Intercommunication, Répondre à un deuxième appel incomming (dépend du fournisseur) 12 Bouton de recomposition automatique, appuyez pour entrer la liste de recomposition et composez le numéro récent 13 Sonnerie marche / arrêt 14 Appuyez sur pour effectuer un appel ou appel conférence intercom 15 Microphone 16 Entrée cordon du combiné 17 Prise alimentation bloc secteur 18 Prise téléphone Constant: Appels à la liste des appelants Clignotant: Les nouveaux appels dans la liste des appelants La sonnerie a été désactivé. La fonction d’alarme est activée. Constant: Mains libres est activé Répertoire est activé Constant: Il ya plus d‘options de menu ou des informations Constant: Le verrouillage du clavier est activée Constant: Le microfone de base est éteint MISE EN SERVICE Raccorder la ligne téléphonique Raccorder le câble téléphonique à la prise téléphone (18). Raccorder le câble téléphonique à la prise téléphonique. Raccorder le cordon du combiné à la prise Combiné filaire e socle (16) Raccorder le bloc secteur Raccorder le câble du bloc secteur à la base (17). Introduisez le bloc secteur dans une prise de courant réglementaire. REPRÉSENTATIONS ET NOTATIONS 2 sec. [Exemple] REGLAGES Appuyer sur la touche représentée Appuyer 2 secondes sur la touche représentée Marquer prochain point de menu avec le bouton ▲ ▼ Saisir des chiffres ou des lettres Les textes affichés entre les parenthèses carrées donnent des instructions pour sélectionner quelque chose ou effectuer une saisie Affichage d‘une icône (exemple) Texte affiché (exemple) 2 sec. [Entrez numéro] OK Modification d‘un numéro du répertoire [Sélectionner numéro] 2 sec. [ Effacer tous les chiffres ou claires derniers chiffres, modifier le chiffre] OK Effacer un numéro du répertoire [Sélectionner numéro] OK Effacer tous les numéros du répertoire 2 sec. OK Enregistrer un numéro de la liste d‘appels (CID) [Sélectionner numéro] 2 sec. OK Enregistrer un numéro de recomposition [Sélectionner numéro] 2 sec. OK Supprimer une recomposition ou appeler le numéro de la liste ou Remarques d‘entretien Nettoyez les surfaces du boîtier avec un chiffon doux et non pelucheux. N‘utilisez pas de produits d‘entretien ou de solvants. Garantie Les appareils SWITEL sont contrôlés et fabriqués suivant les meilleurs OK [Entrez nom] OK [Entrez procédés. Des matériaux sélectionnés et des technologies de pointe leur CHANGER NUM garantissent un fonctionnement irréprochable et une longue durée de vie. numéro] OK La garantie ne s‘applique pas si la cause d‘une erreur de fonctionnement Traitement ultérieur dans le menu Repertoire analogue exemple ci-dessus. du téléphone portable repose sur l‘opérateur de réseau de téléphonie mobile. La garantie ne s‘applique pas aux piles et piles rechargeables utilisées dans les produits. La durée de la garantie est de 24 mois à partir PERSONNALIS de la date ►NOM COMBINE ►MELODIES ►LANGUE ►RACCROC. AUTO d‘achat. Pendant la durée de la garantie, tous les défauts dus à des Exemple: Raccrochez auto vices de matériel ou de fabrication seront éliminés gratuitement. Le droit (Cette fonction vous permet de mettre fin à un appel automatiquement, à la garantie expire en cas d‘intervention de l‘acheteur ou de tiers. Les simplement en plaçant l‘combiné sur le poste de base. Par défaut, le dommages provenant d‘un maniement ou d‘une manipulation incorrects, raccrochage automatique fonction est activée.) d‘une usure naturelle, d‘une mauvaise mise en place ou d‘une mauvaise MENU PERSONNALIS OK RACCROC AUTO conservation, d‘un raccordement ou d‘une installation incorrects ainsi que d‘un cas de force majeure ou autres influences extérieures sont exclus OK [sélectionner on / off] OK Traitement ultérieur dans le menu Personnalis analogue exemple ci-dessus. de la garantie. En cas de réclamations, nous nous réservons le droit de réparer, de remplacer les pièces défectueuses ou d‘échanger l‘appareil. Les composants remplacés ou les appareils échangés deviennent notre HORE & REVEIL propriété. Les demandes de dommages et intérêts sont exclues tant que ►DATE / HEURE ►CHOI FORMAT ►REVEIL ►MELOD REVEIL les défauts ne reposent pas sur une faute intentionnelle ou une négligence Exemple: Réglez Date / Heure grossière du fabricant. Si votre appareil SWITEL présente cependant un MENU HORE & REVEIL DATE & HEURE OK défaut pendant la période de garantie, veuillez vous adresser exclusivement au magasin où vous l‘avez acheté en présentant votre bon d‘achat. [Entrer la date] OK [Entrez le temps] OK OK Vous ne pouvez faire valoir vos droits à la garantie répondant à ces Traitement ultérieur dans le menu Hore & Reveil analogue exemple cidispositions qu‘exclusivement auprès de votre revendeur. Deux ans après dessus. l‘achat et la remise de nos produits, il n‘est plus possible de faire valoir les droits à la garantie. REGL. AVANCES ►CHANGER PIN ►SOUSCRIPTION ►DESOUSCRIRE ►REINITIAMettre l‘appareil au rebut LIS ►PREFIXE AUTO ►DUREE RAPPEL ►MODE NUMEROT ►IE Si vous ne voulez plus servir de votre appareil, veuillez l‘apporter au SONNERIE centre de collecte de l‘organisme de traitement des déchets de votre commune (par ex. centre de recyclage). D‘après la loi relative aux Exemple: Changer Pin appareils électriques et électroniques, les propriétaires d‘appareils MENU REGL. AVANCES OK MODIFIER PIN usagés sont tenus de mettre tous les appareils électriques et OK [Entrer PIN 0000] OK [Entrer nouveau PIN] OK électroniques usagés dans un collecteur séparé. L‘icône ci-contre signifie que vous ne devez en aucun cas jeter votre appareil dans Exemple: Reinitialis les ordures ménagères ! Vous êtes tenus par la loi d‘éliminer vos REINITIALIS MENU REGL. AVANCES OK piles et piles rechargeables auprès d‘un revendeur de piles ainsi qu‘auprès de centres de collecte responsables de leur élimination OK [Acquitter] OK (Tous vos réglages personnels, le journal et la qui mettent à disposition des conteneurs adéquats. Leur élimination est recomposition entrées de la liste seront supprimés) gratuite. L‘icône ci-contre signifie que vous ne devez en aucun cas jeter les piles et piles rechargeables dans les ordures ménagères, mais que Exemple: Souscription vous devez les apporter à un centre de collecte. Éliminez les fournitures (Jusqu‘à 4 combinés peuvent être enregistrés sur une base. Combiné d‘emballage selon les règlements locaux. inclus sont préenregistrés.) MENU Appuyez et maintenez enfoncé le bouton INT de socle (14) pendant 5 Déclaration de conformité sec. puis appuyez sur Cet appareil est en conformité avec la directive 1999/5/CE sur les MENU REGL. AVANCES SOUSCRIPTION OK installations de radio et de télécommunication et la reconnaissance réciproque de leur conformité. La conformité avec la directive OK [Entrer PIN 0000] OK mentionnée ci-dessus est confirmée sur l‘appareil par la marqe CE. Vous Exemple: Courtage / Transfert / Conférence avez la possibilité de télécharger gratuitement la déclaration intégrale de conformité sur notre site Internet www.switel.com. Lors d‘une connexion interne, vous disposez des options suivantes: FONCTIONS DE SOCLE UTILISEZ LE RÉPERTOIRE (Note: Il ne peut être stocké chiffres.) Créer un numéro du répertoire Ligne d‘assistance directe En cas de problèmes techniques, adressez-vous à notre ligne d‘assistance directe. Suisse : Tél. 0900 00 1675 (frais Swisscom à l‘impression de ce mode d‘emploi : CHF 2,60/min). En cas de recours en garantie, adressezvous à votre revendeur. [Sélectionner numéro] OK Appuyez [La communication interne sera terminée et vous pouvez discuter avec l‘appelant externe.] Appuyez INT [La communication interne est mis en attente et vous pouvez parler avec l‘appelant externe. Appuyez INT pour basculer entre interne et externe] Appuyez INT 2 sec. [La conférence à 3 est établi] Appuyez [Lorsqu‘il est connecté à l‘abonné interne - l‘appel externe sera transférée vers l‘autre combiné.] Traitement ultérieur dans le menu Reglage avances analogue exemple ci-dessus. Données techniques (Sous réserve de modifications techniques) Caractéristique Valeur DC 60012C Gamme: Extérieur max. 300 m, intérieur max. 50 m H x L x P (Combiné sans fil) 55 x 170 x 30 mm Poids (Combiné sans fil) 135 g (avec piles) Temps de conversation 8 heures Temps de veille 150 heures Temps de charge 15 heures Piles 2 x 400mAH NiMH 1.2V Plage de températures -20 °C to 60 °C H x L x P (Socle) 170 x 75 x 200 mm Poids (Socle) 565 g (avec Combiné filaire) Bloc secteur En utilisant le modèle d‘adaptateur d‘alimentation à haut rendement énergétique S003IV0600050 (input AC 100-240V ~50-60Hz, output DC 6V/500mA) et S003IV0600015 (input AC 100-240V ~50-60Hz, output 6V/150mA) pour chargeur. PRUDENZA! Rischio di danni all‘udito! Evitare l‘ascolto prolungato ad alto volume. Combinazione DC 60012 Combo Base del telefono 4 17 14 18 11 ATTENZIONE! 9 2 3 8/9 3.1 Portatile con cavo 16 16 7 13 5 Cavo ricevitore Portatile 1 Per montaggio a parete rimuovere il fondo e posizionarlo sul lato come mostrato sopra. 2 3 4 5 6 7 8 9 10 11 12 Caricabatterie 17 13 14 15 ITALIANO Istruzioni per l’uso Leggere e osservare le seguenti informazioni e conservare le istruzioni per l’uso per consultazione futura! AVVERTENZA! Indicazioni di sicurezza Pericolo di esplosione! Utilizzare solo gli alimentatori di rete forniti in dotazione! Utilizzare solo batterie ricaricabili fornite in dotazione o equivalenti! Trattare sempre con prudenza batterie e pile e usare batterie e pile solo come descritto. Non mischiare mai batterie ricaricabili e pile. Non utilizzare mai batterie ricaricabili o pile con capacità o stati di carica differenti. Evitare l’uso di batterie ricaricabili o pile difettose. Rischio di soffocamento dovuto a minuteria, pellicole protettive e di imballaggio! Tenere lontano tale imballaggio dalla portata dei bambini! Batterie ricaricabili e pile possono provocare danni alla salute e all‘ambiente! Non aprire, danneggiare, ingerire o disperdere nell‘ambiente accumulatori e pile. Queste possono contenere metalli pesanti nocivi e dannosi per l‘ambiente. In caso di caduta di tensione non è possibile compiere chiamate con il telefono. Si consiglia di ricorrere in caso di emergenza ad un telefono con filo in grado di funzionare anche senza alimentazione elettrica esterna. Non utilizzare il telefono in prossimità di apparecchiature mediche. Non è possibile escludere il subentro di eventuali interferenze. Rischio di danni materiali. Evitare un’esposizione a fumo, polvere, vibrazioni, sostanze chimiche, umidità, calore e raggi solari diretti. Le riparazioni vanno affidate esclusivamente al personale qualificato del servizio di assistenza tecnica. Rivolgersi al proprio gestore di rete telefonica per ottenere l’abilitazione ai servizi addizionali. Inserire le batterie ricaricabili secondo quanto raffigurato. ATTENZIONE! Le batterie ricaricabili possono causare danni al telefono. Fare attenzione a inserire le batterie ricaricabili correttamente. Spegnere il telefono prima di rimuovere il coperchio del vano batterie. Accendere di nuovo il telefono solo dopo aver applicato il coperchio del vano batterie. MENU STRUTTURA E FUNZIONI DI PORTATILE RUBRICA ►NUOVO NOMIN.. ►ELEN. CHIAM ►MOD. NOMIN. ►ELIMINA ►ELIM. TUTTI ►MEM DIRETTA Esempio: Salvare Memoria ad accesso diretto: (Ci sono 2 memorie ad accesso diretto (tasto 1 e 2) della rubrica. Una pressione prolungata sui tasti in modalità idle comporrà automaticamente il numero di telefono memorizzato.) MENU MEM DIRETTA OK RUBRICA OK [Selezionare il tasto 1 o 2] OK [Ness numero] MENU Caricare le batterie ricaricabili LCaricare le batterie ricaricabili la prima volta per almeno 12 ore, quindi caricare, scaricare completamente le batterie per alcuni cicli. In questo modo si prolunga la durata utile delle batterie ricaricabili. Riporre l’unità portatile nella stazione caricabatterie. OGGETTO DI FORNITURA 1 Base del telefono, 1 Caricabatterie, 1 Portatile con cavo, 1 Portatile, 1 Cavo ricevitore, 2 Spina di adattatore di corrente, 1 Cavo di collegamento telefonico, 2 Accumulatore ricaricabile, 1 Istruzioni per l’uso Costante: Collegamento con la stazione base Lampeggiante: Il collegamento con la stazione base si interrompe. Costante: Indicazione dello stato di carica delle batterie. Lampeggiante: Caricare le batterie: Costante: Chiamata in corso. Lampeggiante: Chiamata in arrivo. Costante: Chiamate nel lista delle chiamate Lampeggiante: Le nuove chiamate nella lista delle chiamate Il tono di chiamata è stato spento. È attivata la funzione di allarme. Constante: Viva voce è attivo Rubrica è attivato Costante: Ci sono più opzioni di menu o informazioni Costante: Blocco tastiera è attivato Costante: Il microfone base è spento ELEMENTI DI COMANDO 1 Altoparlante 2 Display 3 Portatile: Su: Visualizzare le chiamate (CID), Aumentare il volume (+) Giù: Rubrica, Contrazione il volume (-) Navigare nel menu (su / giù) Base: Su: Visualizzare le chiamate (CID), Navigare nel menu (su / giù) Sinistra: Rubrica, Giusto: Lista di ripetizione 3.1 Aumenta / diminuisce il volume dell‘altoparlante durante una chiamata Aumento / diminuisce del volume della suoneria in modalità di standby 4 Portatile: OK, premere per confermare l‘operazione Base: OK, premere per confermare l‘operazione, Premere 3 sec. per impostare l‘ora e la data 5 Portatile: Tasto di chiamata / risposta / Funzione viva voce Passare dalla modalità vivavoce e il ricevitore Base: Modalità stand-by: Premere per la modalità viva voce Passare dalla modalità vivavoce e il ricevitore 6 Aprire Menu 7 Keylock (premere 2 Sek.) 8 Microfono su / fuori 9 Portatile: Indietro, premere per cancellare una voce di menu Premere il tasto per tornare indietro la cifra o il carattere. Premere e tenere premuto per alternare tra nome del ricevitore e la data / ora in modalità inattiva Base: Per tornare al livello precedente se nel menù Cancellare l‘ultimo numero di ingresso o la lettera 10 Tasto di fine chiamata, accendere/spegnere portatile (premere 2 sec.) Premere per uscire dal menu di funzionamento 11 Tasto R (flash), Risposta a una seconda chiamata (seconda del provider) 12 Pulsante Ripetizione, premere per accedere lista di ripetizione e comporre il numero recente 13 Accendere / spegnere Squilli (premere 2 Sek.) 14 Premere per effettuare una chiamata interna o chiamata in conferenza 15 Microfono 16 Cavo del ricevitore di ingresso 17 Presa di alimentazione 18 Presa telefonica MESSA IN FUNZIONE Collegare la linea telefonica Allacciare il cavo telefonico alla presa telefonica (18) Allacciare il cavo telefonico alla presa telefonica a muro Collegare il cavo del microtelefono alla base e portatile (16) Collegare l’alimentatore Collegare il cavo dell’alimentatore alla stazione base (17) Collegare l’alimentatore ad una presa elettrica montata a regola d’arte SIMBOLI DIE DISPLAY RAPPRESENTAZIONI E MODI DI SCRITTURA Premere il tasto raffigurato 2 sec. Premere il tasto raffigurato per 2 secondi Segna prossimo punto del menu con il tasto ▲ ▼ [Esempio] Impostazioni Immettere cifre o lettere Testi in parentesi quadre contengono indicazioni riguardo una determinata selezione o immissione Rappresentazione di un simbolo di display (esempio) Testo di display (esempio) FUNZIONI DI BASE UTILIZZARE LA RUBRICA (Nota: È possibile memorizzare solo i numeri.) Creare una numero della rubrica 2 sec. [Inserire il numero] OK Modificare un numero della rubrica [Selezionare il numero] le cifre o chiare ultime cifre, valore numerico] OK 2 sec. [ cancellare tutte Cancellando un numero della rubrica [Selezionare il numero] OK Cancellando tutti i numeri della rubrica 2 sec. OK Salvare un numero dalla lista chiamate (CID) [Selezionare il numero] 2 sec. OK Salvare un numero di ricomposizione [Selezionare il numero] 2 sec. OK Cancellando una lista (CID) numeri selezionati / chiamata o [Selezionare il numero] OK Indicazioni per la cura Pulire le superfici dell’involucro con un panno morbido e antipelucchi. Non utilizzare detergenti o solventi. Garanzia Gli apparecchi SWITEL sono costruiti e collaudati in osservanza dei processi di produzione più moderni. L‘impiego di materiali selezionati e il numero] OK tecnologie altamente sviluppate sono garanti di una perfetta funzionalità e lunga durata in vita. Non si considera caso di garanzia un malfunziL‘ulteriore elaborazione nel menu Rubrica esempio analogo di cui sopra. onamento dell‘apparecchio la cui causa vada individuata nella sfera di responsabilità del provider di rete telefonica. La garanzia non si estende PERSONALIZZA a pile, batterie ricaricabili o pacchi batteria utilizzati all‘interno degli appa►NOME RICEV. ►TONI RICEV. ►LINGUA ►CHIUS AUTOM. recchi. Il periodo di garanzia commerciale ricopre 24 mesi a partire dalla Esempio: Chius automatico data di acquisto. Entro il periodo di garanzia si procederà all‘eliminazione (Questa funzione consente di terminare una chiamata automaticamente, gratuita di tutti i guasti dovuti a difetti di materiale o produzione. Il diritto semplicemente posizionando il telefono sull‘unità base. Per impostazione di garanzia cessa in caso di interventi da parte dell‘acquirente o di terzi. predefinita, la funzione chius automatico up funzione è ON.) Danni dovuti a impiego o esercizio improprio, naturale usura, errato MENU OK CHIUS AUTOM. PERSONALIZZA montaggio o conservazione, collegamento o installazione impropri, forza maggiore o altri influssi esterni non sono coperti da garanzia. In qualità di OK [Selezionare on / off] OK produttore ci riserviamo il diritto, in caso di reclami, di riparare o sostituire L‘ulteriore elaborazione nel menu Personalizza esempio analogo di cui le parti difettose o di rimpiazzare l‘apparecchio. Parti o apparecchi sostituiti sopra. passano di nostra proprietà. Sono esclusi diritti di risarcimento per danni se non dovuti a intenzione o colpa grave del costruttore. In caso di difetti del ORA & SVEGLIA presente apparecchio durante il periodo di garanzia, si prega di rivolgersi ►IMP. DAT/ORA ►IMP. FORMATO ►SVEGLIA ►TONI SVEGLIA esclusivamente al negozio di rivendita dell‘apparecchio SWITEL assieme al relativo scontrino di acquisto. In base alle presenti disposizioni, tutti i Esempio: Impostare Dat & Ora MENU OK ORA & SVEGLIA DAT & ORA diritti di garanzia dovranno essere fatti valere esclusivamente nei confronti del rivenditore autorizzato. Decorso il termine di due anni dalla data di OK [Inserisci data] OK [Inserire tempo] OK acquisto e consegna dei nostri prodotti non sarà più possibile fare valere alcun diritto di garanzia. L‘ulteriore elaborazione nel menu Ora & Sveglia esempio analogo di cui sopra. Smaltimento Smaltire l‘apparecchio consegnandolo in uno dei punti di raccolta IMP AVANZATE istituiti dalla propria società di smaltimento rifiuti comunale (ad es. ►CAMBIA PIN ►REGISTRAR ►SCOLLEGARE ►REIMPOSTA centro di riciclo materiali). La legge sugli apparecchi elettrici ed ►PREF AUTOM. ►TEMPO FLASH ►MOD. CHIAMATA ►PRIMO elettronici prescrive ai proprietari di apparecchi esauriti la consegna SQUIL di apparecchi elettrici ed elettronici in un centro di rilievo rifiuti in Esempio: Cambia Pin raccolta differenziata. Il simbolo riportato qui a lato indica che non MENU IMP. AVANZATE CAMBIA PIN OK è assolutamente consentito smaltire l‘apparecchio gettandolo nei rifiuti domestici! Per legge sussiste l‘obbligo di consegnare batterie OK [Inserisci PIN 0000] OK [Inserisci nuovo PIN] OK e pile presso i rivenditori di pile utilizzando gli appositi contenitori Esempio: Reimposta di raccolta e provvedendo in tal modo al corretto smaltimento. MENU IMP. AVANZATE REIMPOSTA OK OK Lo smaltimento è gratuito. I simboli indicano che non è assolutamente consentito gettare batterie e pile nei rifiuti domestici, consegnandoli ai fini [Confermare] OK (Tutte le impostazioni personali, registro dello smaltimento nei rispettivi punti di raccolta. chiamate e ricomposizione voci dell‘elenco verranno cancellati) Dichiarazione di conformità Esempio: Registrar Questo apparecchio è conforme alla direttiva 1999/5/CE con(Fino a 4 portatili possono essere registrati ad una unità di base. Incluso cernente le apparecchiature radio, le apparecchiature terminali di portatile sono preregistrati.) telecomunicazione il reciproco riconoscimento della loro conformi Premere e tenere premuto INT pulsante su base (14) per 5 sec. quindi tà. La conformità con la direttiva di cui sopra viene confermata dal marchio premere CE applicato sull‘apparecchio. Per la dichiarazione di conformità completa REGISTRAR MENU IMP. AVANZATE OK si prega di voler usufruire del servizio gratuito di download dal nostro sito web www.switel.com. OK [Inserisci PIN 0000] OK UTILIZZO CONFORME ALLA DESTINAZIONE D’USO Il presente telefono consente di svolgere telefonate all’interno di una rete telefonica. Qualsiasi altro impiego è considerato improprio. Osservare le norme e disposizioni locali. Non sono consentite modifiche o trasformazioni non autorizzate. Non aprire per nessuna ragione l‘apparecchio autonomamente, né procedere a riparazioni di propria iniziativa. Linea diretta di assistenza In caso di problemi tecnici, rivolgersi alla nostra linea diretta di assistenza. Svizzera: tel. 0900 00 1675 (spese da rete nazionale Swisscom alla data di stampa: CHF 2,60/min). In caso di reclami entro il periodo di garanzia commerciale, rivolgersi al rivenditore autorizzato. MODIFICA NUM OK [Inserire il nome] OK [Inserire Esempio: Intermediazione / Trasferimento / Conferenza Durante un collegamento interno sono disponibili le seguenti opzioni: Premere [La chiamata interna viene terminata e si può parlare con il chiamante esterno.] Premere INT [La chiamata interna viene messa in attesa e si può parlare con il chiamante esterno. Premere INT per alternare tra stagista e extern] Premere INT 2 sec. [La conferenza a 3 è stabilito] Premere [Mentre si è connessi con l‘utente interno - la chiamata esterna viene trasferita all‘altro portatile.] L‘ulteriore elaborazione nel menu Imp. Avanzate esempio analogo di cui sopra. Dati tecnici (Con riserva di modifiche tecniche) Caratteristica Valore DC 60012C Campo di funzionamento: esterno 300 m, interna 50 m L x A x P (cornetta) 55 x 170 x 30 mm Peso (cornetta) 135 g (incluso batteria) Batterie 2 x 400mAH NiMH 1.2V Intervallo di temperatura -20 °C to 60 °C Tempo di conversazione 8 ore Modalità standby 150 ore Tempo di carica 15 ore L x A x P (base) 170 x 75 x 200 mm Peso (base) 565 g (incluso portatile con cavo) Alimentatore di rete Utilizzando il modello a basso consumo energetico adattatore di alimentazione S003IV0600050 (input AC 100-240V ~50-60Hz, output DC 6V/500mA) e S003IV0600015 (input AC 100-240V ~50-60Hz, output 6V/150mA) per la base di ricarica. CAUTION! Risk of hearing damage! Avoid listening at full receiver volume. Combination set DC 60012 Combo ATTENTION! 4 17 14 18 11 Telephone base 9 2 3 8/9 16 3.1 Corded handset 16 7 13 5 Handset cord Handset 1 For wall mounting remove the bottom and place it on the other side as shown above. 2 3 4 5 6 7 8 9 10 11 12 Charger 17 13 14 15 ENGLISH Operating Instructions Please read and observe the following information and keep the operating manual nearby for future reference! WARNING! Safety information Risk of explosion! Only use the power adapter plugs supplied! Only use batteries supplied or ones of the same type! Always treat batteries with due care and attention and only use batteries as described. Never use standard and rechargeable batteries together. Never use rechargeable batteries or standard batteries with different capacities or charge statuses together. Never use standard or rechargeable batteries which are damaged. Risk of suffocation through small objects, packaging and protective foil! Keep children away from the product and its packaging! Risks to health and the environment from batteries! Never open, damage or swallow batteries or allow them to pollute the environment. They could contain toxic and ecologically harmful heavy metals. The telephone cannot be used to make calls in the event of a power failure. Always keep a cord connected telephone which operates without an external power supply available in case of emergency situations. Never use the telephone in the vicinity of medical equipment. Effects on such equipment cannot be fully ruled out. Risk of property damage. Prevent exposure to environmental influences, e.g. smoke, dust, vibration, chemicals, moisture, heat and direct sunlight. Only allow repairs to be completed by qualified personnel. Contact your telephone network provider with regard to enabling supplementary services. INTENDED USE The telephone is suitable for telephoning within a public telephone network system. Any other use is considered unintended use. Observe all local directives and regulations. Unauthorised modification or reconstruction is not permitted. Under no circumstances open the device or complete any repair work yourself. PACKAGE CONTENTS 1 Telephone base, 1 Corded handset, 1 Handset cord, 2 power adapter plug, 1 Handset, 1 Charger, 1 Telephone connection cable, 2 Rechargeable batteries, 1 Operating instruction OPERATING ELEMENTS 1 Earpiece 2 Display 3 Handset Up: View Calls (CID), Increase volume (+) Down: Phonebook, Decrease volume (-) Navigating in the Menu (up / down) Base Up: View Calls (CID), Navigating in the Menu (up/down) Left: Phonebook, Right: Show redial list 3.1 Increase / Decrease speaker volume during a call Increase / Decrease ringer volume in idle mode 4 Handset OK, Press to confirm the operation Base OK, Press to confirm the operation, Press 3 sec. to set time and date 5 Handset Stand-by mode: Pick up the handset / make call Toggle between speakerphone and receiver mode Base Stand-by mode: Press for handsfree mode Toggle between speakerphone and receiver mode 6 Open menu 7 Keylock (hold 2 sek.) 8 Microphone on / off 9 Handset Back, Press to cancel a menu entry. Press to backspace the digit(s) or character(s). Press and hold to toggle between handset name and date/time in idle mode Base Return to previous level when in menu. Delete the last input number or letter 10 Hang Up button, switch handset on / off (hold 2 sec.) Press to exit the menu operation 11 R-key (Flash), Answer a second incomming call (provider dependent) 12 Redial Button, Press to enter redial list and dial the recent number 13 Insert dialling pause, Turn ringer on / off (hold 2 sek.) 14 INT, Press to make a intercom call or conference call 15 Microphone 16 Input handset cord 17 Socket power supply 18 Telephone jack STARTING UP Connecting the telephone line Connect the telephone cable to the telephone line socket (18). Connect the telephone cable to the telephone line wall socket. Connect the handset cord to the base and handset (16). Connecting the power adapter plug Connect the cable of the power adapter plug to base and charger (17). Connect the power adapter plug in a properly installed mains power outlet Insert the batteries according to the diagram. ATTENTION! The batteries or telephone could be damaged. Pay attention that the batteries are inserted correctly. Switch the telephone off before removing the battery compartment cover. Only switch it on again when the battery compartment cover has been replaced. HANDSET MENU STRUCTURE AND FUNCTIONS PHONEBOOK ►NEW ENTRY ►LIST ►EDIT ENTRY ►DELETE ►DELETE ALL ►DIRECT MEM. Example: Save Direct Access Memory: (There are 2 direct access memories (Key 1 & 2) in the phonebook. A long press on the keys in idle mode will automatically dial the stored phone number.) MENU PHONEBOOK DIRECT MEM OK OK [Select Key 1 or Key 2] OK [No number] MENU Charging the batteries Charge the batteries for at least 12 hours when charging for the first time and ensure they are subsequently discharged and charged fully. This aids a long service life of the batteries. Place the handset in the charger. ICONS IN THE DISPLAY On: The connection to the base station is good. Flashing: The connection to the base station is lost. On: Indicates the battery charge status full. Flashing: Batteries are being charged. On: A call is currently being made. Flashing: A call has been received. On: Calls in the caller list Flashing: New calls in the caller list The ringing tone has been switched off. The alarm function is activated. On: Speakerphone in use Phonebook is activated On: There are more menu options or informations On: Keypad lock is on On: The base microfone is off DISPLAY AND NOTATION OF OPERATING SEQUENCES Press the button depicted 2 sec. Press and hold down the button depicted for 2 seconds Mark next menu point / entry with ▲▼ button [Example] Enter digits or letters Texts in square brackets give instructions to select an option or make an entry Display of an icon (example) Settings Display of text (example) BASE FUNCTIONS USE THE PHONEBOOK (Note: It can only be stored numbers.) Create a phonebook number [Select number] 2 sec. [ clear last digits, edit number] OK Delete a phonebook number [Select number] OK Delete all phonebook numbers 2 sec. OK Save a call list number (CID) [Select number] Save a redial number clear all digits or OK [Enter name] OK [Enter number] OK [Enter PIN 0000] OK Example: Brokering / Transfer / Conference (kann weg!!! Only possible with one or more registered handsets) During an internal connection you have the following options: Press [The internal call will be ended and you can speak to the external caller.] Press INT [The internal call is put on hold and you can speak to the external caller. Press INT to toggle between intern and extern] Press INT 2 sec. [The 3-party conference is established] Press [While connected to the internal subscriber - the external call will be transferred to the other handset.] Further processing in the Advanced Set menu analogous example above. 2 sec. OK Maintenance Clean the surface of the housing with a soft, fluff-free cloth. Do not use any cleaning agents or solvents. Guarantee SWITEL equipment is produced and tested according to the latest production methods. The implementation of carefully chosen materials and highly Further processing in the Phonebook menu analogous example above. developed technologies ensure trouble-free functioning and a long service life. The terms of guarantee do not apply when a device malfunction was PERSONAL SET caused by the mobile telecommunications network operator/provider. The ►HANDSET NAME ►HANDSET TONE ►LANGUAGE terms of guarantee do not apply to the batteries or power packs used in the ►AUTO HANG-UP products. The period of guarantee is 24 months from the date of purchase. Example: Auto Hang Up All deficiencies related to material or manufacturing errors within the period (This function enables you to end a call automatically by simply placing the of guarantee will be redressed free of charge. Rights to claims under the handset on the base unit. By default, the Auto Hang up feature is ON.) terms of guarantee are annulled following tampering by the purchaser MENU PERSONAL SET AUTO HANG UP OK or third parties. Damage caused as the result of improper handling or operation, normal wear and tear, incorrect positioning or storage, improper OK [Select on / off] OK connection or installation or Acts of God and other external influences Further processing in the Personal Set menu analogous example above. are excluded from the terms of guarantee. In the case of complaints, we reserve the right to repair defective parts, replace them or replace the CLOCK & ALARM entire device. Replaced parts or devices become our property. Rights ►DATE / TIME ►SET FORMAT ►ALARM ►ALARM TONE to compensation in the case of damage are excluded where there is no Example: Set Date / Time evidence of intent or gross negligence by the manufacturer. If your device MENU DATE / TIME CLOCK & ALARM OK does show signs of a defect within the period of guarantee, please contact the sales outlet where you purchased the SWITEL device, producing the OK [Enter date] OK [Enter time] OK purchase receipt as evidence. All claims under the terms of guarantee in Further processing in the Clock&Alarm menu analogous example above. accordance with this agreement can only be asserted at the sales outlet. No claims under the terms of guarantee can be asserted after a period of ADVANCED SET two years from the date of purchase and hand-over of the product. ►CHANGE PIN ►REGISTRATION ►UNREGISTER ►RESET ►AUTO PREFIX ►RECALL TIME ►DIAL MODE ►FIRST RING Disposal Example: Change Pin In order to dispose of your device, take it to a collection point ADVANCED SET MENU CHANGE PIN OK provided by your local public waste authorities (e.g. recycling centre). According to the laws on the disposal of electronic and OK [Enter PIN 0000] OK [Enter new PIN] OK electrical devices, owners are obliged to dispose of old electronic Example: Reset and electrical devices in a separate waste container. The adjacent symbol indicates that the device must not be disposed of in normal ADVANCED SET MENU RESET OK OK domestic waste! [Confirm] OK (All your personal settings, call log and redial list You are legally obliged to dispose of power packs and batteries entries will be deleted) at the point of sale or in the corresponding containers provided at collection points by local public waste authorities. Disposal is free of Example: Registration charge. The symbols indicate that the batteries must not be disposed (Up to 4 handsets can be registered to one base unit. Included handset are of in normal domestic waste and that they must be brought to collection pre-registered.) points provided by local public waste authorities. Packaging materials must Press and hold INT button (14) on base for 5 sec. then press be disposed of according to local regulations. ADVANCED SET MENU REGISTRATION OK Edit Entry OK [Enter number] OK 2 sec. Editing a phonebook number Service hotline In the case of technical problems, contact our Service hotline. Switzerland: Tel. 0900 00 1675 (national charges, Swisscom at time of going to print: CHF 2.60/min). In the case of claims under the terms of guarantee, contact your sales outlet. Declaration of Conformity This device fulfils the requirements stipulated in the Directive 1999/5/EC on radio equipment and telecommunications terminal equipment and the mutual recognition of their conformity. Conformity with the above mentioned directive is confirmed by the CE mark on the device. To view the complete Declaration of Conformity, please refer to the free download available on our web site www.switel.com. Technical data (All rights reserved) Feature Value DC 60012C Operating range: outdoor 300 m, indoor 50 m W x H x D (Handset) 55 x 170 x 30 mm Weight (Handset) 135 g (incl. battery) Talking time 8h Standby 150 h [Select number] 2 sec. OK Delete a redial / call list (CID) number Charge time 15 h Battery 2 x 400mAH NiMH 1.2V or Temperature range -20 °C to 60 °C W x H x D (Base) 170 x 75 x 200 mm Weight (Base) 565 g (incl. Handset) [Select number] OK Power adaptor plug Using the energy-efficient power adaptor model for base unit S003IV0600050 (input AC 100-240V ~50-60Hz, output DC 6V/500mA) and S003IV0600015 (input AC 100-240V ~50-60Hz, output 6V/150mA) for charge cradle.
© Copyright 2026 Paperzz