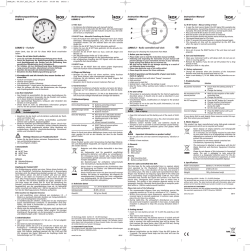
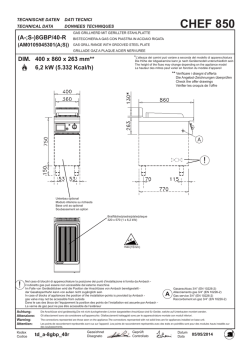
RCT200
Funkwecker mit Thermometer
Réveil radio-piloté avec thermomètre
Orologio sveglia radiocontrollato con
termometro
Radio Controlled Alarm Clock with
Thermometer
Bedienungsanleitung
Mode d'emploi
Istruzioni per l'uso
Operating Manual
Einleitung
Dieses Gerät dient als funkgesteuerte Uhr mit Weckfunktion und Temperaturanzeige. Aufgrund der
handlichen Größe kann dieses Gerät bequem auf Reisen mitgenommen werden und mit der Funktion der
Zeitzoneneinstellung kurzfristig auf eine neue Zeitzone umgestellt werden.
Sicherheitshinweise
1.
2.
3.
4.
5.
6.
7.
8.
9.
10.
11.
12.
13.
14.
15.
16.
17.
18.
19.
20.
21.
Lesen Sie vor dem Gebrauch diese Bedienungsanleitung vollständig durch.
Bei Weitergabe des Gerätes an Dritte muss auch diese Bedienungsanleitung ausgehändigt werden.
Dieses Gerät entspricht den technischen Normen und den betreffenden Sicherheitsanforderungen für
elektrische Geräte.
Der Hersteller übernimmt keine Haftung für Schäden, die auf unsachgemäßen Gebrauch oder
Nichtbeachtung dieser Bedienungsanleitung zurückzuführen sind.
Halten Sie Kinder von dem Gerät fern.
Kinder oder Personen, denen es an Wissen oder Erfahrung im Umgang mit dem Gerät mangelt, oder
die in ihren körperlichen, sensorischen oder geistigen Fähigkeiten eingeschränkt sind, dürfen das Gerät
nicht ohne Aufsicht oder Anleitung durch eine für ihre Sicherheit verantwortliche Person benutzen.
Kinder müssen beaufsichtigt werden, damit sie nicht mit dem Gerät spielen.
Das Gerät nur in gemäßigten Breitengraden verwenden, Tropen und besonders feuchtes Klima
vermeiden.
TAUCHEN SIE DAS GERÄT NICHT UNTER WASSER. STROMSCHLAGGEFAHR!
Das Gerät darf nicht in der Nähe einer Badewanne oder Dusche, oder einem mit Wasser gefüllten
Waschbecken verwendet werden.
Sollte das Gerät doch einmal ins Wasser fallen, lassen Sie das Gerät vor dem Wiedereinschalten von
einem Fachmann überprüfen.
Gerät vor jeglicher Nässe, d. h. auch Spritzwasser und Feuchtigkeit schützen. Insbesondere darauf
achten, dass keinerlei Flüssigkeit durch die Öffnungen in das Gerät gelangt.
Setzen Sie das Gerät nicht dem direkten Sonnenlicht aus. Benutzen Sie das Gerät auch nicht direkt
neben Hitze produzierenden Geräten, wie Öfen oder Kochherden.
Keine Gegenstände mit offenen Flammen, wie z. B. Kerzen in unmittelbarer Nähe des Gerätes stellen.
Keine mit Flüssigkeit gefüllten Gegenstände wie z. B. Vasen im Bereich oberhalb des Gerätes stellen.
Batterien nicht extremer Hitze wie direktem Sonnenlicht, Feuer etc. aussetzen.
Bitte entsorgen Sie gebrauchte Batterien auf ökologische Art und Weise und nach den geltenden
gesetzlichen Bestimmungen.
Benutzen Sie das Gerät nicht, wenn es beschädigt ist. Um Gefahren zu vermeiden, dürfen defekte
Bauteile nur vom Hersteller, seinem Kundendienst oder ähnlich qualifiziertem Personen ersetzt werden.
Öffnen Sie das Gerät nicht. Versuchen Sie nie, das Gerät selbst zu reparieren. Reparaturen dürfen nur
von qualifiziertem Fachpersonal durchgeführt werden.
Die Sensoröffnung (17) an der Rückseite des Gerätes nicht abdecken.
Lassen Sie das Gerät nicht fallen, lassen Sie auch keine Flüssigkeit in das Geräteinnere eindringen oder
Objekte in das Gerät hineinfallen.
Erstickungsgefahr! Halten Sie jegliches Verpackungsmaterial von Kindern fern.
Hinweise zu Batterien
•
•
•
•
•
Verwenden Sie ausschließlich Batterien von bester Qualität. Minderwertige Batterien können durch
Auslaufen Geräteschäden verursachen.
Sollten Batterien einmal ausgelaufen sein, diese mithilfe eines Tuches aus dem Batteriefach entnehmen
und bestimmungsgemäß entsorgen. Vermeiden Sie Haut- und Augenkontakt mit der Batteriesäure.
Sollten Sie doch einmal Augenkontakt mit Batteriesäure erfahren, spülen Sie die Augen mit viel Wasser
aus und kontaktieren umgehend einen Arzt. Bei Kontakt der Batteriesäure mit der Haut, waschen Sie die
Stelle mit viel Wasser und Seife ab.
Wird das Gerät für längere Zeit nicht benutzt, sollte die Batterie entnommen werden, da das Gerät durch
eventuelles Auslaufen der Batterie beschädigt werden kann. Bei nachlassender Leistung muss die
Batterie ersetzt werden.
Batterien sind sehr gefährlich, wenn sie verschluckt werden. Halten Sie Batterien und das Gerät
jederzeit von Kindern fern. Wenn Batterien verschluckt werden, sofort ärztliche Hilfe holen.
Batterien dürfen nicht aufgeladen oder durch andere Mittel reaktiviert, zerlegt, in Feuer geworfen oder
kurzgeschlossen werden.
2
Bedienelemente
1.
2.
3.
4.
5.
6.
7.
8.
9.
Anzeige TEMP (Temperatur)
Anzeige für Stunden
Anzeige DATE (Tag)
Anzeige MONTH (Monat)
Taste Ï
Taste SET
Taste ALARM
Taste SNOOZE/LIGHT
Anzeige für Sekunden
10.
11.
12.
13.
14.
15.
16.
17.
18.
Wecksymbol
Anzeige für Minuten
Anzeige DAY (Wochentag, abgekürzt)
Taste Î
Taste WAVE
Taste RESET
Batteriefach
Sensoröffnung
Standfuß
Automatischer Zeitabgleich
Der Sender für das DCF-Funksignal befindet sich in Deutschland in der Nähe von Frankfurt und erreicht auch
andere europäische Länder. Weitere Informationen zum DCF-Funksignal sind im Internet verfügbar.
• Nach dem Einlegen der Batterie sucht das Gerät automatisch nach dem DCF-Funksignal, um einen
automatischen Zeitabgleich durchzuführen. Das Funksymbol blinkt und zeigt damit an, dass die
Signalsuche gestartet ist. Erscheint das Funksymbol stetig, wird hiermit angezeigt, dass das DCFFunksignal empfangen wird.
• Um zu gewährleisten, dass Zeitabweichungen so gering wie möglich gehalten werden, erfolgt eine
tägliche Zeitabgleichung nachts um 02:00 Uhr. Falls dieser Abgleich nicht erfolgreich ist (das
Funksymbol in der LCD-Anzeige erlischt), folgen 4 weitere Versuche zu jeder der nächsten vollen
Stunde. Eine einmalige Zeitabgleichung pro Tag reicht normalerweise aus, um die Zeit auf eine
Sekunde genau zu halten.
• Drücken Sie die Taste WAVE (14), um den Zeitabgleich manuell zu starten. Drücken Sie die Taste
WAVE erneut, um den Zeitabgleich zu unterbrechen. Falls innerhalb von 7 Minuten kein Signal
empfangen wird, stoppt die Signalsuche (Funksymbol erlischt) und startet erneut zur nächsten vollen
Stunde.
• Da nachts weniger atmosphärische Störungen vorhanden sind, sollte während der Nachtstunden ein
Signalempfang möglich sein.
• In Gebäuden mit Betonwänden, wie z. B. in Bürogebäuden oder in Untergeschossen ist der
Signalempfang schwächer. Falls in einem solchen Fall kein Signal empfangen wird, sollte das Gerät in
der Nähe eines Fensters aufgestellt werden.
Batterie einlegen
Öffnen Sie das Batteriefach (16) an der Rückseite des Gerätes und legen Sie eine 1,5 V Batterie, Typ
AAA/LR03 (im Lieferumfang nicht enthalten), ein. Achten Sie auf korrekte Polarität (+ / -), wie im Batteriefach
angegeben. Nach Einlegen der Batterie ertönt ein Piepton und das Funksymbol erscheint in der LCDAnzeige oberhalb des Wecksymbols (10), oben rechts. Schließen Sie das Batteriefach. Das Gerät versucht
nun automatisch das DCF-Funksignal zu empfangen, um die Uhrzeit automatisch anzuzeigen. Falls kein
Signal empfangen wird, muss die Uhrzeit manuell eingestellt werden.
3
Uhrzeit einstellen
Das Gerät kann die Uhrzeit im 12- oder 24-Stunden Format darstellen. Im 12-Stunden Format erscheint
neben der Zeitanzeige „AM“ für vormittags und „PM“ für nachmittags.
1.
2.
3.
Taste SET (6) gedrückt halten, bis die Jahresanzeige blinkt. Mit den Tasten Ï (5) oder Î (13) die
Jahreszahl einstellen. Mit jedem Drücken der Taste Ï wird die Jahreszahl um eine Stelle erhöht. Mit
jedem Drücken der Taste Î wird die Jahreszahl um eine Stelle verringert. Drücken Sie die Taste SET,
um die Eingabe zu bestätigen.
Danach blinkt die Anzeige MONTH (4) für Monat. Stellen Sie den Monat ebenfalls mit den Tasten Ï
oder Î ein und bestätigen mit der Taste SET.
Verfahren Sie genauso mit den nächsten Einstellungen. Die Einstellung der Zeitzone wird in Abschnitt
Einstellen der Zeitzone erklärt. Drücken Sie daher erstmal die Taste SET, um zum nächsten Punkt
(Stunden) zu springen. Die Reihenfolge der Zeit und Datumseinstellung ist wie folgt:
Jahr → Monat → Tag → Sprache → Wochentag, abgekürzt
→ 12/24 Hr (12/24 Stunden Format) → Zeitzone → Stunden → Minuten
Hinweise:
• Für die Spracheneinstellung des Wochentags stehen die folgenden Einstellungen zur Verfügung:
Deutsch, Englisch, Französisch, Dänisch, Holländisch, Italienisch und Spanisch
• Wird während der Einstellung innerhalb von 30 Sekunden keine Eingabe getätigt, wechselt die LCDAnzeige automatisch vom Einstellmodus zum Anzeigemodus. Die bisherigen Eingaben gehen dadurch
verloren.
• Halten Sie im Einstellmodus die Tasten Ï oder Î gedrückt, werden die entsprechenden Menüpunkte
im Schnelldurchlauf angezeigt.
• Das Gerät kann mit der Taste RESET (15) zurückgesetzt werden. Alle vorherigen Einstellungen gehen
dadurch verloren. Das Gerät sucht dann erneut nach dem DCF-Funksignal.
Zeitzone einstellen
Wenn Sie sich nicht in Deutschland aufhalten oder die Zeit aus einem anderen Land anzeigen lassen
möchten, können Sie die Differenz zum von Deutschland ausgestrahlten DCF-Funksignal (deutsche Zeit) mit
dieser Funktion einstellen.
1. Halten Sie die Taste SET gedrückt, bis die Jahreszahl blinkt.
2. Drücken Sie 5-mal die Taste SET, bis die Zeitzoneneinstellung blinkt. In der LCD-Anzeige erscheint „TZ“
(engl. Time Zone).
3. Drücken Sie die Taste Î 1-mal, um z. B. -1 für England, oder 7-mal die Taste Ï, um +7 für Hong Kong
einzustellen.
4. Drücken Sie die Taste WAVE (14) zur Bestätigung.
Weckzeit einstellen
Mit dem Gerät können 2 Weckzeiten eingestellt werden.
1. Taste ALARM (7) gedrückt halten, bis die Uhrzeit blinkt und in der LCD-Anzeige „A1“ für Weckzeit 1
erscheint.
2. Mit den Tasten Ï (5) oder Î (13) die Stunden einstellen und mit der Taste ALARM bestätigen.
3. Die Anzeige wechselt auf die Minutenanzeige.
4. Stellen Sie die Minuten genauso ein und bestätigen mit der Taste ALARM.
5. Mit der Taste Ï aktivieren Sie die Weckzeit und in der LCD-Anzeige erscheint das Wecksymbol (10)
für die erste Weckzeit. Drücken Sie die Taste Ï erneut, wird die Weckzeit abgeschaltet und das
Wecksymbol erlischt.
6. In der LCD-Anzeige blinkt erneut die Uhrzeit und „A2“ für die zweite Weckzeit. Wenn gewünscht, geben
Sie eine zweite Weckzeit ein. Mit der Taste Ï aktivieren Sie die Weckzeit. Das Wecksymbol
für die
zweite Weckzeit erscheint in der LCD-Anzeige. Verfahren Sie genauso, wie für die erste Weckzeit.
4
7.
8.
Ansonsten drücken Sie die Taste ALARM so oft, bis die aktuelle Uhrzeit wieder angezeigt wird.
Zur eingestellten Weckzeit ertönt ein Piepton, der zuerst langsam und dann in Abständen schneller wird.
Drücken Sie eine beliebige Taste, um den Weckton abzuschalten oder die Taste SNOOZE/LIGHT (8),
um die Schlummerfunktion zu aktivieren (siehe Abschnitt Schlummerfunktion).
Weckzeit aufrufen
Drücken Sie die Taste ALARM, um die eingegebenen Weckzeiten anzuzeigen. In der LCD-Anzeige
erscheint „A1“ und die eingegebene Weckzeit. Drücken Sie die Taste Ï, um die Weckzeit ein- bzw.
auszuschalten. Drücken Sie die Taste ALARM erneut, um Weckzeit 2 anzuzeigen. In der LCD-Anzeige
erscheint „A2“ und die eingegebene Weckzeit. Drücken Sie die Taste ALARM, um zum Anzeigemodus
zurückzukehren.
Schlummerfunktion
Sobald das Wecksignal ertönt, drücken Sie die Taste SNOOZE/LIGHT (8). Das Wecksignal schaltet ab und
ertönt erneut nach 5 Minuten. Drücken Sie eine beliebige Taste, um die Schlummerfunktion abzuschalten.
Beleuchtung
Drücken Sie die Taste SNOOZE/LIGHT (8), um die Anzeigebeleuchtung einzuschalten. Die
Anzeigebeleuchtung erlischt nach ca. 5 Sekunden.
Thermometer
Das Thermometer zeigt die Temperatur in ºC (Celsius) oder ºF (Fahrenheit) an.
Drücken Sie die Taste Î (13), um zwischen ºC und ºF umzuschalten.
Sommerzeit
Wenn sich das Gerät im Bereich eines DCF-Funksignals befindet und die Sommerzeit empfängt, erscheint
das Sommerzeitsymbol links neben der Stundenanzeige.
Batterie wechseln
Die Batterie muss ausgetauscht werden, wenn die Batteriestandsanzeige
in der LCD-Anzeige
erscheint oder die LCD-Anzeige schwächer wird. Zum Austauschen der Batterie gehen Sie genauso vor, wie
in Abschnitt Batterie einlegen beschrieben.
Reinigung
Reinigen Sie die Gehäuseoberflächen mit einem weichen und fusselfreien Tuch. Verwenden Sie keine
Reinigungs− oder Lösungsmittel.
Technische Daten
Stromversorgung:
Zeitanzeige:
Zeiteinheit:
Zeitabgleich:
1 x 1,5 V Batterie, Typ AAA / LR03
12 / 24 Stunden
1 Sekunde
1 x täglich (nachts)
Technische Änderungen vorbehalten!
5
Konformitätserklärung
Dieses Gerät erfüllt die Anforderungen der EU−Richtlinie. Für die komplette
Konformitätserklärung nutzen Sie bitte den kostenlosen Download von unserer Website
www.dexford.com.
Entsorgung
Wollen Sie Ihr Gerät entsorgen, bringen Sie es zur Sammelstelle Ihres
kommunalen Entsorgungsträgers (z. B. Wertstoffhof). Nach dem Elektro−
und Elektronikgerätegesetz sind Besitzer von Altgeräten gesetzlich
verpflichtet, alte Elektro− und Elektronikgeräte einer getrennten
Abfallerfassung zuzuführen. Das nebenstehende Symbol bedeutet, dass Sie
das Gerät auf keinen Fall in den Hausmüll werfen dürfen! Gefährdung von
Gesundheit und Umwelt durch Akkus und Batterien! Akkus und Batterien nie
öffnen, beschädigen, verschlucken oder in die Umwelt gelangen lassen. Sie
können giftige und umweltschädliche Schwermetalle enthalten. Sie sind
gesetzlich verpflichtet, Akkus und Batterien beim batterievertreibenden
Handel sowie bei zuständigen Sammelstellen, die entsprechende Behälter
bereitstellen, sicher zu entsorgen. Die Entsorgung ist unentgeltlich. Die
Symbole bedeuten, dass Sie Akkus und Batterien auf keinen Fall in den
Hausmüll werfen dürfen und sie über Sammelstellen der Entsorgung zugeführt
werden müssen.
Verpackungsmaterialien entsorgen Sie entsprechend den lokalen Vorschriften.
Garantie
DEXFORD − Geräte werden nach den modernsten Produktionsverfahren hergestellt und geprüft.
Ausgesuchte Materialien und hoch entwickelte Technologien sorgen für einwandfreie Funktion und lange
Lebensdauer. Die Garantie gilt nicht für die in den Produkten verwendeten Batterien, Akkus oder Akkupacks.
Die Garantiezeit beträgt 24 Monate, gerechnet vom Tage des Kaufs. Innerhalb der Garantiezeit werden alle
Mängel, die auf Material− oder Herstellungsfehler zurückzuführen sind, kostenlos beseitigt. Der
Garantieanspruch erlischt bei Eingriffen durch den Käufer oder durch Dritte. Schäden, die durch
unsachgemäße Behandlung oder Bedienung, natürliche Abnutzung, durch falsches Aufstellen oder
Aufbewahren, durch unsachgemäßen Anschluss oder Installation sowie durch höhere Gewalt oder sonstige
äußere Einflüsse entstehen, fallen nicht unter die Garantieleistung. Wir behalten uns vor, bei Reklamationen
die defekten Teile auszubessern, zu ersetzen oder das Gerät auszutauschen. Ausgetauschte Teile oder
ausgetauschte Geräte gehen in unser Eigentum über. Schadenersatzansprüche sind ausgeschlossen, soweit
sie nicht auf Vorsatz oder grober Fahrlässigkeit des Herstellers beruhen. Sollte Ihr Gerät dennoch einen
Defekt innerhalb der Garantiezeit aufweisen, wenden Sie sich bitte unter Vorlage Ihrer Kaufquittung
ausschließlich an das Geschäft, in dem Sie Ihr DEXFORD − Gerät gekauft haben.
Alle Gewährleistungsansprüche nach diesen Bestimmungen sind ausschließlich gegenüber Ihrem
Fachhändler geltend zu machen. Nach Ablauf von zwei Jahren nach Kauf und Übergabe unserer Produkte
können Gewährleistungsrechte nicht mehr geltend gemacht werden.
Hotline
Bei technischen Problemen können Sie sich an unsere Service−Hotline unter Tel. 0900 00 1675 innerhalb
der Schweiz (Kosten Swisscom bei Drucklegung: CHF 2.60/min) wenden.
6
Introduction
Cet appareil sert d'horloge radiopilotée avec fonction réveil et affichage de la température. Sa taille maniable
vous permet de l'emmener facilement avec vous en voyage et sa fonction de réglage du fuseau horaire peut
le régler à court terme sur un nouveau fuseau.
Remarques concernant la sécurité
1.
2.
3.
4.
5.
6.
7.
8.
9.
10.
11.
12.
13.
14.
15.
16.
17.
18.
19.
20.
21.
Veuillez lire complètement ce mode d'emploi avant d'utiliser votre appareil.
Dans le cas où vous transmettez celui-ci à un tiers, confiez lui impérativement le mode d'emploi.
Cet appareil répond aux normes techniques et aux exigences de sécurité relatives aux appareils
électriques.
Le fabricant ne se porte pas garant de dommages résultant de son utilisation incorrecte ou de
l'inobservation de ce mode d'emploi. .
Gardez l'appareil hors de portée des enfants.
Des enfants ou des personnes ne sachant pas comment marche l'appareil ou n'ayant pas d'expérience
avec celui-ci ou bien étant limités dans leurs aptitudes corporelles, sensorielles ou intellectuelles ne
doivent pas utiliser celui-ci sans surveillance ou sans être guidés par une personne responsable de leur
sécurité.
Surveiller les enfants afin qu'ils ne se servent pas de l'appareil comme d'un jouet.
Ne l'utiliser que sous des latitudes tempérées, éviter son emploi sous les tropiques et sous un climat
particulièrement humide.
NE PAS IMMERGER L'APPAREIL. RISQUE DE CHOC ÉLECTRIQUE !
Ne pas utiliser l'appareil à proximité d'une baignoire ou d'une douche ou d'un lavabo rempli d'eau.
Si par inadvertance vous laissiez tomber l'appareil dans l'eau, le faire contrôler par un spécialiste avant
de le rebrancher.
Protéger l'appareil de quelconque humidité, donc également de projections d'eau. Faire attention
notamment à ce qu'aucun liquide ne puisse pénétrer par les ouvertures.
Ne pas exposer l'appareil à un ensoleillement direct. Ne pas l'utiliser non plus près d'appareils
produisant de la chaleur tels que poêles ou cuisinières.
Ne pas placer d'objets avec des flammes nues près de l'appareil (bougies par exemple).
Ne pas placer d'objets remplis d'eau (des vases par exemple) dans une zone située au dessus de
l'appareil.
Ne pas exposer les piles à une chaleur extrême telle que la lumière du soleil, le feu, etc.
Éliminer les piles usées en respectant l'environnement et selon les dispositions légales en vigueur.
Ne pas utiliser l'appareil s'il est endommagé. Pour éviter des dangers, seul le fabricant, son service
après-vente ou des personnes ayant une qualification semblable sont autorisés à remplacer des
éléments défectueux.
Ne pas ouvrir l'appareil. Ne jamais essayer de le répare vous-même. Seuls des spécialistes sont
autorisés à effectuer des réparations.
Ne pas recouvrir l'ouverture du capteur (17) situé à l'arrière de l'appareil.
Ne pas laisser tomber l'appareil, ne pas laisser pénétrer de liquide à l'intérieur ou faire tomber des
objets dedans.
Danger d'étouffement ! Garder tout matériel d'emballage hors de portée des enfants.
Remarques concernant les piles
•
•
•
•
•
N'utiliser que des piles d'excellente qualité. Des piles de mauvaise qualité peuvent endommager
l'appareil si elles coulent.
Si des piles ont toutefois coulé, les retirer de leur compartiment à l'aide d'un chiffon et les éliminer
réglementairement. Éviter tout contact de l'acide avec la peau et les yeux. Si ce cas venait à se
produire, rincer les yeux à grandes eaux et contacter un médecin sans délai. En cas de contact de
l'acide avec la peau, rincer l'endroit avec beaucoup d'eau et du savon.
Si l'appareil n'est pas utilisé pendant une période prolongée, il est conseillé de retirer la pile pour qu'il ne
soit pas endommagé au cas où celle-ci coulerait. Remplacer la pile si son rendement diminue.
Les piles sont très dangereuses si elles sont avalées. Toujours les garder hors de portée des enfants. Si
ce cas venait à se présenter, appeler immédiatement un médecin.
Ne pas recharger les piles ou les réactiver par d'autres moyens, ne pas les démonter, ne pas les jeter
dans le feu ou les court-circuiter.
7
Éléments de manipulation
1.
2.
3.
4.
5.
6.
7.
8.
9.
Affichage TEMP (température)
Affichage heures
Affichage DATE (jour)
Affichage MONTH (mois)
Touche Ï
Touche SET
Touche ALARM
Touche SNOOZE/LIGHT
Affichage secondes
10.
11.
12.
13.
14.
15.
16.
17.
18.
Icône réveil
Affichage minutes
Affichage DAY (jour de la semaine, abrégé)
Touche Î
Touche WAVE
Touche RESET
Compartiment à piles
Ouverture capteur
Support
Comparaison horaire automatique
L'émetteur pour le signal radio DCF se trouve en Allemagne aux alentours de Francfort et atteint également
d'autres pays européens. Des informations complémentaires sur le signal radio DCF sont disponibles sur
Internet.
• Après insertion de la pile, l'appareil recherche automatiquement le signal radio DCF pour effectuer la
comparaison horaire automatique. L'icône radio clignote, indiquant ainsi que la recherche du signal a
commencé. Lorsque l'icône radio ne clignote plus, le signal radio est reçu.
• Une comparaison horaire quotidienne a lieu à 02:00 h de la nuit afin de garantir que les écarts horaires
sont maintenus aussi faibles que possible. Dans le cas où cette comparaison échoue (l'icône radio
s'éteint dans l'affichage), 4 nouvelles tentatives suivent à chaque prochaines heure pile. Généralement
une comparaison horaire unique par jour suffit pour que l'heure soit indiquée à la seconde près.
• Appuyez sur la touche WAVE (14) pour démarrer la comparaison horaire à la main. Appuyez une
nouvelle fois sur la touche WAVE pour l'interrompre. Si aucun signal n'est reçu dans les 7 minutes, la
recherche du signal s'arrête (icône radio s'éteint) et recommence à la prochaine heure pile.
• Les perturbations atmosphériques étant moins présentes pendant la nuit, une réception du signal devrait
alors être possible.
• La réception du signal est plus faible dans des bâtiments aux murs en béton tels que bureaux ou soussols. Si, dans ce cas, aucun signal n'est reçu, il est conseillé de placer l'appareil à proximité d'une
fenêtre.
Insérer la pile
Ouvrez le compartiment à piles (16) situé à l'arrière de l'appareil et insérez une pile 1,5 V, type AAA/LR03
(non vendue avec). Respectez la polarité correcte (+ / -) comme indiqué dans le compartiment. Après
insertion de la pile, vous entendez un bip et l'icône radio s'affiche au dessus de l'icône réveil (10), en haut
à droite. Fermez le compartiment. L'appareil essaie maintenant automatiquement de recevoir le signal radio
DCF afin d'afficher l'heure automatiquement. Si aucun signal n'est reçu, vous devez régler l'heure à la main.
8
Régler l'heure
L'appareil peut représenter l'heure en format 12 ou 24 heures. En format 12 heures „AM“ pour matin et „PM“
pour après-midi apparaissent à côté de l'affichage de l'heure.
1.
2.
3.
Appuyez longuement sur la touche SET (6) jusqu'à ce que l'affichage de l'année clignote. Régler le
chiffre de l'année avec les touches Ï (5) ou Î (13). Le chiffre croît à chaque appui de la touche Ï. Le
chiffre décroît à chaque appui de la touche *. Appuyez sur la touche SET pour valider votre saisie.
L'affichage MONTH (4) pour le mois clignote ensuite. Réglez également le mois avec les touches Ï ou
Î et validez avec la touche SET.
Procédez de la même façon pour les prochains réglages. Vous trouvez l'explication du réglage du
fuseau horaire au point Régler le fuseau horaire. Appuyez donc d'abord sur la touche SET pour sauter
au prochain point (heures). La chronologie de l'heure et du réglage de la date est la suivante :
Année → Mois → Jour → Langue → Jour de la semaine, en abrégé
→ 12/24 h (format 12/24 heures) → Fuseau horaire → Heures → Minutes
Remarques :
• Vous disposez des réglages suivants pour régler la langue du jour de la semaine : allemand, anglais,
français, danois, néerlandais, italien et espagnol
• Si vous n'effectuez pas de saisie pendant 30 secondes, l'affichage bascule automatiquement du mode
réglage au mode affichage. Vos saisies précédentes sont alors perdues.
• Si vous maintenez appuyées les touches Ï ou Î en mode réglage, les options de menus
correspondantes seront affichées rapidement.
• Vous pouvez remettre l'appareil à zéro avec la touche RESET (15). Tous vos réglages précédents sont
perdus. L'appareil recherche à nouveau le signal radio.
Régler le fuseau horaire
Si vous ne séjournez pas en Allemagne ou si vous souhaitez voir s'afficher l'heure d'un autre pays, vous
pouvez régler la différence par rapport au signal radio émis par l'Allemagne avec cette fonction.
1. Appuyez longuement sur la touche SET jusqu'à ce que l'affichage de l'année clignote.
2. Appuyez 5 fois sur la touche SET jusqu'à ce que le réglage du fuseau horaire clignote. „TZ“ (angl. Time
Zone) s'affiche.
3. Appuyez 1 fois sur la touche Î pour régler par exemple -1 pour l'Angleterre, ou 7 fois sur la touche Ï
pour régler +7 pour Hong Kong.
4. Appuyez sur la touche WAVE (14) pour valider.
Régler l'heure de réveil
L'appareil vous permet de régler 2 heures de réveil.
1. Appuyez sur la touche ALARM (7) jusqu'à ce que l'heure clignote et que „A1“ pour heure de réveil 1
s'affiche.
2. Réglez les heures avec les touches Ï (5) ou Î (13) et validez avec la touche ALARM.
3. L'affichage bascule sur l'affichage des minutes.
4. Réglage les minutes de la même façon et validez avec la touche ALARM.
5. Vous activez l'heure de réveil avec la touche Ï et l'icône (10) pour la première heure de réveil
s'affiche. Si vous appuyez une nouvelle fois sur la touche Ï, l'heure de réveil est désactivée et l'icône
du réveil s'éteint.
6. L'heure clignote à nouveau sur l'affichage et „A2“ s'affiche pour la deuxième heure de réveil. Si vous le
souhaitez, vous pouvez entrer une deuxième heure de réveil. Vous l'activez avec la touche Ï. L'icône
pour la deuxième heure de réveil s'affiche. Procédez comme pour la première heure.
du réveil
7. Pour le reste, appuyez sur la touche ALARM jusqu'à ce que l'heure actuelle s'affiche.
9
8.
Vous entendez un bip à l'heure réglée dont le son ira en s'accélérant. Appuyez sur une touche
quelconque pour désactiver la sonnerie du réveil ou sur la touche SNOOZE/LIGHT (8) pour activer la
fonction Snooze (voir point Fonction Snooze).
Appeler l'heure de réveil
Appuyez sur la touche ALARM pour voir s'afficher les heures de réveil que vous avez entrées. „A1“ s'affiche
ainsi que l'heure entrée. Appuyez sur la touche Ï pour activer ou désactiver l'heure de réveil. Appuyez une
nouvelle fois sur la touche ALARM pour voir s'afficher l'heure 2. „A2“ s'affiche ainsi que l'heure entrée.
Appuyez sur la touche ALARM pour revenir au mode Affichage.
Fonction Snooze
Appuyez sur la touche SNOOZE/LIGHT (8) dès le signal de réveil. Celui-ci s'arrête et retentit à nouveau au
bout de 5 minutes. Appuyez sur une touche quelconque pour désactiver la fonction Snooze.
Éclairage
Appuyez sur la touche SNOOZE/LIGHT (8) pour activer l'éclairage de l'affichage. Celui-ci s'éteint au bout de
5 secondes environ.
Thermomètre
Le thermomètre affiche la température en degrés ºC (Celsius) ou ºF (Fahrenheit).
Appuyez sur la touche Î (13) pour basculer de ºC à ºF.
Heure d'été
Si l'appareil se trouve dans la zone d'un signal radio DCF et qu'il reçoit l'heure d'été, l'icône heure d'été
s'affiche á gauche á côté de l'affichage de l'heure.
Changer la pile
Vous devez changer la pile lorsque l'icône
de celle-ci s'affiche ou si l'affichage devient plus faible. Pour
changer la pile, procédez comme indiqué au point Insérer la pile.
Nettoyage
Nettoyer les surfaces du boîtier avec un chiffon doux et non pelucheux. Ne pas utiliser de produit de
nettoyage ou de solvant.
Caractéristiques techniques
Alimentation en courant :
Affichage de l'heure :
Unité de temps :
Comparaison horaire :
1 pile x 1,5 V, type AAA / LR03
12 / 24 heures
1 seconde
1 x par jour (la nuit)
Sous réserves de modifications techniques !
10
Déclaration de conformité
Ce réveil répond aux exigences de la directive de l'Union européenne : Pour obtenir la
déclaration intégrale de conformité, veuillez vous servir du téléchargement gratuit sur
notre site Internet www.dexford.com.
Élimination
Si vous voulez vous séparer de votre appareil, veuillez l'apporter au centre de
collecte de l'organisme d'élimination des déchets de votre commune (par ex.
centre de recyclage). D’après la loi relative aux appareils électriques et
électroniques, les propriétaires d’appareils usagés électriques et
électroniques sont tenus de les mettre dans un collecteur séparé. L'icône cicontre signifie que vous ne devez en aucun cas jeter votre appareil dans les
ordures ménagères ! Mise en danger de l'homme et pollution de
l'environnement causées par les piles et piles rechargeables ! Ne jamais
ouvrir, endommager, avaler les piles rechargeables et les piles ou ne jamais
faire pénétrer leur contenu dans l'environnement. Elles peuvent contenir des
métaux lourds toxiques qui le polluent. Vous êtes tenus par la loi d'éliminer
vos piles rechargeables et piles auprès d'un revendeur de piles ainsi
qu'auprès de centres de collecte responsables de leur élimination qui mettent
des conteneurs adéquats à disposition. L'élimination des piles/piles
rechargeables est gratuite. L'icône ci-contre signifie que vous ne devez en
aucun cas jeter les piles rechargeables et piles dans les ordures ménagères,
mais que vous devez les éliminer auprès de centres de collecte.
Éliminer les fournitures d'emballage conformément au règlement local.
Garantie
Les appareils DEXFORD sont fabriqués et contrôlés selon des méthodes de pointe. Les matériaux
sélectionnés et des technologies de haut niveau garantissent un fonctionnement irréprochable et une longue
durée de vie. La garantie ne s'applique pas aux piles, piles rechargeables ou packs de piles rechargeables
utilisés dans les produits. La durée de la garantie est de 24 mois à partir de la date d'achat. Pendant la
période de garantie, tous les défauts dus à des vices de matériel ou de fabrication sont éliminés
gratuitement. Le droit à la garantie expire en cas d'intervention de l'acheteur ou de tiers. Les dommages
provenant d'un maniement ou d'une manipulation incorrects, d'une usure naturelle, d'une mauvaise mise en
place ou d'une mauvaise conservation, d'un raccordement ou d'une installation incorrects ainsi que d'un cas
de force majeure ou autres influences extérieures sont exclus de la garantie. En cas de réclamations, nous
nous réservons le droit de réparer, de remplacer les pièces défectueuses ou d'échanger l'appareil. Les
composants remplacés ou les appareils échangés deviennent notre propriété. Les demandes de dommages
et intérêts sont exclues tant qu'elles ne reposent pas sur l'intention ou une négligence grossière du fabricant.
Si votre appareil devait malgré tout présenter une défectuosité pendant la période de garantie, veuillez vous
adresser, muni de votre reçu, exclusivement au magasin où vous avez acheté votre appareil DEXFORD.
Vous ne pouvez faire valoir vos droits à la garantie selon ces dispositions qu'exclusivement auprès de votre
revendeur. Deux ans après l'achat et la remise de nos produits, il n'est plus possible de faire valoir les droits
à la garantie.
Ligne directe
En cas de problèmes techniques, vous pouvez vous adresser à notre ligne directe de service en Suisse en
composant le numéro de tél. 0900 00 1675 (frais Swisscom à la date d’impression de ce manuel : CHF
2.60/min).
11
Introduzione
L'apparecchio opera come orologio radiocontrollato con funzione sveglia e indicazione della temperatura. Le
dimensioni compatte dell'apparecchio ne fanno un ottimo compagno di viaggio e grazie alla funzione
dell'impostazione dei fusi orari è possibile passare al nuovo fuso orario in brevissimo tempo.
Indicazioni di sicurezza
1.
2.
3.
4.
5.
6.
7.
8.
9.
10.
11.
12.
13.
14.
15.
16.
17.
18.
19.
20.
21.
Prima dell'uso, leggere attentamente e per intero le presenti istruzioni per l'uso.
In caso di cessione dell'apparecchio a terzi, consegnare anche queste istruzioni per l'uso.
Il presente apparecchio è conforme alle norme tecniche e alle prescrizioni di sicurezza applicabili per
apparecchi elettrici.
Il costruttore non assume alcuna garanzia per danni riconducibili ad un impiego non conforme o alla
mancata osservanza delle presenti istruzioni per l'uso.
Tenere lontano i bambini dall'apparecchio.
Il presente apparecchio non è concepito per essere utilizzato da bambini o persone con capacità
fisiche, sensoriali o intellettive limitate o con carenza di esperienza e/o di cognizioni, che pertanto
devono essere controllate da persone responsabili o ricevere istruzioni su come utilizzare
l'apparecchio.
Sorvegliare i bambini per assicurarsi che non giochino con l'apparecchio.
Utilizzare l'apparecchio solo a gradi di latitudine moderati, evitare i tropici o temperature umide.
NON IMMERGERE L'APPARECCHIO IN ACQUA. PERICOLO DI SCOSSA ELETTRICA!
Non utilizzare l'apparecchio vicino a vasche da bagno o docce, o in un lavandino riempito d'acqua.
In caso di caduta dell'apparecchio in acqua, fare controllare l'apparecchio prima del suo reinserimento
da un tecnico specializzato.
Proteggere l'apparecchio da umidità, schizzi d'acqua e umidità. Evitare in particolare la penetrazione di
liquidi dalle aperture dell'apparecchio.
Non esporre l'apparecchio ai raggi solari diretti. Non utilizzare l'apparecchio vicino ad altri apparecchi
che producono calore, come forni o piani di cottura.
Non posizionare oggetti con fiamma aperta, come ad esempio candele, nelle immediate vicinanze
dell'apparecchio.
Non mettere recipienti pieni di liquido, come ad esempio vasi, sull'apparecchio o nelle sue immediate
vicinanze.
Non esporre le pile o le batterie a calore eccessivo, come quello prodotto dalla luce del sole, dal fuoco
o simili.
Smaltire le pile usate in modo ecocompatibile in osservanza delle norme di legge in vigore.
Non utilizzare l'apparecchio se danneggiato. Per evitare pericoli, fare sostituire eventuali componenti
difettosi solo dal costruttore, dal suo servizio di assistenza o da persone con simile qualifica.
Non aprire l'apparecchio. Non provare in alcun caso a riparare l'apparecchio per conto proprio. Affidare
eventuali interventi di riparazione a personale tecnico qualificato.
Non coprire l'apertura del sensore (17) presente sul retro dell'apparecchio.
Non lasciare cadere l'apparecchio, non fare giungere liquidi al suo interno e non lasciarvi cadere dentro
altri oggetti.
Pericolo di soffocamento! Tenere lontano dai bambini il materiale d'imballaggio.
Indicazioni sulle pile
•
•
•
•
Utilizzare solo pile di ottima qualità. Pile di scarsa qualità possono causare danni all'apparecchio dovuti
alla fuoriuscita di liquidi dalle pile.
In caso di fuoriuscita di liquidi dalle pile, rimuovere le pile dal vano pile con l'ausilio di un panno e
procedere allo smaltimento conforme. In presenza di acidi fuoriusciti, evitare il contatto con la pelle e gli
occhi. In caso di contatto degli occhi con gli acidi fuoriusciti dalle pile, sciacquare gli occhi con
abbondante acqua e rivolgersi immediatamente ad un medico. In caso di contatto della pelle con gli
acidi fuoriusciti dalle pile, sciacquare la parte interessata con abbondante acqua e sapone.
Rimuovere le pile dall'apparecchio se non lo si utilizza per un periodo prolungato; in questo modo si
evitano danni all'apparecchio dovuti alla fuoriuscita di liquidi dalle pile. Sostituire le pile se le prestazioni
cominciano a risentirne negativamente.
Le pile sono molto pericolose se inghiottite. Tenere sempre lontano pile e l'apparecchio dalla portata dei
bambini. In caso di ingestione accidentale delle pile, rivolgersi immediatamente ad un medico.
12
•
Le pile non vanno ricaricate o riattivate in altro modo, non vanno smontate, cortocircuitate o gettate nel
fuoco.
Elementi di comando
1.
2.
3.
Indicazione TEMP (temperatura)
Indicazione delle ore
Indicazione DATE (giorno)
10.
11.
12.
4.
5.
6.
7.
8.
9.
Indicazione MONTH (mese)
Tasto Ï
Tasto SET
Tasto ALARM
Tasto SNOOZE/LIGHT
Indicazione per secondi
13.
14.
15.
16.
17.
18.
Simbolo sveglia
Indicazione dei minuti
Indicazione DAY (giorno della settimana,
abbreviato)
Tasto Î
Tasto WAVE
Tasto RESET
Vano pile
Apertura del sensore
Base di appoggio
Sincronizzazione automatica dell'orario
Il trasmettitore per il segnale radio DCF si trova in Germania nei pressi di Francoforte/Meno ed è ricevuto
anche in altri Paesi europei. Per maggiori informazioni sul segnale radio DCF si prega di consultare Internet.
• Una volta inserita la pila, l'apparecchio cerca automaticamente il segnale radio DCF in modo da
effettuare una sincronizzazione automatica dell'orario. Il simbolo radio lampeggia e indica che
l'apparecchio ha avviato la ricerca del segnale. Se il simbolo radio è visualizzato in modo permanente
significa che il segnale radio DCF è stato individuato e ricevuto.
• Affinché lo sfasamento dell'orario sia quanto più minimo, la sincronizzazione dell'orario giornaliera è
svolta di notte alle ore 02:00. In caso non risultasse necessario effettuare una sincronizzazione (il
simbolo radio sul display LCD si spegne), seguono 4 ulteriori tentativi, uno per ogni ora piena
successiva. In linea generale è sufficiente compiere una sincronizzazione dell'orario al giorno per
ottenere un orario esatto.
• Premere il tasto WAVE (14) per avviare manualmente la sincronizzazione dell'orario. Premere di nuovo
il tasto WAVE per interrompere la sincronizzazione dell'orario. Se entro 7 minuti non si riceve alcun
segnale, l'apparecchio interrompe la ricerca del segnale radio (simbolo radio si spegne) per
riprenderla quindi all'ora piena successiva.
• Considerato che di notte le interferenze atmosferiche sono inferiori, la ricezione del segnale è facilitato
nelle ore notturne.
• In edifici con pareti in cemento, come il caso ad esempio in edifici uso ufficio o scantinati, la ricezione
del segnale è più debole. In caso di mancata ricezione del segnale, posizionare l'apparecchio nelle
vicinanze di una finestra.
Inserimento delle pile
Aprire il vano pile (16) sul retro dell'apparecchio e inserire una pila da 1,5 V, tipo AAA/LR03 (non inclusa
nella confezione). Fare attenzione alla corretta polarità (+ / -) secondo quanto indicato all'interno del vano
pile. Una volta inserita la pila si avverte un segnale acustico ed il simbolo radio è visualizzato sul display
LCD sopra il simbolo sveglia (10), nella parte in alto a destra. Chiudere il vano pile. L'apparecchio cerca
13
quindi di individuare automaticamente il segnale radio DCF in modo da poter impostare automaticamente e
quindi visualizzare l'orario. In caso di mancata ricezione del segnale, l'orario andrà impostato manualmente.
Impostazione dell'orario
L'apparecchio è in grado di visualizzare l'orario in formato 12 ore o 24 ore. Nel formato 12 ore, accanto
all'orario è segnalata la sigla „AM“ per indicare le ore antipomeridiane e „PM“ per le ore pomeridiane.
1.
2.
3.
Tenere premuto il tasto SET (6) fino a quando le cifre relative all'anno lampeggiano. Con i tasti Ï (5) o
Î (13) è quindi possibile impostare l'anno. Ogni volta che si preme il tasto Ï l'anno aumenta di un
numero. Ogni volta che si preme il tasto Î l'anno diminuisce di un numero. Premere il tasto SET per
confermare l'immissione.
Fatto questo lampeggia l'indicazione MONTH (4) relativa al mese. Impostare anche il mese secondo
con l'ausilio dei tasti Ï o Î e confermare con il tasto SET.
Procedere secondo la stessa modalità per le impostazioni successive. L'impostazione del fuso orario è
spiegato nella sezione Impostazione del fuso orario. Premere quindi innanzitutto il tasto SET per saltare
al punto (ore) successivo. La sequenza di orario e impostazione data è la seguente:
Anno → Mese → Giorno → Lingua → Giorno della settimana, abbreviato
→ 12/24 Hr (formato 12/24 ore) → Fuso orario → Ore → Minuti
Note:
• Come lingua per la visualizzazione del giorno della settimana è possibile scegliere tra le seguenti
opzioni: tedesco, inglese, francese, danese, olandese, italiano e spagnolo
• In caso di mancata conferma dell'impostazione entro 30 secondi dall'immissione, il display LCD passa
automaticamente dalla modalità d'impostazione alla modalità di visualizzazione. Eventuali immissioni
effettuate sono quindi annullate.
• Se si tengono premuto in modalità d'impostazione i tasti Ï o Î, le voci di menu sono visualizzate in
modalità di scorrimento rapido.
• Per resettare l'apparecchio, premere il tasto RESET (15) . Tutte le impostazioni effettuate in precedenza
sono annullate. L'apparecchio procede in tal caso di nuovo alla ricerca del segnale radio DCF.
Impostazione del fuso orario
Quando non si è in Germania o si desidera visualizzare l'orario attualmente in vigore in un altro Paese, la
funzione consente di impostare la differenza di orario rispetto al segnale radio DCF trasmesso in Germania
(ora tedesca).
1. Tenere premuto il tasto SET fino a quando le cifre relative all'anno lampeggiano.
2. Premere 5 volte il tasto SET fino a quando l'impostazione del fuso orario lampeggia. Sul display LCD
appare „TZ“ (ingl. Time Zone).
3. Premere il tasto Î 1 volta e impostare ad esempio -1 per Inghilterra, oppure premere 7 volte il tasto Ï
e impostare per esempio +7 per Hong Kong.
4. Premere il tasto WAVE (14) per confermare.
Impostazione dell'orario di sveglia
L'apparecchio consente di impostare 2 orari di sveglia differenti.
1. Tenere premuto il tasto ALARM (7) fino a quando l'orario lampeggia e sul display LCD appare „A1“ per
indicare l'orario di sveglia 1.
2. Con i tasti Ï (5) o Î (13) impostare le ore e confermare con il tasto ALARM .
3. La visualizzazione passa ai minuti.
4. Impostare i minuti secondo le stesse modalità e confermare con il tasto ALARM.
5. Con il tasto Ï si attiva l'orario di sveglia e sul display LCD è quindi visualizzato il simbolo sveglia
(10) per il primo orario di sveglia. Premendo di nuovo il tasto Ï, l'orario di sveglia scompare e il simbolo
sveglia si spegne.
14
6.
7.
8.
Sul display LCD lampeggia di nuovo l'orario e „A2“ per indicare il secondo orario di sveglia. Se occorre,
procedere all'immissione del secondo orario di sveglia. Con il tasto Ï si attiva l'orario di sveglia. Il
per il secondo orario di sveglia scompare dal display LCD. Procedere secondo la
simbolo sveglia
procedura già indicata per il primo orario di sveglia.
Premere altrimenti il tasto ALARM tante volte fino a quando si ottiene di nuovo la visualizzazione
dell'orario attuale.
Una volta raggiunto l'orario di sveglia impostato si avverte un segnale acustico, inizialmente lento e
quindi più veloce man mano che trascorre più tempo. Premere un tasto a piacere per disattivare il
segnale di sveglia, o premere il tasto SNOOZE/LIGHT (8) per attivare la funzione snooze (vedi la
sezione Funzione snooze).
Richiamo dell'orario di sveglia
Premere il tasto ALARM per visualizzare gli orari di sveglia impostati. Sul display LCD è visualizzato „A1“ e
l'orario di sveglia impostato. Premere il tasto Ï per attivare o disattivare l'orario di sveglia. Premere di nuovo
il tasto ALARM per visualizzare l'orario di sveglia 2. Sul display LCD è visualizzato „A2“ e l'orario di sveglia
impostato. Premere il tasto ALARM per tornare indietro alla modalità di visualizzazione.
Funzione snooze
Non appena si inserisce il segnale acustico di sveglia, premere il tasto SNOOZE/LIGHT (8). Il segnale di
sveglia si spegne per riprendere quindi di nuovo dopo 5 minuti. Premere quindi un tasto a piacere per
disattivare la funzione snooze.
Illuminazione
Premere il tasto SNOOZE/LIGHT (8) per attivare l'illuminazione del display. L'illuminazione del display si
spegne dopo ca. 5 secondi.
Termometro
Il termometro indica la temperatura in gradi ºC (Celsius) o ºF (Fahrenheit).
Premere il tasto Î (13) per passare da ºC a ºF e viceversa.
Orario estivo
In caso l'apparecchio si trovi entro il raggio di ricezione di un segnale radio DCF e il segnale dell'orario estivo,
sul display appare il simbolo relativo all'orario estivo , a sinistra accanto all'indicazione delle ore.
Sostituzione della pila
La pila va sostituita non appena sul display LCD viene visualizzato il simbolo indicante lo stato di carica della
o in caso di una scarsa intensità di visualizzazione sul display LCD. Per sostituire la pila,
pila
procedere come descritto nella sezione Inserimento delle pile.
Pulizia
Pulire le superfici dell'apparecchio con un panno morbido e antipelucchi. Non utilizzare detergenti o solventi.
Specifiche tecniche
Alimentazione:
Indicazione orario:
Unità di tempo:
Sincronizzazione orario:
1 pila da 1,5 V, tipo AAA / LR03
12 / 24 ore
1 secondo
1 volta al giorno (notte)
Con riserva di modifiche tecniche!
15
Dichiarazione di conformità
Questo apparecchio è conforme alla Direttiva UE. Per la dichiarazione di conformità
completa è possibile usufruire del servizio gratuito di download dal nostro sito Internet
www.dexford.com.
Smaltimento
Procedere allo smaltimento dell'apparecchio esaurito consegnandolo presso
uno dei punti di raccolta istituiti dalla propria società di smaltimento rifiuti
comunale (ad es. centro di riciclo materiali). Secondo quanto previsto dalla
legge sugli apparecchi elettrici ed elettronici, i proprietari di apparecchi
esauriti sono tenuti alla consegna di tutti gli apparecchi elettrici ed elettronici
presso un centro di rilievo rifiuti in raccolta differenziata. Il simbolo riportato
qui a lato indica che non è assolutamente consentito smaltire l'apparecchio
assieme ai normali rifiuti domestici! Accumulatori e pile possono provocare
danni alla salute e all'ambiente! Non aprire, danneggiare, ingerire o
disperdere nell'ambiente batterie ricaricabili e pile. Queste possono
contenere metalli pesanti nocivi e dannosi per l'ambiente. Per legge sussiste
l'obbligo di consegnare batterie ricaricabili e pile presso i rivenditori di pile
utilizzando gli appositi contenitori di raccolta e provvedendo in tal modo al
corretto smaltimento. Lo smaltimento è gratuito. I simboli indicano che non è
assolutamente consentito gettare batterie ricaricabili e pile nei rifiuti domestici,
consegnandoli invece ai fini dello smaltimento nei rispettivi punti di raccolta.
Smaltire confezioni ed imballaggi in base a quanto indicato dalle norme in vigore a livello locale.
Garanzia
Gli apparecchi DEXFORD sono costruiti e collaudati in osservanza dei processi di produzione più moderni.
L'impiego di materiali selezionati e tecnologie altamente sviluppate sono garanti di una perfetta funzionalità e
lunga durata in vita. La garanzia non si estende a pile, batterie ricaricabili o accumulatori utilizzati all'interno
degli apparecchi. Il periodo di garanzia ricopre 24 mesi a partire dalla data di acquisto. Entro il periodo di
garanzia si procederà all'eliminazione gratuita di tutti i guasti dovuti a difetti di materiale o produzione. Il diritto
di garanzia cessa in caso di interventi da parte dell'acquirente o di terzi. Danni derivanti da un impiego o
esercizio non conforme agli usi previsti, a naturale usura, a errato montaggio o errata conservazione, a
collegamento o installazione impropri, dovuti a forza maggiore o ad altri influssi esterni non sono coperti da
garanzia. In qualità di produttore ci riserviamo il diritto, in caso di reclami, di riparare o sostituire le parti
difettose o di rimpiazzare l'apparecchio. Parti o apparecchi sostituiti passano di nostra proprietà. Sono esclusi
diritti di risarcimento per danni qualora non siano dovuti a intenzione o colpa grave del costruttore. Nel caso
in cui il presente apparecchio dovesse ciò nonostante presentare un difetto durante il periodo di garanzia,
vogliate rivolgervi esclusivamente al negozio di rivendita dell'apparecchio DEXFORD assieme al relativo
scontrino di acquisto.
In base alle presenti disposizioni, tutti i diritti di garanzia dovranno essere fatti valere esclusivamente nei
confronti del rivenditore autorizzato. Decorso il termine di due anni dalla data di acquisto e consegna dei
nostri prodotti non sarà più possibile fare valere alcun diritto di garanzia.
Linea di assistenza tecnica
In caso di problemi tecnici è possibile rivolgersi alla nostra linea di assistenza tecnica chiamando al numero
0900 00 1675 valido per la Svizzera (spese da rete Swisscom alla data di stampa: CHF 2.60/min).
16
Introduction
This device serves as a radio controlled clock with alarm function and temperature display. Its compact size
means it can easily be taken on journeys and the time zone function enables quick adjustment to new time
zones.
Safety information
1.
2.
3.
4.
5.
6.
7.
8.
9.
10.
11.
12.
13.
14.
15.
16.
17.
18.
19.
20.
21.
Read this operating manual thoroughly before putting the clock into operation.
If the device is transferred to others, this operating manual must be handed over with it.
The device complies with all technical standards and applicable safety requirements for electrical
devices.
The manufacturer is not deemed liable for damage resulting from improper use or failure to observe
information in this manual.
Keep the device out of reach of children.
Children and persons who lack knowledge or experience of handling such devices or who have
restricted physical, sensory or mental capabilities must not use the device without supervision or
instruction from persons responsible for their safety.
Children must be supervised to ensure they do not play with the device.
The device may only be used in temperate climate zones; avoid tropical and extremely damp climates.
NEVER IMMERSE THE DEVICE IN WATER. RISK OF ELECTRIC SHOCK!
The device must never be used near a bathtub or shower or a sink filled with water.
If the device should fall into water, have it checked by a specialist before putting it into operation again.
Protect the device from contact with any liquids, including spray and moist conditions. Pay particular
attention that no liquids enter into the openings in the device.
Do not expose the device to direct sunlight. Do not use the device directly beside sources of heat, such
as an oven or cooking range.
Do not place objects with an open flame, e.g. candles, in the direct vicinity of the device.
Do not place objects filled with water, e.g. vases, in the direct vicinity of the device.
Do not expose batteries to extreme heat, such as direct sunlight, fire, etc.
Please dispose of used batteries ecologically and according to applicable legal regulations.
Do not use the device if it is damaged. To prevent risks, defective components may only be replaced by
the manufacturer, their service personnel or similarly authorised persons.
Do not open the device. Never attempt to repair the device yourself. Repairs may only be completed by
persons with the necessary skills.
Do not cover the sensor opening (17) on the rear side of the device.
Do not let the device fall, do not allow any liquids or objects to get into the inside of the device.
Risk of suffocation! Keep all packaging material out of reach of children.
Notes on batteries
•
•
•
•
•
Only use batteries of the highest quality. Batteries of an inferior quality could cause equipment damage
through leaking.
If batteries should leak, clean the battery compartment with a cloth and dispose of it according to the
legal requirements. Avoid battery acid coming into contact with the skin and eyes. If battery acid does
come into contact with the eyes, rinse them thoroughly with lots of water and seek medical attention
immediately. If battery acid comes into contact with the skin, wash the area thoroughly with soap and
water.
If the device will remain out of operation for a longer period, remove the battery because the device
could be damaged should the battery leak. Change the battery when the power deteriorates.
Batteries are very dangerous if swallowed. Keep batteries and the device out of reach of children. If
batteries are swallowed, seek medical attention immediately.
Batteries must not be recharged, reactivated or disassembled by any means, thrown into a fire or short
circuited.
17
Operating elements
1.
2.
3.
4.
5.
6.
7.
8.
9.
TEMP display (temperature)
Hour display
DATE display
MONTH display
Ï button
SET button
ALARM button
SNOOZE/LIGHT button
Second display
10.
11.
12.
13.
14.
15.
16.
17.
18.
Alarm icon
Minute display
DAY display (weekday, abbreviated)
Î button
WAVE button
RESET button
Battery compartment
Sensor opening
Base
Automatic time synchronisation
The transmitter for the DCF radio signal in Germany is near Frankfurt and also reaches other European
countries. Further information on the DCF radio signal is available in Internet.
• After inserting the battery, the device automatically scans for the DCF radio signal to complete
synchronisation of the time. The radio signal icon flashes, thus indicating that scanning for the signal
has started. When the radio signal icon is displayed continually, the DCF radio signal has been received.
• To ensure that time deviations are kept as small as possible, a daily time synchronisation occurs at night
at 2:00 a.m. If this synchronisation is unsuccessful (the radio signal icon disappears from the LC
display), 4 further attempts are made at the top of the next hours. A time synchronisation once a day
normally suffices to keep the time accurate to the second.
• Press the WAVE button (14) to start the time synchronisation manually. Press the WAVE button again to
interrupt time synchronisation. If no signal is received within 7 minutes, signal scanning stops (the radio
signal icon disappears) and restarts at the top of the next hour.
• Since there is less atmospheric disturbance at night, signal reception should be possible during the
night.
• Signal reception is weaker in buildings with cement walls, e.g. office buildings or basements. If no signal
is received in such cases, position the device in the vicinity of a window.
Inserting the battery
Open the battery compartment (16) on the rear side of the device and insert a 1.5 V battery, type AAA/LR03
(not supplied with the device). Pay attention to correct polarity (+ / -) as indicated in the battery compartment.
After inserting the battery, an acoustic signal is issued and the radio signal icon appears in the LC display
above the Alarm icon (10) at the top right. Close the battery compartment. The device then automatically
attempts to receive the DCF radio signal in order to display the time. If no signal is received, set the time
manually.
18
Setting the time
The device can display the time in 12 or 24-hour format. When the 12-hour format is selected, "AM"
(morning) or "PM" (afternoon) appears beside the time display.
1.
2.
3.
Press and hold the SET button (6) until the year display flashes. Use the button Ï (5) or Î (13) to set
the year. Press the Ï button to increase the year by one. Press the Î button to reduce the year by
one. Press the SET button to confirm the setting.
The MONTH (4) indicator then flashes. Use the Ï or Î button to set the month in the same way and
confirm the setting by pressing the SET button.
Proceed in exactly the same way for the other settings. Setting the time zone is described in Section
Setting the time zone. Therefore, press the SET button first to skip to the next point (Hour). The
sequence of time and date settings is as follows:
Year → Month → Day → Language → Weekday (abbreviated)
→ 12/24 Hr (12/24-hour format) → Time zone → Hour → Minute
Note:
• The following language settings are available for the weekday: German, English, French, Danish, Dutch,
Italian and Spanish.
• If there is no input for a period of 30 seconds while making a setting, the LC display automatically
switches from Setting mode to Display mode. The entries made to that point are discarded.
• If you press and hold the Ï or Î button when in Setting mode, the corresponding menu options are run
through the display quickly.
• The device can be reset by pressing the RESET button (15). All the settings made are reset to their
default status. The device then scans for the DCF radio signal.
Setting the time zone
If you are not in Germany and want to adjust the clock to the time zone you are currently in or you simply
want to display the time from another country, you can use this function to set the time difference from the
DCF radio signal transmitted in Germany (German time).
1. Press and hold the SET button until the year flashes.
2. Press the SET button 5 times until the time zone setting flashes. "TZ" (Time Zone) appears in the LC
display.
3. Press the Î button once to set the difference, e.g. -1 (hour) for England, or the Ï button 7 times (+7
hours) for Hong Kong.
4. Press the WAVE button (14) to confirm the setting.
Setting the alarm time
You can set two alarm times on the device.
1. Press and hold the ALARM button (7) until the time flashes and "A1" appears in the LC display for
alarm time 1.
2. Use the buttons Ï (5) and Î (13) to set the hour and confirm it by pressing the ALARM button.
3. The display switches to the minute display.
4. Set the minute in the same way as the hour and confirm by pressing the ALARM button.
5. Use the Ï button to activate the alarm time and the alarm icon (10) appears in the display for the
first alarm time. Press the Ï button again to deactivate the alarm time and the alarm icon
disappears from the display.
6. The time and "A2" for the second alarm time flash in the display. If so required, set a second alarm
time. Press the Ï button to activate the alarm time. The alarm icon
for the second alarm time
appears in the LC display. Proceed in the same way as for the first alarm time.
7. Otherwise, press the ALARM button as often as necessary until the current time reappears in the
display.
8. A beep tone is issued at the alarm time set which starts slowly then sounds at increasingly shorter
intervals. Press any button to deactivate the alarm signal or the SNOOZE/LIGHT button (8) to activate
the Snooze function (refer to Section Snooze function).
19
Displaying the alarm time
Press the ALARM button to display the alarm times set. "A1" appears in the display together with the set
alarm time. Press the Ï button to activate or deactivate the alarm time. Press the ALARM button again to
display the 2nd alarm time set. "A2" appears in the display together with the set alarm time. Press the
ALARM button to return to the standard display.
Snooze function
When the acoustic alarm signal is sounded, press the SNOOZE/LIGHT button (8). The acoustic alarm signal
is switched off and starts again after 5 minutes. Press any button to deactivate the Snooze function.
Back-lighting
Press the SNOOZE/LIGHT button (8) to switch on the back-lighting. The back-lighting goes out after
approx. 5 seconds.
Thermometer
The thermometer indicates the temperature in ºC (Celsius) or ºF (Fahrenheit).
Press the Î button (13) to switch between ºC and ºF.
Summer time
When the device is within range of a DCF radio signal and receives the summer time, the summer time
icon appears to the left of the hour display.
Changing the battery
The battery must be changed when the battery status indicator
in the LC display appears or the LC
display quality becomes weaker. To change the battery, proceed in exactly the same way as described in
Section Inserting the battery.
Cleaning
Clean the housing surfaces with a soft, fluff-free cloth. Do not use any cleaning agents or solvents.
Technical Data
Power supply:
Time display:
Time unit:
Time synchronisation:
1 x 1.5 V battery, type AAA / LR03
12/ 24-hour format
1 second
1 x daily (at night)
Specifications subject to change without notice!
20
Declaration of Conformity
This device fulfils the requirements stipulated in the EU directive. To view the complete
Declaration of Conformity, please refer to the free download available on our web site at
www.dexford.com.
Disposal
In order to dispose of your device, take it to a collection point provided by your
local public waste authorities (e.g. recycling centre). According to laws on the
disposal of electronic and electrical devices, owners are obliged to dispose of
old electronic and electrical devices in a separate waste container. The
adjacent symbol indicates that the device must not be disposed of in normal
domestic waste! Risks to health and the environment from batteries! Never
open, damage or swallow batteries or allow them to pollute the environment.
They could contain toxic and ecologically harmful heavy metals. You are
legally obliged to dispose of power packs and batteries at the point of sale or
in the corresponding containers provided at collection points by local public
waste authorities. Disposal is free of charge. The above symbols indicate that
the batteries must not be disposed of in domestic waste and that they must
be disposed of at an authorised collection point.
Packaging materials must be disposed of according to local regulations.
Guarantee
DEXFORD equipment is produced and tested according to the latest production methods. The
implementation of carefully chosen materials and highly developed technologies ensure trouble-free
functioning and a long service life. The terms of guarantee do not apply to the batteries or power packs used
in the products. The period of guarantee is 24 months from the date of purchase. All deficiencies related to
material or manufacturing errors within the period of guarantee will be redressed free of charge. Rights to
claims under the terms of guarantee are annulled following tampering by the purchaser or third parties.
Damage caused as the result of improper handling or operation, normal wear and tear, incorrect positioning
or storage, improper connection or installation or Acts of God and other external influences are excluded from
the terms of guarantee. In the case of complaints, we reserve the right to repair defect parts, replace them or
replace the entire device. Replaced parts or devices become our property. Rights to compensation in the
case of damage are excluded where there is no evidence of intent or gross negligence by the manufacturer.
If your device does show signs of a defect within the period of guarantee, please contact the sales outlet
where you purchased the DEXFORD device, producing the purchase receipt as evidence.
All claims under the terms of guarantee in accordance with this agreement can only be asserted at the sales
outlet. No claims under the terms of guarantee can be asserted after a period of two years from the date of
purchase and hand-over of the product.
Hotline
In the case of technical problems, you can contact our hotline service, Tel. 0900 00 1675 within Switzerland
(Swisscom fees at time of going to print: CHF 2.60/min).
21
© Copyright 2026 Paperzz