「InteractionBox」を使う
ここでは、「Leap Motion」の「座標を変換する方法」について解説し
「指がウィンドウのどの位置にいるか」ということを知ることができま
す。
これを使ったプログラムは「4-2
お絵かきツールを作成する」で解
説しています。
ます。
*
変換された位置の動きを見る
「Leap Motion V1」では、いくつかの座標変換の方法がありましたが、
「Leap Motion V2」では「InteractionBox」の変換のみとなっています
「InteractionBox」がどのように動作するのか見てみましょう。
※より正確には、「インターセクション・ポイント」(Intersection Poi
nt)および「プロジェクション・ポイント」(Projection Point)V1.2
から非推奨となりました。
■ プログラム
全体のコードは「InteractionBox01」にあります。
「InteractionBox」を模した枠の中を、指の位置を表わした球が動き
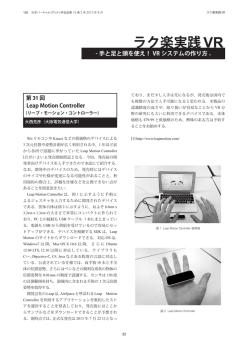
「InteractionBox」のイメージは、次の図です。
「InteractionBox」のイメージ
ます。
このプログラムの実行結果
「Leap Motion」の逆ピラミッドの中に直方体の検出環境を作ります。
この直方体の左下奥を(0,0,0)として、「0」から「1」までの範囲で値が
変化します。
たとえば、この値にウィンドウの「幅」や「高さ」を掛けることで、
2
● update()
フレームの更新と各座標の取得を行ないます。
「InteractionBox」からは、「中心の座標」と「幅」「高さ」「奥
行き」がそれぞれ取得(単位はすべて mm(ミリメートル))できるので、
計算して、「左右」「上下」「前後」の位置を求めます。 void update() { // フレームの更新 mLastFrame = mCurrentFrame; ● renderFrameParameter()
mCurrentFrame = mLeap.frame(); 「幅」「高さ」「奥行き」の値を表示します。 void renderFrameParameter() iBox = mCurrentFrame.interactionBox(); { … mLeft = iBox.center().x ‐ (iBox.width() / 2); mRight = iBox.center().x + (iBox.width() / 2); ss << "Width :" << iBox.width() << "mm" << "¥n"; mTop = iBox.center().y + (iBox.height() / 2); ss << "Height:" << iBox.height() << "mm" << "¥n"; mBaottom = iBox.center().y ‐ (iBox.height() / 2); ss << "Depth :" << iBox.depth() << "mm" << "¥n"; mBackSide = iBox.center().z ‐ (iBox.depth() / 2); ss << "Center:" << iBox.center() << "¥n"; mFrontSide = iBox.center().z + (iBox.depth() / 2); … renderFrameParameter(); } } ● drawLeapObject()
「drawInteractionBoxFrame()」で「InteractionBox」の枠を描
画し、「drawFingerPoint()」で「InteractionBox」内の指の位置を
描画します。
3
4
void drawLeapObject() gl::drawLine( Vec3f( mLeft, mTop, mFrontSide ), { Vec3f( mLeft, mTop, mBackSide ) ); … // 下面 // 表示処理 gl::drawLine( Vec3f( mLeft, mBaottom, mBackSide ), drawInteractionBoxFrame(); Vec3f( mRight, mBaottom, mBackSide ) ); drawFingerPoint(); gl::drawLine( Vec3f( mRight, mBaottom, mBackSide ), … Vec3f( mRight, mBaottom, mFrontSide ) ); } gl::drawLine( Vec3f( mRight, mBaottom, mFrontSide ), ● drawInteractionBoxFrame()
Vec3f( mLeft, mBaottom, mFrontSide ) ); 「update()」で求めた頂点の座標から、
「InteractionBox」の枠を描画
します。
gl::drawLine( Vec3f( mLeft, mBaottom, mFrontSide ), void drawInteractionBoxFrame() Vec3f( mLeft, mBaottom, mBackSide ) ); { // 中心点 // 側面 //gl::drawSphere( toVec3f( iBox.center() ), 5 ); gl::drawLine( Vec3f( mLeft, mTop, mFrontSide ), Vec3f( mLeft, mBaottom, mFrontSide ) ); // 上面 gl::drawLine( Vec3f( mLeft, mTop, mBackSide ), gl::drawLine( Vec3f( mLeft, mTop, mBackSide ), Vec3f( mRight, mTop, mBackSide ) ); Vec3f( mLeft, mBaottom, mBackSide ) ); gl::drawLine( Vec3f( mRight, mTop, mBackSide ), gl::drawLine( Vec3f( mRight, mTop, mFrontSide ), Vec3f( mRight, mTop, mFrontSide ) ); Vec3f( mRight, mBaottom, mFrontSide ) ); gl::drawLine( Vec3f( mRight, mTop, mFrontSide ), gl::drawLine( Vec3f( mRight, mTop, mBackSide ), Vec3f( mLeft, mTop, mFrontSide ) ); Vec3f( mRight, mBaottom, mBackSide ) ); } 5
6
● drawFingerPoint()
「人差し指」の座標を描画します。
void drawFingerPoint() 2 次元の位置座標として利用する
「InteractionBox」で変換された位置割合のうち、「X,Y」を使うこと
{ で、2 次元の位置座標として利用することができます。
// 人差し指を取得する Leap::Finger finger = mLeap.frame() .fingers() .fingerType( Leap::Finger::Type::TYPE_
INDEX )[0]; if ( !finger.isValid() ) { return; } Leap::Vector normalizedPosition = iBox.normalizePoint( finger.tipPosition() ); // 位置の割合から実際の座標を計算 // 原点を左下奥にする auto x = (normalizedPosition.x * iBox.width()) + mLeft; auto y = (normalizedPosition.y * iBox.height()) + mBaottom; ■ プログラム
auto z = (normalizedPosition.z * iBox.depth()) + mBackSide; それではコードを見てみましょう。
gl::drawSphere( Vec3f( x, y, z ), 5 ); 全体のコードは「InteractionBox02」にあります。
} 現在のフレームで検出された指から、「人差し指」を取得します。
その指が有効であれば、指先の座標を「InteractionBox」の位置に変
換します。
変換された「X,Y,Z」の位置に「幅」
「高さ」
「奥行き」の値を掛け、原
点(左下奥)中心にすることとで、「InteractionBox」の座標になります。
7
8
できます。 ● draw()
変換したい座標を「Leap::InteractionBox::normalizePoint
()」に指定します。 「normalizePoint()」で返される座標系は「InteractionBox」の左
下奥が原点となり、それぞれ右、上、手前方向に「0」から「1」の
範囲の InteractionBox の位置の割合で変化します。 ここでは、あらかじめ取得した人差し指の座標を変換しています。 「InteractionBox」の座標に変換します。
// 人差し指を取得する Leap::Finger finger = mLeap.frame() .fingers() .fingerType( Leap::Finger::Type::TYPE_IN
DEX )[0]; if ( !finger.isValid() ) { 「normalizePoint()」で返される座標系
return; } これを、スクリーン(ウィンドウ)の座標に変換します。
// InteractionBoxの座標に変換する Leap::InteractionBox iBox = mLeap.frame().interactionBox(); // ウィンドウの座標に変換する Leap::Vector normalizedPosition = float x = normalizedPosition.x * WindowWidth; iBox.normalizePoint( finger.stabilizedTipPosition
float y = WindowHeight ‐ (normalizedPosition.y * WindowHeight); () ); 「X 座標」はそのままウィンドウサイズを掛ければよいのですが、「Y
「InteractionBox」は、
「Leap::Frame::interactionBox()」で取得
9
座標」は「InteractionBox の原点が下」「ウィンドウの原点が上」
10
なので、上下を反転しています。
位置が緑色で表わされます。
ホバー状態
タッチと判定されると、指の位置が赤くなります。
これで指の位置をスクリーン(ウィンドウ)の位置に合わせることがで
きました。
タッチ状態を判定する
ここまでで「Leap Motion」の座標とスクリーン(ウィンドウ)の座標を
結び付けることができました。
ここにタッチスクリーンでのタッチ状態を模擬した判定を加えること
で、非接触のタッチスクリーンを実現できます。
「Leap Motion SDK」では、タッチの判定を API としてもっており、そ
タッチ状態
れを利用することで簡単に実装できます。
先のプログラムにタッチの判定を追加することで、次のように動作し
非接触のインターフェイスでは、操作しようとしている位置(ここでは
指)がわかりづらいことが難点です。
ます。
ホバー状態(指を検出しているがタッチはしていない状態)では、指の
ホバー状態を明確に判定することで、これからタッチしようとしてい
る位置をユーザーに知らせることができ、より使いやすい操作体系を提
11
12
供できます。
gl::drawSolidCircle( Vec2f( x, y ), 20 ); ■ プログラム
それではコードを見てみましょう。
… 全体のコードは「InteractionBox03」にあります。
} ほとんどのコードは「InteractionBox02」であり、タッチの判定コー
ドのみ追加しています。
指の位置を描画する前に、タッチ状態によって色を変えています。
void draw() タッチの状態は、「Leap::Pointable::Zone 列挙体」で定義され、
「Leap::Pointable::touchZone()」で取得できます。
{ … 「Leap::Pointable::Zone 列挙体」には、次の値があります。 値
// ウィンドウの座標に変換する 意
味
float x = normalizedPosition.x * WindowWidth; ZONE_NONE タッチでもホバーでもない float y = WindowHeight ‐ (normalizedPosition.y * WindowHeight); ZONE_HOVERING ホバーしている ZONE_TOUCHING タッチしている // ホバー状態 if ( finger.touchZone() == Leap::Pointable::Zone::ZONE_HOVERING
) { また、タッチ状態の度合い(タッチの深さ)を取得することもでき
ます。 gl::color(0, 1, 0, 1 ‐ finger.touchDistance()); この値は「Leap::Pointable::touchDistance()」で取得できます。
} 「タッチの状態」(touchZone()の値)と「タッチの度合い」(touchDi
// タッチ状態 stance()の値)の関係は次のようになります。
else if( finger.touchZone() == Leap::Pointable::Zone::ZONE_TOUC
HING ) { gl::color(1, 0, 0, ‐finger.touchDistance()); } // タッチ対象外 else { 「Leap Motion」でタッチを判定する
gl::color(0, 0, 1, .05); } 13
14
© Copyright 2026 Paperzz