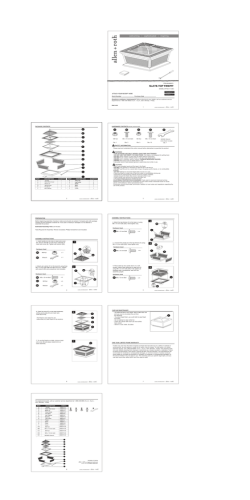
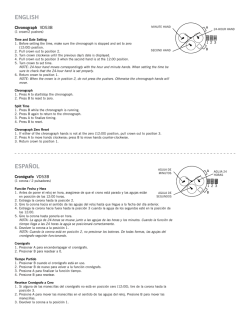
ITEM #0493712 10 FT X 12 FT EASY UP GAZEBO allen + roth® is a registered trademark of LF, LLC. All Rights Reserved. MODEL #L-GZ472PST-I Français p. 10 Español p. 19 ATTACH YOUR RECEIPT HERE Serial Number Purchase Date Questions, problems, missing parts? Before returning to your retailer, call our customer service department at 1-866-439-9800, 8 a.m. - 8 p.m., EST, Monday - Friday. EB13939 Lowes.com/allenandroth 1 PACKAGE CONTENTS A F G B H C I J K L D M N O E PART A B C D E F G H I J K L M N O P DESCRIPTION Pole Long Crossbeam Short Crossbeam Middle Bar Connector Corner Bar Connector Long Corner Bar Short Corner Bar Long Middle Bar Short Middle Bar Top Connector Finial Hook Small Canopy Large Canopy Mosquito Netting Curtain QUANTITY 4 2 2 4 4 4 4 2 2 1 1 1 1 1 1 1 Lowes.com/allenandroth 2 P HARDWARE CONTENTS (not shown actual size) BB AA Bolt Qty. 16 Stake Qty. 16 SAFETY INFORMATION Please read and understand this entire manual before attempting to assemble or install the product. lightning. WARNING liable for any loss of the product or other items due to the failure to take down the item during any inclement weather. PREPARATION Before beginning assembly of product, make sure all parts are present. Compare parts with package contents list and hardware contents list. If any part is missing or damaged, do not attempt to assemble the product. Estimated Assembly Time: 30 minutes No Tools Required for Assembly. Lowes.com/allenandroth 3 ASSEMBLY INSTRUCTIONS 1. Unfold the long crossbeams (B) and insert them into the slots on poles (A). Secure with bolts (BB). 1 Repeat step for the short crossbeams (C), creating the frame of the item. A Bolt C C B Hardware Used BB BB B A x8 2. Insert the corner bar connectors (E) into poles (A), and secure with bolts (BB). 2 E Hardware Used C B BB Bolt x4 BB A 3. Insert middle bar connector (D) into long crossbeams (B) and short crossbeams (C), securing with bolts (BB). 3 D B Hardware Used C BB Bolt x4 BB Lowes.com/allenandroth 4 ASSEMBLY INSTRUCTIONS 4. Insert long corner bars (F) on the short corner bars (G). 4 F G 5. Slide the short corner bars (G) into corner bar connectors (E). 5 6. Attach the hook (L) to top connector (J), then insert the long corner bars (F) into top connector (J). 6 E G J L F Lowes.com/allenandroth 5 F ASSEMBLY INSTRUCTIONS 7. Slide long middle bars (H) and short middle bars (I) into middle bar connectors (D). 7 H D C Note: The short middle bars (I) should be connected to the middle bar connectors (D) installed on long crossbeam (B). The long middle bars (H) should be connected to the middle bar connectors (D) installed on short crossbeam (C). D I B 8. Insert long middle bars (H) and short middle bars (I) into top connector (J). 8 J I H H 9. Attach large canopy (N) to the roof along the short corner bars (G), aligning the corners and stretching it to 9 I N G Lowes.com/allenandroth 6 ASSEMBLY INSTRUCTIONS 10. Attach small canopy (M) to the top along the long corner bars (F), then attach finial (K) to the top. Align the corners and stretch small canopy (M) on top of the long corner bars (F) to secure, then fasten the ties on both canopies. 10 F F N M N F 11. Use the preassembled plastic rings on the mosquito netting (O) and curtain (P) to hang the mosquito netting (O) and curtain (P) onto the short crossbeams (C) and long crossbeams (B). NOTE: The mosquito netting (O) installs around the inside poles (A). Be mindful of the dimensions of the item to ensure you install the mosquito netting (O) and curtain (P) correctly. 11 P O 12. Secure the item to the ground using stakes (AA). 12 Hardware Used AA A Stake AA AA AA AA Lowes.com/allenandroth 7 CARE AND MAINTENANCE 7KLV LWHP LV LQWHQGHG IRU GHFRUDWLYH DQG VXQVKDGH SXUSRVHV RQO\ DQG LV QRW GHVLJQHG WR withstand inclement weather, including high winds, rain, and snow. In order to avoid damage in such instances, remove any accumulated water and the roof immediately. Disassemble the item in the reverse order of the assembly steps. $OZD\V GLVDVVHPEOH WKH LWHP FRPSOHWHO\ $ SDUWLDOO\ GLVDVVHPEOHG LWHP LV QRW VWDEOH HQRXJK WR UHVLVW wind and inclement weather, and therefore can be damaged and/or cause damage. 'R QRW XVH EOHDFK DFLG RU RWKHU DEUDVLYH FOHDQHUV RQ WKH URRI RU IUDPH SDUWV 6WHHO FRPSRQHQWV RI JDUGHQ DFFHVVRULHV DQG IXUQLWXUH DUH WUHDWHG ZLWK UXVW LQKLELWLQJ SDLQW +RZHYHU GXH WR WKH QDWXUH RI VWHHO VXUIDFH R[LGDWLRQ UXVWLQJ ZLOO RFFXU LI WKLV SURWHFWLYH FRDWLQJ is scratched. This is a natural process. To minimize this condition, it is recommended that care be taken when assembling and handling the product, in order to prevent the paint from being scratched. 6XUIDFH UXVW FDQ EH UHPRYHG HDVLO\ XVLQJ D YHU\ OLJKW DSSOLFDWLRQ RI FRPPRQ FRRNLQJ RLO ,I VXUIDFH R[LGDWLRQ UXVWLQJ RFFXUV DQG QR PHDVXUHV DUH WDNHQ WR FRUUHFW LW WKH R[LGDWLRQ PD\ VWDUW GULSSLQJ RQWR WKH DVVHPEO\ VXUIDFH ZKLFK PD\ FDXVH GDPDJLQJ VWDLQV WKDW PD\ EH GLI¿FXOW WR UHPRYH ,I WKH SURGXFW ZLOO QRW EH XVHG IRU D ORQJ SHULRG HJ ZLQWHU WLPH LW VKRXOG EH VWRUHG LQ D FOHDQ GU\ environment. .HHS WKH RULJLQDO SDFNDJLQJ WR VWRUH WKH LWHP ONE-YEAR LIMITED WARRANTY 7KLV OLPLWHG ZDUUDQW\ LV H[WHQGHG WR WKH RULJLQDO SXUFKDVHU DQG DSSOLHV WR GHIHFWV LQ PDWHULDO DQG workmanship of your item provided the item is maintained with care and used only for personal, residential purposes. The manufacturer warranty for this item, is to be free of defects in material and workmanship for a period of one year. If any defect is found, please call our customer service department at 1-866-439-9800 for help. The manufacturer will not cover transportation or delivery costs or compensate the individual or any outside party for assembling or disassembling the product. This warranty gives you certain rights, and you may have other rights that vary from state to state. Lowes.com/allenandroth 8 REPLACEMENT PARTS LIST For replacement parts, call our customer service department at 1-866-439-9800, 8 a.m. - 8 p.m., EST, Monday - Friday. K G J E F I L B H D P C M BB A PART A B C D E F G H I J K L M N O P BB N O DESCRIPTION Pole Long Crossbeam Short Crossbeam Middle Bar Connector Corner Bar Connector Long Corner Bar Short Corner Bar Long Middle Bar Short Middle Bar Top Connector Finial Hook Small Canopy Large Canopy Mosquito Netting Curtains Bolt PART NUMBER #0493712-A1 #0493712-A2 #0493712- B1 #0493712-C #0493712-D #0493712-E #0493712-E1 #0493712-F #0493712-F1 #0493712-G #0493712-H #0493712-J #0493712-K #0493712-L #0493712-M #0493712-N #0493712-I Printed in China allen + roth® is a registered trademark of LF, LLC. All rights reserved. Lowes.com/allenandroth 9 XFMDPNJOHtTPQIJTUJDBUFEtJOTQJSJOH ARTICLE #0493712 PAVILLON DE JARDIN FACILE À MONTER DE 3,05 M X 3,66 M allen + roth® est une marque de commerce déposée de LF, LLC. Tous droits réservés. MODÈLE #L-GZ472PST-I JOIGNEZ VOTRE REÇU ICI Numéro de série Date d’achat Des questions, des problèmes, des pièces manquantes? Avant de retourner le produit au détaillant, appelez notre service à la clientèle au 1 866 439-9800, entre 8 h et 20 h (HNE), du lundi au vendredi. Lowes.com/allenandroth 10 CONTENU DE L’EMBALLAGE A F G B H C I J K L D M N O E PIÈCE A B C D E F G H I J K L M N O P DESCRIPTION Poteau Traverse longue Traverse courte Raccord de tige centrale Raccord de tige de coin Tige de coin longue Tige de coin courte Tige centrale longue Tige centrale courte Raccord du toit Embout Crochet Petit auvent Grand auvent Moustiquaire Rideau QUANTITÉ 4 2 2 4 4 4 4 2 2 1 1 1 1 1 1 1 Lowes.com/allenandroth 11 P QUINCAILLERIE INCLUSE (non illustrée à la grandeur réelle) BB AA Boulon Qté : 16 Piquet Qté : 16 CONSIGNES DE SÉCURITÉ Assurez-vous de lire et de comprendre l’intégralité de ce manuel avant de tenter d’assembler ou d’installer le produit. horizontal et plat. AVERTISSEMENT ou le détaillant n’est pas responsable de toute perte du produit ou d’autres produits si vous n’avez pas démonté le produit lors de toutes intempéries. PRÉPARATION Avant de commencer l’assemblage du produit, assurez-vous d’avoir toutes les pièces. Comparez le manquantes ou endommagées, ne tentez pas d’assembler le produit. Temps d’assemblage approximatif : 30 minutes. Aucun outil n’est nécessaire pour l’assemblage. Lowes.com/allenandroth 12 INSTRUCTIONS POUR L’ASSEMBLAGE 1. Dépliez les traverses longues (B) et insérez-les dans les fentes des poteaux (A). Fixez-les à l’aide de boulons (BB). 1 BB B Faites de même pour les traverses courtes (C) pour monter l’armature du produit. A C Quincaillerie utilisée BB Boulon C B x8 A 2. Insérez les raccords de tige de coin (E) dans les poteaux (A) et à l’aide des boulons (BB). 2 E Quincaillerie utilisée C B BB Boulon x4 BB A 3. Insérez un raccord de tige centrale (D) dans les traverses longues (B) et dans les traverses à l’aide des boulons (BB). courtes (C), puis 3 D Quincaillerie utilisée BB Boulon B C x4 BB Lowes.com/allenandroth 13 INSTRUCTIONS POUR L’ASSEMBLAGE 4. Insérez les tiges de coin longues (F) dans les tiges de coin courtes (G). 4 F G 5. Faites glisser les tiges de coin courtes (G) dans les raccords de tige de coin (E). 5 E G 6 puis insérez les tiges de coin longues (F) dans le raccord du toit (J). J L F Lowes.com/allenandroth 14 F INSTRUCTIONS POUR L’ASSEMBLAGE 7. Faites glisser les tiges centrales longues (H) et les tiges centrales courtes (I) dans les raccords de tige centrale (D). 7 H D C Remarque : Les tiges centrales courtes (I) devraient être raccordées aux raccords de tige centrale (D) installés sur la traverse longue (B). Les tiges centrales longues (H) devraient être raccordées aux raccords de tige centrale (D) installés sur la traverse courte (C). D I B 8. Insérez les tiges centrales longues (H) et les tiges centrales courtes (I) dans le raccord du toit (J). 8 J I H H 9. Fixez le grand auvent (N) au toit sur les tiges de coin courtes (G) en l’alignant avec les coins et en l’étirant pour qu’il s’ajuste. 9 I N G Lowes.com/allenandroth 15 INSTRUCTIONS POUR L’ASSEMBLAGE longues (F) en ensuite connectez le fleuron (K) à la cime. L’alignant avec les coins et en l’étirant En attachant les attaches des deux toiles. 10 F F N M N F 11 Remarque: Le moustiquaire (O) s'installe tout autour sur les tringles intérieures (A). Faites attention avec les dimensions de l’article pour vous assurer d’installer le moustiquaire (O) et les rideaux (P) correctement. P O 12 Quincaillerie utilisée AA Piquet AA AA AA AA Lowes.com/allenandroth 16 ENTRETIEN &H SURGXLW HVW FRQoX SRXU XQ XVDJH GpFRUDWLI HW SRXU OD SURWHFWLRQ VRODLUH VHXOHPHQW ,O Q¶HVW SDV FRQoX SRXU UpVLVWHU DX[ LQWHPSpULHV QRWDPPHQW OHV YHQWV YLROHQWV OD SOXLH HW OD QHLJH $¿Q GH prévenir les dommages causés par de telles intempéries, retirez immédiatement l’eau accumulée et le toit. Démontez le produit dans l’ordre inverse des étapes d’assemblage. 'pPRQWH] WRXMRXUV OH SURGXLW DX FRPSOHW 8Q SURGXLW GpPRQWp HQ SDUWLH Q¶HVW SDV DVVH] VROLGH SRXU UpVLVWHU DX YHQW HW DX[ LQWHPSpULHV LO SRXUUDLW V¶HQGRPPDJHU RX FDXVHU GHV GRPPDJHV 1¶XWLOLVH] SDV G¶DJHQW GH EODQFKLPHQW RX G¶DXWUHV QHWWR\DQWV DEUDVLIV VXU OH WRLW RX VXU OHV SLqFHV IRUPDQW O¶DUPDWXUH /HV SLqFHV HQ DFLHU LQR[\GDEOH GHV DFFHVVRLUHV GH MDUGLQ HW GHV PHXEOHV VRQW WUDLWpHV DYHF XQH SHLQWXUH DQWLURXLOOH 7RXWHIRLV HQ UDLVRQ GH OD QDWXUH GH O¶DFLHU XQH R[\GDWLRQ GH OD VXUIDFH URXLOOH SHXW VH SURGXLUH VL FHWWH FRXFKH SURWHFWULFH HVW pJUDWLJQpH &¶HVW XQ SURFHVVXV QDWXUHO $¿Q GH PLQLPLVHU FHWWH VLWXDWLRQ QRXV YRXV UHFRPPDQGRQV G¶rWUH SUXGHQW ORUV GH O¶DVVHPEODJH HW GH OD PDQLSXODWLRQ GX SURGXLW D¿Q G¶pYLWHU TXH OD SHLQWXUH QH V¶pJUDWLJQH 2Q SHXW IDFLOHPHQW HQOHYHU OD URXLOOH VXU OD VXUIDFH HQ DSSOLTXDQW XQ SHX G¶KXLOH GH FXLVVRQ 6L XQH R[\GDWLRQ URXLOOH GH OD VXUIDFH VH SURGXLW HW TX¶DXFXQH PHVXUH Q¶HVW SULVH D¿Q GH FRUULJHU OD VLWXDWLRQ O¶R[\GDWLRQ SHXW FRXOHU VXU O¶HQVHPEOH GH OD VXUIDFH FH TXL SHXW FDXVHU GHV WDFKHV GRPPDJHDEOHV TXL SRXUUDLHQW rWUH GLI¿FLOHV j HQOHYHU 6L YRXV QH SUpYR\H] SDV XWLOLVHU OH SURGXLW SRXU XQH ORQJXH SpULRGH SDU H[HPSOH HQ KLYHU LO GHYUDLW rWUH UDQJp GDQV XQ HQGURLW SURSUH HW VHF &RQVHUYH] O¶HPEDOODJH G¶RULJLQH SRXU UDQJHU OH SURGXLW GARANTIE LIMITÉE DE UN AN &HWWH JDUDQWLH OLPLWpH QH V¶DSSOLTXH TX¶j O¶DFKHWHXU LQLWLDO GX SURGXLW HW VH OLPLWH DX[ GpIDXWV GH PDWpULDX[ HW GH IDEULFDWLRQ ORUVTXH OH SURGXLW D pWp FRUUHFWHPHQW HQWUHWHQX HW TX¶LO D pWp XWLOLVp j GHV ¿QV SHUVRQQHOOHV HW UpVLGHQWLHOOHV /H IDEULFDQW JDUDQWLW FH SURGXLW FRQWUH OHV GpIDXWV GH PDWpULDX[ HW GH IDEULFDWLRQ SRXU XQH SpULRGH GH XQ DQ 6L YRXV UHPDUTXH] XQ GpIDXW YHXLOOH] WpOpSKRQHU j QRWUH VHUYLFH j OD FOLHQWqOH DX /H IDEULFDQW QH SDLHUD SDV OHV IUDLV GH WUDQVSRUW HW GH PDQXWHQWLRQ HW LO QH dédommagera pas l’acheteur ni aucun tiers pour l’assemblage ou le démontage du produit. &HWWH JDUDQWLH YRXV FRQIqUH GHV GURLWV SUpFLV ,O HVW SRVVLEOH TXH YRXV GLVSRVLH] pJDOHPHQW G¶DXWUHV droits, qui varient d’un État ou d’une province à l’autre. Lowes.com/allenandroth 17 LISTE DES PIÈCES DE RECHANGE Pour obtenir des pièces de rechange, veuillez communiquer avec notre service à la clientèle au 1 866 439-9800, entre 8 h et 20 h (HNE), du lundi au vendredi. K G J E F I L B H D P C M BB A PIÈCE A B C D E F G H I J K L M N O P BB N O DESCRIPTION Poteau Traverse longue Traverse courte Raccord de tige centrale Raccord de tige de coin Tige de coin longue Tige de coin courte Tige centrale longue Tige centrale courte Raccord du toit Embout Crochet Petit auvent Grand auvent Moustiquaire Rideaux Boulon NUMÉRO DE PIÈCE #0493712-A1 #0493712-A2 #0493712- B1 #0493712-C #0493712-D #0493712-E #0493712-E1 #0493712-F #0493712-F1 #0493712-G #0493712-H #0493712-J #0493712-K #0493712-L #0493712-M #0493712-N #0493712-I Imprimé en Chine allen + roth® est une marque de commerce déposée de LF, LLC. Tous droits réservés. Lowes.com/allenandroth 18 XFMDPNJOHtTPQIJTUJDBUFEtJOTQJSJOH ARTÍCULO # 0493712 allen + roth® es una marca registrada de LF, LLC. Todos los derechos reservados. GAZEBO DE ENSAMBLAJE FÁCIL DE 3,05 M X 3,66 M MODELO # L-GZ472PST-I ADJUNTE SU RECIBO AQUÍ Número de serie Fecha de compra ¿Preguntas, problemas, piezas faltantes? Antes de volver a la tienda, llame a nuestro Departamento de Servicio al Cliente al 1-866-439-9800, de lunes a viernes de 8 a.m. a 8 p.m., hora estándar del Este. Lowes.com/allenandroth 19 CONTENIDO DEL PAQUETE A F G B H C I J K L D M N O E PIEZA A B C D E F G H I J K L M N O P DESCRIPCIÓN Poste Viga transversal larga Viga transversal corta Conector de la barra central Conector de la barra de esquina Barra de esquina larga Barra de esquina corta Barra central larga Barra central corta Conector superior Remate Gancho Toldo pequeño Toldo grande Mosquitero Cortina CANTIDAD 4 2 2 4 4 4 4 2 2 1 1 1 1 1 1 1 Lowes.com/allenandroth 20 P ADITAMENTOS (no se muestran en tamaño real) BB AA Perno Cant. 16 Estaca Cant. 16 INFORMACIÓN DE SEGURIDAD la muerte. de los niños. ADVERTENCIA cuando el clima sea inclemente. PREPARACIÓN Tiempo estimado de ensamblaje: 30 minutos Lowes.com/allenandroth 21 INSTRUCCIONES DE ENSAMBLAJE 1. Despliegue las vigas transversales (B) e insértelas en las ranuras en los postes (A). Fije con pernos (BB). 1 BB B Repita el paso previo para las vigas transversales cortas (C), lo que creará la estructura del artículo. A C Aditamentos utilizados BB Perno x8 C B A 2. Inserte los conectores de la barra de esquina (E) en los postes (A) y asegure con pernos (BB). 2 E Aditamentos utilizados C B BB Perno x4 BB A 3. Inserte el conector de la barra central (D) en las vigas transversales largas (B) y las vigas transversales cortas (C) y asegúrelo con pernos (BB). 3 D Aditamentos utilizados BB Perno B x4 C BB Lowes.com/allenandroth 22 INSTRUCCIONES DE ENSAMBLAJE 4. Inserte las barras de esquina largas (F) en las barras de esquina cortas (G). 4 F G 5. Deslice las barras de esquina cortas (G) en los conectores de las barras de esquina (E). 5 E G 6 en el conector superior (J). J L F Lowes.com/allenandroth 23 F INSTRUCCIONES DE ENSAMBLAJE 7. Deslice las barras centrales largas (H) y las barras centrales cortas (I) en los conectores de las barras centrales (D). 7 H D C Nota: Las barras centrales cortas (I) deben conectarse a los conectores de las barras centrales (D) instalados en la viga transversal larga (B). Las barras centrales largas (H) deben conectarse a los conectores de las barras centrales (D) instalados en la viga transversal corta (C). D I B 8. Inserte las barras centrales largas (H) y las barras centrales cortas (I) en el conector superior (J). 8 J I H H 9. Fije el toldo grande (N) al techo a lo largo de las barras de esquina cortas (G), alineando las esquinas y estirándolas para que se ajuste. 9 I N G Lowes.com/allenandroth 24 INSTRUCCIONES DE ENSAMBLAJE a lo largo de las barras de esquina largas (F). Luego conecte el floron (K) en la cima. Alineando 10 para asegurar. Amarrando las cintas de los dos toldos. F F N M N F 11. Use los anillos de plástico preensamblados en 11 largas (B). Nota: El mosquitero (O) se debe instalar todo alrededor sobre las barras interiores (A). Tenga cuidado con las dimensiones del articulo para asegurarse que instala el mosquitero (O) y las cortinas (P) correctamente. P O 12 Aditamentos utilizados AA Estaca AA AA AA AA Lowes.com/allenandroth 25 CUIDADO Y MANTENIMIENTO (VWH DUWtFXOR HVWi GLVHxDGR SDUD ¿QHV GHFRUDWLYRV \ SDUD GDU VRPEUD \ QR HVWi SHQVDGR SDUD UHVLVWLU FOLPDV LQFOHPHQWHV OR TXH LQFOX\H YLHQWRV IXHUWHV OOXYLD \ QLHYH 3DUD HYLWDU GDxRV HQ GLFKDV LQVWDQFLDV UHWLUH HO DJXD DFXPXODGD \ HO WHFKR LQPHGLDWDPHQWH 'HVHQVDPEOH HO DUWtFXOR HQ HO RUGHQ LQYHUVR GH ORV SDVRV GH HQVDPEODMH 6LHPSUH GHVHQVDPEOH HO DUWtFXOR FRPSOHWDPHQWH 8Q DUWtFXOR SDUFLDOPHQWH GHVHQVDPEODGR QR HV OR VX¿FLHQWHPHQWH HVWDEOH SDUD UHVLVWLU HO YLHQWR \ HO FOLPD LQFOHPHQWH SRU OR TXH VH SXHGH GDxDU o producir daños. 1R XWLOLFH EODQTXHDGRUHV iFLGR QL RWURV OLPSLDGRUHV DEUDVLYRV HQ HO WHFKR R ODV SLH]DV GH OD estructura. /RV FRPSRQHQWHV GH DFHUR GH ORV DFFHVRULRV \ PXHEOHV GH MDUGtQ VRQ WUDWDGRV FRQ SLQWXUD DQWLR[LGDQWH 6LQ HPEDUJR GHELGR D OD QDWXUDOH]D GHO DFHUR SXHGH SURGXFLUVH XQD R[LGDFLyQ VXSHU¿FLDO VL HVWH UHFXEULPLHQWR SURWHFWRU VH UD\D (VWH HV XQ SURFHVR QDWXUDO 3DUD PLQLPL]DU HVWD FRQGLFLyQ VH UHFRPLHQGD TXH WHQJD FXLGDGR FXDQGR HQVDPEOH R PDQLSXOH HO SURGXFWR SDUD HYLWDU TXH OD SLQWXUD VH UD\H (O y[LGR VXSHU¿FLDO VH SXHGH HOLPLQDU IiFLOPHQWH FRQ XQD DSOLFDFLyQ OLJHUD GH DFHLWH SDUD FRFLQDU FRP~Q 6L VH SURGXFH R[LGDFLyQ VXSHU¿FLDO \ QR VH WRPDQ PHGLGDV SDUD FRUUHJLUOD OD R[LGDFLyQ SXHGH FRPHQ]DU D DYDQ]DU D OD VXSHU¿FLH GH HQVDPEODMH OR TXH SXHGH FDXVDU PDQFKDV SHUMXGLFLDOHV TXH SXHGHQ VHU GLItFLOHV GH HOLPLQDU 6L QR XVDUi HO SURGXFWR SRU XQ SHULRGR SURORQJDGR GXUDQWH HO LQYLHUQR SRU HMHPSOR DOPDFpQHOR HQ XQ DPELHQWH VHFR \ OLPSLR *XDUGH HO HPSDTXH RULJLQDO SDUD DOPDFHQDU HO DUWtFXOR UN AÑO DE GARANTÍA LIMITADA (VWD JDUDQWtD OLPLWDGD VH H[WLHQGH DO FRPSUDGRU RULJLQDO \ OD PLVPD VH DSOLFD D GHIHFWRV HQ HO PDWHULDO \ OD PDQR GH REUD GH VX DUWtFXOR VLHPSUH TXH HO DUWtFXOR VH FRQVHUYH FRQ FXLGDGR \ VyOR VH XWLOLFH SDUD ¿QHV SHUVRQDOHV UHVLGHQFLDOHV (O IDEULFDQWH JDUDQWL]D TXH HVWH DUWtFXOR QR SUHVHQWDUi GHIHFWRV HQ ORV PDWHULDOHV QL OD PDQR GH REUD GXUDQWH XQ SHUtRGR GH XQ DxR 6L HQFXHQWUD DOJ~Q GHIHFWR OODPH D QXHVWUR 'HSDUWDPHQWR GH 6HUYLFLR DO &OLHQWH DO SDUD VROLFLWDU D\XGD (O IDEULFDQWH QR VH KDUi UHVSRQVDEOH de los costos de transporte o entrega ni tampoco compensará a la persona o a terceros por el HQVDPEODMH R GHVHQVDPEODMH GHO SURGXFWR (VWD JDUDQWtD OH RIUHFH FLHUWRV GHUHFKRV SHUR XVWHG SXHGH WHQHU RWURV GHUHFKRV TXH YDUtDQ VHJ~Q HO HVWDGR Lowes.com/allenandroth 26 LISTA DE PIEZAS DE REPUESTO Para obtener piezas de repuesto, llame a nuestro Departamento de Servicio al Cliente al 1-866-439-9800, de lunes a viernes de 8 a.m. a 8 p.m., hora estándar del Este. K G J E F I L B H D P C M BB A PIEZA A B C D E F G H I J K L M N O P BB N O DESCRIPCIÓN Poste Viga transversal larga Viga transversal corta Conector de la barra central Conector de la barra de esquina Barra de esquina larga Barra de esquina corta Barra central larga Barra central corta Conector superior Remate Gancho Toldo pequeño Toldo grande Mosquitero Cortinas Perno NÚMERO DE PIEZA #0493712-A1 #0493712-A2 #0493712- B1 #0493712-C #0493712-D #0493712-E #0493712-E1 #0493712-F #0493712-F1 #0493712-G #0493712-H #0493712-J #0493712-K #0493712-L #0493712-M #0493712-N #0493712-I Impreso en China allen + roth® es una marca registrada de LF, LLC. Todos los derechos reservados. Lowes.com/allenandroth 27
© Copyright 2026 Paperzz