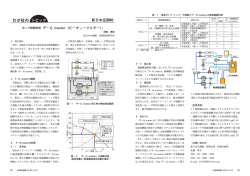
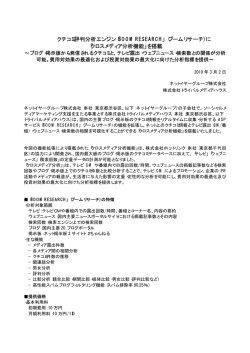
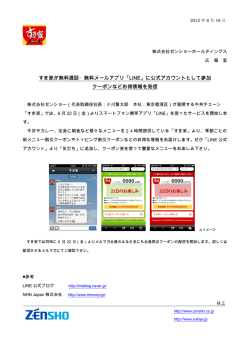
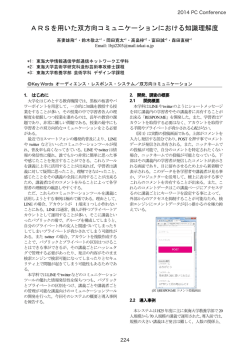
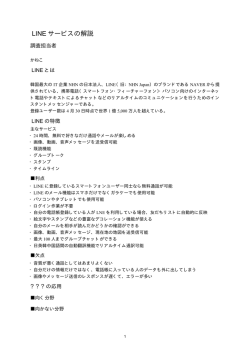
1
McLaughlin Optimist Owners Manual
マクローリン オプティミスト オーナーズ マニュアル
問題がある場合は、販売店、又はマクローリンに連絡してください:
www.optistuff.com 800 784 6478 (423 875 0740)
If you have a problem contact your dealer or McLaughlin: www.optistuff.com 800 784 6478 (423 875 0740)
スプリット
セール
マスト
ブーム
手綱
Bridle
ティラー
ブームブロック
Boom block
ラダー
センターボード
メインシート
オプティミストの各部名称
McLaughlin Rigging Instructions
マクローリン艤装説明
はじめに
Getting Started.
1. These instructions are written specifically for the McLaughlin Club Racer and Trainer. Racing models, including the
Intermediate Racer, Advanced Racer, and Pro have supplemental rigging instructions, a copy of which is included
in this manual after the “Tie on the sail section”.
1. これらの説明は、特にマクローリンクラブレーサー、及び指導者のために作成されている。 レーシングモ
デル、中庸レーサー、先進のレーサー、及びプロフェッシォナルモデルは、補足的な艤装説明を必要とし、
それらの記述は、このマニュアルの「セールの結び」に続いて記載されている。
2. Unpack your new McLaughlin Optimist and spread out the parts on a clean, dry section of grass. Take a moment to look
over the parts list and familiarize your self with the major parts. (See illustration (1)). Be careful not to loose or throw away
small parts such as tiller screws.
2. マクローリンオプティミストを紐解き、そして部品を芝生の綺麗かつ乾燥した区画に広げる。 しばしの間
部品リストに目を通し、そして主要な部品に自ら親しむ。
( ( 1 ) Parts of the Optimist 参照 )
。 ティラーのネ
ジのような小さな部品をなくしたり、又はほったり投げたりしないように気を付ける。
2
PARTS LIST
Sail with 2 battens
3 Air Bags
Bailing Bucket: tie to forward air bag strap
Bow line: 28 foot ¼ inch yellow floating line
(Racing Spars include a B-Pack with wind pennant, and
Rudder and Tiller/Hiking Stick
sprit halyard, plus pre-rigged vang, bridle and outhaul)
Centerboard with Tie in line
Owners Manual
Hull
Spar Set with mast, boom and sprit
Carbo Boom Block: safety snap shackle attached
Main Sheet: 21 foot 5/16 black floating line
Note: On racing spars many of these lines will already be attach for you. The colors will also be different.
Line Packed in a zip lock bag: (Club Racer only)
(1) 3/16 x 40 in. red Boom Vang
(1) 3/16 x 58 in. blue Lower Sprit Line
(1) 3/16 x 40 in. red Out Haul
(1) 3/16 x 40 in. blue Upper Sprit Line
(14) 2 mm x 17 in. black Sail Ties:
(5) 3 mm x 22 in. black Corner Ties
(1) Harken Micro Block
(1) 3 mm x 22 in. black Preventer
(1) 3 mm x 60 in. black low stretch Boom Bridle with attachment Ring.
See your packing list or sales receipt for non-standard items such as: Racing Sails, Praddles, Top and Bottom Covers,
Blade Bag, Spar bag or Dolly. Note racing sails come with sail ties in the sail bag. They are not included with the boat.
Required Tools:
1. Flat Head Screw Driver
2. Small Adjustable Wrench or Pliers
3. 5/32-inch drill for aligning tiller holes with the blade holes if needed.
Install your air bags.
1. Slide your un-inflated air bags into the straps on each side and in the stern of the hull. The bags can be inflated manually
or with a low-pressure air pump or compressor.
2. Note: Do not over inflate the air bags! When properly filled, the air bags will be soft to the touch. Over inflated bags
may burst when heated by the sun or rising temperatures.
Layout the mast and boom on the ground.
1. The Mast and Boom form an "L" shape, with the jaws of the boom fitting tightly around the mast about halfway
between the two mast cleats. Refer to illustration (1)
2. Note that the eye straps on the top of the mast should be opposite the boom, as is the white Preventer Button. Also note that
the lip on the end of the boom and the buttons toward the middle of the boom should be facing up.
部品リスト
オーナーズ マニュアル
艇体
スパーセット:マスト、ブーム、スプリットを含む
(レーシングスパーは、風見に入った B パック、並びに
スプリットハリヤード + 艤装前のバング、ブライドル
及びアウトホールを含む)
セール + 2 バテン
3 エアーバッグ
前方にエアバック止めに繋いだアカ汲み
8.54m 浮揚タイプ黄色のバウライン
ラダー及びティラー/ハイキングストラップ
ひも付きセンターボード
カルボ ブームブロック:安全スナップシャックル付き
6.5m 浮揚タイプ黒色メインシート
注:レーシングスパーにおいては、以下の多数のラインが附属している。 色は異なってくる。
Line Packed in a zip lock bag: (クラブレーサーに限る)
(1) 3/16 x 40 in. red Boom Vang
(1) 3/16 x 58 in. blue Lower Sprit Line
(1) 3/16 x 40 in. red Out Haul
(1) 3/16 x 40 in. blue Upper Sprit Line
(14) 2 mm x 17 in. black Sail Ties:
(5) 3 mm x 22 in. black Corner Ties
(1) Harken Micro Block
(1) 3 mm x 22 in. black Preventer
(1) 3 mm x 60 in. black low stretch Boom Bridle with attachment Ring.
標準品ではないもののパッキングリスト、又はレシートを見てください、それらは:レーシングセール、パド
ル、上下ボートカバー、舵を入れる袋、スパーバッグ又はドーリーです。 レーシングセールはガラミ付きでセ
ールバッグの中にある。 それらはボートには附属していない。
必要な工具:
1. – ドライバー
2. 小型アジャスタブルレンチ、又はプライヤー
3. 4m のドリル:必要な場合に舵穴とティラーの穴を調整するためのもの
エアーバッグの据え付け
1. 船体の両舷及び船尾のストラップに空気を抜いたエアーバッグをスライドして納める。 エアーバッグ
は、直接、低圧のエアーポンプ、又はコンプレッサーにより充填できる。
2. 注意: 決して過大にエアーバッグに空気を入れてはならない! 適切に充填した場合、エアーバッグは
触ると柔らかい状態となる。 過大に充填されたエアーバッグは、太陽又は気温の上昇により破裂する。
マスト及びブームを地面に並べる
1. マスト及びブームを “L” 形状に置き、ブームのジョーをマストの 2 つのクリートの間にしっかりと据え
付ける。 イラスト ( 1 ) 参照
2. マスト頂部のアイストラップは、トッププリベンター留めとするためにブームの反対側にならなければ
ならない。 さらに、ブーム端部のリップ部、及びブーム中央部の留め金は上向きとする。
3
セールの結び
Tie On The Sail
1. セールをしかるべき所に置き、ラインバッグから細い黒色の紐を 2 束取
り出す。
1. Lay the Sail in place and remove the two bundles of thin black line from the line
pack.
Throat
2. Start with the Corner Ties. (The bundle of 6, 3 mm 22 in. black lines) Each corner tie
should be passed through a sail grommet and around the spar twice, for extra
strength. Illustrations (2) and (3) will help you identify the parts of the sail and how
they are tied. The extra corner tie is your boom Preventer.
3. セールのヘッドから結び始める。 トップセールの鳩目とマストトップ
のアイを結ぶことから始める。 マスト全周に紐を回してトップセール
の鳩目、及びトップ アイ ストラップに紐を通す。 次に、トップセー
ル鳩目から 2 段目の鳩目から下部のアイストラップに紐を通す。 この
結びは、スプリット ハリヤードに張力がかけられたときに、セールが
上に揚がることを防止するものであり、かつ上段のコーナーの結びがマ
ストから抜けることも防止する。
( 図 ( 3a ))参照
3. Tie the Head of the sail first. Start by lining up the topsail grommet and the topmast
eye. Tie around the entire mast passing through the topsail grommet and the top eye
strap. Next, tie the second corner tie from the topsail grommet through the lower eye
strap. This tie should prevent the sail from rising up when the sprit halyard is
tensioned and also keep the first corner tie from slipping over the top of the mast.
(See illustration (3a))
4. 次はタックの結びです。タックは 2 つのコーナー結索が用いられる。1
つはマストへの取り付け、そしてもう 1 つはブームへの取り付けであ
る。
4. Tie the Tack next. The tack uses two corner ties, one to secure it to the mast and one
to secure it to the boom. (See illustration (3b))
5. クリューを最後に結ぶ。 よくある間違いの 1 つに、クリューをブーム
端部のリップ部に直接結びつけることであり、これは正しくない。 ク
リューは、自由にスライドするようにブームに回して結ぶ。
5. Tie the Clew last. A common mistake is tying the clew directly to the lip on the end of
the boom, this is incorrect. The clew should be tied around the boom so that it slides
freely.
6. The 6th corner tie is used for the Boom Preventer. (See illustration (3b)) The boom
Preventer is a sling that rests on the mast’s Boom Preventer Button. Its purpose is to
control the height of the boom by twisting (not shown) the line to effectively shorten
it, and therefore prevent the boom from dropping as the mainsheet and vang are
tensioned. This prevents over tightening of the luff and leach of the sail (which is
slow in most conditions.) To rig the boom preventer, tie a stopper knot in one end of
the corner tie. Next, thread the free end of the corner tie through one of the holes in
the boom jaw (from the bottom to the top), loop over the Preventer button on the
mast, and through the other boom jaw hole. Now secure it with a stopper knot in the
free end of the corner tie.
7. Now that the corners are ready, use the Sail Ties (bundle of 14 thin purple lines) to
finish tying the sail. The ties along the mast should be tight, with no more than 1/8 in.
between the sail and the mast. The ties along the boom should have a space of about
1/4 in. between the sail and the boom.
2. コーナーの結びから始める。
( No. 6 の束、3mm の黒い紐)それぞれの
コーナーの結索はセールの鳩目を通し、かつ強度を増すためにスパーに
2 回巻きにする。 図 ( 2 ), ( 3 ) はセールの箇所、及びどのように結ぶか
を識別する援助となろう、そして特に追加のコーナーの結びはブームプ
リベンターである。
( 3a ) Head
( 3c ) Head ヘッド
( 3b ) Tack
( 3d ) タック
preventor line twisting
6. 6 番目のコーナーの結びは、ブームプリベンターである。
( 図 ( 3b ) 参
照 ) ブームプリベンターは、吊り索であり、マストのブームプリベン
ターを底部で支える。 その役割は、プリベンターを効果的に短くする
ために、プリベンターをねじる ( 図 ( 3d ) 参照 ) ことで,ブームの高さ
をコントロールする、かつ、これによってメインシート及びバングに張
力がかかったときにブームが下がることを防ぐ。 これは、セールのラ
フ及びリーチの張りすぎ(これはほとんどの場合スピードを落とす)を
防ぐ。 ブームプリベンターの装着法: コーナーの結びの片方の端部を
8 ノットで結ぶ。 次に、ブームジョーの片方の穴に結び目のない紐を
通し(下から上へ)
、マストのプリベンターボタンに弧を描くように掛
ける、そしてもう片方のジョウの穴に紐を通す。 これでコーナーの紐
の端部を 8 ノットで結ぶことで結索を確実なものとする。
7. これで、コーナーは準備ができたので、ガラミ( No.14 の細い紫の紐
の束 )を使用してセールを結びつける。 マストに結びつける際には、
セールとマストの間が 3mm ( Toni Tio 8mm 推奨 ) を超さないようにき
つく締め付ける。 ブームに結びつける際には、セールとブームの間が
約 6mm( 8mm )の隙間が空くように取り付けるとよい。( ルールは
どちらも 10mm 以内 )
4
Special Instructions For A Removable Racing Sail (Applies to the Silver and Black Gold spar sets)
取り外し可能なレーシングセールの特別な使用説明( シルバー、及びブラックゴールド スパーに適用する )
Read this along with the information shown above.
Race sails are very expensive and wrinkle easily. Heavy creasing of the sail changes its shape and therefore its performance.
上記に記載の説明に沿って読んでください。
レースセールは大変高価なものであり、しわになりやすい。 セールのひどいしわは、セール形状を変化させ、
結果としてその性能を変化させる。
With the club spars you normally wrap the sail around the mast and boom causing creasing. To remove the sail and roll it
requires you to untie every sail tie on the mast. Not a fun job. That is why the racing spars were developed. So that you
can slide the sail off the mast without untying the sail ties. All the upper fittings on the mast are removable to
accommodate this. You then loosely wrap the sail around just the boom. Even the battens fall into place parallel to the boom.
The boom prevents the sail from getting folded in two and acts as a mandrel to roll against. This keeps the sail looking good
throughout its life.
クラブでの艤装において、セールを普通にマストとブームに巻き込むことは、しわの原因となる。 セールを外
しロールに巻くことは、マストのがらみを外すことである。 楽しい作業ではない。 それがなぜレーシング艤
装が開発されたかという理由である。 その結果、セールのガラミを外すことなくマストからセールを横滑りさ
せて抜くことができる。 マストのすべての艤装は、セールを外すことを考慮して取り外し可能となっている。
セールを引き抜いてから、セールをブームにゆるめに巻いていく。 実際にバテンはブームに対して平行になる
ように収める。 ブームはセールが 2 つに折り曲がることを防止し、かつ巻く際の心棒の役目をする。 これに
よりセールは、その一生をよい形状のままいることができる。
Tying on you race sail
1. Layout your mast and boom (make sure the boom is right side up and the boom preventer line is around the mast).
レーシングセールの結び
1. マスト及びブームを配置する( ブームの上下が正しいこと、及びブームプリベンターがマストを正しく
囲んでいることを確認すること。
2. Layout the sail and begin at the top. Use a 3mm x 22” corner tie, wrapping twice around the mast at the upper front
mast hole and twice through the throat grommet (yeah, that’s the big top one in the corner) of the sail.
3. Tie it tightly so the edge of the sail is touching the mast. Use a square knot (sometimes called a reef knot) at this point.
2. セールを配置し、頂部から結索を開始する。 3mm * 56cm の紐を使用し、マストに 2 巻きしその内の 1
巻きをトップピンの穴に通し、セールの鳩目に 2 巻きを通す。
( セールのコーナーの最上部の大きな穴)
3. セールの端部がマストに当たるほどきつく締め付ける。 ここは、本結びで締め付ける。
4. Next, insert your wind pennant at an angle into the mast end and snag just one of the wraps of the tie through the top
hole with the point, or use the top pins.
4. 次に、風見をマスト頂部に一定の角度で挿入し、トップホールの箇所で結びの巻き付けの一カ所をひっか
ける、又はトップピンを使用して完成させる。
5. As you continue to push the needle of the wind pennant, notice the tie getting tighter. At this point you may need to
loosen the upper part of the knot just slightly (especially on a light wind day). With the needle in position, the corner tie
should be taut, with the sail firmly against the backside of the mast. You have used the leverage of the needle to tighten
the tie and in the process; the knot has been drawn tighter.
5. 風見の心棒を押し続けると、結びがきつくなることに注意する。 この点に関して、上部のセールの結び
を緩める必要があるかもしれない(特に微風の日には)
。 風見の心棒が適正な位置にあるときに、セール
をマストの後方にしっかり引きながら、結びをピンと張ってみる。 結びをきつく締める際、及びその過
程において心棒のてこの力を利用したことになり、結びは、よりきつく結ばれる。
6. Now pull hard on each end of the corner tie line to secure the knot. Then add half a square not, as a “keeper” on top of
the existing square knot. The keeper does two things. It keeps the knot tight and acts as a safety net. If the second knot
comes undone you still have the fist knot. There are several other ways to accomplish this, but none as efficient.
6. 結びを確実にするためにコーナーの結びの各エンドをきつく引く。 そして、現存の本結びの守りとして、
追加の本結びを施す。 この追加の本結びは、現存の本結びを守り、安全策として作用する。 追加の本結
びがほどけたとしても、現存の本結びが生き残ることになる。 他にもいくつかの違った結びを確実にす
る方法があるが、これほど効果的なものは他にない。
Note: If you cross the finish line with an untied or missing sail tie you can be disqualified. Not keeping the sail mark
between the two bands on the mast is also a violation of the rules. These two rules are checked closely at major regattas.
That is why knot tying is so important.
注意: かけたガラミが結んでなかったり、なくなったりしたら、あなたは失格となろう。 マストの 2 本の
ブラックバンドの間にセールマークが収まっていなければ、
これも規則違反となる。これらの 2 つの規則は、
大きな大会では厳しく検査される。 これが、結びがそれほど重要であることの理由である。
7. If you followed directions, the sail mark should be in the middle between the mast bands. Now to keep the sail mark
between the bands you need to add the halyard Preventer corner tie. This tie prevents the sail from rising upward as the
sprit pulls the top of the sail upward to obtain its proper shape as you tension the sprit halyard. See Paragraph 3 and
diagram 3a in the previous section “Tie the head first”.
7. もし、帆走指示書に従うならば、セールマークはマストのブラックバンドの真ん中に納めるべきである。
セールマークをブラックバンドの真ん中に置き、コーナーの結びのハリヤードプリベンターをセットす
る。 このプリベンターは、適正なセール形状を得るためにスプリットのハリヤードを引いたときに、セ
ール頂部を上に引き揚げるので、セール頂部が揚がるのを防止する。 前節の第 3 項、及び図 3a 参照。
8. Use the top pin or push the sail tie into the second hole from the top as shown in the diagrams following this section.
Insert the flag pennant needle into the loop or top pin. Continue to push it in until it hits the flotation cork about 6 inches
down from the top. Then wrap the Preventer corner tie around the mast and through the same grommet as the top corner
tie and secure it with a square knot. Again look at diagram 3a.
8. トップピンを使用するか、又はこの節のある図に示されているように、マスト頂部から 2 番目の穴にセー
ル索を押し込む。 紐の輪っか、又はトップピンに、風見の心棒を挿入する。 心棒が浮揚コルクに当たる
までマスト頂部から約 15cm 押し込む。 それからプリベンター索をマストに回し、セールのトップコーナ
ーの結びと同じ鳩目に通し、本結びで結索する。 もう一度、図 3a を見てみよう。
9. Check the position of the sail mark in relation ship to the mast bands by pulling up ward on the top of the sail to simulate
the upward pressure of the sprit halyard tensioner. Adjust your sail tie so the sail mark is on the high side toward the top
band. This seems contrary to your thinking but once you put on the boom vang and boom Preventer the sail mark will
move downward hopefully to a half way point. Now add a second square knot as a keeper like you did on the first
corner tie.
9. スプリットのハリヤードを張ったときに、セール頂部が引き揚げられようとするさまを再現しながらマス
トバンドの中にセールバンドがくるようにセットする。 セールマークが上のブラックバンドの位置に、
セールマークが来るようにプリベンダー長さを調整する。 これは、ブラックバンドの真ん中にセールマ
ークを納める思いと違うように思えるが、しかしブームバング及びブームプリベンターをセットすれば、
セールマークは、望みどおりに中間点に移動していく。 そして、最初のコーナー結びでやったように、
安全策として 2 回目の本結びを追加で結ぶ。
10. Now tie on the sail ties as described in paragraph 7 “Sail Ties” of the previous section.
10. 引き続いて、前節の第 7 項における「セールの結び」に記載されている結索をやろう。
5
Once you have everything on (Outhaul, sprit, vang, top and vang
preventer, andcorners), put a little bit of tension on them, and then tie the
sail ties to all the remaining grommets using the 3mm diameter line
provided. The way to tie these lines is with square knot.We suggest you
tie these with two wraps around the boom. Keep in mind that the lines
on the boom are tied loose (not more than 10 mm away but as close to that
as possible), and the lines on the mast go tight (not tighter than 1 mm). See
pictures. Don't forget to tighten your knots very tight. If not, the knots will
come undone when the sail luffs.
ひとたび、コーナーラインを各部に取り付けたら、
(アウトホー
ル、スプリット、トップ・バングプリベンター、及びコーナー)
、
それらに少しだけ張力をかける、そしてセールの残りすべての鳩
目に、備え付けの 3mm のガラミを結ぶ。 それらの結び方は本結
びである。 ブーム及びマストにはガラミを 2 回しして結ぶことを
推奨する。 ブームへのガラミの取り付けは緩めにし( 10mm を超
えてはならないが(ルール)10mm に可能なかぎり近くなるよう
に)
、そしてマストにはきつめに取り付ける( 1mm 以内まで締め
付けてはならない)
。 写真参照。 ガラミの結びを非常にきつく締
めることを忘れてはならない。 もしきつく結ばなければ、セール
がばたついたときに結びがとけてしまう。
ALTERNATIVE METHOD WITHOUT PINS
マストへはきつめに結ぶ:ノースセール推奨
( 8mm 隙間を空ける:Toni tio 推奨)
ルールは 10mm 以内
ブームへは、隙間を空けて結ぶ
ノースセール、オリンピックセール推奨
( 8mm、ルールは 10mm 以内 )
クロースのセールトリム
ランニングのシート
縦じわは、スプリット
の張りすぎで、最悪で
ある。
ブラックバンドの間
に、セールバンドが位
置する。
正しいスプリットの
張り具合!
マストトップからブ
ームエンドへのわず
かなしわは問題ない、
OK !
6
Rig your boom bridle.
ブームブライドル(手綱)の取り付け
1. Locate the two Boom Bridle Buttons on the topside of the boom; each is about midway to center on either end. Attach the Boom
Bridle (3 mm, 64 in. black low stretch line with an attachment ring on it) to the boom by tying around the boom on the outside of
each button. (See illustration (4)). This line must be very tight. See safety notes as to why!
1. ブームの上面にブームブライドル留めが 2 つあり、各ブライドル留めは両側から中央に向けて配置
されている。 ブームブライドル( 取り付けリング付きの 3mm、163cm 黒色のローストレッチの紐)
を、各ブライドル留めの外側にブームに巻き付けて結びつける(図 4 参照)
。 この紐は非常にきつ
く締め付けなければならない。 理由は安全策の章を参照!
バウラインノット
バウラインノット
アウトホール・ブライドル
ストッパーノット
8 ノット
Rig your control lines.
コントロールラインの取り付け
1. Locate the Boom Vang Button near the jaw end of the boom. Use the Vang line
(3/16, 30 in. Red line) to tie around the boom so that the button prevents the line
from sliding toward the mast. Then thread the line through the vang cleat on the
mast, from the bottom to the top.
1. ブーム端部のジョーの近くにブームバング留めがある。 バングライン(6mm、91cm)
を使用して、バング留めが紐のマスト側への移動を防止するように、ブームに回し
て結ぶ。 それからマストに付いているクリートに、下から上に向けて紐を通す。
2. アウトホールを取り付けよう。 紐の端部を 8 ノットでストッパーを作る。 ブーム
の後方から、ブーム端部の凸部の穴を通して、セールの鳩目を通す、それからブー
ム端部の凸部の穴に戻していく。 そして、ブームの側面に設置されているクリート
にかける。
2. Now rig your Outhaul. Tie a stopper knot in the end of the line. From the back
of the boom, thread the line through the hole in the lip of the boom end, through the
sail grommet, then back out the hole in the boom end. Now run the line through the
cleat located on the side of the boom.
3. 次のセールコントロールは、スプリットハリヤードである。 スプリットハリヤード
ブロックは、マストの前面にある。 上部スプリットライン( 6mm、102cm )をブ
ロックに通し、そしてラインの端部に小さくバウラインノット(輪っか)を作る。 ラ
インバックの中にあるマイクロブロックにラインの反対側を結びつける。 そして下
部スプリットライン( 6mm、147cm )を準備し、スプリット ハリヤード クリー
ト の結合部に結びつける。 次に、結んでいない方をマイクロブロック、及びスプ
リットハリヤードクリートに通す。 ( 図 6 参照)
3. The next sail control is the Sprit Halyard. Locate the Sprit Halyard Block on the front side of the
mast. Run the Upper Sprit Line (3/16, 40 in. blue) through it and tie a small bowline (loop) in one end.
To the other end, tie the Micro Block provided with your line pack. Now locate the Lower Sprit Line
(3/16, 58 in. blue line) and tie one end to the bridge of the Sprit Halyard Cleat. Next, run the free end of
the lower sprit line through the Micro block and through the sprit halyard cleat. (See illustration (6))
マストをたてる
Stepping the mast.
1. Point the bow of the boat into the wind.
2. Pick up your rig and put the mast through the hole in the thwart (deck) and into the Mast Step. (See
illustration (1))
1. 艇の船首を風上にたてる。
2. 艤装したマストを持ち上げてデッキに横たわる梁の穴を通して、マストステップに
納める( 図 1 参照 )
3. Raise the Sprit by placing the tip of the upper end (the end w/o the plastic chafe guard) into the loop at
the peak of the sail. Place the lower end into the loop you tied into the upper sprit line and adjust the
tension at the sprit halyard cleat. Remember that the sprit is always rigged on the starboard (right) side of
the mast.
3. セールのピークの輪っかにスプリットの上部先端( プラスティックの擦れ止めの端
部)をセットして、スプリットを持ち揚げる。 スプリット下部を上部スプリットラ
インの輪っかに通し、ハリヤードで張り具合を調整してクリートに止める。 スプリ
ットは、常にマストの右側に取り付けることを忘れてはならない。
スプリット
ハリヤード
7
Rig the Main Sheet and Mast Tie down.
Start by securing the Boom Block to the boom bridle with the trigger snap. The trigger snap is your quick
release system for the sail.
Tie one end of the Main Sheet (21 foot 5/16 black line) through bottom hole of the block with a bowline or
stopper knot. Run the free end through the small hull block from back to front, through the boom block from
front to back and through the large ratchet block. (See illustration (7)) Make sure that the ratchet block "clicks"
when the main sheet is tightened and locks when the main sheet is released. If you prefer to turn off the
ratchet, you can do so by adjusting the slide on the side of the block. Tie a stopper knot in the loose end of the
main sheet.
( 7 ) メインシート
メインシートの艤装、及びマストの固縛
トリガースナップを使ってブームブライドルにブームブロックを取り付けることから
開始する。 トリガースナップはセール(ブーム)を素早く切り離すための装置である。
メインシート( 10mm、6.4m )の片方ををブームブロックの下部の穴に通してバウラ
インノット、又は 8 ノットで取り付ける。 ラインの片方のフリーな部分を艇付きの小
さなブロックに後ろから船首の方に通し、次にブームブロックの船首側から後方へライ
ンを通し、大きなラチェットブロックに通す( 図 ( 7 ) )参照 )
。 メインシートを引
いたときにラチェットブロックがクリック回転し、放したときに締め付け・ブロックす
ることを確実にすること。 ラチェット機能を解除したいときは、ブロック側面のスラ
イドを調整することで解除できる。 メインシートの端部を 8 ノットでストッパーを作
る。
Secure the Mast Tie Down! This is the most important line on the boat. It is already properly installed on
he deck in front of the mast hole. To secure the Mast Tie Down, tie around the mast and over the vang cleat.
The line is long enough to go across the cleat and around to the front of the mast where it can be tied and not
obstruct the cleat from turning side to side. It is very important that this line is always tied, and tied
tightly. (See illustration (8)) Failure to secure this line will result in a dismasting during capsize and can
seriously damage your Optimist.
マストの固縛! これはボートにおいて一番大切なラインである。 マストがすでにマ
ストホールを通してオンデッキに備え付けられている。 マストを固縛するために、ラ
インをバングクリートの上部を回してかける、そしてマスト前方のアイを通して結ぶ。
このアイは紐を通すことができ、かつクリートが片舷から反対舷に動いても邪魔になら
ないものとする。 このラインは常に結んでおき、かつ堅固であることが非常に重要で
ある。 ( 図 ( 8 ) 参照 )
。 この固縛を怠ることは、沈したときにマストが外れること
になり、あなたのオプティミストに深刻な損傷を与える。
( 現在はマストストッパーを使用)
Assemble the rudder. Remove the Tiller, Rudder and Dagger board from its protective packaging. Don’t
throw away the packaging until you’ve accounted for all three, plus the 2 sets of tiller bolts, nuts and washers.
ラダーの取り付け。 ティラー、ラダー、及びセンターボードを専用の防御箱から取り
出す。 これらの 3 点全部、及び 2 組みのティラーボルト、ナット、及びワッシャーを
確認するまでは、決して防御箱を捨ててはならない。
Place the rudder head between the bars of the tiller. Check to see that tiller is facing the same direction as the
rudder pintles and that the Tiller Extension is facing up. Secure the tiller with the tiller bolts through the
pre-drilled holes. (It is usually easier to start with the rear bolt). If the holes do not exactly line up it maybe
necessary to reem the front hole with a 5/32-inch drill.
ティラーの棒の間にラダーの上部を据え付ける。 ティラーがラダーピントル(旋回支
持棒)と同方向に向いていること、及びティラーエクステンションが上を向いているこ
とを確認すること。 すでに空いている穴を通してティラーをボルトで固定する。( 通
常船尾側から取り付けると簡単にすむ。
) 穴が正確にアラインされていない場合、4mm
のドリルで前方の穴を再調整する必要がある。
8
Finishing Up.
仕上げ
1. The Bow Line (28 foot 3/16 yellow line) should be led through the bow loop and then down to the mast step. Go around
the mast cup with a tight bowline knot. When towing make sure the line does not get caught under the screw sticking out
the back. If this happens it can cause serious damage to the function of the screw and knob.
1. バウライン ( 6mm * 8.53m ) を船首の輪っかに通し、マストステップに降ろす。 マストカップを囲んでバ
ウラインノットで結ぶ。 曳航する際は、スクリューに絡んで前後進ができなくならないように後方クリア
ーを確認しなければならない。 ラインがスクリュー絡んでしまった場合には、スクリューとバウライン取
り付け船体に重大な損傷を引き起こす可能性がある。
2. Tie the Dagger board to the eye strap on the forward face of the dagger board trunk. Blunt end forward.
4. Once the boat has been launched and is in sufficiently deep water, secure the rudder by placing the rudder pintles into the
stern gudgeons. The rudder will automatically lock into place with the metal keeper tab. (To remove the rudder, press the
keeper tab and lift it from the gudgeons). Next, slide the dagger board into the dagger board trunk and tie the keeper line to
the eye on the trunk. Be sure the blunt end of your dagger board is facing forward.
2. センターボードトランクの前面に付いているアイと、センターボード紐で結ぶ。 かどが鋭利ではない方が
前方である。
3. マクローリンの新艇を進水させる前に、進水するところに艇を損傷させる異物がないかチェックすること。
( 岩、貝、砂礫 )
4. 艇を進水させ、かつ水深が十分にある場合、船尾のガジョンにラダーピントルを押し込んで舵をセットす
る。 ラダーは金属製のストッパーによりオートマティックにロックされる( ラダーを取り外す場合、ス
トッパーを押さえて、ガジョンから持ち上げて引き抜く。 次に、センターボードをトランクにスライドさ
せて収め、センターボードラインの結索を確認する。 ゼンターボードのエッジが鋭利ではない方が前向き
であることを確認すること。
5. If your life jacket is on and zipped up, you’re ready to go sailing!
5. ライフジャケットを装着して、ジッパーを引き上げれば、セーリングの準備完了となる!
Safety Tips
安全策の助言
Although sailing is a relatively safe sport, the sea ensures that there is always risk of accident.
The following is a brief list of precautions that will greatly reduce the risk of serious injury.
セーリングは比較的安全なスポーツといわれているが、海上では常に事故のリスクが存在する。 以下にあげる
ことは、事前の防止策の抜粋であり、深刻な怪我のリスクを大幅に減らしてくれるだろう。
1. Always wear a US Coast Guard Approved PFD. Not only is it a class rule but life jackets save lives everyday. Make sure
that yours fits properly and is rated for your weight. Too many Optimist sailors hit the water with a PFD that is far too big
for them. Only a properly fitted and properly worn life jacket can save your life.
1. US コーストガード承認のライフジャケットを常に着用すること。 クラスルールというだけではなく、ラ
イフジャケットは毎日人の命を救っている。 ライフジャケットが適切に整備されていること、及びあなた
の体重にあっていることを確実にしなさい。 ライフジャケットの適切な整備、及び適切に着用するすると
が、あなたの命を救います。
2. It is an IODA (International Optimist Dinghy Association) class rule that the boom bridle never extends more than 10 cm
from the boom. This rule was created, and should be heeded, because it greatly reduces the risk of a sailor’s head being
caught in the bridle during a maneuver. Keep your bridle tight!
2. IODA のクラスルールであるが、ブームブライドルは、決してブームから 10cm 以上離れてはならない。 こ
のルールは確立されており、心に留めておくべきである。 なぜなら、操船中にセーラーの頭がブライドル
の間に引っかかるリスクを大幅に低減させているから。
3. The trigger snap provided with your boat is designed to prevent catching on clothing, don’t replace it with shackles that
can. If your trigger snap wears out, contact your dealer or McLaughlin Boat Works to purchase a replacement.
3. ボートに附属しているトリガースナップは、衣服に引っかかるのを防止するように設計されているから、
シャックルと取り替えてはならない。 トリガースナップが摩耗してきたら、買い換えるために近くの販売
店か、マクローリンに連絡してください。
4. Attend a sailing course taught by US Sailing certified instructors and never send a child sailing without adult supervision.
4. アメリカ合衆国認定の指導者によって指示されたセーリングコースに従い、かつ大人の監督者がいない状
況で子供のセーラーを決して出艇させてはならない。
5. Always check the weather before going sailing. Checking weather conditions and knowing your limitations is an import
part of safe sailing.
5. セーリングに出かける前に、常に気象・海象を調べておこう。 気象・海象のチェック、及びあなたの限界
を知ることは、安全なセーリングの重要な要件である。
6. Wear appropriate clothing. Since you’ve already checked the weather (see #5), you know what to expect in terms of
temperature and precipitation. What is merely uncomfortable for some athletes can be dangerous for sailors. Your mental
ability is what you require most while sailing, and that’s what hypothermia takes first. Remember, there’s no such thing
as over prepared for a sailor, and you can’t just "run to the sidelines" for a sweater if you get cold.
6. 適切な衣類を着よう。 すでに気象・海象をチェックしたなら(第 5 項)
、気温及び降雨量に関して何を予
測するかをあなたは知っている。 ある種の競技者に単にそぐわないことは、セーラーにとっても危険とな
りうる。 あなたの精神力は、セーリング中にあなたが何を一番必要としているか、そしてそれは低体温へ
の処置が最優先であるということにかかっている。 セーラーにとって過剰な準備というものは存在しな
い、なぜならあなたが寒くなっても、すぐにはセーターを取りに「待機場所に帰る」ことはできないのだ
から。
7. 日焼け防止 セーリング中、あなたは太陽光線をダブルで浴びることになる、一つは太陽から、もう一つ
は水面反射からである。 日陰はどこにもありはしない、自ら準備しよう( 帽子、サングラス、化学繊維
の衣類、ほか )
3. Before launching your new McLaughlin Optimist, check the launching area for anything that might damage your boat.
(rocks, shells or debris)
7. Wear sunscreen. While sailing, you’ll get a double dose of sun, once from the sun, once from the water reflection. There’s
nowhere to seek shade, so bring your own. (Hats, sungalasses, loose synthetic fiber clothing, etc.)
8. Stay hydrated. Sailing is primarily a summer sport, which means lots of sun and lots of heat. Always bring water with
you and drink even when you’re not thirsty.
8. 水分を補給しよう。 セーリングは、主に夏のスポーツであり、太陽がいっぱいで灼熱を意味する。
必ず水を持って出なさい、のどが渇かなくても定期的に水を飲みなさい。
9
Care and Upkeep Storage:
保管及び維持管理
1. A good set of covers and a dolly will pay for themselves in resale value the first year you own your boat. Especially in the
Optimist class, with all the travel and handling your hull will endure, protection needs to be your first priority. Covers, a
dolly, and especially a blade bag, are a must if you want to keep your boat looking and performing at its best. The blade
bag is the first cover to buy. It provides a breathable compartment to store the skippers life jacket, gloves, sun screen,
sunglasses, money, set of dry clothes, just about anything they can misplace or loose. These items make great birthday and
Christmas gifts.
1. あなたが艇を所有した最初の年に、品質の良いカバーとドーリーの購入はリセールへの投資となる。 特に
オプティミスト級においては、すべてのレース遠征、艇の取扱い時に、あなたの艇を持ちこたえさせるた
めに、保護資材はあなたの最優先事項となる。 カバー、ドーリー、そして特に舵・センターバッグは、あ
なたが、艇を美観と性能をベストに保とうと願うならば、必須のアイテムである。 舵・センターバッグは
最初に買う必須なものである。 スキッパーのライフジャケット、手袋、帽子、サングラス、お金、乾いた
衣類、及び置き間違えたりなくしたりする可能性のあるいかなるものをも、収納する通気性のある品物が
手に入る。 これらの製品は、誕生日とクリスマスのすばらしいプレゼントとなる。
2. Don’t store your foils in an exceptionally hot environment. (For example, a car’s trunk in summer)
2. ラダー・センターは、決して暑いところに置いてはならない。
( 例えば、夏の車のトランク)
3. There are many options for day-to-day storage. Most commonly, the hull is stored upside down in its bottom cover, or right
side up on a dolly with a tented top cover. These items are available through your dealer.
3. 毎日の保管にはたくさんの選択肢がある。 一般的には、船体はボットムカバーを付けて逆さまに保管する、
又はテント型のトップカバーを付けて正立でドーリーに保管する。 これらの品物は販売店で購入できる。
4. If possible, your Optimist should be stored indoors for the winter. If that is not possible, it should be stored upside down; in
it’s cover, on padded racks. Do NOT shrink-wrap your Optimist.
4. もし可能であれば、OP を冬の間屋内で保管するとよいでしょう。 それができないのであれば、艇は逆さ
まに保管する、カバーをし、損傷除けの当てものも必要である。 決して縮むもので艇を覆わないこと。
5. It is best to store your Optimist upside down, resting on the deck. If you chose to store your boat upright, make sure the
bottom is evenly supported and never place anything in or on the boat.
5. OP は逆さまで、デッキを支えに保管するのが一番である。 もし、OP を正立で保管するのなら、ボットム
が均等に支持されており、かつ艇の中又は艇の上に何も置いてはならない。
Transportation:
運搬
1. The Optimist is easily car topped or trailed. Trailers are available in all shapes and sizes, ranging from small 2 boat trailers
to huge 20 and 30 boat trailers. If you are only transporting 1 boat, we highly recommend car topping over trailing.
1. OP は簡単にカートップできるし、トレーラーでも運べる。 トレーラーは、すべての形状及び大きさのも
のを運搬可能で、2 艇を運べる小さいものから 20~30 艇を運べるものまである。 もしあなたが、1 艇のみ
を運ぶのであれば、トレーラーよりもカートップで運搬することを強く推奨する。
2. When transporting your Optimist on a trailer/car, always use padded bunks and secure the boat deck down. Never travel
with the hull resting on its bottom.
2. カートップ又はトレーラーで運搬中においては、常に当て材を使用し、ボートデッキを下に固縛すること。
決してボットムを下にして運搬してはならない。
3. When transporting your Optimist, either use a top cover or remove the air bags from their straps. The constant pressure of
the wind will damage air bags if left unprotected in the boat.
3. OP を運搬する場合、トップカバーを使用するか、又はエアーバッグを取り外してください。 トップカバ
ーをせずにいたら、常に受ける風圧によりエアーバックに損傷を引き起こすであろう。
4. Utilize safety lines. Tie a line between the primary straps and cinch it tight, its purpose is keep the straps from sliding apart
and off the boat. Tie from a secure point on boat (hiking straps, main sheet block, mast step) directly to the trailer or roof
rack. This line will assure that, even if the straps are lost, the boat cannot be completely lost.
4. 安全な固縛 主要な受け材を使用してラインを掛け、強く締め付ける。 その目的は、受け材からボートが
滑ったり、外れたりしないように固定するためである。 ハイキングストラップ、メインシートブロック、
マストステップを、ボートの本来の取り付け位置から、トレーラー及びルーフラックへ直接固縛すること
は、もし受け材がなくなったとしても、ボートを完全には喪失しないことを確実にするであろう。
Care and Cleaning:
手入れ及びクリーニング
1. When sailing in salt water, thoroughly rinse the entire boat with fresh water, including sails and spars.
1. 海上(塩水)でセーリングしたときは、真水でボート全体、セール、及び艤装類をよく洗い流す。
2. Always allow sails to dry before stowing. Sailcloth, like most fabrics, will mildew if stored wet.
2. 格納する前には、常にセールを乾燥させる。 セールクロスは湿ったまま収納すると、織物と同様にカビが
生えてくる。
3. Store the dagger board and rudder in a cool place, excessive heat can cause warping and blistering.
3. センターボード・ラダーは涼しい場所に保管する、過剰な加熱は、ねじれ、及び気泡ふくれの原因となる。
4. There are many high quality marine-cleansing products on the market. Avoid any cleaner, which includes abrasives. For
daily cleaning, we recommend non-toxic, biodegradable soaps such as Lemon Joy dish detergent.
4. 市場にはたくさんの高品質なマリン用洗浄製品があるが、いかなるクリーナーも使ってはならない。 クリ
ーナーには、研磨剤が含まれているから。 毎日の洗浄には、毒性のない、生物分解性の純石鹸(例えばシ
ャボン玉石鹸)を使用する。
5. For more serious stains, we recommend Starbright Boat Cleaner. This is a more chemically active cleaner and should only
be used after soap and water has been tried.
5. さらにひどい汚れに対しては、Starbright Boat Cleaner を推奨する。 これは化学洗浄剤であるので、石鹸及
び真水での洗浄を試みたあとで、Starbright Boat Cleaner を使用してみるとよい。
6. Very serious stains can be removed from gel coat using lacquer thinner. Lacquer thinner will dissolve stickers, so be careful
where you use it. Left on the surface it will eventually dissolve gel coat as well so, be sure to thoroughly rinse with water
afterwards. An adult should supervise the use of lacquer thinner.
6. 非常に頑固な汚れに対しては、ゲルコートに使用するリッカーシンナーで落とすことができる。 リッカー
シンナーはステッカーを溶かすので、使用の際は注意が必要である。 船体表面にシンナーを放置すると、
ゲルコートをも溶かしてしまうので、使用後は必ず完璧に真水で洗い落とすこと。 大人の管理・監督のも
とにリッカーシンナーを使用すること。
7. Wet sanding is required only if the bottom is scratched. Your McLaughlin Optimist arrives with a race ready finish.
Cleansing the bottom with soap and water to remove dirt and oil is the best pre-race preparation.
7. 船底にひっかき傷があった場合に限り、水サンドペーパーが必要となる。 マクローリン OP は即レース可
能状態で届けられる。
船底を石鹸及び真水で洗浄して、汚れと油を落とすことが、一番のレース前の準備となる。
10
Basic Tuning
チューニングの基本
Mainsheet- Mainsheet controls boom position; it is a balance between pointing and speed. Upwind, the sail should be
trimmed to the leeward comer of the transom for most conditions, further in for heavy air, further out for light. It is usually
better to give up maximum pointing for increased speed.
メインシート: メインシートはブームの位置を制御する; それは上り角とスピードのバランスを意図する。上
りにおいては、セールはほとんどの状況において( 微風から強風に至るまで )船辺トランザムの風下側コー
ナーにトリムするのがよい。 通常の状況では、最大限上り角を狙うよりはベアーしてスピード優先でいくほう
がよい。
Luff Telltales- In light wind, out of tacks or while footing for speed, steer so that the luff telltales are flying straight back. In
medium wind with flat water or light chop, steer so that the windward telltale is partially stalled, and the leeward telltale is
flying straight back. In heavy wind (when you can no longer hike the boat perfectly flat), steer so that the windward and
leeward telltales are somewhat stalled. A luff should only be carried when feathering in very heavy winds. Before carrying a
luff, you should consider raising your centerboard slightly to de-power the boat.
ラフのテルテール: 軽風下において、タック終了後、又はスピード狙いの場合は、ラフのテルテールは一直線
で後ろに流れるように操船する。 中風下の平水面又は小さな波のある海面では、風上のテルテールは一部スト
ールし、風下のテルテールは一直線で後ろに流れるように操船する。 強風下(もはや完璧に艇をフラットにで
きないとき:オーバーパワー)では、風上及び風下のテルテールは、いくらかストールする程度に操船する。 強
風下で艇が切り上がる場合に限り、ラフィングするとよい。 ラフィングする前に、艇の揚力低減のために、セ
ンターボードを少し引き上げることを考慮するべきである。
Leach Telltales- Because of the limited control the vang offers on an Optimist, the leach telltale is mostly an indicator of
mainsheet trim. Generally, it should be steaming straight back with the curvature of the leach. If it is stalling to windward,
you are under trimmed. (The luff telltales will almost always be a better indicator of this) If the leach telltale is stalled far to
leeward, you are either carrying too much vang or are over trimmed, either way the leach is stalled.
リーチのテルテール: OP においては、バングでの制御は制限されているので、リーチのテルテールは、メイ
ンシートトリムの最も顕著な指標となる。 一般的に、テルテールはリーチの湾曲に沿って一直線に後ろに流れ
るべきである。 テルテールが風上にストールする場合は、トリム量が足りない( 常にラフテルテールが、こ
の場合のよりよい顕著な指標となる。
) リーチテルテールが風下にストールする場合は、バングの張りすぎか、
又はオーバートリムであり、このどちらにしてもリーチはストールする。
( リーチに風が流れない )
Boom Preventer - The boom Preventer controls the luff tension in conjunction with the vang and sprit. In medium winds the
luff should have "neutral" tension under pressure, no horizontal wrinkles or vertical wrinkles. In light winds, one or two
twists should be added to produce very slight scallops under pressure. In heavy winds, twists should be let off to produce a
vertical wrinkle in the luff, however, that wrinkle should disappear under pressure.
ブームプリベンター: ブームプリベンターは、バング及びスピリットと関連しながらラフの張り具合を制御す
る。 中風下では、ラフは風圧に対して中庸な張り具合とするべきであり、横方向及び縦方向のしわもあっては
ならない。 軽風下では、ブームプリベンターに 1、2 回転のねじりを追加し、わずかな貝殻状のしわが横に現
れる程度にラフを緩め、深くする。 強風下では、プリベンターのねじりを減らし、ラフに縦のしわが現れるよ
うにきつく浅くするが、この縦のしわは、風圧下では消えてなくなる程度にするとよい。
Vang - The vang controls the luff tension upwind and leech tension off the wind. Use these settings as a starting place.
バング: バングは、ラフ及びリーチの張り具合を制御する。 バングは出艇前にセットすべきであるが、洋上
でも調整できる。
5 knots: Use the Mainsheet to trim for your upwind boom position, and then cleat the vang at that spot. If the wind is puffy,
trim for the median wind speed but leave a small slack in the vang. This will give you added leach control upwind
2~3m の風: メインシートを上り角の位置にトリムする、そして、その状況でバングをクリートにかける。 風
がパッと吹く場合には中風下のセットをするべきであるが、バングは少し緩めておく。 これにより上りのとき
にリーチを制御することができる。
8 to 12 knots: Trim until the boom is centerline and 5 to 8 inches off the transom, and then cleat the vang. In puffy conditions,
trim for the median wind speed or slightly less.
4~6m の風: ブームをトランザムから 12~20cm 浮かす状態でセンターラインまで引き、そしてバングをクリ
ートにかける。 風がパッと吹く場合には、中風下のセットをするべきであるが、バングは少し緩めがよい。
15+ knots: Trim until the boom is 0-3 inches from the transom, and then cleat the vang. If the leach is stalling, ease the vang
slightly or loosen the clue tie.
8m 以上: ブームがトランザムから 7cm 以内となるまでトリムする、そしてバングをクリートにかける。 リ
ーチがストールする場合、少しだけバングを緩める。
Outhaul- In medium air, the outhaul should be trimmed with pronounced scallops along the foot. The clue should be 3-6 cm
from the end of the boom. In heavy air the outhaul should be tightened so that the scallops are removed. However, it should
never be so tight that a hard crease in the foot is induced. In light air it should be eased to a maximum of about 7 or 8 cm from
the end of boom.
アウトホール: 中風下では、フットに沿ってガラミからセールの最初の縫い目までの間に顕著な貝殻のような
しわが出るようにトリムする。 強風下では、上記のしわが消え去るまできつくトリムする。 しかしながら、
フットに極端なしわを生ずるほど強く引いてはならない。 軽風下では、風の流れをよくするために中風のセッ
トよりもアウトホールをやや引き気味にしてフットのしわをなくす。
Sprit- When rigging, slight wrinkles should appear from the sail’s peak to the tack. In light wind these wrinkles should be
very small, in heavy wind the sprit should be tightened so that the wrinkles become pronounced. In any wind speed, the sail
should be perfectly smooth at the median or predominant wind speed on any leg of the course. As a result, slight wrinkles
will sometimes appear from the top of the mast to the clue in puffs and from the peak to the tack in lulls. In medium and
strong winds, especially with light sailors, err to the side of wrinkles
スプリット: スプリットをセットすると、セールのピークからタックにかけてわずかなしわが生じる。 軽風
下では、このしわをできるだけ小さくするべきである。 強風下では、縦しわが出るほどきつくスプリットを張
るべきである。 どのような風域においても、どのようなコース・レグにおける中庸または支配的な風速下にお
いても、セールは完璧になめらかとするのがよい。 結果的に、パッと風が吹いたときにはマストトップからク
リューに小さな横しわが現れ、風がやむとピークからタックにかけて縦しわが現れる。 中風下、及び強風下に
おいて、特に軽量のセーラーには、縦のしわはよくない。
( 原則、縦のしわはよくないので、避ける )
11
Mast Rake- Mast Rake is a highly personal measurement, which effects power and pointing. The following table should be
used as a starting point for your rake. From that starting point you should adjust the rake to suit your personal sailing style
(are you a "footer" or a "pointer"?), the wind conditions you will be sailing in, the sea conditions and your spars (are they stiff
or bendy?). Generally, your rake should be adjusted so that the boom is parallel with the water when sheeted for optimum
upwind sailing. The following measurements are taken from the top of the mast to the rear deck bottom lip.
Childs Weight (lbs.)
Mast Rake (in)
Under 70
70-80
80-90
90-100
100-110
110-120
Over 120
109-110
110-111
111-112
112-112.5
112.5-113
113-113.5
114-114.5
マストレーキ: マストレーキは極めて個人だけに当てはまる計測であり、レーキはパワー及び上り角に作用す
る。 以下の表は、あなたのレーキの最初の目安として利用していただきたい。 この最初の調整から、あなた
の個人的なセーリングスタイル(あなたがスピード重視か、上り角重視か?)
、あなたがセーリングするであろ
う風の状況、海象、及びあなたのスパー類( 堅めか又は曲がりよいか)に合わせてレーキを調整するとよい。
一般的に、OP を上りに展開したときに、ブームが水面と平行になるようにレーキを調整するのがよい。
以下の計測表は、マストトップから OP の船尾デッキのガンネルリップ下端までの長さである。
Childs Weight (kg)
子供の体重 ( kg )
Mast Rake (cm)
マストレーキ ( cm )
31 kg 以下
276 - 279
32 - 36
279 - 282
37 - 40
282 - 284
41 - 45
284 - 286
46 - 49
286 - 287
50 - 54
287 - 288
Over 55
289 - 291
Done at Saijo this 5th day of September 2012 by Arata Nakagawa.
西条にて、2012 年 9 月 5 日作成、中川新
Reviewed on 7th September 2012
9/7 見直し
© Copyright 2026 Paperzz