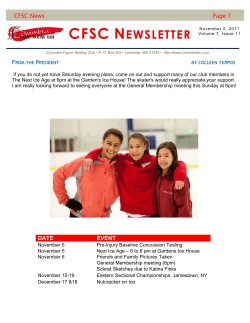
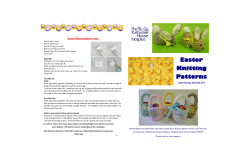
Free Crochet Pattern Lion Brand® Vanna's Choice® Oprah Doll Pattern Number: L1000 Free Crochet Pattern from Lion Brand Yarn Lion Brand® Vanna's Choice® Oprah Doll Pattern Number: L1000 SKILL LEVEL: Easy + SIZE: One Size About 12 1/2 in. (32 cm) tall CORRECTIONS: None as of Feb 21, 2011. To check for later updates, click here. MATERIALS • 860-124 Lion Brand Vanna's Choice Yarn: 1 Ball (A) • 860-113 Lion Brand Vanna's Choice Yarn: 1 Ball (B) • 860-153 Lion Brand Vanna's Choice Yarn: 1 Ball (C) • 860-127 Lion Brand Vanna's Choice Yarn: 1 Ball (D) • 860-149 Lion Brand Vanna's Choice Yarn: 1 Ball (E) • Lion Brand Crochet Hook - Size E-4 • Lion Brand Split Ring Stitch Markers • Large-Eye Blunt Needles (Set of 6) • Additional Materials Toffee Scarlet Black Espresso Silver Grey Fiberfill stuffing Two safety eyes, 9 mm Small piece of white felt (for smile) 10 small beads (optional) 16 gauge wire, 10 in. (25.5 cm) long 1/4 in. (64 mm) dowel, 5 in. (12.5 cm) long Embroidery needle Small amount of black embroidery floss (for eyebrows and eyelashes) Craft glue Powdered blush Powdered grey eye shadow GAUGE: Exact gauge is not important to this project STITCH EXPLANATION: Bobble Yarn over, insert hook in next st, yarn over and draw up a loop, yarn over and draw through 2 loops on hook; (yarn over, insert hook in same st, yarn over and draw up a loop, yarn over and draw through 2 loops on hook) 3 times, yarn over and draw through all 5 loops on hook. sc2tog (sc 2 sts together) Insert hook into st and draw up a loop. Insert hook in next st and draw up a loop. Yarn over, draw through all 3 loops on hook – 1 st decreased. TECHNIQUE EXPLANATION This design uses an adjustable ring to create a neat, closed center on the pieces. Adjustable ring method: Wrap yarn around index finger. Insert hook into ring on finger, yarn over and draw up a loop. Carefully slip ring from finger and work the stitches of Rnd 1 (in pattern, below) into the ring. When Rnd 1 is complete gently, but firmly, pull tail to close up the ring. NOTES: 1. Pieces of doll are worked in continuous rnds; do not join and do not turn at beg of rnds. A marker is used to indicate the beg of rnd. Move marker up as each rnd is completed. 2. If doll is for a child, omit Microphone and Bracelet. 3. To change color, work last st of old color to last yarn over. Yarn over with new color and draw through all loops on hook to complete st. Fasten off old color. HEAD Beg at top of Head with A, make an adjustable ring. Rnd 1: Ch 1, work 6 sc in ring. Gently, but firmly, pull tail to close up ring. Place marker in first sc for beg of rnd; move marker up as each rnd is completed. Rnds 2 and 3: Work 2 sc into each sc around – 24 sc at the end of Rnd 3. Rnd 4: *2 sc in next sc, sc in next sc; rep from * around – 36 sc at the end of this rnd. Rnd 5: *2 sc in next sc, sc in next 5 sc; rep from * around – 42 sc at the end of this rnd. Rnds 6 and 7: Sc in each sc around. Rnd 8: *Sc2tog, sc in next 5 sc; rep from * around – 36 sc at the end of this rnd. Rnd 9: *Sc2tog, sc in next 4 sc; rep from * around – 30 sc at the end of this rnd. Rnds 10 and 11: Sc in each sc around. Rnd 12: Sc in next 15 sc, Bobble in next st (for nose), sc in next 14 sc. Rnd 13: *Sc2tog, sc in next 3 sc; rep from * around – 24 sc at the end of this rnd. Rnd 14: Sc in each sc around. Rnd 15: (Sc2tog) 3 times, sc in next 12 sc, (sc2tog) 3 times – 18 sc at the end of this rnd. Following package directions, insert safety eyes above Rnd 9, 8 sts apart. Stuff head firmly. Rnd 16: (Sc2tog) 3 times, sc in next 6 sc, (sc2tog) 3 times – 12 sc at the end of this rnd. Finish stuffing Head. Rnd 17: *Sc2tog; rep from * around – 6 sc at the end of this rnd. Fasten off. BODY Beg at lower edge of Body, with B, make an adjustable ring. Rnds 1-3: Work same as Rnds 1-3 of Head – 24 sc at the end of Rnd 3. Rnd 4: *2 sc in next sc, sc in next 3 sc; rep from * around – 30 sc at the end of this rnd. Rnds 5-7: Sc in each sc around. Rnd 8: *Sc2tog, sc in next 8 sc; rep from * around – 27 sc at the end of this rnd. Rnd 9: *Sc2tog, sc in next 7 sc; rep from * around – 24 sc at the end of this rnd. Rnd 10: *Sc2tog, sc in next 6 sc; rep from * around – 21 sc at the end of this rnd. Rnd 11: *Sc2tog, sc in next 5 sc; rep from * around – 18 sc at the end of this rnd. Rnds 12 and 13: Sc in each sc around. Rnd 14: *2 sc in next sc, sc in next 8 sc; rep from * around – 20 sc at the end of this rnd. Rnd 15: *2 sc in next sc, sc in next 9 sc; rep from * around – 22 sc at the end of this rnd. Rnd 16: *2 sc in next sc, sc in next 10 sc; rep from * around – 24 sc at the end of this rnd. Rnd 17: Sc in next 10 sc, 5 hdc in next sc, sc in next 3 sc, 5 hdc in next sc, sc in next 9 sc – 32 sts at the end of this rnd. Rnd 18: Sc in next 9 sc, (sc2tog) 3 times, sc in next 2 sc, (sc2tog) 3 times, sc in next 9 sc – 26 sc at the end of this rnd. Rnd 19: Sc in next 7 sc, sc2tog, sc in next 8 sc, sc2tog, sc in next 7 sc – 24 sc at the end of this rnd. Change to A. Beg stuffing Body and continue to stuff as work progresses. Rnd 20: *Sc2tog, sc in next 2 sc; rep from * around – 18 sc at the end of this rnd. Rnd 21: *Sc2tog, sc in next sc; rep from * around – 12 sc at the end of this rnd. Rnd 22: *Sc2tog, sc in next 2 sc; rep from * around – 9 sc at the end of this rnd. Rnds 23 and 24: Sc in each sc around. Fasten off, leaving a long tail. Insert dowel into center of Body, allowing 2 in. (5 cm) of dowel to extend from neck. Finish stuffing Body. Position Head onto dowel, then use tail to sew Head to Body. LEGS (make 2) Beg at top of Leg with A, make an adjustable ring. Rnd 1: Ch 1, work 6 sc in ring. Gently, but firmly, pull tail to close up ring. Place marker in first sc for beg of rnd; move marker up as each rnd is completed. Rnd 2: Work *2 sc in next sc, sc in next sc; rep from * around – 9 sc at the end of this rnd. Rnd 3: 2 sc in next sc, sc in next 8 sc – 10 sc at the end of this rnd. Rnds 4-8: Sc in each sc around. Rnd 9: (Sc2tog) twice, sc in next 6 sc – 8 sc at the end of this rnd. Rnd 10: 2 sc in next 2 sc, sc in next 6 sc – 10 sc at the end of this rnd. Rnds 11-14: Sc in each sc around. Rnd 15: Sc in next 2 sc, sc2tog, sc in next 6 sc – 9 sc at the end of this rnd. Rnd 16: Sc in next 7 sc, 3 hdc in next sc, sc in next sc – 11 sts at the end of this rnd. Rnd 17: Sc in next 2 sc, sc2tog, sc in next 4 sts, 3 hdc in next hdc, sc in next 2 sts – 12 sts at the end of this rnd. Shoe Change to B. Rnd 18: Sc in next 8 sts, (hdc, 2 dc, hdc) in next hdc, sc in next 3 sts – 15 sts at the end of this rnd. Rnd 19: Sc in each st around. High Heel Note: In the next 3 rows, you will not work all the way around. You will only work into some of the sts of the previous rnd or row. Take care to turn when instructed. Row 20: Sl st in next sc, sc in next 4 sc – 4 sc at the end of this row. Row 21: Ch 1, turn, sc in next 4 sc. Row 22: Ch 1, turn, sk first 3 sc, sl st in next sc, folding Rows 20-22 in half to create high heel. Fasten off, and use tail to sew heel closed down to Row 20. Stuff Legs firmly and set aside. SHOE SOLES (make 2) With B, ch 3. Row 1: Sc in 2nd ch from hook and next ch – 2 sc at the end of this row. Row 2: Ch 1, turn, sc in each sc across. Row 3: Ch 1, turn, 2 sc in each sc across – 4 sc at the end of this row. Row 4: Ch 1, turn, (sc2tog) twice – 2 sc at the end of this row. Row 5: Rep Row 2. Fasten off, leaving a long tail for sewing. Sew Shoe Sole onto bottom of Leg, leaving high heel unsewn. Rep for 2nd Shoe Sole. Sew Legs to Body. SKIRT With B, ch 26. Being careful not to twist ch; join with sl st in first ch to form a ring. Rnd 1: Ch 2, hdc in each ch around; join with sl st in top of beg ch. Rnds 2-9: Ch 2, hdc in each hdc around; join with sl st in top of beg ch. Fasten off. With B, sew Skirt to Body along Rnd 12 of Body. SLEEVES (make 2) Beg at top of Sleeve with B, make an adjustable ring. Rnds 1 and 2: Work same as Rnds 1 and 2 of Leg – 9 sc at the end of Rnd 2. Rnds 3-10: Sc in each sc around. Rnd 11: (Sl st, ch 1, sl st) in each sc around. Fasten off. Stuff Sleeves and set aside. HANDS/FOREARMS (make 2) Beg at top of Forearm with A, make an adjustable ring. Rnd 1: Ch 1, work 4 sc in ring. Gently, but firmly, pull tail to close up ring. Place marker in first sc for beg of rnd; move marker up as each rnd is completed. Rnd 2: Work 2 sc in each sc around – 8 sc at the end of this rnd. Rnds 3 and 4: Sc in each sc around. Rnd 5: Sc in next 3 sc, Bobble in next sc (for thumb), sc in next 2 sc, sc2tog – 7 sts at the end of this rnd. Rnds 5-9: Sc in each sc around. Fasten off, leaving a long tail for sewing. Stuff Hands/Forearms. Bend one end of 16 gauge wire and insert it into one stuffed Hand/Forearm. Thread other end of wire through the top of a stuffed Sleeve. Sew the Hand/Forearm inside Sleeve. Thread wire through the Body at the shoulder and out the other side of Body at a corresponding position. Sew stuffed and wired Sleeve to Body at shoulder, positioning arm as desired. Bend other end of wire and insert it into the top of the other Sleeve then down into other Hand/Forearm. Sew the Hand/Forearm inside Sleeve, then sew Sleeve to Body at other shoulder. COLLAR With B, ch 31. Rnd 1: Sc in 2nd ch from hook and next ch, hdc in next 2 ch, (dc, ch 2, sl st) in next ch, sc in next 20 ch, (sl st, ch 2, dc) in next ch, hdc in next 2 ch, sc in last 2 ch. Fasten off, leaving a long tail for sewing. Beg and ending at center front, sew Collar around neck. HAIR Note: You will begin with a wig base that will fit over doll’s head. Beg at top of base with C, make an adjustable ring. Rnds 1-11: Work same as Rnds 1-11 of head. Fasten off, leaving a long tail for sewing. Sew wig base to doll’s head. Cut 36 strands of C and 6 strands of D, each 8-9 in. (20.5-23 cm) long. Fold a C strand in half. Insert hook into a st on Rnd 10 of Wig Base, and through the fold of one strand of C. Draw fold through the st, forming a loop. Thread ends of strand through loop. Rep all the way around Rnd 10 of Wig Base. Working around sides and back of head, attach rem C strands along Rnds 6 and 4 of Wig Base. Attach D strands randomly throughout the attached C strands. With blunt end of needle, gently separate each yarn strand of hair into 4 separate strands. Trim hair strands as desired. EARS (make 2) With A, make an adjustable ring. Rnd 1: Ch 1, work 6 sc in ring. Gently, but firmly, pull tail to close up ring. Place marker in first sc for beg of rnd; move marker up as each rnd is completed. Rnd 2: Sc in each sc around. Fasten off, leaving a long tail for sewing. Sew an Ear to each side of Head, beneath hair at the edge of the wig base and aligned with the nose. MICROPHONE Note: Do not add a Microphone if doll is for a child. Beg at lower end of Microphone, with E, make an adjustable ring. Rnd 1: Ch 1, work 4 sc in ring. Gently, but firmly, pull tail to close up ring. Place marker in first sc for beg of rnd; move marker up as each rnd is completed. Rnd 2: Working in back loops only, sc in each sc around. Rnds 3-7: Sc in each sc around. Change to C. Rnd 8: Working through front loops only, *2 sc in next sc, sc in next sc; rep from * around – 6 sc at the end of this rnd. Rnd 9: *2 sc in next sc, sc in next sc; rep from * around – 9 sc at the end of this rnd. Rnd 10: *Sc2tog, sc in next sc; rep from * around – 6 sc at the end of this rnd. Fasten off, leaving a long tail. With tail sew, opening closed. Sew Microphone to one Hand. FINISHING Weave in ends. With black embroidery floss, embroider straight st eyebrows and eyelashes. Cut a smile from white felt and glue to Head. With B, embroider straight sts to outline felt smile. Apply blush to cheeks and eye shadow above eyes. Earrings To create earrings, thread blunt needle with E, knot end, and pull through the Ear. Leaving a loop of E, sew back through Ear, then knot E to secure. Rep in other Ear. Bracelet Note: Do not add a Bracelet if doll is for a child. Thread embroidery needle with a length of floss. Knot one end of floss. String beads onto floss, wrap floss around doll’s wrist, then knot ends of floss together. ABBREVIATIONS / REFERENCES Click for explanation and illustration beg = begin(s)(ning) ch(s) = chain(s) dc = double crochet hdc = half double crochet rep = repeat(s)(ing) rnd(s) = round(s) sc = single crochet sl st = slip stitch st(s) = stitch(es) Learn to crochet instructions: http://learnToCrochet.LionBrand.com Every effort has been made to have the knitting and crochet instructions accurate and complete. We cannot be responsible for variance of individual knitters and crocheters, human errors, or typographical mistakes. *Vanna's Choice® (Article #860) is a 4-ply worsted-weight 100% acrylic yarn. • Solids in 3.5 oz/100g (170 yd/156 m) balls • Prints in 3 oz/85 g (145 yd/133 m) balls 100% acrylic We want your project to be a success! If you need help with this or any other Lion Brand pattern, e-mail support is available 7 days per week. Just click here to explain your problem and someone will help you! For thousands of free patterns, visit our website www.LionBrand.com To order visit our website www.lionbrand.com or call: (800) 258-YARN (9276) any time! Copyright ©1998-2009 Lion Brand Yarn Company, all rights reserved. No pattern or other material may be reproduced -- mechanically, electronically, or by any other means, including photocopying -- without written permission of Lion Brand Yarn Company.
© Copyright 2026 Paperzz