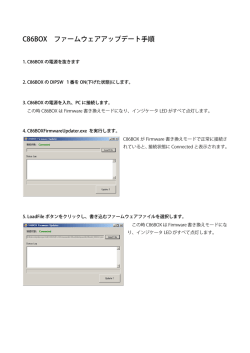
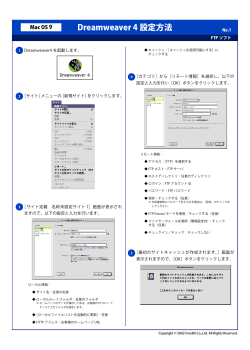
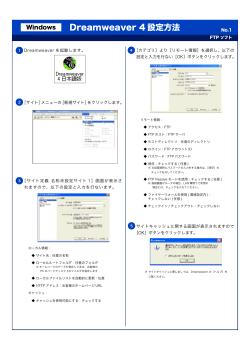
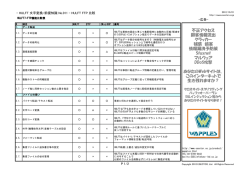
ftScalable Storage G3 ログ取得手順 内容: ftScalable Storage G3に関する調査解析を行う際に、必要となるログデ ータの取得方法となります。 Rev 1: 2015/12/18 ftScalable Storage G3 のログデータ取得内容 ftScalable Storage G3 にはロギング機能が備わっており、ログには下記内容が含まれてい ます。 基本的なデバイスステータス概要や構成データなど 各コントローラからのイベントログ 各コントローラからのデバッグログ 起動ログ クリティカルダンプ(クリティカルエラーが発生していた場合) 各コントローラからの CAPI トレースログ 各コントローラはログデータの収集とファームウェアのロードに1つのメモリバッファー を共有します。同時に複数のログデータの保存やログデータの保存中にファームウェアの アップデートは実施しないでください。 ログデータは下記 2 つの方法で取得できます。 ① G3MC(ブラウザ経由での GUI インターフェース)を使用したログの取得 ② FTP を使用したログの取得 ※本資料においては、ftScalable StorageG3 に設定されている IP アドレスは、192.168.0.1 を使用し ています。 1. G3MC からの取得方法 ① ブラウザに RAID コントローラの IP アドレスを入力し G3MC にログイン後、画面左 下のフッターのシステムヘルス情報パネルをクリックし、Save Logs を選択します。 ② Save Logs の画面が表示されます。サポート担当者にデータの提供者がわかるように Your Name、Your Email Address、Your Phone Number と Comments(*印のついた 項目は必須入力項目です)を入力して OK をクリックします。コメント欄は問題の説明 や発生日時などのコメントを入力してください。コメントテキストは最大 500 バイト まで入力できます。 ③ ログの取得が開始されます。この操作が完了するまで数分かかります。 ④ Log file created となり、ファイルを開くまたは保存するメッセージが表示されたら保 存をクリックします。 ※Internet Explore で、ダウンロードがセキュリティバーによってブロックされる場合、フ ァールのダウンロードオプションを選択してダウンロードしてください。 ログのダウンロードが一度で成功しない場合は、再度ログの取得を実施してください。 Chrome を使用している場合は、ダウンロードフォルダに store.zip が保存されます。 Firefox を使用していて、ダウンロードフォルダを設定している場合はそのフォルダに sotre.zip が保存されます。 それ以外の場合はファイルの保存場所と名前を指定するようにメッセージが表示され ます。 2. ftp での取得方法 ftp にてログインを実施して“get logs filename.zip”コマンドで取得する事が可能です。 RAID コントローラの設定で ftp が無効となっている場合は、後述の手順で ftp の有効化を 実施する必要があります。 実行例: C:\Users\marai\Desktop>ftp 192.168.0.1 192.168.0.1 に接続しました。 220-Welcome to Pure-FTPd. 220-You are user number 1 of 5 allowed. 220-Local time is now 11:30. Server port: 21. 220-This is a private system - No anonymous login 220 You will be disconnected after 15 minutes of inactivity. ユーザー (192.168.0.1:(none)): manage 331 User manage OK. Password required パスワード:****** 230-OK. Current restricted directory is / 230-Instructions for updating firmware in controller modules: 2301. Type 'put <filename> flash' where <filename> is the new firmware image to load. 2302. It will take approximately 10 minutes for the new firmware to load and 230for the automatic restart to complete. Progress messages will be 230displayed in this FTP interface during that time. Wait for the progress 230messages to indicate that the code load has completed. 2303. If the partner firmware upgrade (PFU) feature is enabled, allow 230an additional 20 minutes for the partner controller to be updated. 230No messages will be displayed in the FTP interface during PFU. 230If PFU is NOT enabled, log into the other controller and repeat steps 1-2. 2304. WARNING! Do not power cycle or restart during the firmware update 230as this can result in loss of capabilities for this unit. 2305. If you attempt to load an incompatible firmware version (such as code 230that is intended only for an iSCSI system on an FC system) the message 230"*** Code Load Fail. Bad format image. ***" will be displayed and the FTP 230prompt will come back in just a few seconds. The code will not be loaded. 230230-Instructions for updating firmware in expansion modules: 2301. Obtain the address of each enclosure management processor (EMP) in the form 230<EMP-channel-ID>:<EMP-target-ID> (for example, 0:63 and 1:63) 230and obtain the firmware revision of each EMP. 230Determine which EMPs need to be updated based on the revision. 230Note: In the WBI, the EMP addresses are displayed by clicking on each 230enclosure in the Configuration View. The needed data is displayed 230in the fields labeled 'EMP A Bus ID', 'EMP B Bus ID', 'EMP A TargetID', 230'EMP B Target ID', 'EMP A Revision', and 'EMP B Revision'. (The terms 230'bus' and 'channel' are equivalent.) 230Note: In the CLI, enter 'show enclosures'. The needed data is displayed 230in the columns labeled 'EMP A CH:ID Rev' and 'EMP B CH:ID Rev'. 2302. Log in via FTP with user name and password. 2303. Type 'put <filename> encl:<EMP-channel-ID>:<EMP-target-ID>' 230where <filename> is the new firmware image to load. 2304. It typically takes several minutes for the new firmware to load. Progress 230messages will be displayed in this FTP interface during that time. Wait 230for the progress messages to indicate that the code load has completed. 230WARNING! Do not power cycle or restart during the firmware update 230as this can result in loss of capabilities for this unit. 2305. Repeat steps 3-4 for each EMP to update in each enclosure. 230230-Instructions for updating disk firmware: 2301. Obtain the address of each disk to be loaded in the form 230<enclosure-ID>.<slot-number> (for example, 0.1 and 1.9) 230and obtain the firmware revision of each of these disks. 230Determine which disks need to be updated based on the revision. 230Note: In the WBI, the disk addresses are displayed by clicking on each 230enclosure in the Configuration View and then selecting the desired 230disk. The needed data is displayed in the fields labeled 'EnclosureID', 230'Slot', and 'Revision'. 230Note: In the CLI, enter 'show disks'. The needed data is displayed 230in the columns labeled 'Location' and 'Revision'. 2302. Log in via FTP with user name and password. 2303. Type 'put <filename> disk:<disk-list>' 230where <filename> is the new firmware image to load, 230and <disk-list> is a list of the form currently supported in the CLI . 230You can specify: 230- A disk (Example: 0.4) 230- A hyphenated range of disks (Example: 0.4-7) 230- A comma-separated list of individual disks, ranges, or both with no spaces. 230(Example: 0.4,0.6-9) 230If "disk" with no disk-list is entered, all disks compatible with the 230specified firmware will be updated. 2304. It typically takes several minutes for the new firmware to load. Progress 230messages will be displayed in this FTP interface during that time. Wait 230for the progress messages to indicate that the code load has completed. 230WARNING! Do not power cycle or restart during the firmware update 230as this can result in loss of capabilities for this unit. 2305. Repeat steps 3-4 for each disk to update in each enclosure. 230230-Instructions for getting debug logs: 2301. Log in with a user name and password. 2302. Type 'get logs <filename.zip>' 230where <filename.zip> is the file to capture the system debug logs. 230Note the debug logs are in a compressed archive format and will need to be 230uncompressed before viewing. 230230-Instructions for getting historical disk-performance statistics: 2301. Log in as a user that has permission to use the FTP interface. 2302. Type 'get perf[:<date/time-range>] <filename>.csv' 230where <filename>.csv is the file to capture the historical 230disk-performance statistics and <date/time-range> is optional 230and specifies the time range of data to transfer, in the format: 230start.<yyyy>-<mm>-<dd>.<hh>:<mm>.[AM|PM].end.<yyyy>-<mm>-<dd>.<hh>:<mm>.[AM|PM]. 230The <date/time-range> string must contain no spaces. 2303. Example: 'get perf:start.2015-01-03.04:00.AM.end.2015-01-05.10:00.PM. statistics.csv' 230230-Instructions for loading a license file: 2301. Log in with a user name and password. 2302. Type 'put <certificate.txt> license' 230where <certificate.txt> is the name of the license file generated 230for your specific system. 230230-Instructions for loading security certificate files: 2301. The security certificate files will consist of a pair of files. 230You will have a certificate file and a key file. 2302. Log in with a user name and password. 2303. Type 'put <certificate-file-name> cert-file' 230where <certificate-file-name> is the name of the certificate file 230for your specific system. 2304. Type 'put <key-file-name> cert-key-file' 230 where <key-file-name> is the name of the security key file for ftp> bin 200 TYPE is now 8-bit binary ftp> get logs store.zip 200 PORT command successful 150-Starting operation: STATUS: Getting Storage Controller logs ... Please wait... STATUS: Finished getting Storage Controller logs STATUS: Getting local Management Controller logs from A adding: A/cfg/watcher1.out (deflated 12%) adding: A/cfg/watcher2.out (deflated 85%) adding: A/log/os/preprestart.log.0 (deflated 89%) adding: A/log/os/preprestart.log.1 (deflated 89%) adding: A/log/os/preprestart.log.2 (deflated 88%) adding: A/log/os/preprestart.log.3 (deflated 89%) adding: A/log/os/preprestart.log.4 (deflated 89%) STATUS: Finished getting logs from local Management Controller. STATUS: Getting logs from Partner Managment Controller B STATUS: Finished getting the Partner Managment Controller B logs STATUS: get logs operation is complete Size: 10478736 bytes Operation Complete 150-Connecting to port 61677 150 (10478736 bytes) to download 226-File successfully transferred 226 0.832 seconds (measured here), 12.01 Mbytes per second ftp: 10478736 バイトが受信されました 0.83 秒 12670.78KB/秒。 ftp> RAID コントローラの設定で ftp が無効になっている場合は、ftp で接続できません。次の 方法で CLI にログインして ftp を有効化することができます。 実行例: telnet 192.168.0.1 192.168.0.1 login: manage Password:******* Stratus ftScalable Storage AA-D98000 System Name: Uninitialized Name System Location: Uninitialized Location Version: GL210R006-02 下記コマンドで現在の設定を確認 # show protocols Service and Security Protocols -----------------------------Web Browser Interface (HTTP): Enabled Secure Web Browser Interface (HTTPS): Enabled Command Line Interface (Telnet): Enabled Secure Command Line Interface (SSH): Enabled Storage Management Initiative Specification (SMI-S): Enabled Unsecure Storage Management Initiative Specification (SMI-S 5988): Disabled File Transfer Protocol (FTP): Disabled Simple Network Management Protocol (SNMP): Enabled Service Debug (Debug): Disabled In-band SES Management (SES): Enabled Activity Progress Reporting (activity): Disabled 下記コマンドで ftp の有効化 # set protocols ftp enabled Success: Command completed successfully. ftp が有効になったことを確認 # show protocols Service and Security Protocols -----------------------------Web Browser Interface (HTTP): Enabled Secure Web Browser Interface (HTTPS): Enabled Command Line Interface (Telnet): Enabled Secure Command Line Interface (SSH): Enabled Storage Management Initiative Specification (SMI-S): Enabled Unsecure Storage Management Initiative Specification (SMI-S 5988): Disabled File Transfer Protocol (FTP): Enabled Simple Network Management Protocol (SNMP): Enabled Service Debug (Debug): Disabled In-band SES Management (SES): Enabled Activity Progress Reporting (activity): Disabled 以上
© Copyright 2026 Paperzz