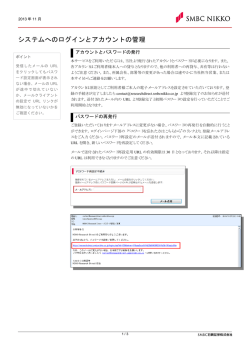
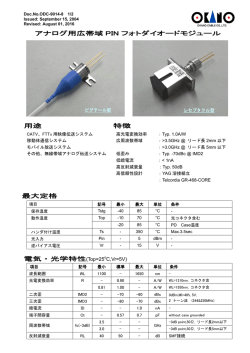
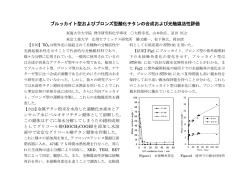
リニヤゲージ LG-01100/LGM-01100 User’s Manual No. 99MBC072B2 Series No. 542 はじめに 2. ゲージとカウンタの接続 6. 測定子の交換およびリフティングレバー (LG-01100 のみ ) の取付方法 本器の性能を十分発揮させ、長期にわたり良好な状態でご使用いただくために、 ご使用の前にはこのユーザーズマニュアルの内容をご確認いただき、正しくお使い ください。本書はお読みになった後も大切に保管してください。また、外観・仕様 などは商品改良のために予告なしに変更することがありますのでご了承ください。 出力コネクタ (6) をリニヤゲージカウンタの入力コネクタに接続します。詳細はリニヤ ゲージカウンタのユーザーズマニュアルを参照してください。 付属のキースパナをスピンドルのスパナ掛けにかけ、しっかり固定し測定子または 取付けホルダをペンチ等ではさんで取り外し/取り付けしてください。(下図参照) 海外移転に関するご注意 ドライブコネクタ (8) をモータドライブユニットの入力コネクタに接続します。詳細 はモータドライブユニットのユーザーズマニュアルを参照してください。 電磁両立性について * 本製品は、欧州 EMC 指令に適合していますが、この要求を超える電磁妨害に対し ては保証外となり、適切な対策が必要となります。 * 本製品は工業用製品です。住宅環境での使用は意図しておりません。住宅環境で 使用すると、他の機器に対して電磁妨害が発生する可能性があります。その場合 には電磁妨害に対する適切な対策が必要となります。 安全に関する注意 商品のご使用に当たっては、記述の仕様・機能・使用上の注意に従ってご使用ください。 従わないでご使用になりますと安全性を損なう恐れがあります。 警告 替え測定子によっては、測定子先端形状が鋭利になっているものがあります。 これらの測定子を使用する場合は、怪我をする恐れがありますので、使用 及び取扱いには充分な安全対策を実施してください。 注意 LG-01100 の場合、測定子を押し込んだ後に自由開放させると押込み量に よっては、測定子が非常に早いスピードで突出しますので、指や手を挟ま れないように注意をしてください。 85ID25ഊຎ 取付けホルダ (NO.02ADG181) 重要 他の機器類の動力線とゲージのケーブルを近付けて使用しますと、誤動作の原因と なりますので動力線から離して配線してください。 リフティングレバー (NO.137693) 本器の装置への取付けは、φ20 ステム部をクランプする方法と、ゲージ本体取付用穴 を使用した方法の 2 りがあります。 1) ゲージ本体取付用穴 (2) を使用する場合は、標準付属品の六角穴付ボルトを使用 してしっかり固定してください。 2) ステム部 (1) をクランプして取付る場合は、スリ割り入りホルダ又は割ブッシュ を推奨致します。 ( 下図参照 ) + +0 0.0 .0 28 07 20 スリ割り入りホルダ + +0 0.0 .0 28 07 MNUఒਖ M2.5×0.45 4. ゲージの取付方法 20 ʭʁʠʃʯˁᆵ スパナ掛け部 ※ 上端検出信号は、47kΩ 程度の抵抗を使い終端してから、シュミット回路を用い て入力して下さい。 ※ 別途、ノイズ対策を実施して下さい。 割りブッシュ入りホルダ 重要 スピンドルを通してゲージ内部に回転力(モーメント)が加わると、破損するおそ れがありますのでキースパナでしっかりと固定してから作業を行うよう十分ご注意 ください。 7. カウンタへの出力信号仕様 以下の行為、状況は本器の故障、誤動作の原因となりますので避けて下さいますよう お願いします。 割りブッシュ 重要 1 +5V ※ 1 6 5 4 2 φA 3 φB 4 φA 5 GND ● 止めネジで直接ステムを押し付ける方法は避けてください。 (作動不良の原因となる 可能性があります。) ● ゲージは測定面に対して垂直になるように取付けてください。傾けて取り付けま すと測定結果に誤差を生じます。 φB ※:ゲージヘッドへの供給電源 電源電圧 : 5V(4.8V 〜 5.2V) リップル電圧 : 200mVp-p 以下、消費電流:MAX120mA 3) 入出力信号レベル 差動ラインドライバ AM26LS31 相当(+5V、GND 除く) 4) 出力信号タイミングチャート 出力コネクタ RM12BPG-6P(ヒロセ) 量子化誤差 測 測定子下向き 定 測定子横向き 力 測定子上向き 位置検出方式 最大計数応答速度 駆動方式 上端位置検出 計数出力信号 測定子 ステム径 軸受け方式 防塵防水性 ケーブル長 使用温度範囲(湿度) 保存温度範囲(湿度) ステム 6 (3) スピンドル 20 L0 243.5 7 17 34 5. 防塵防水性 (IP54) についての注意事項 1 重要 ● 出力コネクタ・ドライブコネクタ部は保護構造になっておりません。直接水や油 等のかからない場所に設置してください。 ● 延長ケーブルをご使用の際には、接続コネクタ部に露出がないように完全なシール を施してください。 ● ケーブルの被覆が破れると、毛細管現象により液体がゲージ内部に侵入し故障の原因 となります。被覆が破れた場合には最寄りの弊社営業所に修理を依頼願います。 ● 本機は各部にシールが施されているため、分解できない構造となっております。 そのため、分解をされますと所定の性能を発揮できませんので絶対におやめください。 ● 各シール部に使用しているゴムは、多様化するクーランと、薬品などに対して万 能ではありません。これらが著しく劣化する場合には、最寄りの弊社営業所まで ご相談ください。 神奈川県川崎市高津区坂戸 1-20-1 〒 213-8533 6 5 2 3 ※1. モータの駆動電圧 (HOT / RET 間) ※2.上端検出信号 ※3. 4 ●電源電圧 ●定格電流 ●無負荷電流 ● LMT 信号 センサ(フォトカプラ)への供給電源 ピン No. 1 2 3 4 5 6 : : : : 542-312 LG-01100 542-313 LGM-01100 100mm 0.1µm (2+L/100)m:L =任意測定長(mm) 但し、2.5µm 以下 ±1 カウント 8.0N 以下 6.5N 以下 5.0N 以下 モータドライブユニット の設定による。※1 光電式反射型リニヤエンコーダ 約 400mm/sec※2 引張りコイルバネ モータドライブ フォトカプラにより検出 90° 位相差差動方形波(RS422A 準拠) φ3 超硬球(取付ネジ:M2.5×0.45) φ20 ベアリング IP54 相当 約 2m 0 〜 40℃(20 〜 80% RH、非結露) –10 〜 60℃(20 〜 80% RH、非結露) 測定子交換用キースパナ(No.210187) 六角穴付ボルト M4×0.7×35 2 ヶ(ゲージ取付用) 平座金 小形丸 呼び 4 2 ヶ(ゲージ取付用) リフティングレバー (No.137693) 取付けホルダ (No.02ADG181) EMC 指令 : EN61326-1 Immunity test requirements : Clause 6.2 Table2 Emission limit : Class A 1) ドライブコネクタ(ゲージ側):HR10A-7P-6P(ヒロセ) 2) ピン配列 429 本体取付用穴 2−4.5キリ・9ザグリ深4 50 CE マーキング 5) 接続適合コネクタ及び推奨受信 IC( ラインレシーバ ) コネクタ(カウンタ側) : RM12BRD-6S(ヒロセ) ラインレシーバ : AM26LS32 相当品 8. モータドライブユニットへの入出力信号仕様(LGM-01100 のみ) 68 6 カウンタへ 注記:(7) と (8) は LGM-01100 のみ (2) 36 測定子 (4) コード NO. 符号 測定範囲 分解能 指示精度(20℃) 0.1m ストローク=102以上 (7) (5) (1) 9. 仕様(t=20℃、電源投入後 30 分にて) 付属品 (6) 20 0–0.013 4) 接続適合コネクタ コネクタ(モータドライブユニット側) :HR10A-7R-6S(ヒロセ) 33 誤差 = LO–L1 191.5 モータドライブユニットへ 出力ケーブル(ケーブル長2m) ドライブコネクタ HR10A-7P-6P(ヒロセ) 信号名 6 L1 ドライブケーブル(ケーブル長2m) 3 ピンNO. (単位:mm) 49 (8) 2 重要 47kΩ GND スパナ掛け部 キースパナ 1) 出力コネクター(ゲージ側):RM12BPG-6P( ヒロセ ) 2) ピン配列 1. 各部の名称と寸法 MNUఒਖɈିఒޑᇭĪઞ৽ī 3. ゲージとモータドライブユニットの接続(LGM-01100 のみ) ご使用上の注意 ● 落下などの急激なショックを与えたり、過度の力を加えないでください。 ● 分解、改造しないでください。 ● 直射日光のあたる所、極端に熱い、寒い所での使用・保管は避けてください。 ● 精度良くご使用していただくため、温度変化の激しい環境でのご使用は避けてください。 ● 電気ペン等の高電圧機器を使用した場合、電子部品が破壊される場合があります。 また電気的ノイズの大きい場所での使用は避けてください。 ● スピンドルに対し垂直な方向の荷重や、ねじれが加わるような使用は避けてください。 ● 作動不良の原因となりますので、ステム部を必要以上に締め過ぎないよう注意して ください。 ● ケーブルに無理な力をかけないよう、また無理な曲げを与えないよう注意してください。 ● ストロークの両端を原点として使用しないでください。 ● 安定した測定を行うには、電後 30 分程度お待ちください。 ● 他の機器類などと組み合わせて使用になる場合、環境や使用条件などにより性能 が十分に発揮できない場合がありますので、ご検討の上ご使用ください。 ● 仕様に示された条件以外で使用された場合、機能および性能の保証ができません のでご注意ください。 ● 本製品が万が一故障した場合の損害賠償防止処置(安全対策)を十分に行ってください。 ʊĜʐത 15 本製品は「外国為替及び外国貿易法」の規制対象品です。製品や技術を海外移転す る場合は、事前に弊社にご相談ください。 3)上端検出 (LMT) 信号受信回路例 信号名 HOT※1 RET※1 NC +5V※3 LMT※2 GND※3 DC12V 125mA 以下 55mA 以下 エミッタフォロワ出力 低電圧指令 : EN61010-1 注記 ※1. LGM-01100 の速度は、モータドライブユニットにて変更可能です。詳細はモータ ドライブユニットの取扱説明書を参照してください。 ※2. LG-01100 の場合、測定子を押し込んだ後に自由開放させると押し込み によっては、 オーバースピードエラーを発生する場合がありますので注意してください。 Linear Gage LG-01100/LGM-01100 User’s Manual No. 99MBC072B2 Series No. 542 2. Connecting the Gage to the Counter To obtain the highest performance and the longest service life from your Linear Gage, carefully read this manual thoroughly prior to setup and operation. After reading this manual keep it near the Linear Gage for quick reference. The external view and specifications of this gage are subject to change without prior notification due to improvements. Connect the output connector (6) of the gage to the input connector on a linear gage counter. For detailed information, refer to the user's manual of the linear gage counter. Export Control Compliance Connect the drive connector (8) of the gage to the input connector on a motor-drive unit. For detailed information, refer to the user's manual of the motor-drive unit. The goods, technologies or software described herein may be subject to National or International, or Japanese Export Controls. To export directly or indirectly such matter without due approval from the appropriate authorities may therefore be a breach of export control regulations and the law. Electromagnetic Compatibility This product complies with the EU EMC Directive. Note that if electromagnetic interference, which exceeds the requirements of applicable standards related to the EU EMC Directive, should be applied to this product, the accuracy and performance of this product are not guaranteed so that it is necessary to take appropriate measures. This product is an industrial product, and is not intended to be used in residential environment. If this product is used in residential environment, this product may cause electromagnetic interference with other instruments. In such a case, it is required to take appropriate measures for preventing such electromagnetic interference. Safety Precautions To ensure operator safety, use the instrument in conformance with the directions and specifications given in this User's Manual. Some replacement contact points may have a sharp tip. There is a risk of personal injury if either of these contact points is used. WARNING Exercise sufficient precautions for safe use and operation. 3. Connecting the Gage to the Motor-drive unit (LGM-01100 only) 6. Replacing the contact point and mounting the lifting lever (LG-01100 only) Mounting holder (NO. 02ADG181) M2.5×0.45 4. Mounting the Gage + +0 0.0 .0 28 07 20 Slotted holder + +0 0.0 .0 28 07 Key way 4) Split bushing holder 1) 2) Pin NO. Signal name +5V 2 φA 3 φB * 4 φA 5 GND 6 φB * Power supply to the gage head Power voltage : 5V (4.8V to 5.2V) Ripple voltage : 200mVp-p or less Current consumption : 120mA max. 3) Input/output signal level Equivalent to differential line driver AM26LS31 (+5V, GND excluded) 4) Output signal timing chart φA φA Error = LO–L1 (unit: mm) φB L0 5. Precautions in Protecting the Gage from Dust and Water (IP54) 429 IMPORTANT 7 68 50 Stem 6 (3) ストローク=102以上 0.1m 5) Main unit mounting hole 2–4.5 drill, 9 countersink, 4 deep 243.5 To the counter 6 5 4 IMPORTANT (2) 36 Contact point (4) 1 φB Output connector RM12BPG-6P (Hirose) To the Motor-drive unit (5) (1) 191.5 Drive cable (cable length 2m) Output cable (cable length 2m) (7) 3 (6) 20 0–0.013 1 6 2 L1 Drive connector HR10-A-7P-6P (Hirose) (8) 33 Spindle 20 17 34 • The output connector and the drive connector are not protective structured. Install the gage at a place where it is not splashed directly with water and oil. • If using an extension cable seal up the each connector joint so that no part of it is exposed to the air. • If the cable cover is broken, liquid will penetrate into the gage inside due to capillary phenomenon. If any part of cable sheath is broken, contact the nearest Mitutoyo Service Center for repair. • Each part of the gage is sealed up, and therefore must not be disassembled. If any part is disassembled, the rated performance will not be obtained. Do not absolutely disassemble the gage. • The materials including rubber which are used for each sealed part is not universal against diversified coolants and chemicals. If those parts deteriorate unusually, consult the nearest Mitutoyo Service Center. NOTE: Parts (7) and (8) are provided only for LGM-01100. 20-1, Sakado 1-Chome, Takatsu-ku, Kawasaki-shi, Kanagawa 213-8533, Japan Applicable connector (motor drive unit) : HR10A-7R-6S (Hirose) Order No. Model Measuring range Resolution Accuracy (20°C) Output connector (for the Gage) : RM12BPG-6P (Hirose) Pin assignment Split bushing IMPORTANT 49 47kΩ 9. Specifications (at 20°C, in 30 minutes after power-on) 7. Specifications of the Output Signals to the Counter • Absolutely avoid pressing the stem directly with set screws. (The built-in bearing may be damaged.) • Mount the gage so that the spindle is directed perpendicular to the measured surface. If the gage is mounted at an angle to the measured surface, an error may be generated in measurement results. LMT signal * Input the upper limit detection signal, with it terminated with about 47kΩ, to the Schmitt circuit. * Implement noise measures separately If torque is applied to the gage inside through the spindle, damage in the gage may result. Be sure to fix the spindle using the key spanner. Carefully avoid the following attempts and conditions to protect the instrument from failure and malfunction. 1. Name and Dimension of Each Part Key way Key spanner IMPORTANT Precautions for Use 74HC14 or equivalent GND Lifting lever (NO.137693) To mount the gage on another instrument, use either of the two methods: one is the method of clamping the f20 stem, and the other is the method of using the mounting holes on the gage main unit. 1) To mount the gage using the mounting holes (2) on the gage body, use the supplied socket-head screws to secure the gage firmly. 2) To mount the gage by clamping the stem (1), it is recommended to use a slit holder or a slit-bushing inserted holder. (See the following figure.) LMT signal receiver circuit (referene) Gage side Photo-coupler output If the gage cable is close to the power line for other instruments, the gage may malfunction. Connect the gage cable as apart from the power line as possible. 20 Example of the upper limit detection (LMT) signal receiver circuit Mate the supplied key wrench with the key way on the spindle to fix the spindle, and then attach/detach the contact point or the mounting holder of the lifting lever while holding it with a pair of pliers. (See the figure below.) IMPORTANT In LG-01100 an over-speed error may occur depending on the spindle retraction amount, if the contact point is released freely after it is retracted. Exercise care so that your fingers or hand may not be caught CAUTION between the contact point and a workpiece. • Do not apply sudden shocks including a drop or excessive force to the linear gage. • Do not disassemble or modify the gage. • Do not use and store the gage at sites where it is exposed to direct sunlight or at extremely hot or cold sites. • To use the gage highly accurately, avoid sites where the temperature will change abruptly. • Absolutely do not apply an electric engraver to the gage. The high voltage may damage electronic parts. Also, do not use the gage at sites where it is subject to large electric noises. • Do not exert load on the spindle in the perpendicular direction and do not twist the spindle. • Do not clamp the stem too tightly, since the spindle will not move smoothly. • Do not apply excessive tension to the cable or do not bend it forcibly. • To perform stable measurement, allow at least 30 minutes after turning on the power. • Do not set up the origin point at either end of the stroke. • If the gage is used in combination with other instruments, the maximum performance could not be obtained depending on environmental and ope-rating conditions. Take those conditions into consideration prior to use. • The functions and performance will not be guaranteed, if the gage is used in other conditions than those specified. • Take sufficient damage-preventive processing (safety measures), should this gage have been at fault. 3) 15 Foreword Applicable connector and recommended receiver IC (line receiver) Connector (for the counter) : RM12BRD-6S (Hirose) Line receiver : AM26LS32 or equivalent Quantinzing error Measuring force : Contact point downward Contact point horizontal Contact point upward Positional sensor Maximum count response speed Drive system Upper limit position detection Count output signal Contact point Stem diameter Bearing type Dust/Water protection level Cable length Operating temperature (Humidity) Storage temperature (Humidity) Standard accessory 8. Specifications of Input/output Signal to the Motor-drive unit (LGM-01100 only) 1) 2) Drive connector(for the gage) : HR10A-7P-6P (Hirose) Pin assignment 1 6 5 2 3 4 *1. Motor drive voltage • Power voltage (between HOT and RET) • Rated current • No-load current *2. Upper limit detection signal • LMT signal *3. Power supply to the Sensor (photo-coupler) CE marking Pin No. 1 2 3 4 5 6 Signal name HOT *1 RET *1 NC +5V *3 LMT *2 GND *3 : DC12V :125mA or less : 55mA or less : Open emitter output 542-312 LG-01100 542-313 LGM-01100 100mm 0.1µm (2+L/100)µm : L= measured length in mm However, it should be less than 2.5µm ±1 count 8.0N or less 6.5N or less 5.0N or less Depends on the motor drive unit setting *1 Photoelectric reflection linear encoder Approx. 400mm/sec *2 Drive mehod tension coil spring Motor-drive Detection with a photo-coupler 90° phase differential suquare wave (conforming to RS422A) φ3 carbide ball (Thread: M2.5×0.45) φ20 Bearing IP54 or equivalent Approx. 2m 0 to 40°C (20 to 80%RH, with no condensation) –10 to 60°C (20 to 80%RH, with no condensation) Key spanner for contact point replacement (NO. 210187) Two Hex screws M4×0.7×35 (for mounting the gage) Two plain washers small round bars nominal 4 (for mounting the gage) Lifting lever (No. 137693) Mounting holder (No. 02ADG181) EMC Directive : EN61326-1 Immunity test requirements : Clause 6.2 Table2 Emission limit : Class A NOTE *1. The drive speed of LGM-01100 can be changed according to the setting of the motor drive unit. For detailed information, refer to the user's manual of the motordrive unit. *2. In LG-01100 an over-speed error may occur depending on the spindle retraction amount, if the contact point is released freely after it is retracted. For the EU Directive Authorized representative and importer in the EU: Mitutoyo Europe GmbH Borsigstrasse 8-10, 41469 Neuss, Germany Printed in Japan DQIPNE101111
© Copyright 2026 Paperzz