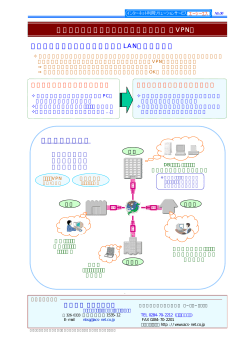
VPN システム
杉谷 賢一
ネットコミニュケーション研究部門
[email protected]
概要
平成 15 年度,当センターが導入した VPN (Virtual Private Network) システムは,平成 16 年度より本格的に
運用を開始します.本稿では, VPN システムの概要並びに,VPN システムを利用するためのクライアント PC へ
のソフトウェアのインストールについて説明します.
1
VPN システムとは
ターネット・サービ ス・プロバイダと契約され,ご 自宅
の PC がインターネットに接続されているとする.この
家庭の イン ターネット 接続の多くが FTTH(光ケー
状態で皆さんの PC は,契約しているプロバイダのネッ
ブ ル に よ る 接 続),ADSL(電 話 線 に よ る 高 速 接 続), トワーク内の構成要素となっている.ここで,ご自宅の
CATV(ケーブルテレビの回線による接続) などのブロー PC で,VPN の仕組みを利用し ,熊大のネットワーク
ド バンド 化された現在,自宅から SOSEKI など の学内
(KUIC) に接続すると,インターネットを経由している
専用のサービ スを利用したいという要望が多くなった. のにも係わらず,KUIC に直接接接続されている (学内
ただ,学内専用のサービ スは,セキュリュティ・レベル の PC の) ように見せることが可能になる.
の高い情報を取り扱うゆえに「学内専用」としているた
この VPN を構築するためには,異るネットワークの
め,世界中の人がアクセスできるインターネットを経由
それぞれに,VPN を実現するための装置もし くはソフ
したアクセスを,基本的に許すわけにはいかない.
トウェアが必要である.この度,当センターでは,専用
ただ,このような要求は大学だけ無く,一般の組織で
装置 (Cisco 社製 コンセントレータ VPN 3030) を導入し
も需要が多い.例えば,九州営業所から,社外秘の情報
た.この装置に接続するためには,専用の ID の取得と
を蓄えてある東京本社のデータベースを利用するシステ
専用ソフトを PC にインストールする必要がある.専用
ムを構築する際,セキュリティを保つために,従来は東
の ID の取得には,サポートならびにメインテナンスの
京本社と九州支社を結ぶ専用線を引き,そのネットワー
費用の一部を校費で負担していただくことになっている.
クを利用して,通信を行っていた.このとき,通信路に
専用ソフトは,当センターの学内専用の WEB ページか
外部からの侵入はあり得ないので,安全な通信が行える
ら取得できる.現在対応している OS は,Windows(98,
が,非常にコストがかかることになる.そこで,専用線
を引かずに,インターネットを利用して安全な通信がで
きれば ,大幅なコストダウンが期待できることになる.
NT, ME, 2000, XP),MacOSX(10.1.5 以降),Linux で
ある.
以下では,それぞれの OS での専用ソフトのインストー
そこで,登場したのが VPN(Virtual Private Network)
ルおよび設定の方法を説明する.
という技術である.これは,インターネットを含む任意
のネットワーク上に,暗号化技術を用いた仮想的 (vir-
(※) 実際にご利用されるには,校費移算の手続き並び
tual) なネットワークを構築する仕組みである.この技
術を使うと,以下のようなことができる.皆さんがイン
に ID 登録,暗号化の鍵等の情報の取得が必要となります
ので,当センターの事務 (内線 3824) に御連絡ください.
25
平成 15 年度 総合情報基盤センター 年報
26
2
Linux 版 CiscoVPN (4.03) クライアント のインスト ール
1.準備 1) Linux 側で DHCP を有効にし ,インターネットが問題なく利用できることを確認.
2) IPtable (ipchains) の設定確認
(※) この「 2) 」は,必要な場合のみ.
外部から UDP の 500 番ポートを許可する
< iptable の例>
実行停止
/etc/init.d/iptable stop
/etc/sysconfig/iptable を編集し ,下記の 1 行を追加
-A RH-Lokkit-0-50-INPUT -p udp -m udp –dport 500 -j ACCEPT
※ UDP の制限リストよりも上に追加します.
再開
/etc/init.d/iptable start
3) カーネルソースの保存先パスを確認.
(※) 通常/usr/src/の配下にある.存在しない場合はパッケージを追加インストールする.
2.クライアント のインスト ール
1) 登録ユーザにお送りする資料に示しす URI よりクライアントソフトのパッケージ (vpnclient-linux-4.0.3.Bk9.tar.gz) をダウンロード する.
2) root になり,パッケージを解凍する.
$ su (root のパスワード を入力)
# tar zxf (somewhere)/vpnclient-linux-4.0.3.B-k9.tar.gz
3) root にてインストーラを実行する設定は全てデフォルトで OK.
「 3. 」を実行)
実行後にシステムを再起動する.(再起動したくない場合は,
——— ここから,実際のインストール例
# cd vpnnclient
# ./vpn install
Cisco Systems VPN Client Version 4.0.3 (B) Linux Installer
Copyright (C) 1998-2001 Cisco Systems, Inc. All Rights Reserved.
By installing this product you agree that you have read the
license.txt file (The VPN Client license) and will comply with
its terms.
Directory where binaries will be installed [/usr/local/bin]
Automatically start the VPN service at boot time [yes]
平成 15 年度 総合情報基盤センター 年報
In order to build the VPN kernel module, you must have the
kernel headers for the version of the kernel you are running.
For RedHat 6.x users these files are installed in /usr/src/linux by default
For RedHat 7.x users these files are installed in /usr/src/linux-2.4 by default
For Suse 7.3 users these files are installed in /usr/src/linux-2.4.10. SuSE by default
Directory containing linux kernel source code [/lib/modules/2.4.18-17/build]
* Binaries will be installed in ”/usr/local/bin”.
* Modules will be installed in ”/lib/modules/2.4.18-17/CiscoVPN”.
* The VPN service will be started AUTOMATICALLY at boot time.
* Kernel source from ”/lib/modules/2.4.18-17/build” will be used to build the module.
Is the above correct [y]
Making module
Create module directory ”/lib/modules/2.4.18-17/CiscoVPN”.
Copying module to directory ”/lib/modules/2.4.18-17/CiscoVPN”.
Creating start/stop script ”/etc/init.d/vpnclient init”.
Enabling start/stop script for run level 3,4 and 5.
Creating VPN configuration file ”/etc/CiscoSystemsVPNClient/vpnclient.ini”.
Installing license.txt (VPN Client license) in ”/etc/CiscoSystemsVPNClient/”:
Installing bundled user profiles in ”/etc/CiscoSystemsVPNClient/Profiles/”:
* New Profiles : sample
Copying binaries to directory ”/usr/local/bin”.
Setting permissions.
/usr/local/bin/cvpnd (setuid root)
/etc/CiscoSystemsVPNClient (world writeable)
/etc/CiscoSystemsVPNClient/Profiles (world writeable)
/etc/CiscoSystemsVPNClient/Certificates (world writeable)
* You may wish to change these permissions to restrict access to root.
* You must run ”/etc/init.d/vpnclient init start” before using the client.
* This script will be run AUTOMATICALLY every time you reboot yourcomputer.
——— 実際のインストール例は,ここまで.
3.モジュールの組み込み (reboot せずに,VPN を利用する場合) (※ )「 2.
」の作業終了後,reboot した場合は,この「 3.
」は,スキップして良い.
root で以下を実行以下を実行する.
# /etc/init.d/vpnclient init start
次回から上記が自動起動されることを確認するために,以下を実行する.
27
平成 15 年度 総合情報基盤センター 年報
28
$ /sbin/chkconfig –list — grep vpnclient init
vpnclient init 0:off 1:off 2:off 3:on 4:on 5:on 6:off
上記になれば ,次回 boot 後は,自動起動されている.
module が組み込まれたか確認するために,以下のように lsmod を実行.
$ lsmod — grep cisco
cisco ipsec 378880 0
上記のように「 cisco ipsec 」の項目があれば,OK
4.ユーザ設定ファイルの作成 1) 下記を参考に /etc/CiscoSystemsVPNClient/Profiles/ <プロファイル名> .pcf ファイルを作成する.
登録ユーザにお送りする資料により,下記を設定する.
<プロファイル名を「 foo 」とした場合の例>
・/etc/CiscoSystemsVPNClient/Profiles/foo.pcf の内容例
[main]
Host=xxx.xxx.xxx.xxx <======== VPN 装置の IP アドレスを指定
AuthType=1
GroupName=yyyyyyyy <======== Group Name を指定
GroupPwd=zzzzzzzzz <======== Group Password を指定
Username=XXXXXXXX <======== VPN 接続用個人 ID(User Name) を指定
EnableNat=0
5.接続 接続コマンド は /usr/local/bin/vpnclient を使用する.また,root ではなく,一般ユーザで実行する.
< 接続例 >
※プロファイル名は「 4.
」で作成したファイル名.
$ vpnclient connect foo <===「 connect オプション+プロファイル名」を指定
Cisco Systems VPN Client Version 4.0.3 (B)
Copyright (C) 1998-2003 Cisco Systems, Inc. All Rights Reserved.
Client Type(s): Linux
Running on: Linux 2.4.18-17 #1 Fri Feb 20 16:15:57 JST 2004 i686
Initializing the VPN connection.
Contacting the gateway at xxx.xxx.xxx.xxx
User Authentication for foo...
平成 15 年度 総合情報基盤センター 年報
29
Enter Username and Password.
Username [XXXXXXXX]: <==== (foo.pcf で設定した Username が表示)
Password []: <==== VPN 接続用のパスワード (User Password) を入力
Authenticating user.
Negotiating security policies.
Securing communication channel.
Welcome To KUIC VPN
Do you wish to continue? (y/n): y <=== 接続する場合は「 y 」を入力
Your VPN connection is secure.
VPN tunnel information.
Client address: ccc.ccc.ccc.ccc <=== PC が利用する IP アドレスが表示
Server address: xxx.xxx.xxx.xxx <=== VPN 装置の IP アドレスが表示
Encryption: 168-bit 3-DES
Authentication: HMAC-MD5
IP Compression: None
NAT passthrough is inactive
Local LAN Access is disabled
この表示が出たら,接続完了.
ただし ,このままの状態が続くので,切らないようにすること.
6.接続終了 「 5.
」で起動したクライアントを kill(^C) すれば ,終了.
(注意) VPN 接続時には,熊大のネットワークしか,接続できないので,熊大外のネットワークに接続すると
きには,VPN クライアントを kill する必要がある.
© Copyright 2026 Paperzz