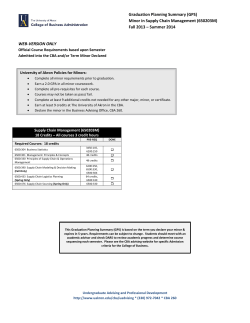
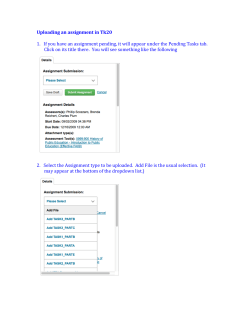
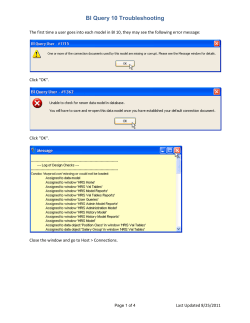
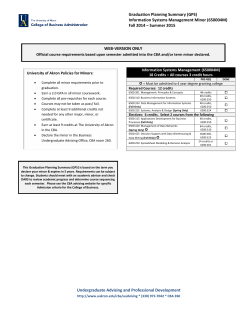
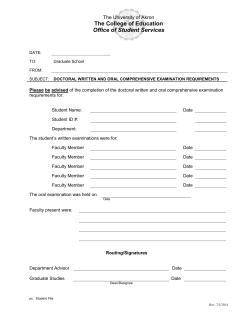
University of Akron Advising Summary – March Functionality Below is a brief graphical representation of how an advisor can quickly and easily create an Advising Summary Report for an advising session as well as creating a Note in GradesFirst. Creating an Advising Summary Report for an advising session Step 1: Select a student to create an Advising Summary Report. In order to create an Advising Summary Report for an advising session that was not scheduled through GradesFirst, select the student by checking the box next to their name. In order to open Step 2: Open the A dvising Summary Report. an Advising Summary Report for the selected student, click the ‘Advising Report’ button above the assigned student list. Step 3: Choose a location. In order to submit the Advising Summary Report, a location must be chosen. Step 4: Add summary notes. Use this section to add summary notes for the advising session. Step 5: Add reminder information. Use this section to add reminder information to the Advising Summary Report. This does not schedule any future appointment. Step 6: Save the Advising Summary Report. Once the Advising Summary Report has been filled out, click the ‘Save this Report’ button to save the report information. Submitted Advising Summary Reports will populate in the Recent Advising Appointments section. Add a Note to a student profile Step 1: Select the student to add a Note. In order to add a Note to a student profile, first select the student by checking to box next to their name. Note prompt. In order to open a Note Step 2: Open the prompt, click the ‘Note’ button above the assigned student list. Step 3: Create the Note. This section can be used to add additional information to the Note. Step 4: Choose a Note Reason. It is required to choose a Note Reason before saving the Note. Multiple Note Reasons can be chosen. Step 5: Attach a document to the Note. Use the ‘Choose File’ button to add an attachment to the Note. Step 6: Add permissions to the Note. It is optional to allow the student to view the Note as well as have the Note appear on the Student Development Report. Step 7: Save the Note. Once all Note information has been inputted, click the ‘Save Note’ button to create the Note. Viewing Notes. Notes can be viewed from the student profile “Reports / Notes” section or the “Notes” report in the ‘Reports’ tab. ”Reports / Notes” section of the student profile “Notes” report
© Copyright 2026 Paperzz