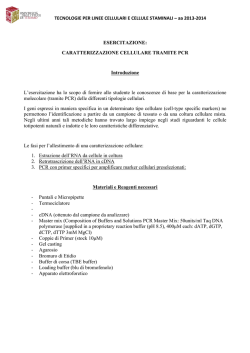
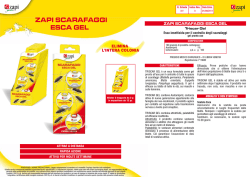
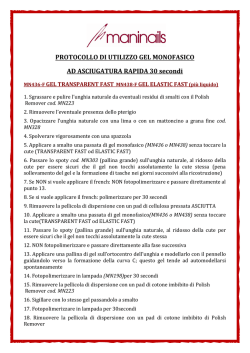
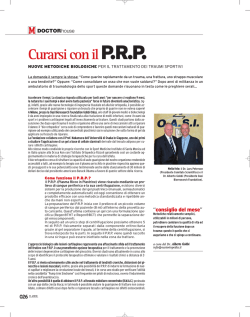
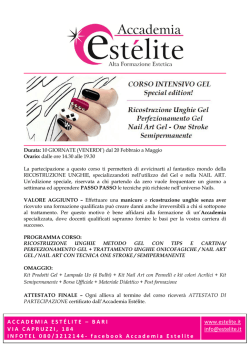
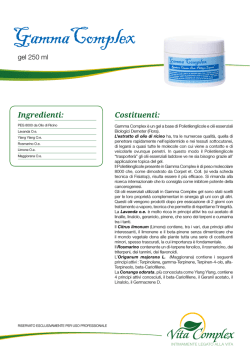
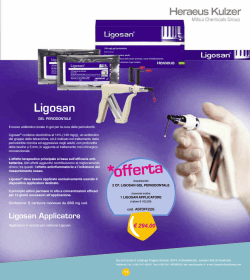
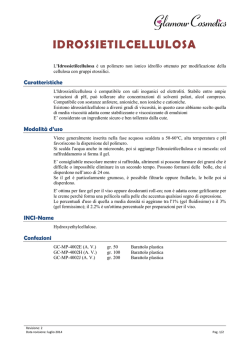
user manual
HE 99X
Hoefer HE 99X
submarine electrophoresis unit
um
HE99X-IM/Rev. K0/08-04
Page finder
Submarine Unit function and description . . . . . . . . 1
Specifications . . . . . . . . . . . . . . . . . . . . . . . . . . . . . 2
Important information . . . . . . . . . . . . . . . . . . . . . . . 3
Operating instructions . . . . . . . . . . . . . . . . . . . . . . . 4
Care and maintenance . . . . . . . . . . . . . . . . . . . . . . 9
Troubleshooting . . . . . . . . . . . . . . . . . . . . . . . . . . 12
Buffers, volumes, and notes . . . . . . . . . . . . . . . . . 13
Ordering information . . . . . . . . . . . . . . . . . . . . . . . 19
• pi
Safety warnings and precautions
English
Important user information
c
m
Please read this entire manual to fully understand the safe and
effective use of this product.
The lightning symbol within an equilateral triangle is intend-ed
to alert the user to the risk of exposure to high voltages.
The exclamation mark within an equilateral triangle is intended
to alert the user to the presence of important operating and
maintenance instructions in the literature accompanying the
instrument.
Hoefer, Inc. reserves the right to make changes in the specifications without prior notice.
Warranty and liability
Hoefer, Inc. guarantees that the product delivered has been
thoroughly tested to ensure that it meets its published specifications. The warranty included in the conditions of delivery is
valid only if the product has been installed and used according
to the instructions supplied by Hoefer, Inc..
Hoefer, Inc. shall in no event be liable for incidental or consequential damages, including without limitation, lost profits, loss
of income, loss of business opportunities, loss of use and other
related exposures, however caused, arising from the faulty and
incorrect
use of the product.
Renseignements importants d’utilization
Français
c
m
Pour une bonne compréhension et une utilisation en sécurité
maximale, il convient de lire entièrement ce manuel.
Le symbole de l’éclair dans un triangle équilatéral a pour objet
d’attirer l’attention de l’utilisateur sur un danger d’exposition à
la haute tension.
Dans la documentation qui accompagne l’instrument un point
d’exclamation dans un triangle équilatéral a pour but d’attirer
l’attention de l’utilisateur sur des instructions importantes de
fonctionnement ou de maintenance.
Hoefer, Inc. se réserve le droit d’effectuer des modifications de
ces spécifications sans aucun préavis.
Garantie et responsabilité
Hoefer, Inc. garantit à l’utilisateur que le produit livré a subi
avec succès tous les essais prévus pour s’assurer qu’il est
conforme aux spécifications et normes en vigueur. La garantie
incluse dans les conditions de livraison n’est valable que si le
produit a été installé et utilisé conformément aux instructions
fournies par Hoefer, Inc..
La société Hoefer, Inc. ne sera en aucun cas responsable de
tout dommage causé directement ou indirectement par toute
utilisation incorrecte ou non approuvée du produit ou découlant de cette utilisation, y compris toute perte de bénéfice
• pii
ou de recettes, toute perte de perspectives commerciales,
tout empêchement d’utilisation et tout autre risques ayant un
rapport avec l’utilisation du produit, mais sans aucune limitation quant à la nature de ces dommages.
Wichtige benutzerinformationen
Deutsch
c
m
Für ein vollständiges Verständnis und eine sichere Handhabung dieses Produktes ist es notwendig, daß der Benutzer
dieses Handbuch vollständig durchliest.
Ein Blitzsymbol in einem gleichseitigen Dreieck soll den
Benutzer auf die Gefahr anliegender Hochspannungen
hinweisen.
Ein Ausrufezeichen in einem gleichseitigen Dreieck soll den
Benutzer auf die Anwesenheit wichtiger Betriebs- und Wartungsanweisungen in der dem Gerät beiliegenden Dokumentation
hinweisen.
Hoefer, Inc. behält sich das Recht vor, die Spezifikationen ohne
vorhergehende Ankündigung zu ändern.
Gewährleistung and haftung
Hoefer, Inc. garantiert, daß das gelieferte Produkt sorgfältig
auf die Einhaltung der veröffentlichten Spezifikationen getestet
wurde. Die in den Lieferbedingungen näher erläuterten
Gewährleistungsansprüche gelten nur dann, wenn das Produkt
gemäß den von Hoefer, Inc. gelieferten Anweisungen installiert
und benutzt wurde.
Hoefer, Inc. übernimmt keinerlei Haftung für Schäden oder
Folgeschäden, einschließlich, aber nicht begrenzt auf Gewinneinbußen, Einkommensverluste, entgangene Geschäftsabschlüsse, Verlust der Gebrauchsfähigkeit oder andere Verluste,
die wie auch immer durch eine fehlerhafte oder unsac-gemäße
Verwendung des Produkts verursacht wurden.
Español
c
m
Información importante para el
usuario
Para comprender el producto y utilizarlo con seguridad es
necesario leer este manual en su totalidad.
El símbolo del rayo en un triángulo equilátero alerta al usuario
sobre el riesgo de exposición a altas tensiones.
El signo de admiración en un triángulo equilátero en el manual,
advierte al usuario sobre la presencia de instrucciones importantes de operación y mantenimiento del aparato.
Hoefer, Inc. se reserva el derecho a modificar las especificaciones sin previo aviso.
Garantía y responsabilidad
Hoefer, Inc. garantiza que el producto entregado ha sido
probado a fondo para comprobar el cumplimiento de las
especificaciones publicadas. La garantía incluida en las condi-
• piii
ciones de entrega sólo es válida si el producto se ha instalado
y utilizado de acuerdo con las instrucciones entregadas por
Hoefer, Inc..
Hoefer, Inc. no será responsable, bajo ningún concepto, de
daños directos o indirectos, incluyendo sin limitación la pérdida
de beneficios, la pérdida de ingresos, la pérdida de oportunidades de negocio, la pérdida de utilización y otras consecuencias relacionadas, cualquiera que sea la causa, que se deban a
la utilización defectuosa e incorrecta del producto.
Informazioni importanti per
l’operatore
Italiano
c
m
Per un utilizzo sicuro del prodotto, leggere attentamente l’intero
contenuto del presente manuale.
Il punto esclamativo all’interno di un triangolo equilatero indica
all’operatore la presenza di importanti istruzioni di funzionamento e manutenzione nella documentazione allegata al
prodotto.
Il simbolo del fulmine all’interno di un triangolo equilatero
indica all’utente la presenza di un rischio di esposizione ad alte
tensioni.
Hoefer, Inc. si riserva il diritto di apportare modifiche ai dati
tecnici senza preavviso.
Garanzia e responsabilitá
Hoefer, Inc. garantisce che prima della consegna il prodotto è
stato collaudato a fondo per soddisfare i requisiti specificati. La
garanzia inclusa nelle condizioni di consegna risulta valida solamente se il prodotto è stato installato ed utilizzato nel rispetto
delle istruzioni fornite da Hoefer, Inc..
Hoefer, Inc. non potrà essere ritenuta responsabile di incidenti
o danni consequenziali, inclusi’ma non limitati’a perdite di
profitti, mancato guadagno, perdite di affari, difetti di funzionamento e relative esposizioni, dovuti ad un utilizzo non corretto
del prodotto.
• piv
Submarine Electrophoresis Unit
Function and description
Fig 1. Horizontal submarine unit
main components
Gel casting kits, combs and comb
backs may be ordered separately;
Fig 2 illustrates a casting kit, and
the ordering section tabulates all
comb sizes and accessories.
The Hoefer™ HE 99X unit electrophoretically
separates nucleic acid fragments in a submarine
gel. The gel is first cast in a gel caster, which is
available in three lengths. (The longer 15 and
20 cm trays can hold one or two combs.) Once
the gel sets, the running tray is transferred to
the platform of the electrophoresis unit and the
gel is submerged under running buffer.
color-coded leads connect electrodes in
the unit base to the power supply.
electrode
post (2)
rest thumbs
on both posts
(protruding
through each
end of lid) while
lifting both tabs
on lid for easy lid
removal.
spirit level
running platform
buffer chamber
leveling feet (4)
• p1
Unpacking
This declaration of conformity is only valid for the
instrument when it is:
• used in laboratory locations,
• used as delivered from
Hoefer, Inc. except for
alterations described in the
user manual, and
• connected to other CE
labeled instruments or
products recommended or
approved by Hoefer, Inc..
Unwrap all packages carefully and compare contents with the packing list, making sure all items
arrived. If any part is missing, contact your local
Hoefer, Inc. sales office. Inspect all components
for damage that may have occurred while the
unit was in transit. If any part appears damaged,
contact the carrier immediately. Be sure to keep
all packing material for damage claims or to use
should it become necessary to return the unit.
Specifications
Max. voltage
Max. wattage
Max. amperage
Max. operating temp.
Max. buffer volume
Gel size
Environmental
operating conditions
Installation category
Pollution degree
Dimensions (w � l � d)
(includes electrode posts)
Weight
(base, lid, and leads only)
Product certifications
• p2
200 V—
--20 W
100 mA
45 °C
1.2 liters
15 cm wide � 10, 15,
or 20 cm long
Indoor use: 4–40 °C
Humidity up to 80%
Altitude up to 2000 m
II
2
18.2 � 36 � 14 cm
(7.2 � 14.2 � 5.5 in.)
0.82 kg (1.8 lb)
EN61010–1, UL61010A1,
CSA C22.2 1010.1,
CE Certified
Important information
English
�
�
• The safety lid must be in place before connecting the
power leads to a power supply.
• Turn all power supply controls off and disconnect the
power leads before removing the safety lid.
• Do not allow the operating temperature to exceed 45 °C.
All plastic parts are rated for 45 °C continuous duty. For
longer runs you can control heating somewhat by chilling
the buffer before use, running the unit in a cold room, or
both. Overheating will cause irreparable damage to the
unit!
• Cool the agarose to 50 °C before pouring into the
casting kit or horizontal unit to prevent plastic parts from
warping.
• If this equipment is used in a manner not specified
by the manufacturer, the protection provided by the
equipment may be impaired.
• Only accessories and parts approved or supplied by
Hoefer, Inc. may be used for operating, maintaining, and
servicing this product.
Informations importantes
Français
�
�
• Le couvercle de sécurité doit être en place avant de
brancher les prises au générateur.
• Eteindre le générateur et débrancher les prises avant
d’enlever le couvercle de sécurité.
• Ne pas utiliser à une température au dessus de 45°C.
Toutes les piéces en plastique sont prévues pour
résister à une température constante de 45 °C. Pour
des coulages plus long, on peut aussi contrôler la
température en refroidissant le tampon avant l’utilisation
et/ou en utilisant l’instrument dans une chambre
froide. Un surchauffement peut causer des dommages
irréparables à l’instrument.
• Refroidir l’agarose entre 50 °C avant de la verser dans
l’unité de moulage ou dans le module horizontal afin
d’éviter que les piéces en plastique ne se déforment.
• Si l’instrument n’est pas utilisé en conformité avec les
recommandations du fabriquant, les protections de
sécurité qui équipent cet appareil peuvent être rendues
inéfficaces.
• Seulement les accessoires et piéces detachées approuvés
ou fournis par Hoefer, Inc. sont recommandés pour
l’utilisation, l’entretien et réparation de cet appareil.
• p3
Operating instructions
Before you start…
➊
Wash all components with a
dilute solution of laboratory
detergent and rinse thoroughly.
➋
Level the unit by placing the
spirit level on the running
platform and adjusting the
leveling feet.
Agarose gels are first cast in the gel casting kit,
and samples are then loaded into the wells and
electrophoretically separated. The fluorescent
dye ethidium bromide can be added to the gel
or electrophoresis buffer or both in order to
track separation progress. At the completion
of electrophoresis, the gel may be stained and
photographed, blot transferred, or dried for
autoradiography.
Casting the gel
Prepare the solutions
➊
Prepare about 1.3 liters of running buffer. Up to 100
ml of buffer is required for the gel and 1.2 liters for
the buffer chamber. Refer to p. 11 for recipes of three
commonly used electrophoretic running buffers.
➋
Prepare the sample loading buffer. Refer to page 12 for
a recipe and tabulated volume capacity for each comb
size.
volume for 3-mm thick gels
➌
tray size (cm)
agarose (ml)
Prepare agarose solution(s).
15 � 10
45
15 � 15
68
15 � 20
90
Caution! Ethidium bromide is a
known mutagen. Always wear
gloves when handling.
• p4
Dissolve agarose in running buffer, heat according to
instructions accompanying the agarose, and allow the
solution to cool to 50 °C before pouring into the
running tray.
Optional: Add 0.5 µg/ml ethidium bromide to the gel
solution in order to facilitate observation of separation
progress during electrophoresis.
Note: Grooves in the running
tray create ridges at both ends
of the gel to prevent it from
slipping or floating. If these
ridges are not desired, either
tape over the grooves before
casting, or trim off ridges with a
spatula after the run.
Fig 2. Gel casting kit
Running tray installation: Approach
the foam pad with one end of the
running tray (Arrow A) and then
gently press the tray edge against
the pad, compressing it enough
to allow the opposite end of the
running tray to drop fully into the
casting tray (Arrow B) before sealing
against the foam pad.
Prepare the casting tray and pour the gel
➊
Install a foam pad at each end of the casting tray.
Use a comb as a placement guide so that the pad
~1 mm from the bottom of the tray: Lay the
adheres ~
comb into the bottom of the tray, oriented so that it
fits completely across the tray along the side that is
16 cm wide. Peel off the adhesive backing on the foam
pad, align the pad on the comb, adhesive side toward
the inside wall of the tray, and slide the comb against
the wall. Press the foam pad in place and repeat with
second pad on the wall opposite the first pad.
UVT gel running tray (15 � 20 cm)
color-coded dots (2)
on handles orient the
running tray on the
running platform.
the comb back fits
into any set of slots.
the comb back
assembly shown in
Fig 3 is oriented to fit
into this slot.
B
A
foam pads (2)
gel casting tray
(15 � 20 cm)
• p5
➋
Seat the running tray between the foam pads in the
casting tray by placing one end of the tray against the
foam pad, slightly compressing it, then seating the
other end of the tray against the opposite foam pad.
(See arrows A and B in Fig 2.) The running tray should
lay flush against the bottom of the casting tray.
➌
Place the casting tray assembly on a leveling surface
and level, using the spirit level on the running tray as a
guide. Check that the comb assembly leaves
~1 mm of space between the comb bottom and the
~
running tray. Remove the level and the comb assembly.
Fig 3. Assembled comb.
comb back
Prepare the combs
➊
screws
Align the two slots in the comb with the loosened
thumb screws of the comb back. Tighten the screws
until the comb is just supported.
➋
Place the comb assembly into a set of slots on the
running tray seated in the casting tray. Adjust the comb
~1.0 mm from the
so that the bottom of the teeth are ~
running tray. Tighten the screws to secure the comb.
To run twice as many samples on the 15 and 20 cm
trays, prepare two comb assemblies and place one
near the cathode end, indicated by the black dot, and
one at the center.
• p6
Final casting steps
➊
Pour the agarose solution (cooled to 50 °C) onto the
running tray seated in the casting tray. Orient the comb
assembly so that it is at the end of the tray opposite the
direction of migration (typically at the cathode [–] end,
which is marked by a black dot on the handle). Fit the
comb assembly into the slots.
➋
Allow a minimum of 30 min for the gel to set, then
remove the comb carefully: partially lift and slightly tilt
the comb at one end and slowly withdraw it from the
gel. (Pulling the comb straight up creates a vacuum in
the wells that may lift the gel out of the tray.)
➌
Lift the running tray out of the casting tray and transfer
it with the gel to the horizontal unit. Orient the running
platform so that the sample will “run to red.” That is,
place the sample wells at the cathode (–) end, which is
indicated by a black dot. A notch on either side of the
running tray centers the tray on the running platform.
• p7
Preparing for electrophoresis
Caution! Wear UV safety
goggles and protect skin when
using a UV lamp.
Refer to the Buffers, volumes, and notes section
for additional information and guidelines.
➊
Note: See page 12 for a sample
loading buffer recipe and well
volumes for various comb sizes
in gels of different thicknesses.
Optional: To monitor separation progress, either add 0.5
µg/ml (final conc.) of ethidium bromide to the running
buffer now or add 50 µg/ml (final conc.) ethidium
bromide to the sample buffer. To visualize progress,
turn off the power supply, remove the lid assembly, and
hold a portable UV lamp near the gel.
Note: Adding ethidium bromide to the running or
sample buffer slows migration slightly. Detection by
this method is not as sensitive as by staining after the
electrophoresis run. See the DNA detection section, p.
14, for more details.
➋
Important! If running two
sets of samples in one gel,
monitor the run closely and
stop electrophoresis when the
marker dye approaches the
wells in the center.
Fill the chamber with buffer until the gel is submerged
~1 mm.
~
➌
Load the samples. Add the sample to 1/5 volume of the
sample loading buffer. Mix each sample and load into a
well with a micro-pipet, taking care to avoid puncturing
the well bottom or entrapping bubbles.
➍
Place the lid on the unit so that the cathode (black
lead) is at the end nearest the samples. (Nucleic acid
samples migrate toward the anode.)
➎
Connect the color-coded leads (red to red, and black
to black) to an approved power supply. Set the voltage
and timer (if available). Agarose gels are typically run at
constant voltage under a voltage gradient in the range
of 2–5 V/cm. The distance between the electrodes is
~26 cm, so a setting of 130 V results in a gradient of
~
5 V/cm.
• p8
After electrophoresis
➊
Important! Always turn off the power supply and
disconnect the leads before removing the lid.
➋
If no ethidium bromide was added to the gel or sample
before the run, stain the gel now in a solution of 0.5 to
1.0 µg/ml ethidium bromide in water or buffer.
➌
Clean the unit as described in the next section.
Care and maintenance
Cleaning
• Never autoclave or heat any component
above 45 °C.
• Never use abrasive cleansers.
• Do not expose the unit to solutions or vapors
of aromatic or halogenated hydrocarbons,
ketones, esters, alcohols (over 30%), or concentrated acids (over 25%).
The unit is resistant to all common electrophoresis buffers, but we recommend a thorough
washing with a mild detergent after each use.
Rinse with distilled water and allow to air dry.
To remove DNase and RNase contamination,
fill the unit with 3% hydrogen peroxide (H2O2),
soak for 10 minutes, then rinse thoroughly with
DEPC-treated, autoclaved, deionized water.
(Sambrook and Russell, et al. 1:7.82)
• p9
Replacing the electrode
Note: Platinum wire becomes
brittle with repeated flexing.
Handle platinum wire as little as
possible and with great care to
avoid breakage.
To avoid stressing the wire, do
not wrap it around the banana
plug; fit it between the metal
and nylon washers.
If an electrode breaks, replace it with a 25 cm
(10”) length of 0.25 mm (0.01”) diameter platinum wire as follows:
➊
Release one end of the platinum electrode by loosening
the banana plug. (Notice that the wire lies between the
nylon and metal washers.)
➋
Carefully pry loose both nylon buttons on the electrode
shield with a blunt edge such as a screwdriver. Once
the buttons are removed, slip off the Teflon tubing from
the electrode and pull the electrode loose from the far
end of the shield. (Save the buttons and Teflon tubing.)
➌
~6 mm in dia.) at one end of the new
Form a loop ( ~
platinum wire and anchor the loose end by twisting it
around the wire. (The end of a pencil is a useful aid in
forming the loop.) Fit the loop onto the button stem and
press the button into the hole at the end furthest from
the banana plug.
➍
Guide the wire along the groove in the shield, and with
the second button stem straddling the wire, press the
button into the hole closest to the banana plug.
➎
Slip the Teflon™ tubing over the wire and route the wire
up the ramp to the banana plug. Gently tug the wire
so that it is just taut and then fit the wire between the
nylon and metal washers. (Do not wrap around the
banana plug.) Secure the wire by tightening the banana
plug no more than 1/8 turn past snug. Trim wire if
necessary.
• p10
Fig 4. Replacing the electrode.
Guide the wire up the ramp and then lay
it between the metal and nylon washers.
trim excess wire.
Pull up both buttons on the electrode shield, release the damaged
electrode, and install a new length
of platinum wire.
button
electrode
shield
Expanded view of end not shown in main
diagram: Anchor one end of the wire by
forming a secured loop and holding it in
place with the button stem.
• p11
Troubleshooting
problem
solution
Sample well deformed
Allow the gel to set for a minimum of 1 hour and make sure it is at
room temperature before removing the comb.
Remove the comb at a slight angle and very slowly to prevent the
gel from breaking.
Take care to not damage the well with the pipet while loading the
sample; aim for the center of the well and do not puncture the
bottom with the pipet tip.
Samples not running
along a straight path
If the comb is warped, replace.
If the running tray is warped, replace. (Cool agarose to 50 °C to prevent the tray from warping.)
Circulate buffer if it becomes depleted by stopping the run and
pipetting the buffer from one chamber to the other.
Double-banded pattern
Make sure the comb remains vertical after the gel is cast so that
the well shape is not distorted.
Decrease the buffer level to 1 mm above the top of the gel in
order to reduce the temperature gradient in the gel.
Poor band resolution
Add Ficoll™, glycerol, or sucrose to the sample loading buffer to
ensure that the sample sinks to the bottom of the well. (Ficoll is
the recommended agent.)
Make sure the sample is completely dissolved.
Reduce the sample concentration.
Reduce the sample volume.
Reduce voltage to ≤5 V/cm.
Be sure the well floor is at least 1 mm thick to prevent samples
from leaking through the bottom.
Reduce the salt concentration of the sample.
Check enzyme activity; the sample may require longer digestion or
a different restriction buffer.
Prepare fresh sample if you suspect nuclease contamination.
Choose agarose with a low endosmosis value.
Foam pads peel off
• p12
Do not press the running tray into place. Install as described on
page 5.
Buffers, volumes, and notes
Important! Do not adjust the
pH of these buffers once they
are prepared according to the
recipe!
Running buffers for DNA in agarose gels
Recipes for the three most commonly used running buffers for DNA electrophoresis are listed
below. The buffering capacity of both TBE and
TPE is usually sufficient so that buffer circulation is unnecessary. Circulation may be required
during runs longer than 3 hours or when using
the TAE buffer.
a
10X Tris-borate-EDTA (TBE) stock buffer
(0.89 M Tris, 0.89 M boric acid, 20 mM EDTA,
pH ≈8.3, 1000 ml)
Tris base (FW 121.1)
Boric acid (FW 61.8)
EDTA solution
(0.5 M, pH 8.0, soln. 4)
Deionized H2O
0.89 M
0.89 M
0.02 M
108.0 g
55.0 g
40.0 ml
to 1000.0 ml
Stir. Do not adjust pH.
Before use dilute either to:
0.5X, to yield 45 mM Tris base, 45 mM boric acid,
and 1 mM EDTA. This dilution is often used because
current remains low, resulting in less heat.
— or —
1X, to yield 89 mM Tris base, 89 mM boric acid, and 2
mM EDTA.
a
10X Tris-phosphate-EDTA (TPE) stock buffer
(0.89 M Tris, 0.89 M phosphoric acid, 20 mM EDTA,
pH ≈8.1, 1000 ml)
Tris base (FW 121.1)
Phosphoric acid (85%)
EDTA solution
(0.5 M, pH 8.0, soln. 4)
Deionized H2O
0.89 M
0.23 M
0.02 M
108.0 g
15.5 ml
40.0 ml
to 1000.0 ml
Stir. Do not adjust pH.
Dilute to 1X, to yield 89 mM Tris base, 23 mM
phosphoric acid, and 2 mM EDTA.
• p13
a
10X Tris-acetate-EDTA (TAE) stock buffer
(0.4 M Tris, 0.2 M acetic acid, 10 mM EDTA, pH
≈8.4, 1000 ml)
Tris base (FW 121.1)
0.40 M
48.4 g
Acetic acid (99.5%)
0.20 M
11.4 ml
EDTA solution (0.5 M, pH 8.0, soln. 3)
0.01 M
20.0 ml
Deionized H2O
to 1000.0 ml
Stir. Do not adjust pH. Dilute to 1X before use to yield
40 mM Tris base, 20 mM acetic acid, and 1 mM EDTA.
b
EDTA solution (ethylenediamine tetraacetic acid)
(0.5 M, pH 8.0, 100 ml)
Na2EDTA·2H2O, (FW 372.2)
Deionized H2O
NaOH (10 M) to pH 8.0
Deionized H2O
a
0.5 M
18.6 g
to 70.0 ml
≈5.0 ml
to 100.0 ml
Sambrook J. and Russell, D.W., (2001) Molecular Cloning: A Laboratory
Manual, A1.17
Current Protocols in Molecular Biology (1993) A.2.1
b
• p14
Loading buffer and sample volumes
Loading buffer
(5X, 25% Ficoll PM 400, 0.25% Bromphenol blue †, 10
ml)
Deionized H2O
Ficoll PM 400 (Hoefer, Inc.)
Bromophenol blue (FW 691.9)
Deionized H2O
to 7.0 ml
2.5 g
25.0 mg
to 10.0 ml
Add 1 volume loading buffer to 4 volumes of sample.
(Loading buffer increases solution density.)
Note 1 Sucrose or glycerol may be used instead of
Ficoll PM 400.
Note 2 Xylene cyanol (0.25%), which migrates more
slowly than bromophenol blue, can be added
as an additional marker if desired. The agarose
concentration determines the position of the
dye bands relative to a polynucleotide.
†
Tracking dyes may be omitted to eliminate obscuring or dragging effects
caused by comigration with smaller nucleic acids.
Comb specifications and well volumes
code
number
no. of
wells
well
width
(mm)
well
sample vol.
thickness per 1 mm
(mm)
depth (µl)
HE91A-P-1.5
HE91A-P-3.0
HE91A-10-1.5
HE91A-10-3.0
HE91A-15-1.0
HE91A-15-1.5
HE91A-15-3.0
HE91A-20-1.0
HE91A-20-1.5
HE91A-20-3.0
HE91A-30-1.0
1/2
1/2
10
10
15
15
15
20
20
20
30
113/10
113/10
9.7
9.7
7.1
7.1
7.1
4.7
4.7
4.7
3.0
1.5
3.0
1.5
3.0
1.0
1.5
3.0
1.0
1.5
3.0
1.0
171/14.5*
342/29.0*
14.5
30.0
7.1
10.6
21.3
4.7
7.1
14.2
3.0
*Preparative combs form two reference wells (for MW standards), one on
each side of the preparative well. The first number is sample volume/mm
depth in the preparative well; the second is volume/mm in the reference
well.
• p15
Agarose gel electrophoresis notes
Agarose gel electrophoresis can be used to separate DNA fragments down to 0.1 kb or less.
Polyacrylamide gels are typically used for fragments smaller than 1 kb.
Note: RNA samples usually
require longer runs or buffers
that are easily depleted, so it is
necessary to periodically stop
the run and recirculate the
buffer.
DNA mobility
The suggested agarose concentration for separating
fragments of various sizes is listed below. Other factors affecting separation results include the selected
running buffer, the voltage setting, the temperature,
and the presence of ethidium bromide.
Agarose concentrations for separating
DNA fragments of various sizes
†
agarose (%)
effective range of resolution
of linear DNA fragments (kb) †
0.5
0.7
1.0
1.2
1.5
1 to 30
0.8 to 12
0.5 to 10
0.4 to 7
0.2 to 3
Current Protocols in Molecular Biology, p 2.5.2 (1993).
A common standard is a Hind III digest of
lambda phage, which gives eight fragments ranging in size from 0.1 to 23 kb. The bands are well
resolved when run 2 hours on a 20 cm long 1%
agarose gel in 0.5X TBE buffer at 150 V.
RNA mobility
For an example of RNA
electrophoresis, refer to
Molecular Cloning:
A Laboratory Manual by
J. Sambrook and D.W.
Russell.
• p16
RNA can also be separated on the basis of size.
To avoid irregularities due to secondary structure, RNA is denatured either before or during
electrophoresis. For example, RNA fragments
previously denatured with glyoxal and dimethylsulfoxide can be separated on neutral agarose
gels, or RNA can be fractionated on agarose
gels containing methylmercuric hydroxide or
formaldehyde.
DNA detection
DNA can be detected either by the fluorescence
of bound ethidium bromide or by autoradiography of radio-labeled DNA.
Caution! Ethidium bromide is a
known mutagen. Always wear
gloves when handling.
Caution! Wear UV safety
goggles and protect skin when
using any UV light source.
Note: Ethidium bromide slows
~15%.
DNA migration by ~
Note: Minimize the staining
time to prevent small nucleic
acid fragments from diffusing
out of the gel.
Ethidium bromide (0.5 µg/ml) can be added
to running buffer to monitor sample progress
because the dye’s fluorescence reveals DNA
under UV light. (To check band location, turn
off the power supply and remove the lid of the
agarose unit. Hold a portable UV lamp near the
running tray. Replace the lid and turn on the
power again to resume electrophoresis.)
Alternatively, after electrophoresis, stain the
gel in an ethidium bromide solution (0.5 µg/ml
H2O) for 15 to 60 minutes and then view or
photograph the sample on a UV transilluminator.
To photograph the gel, either place the running
tray on the transilluminator surface or slide the
gel onto the surface for maximum exposure.
The running tray is 95% transparent to 302 nm
light and 40% transparent to 254 nm light. If
you place the gel on the transilluminator, ensure
that it lies flat by cutting off the ridges formed
by the grooves in the running tray. (Do not
damage the transilluminator surface; trim both
ends of the gel with a spatula while it is still in
the tray, lift away the ridges, and then slide the
gel onto the transilluminator.) For viewing, 302
nm light is recommended for both acceptable
sensitivity and reduced photonicking.
To reduce the background fluorescence of
unbound ethidium bromide, the gel can be
destained by soaking it for 5 minutes in 0.01
M MgCl2, or for 1 hour in 0.001 M MgSO4.
Destaining makes it easier to detect small quantities (less than 10 ng) of DNA. (Sambrook and
Russell, A9.4)
• p17
Transfer
Before transfer, trim off the ridges at both ends
of the gel to ensure even gel contact with the
membrane.
References
Ausubel, et al., (eds). Current Protocols in
Molecular Biology. Greene Publishing and
Wiley-Interscience. New York (1993).
Sambrook, J., and Russell, D.W., Molecular
Cloning: A Laboratory Manual. Cold Spring
Harbor Laboratory Press. (2001).
HE96X
lid w/power cables
SE6056-HV
high voltage
leads, set
HE90X
buffer chamber
SER11
spirit level
HE99XRK-1
leveling foot
• p18
Ordering information
quantity
HE 99X Horizontal Agarose Submarine Unit, complete.
Includes basic unit, 15 � 20 cm gel casting kit,
one 1.5 mm-thick 15-well comb and comb back.
HE 99X Horizontal Agarose Submarine Unit, basic.
Includes spirit level. (Order gel casting kit,
comb and comb back separately.)
Accessories and replacement parts
Buffer chamber assembly only
Comb back for HE 99X comb with 2 screws
Lid with power cables
High voltage leads, set
Mylar sealing tape (1 roll, 66 mm)
Foam sealing gaskets
Leveling feet
code number
1
HE99X-15-1.5
1
HE99X
1
1
1
1
1
4
4
HE90X
HE91-BK
HE96X
SE6056-HV
SE1510
HE98X
HE99XRK-1
1
1
UV20-115V
UV20-230V
Companion products
MacroVue™ UV-20 Transilluminator
115 V~
230 V~
HE 99X gel casting kits
Each size includes 1 gel casting tray, 1 UVT running tray, and 4 foam sealing gaskets
code number
15 � 10 cm
15 � 15 cm
15 � 20 cm
HE97X-10
HE97X-15
HE97X-20
HE
15
15
15
99X gel casting trays
� 10 cm
� 15 cm
� 20 cm
1
1
1
HE95X-10
HE95X-15
HE95X-20
HE
15
15
15
99X gel running trays
� 10 cm
� 15 cm
� 20 cm
1
1
1
HE92X-10
HE92X-15
HE92X-20
• p19
Combs
no. of wells
comb thickness
(mm)
well width
(mm)
code number
1/2*
1/2*
1.5
3.0
113/10
113/10
HE91A-P-1.5
HE91A-P-3.0
10
10
15
15
15
1.5
3.0
1.0
1.5
3.0
9.7
9.7
7.1
7.1
7.1
HE91A-10-1.5
HE91A-10-3.0
HE91A-15-1.0
HE91A-15-1.5
HE91A-15-3.0
20
20
20
30
1.0
1.5
3.0
1.0
4.7
4.7
4.7
3.0
HE91A-20-1.0
HE91A-20-1.5
HE91A-20-3.0
HE91A-30-1.0
*Preparative combs form two marker wells, one on each side of the preparative well. The first value in each column refers to
the prep well, the second to the reference well.
HE31-S
screws
HE91-BK
comb back with
2 screws
combs
(see list for sizes)
• p20
• p21
Printed in the USA
Hoefer, Inc.
953 Indiana Street
San Francisco, CA
94107 USA
www.hoeferinc.com
© Copyright 2026 Paperzz