PART #1
Quick Start Guide FRONTIER HIGH-SPEED INTERNET
STEP ONE
STEP THREE
After you unpack the box, please verify that you have the
following parts:
If you do not have voice service with Frontier (Simply
Broadband customer), please skip to Step 4.
• NETGEAR 7550 Wi-Fi Router and Power Supply
• Ethernet Cable (larger connector)
• DSL Cord (smaller connector)
• 3 In-Line Filters
Install filters on ALL phone devices.
STEP FIVE
STEP SEVEN
to the new Wi-Fi Router1 and
Connect Ethernet cable
the Ethernet port on your desktop or laptop.
If the DSL light doesn't turn solid green after 2 minutes, please
verify the physical setup has been completed as shown in the
“Final Setup Example” and all connections are secure. If you
are still unable to connect, please call 1.800.239.4430.
B
Ethernet port
Three DSL/phone filters are included in your welcome kit.
on ALL phone devices. Do not install filters
Install filters
on phone jacks that are not in use.
Even if you plan to use wireless connectivity, the initial
connection and setup must be performed using the Ethernet
cable.
Step-By-Step Setup Instructions
Power outlet
DSL Light
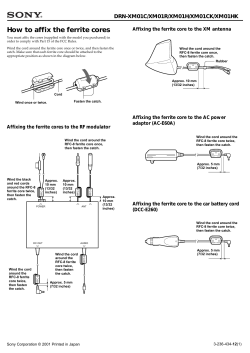
Connect the PHONE side of the dual-port filter to:
NOTE: You should have been provided with a primary e-mail
address and selected a password upon sign-up/purchase.
IF NOT, before proceeding, call 1.800.239.4430.
•DVRs
•Meter readers
•TTY devices
•Emergency medical devices
•Security systems
Power cord
Wi-Fi Router
Ethernet cable
POWER
•Phones
•Answering machines
•Caller ID units
•Fax machines
•Satellite receivers
B
DC 12V
E4
E3
RESET
You will also need your primary billing telephone number for this
account.
E2
E1
ETHERNET
DSL
Some disruption in phone clarity and Internet service may
occur if devices are left unfiltered. Additional filters (including
wall-mount filters) are available free of charge by calling
1.800.239.4430.
STEP TWO
Do you have dial-up or another Internet service?
(If not, please skip to Step 3)
If you will no longer be using that service, use one of the
following options:
1
STEP SIX
Important!
•Do not install filters on phone jacks that are not
in use.
• If you have dial-up (receiving Internet service through your
telephone line), unplug the phone cord from your computer
and the wall jack. Set the phone cord aside.
o not use the new Wi-Fi Router’s Port 1 for initial setup.
D
Use Ethernet ports 2, 3 or 4.
to the DSL port on the Wi-Fi
Connect DSL cord
Router and to the DSL port on the dual-port filter.
Wall jack
STEP FOUR
Locate your Ethernet cable (larger connector) and your DSL
cord (smaller connector) from the Installation Kit.
A
POWER
• If you currently have other Internet service and if you use
a router, disconnect the Ethernet cable (See example Step
5, Cord B) from the computer that is connected to the old
router and ANY computer in the home that was connected
to a router or Wi-Fi Router. Your new Frontier Wi-Fi Router
has built-in wireless capabilities, which allows you to connect
additional computers to your network without the need for
cables.
Power outlet
Wi-Fi Router
DC 12V
E4
E3
T
RESE
NET
ETHER
DSL
DSL cord
E2
E1
Power cord
C
Connect the power cord to the Wi-Fi Router and plug it
into a power outlet.
• If you are replacing a current Frontier Wi-Fi Router, unplug
the Ethernet cable from your old router/modem and plug it
into the new 7550 Wi-Fi Router.
Ethernet Cable
DSL Cord
FIRST—Turn the power switch found at the back of the Wi-Fi
Router to the ON position. You should now see the DSL light
blinking.
Note: If there are no landline phone devices in
your home, or you are swapping out an existing
modem, proceed to Step 5.
NEXT—Wait for the DSL light to turn green. If the light turns
solid green, turn to the back side of this guide to continue
configuration.
NEED HELP?
Call Frontier
Tech Support
1.800.239.4430
Power outlet
Wall jack
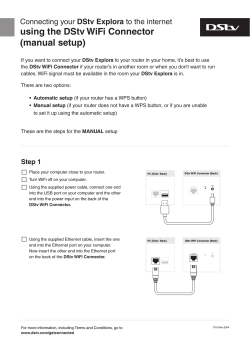
Final Setup
Example
Power
cord
Wi-Fi Router
Filter
A
POWER
DC 12V
E4
E3
T
RESE
E2
RNET
E1
ETHE
DSL
Phone
(Optional)
C
DSL cord
B
Ethernet cable
B
(The modem and your computer may look different than those depicted in this example.)
Do not use Port 1 for initial setup. Use Ethernet ports 2, 3 or 4. DSL is your High-Speed Internet Service.
FTR_NetGear_7550_Res_QSG_12_13
PART #2
WI-FI ROUTER CONFIGURATION & EMAIL SETUP
WI-FI ROUTER CONFIGURATION
After the physical connections are made, follow the steps below to
complete the setup wizard:
STEP ONE
Please wait while setup completes. If you do not see this status bar as
shown below, call 1.800.239.4430.
Open a Web browser:
Internet Explorer
Mozilla FirefoxВ®
Google Chrome
STEP ELEVEN
STEP FOUR
Congratulations! Your setup is complete and you are now connected
and are ready to submit your new Frontier email address on this screen.
You can access frontier.my.yahoo.com, as well as many other Frontier
services, from this page.
You will now be prompted to log back in to Frontier Webmail. Once you
do so, you will be able to begin sending and receiving email.
For the setup of your wireless computers and devices, refer to the SSID
name in Step 4 and the WPA key in Step 5.
Safari
In the address bar, type the following numbers: 192.168.254.254 Push
the Enter/Return key on your keyboard.
STEP TWO
Enter “admin” as the password in the first New Password field and retype
“admin” in the second New Password field. Then click the Apply button.
STEP SEVEN
Summary Page: This page summarizes Wi-Fi Router settings. Note that
the PPP password is hidden for security purposes. You can click Print
to print out the summary page and save it for future reference. Please
keep your SSID name and WPA shared key in a safe place. Click Next to
continue.
EMAIL SETUP
STEP THREE
Now that you are able to access the Internet, you can follow the steps
below to activate your Frontier email account.
Time Zone Setting: Select your local time zone and click Apply. Leave
the other options in the default “Yes” position.
STEP ONE
In the address bar of your Web browser, type the following address:
webmail.frontier.com.
STEP EIGHT
For more information on Frontier Webmail, please visit:
www.frontierhelp.com/faq.cfm?catid=333
If you are interested in setting up an email client, such as Outlook,
Windows Mail, Mac Mail, etc., instructions can be found here:
www.frontierhelp.com/faqcategories.cfm?mcatid=1
Push the Enter/Return key on your keyboard.
Click the Next button to continue the setup process.
STEP FOUR
STEP TWO
The Wireless Network’s name (or SSID) is Frontier, plus the last four digits
of the Wi-Fi Router’s serial number and will be automatically populated.
You may change this name to one you prefer. Then click Apply.
If you agree, check the box and then click the “I accept” button. If you
do not agree with the Terms of Service, you will not be able to advance
with the email setup.
SECURE IT FROM THE START
Keep your Frontier High-Speed Internet fully secured from the moment you hook it up, with
Frontier Secure. With help that is always there when you need it, Frontier Secure protects
your digital lives and livelihoods!
STEP NINE
Please enter the first part of your primary account e-mail address before
the "@" symbol in both boxes, and then click the Submit button.
PROTECT YOURSELF, YOUR FAMILY, YOUR EQUIPMENTВВ‑В—ALL IN ONE PLACE:
• AWARD-WINNING COMPUTER SECURITY—Protects against viruses, spyware,
rootkits and other malware; email filtering, firewall protection, URL blocking, parental
control and protection from new threats.
STEP FIVE
Wireless Security Settings: By default, the setting is WPA2 Personal (PSK)
and AES. SSID Broadcast is enabled. Enter a wireless network password
with a minimum of 8 characters that you would like to use to access your
wireless network.
PART #3
• UNLIMITED CLOUD-BASED BACKUP & SHARING—Automatically, silently backs up
unlimited computer information; access and share files and documents from any Internetenabled device.
welcome
STEP TEN
Search Frontier Site
• 100% U.S.-BASED PREMIUM TECHNICAL SUPPORT—24/7 unlimited, remote
access to technical support for troubleshooting and device/software installation; PC
Tune-Ups, malware removal and more.
PLEASE NOTE: You will need to agree to the Frontier Electronic Terms and
Conditions. Enter your primary billing telephone number in the Phone
Number
field and enter up to 3 initials (not case sensitive) in the initials
.
field. Click the I Agree button.
STAY CONNECTED
Residential
Small Business
Bundles
Enterprise
Cart (0)
High-Speed Internet
Frontier Secure
Phone
MY SERVICES
TV
Support
LikeLi
Follow @FrontierCorp
WELCOME TO FRONTIER'S HIGH-SPEED INTERNET SERVICE!
Printable View
STEP THREE
FRONTIER SECURE PERSONAL SECURITY PLUS BUNDLE
Please enter your date of birth, gender and zip code. Click Submit.
STEP SIX
NOTE: YOU SHOULD HAVE BEEN PROVIDED WITH A PRIMARY EMAIL
ADDRESS and selected a password upon sign-up.
Enter the primary account email address that you selected at sign-up/
purchase into the User Name field. Enter the primary account password
into the Password field and re-enter the password again into the Re-Type
Password field. Click the Apply button.
RESIDENTIAL DIGITAL PHONE & INTERNET SERVICE TERMS AND CONDITIONS
THIS ELECTRONIC DOCUMENT IS A LEGALLY BINDING AGREEMENT AND DESCRIBES THE TERMS AND CONDITIONS PURSUANT TO WHICH FRONTIER
("Frontier" or "we") WILL PROVIDE YOU WITH DIGITAL PHONE AND/OR INTERNET ("Internet Service", or "Broadband Service", collectively "Services"). THIS
AGREEMENT REQUIRES THAT ANY DISPUTE BE RESOLVED BY BINDING ARBITRATION ON AN INDIVIDUAL BASIS RATHER THAN LAWSUITS, JURY
TRIALS, OR CLASS ACTIONS, AS EXPLAINED MORE FULLY BELOW. BY USING OR PAYING FOR FRONTIER INTERNET SERVICES OR EQUIPMENT, YOU
ARE AGREEING TO THESE TERMS AND CONDITIONS.
SEVERAL SECTIONS OF THIS AGREEMENT HAVE DIFFERENT TERMS AND CONDITIONS FOR FRONTIER'S WIRED BROADBAND SERVICE AND ITS
SATELLITE BROADBAND SERVICE.
AT THE END OF THIS AGREEMENT YOU WILL BE ASKED WHETHER YOU ACCEPT THESE TERMS AND CONDITIONS. YOU WILL HAVE TO USE THE
SCROLL BAR TO SEE ALL OF THE TERMS AND CONDITIONS.
TERM ARRANGEMENTS
Frontier provides discounted term arrangements, gifts, and/or promotions to customers that commit to a term contract arrangement. If you are a term customer, your
Phone and/or Internet Service is subject to the term commitment you agreed to. You understand and agree that you must continue to purchase the Services for a
minimum term to receive any promotional offer. You agree to keep the Frontier Services during this initial term and all renewals. You must continue to purchase the
Services for the minimum term agreed upon to receive the discounted rates. This term commitment will automatically renew for the same time period each time it
expires unless you notify Frontier or we notify you of termination before the term commitment period ends. At the end of your term commitment, additional and/or
different service and equipment charges may apply. If you do not fulfill the minimum term commitment or any renewal thereof, you will be liable for and agree to pay to
Frontier a termination charge that you agreed to when ordering Service.
If you ordered Frontier's satellite Broadband Service and you cancel Service early, you agree to pay Frontier a termination fee of up to $400. In addition, you may be
$
$
Phone Number
The telephone number entered
Enter primary
phone number
in your application.
Enter
initials here
Enter Your Initials
Note: Due to federal requirements and regulations, your birth date is
required to be COPPA compliant. For more information on this, please
visit www.coppa.org/coppa.htm.
CALL 1.888.620.3663
OR VISIT FRONTIER.COM/SECURE1
Already a Frontier Secure customer? Now is the time to make sure that
Click I Agree
Skip For Now
your protection services are fully activated. Call us today if we can help!
We care about your experience
Tweet us @FrontierCorp
GET TO KNOW FRONTIER
HELP & SUPPORT
ADDITIONAL SERVICES
Our Values
My Personal Account
Frontier Secure
Investor Relations
My Business Account
Frontier Wi-Fi
Press Releases
Internet Tech Support
Frontier Pages
Policies & Notifications
Frontier Secure Support
Frontier Games
В© 2013 Frontier Communications Corporation.
© Copyright 2026 Paperzz