CQ5 WCM How To - A Collection
CQ5 WCM How To - A Collection
CQ 5.2 WCM
Copyright 1993-2009 Day Management AG
Contents
1. Introduction ........................................................................................................................ 1
1.1. Introduction ............................................................................................................. 1
1.2. Purpose of this Document ........................................................................................ 1
1.3. Target Audience ...................................................................................................... 1
2. How to Quickly Create a Website ....................................................................................... 2
2.1. Introduction ............................................................................................................. 2
2.2. Creating the application, the Content Page Template, the Content Page Component
and a Web Page ........................................................................................................... 2
2.3. Setting up the Designer ........................................................................................... 3
2.4. Importing the original Web Page (CSS, HTML and images) into your project ................ 3
2.5. Replacing static content by dynamic content using CQ Foundation Components .......... 4
2.6. Creating a Media Library ......................................................................................... 5
3. How to Develop Components ............................................................................................. 6
3.1. Developing Components .......................................................................................... 6
3.1.1. Developing a new component by adapting an existing component .................... 6
3.1.2. Adding a new component to the paragraph system (design mode) ................... 7
3.1.3. Extending the Text and Image Component - An Example ................................ 7
4. How to Set Up a Cluster .................................................................................................. 14
4.1. How to Set Up a Cluster in CQ .............................................................................. 14
5. How to Monitor Performance ............................................................................................ 15
5.1. Introduction ........................................................................................................... 15
5.2. Performance - some theory .................................................................................... 15
5.3. Performance - basic rules ...................................................................................... 16
5.4. Recognizing some common performance problems ................................................. 17
5.5. Monitoring, and optimizing, the performance ........................................................... 17
5.5.1. Tools and mechanisms ............................................................................... 18
5.5.2. Interpreting the request.log .......................................................................... 19
5.5.3. Caching ...................................................................................................... 21
5.5.4. Analyzing Search ........................................................................................ 23
5.5.5. Monitoring Performance using JVisualVM ..................................................... 23
5.5.6. Performance when loading and editing Digital Assets .................................... 23
6. How to Create and Use a Workflow .................................................................................. 25
6.1. Creating a Workflow .............................................................................................. 25
6.1.1. Creating a new Workflow Model .................................................................. 25
6.1.2. Editing the Workflow ................................................................................... 25
6.2. Using the Workflow ............................................................................................... 28
6.2.1. Starting the Workflow for an individual page ................................................. 28
6.2.2. Taking actions on a Participant Step ............................................................ 30
6.2.3. Suspending, Resuming and Terminating a Workflow instance ........................ 33
6.2.4. Monitoring the Status of Workflow Instances ................................................. 33
6.3. Using the Workflow Launcher for Node Modifications ............................................... 34
6.3.1. Adding a Launcher relationship .................................................................... 35
6.3.2. Removing a Launcher relationship ............................................................... 36
7. Multi Site Manager ........................................................................................................... 37
7.1. Typical Use Cases for the Multi Site Manager ......................................................... 37
7.1.1. Multinational Site ........................................................................................ 37
7.1.2. Multilingual Site .......................................................................................... 37
7.1.3. Multinational Multilingual Site ....................................................................... 38
7.2. Managing Different Language Versions of a Website ............................................... 38
7.3. Managing the Translation of your Language Branches ............................................. 40
7.4. Managing Blueprints and Live Copies ..................................................................... 42
7.4.1. Creating a Live Copy .................................................................................. 42
7.4.2. Configuring Synchronization Actions between a Blueprint and its Live Copy
..... 51
7.4.3. Rolling out Changes on the Blueprint to the Live Copy .................................. 55
7.4.4. Live Copy status at Page and at Paragraph level .......................................... 57
Page iii of 214
CQ 5.2 WCM
Copyright 1993-2009 Day Management AG
CQ5 WCM How To - A Collection
7.4.5. Managing Blueprints and Live Copies .......................................................... 62
7.4.6. Moving Blueprint and/or Live Copy pages ..................................................... 64
8. Upgrading to CQ5 ............................................................................................................ 65
8.1. How to Upgrade Your CommuniquГ© Instance (3 or 4) to CQ5 ................................... 65
8.2. Upgrading from CQ 5.1 to CQ 5.2 .......................................................................... 67
8.2.1. Important information to read before starting the upgrade .............................. 67
8.2.2. Preparing for the upgrade from CQ 5.1 to CQ 5.2 ......................................... 68
8.2.3. Upgrading your CQ 5.1 instance to CQ 5.2 .................................................. 69
8.2.4. Upgrading your CQ 5.1 Digital Assets .......................................................... 70
8.2.5. Tasks to perform after the upgrade .............................................................. 71
8.2.6. The final status of your upgraded instance ................................................... 72
9. Installing CQ5 .................................................................................................................. 73
9.1. How to Install CQ WCM Author and Publish Instances using Quickstart ..................... 73
9.1.1. Installing an Author Instance ....................................................................... 73
9.1.2. Installing a Publish Instance ........................................................................ 74
9.1.3. Installing a CQ WCM Instance - Generic Procedure ...................................... 74
9.2. How to install CQ5 with an Application Server ......................................................... 75
9.2.1. WebSphere v6.1 ......................................................................................... 76
9.2.2. WebLogic v10.3 .......................................................................................... 78
9.2.3. Tomcat v6 .................................................................................................. 80
9.2.4. JBoss v4 .................................................................................................... 82
9.2.5. Generic Procedures .................................................................................... 85
10. How to Use, Create, and Edit a Page .............................................................................. 88
10.1. Managing Pages within CQ WCM ......................................................................... 88
10.1.1. Creating a New Page ................................................................................ 88
10.1.2. Editing a Page .......................................................................................... 90
10.1.3. Find & Replace ......................................................................................... 93
10.1.4. Moving or Renaming Page ........................................................................ 94
10.1.5. Deleting a Page ........................................................................................ 95
10.1.6. Setting the Page Properties ....................................................................... 96
11. How to Publish a Page ................................................................................................. 102
11.1. How To Publish Pages ....................................................................................... 102
11.1.1. Activating Content ................................................................................... 102
11.1.2. Deactivating Content ............................................................................... 103
11.1.3. Determining Page Publication Status ........................................................ 104
11.1.4. Locking Pages ........................................................................................ 104
11.1.5. Unlocking Pages ..................................................................................... 105
11.1.6. Using Preview Mode ............................................................................... 106
12. How to Restore a Page ................................................................................................ 107
12.1. How To Restore Pages ...................................................................................... 107
13. How to Create Templates ............................................................................................. 109
13.1. Developing Page Templates ............................................................................... 109
13.1.1. Creating a new Template (based on an existing template) .......................... 109
14. How to activate a section of your website ...................................................................... 110
14.1. How to activate a complete section (tree) of your website ..................................... 110
15. How to Use Tags ......................................................................................................... 111
15.1. How to Manage Tags in CQ WCM ...................................................................... 111
15.1.1. Using Sidekick to access and assign Tags ................................................ 111
15.1.2. The Tag Administration Console .............................................................. 112
15.1.3. Searching for Tags .................................................................................. 114
16. How to use Social Collaboration .................................................................................... 116
16.1. How to Blog with CQ ......................................................................................... 116
16.1.1. Creating a new blog ................................................................................ 116
16.1.2. Posting a new blog entry ......................................................................... 116
16.1.3. Adding quick reference links to your blog .................................................. 118
16.1.4. Importing RSS Feeds .............................................................................. 119
16.2. Managing the Social Collaboration Profiles .......................................................... 121
16.2.1. Registering and editing a user profile ....................................................... 121
Page iv of 214
CQ 5.2 WCM
Copyright 1993-2009 Day Management AG
CQ5 WCM How To - A Collection
16.2.2. Finding the profiles in CRX ......................................................................
17. How to import offline documents ...................................................................................
17.1. How to import documents generated offline .........................................................
18. Validating External Links ...............................................................................................
18.1. How to validate external links .............................................................................
19. How to Find Logs and Audit Entries ..............................................................................
19.1. Working with Audit Records and Log Files ..........................................................
19.1.1. Finding the Audit Records .......................................................................
19.1.2. Finding the Log Files ...............................................................................
19.1.3. Activating the DEBUG Log Level ..............................................................
19.1.4. Create a Custom Log File ........................................................................
20. How to monitor, and configure, your Replication Agents ..................................................
20.1. How to monitor your Replication Agents ..............................................................
20.2. How to configure your Replication Agents ...........................................................
20.2.1. Configuring your Replication Agents from wcm/siteadmin ...........................
20.2.2. Configuring your Replication Agents from the CRX Explorer .......................
20.2.3. Configuring Reverse Replication ..............................................................
20.2.4. Configuring Replication for Multiple Publish Instances ................................
20.2.5. Configuring a Dispatcher Flush agent .......................................................
21. Troubleshooting CQ WCM ............................................................................................
21.1. Troubleshooting scenarios by Role(s) ..................................................................
21.2. Troubleshooting Scenarios .................................................................................
21.2.1. Common Installation Issues .....................................................................
21.2.2. Possible Issues with the GUI ...................................................................
21.2.3. Methods for Troubleshooting Analysis ......................................................
22. How to Backup your CQ WCM instance ........................................................................
22.1. Backing up your software installation ..................................................................
22.2. Backing up your repository .................................................................................
23. Security Checklists .......................................................................................................
23.1. Security Checklist for System Administrators .......................................................
23.2. Security Checklist for Power Users .....................................................................
23.3. Security Checklist for Developers ........................................................................
23.4. Disable WebDAV ...............................................................................................
23.5. Restrict Access via the Dispatcher ......................................................................
23.6. Check for Cross-Site Scripting (XSS) ..................................................................
23.7. Change Default Passwords ................................................................................
23.7.1. Changing the CQ admin password ...........................................................
23.7.2. Changing the admin password for CQSE ..................................................
23.7.3. Changing the admin password for the Apache Felix Web Management
Console .............................................................................................................
23.8. Use the user session, not the administrative session ............................................
24. Defining Performance Tests on Your Publish Environment ..............................................
24.1. Introduction ........................................................................................................
24.2. Phases to be used .............................................................................................
24.3. Verification of Knowledge ...................................................................................
24.3.1. Test Architecture .....................................................................................
24.3.2. Application Map ......................................................................................
24.4. Scope Definition .................................................................................................
24.5. Test Methodologies ............................................................................................
24.6. Defining the Performance Goals .........................................................................
24.6.1. Single Component Tests ..........................................................................
24.6.2. Combined Component Tests ....................................................................
24.6.3. Going Live Tests .....................................................................................
24.6.4. Error Tests .............................................................................................
24.6.5. Endurance Tests .....................................................................................
24.7. Optimization .......................................................................................................
24.8. Reporting ...........................................................................................................
25. Extending CQ documentation and Online Help ...............................................................
Page v of 214
122
123
123
124
124
125
125
125
126
127
128
130
130
131
131
132
133
135
135
137
137
137
137
138
139
144
144
144
145
145
145
145
145
146
147
147
148
150
151
151
152
152
152
152
153
153
153
154
154
155
155
156
156
156
157
157
158
CQ 5.2 WCM
Copyright 1993-2009 Day Management AG
CQ5 WCM How To - A Collection
25.1. How to extend the documentation and online help ...............................................
25.1.1. To extend the online help delivered with CQ .............................................
26. How to Create a Fully Featured Internet Website ............................................................
27. How to Set Up the Development Environment with Eclipse ..............................................
27.1. How to Set Up the Development Environment with Eclipse ...................................
27.1.1. Creating the Project Structure in CQ5 .......................................................
27.1.2. Installing FileVault (VLT) ..........................................................................
27.1.3. Installing Eclipse .....................................................................................
27.1.4. Creating the Project Structure in Eclipse ...................................................
27.1.5. Scripting with Eclipse and CQ5 ................................................................
27.1.6. Java Developing with Eclipse and CQ5 ....................................................
27.1.7. Building collaborative and automated projects ...........................................
28. Multi Site Manager for Developers .................................................................................
28.1. MSM in the Repository .......................................................................................
28.1.1. MSM-specific Nodes, Node Types, and Properties ....................................
28.1.2. MSM mechanisms in the repository ..........................................................
28.2. Extending MSM Functionalities ...........................................................................
28.2.1. How to extend synchronization actions .....................................................
28.2.2. How to define the properties and the nodes that are copied to the Live
Copy ..................................................................................................................
28.2.3. How to remove the "Chapters" step in the "Create Site" wizard ...................
29. JSP Tag Libraries .........................................................................................................
29.1. JSP Tag Libraries ..............................................................................................
29.1.1. CQ Tag Library .......................................................................................
29.1.2. Sling Tag Library .....................................................................................
30. DAM Media Handlers ....................................................................................................
30.1. Default Media Handlers ......................................................................................
30.2. Using Media Handlers in Workflows to perform tasks on Assets ............................
30.3. Disabling/Enabling a Media Handler ....................................................................
30.4. Creating a new Media Handler ...........................................................................
30.4.1. Important Classes and Interfaces .............................................................
30.4.2. Example: create a specific Text Handler ...................................................
31. How to Model Data .......................................................................................................
31.1. Data Modeling - David Nuescheler's Model ..........................................................
31.1.1. Source ....................................................................................................
31.1.2. Introduction from David ............................................................................
31.1.3. Seven Simple Rules ................................................................................
A. Copyright, Licenses and Formatting Conventions .............................................................
A.1. Formatting Conventions .......................................................................................
Page vi of 214
158
158
161
162
162
162
162
163
164
168
170
172
173
173
173
176
177
177
186
187
188
188
188
193
196
196
197
200
201
201
201
208
208
208
208
208
214
214
CQ 5.2 WCM
Copyright 1993-2009 Day Management AG
1 Introduction
1.1 Introduction
To help you perform certain tasks within CQ5 this collection of How To articles has been compiled.
1.2 Purpose of this Document
To collect all the How To articles into one document.
1.3 Target Audience
• see individual How To sections
Page 1 of 214
CQ 5.2 WCM
Copyright 1993-2009 Day Management AG
2 How to Quickly Create a Website
2.1 Introduction
This tutorial enables you to quickly create a website with CQ5, based on an existing website. It is
mainly targeted at Day Pre-Sales staff and Day Partners preparing Proof Of Concept for a project.
You only need CQ5 WCM, CQDE and a Web browser.
2.2 Creating the application, the Content Page Template, the
Content Page Component and a Web Page
1.
In CRX Explorer, copy the node apps/geometrixx, name the target node
<customername> and paste it under apps.
2.
Set the title (jcr:title property) of the Template apps/<customername>/templates/
contentpage to <Customername> Content Page Template.
3.
Replace the thumbnail /apps/<customername>/templates/contentpage/
thumbnail.png with one representing your Template.
• Create a PNG image, 128 x 98 px big.
• In your file system, copy the image and paste it into /apps/<customername>/
templates/contentpage/ .
4.
Delete the property allowedPaths of the Template /apps/<customername>/
templates/contentpage.
5.
Set the property sling:resourceType of the node /apps/<customername>/
templates/contentpage/jcr:content to <customername>/components/
contentpage.
6.
In CQDE, under the Component /apps/<customername>/components/contentpage,
create the file contentpage.jsp.
7.
Copy/paste following code into the script contentpage.jsp:
<%@page session="false" contentType="text/html; charset=utf-8" %><%
%><%@taglib prefix="cq" uri="http://www.day.com/taglibs/cq/1.0" %><%
%><!DOCTYPE HTML PUBLIC "-//W3C//DTD HTML 4.01//EN" "http://www.w3.org/TR/html4/
strict.dtd">
<html>
<%@include file="/libs/wcm/global.jsp" %><%
%><head>
<cq:include script="/libs/wcm/init/init.jsp"/>
<% currentDesign.writeCssIncludes(out); %>
MyCustomerHead
</head>
<body>
MyCustomerBody
</body>
</html>
8.
In your browser, open the CQ site administration.
9.
Under Websites, create a new page with the Title www.<customername>.com, the label
<customername> and the <Customername> Content Page Template.
10. Under the Page www.<customername>.com, create a new page with the Title English,
the label en and the <Customername> Content Page Template. If needed, create one Page
with the Title French, the label fr and one Page the Title German, the label de.
Page 2 of 214
CQ 5.2 WCM
Copyright 1993-2009 Day Management AG
How to Quickly Create a Website
11. Under the Page English, create as many pages as needed in order to reproduce the site
map of your customer site.
12. Open the English Page. It should look as follows:
2.3 Setting up the Designer
1.
In CRX Explorer, copy the node /etc/designs/geometrixx, name the target node
<customername> and paste it under /etc/designs.
2.
In contentpage.jsp, insert <% currentDesign.writeCssIncludes(out); %> at the
appropriate location.
3.
In CQDE, open the file /etc/designs/<customername>/static.css and adapt the
styles to your needs.
4.
Link your pages to the <customername> designer: in CRX Explorer, select the node /
content/<customername>/jcr:content. Double-click Property cq:designPath and
set /etc/designs/<customername> as Value.
2.4 Importing the original Web Page (CSS, HTML and images) into
your project
1.
In Firefox, browse to the page that you want to import, select Save Page As …, enter
<customername> as Filename and save it on your desktop.
2.
Test the downloaded website on your desktop: open the downloaded
<customername>.htm file in your browser and compare the result with the original website.
If it is different, open the file in a text editor and fix the problems. Problems are often caused
by paths for css files and images that need to be correctly reset.
3.
In your filesystem, zip all the resources of your webpage (html, css, images, ...).
4.
In CRX Explorer, under the node /apps/<customername>/components/contentpage,
create a New Node: set the Name to resources and the Type to sling:Folder.
Page 3 of 214
CQ 5.2 WCM
Copyright 1993-2009 Day Management AG
How to Quickly Create a Website
5.
In CRX Content Loader, import the zip file and expand it into the node /apps/
<customername>/components/contentpage/resources:
• Browse to http://localhost:4502/crx/loader/index.jsp.
• Click Browse beside Root path for import:, browse to the node /apps/
<customername>/components/contentpage/resources and click Open.
• Click Browse beside File to upload:, browse to your zip file and click Open.
• Check Auto-Expand and Expand file content directly below selected
root checkboxes.
• Click Import.
Note
In a normal project setup, the resources wouldn't be placed under the Component. It
is only done here to maximize your efficiency.
6.
In CQDE, open the file <customername>.html and copy the content between the <head>
and </head> tags. In the script contentpage.jsp, select
MyCustomerHead
and paste the previously copied content.
7.
In the file <customername>.html, copy the content between the <body> and </body> tags.
In the script contentpage.jsp, select
MyCustomerBody
and paste the previously copied content.
8.
In the script contentpage.jsp, reset the paths of the css files and the images by replacing:
<customername>_files
with:
/apps/<customername>/components/contentpage/resources
Note
Make sure that the names of your resources don't start with _ (underscore).
.
9.
In the script contentpage.jsp, replace all external links with internal links. This way the
external links don't appear broken when your machine is not online.
10. In your browser, in the CQ Site Administration, open the page www.<customername>.com. It
should display your <customername> web page.
2.5 Replacing static content by dynamic content using CQ
Foundation Components
1.
In CQDE, in the file contentpage.jsp, select the content of the middle part of the page and
replace it with:
<cq:include path="par" resourceType="foundation/components/parsys" />
Page 4 of 214
CQ 5.2 WCM
Copyright 1993-2009 Day Management AG
How to Quickly Create a Website
. The content has been replaced by the parsys Foundation Component.
2.
In your browser, refresh your page. The features of the Paragraph System are now available
to you: you can include other Components, for example, Flash, Text or Text Image.
3.
By following the previous steps, you can add other CQ Foundation Components as for
example topnav or toolnav.
4.
In your browser, in the CQ Site Administration, open a page of your choice from your
application. Copy content from the original web page and paste it into your page.
5.
Adapt the design to look like the design of the original website.
2.6 Creating a Media Library
1.
In your browser, download about 20 resources (pictures, banners, pdf, …) from the original
website: open a Google page, type site:<customer-url>, click search and click the
Images tab. Save the desired resources on your computer.
2.
In your filesystem, zip all the resources.
3.
In CRX Content Loader, import the zip file and expand it into the node content/dam/
<customername>. The resources are now available in the contentfinder, when browsing
through the Pages.
Page 5 of 214
CQ 5.2 WCM
Copyright 1993-2009 Day Management AG
3 How to Develop Components
3.1 Developing Components
This section describes how to create your own components and add them to the paragraph
system.
A quick way to get started is to copy an existing component and then make the changes you want.
You can also use this method to edit existing components (although Day recommends that you
back up the original component).
An example of how to develop a component is described in detail in Extending the Text and Image
Component - An Example.
3.1.1 Developing a new component by adapting an existing component
To develop new components for CQ WCM based on existing component, you copy the component
and create a javascript file for the new component and store it in a location accessible to CQ5:
1.
Create a new component folder in /apps/<website-name>/
components/<MyComponent> by copying an existing component, such as the Text
component, and renaming it.
2.
In the CRX Explorer, modify the jcr:description and jcr:title to reflect its new name.
3.
Open the new component folder and make the changes you require; also, delete any
extraneous information in the folder.
You can make changes such as:
• adding a new field in the dialog box
• replacing the .jsp file (name it after your new component)
• or completely reworking the entire component if you want
For example, if you take a copy of the standard Text component, you can add an additional
field to the dialog box, then update the .jsp to process the input made there.
Page 6 of 214
CQ 5.2 WCM
Copyright 1993-2009 Day Management AG
How to Develop Components
4.
In the Content Explorer, navigate to the component and change the allowedParents
property to */parsys, which makes it available to the paragraph system.
Note
Either cq:editConfig node, dialog, or design_dialog node should be present and
properly initialized for the new component to appear.
5.
Activate the new component in your paragraph system either by adding /apps/<websitename>/components/<MyComponent> to the /etc/designs/default/<websitename>/jcr:content/contentpage/parsys/components property in CRX or by
following the instructions in Adding new components to paragraph systems.
6.
In CQ WCM, open a page in your web site and insert a new paragraph of the type you just
created to make sure the component is working properly.
Note
To see timing statistics for page loading, you can use Ctrl-Shift-U - with ?
debugClientLibs=true set in the URL.
3.1.2 Adding a new component to the paragraph system (design mode)
After the component has been developed, you add it to the paragraph system, which enables
authors to select and use the component when editing a page.
1.
Access a page within your authoring environment that uses the paragraph system; for
example <contentPath>/Test.html.
2.
Switch to Design mode by either:
• adding ?cmsmode=design to the end of the URL and accessing again; for example
<contextPath>/ Test.html?cmsmode=design.
• clicking Design in Sidekick
You are now in designmode and can edit the paragraph system:
3.
Click Edit.
A list of components belonging to the paragraph system are shown (all those defined with the
property allowedParents=*/parsys). Your new component is also listed.
The components can be activated (or deactivated) to determine which are offered to the
author when editing a page.
4.
Activate your component, then return to normal edit mode to confirm that it is available for
use.
3.1.3 Extending the Text and Image Component - An Example
This section provides an example on how to extend the widely used text and image standard
component with a configurable image placement feature.
The extension to the text and image component allows editors to use all the existing functionality of
the component plus have an extra option to specify the placement of the image either:
• on the left-hand side of the text (current behavior and the new default)
• as well as on the right-hand side
Page 7 of 214
CQ 5.2 WCM
Copyright 1993-2009 Day Management AG
How to Develop Components
After extending this component, you can configure the image placement through the component's
dialog box.
The following techniques are described in this exercise:
• Copying existing component node and modifying its metadata
• Modifying the component's dialog, including inheritance of widgets from parent dialog boxes
• Modifying the component's script to implement the new functionality
3.1.3.1 Extending the existing textimage component
To create the new component, we use the standard textimage component as a basis and modify
it. We store the new component in the Geometrixx CQ WCM example application. To extend the
textimage component, go to the CRX Explorer (server name:port number/crx) and log in as
admin and then navigate to the Content Explorer.
1.
Copy the standard textimage component from /libs/foundation/components/
textimage into the Geometrixx component folder, /apps/geometrixx/components,
using textimage as the target node name. (Copy the component by navigating to the
component, right-clicking and selecting Copy and browsing to the target directory.)
2.
To keep this example simple, navigate to the component you copied and delete all the
subnodes of the new textimage node except for the following ones:
• dialog definition: textimage/dialog
• component script: textimage/textimage.jsp
Page 8 of 214
CQ 5.2 WCM
Copyright 1993-2009 Day Management AG
How to Develop Components
3.
Edit the component metadata:
• Component name
• Set jcr:description to Text Image Component (Extended)
• Set jcr:title to Text Image (Extended)
• Component listing in the paragraph (parsys component) system (leave as is)
• Leave allowedParents defined as */parsys
• Group, where the component is listed in the sidekick (leave as is)
• Leave componentGroup set to General
• Parent component for the new component (the standard textimage component)
• Set sling:resourceSuperType to foundation/components/textimage
After these steps the component node looks like the following:
4.
Modify the component's dialog box to include the new option. The new component inherits
the parts of the dialog box that are the same as in the original. The only addition we make is
to extend the Advanced tab, adding an Image Position dropdown list, with options Left
and Right:
• Leave the textimage/dialog properties unchanged.
• Note how textimage/dialog/items has three subnodes, tab1 to tab3, representing
the three tabs of the textimage dialog box.
• For the first two tabs (tab1 and tab2):
• Change xtype to cqinclude (to inherit from the standard component).
• Add a pathParameter property with values /libs/foundation/components/
textimage/dialog/items/tab1.infinity.json and /libs/foundation/
components/textimage/dialog/items/tab2.infinity.json, respectively.
• Remove all other properties or subnodes.
• For tab3:
• Leave the properties and subnodes without changes
• Add a new field definition to tab3/items, node position of type cq:Widget
• Set the following properties (of type String) for the new tab3/items/position node
Page 9 of 214
CQ 5.2 WCM
Copyright 1993-2009 Day Management AG
How to Develop Components
• name: ./imagePosition
• xtype: selection
• fieldLabel: Image Position
• type: select
• Add subnode position/options of type cq:WidgetCollection to represent the
two choices for image placement, and under it create two nodes, o1 and o2 of type
nt:unstructured
• For node position/options/o1 set the properties: text to Left and value to left
• For node position/options/o2 set the properties: text to Right and value to
right
Image position is persisted in content as the imagePosition property of the node
representing textimage paragraph.
After these steps, the component dialog box looks like this:
5.
Extend the component script, textimage.jsp, with extra handling of the new parameter.
• Open the /apps/geometrixx/components/textimage/textimage.jsp script for
editing.
• We are going to manipulate the style of the <div class="image"> tag, generated by the
component, to float the image to the right. It is located in the following area of the code:
Image img = new Image(resource, "image");
if (img.hasContent() || WCMMode.fromRequest(request) == WCMMode.EDIT) {
%><div class="image"><%
img.loadStyleData(currentStyle);
We are going to replace the emphasized code fragment %><div class="image"><%
with new code generating a custom style for this tag.
Page 10 of 214
CQ 5.2 WCM
Copyright 1993-2009 Day Management AG
How to Develop Components
• Copy the following code fragment, and replace the %><div class="image"><% line with
it:
// todo: add new CSS class for the 'right image' instead of using
//
the style attribute
String style="";
if (properties.get("imagePosition", "left").equals("right")) {
style = "style=\"float:right\"";
}
%><div <%= style %> class="image"><%
Note that for simplicity we are hard-coding the style to the HTML tag. The proper way to do
it would be to add a new CSS class to the application styles and just add the class to the
tag in the code in the case of a right-aligned image.
• The code fragment, after the change, should look like this (new code emphasized):
Image img = new Image(resource, "image");
if (img.hasContent() || WCMMode.fromRequest(request) == WCMMode.EDIT) {
// todo: add new CSS class for the 'right image' instead of using
//
the style attribute
String style="";
if (properties.get("imagePosition", "left").equals("right")) {
style = "style=\"float:right\"";
}
%><div <%= style %> class="image"><%
img.loadStyleData(currentStyle);
• Save the script to the repository.
6.
The component is ready to test.
3.1.3.2 Checking the new component
After the component has been developed, you can add it to the paragraph system, which enables
authors to select and use the component when editing a page. These steps allow you to test the
component.
1.
Open a page in Geometrixx; for example, English/Company
2.
Switch to design mode by clicking Design in Sidekick
3.
Edit the paragraph system design by clicking Edit on the paragraph system in the middle of
the page. A list of components, which can be placed in the paragraph system are shown, and
it should include your newly developed component, Text Image (Extended). Activate it
for the paragraph system by selecting it and clicking OK.
4.
Switch back to the editing mode.
5.
Add the Text Image (Extended) paragraph to the paragraph system, initialize text and image
with sample content. Save and you should see the default rendering of Text and Image
component:
Page 11 of 214
CQ 5.2 WCM
Copyright 1993-2009 Day Management AG
How to Develop Components
6.
Open the dialog of the text and image paragraph, and change the Image Position on the
Advanced tab to Right, and click OK to save the changes.
7.
You see the paragraph rendered with the image on the right:
Page 12 of 214
CQ 5.2 WCM
Copyright 1993-2009 Day Management AG
How to Develop Components
8.
The component is now ready to use.
The component stores its content in a paragraph on the Company page. The following screenshot
shows how our new configuration parameter is persisted in the repository, with the node
representing the paragraph we have just created.
The textimage/imagePosition parameter represents the position of the image for this
paragraph on /content/geometrixx/en/company page.
Page 13 of 214
CQ 5.2 WCM
Copyright 1993-2009 Day Management AG
4 How to Set Up a Cluster
4.1 How to Set Up a Cluster in CQ
A cluster is formed of two, or more, live servers linked together. Therefore, if one node fails, the
other nodes are active and accessible for your applications and there is no system interruption.
This allows you to recover and re-start failed nodes easily. New nodes can also be added to an
existing cluster, allowing for simple extensibility.
Clustering is beneficial for:
Increased availability
When a server breaks down, or becomes unavailable, the cluster agent relays requests to the
servers that are still running. Service continues without interruption.
Increased performance
Clustering increases system performance and availability even when nodes fail.
While all servers in the cluster are active, you can use their combined computational power.
Therefore, this solution improves performance during normal use. However, if one server
breaks down you lose its performance, so the overall application performance may suffer.
The following section describes how to set up a cluster in CQ with two cluster nodes on two
separately networked servers.
The master node is called node 1, the slave node is called node 2.
On the node 1 (master):
1.
In the file system, create a folder /node1.
2.
Install CQ under /node1. For a complete description of the installation, please refer to the
section called “Installing an Author Instance”.
3.
In the file system, share the folder node1/crx-quickstart/repository/shared so that
it can be accessed from node 2.
On the node 2 (slave):
1.
In the file system, create a folder /node2.
2.
Install CQ under /node2. For a complete description of the installation, please refer to the
section called “Installing an Author Instance”.
3.
In the file system, map the folder on node 1 node1/crx-quickstart/repository/
shared to a drive; Z: in our case.
4.
In your browser, navigate to http://localhost:4502/crx to open the CRX Main
Console.
5.
Log in as administrator (admin).
6.
Click Repository Configuration.
7.
Under Tools, click Cluster.
8.
Under Join Cluster, as Shared path, enter Z:\ and click Join.
Note
In order to add more nodes to the cluster, repeat the steps on the slave node as many
times as needed.
Page 14 of 214
CQ 5.2 WCM
Copyright 1993-2009 Day Management AG
5 How to Monitor Performance
5.1 Introduction
CQ5 encompasses several applications, and interacts with several more.
Performance (or the lack of it) is one of the first things that your users notice, so as with any
application with a user interface, performance is of key importance. To optimize the performance of
your CQ5 WCM installation you need to monitor various attributes of the instance and its behavior.
This is primarily of interest to power user, system administrators and project managers.
5.2 Performance - some theory
The problems that cause performance issues are often difficult to track down, even when their
effects are easy to see.
A basic starting point is a good knowledge of your system when it is operating as normal. If you
don't know how your environment "looks" and "behaves" when it is performing properly, it can
be difficult to locate the problem when performance deteriorates. This means that you should
spend some time investigating your system when it is running smoothly and ensure that collecting
performance information is an ongoing task. This will provide you with a basis for comparison
should the performance suffer.
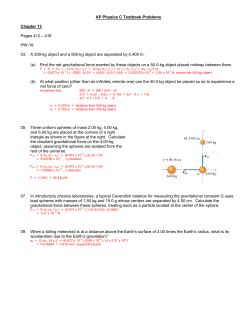
The following diagram illustrates the path that a request for CQ5 content can take - and therefore
the number of different elements which can impact the performance.
Figure 5.1. CQ5 request - the web-chain
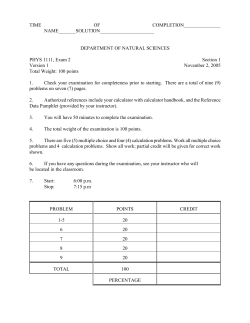
Performance is also a balance between Volume and Capacity:
Volume
the amount of output that is processed and delivered by the system.
Page 15 of 214
CQ 5.2 WCM
Copyright 1993-2009 Day Management AG
How to Monitor Performance
Capacity
the system’s ability to deliver the volume.
This can be illustrated in various locations throughout the web-chain.
Figure 5.2. Capacity vs. Volume
There are several functional areas which are often responsible for impacting the performance:
• Caching
• Application (your project) code
• Search functionality
5.3 Performance - basic rules
Certain rules should be kept in mind when optimizing performance:
1. Performance tuning must be part of every project.
2. Do not optimize early in the development cycle.
3. Performance is only as good as the weakest link.
4. Always think about capacity vs. volume.
5. Optimize important things first.
6. Never optimize without realistic goals.
Note
Bear in mind that the mechanism you use to measure performance will often affect
exactly what you are trying to measure. You should always try to account for these
Page 16 of 214
CQ 5.2 WCM
Copyright 1993-2009 Day Management AG
How to Monitor Performance
discrepancies, and eliminate as much of their effect as possible; in particular browser
plug-ins should be de-activated wherever possible.
5.4 Recognizing some common performance problems
The following lists common performance issues which occur, together with proposals on how to
spot and counteract them.
Table 5.1. Recognizing common performance problems
Area
Symptom(s)
To increase capacity...
To reduce volume...
Client
High client CPU usage.
Install a client CPU with
higher performance.
Simplify (HTML) layout.
Low server CPU usage.
Upgrade to a faster browser. Improve client-side cache.
Some clients fast, some
slow.
Server
Network
CPU usage low on both
servers and clients.
Remove any network
bottlenecks.
Improve/optimize the
configuration of the client
cache.
Browsing locally on the
server is (comparatively)
fast.
Increase network
bandwidth.
Reduce the "weight" of
your web pages (e.g. less
images, optimized HTML).
Cluster your web-servers.
Reduce the hits per page
(visit).
Web-server CPU usage on the webserver is high.
Use a hardware loadbalancer.
Application Server CPU usage is high.
Cluster your CQ5 instances. Search for, and eliminate,
CPU and memory hogs (use
code review, timing output,
etc).
High memory consumption.
Improve caching on all
levels.
Low response times.
Optimize templates and
components (e.g. structure,
logic).
Repository
Cache
5.5 Monitoring, and optimizing, the performance
Performance issues may stem from a number of causes that have nothing to do with your website,
including temporary slowdowns in connection speed, CPU load, and many more.
It may also impact either all your visitors, or only a subset of them.
All this information needs to be obtained, sorted and analyzed before you can optimize the
performance.
If you experience a performance issue:
• try to replicate it: with one (or preferably more) standard web-browsers, on a different client that
you know has good general performance and/or on the server itself (if possible)
Page 17 of 214
CQ 5.2 WCM
Copyright 1993-2009 Day Management AG
How to Monitor Performance
• check whether anything (related to the system) has changed within an appropriate time-space,
and if any of these changes could have impacted the performance
• collect as much information as possible to compare with your knowledge of the system under
normal circumstances
5.5.1 Tools and mechanisms
The following gives a short overview of some of the tools available for monitoring performance.
Note
Some of these will be dependent on your operating system.
Table 5.2. Tools and mechanisms for monitoring performance
Tool
Used to analyze...
Usage / More information...
request.log
Response times and
concurrency.
Interpreting the request.log.
truss/strace
Page Loads
Unix command. Include the misc.truss log level to
INFO.
Thread dumps
Observe JVM threads. Dependent on the operating system, e.g. kill -QUIT
Identify contentions,
<pid> on Unix/Linux whereas Ctrl-Break on Windows.
locks and long-runners.
System calls
Identify timing issues.
Apache Bench Identify memory leaks,
selectively analyze
response time.
Calls to System.currentTimeMillis() or
com.day.util.Timing are used to generate
timestamps from your code, or via HTML-comments.
Note: These should be implemented so that they can
be activated / deactivated as required; when a system is
running smoothly the overhead of collecting statistics will
not be needed.
For full details: http://httpd.apache.org/docs/2.0/programs/
ab.html; basic usage is: ab -k -n <requests> -c
<concurrency> <url>
Search
Analysis
Execute search queries Analyzing Search.
offline, identify response
time of query, test and
confirm result set.
JMeter
Load and functional
tests.
http://jakarta.apache.org/jmeter/
JProfiler
In-depth CPU and
memory profiling.
http://www.ej-technologies.com/
JConsole
Observe JVM metrics
and threads.
Usage: jconsole
Note: With JDK 1.6 JConsole is extensible with plug-ins;
for example, Top or TDA (Thread Dump Analyzer).
JVisualVM
Observe JVM metrics,
threads, memory and
profiling.
Monitoring Performance using JVisualVM.
Usage: jconsole
Note: With JDK 1.6 JConsole is extensible with plug-ins;
for example, Top or TDA (Thread Dump Analyzer).
Unix/Linux commands.
Page 18 of 214
CQ 5.2 WCM
Copyright 1993-2009 Day Management AG
How to Monitor Performance
Tool
Used to analyze...
Usage / More information...
truss/strace,
lsof
In depth kernel call and
process analysis (Unix).
Timing
Statistics
See timing statistics for To see timing statistics for page rendering
page rendering.
you can use Ctrl-Shift-U together with ?
debugClientLibs=true set in the URL.
5.5.2 Interpreting the request.log
This file registers basic information about every request made to CQ5. From this valuable
conclusions can be extracted.
5.5.2.1 Monitoring traffic on your website
The request log registers each request made, together with the response made:
09:43:41 [66] -> GET /author/y.html HTTP/1.1
09:43:41 [66] <- 200 text/html 797ms
By totaling all the GET entries within a specific periods (e.g. over various 24 hour periods) you can
make statements about the average traffic on your website.
5.5.2.2 Monitoring response times with the CQ5 request.log
A good starting point for performance analysis is the request log.
You can find the request log at <cq-installation-dir>/crx-quickstart/logs.
The log looks as follows (the lines are shortened for simplicity):
31/Mar/2009:11:32:57
31/Mar/2009:11:32:57
31/Mar/2009:11:33:17
31/Mar/2009:11:33:17
+0200
+0200
+0200
+0200
[379]
[379]
[380]
[380]
->
<->
<-
GET
200
GET
200
/path/x HTTP/1.1
text/html 33ms
/path/y HTTP/1.1
application/json 39ms
This log has one line per request or response:
• The date at which each request or response was made.
• The number of the request, in square brackets. This number matches for the request and the
response.
• An arrow indicating whether this is a request (arrow pointing to the right) or a response (arrow to
the left).
• For requests, the line contains:
• the method (typically, GET, HEAD or POST)
• the requested page
• the protocol
• For responses, the line contains:
• the status code (200 means “success”, 404 means “page not found”)
• the MIME type
• the response time
Page 19 of 214
CQ 5.2 WCM
Copyright 1993-2009 Day Management AG
How to Monitor Performance
Using small scripts, you can extract the required information from the log file and assemble the
statistics you want. From these, you can see which pages or types of pages are slow, and if the
overall performance is satisfactory.
5.5.2.3 Monitoring search response times with the CQ5 request.log
Search requests are also registered in the log file:
31/Mar/2009:11:35:34 +0200 [338] -> GET /author/playground/en/tools/search.html?
query=dilbert&size=5&dispenc=utf-8 HTTP/1.1
31/Mar/2009:11:35:34 +0200 [338] <- 200 text/html 1562ms
So, as above, you can use scripts to extract the relevant information and build up statistics.
5.5.2.4 Monitoring the numbers and impacts of concurrent users
Again the request.log can be used to monitor concurrency and the system's reaction to it.
Tests must be made to determine how many concurrent users the system can handle before a
negative impact is seen. Again scripts can be used to extract results from the log file:
• monitor how many requests are made within a specific time span e.g. one minute
• test the effects of a specific number of users all making the same requests at (as close as
possible) the same time; e.g. 30 users clicking Save at the same time
31/Mar/2009:11:45:29 +0200 [333] -> GET /author/libs/Personalize/content/statics.close.gif
HTTP/1.1
31/Mar/2009:11:45:29 +0200 [334] -> GET /author/libs/Personalize/content/statics.detach.gif
HTTP/1.1
31/Mar/2009:11:45:30 +0200 [335] -> GET /author/libs/CFC/content/imgs/
logo.rZMNURccynWcTpCxyuBNiTCoiBMmw000.default.gif HTTP/1.1
31/Mar/2009:11:45:32 +0200 [335] <- 304 text/html 0ms
31/Mar/2009:11:45:33 +0200 [334] <- 200 image/gif 31ms
31/Mar/2009:11:45:38 +0200 [333] <- 200 image/gif 31ms
31/Mar/2009:11:45:42 +0200 [336] -> GET /author/libs/CFC/content/imgs/
logo.rZMNURccynWcTZRXunQbbQtvuuCMbRRBuWXz0000.default.gif HTTP/1.1
31/Mar/2009:11:45:43 +0200 [337] -> GET /author/titlebar_bg.gif HTTP/1.1
31/Mar/2009:11:45:43 +0200 [336] <- 304 text/html 0ms
31/Mar/2009:11:45:44 +0200 [337] <- 304 text/html 0ms
5.5.2.5 Using rlog.jar to find requests with long duration times
CQ includes various helper tools located in <cq-installation-dir>/crx-quickstart/opt/
helpers. One of these, rlog.jar, can be used to quickly sort request.log so that requests
are displayed by duration, from longest to shortest time.
The following command shows the possible arguments:
$java -jar rlog.jar
Request Log Analyzer Version 21584 Copyright 2005 Day Management AG
Usage:
java -jar rlog.jar [options] <filename>
Options:
-h
Prints this usage.
-n <maxResults> Limits output to <maxResults> lines.
-m <maxRequests> Limits input to <maxRequest> requests.
-xdev
Exclude POST request to CQDE.
For example, you can run it specifying request.log file as a parameter and show the 10 first
requests that have the longest duration:
Page 20 of 214
CQ 5.2 WCM
Copyright 1993-2009 Day Management AG
How to Monitor Performance
$ java -jar ../opt/helpers/rlog.jar -n 10 request.log
*Info * Parsed 464 requests.
*Info * Time for parsing: 22ms
*Info * Time for sorting: 2ms
*Info * Total Memory: 1mb
*Info * Free Memory: 1mb
*Info * Used Memory: 0mb
-----------------------------------------------------18051ms 31/Mar/2009:11:15:34 +0200 200 GET /content/geometrixx/en/company.html text/
html
2198ms 31/Mar/2009:11:15:20 +0200 200 GET /libs/cq/widgets.js application/xjavascript
1981ms 31/Mar/2009:11:15:11 +0200 200 GET /libs/wcm/content/welcome.html text/html
1973ms 31/Mar/2009:11:15:52 +0200 200 GET /content/campaigns/geometrixx.teasers..html
text/html
1883ms 31/Mar/2009:11:15:20 +0200 200 GET /libs/security/cq-security.js application/
x-javascript
1876ms 31/Mar/2009:11:15:20 +0200 200 GET /libs/tagging/widgets.js application/xjavascript
1869ms 31/Mar/2009:11:15:20 +0200 200 GET /libs/tagging/widgets/themes/default.js
application/x-javascript
1729ms 30/Mar/2009:16:45:56 +0200 200 GET /libs/wcm/content/welcome.html text/html;
charset=utf-8
1510ms 31/Mar/2009:11:15:34 +0200 200 GET /bin/wcm/contentfinder/asset/view.json/
content/dam?_dc=1238490934657&query=&mimeType=image&_charset_=utf-8 application/json
1462ms 30/Mar/2009:17:23:08 +0200 200 GET /libs/wcm/content/welcome.html text/html;
charset=utf-8
Note
You may need to concatenate the individual request.log files if you need to do this
operation on a large data sample.
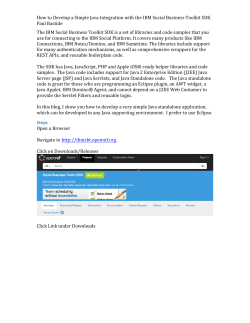
5.5.3 Caching
The following diagram shows the different cache locations that can be used for the various content
types.
Figure 5.3. What can be cached where?
The following can act as a rough guide for target values:
Page 21 of 214
CQ 5.2 WCM
Copyright 1993-2009 Day Management AG
How to Monitor Performance
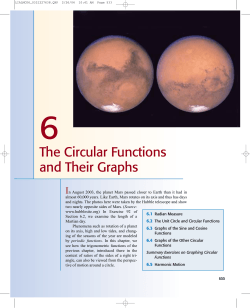
Figure 5.4. Cache vs. Uncached - maximum hits / second
Although there are many algorithms to ensure that data is retrieved from the source system when
appropriate, circumstances can arise where the data residing in a cache is out of date. Retrieving
every page individually is the only guaranteed method of ensuring your content is up-to-date, but it
is very costly in terms of response, and can indeed cause knock-on effects.
This is particularly relevant when using personalized pages, where at least some content of a
page is dependent on the user, and the account they used to login.
Figure 5.5. Cache speed vs. Data Integrity
Page 22 of 214
CQ 5.2 WCM
Copyright 1993-2009 Day Management AG
How to Monitor Performance
5.5.3.1 Optimizing your content for cache performance
Make sure you use realistic cache settings for the browser cache. If you have disabled the browser
cache for development, this may increase traffic and decrease responsiveness.
5.5.4 Analyzing Search
First steps to analyzing the search function can be made with Monitoring search response times
with the CQ5 request.log.
However, once you have determined the response time, you may need to analyze why the request
is taking the time it does, and what can be done to improve the response. Further information about
the underlying search functionality of CRX can be found at Searching in CRX.
5.5.5 Monitoring Performance using JVisualVM
Since JDK 1.6 the tool command jvisualvm is available. After you have installed JDK 1.6 you
can:
1.
Either:
a.
Start your CQ5 instance using the -jconsole option.
b.
Add the -Dcom.sun.management.jmxremote argument to the java command line
that starts your JVM.
2.
Run jvisualvm (normally found in the JDK 1.6 bin folder).
3.
From within the Local application, double-click com.day.crx.quickstart.Main:
Note
You can use this tool to generate thread dumps and memory head dumps. This
information is often requested by the technical support team.
5.5.6 Performance when loading and editing Digital Assets
Due to the large volume of data involved when loading and editing digital assets, performance can
become an issue.
Page 23 of 214
CQ 5.2 WCM
Copyright 1993-2009 Day Management AG
How to Monitor Performance
Two things affect performance here:
• CPU - multipe cores allow for smoother work when transcoding
• Hard disk - parallel RAID disks achieve the same
To improve performance you can consider the following:
• How many assets are going to be uploaded per day? A good estimate can be based on:
• The timeframe in which edits will be made (typically the length of the working day, more for
international operations).
• The average size of images uploaded (and the size of renditions generated per image) in
megabytes.
• Determine the average data rate:
80% of all edits will be made in 20% of the time, so in peak time you will have 4 times the
average data rate. This is your performance goal.
Page 24 of 214
CQ 5.2 WCM
Copyright 1993-2009 Day Management AG
6 How to Create and Use a Workflow
6.1 Creating a Workflow
First, you must create your workflow. You can then apply an instance of this (version dependent)
when managing your website.
Important
Actions on workflows can only be undertaken if:
• you are working with the admin account
• the account has been assigned to the default group workflow-users, which holds all
the privileges necessary for your users to perform workflow actions.
Note
For simplicity, the following examples have all been made using the admin account.
6.1.1 Creating a new Workflow Model
The actual creation is a small step - a skeleton workflow (with 3 default steps) will be created.
1.
Open the Workflow console.
2.
From the Models tab, select New from the top navigation bar. The New Workflow dialog
opens.
3.
Specify the Title for your workflow.
4.
Click OK to save and close the dialog. You return to the Models tab, where you see your new
workflow in the list.
6.1.2 Editing the Workflow
When you create a new workflow, a skeleton workflow is created with a minimum of steps. For the
workflow to become meaningful, you must edit it.
1.
Open the Workflow console.
2.
From the Models tab, select your workflow.
3.
Either click Edit or double-click the name of the workflow. A new tab (named after the
workflow) opens for editing and configuring the workflow. This shows 3 panes:
Page 25 of 214
CQ 5.2 WCM
Copyright 1993-2009 Day Management AG
How to Create and Use a Workflow
• Toolbox
Lists the Step and Split types. Click to display the appropriate list, then use drag the
element you want into the appropriate position to build your workflow.
Note
A complete explanation of all types of workflow steps and splits, together with
their related properties, can be found in the section called “The types of Workflow
Steps available”.
• Workflow Model
Contains the graphical representation of your workflow. Here you can position the steps
and splits, edit the workflow name or description and save changes.
The Save button is also located here, as is the Model Version. The Model Version is
incremented every time the workflow model is updated. This is reflected in the monitoring
displays. As multiple versions of a workflow can be in use at any one time, this helps you
track the version being used in each instance.
• Properties
Allows you to edit properties of the individual steps and splits.
Note
A complete explanation of all types of workflow steps and splits, together with
their related properties, can be found in the section called “The types of Workflow
Steps available”.
Three steps have already been created:
Start
A mandatory step to start the workflow. This cannot be edited, nor deleted.
Step 1
A Participant step which is an example. This must be edited, or replaced if required.
Further steps can be added.
End
A mandatory step for every workflow. The End step is used to cleanly terminate the
workflow, or to pass control back to the parent workflow in the case of a child (sub-)
workflow.
Page 26 of 214
CQ 5.2 WCM
Copyright 1993-2009 Day Management AG
How to Create and Use a Workflow
You can either define a full workflow, or a sub-section of a workflow. Sub-workflows can then
be referenced by other workflows to form part of a complete workflow. This simplifies the
construction of complex workflows, and also allows you to reuse sub-workflows which occur
repeatedly.
4.
Enter a Model Description for the workflow (you can also edit the Model Title) from
the center pane. Click on the field to enter edit mode.
5.
You can now design your workflow by dragging steps onto the Workflow Model, then
configuring the properties.
6.
When finished, Save your model, then close the tab.
6.1.2.1 Example
To illustrate some of the possibilities for creating a workflow, the following example emulates a
variation of the Publish Example workflow.
1.
Edit Step 1 using
on the step itself.
a.
Enter Validate Content for the Title and Description.
b.
Set the User/Group to admin.
c.
Set the Timeout to Off and Timeout Handler empty.
2.
Click Splits to display the list of split types.
3.
Drag an Or Split onto the workflow and position it between Validate Content and End.
An Or Split is added to your workflow.
4.
Edit the left-hand branch:
a.
Click the
icon on the actual branch.
b.
Set Default Route to true.
c.
Click the
icon on New Step in the left-hand branch. This will be a Participant step.
5.
d.
Enter Cancel Publish for the Title and Description.
e.
Set the User/Group to admin.
Edit the right-hand branch:
Page 27 of 214
CQ 5.2 WCM
Copyright 1993-2009 Day Management AG
How to Create and Use a Workflow
a.
Click the
icon on the actual branch.
b.
Set Default Route to false.
c.
Leave the Rule empty. This is for demonstration purposes.
d.
Click the
icon on New Step in the right-hand branch. Change this from a Participant to a
Process step; the properties available will be updated.
e.
Enter Publish Page for the Title and Description.
f.
Set the Handler Advance to false.
g.
Select com.day.cq.wcm.workflow.process.ActivatePageProcess as the
Implementation script. This implementation will publish the selected page to the publisher
instances.
6.
Now you have specified all steps in your workflow, click Save.
7.
Finally close the tab and return to the main console.
6.2 Using the Workflow
After you have defined your workflow you will want it to be used when managing your website. The
following sections detail the different tasks when using workflows.
6.2.1 Starting the Workflow for an individual page
There are two methods of starting a workflow; from the Workflow Console or the siteadmin:
Page 28 of 214
CQ 5.2 WCM
Copyright 1993-2009 Day Management AG
How to Create and Use a Workflow
In either case you need to link a workflow to its payload. The payload (including pages, nodes,
resources) will then be subject to this instance of the workflow.
Important
The current version of the workflow model is assigned; if the main copy of the workflow is
updated later then the changes will have no impact on the instance assigned.
Procedure 6.1. Starting a workflow from the workflow console
1.
Open the Workflow console.
2.
From the Models tab select the required workflow.
3.
Click Start from the top navigation.
4.
The Start Workflow dialog opens allowing you to enter the payload and a comment.
Specify the payload (includes pages, nodes, resources, and so on) to which the workflow is
to be applied. You can use the drop down menu to browse the repository when selecting:
5.
Click OK to save your selection and start the workflow. Now the workflow is running.
Procedure 6.2. Starting a workflow from the sidekick
1.
Open the siteadmin.
2.
Open the required page.
3.
Select the Workflow tab from the sidekick.
4.
Expand the Workflow dialog, allowing you to select the Workflow and a enter a Comment.
Page 29 of 214
CQ 5.2 WCM
Copyright 1993-2009 Day Management AG
How to Create and Use a Workflow
5.
Click Start Workflow to save your selection and start the workflow. Now the workflow is
running.
Once a page has been linked to a workflow it will be indicated in the siteadmin:
6.2.2 Taking actions on a Participant Step
Any participant steps that you have created will be assigned to the specific user or group, who will
need to take action:
• When the task is completed they then acknowledge this fact by completing the workflow step
(see Completing a Participant step).
• If the specific user(s) are unable to take action they can delegate responsibility to another user or
group (see Delegating a Participant step).
• If necessary they can step back to repeat a section of the workflow (see Performing Step Back
on a Participant step).
6.2.2.1 Selecting a Participant Step to take action
Before you can take any action on a Participant step, you need to select it:
Page 30 of 214
CQ 5.2 WCM
Copyright 1993-2009 Day Management AG
How to Create and Use a Workflow
1.
Open the Workflow console.
2.
Select the Inbox tab to see when an action is assigned to you. This occurs when a workflow
reaches a Participant step with your account, or group, specified:
3.
Select the entry.
6.2.2.2 Completing a Participant step
After you have taken the action indicated you can complete the workflow step, thus allowing the
workflow to continue.
1.
Click the Complete button in the top navigation bar.
2.
In the resulting dialog, select the Next Step; that is, the step to execute next. A drop down
list shows all appropriate destinations. A Comment can also be entered.
Note
The number of steps listed depends on the design of the workflow.
3.
Click OK to confirm the action.
6.2.2.3 Delegating a Participant Step
If a step has been assigned to you, but for any reason you are unable to take action, you can
delegate the step to another user or group.
1.
Click the Delegate button in the top navigation bar.
2.
In the resulting dialog, select the User you want to pass the action to.
A drop down list shows all appropriate users.
Page 31 of 214
CQ 5.2 WCM
Copyright 1993-2009 Day Management AG
How to Create and Use a Workflow
If the step has been defined with one user, then only this user will be available - the step
cannot be delegated to anyone else.
If a group has been defined, then the list shows the group itself and all individual users within
the group. You can delegate to either the entire group, or an individual user within that group.
A Comment can also be entered.
3.
Click OK to confirm the action.
6.2.2.4 Performing Step Back on a Participant step
If you discover that a step, or series of steps, needs to be repeated you can step back. This allows
you to select a step that occurred earlier in the workflow for reprocessing. The workflow returns to
the step you specify, then proceed from there.
1.
Click the Step Back button in the top navigation bar.
2.
In the resulting dialog, select the Previous Step; that is, the step to execute next - even
though it is a step that occurs earlier in the workflow. A drop down list shows all appropriate
destinations.
Note
The number of previous steps available in the list depends on the design of the
workflow.
Page 32 of 214
CQ 5.2 WCM
Copyright 1993-2009 Day Management AG
How to Create and Use a Workflow
3.
Click OK to confirm the action.
6.2.3 Suspending, Resuming and Terminating a Workflow instance
Aside from workflow instances that require your immediate action and show up in your Workflow
Inbox, you can perform certain other actions on running workflow instances.
1.
Open the Workflow console.
2.
Select the Instances tab. You will see a list of active (neither finished, nor terminated)
workflow instances.
3.
Select an entry.
4.
To suspend the workflow, click the Suspend button in the navigation bar. The State changes
to Suspended. This can be helpful in exceptional cases when you do not want the workflow
to proceed; for instance for maintenance.
5.
While a workflow is suspended, you can then click Resume. This restarts the workflow from
where it was suspended, with the same configuration. Again the State is updated.
6.
To finally terminate the workflow, click Terminate. This immediately ends the workflow
execution - the state changes to ABORTED. A terminated workflow instance cannot be
restarted.
The Instances tab is not only useful for taking action on running workflows, you can also use it to
monitor workflow instances, without necessarily modifying them.
6.2.4 Monitoring the Status of Workflow Instances
To monitor the status of workflow instances, you can use the Instances or Archive tabs.
Instances tab
Shows all running instances.
Archive tab
Shows terminated workflow instances.
6.2.4.1 Monitoring Workflows in progress
From the Instances tab you can see the status of a Workflow in progress. A list of the active
Models is shown; in this case RUNNING:
Page 33 of 214
CQ 5.2 WCM
Copyright 1993-2009 Day Management AG
How to Create and Use a Workflow
With the Instances tab you can take various actions (see Suspending, Resuming and
Terminating a Workflow instance) and also Open History to show the actions executed to date
on the workflow instance:
6.2.4.2 Archived Workflows
After a Workflow instance has finished, for whatever reason (terminated, as below, or after
successful completion), it can (only) be seen in the Archive tab:
As the workflow has already completed, no further action can be taken on these instances.
However, if you need further details of a completed workflow you can use Open History.
6.3 Using the Workflow Launcher for Node Modifications
The Workflow Launcher, provides one component to monitor all changes in the content repository
and launch workflows dependent on the location and resource type of the changed node.
Using the Launcher tab you can:
• see the workflows already launched for specific nodes.
• select a workflow to be launched when a certain node/node-type has been modified.
• remove an existing workflow-to-node relationship.
Various definitions are included with the standard installation. These are used for digital asset
management and social collaboration tasks:
Page 34 of 214
CQ 5.2 WCM
Copyright 1993-2009 Day Management AG
How to Create and Use a Workflow
6.3.1 Adding a Launcher relationship
1.
Open the Workflow tab.
2.
Select the Launcher tab.
3.
Click Add... and configure the new workflow-to-node relationship as required:
Event Type
Define the event type that will launch the workflow:
• Created
• Modified
• Removed
Nodetype
Select the nodetype from the drop down list.
Path
Define the path for which the launch entry is to be applied.
Condition
Define any conditions which may apply on node property values.
Page 35 of 214
CQ 5.2 WCM
Copyright 1993-2009 Day Management AG
How to Create and Use a Workflow
For example, to check whether a node has a property “name” holding the value “User”
specify name==User.
Workflow
The workflow to be launched when the Event Type occurs on the Nodetype and/or
Path under the defined Condition.
Description
A description for the relationship.
6.3.2 Removing a Launcher relationship
1.
Open the Workflow tab.
2.
Select the Launcher tab.
3.
Click on the entry you want to remove.
4.
Click Remove.
Page 36 of 214
CQ 5.2 WCM
Copyright 1993-2009 Day Management AG
7 Multi Site Manager
This section describes the functionalities of the CQ5 Multi Site Manager (MSM).
With CQ5, you can manually manage multiple sites. When the number of sites in the same
language is low (three to five), a manual process is most efficient. However, as soon as the number
of sites grows or when multiple languages are involved, it becomes more efficient to use an
automated functionality: the MSM. The MSM lets you define relations between the sites and also
lets you define to what degree re-use or control is exerted on the different sites. The MSM, once
set up, does this automatically.
MSM reduces the time it takes to manage your websites and increases re-use for:
• Different language editions of a website
• Automatic updates of one or more sites based on a source site. It allows you to:
• Enforce a common base structure and common content across all versions of the website.
• Provide structure and content that the sites can freely use, thus avoiding duplicated work and
improving the unified look and feel.
• Focus on the differences between the sites.
• Manage the content based on a fine level of granularity as the inheritance of the content and
structure can be managed at a page and/or paragraph level.
7.1 Typical Use Cases for the Multi Site Manager
This section describes several scenarios where using the MSM is easier than maintaining sites
manually.
7.1.1 Multinational Site
ENT Corporation, a large distributed enterprise, has a large number of subsidiaries in various
countries. All of them share a similar look-and-feel. These sites share various components with one
another and most are centrally hosted.
Corporate Communications at ENT can use MSM features to propagate press release content
to all the various press release pages of each of the countries' websites. This is done simply by
making the press releases section of the source website mandatory.
Additionally, the Knowledge Management department at ENT has gathered a large collection of
FAQs that apply to most countries. To allow the surfer to stay in his or her respective country's
website yet have access to the FAQ appropriate to that country, this content can be offered as
optional on the MSM source site. As a result, the owner of a particular country's web site can
subscribe to the content that is appropriate for that site. The content is not "forced" on the owner of
a site.
Some time later, because of the reorganization of the site, the press releases section is moved to
another location in the navigation on the source site. Because of MSM, this change is reflected
automatically in all subsidiary sites.
7.1.2 Multilingual Site
UNORG, a multinational organization, hosts a website in 15 languages.
Experience has shown that multilingual websites often share a number of characteristics:
Page 37 of 214
CQ 5.2 WCM
Copyright 1993-2009 Day Management AG
Multi Site Manager
• Content trees are not identical in different languages.
• There is almost never a "lead" language in which all the content is available.
• It is not just about text (images mean different things in different cultures).
• Internal document structures (content objects) in different languages, or even different
geographies with the same language, are often different, for example, because of differing legal
requirements.
• The "if-language-is-not-there-then-switch-to-default-language" scenario almost never works (a
French surfer does not appreciate suddenly being thrown into a section of English content).
But, despite all of these differences between different language sections, there is also a certain
coherence between the languages that needs to be maintained.
The Language Manager monitors the differences between language sections and allows for the
clean up of any differences between the various language trees, thus helping to keep the sections
synchronized.
7.1.3 Multinational Multilingual Site
ENT Corporation, a large distributed enterprise, with a large number of subsidiaries also has a
number of subsidiaries in countries like Switzerland, Belgium, and Canada that have to support a
number of different languages per national site. But the set of supported languages per site must
be decided on a per-country basis.
The combination of the Language Manager and the Multi-Site Manager lets you precisely control
which content is visible in which country and how the various languages are managed and kept
synchronized on a per-country level.
7.2 Managing Different Language Versions of a Website
This section describes how to add a new language version of a web site using the Language Copy
tool:
1.
In the Websites tab, in the left pane, select the site.
2.
In the right pane, make sure that the Names of the language pages are ISO language
abbreviations (for example: en , fr, de). Check the ISO specifications for more information.
3.
Add a new language branch to the site:
1.
Click New... .
2.
In the dialog, specify the Title and the Name (the name must be an ISO language
abbreviation). Select the Template and click Create.
Page 38 of 214
CQ 5.2 WCM
Copyright 1993-2009 Day Management AG
Multi Site Manager
4.
In the Websites tab, in the left pane, select the site.
5.
In the Tools menu, select Language Copy.
6.
The Language Copy dialog opens. It displays a matrix of the language versions available
for individual pages. An x in a language column means that the page is available within the
language tree.
7.
To copy an existing page or page tree to a specific language first select the appropriate empty
cell. Then click the arrow and select the type of copy in the drop-down menu.
Page 39 of 214
CQ 5.2 WCM
Copyright 1993-2009 Day Management AG
Multi Site Manager
Table 7.1. Type of Language Copy
auto
Uses the behavior from parent pages
ignore
Cancels the copy for this page and its
children
<language>+ (e.g. French+)
Copies the page and all its children from that
language
<language> (e.g. French)
Copies only the page from that language
8.
Click OK to close the dialog.
9.
In the next dialog, click Yes to confirm the copy.
7.3 Managing the Translation of your Language Branches
When your website consists of several language branches and when you create a new page in
your reference language branch, you can start a translation workflow that automatically creates
new pages in the language branches of your choice and helps you translate the pages by
displaying side-by-side the page to be translated and the reference page.
This procedure describes how to start the translation workflow and how to display the reference
page beside the page that needs to be translated.
Important
The website must have at least two language branches.
1.
In the Siteadmin tab create a new page in your reference language branch, for example,
English.
2.
Open the new page and add the desired text.
3.
In the Sidekick, in the Workflow tab, select Translation:
Page 40 of 214
CQ 5.2 WCM
Copyright 1993-2009 Day Management AG
Multi Site Manager
1.
Check the language branch(es) into which you would like to have a new page created.
2.
In the Workflow drop-down menu, select Translation.
3.
Click Translate.
The reference page is being copied into the selected language branch(es).
4.
Activate the reference page. A new version of the page is created.
5.
Open the page that needs to be translated. Edit the text that has been copied from the
reference page and translate it. Save your changes.
6.
Open the reference page and add new content to it.
7.
Activate the reference page. A new version of the page is created.
8.
Open the page that needs to be translated.
9.
In the Sidekick, in the Workflow tab, select Translation to see the changes that have
been made in the reference page since a specified version. Check this version and click Show
Side-By-Side.
10. The reference page is displayed beside the page that needs to be translated. The text that
has been added since the selected version is red and underlined.
Page 41 of 214
CQ 5.2 WCM
Copyright 1993-2009 Day Management AG
Multi Site Manager
Note
The reference page is only displayed and cannot be edited.
11. Edit the text that needs to be translated and translate it. Save your changes.
12. To close the view of the reference page, click Hide in the Sidekick.
Repeat previous steps every time new content is added to the reference page and needs to be
translated in one or more language branches.
7.4 Managing Blueprints and Live Copies
MSM lets you create a site (called a Live Copy) based on another site (called a Blueprint) and to
actively manage the relationships between the Blueprint and the Live Copy. The Blueprint defines
structure and content centrally. The structure and content can then be used on the Live Copy.
7.4.1 Creating a Live Copy
This section explains how to create a Live Copy, which is a copy of another site called a Blueprint
and is actively linked to the Blueprint.
With CQ5 it is possible to:
• Create a Live Copy based on a predefined Blueprint
• Create a Live Copy based on an existing site or on any page and its sub pages
Note
A Live Copy can only be linked to one Blueprint.
A Blueprint can be linked to several Live Copies.
7.4.1.1 Creating a Live Copy based on a Blueprint
This section describes:
• how to create a Blueprint by defining an existing site as a Blueprint.
Page 42 of 214
CQ 5.2 WCM
Copyright 1993-2009 Day Management AG
Multi Site Manager
• how to create a Live Copy based on an existing Blueprint.
Note
If the Blueprint already exists, the first section can be skipped.
7.4.1.1.1 Creating a Blueprint
This section explains how to create a Blueprint by defining an existing site as Blueprint. A single
Blueprint can be used to create as many Live Copies as needed.
To create a Blueprint:
1.
Select the Tools tab.
2.
In the left pane, under the Tools folder, select the Blueprints folder. In the right pane,
click New... .
3.
In the dialog, specify a title and a name. Click Create to close the dialog.
4.
Refresh the Page List. Right-click the newly created page and select Open in the drop-down
menu.
5.
The page opens. Click Edit.
6.
In the dialog, in the Settings tab:
• Name: name the Blueprint
• Description: describe the Blueprint (this is not mandatory)
• Source Path: set the site path of the Blueprint:
1.
Click the arrow to open a dialog.
2.
In the dialog, navigate to the desired site. Click OK to close the dialog.
Page 43 of 214
CQ 5.2 WCM
Copyright 1993-2009 Day Management AG
Multi Site Manager
Note
You can also type the absolute path of the site.
Note
The Source site must have the same site structure as Geometrixx for its
languages and chapters (children pages of the language pages).
7.
In the Thumbnail Image tab: specify a thumbnail (this is not mandatory). It will appear in
the dialog when creating a Live Copy.
8.
Click OK to close the dialog.
9.
The Blueprint definition page looks as follows:
Page 44 of 214
CQ 5.2 WCM
Copyright 1993-2009 Day Management AG
Multi Site Manager
7.4.1.1.2 Creating a Live Copy based on a Blueprint
This section describes how to create a Live Copy based on an existing Blueprint.
1.
In the Websites tab, in the left pane, select the Websites folder.
2.
Click the arrow beside the New... button and select New Site... .
3.
In the dialog, specify a title and a name for your site and select the desired Blueprint. A
sequence is displayed at the bottom of the dialog (the sequence might take a few seconds to
be collated and displayed). Click Next.
4.
Select the languages of the Blueprint to be copied to the new site. Click Next.
Page 45 of 214
CQ 5.2 WCM
Copyright 1993-2009 Day Management AG
Multi Site Manager
5.
Select the main chapters of the Blueprint to be copied to the new site. Click Next.
6.
Select the Site Owner account to be responsible for this site (e.g.: admin). Click Next.
Note
The Site Owner entry is saved but currently not used within CQ5.
Page 46 of 214
CQ 5.2 WCM
Copyright 1993-2009 Day Management AG
Multi Site Manager
7.
Specify following parameters:
• Sync Trigger defines when the modifications on the Blueprint are propagated to the Live
Copy. Choose one of the following values:
• Never: the modifications will never be propagated. The Live Copy is then a plain copy of
the Blueprint at the time of creation.
• On Rollout: the modifications are propagated when rollout is activated. For more
information on rollout, refer to the section called “Rolling out Changes on the Blueprint to
the Live Copy”.
• On Modification: the modifications are propagated for each modification to the
Blueprint.
Note
Be careful when choosing this option as it might cause a lot of network traffic.
• On Activation: the modifications are propagated when the Blueprint is activated.
• Update Content:
• If checked, modifications to the Blueprint will be propagated.
• If unchecked, modifications to the Blueprint will not be propagated. This option should
only be used in combination with a workflow.
• Enable Notification: if checked, you will be notified when the modifications are
propagated.
Note
In order to be notified, you first need to subscribe to rollout.
• Start Workflow: select the workflow to be started when the synchronization actions are
triggered. Refer to Chapter 1, to define your own workflow.
Page 47 of 214
CQ 5.2 WCM
Copyright 1993-2009 Day Management AG
Multi Site Manager
• Read only for: select the group that will have read-only access to the Live Copy. This
option prevents a group from modifying the Live Copy.
Click Next.
8.
Click Create Site to create the Live Copy.
9.
When the Live Copy is created, it is displayed in the Websites tab:
Page 48 of 214
CQ 5.2 WCM
Copyright 1993-2009 Day Management AG
Multi Site Manager
7.4.1.2 Creating a Live Copy based on an existing Site
To create a Live Copy based on an existing site or on any page and its sub pages:
1.
In the Websites tab, in the left pane, select the location where the Live Copy will be created.
2.
In the right pane, click the arrow beside New..., then select New Live Copy... .
3.
In the dialog, specify following parameters:
• Title: choose a title for the Live Copy.
• Name: choose a name for the Live Copy.
• Live Copy From: define the Source path:
1.
Click the arrow to open a dialog.
2.
Navigate to the desired site or sub-site and click OK to close the dialog.
Note
You can also type the absolute path of the site.
• Sync Trigger defines when the modifications on the Blueprint are propagated to the Live
Copy. Choose one of the following values:
• Never: the modifications will never be propagated. The Live Copy is then a plain copy of
the Blueprint at the time of creation.
• On Rollout: the modifications are propagated when rollout is activated. For more
information on rollout, refer to the section called “Rolling out Changes on the Blueprint to
the Live Copy”.
• On Modification: the modifications are propagated for each modification to the
Blueprint.
Note
Be careful when choosing this option as it might cause a lot of network traffic.
• On Activation: the modifications are propagated when the Blueprint is activated.
• Update Content:
• If checked, modifications to the Blueprint will be propagated.
• If unchecked, modifications to the Blueprint will not be propagated.. This option should
only be used in combination with a workflow.
Page 49 of 214
CQ 5.2 WCM
Copyright 1993-2009 Day Management AG
Multi Site Manager
• Enable Notification: if checked, you will be notified when the modifications are
propagated.
Note
In order to be notified, you first need to subscribe to rollout.
• Start Workflow: select the workflow to be started when the synchronization actions are
triggered. Refer to Chapter 1, to define your own workflow.
• Read only for: select the group that will have read-only access to the Live Copy. This
option prevents a group from modifying the Live Copy.
4.
Click Create to close the dialog and create the Live Copy.
5.
When the Live Copy is created, it is displayed in the Websites tab.
Page 50 of 214
CQ 5.2 WCM
Copyright 1993-2009 Day Management AG
Multi Site Manager
7.4.2 Configuring Synchronization Actions between a Blueprint and its Live
Copy
CQ5 lets you configure synchronization actions between a Blueprint and its Live Copy. These
actions can be configured on both a Blueprint and/or on a Live Copy page. When configuring the
synchronization actions you should be aware of the following:
• When a Blueprint is created, no synchronization actions are saved to the Blueprint pages.
• When configuring a synchronization action on a Blueprint page, the action is only saved to the
selected Blueprint page. Blueprint children pages do not inherit actions.
• When a Live Copy is created, the synchronization actions are only saved to the Live Copy root
page.
• When configuring a synchronization action on a Live Copy page, the action is only saved to the
selected Live Copy page.
• When you select a Live Copy page (called page A here) that does not have any actions explicitly
saved to it, the tree is scanned upwards until the first parent page with actions is found:
• those actions are then used for the selected page (but not saved to the selected page) if no
actions are saved to the corresponding Blueprint page of the Live Copy page A.
• if actions are saved to the corresponding Blueprint page of the Live Copy page A, those
actions are then used for the selected page A (but not saved to the selected page A).
Following graphic explains the inheritance process:
Page 51 of 214
CQ 5.2 WCM
Copyright 1993-2009 Day Management AG
Multi Site Manager
7.4.2.1 Configuring Synchronization Actions on a Blueprint page
To configure synchronization actions on a Blueprint page:
1.
In the Websites tab, in the right panel, right-click the Blueprint page and select Properties
in the drop-down menu.
Note
You can also open the page and click Page Properties... in the Sidekick.
2.
In the dialog, select the Blueprint tab:
• Current Live Copies: lists all the Live Copies currently linked to this Blueprint. It is not
possible to modify this list.
Page 52 of 214
CQ 5.2 WCM
Copyright 1993-2009 Day Management AG
Multi Site Manager
• Update Content:
• If checked, modifications to the Blueprint will be propagated.
• If unchecked, modifications to the Blueprint will not be propagated.. This option should
only be used in combination with a workflow.
• Enable Notification: if checked, you will be notified when the modifications are
propagated.
Note
In order to be notified, you first need to subscribe to rollout.
• Start Workflow: select the workflow to be started when the synchronization actions are
triggered. Refer to Chapter 1, to define your own workflow.
• Read only for: select the group that will have read-only access to the Live Copy. This
option prevents a group from modifying the Live Copy.
Note
If the selected page is also a Live Copy, the Live Copy tab is activated. Otherwise,
it is deactivated.
3.
Click OK to close the dialog.
Page 53 of 214
CQ 5.2 WCM
Copyright 1993-2009 Day Management AG
Multi Site Manager
7.4.2.2 Configuring Synchronization Actions on a Live Copy page
To configure synchronization actions for a Live Copy page:
1.
In the Websites tab, in the right panel, right-click the Live Copy page and select
Properties.
Note
You can also open the page and click Page Properties... in the Sidekick.
2.
In the dialog, select the Live Copy tab:
• Live Copy from: displays the Blueprint path.
• Live Copy cancelled: if checked, the Live Copy page is not linked to the Blueprint
anymore.
• Informative text:
• Displays as follows when the current page is the Live Copy root page:
• Displays as follows when the actions are inherited from a parent page:
• Displays as follows when the actions are saved to the current page:
It is possible to restore parent configurations by clicking reset the configuration.
• Sync Trigger defines when the modifications on the Blueprint are propagated to the Live
Copy. Choose one of the following values:
• Never: the modifications will never be propagated. The Live Copy is then a plain copy of
the Blueprint at the time of creation.
• On Rollout: the modifications are propagated when rollout is activated. For more
information on rollout, refer to the section called “Rolling out Changes on the Blueprint to
the Live Copy”.
• On Modification: the modifications are propagated for each modification to the
Blueprint.
Note
Be careful when choosing this option as it might cause a lot of network traffic.
• On Activation: the modifications are propagated when the Blueprint is activated.
• Update Content:
• If checked, modifications to the Blueprint will be propagated.
Page 54 of 214
CQ 5.2 WCM
Copyright 1993-2009 Day Management AG
Multi Site Manager
• If unchecked, modifications to the Blueprint will not be propagated.. This option should
only be used in combination with a workflow.
• Enable Notification: if checked, you will be notified when the modifications are
propagated.
Note
In order to be notified, you first need to subscribe to rollout.
• Start Workflow: select the workflow to be started when the synchronization actions are
triggered. Refer to Chapter 1, to define your own workflow.
• Read only for: select the group that will have read-only access to the Live Copy. This
option prevents a group from modifying the Live Copy.
Note
If the selected page is also a Blueprint, the Blueprint tab is activated. Otherwise,
it is deactivated.
3.
Click OK to close the dialog.
7.4.3 Rolling out Changes on the Blueprint to the Live Copy
Rolling out consist of propagating the changes made on the Blueprint to the Live Copy.
This section describes how to roll out the changes from the Blueprint to the Live Copy.
Page 55 of 214
CQ 5.2 WCM
Copyright 1993-2009 Day Management AG
Multi Site Manager
The following rules apply for a rollout:
• A rollout can only be triggered on the Blueprint. There is one exception to this rule: when a
paragraph is re-locked on a Live Copy page, a rollout is automatically triggered on a Live Copy.
• A rollout can be triggered for one page or for a page and all its sub-pages.
• A rollout can be triggered for a paragraph.
To roll out the changes from the Blueprint to the Live Copy:
1.
Open the Blueprint page.
2.
In the Sidekick, in the Page tab, select Rollout Page.
3.
In the dialog, select the Rollout Scope:
• Rollout entire page to only roll out the page.
• Rollout page and all sub pages to roll out the page and all its sub pages.
• Rollout selected components to roll out the paragraphs selected in the page.
• Delete + rollout selected components: when this option is checked, the selected
components are deleted on the Blueprint and the deletion of the selected components is
propagated to the Live Copies.
Click Next to reach the next step.
4.
In the next dialog, select the Live Copy(ies) to be updated and click Rollout.
Page 56 of 214
CQ 5.2 WCM
Copyright 1993-2009 Day Management AG
Multi Site Manager
Note
In a Live Copy page, the Rollout Page button is deactivated.
Note
Media assets originating from CQ DAM (Digital Asset Management) are referenced in
Blueprints and Live Copies. When an asset is modified in the DAM, the modified asset
is rendered in the Blueprint and the Live Copy. A rollout is not needed to propagate the
change. This asset has its own life cycle and is independent from the Blueprint and the
Live Copy.
7.4.4 Live Copy status at Page and at Paragraph level
Live Copy status are displayed as follows:
• the Websites tab displays colored indicators for the Live Copy pages.
• the Live Copy page displays visual indicators for all its paragraphs.
7.4.4.1 Live Copy Page Status
The Websites tab displays colored indicators for the Live Copy pages. Moving the mouse cursor
over the icon displays the detailed status.
Page 57 of 214
CQ 5.2 WCM
Copyright 1993-2009 Day Management AG
Multi Site Manager
A Live Copy page has one of the following icons:
Table 7.2.
Icon
Description
Live Copy from the Blueprint page <path of the page>.
(green)
The page contains paragraphs for which Live Copy has been cancelled (lock open
on the Live Copy).
(grey)
The page has been created on the Live Copy.
(blue)
The Blueprint page <path of the page> has been deleted.
(red)
Either the Live Copy or the Blueprint page <path of the page> has been locally
modified.
(yellow)
7.4.4.2 Live Copy Paragraph status
7.4.4.2.1 Viewing the paragraph status of a Live Copy page
To view the status of a Live Copy paragraph:
1.
Open the Live Copy page.
2.
In the Sidekick, click the Live Copy Status button to view the status of all the paragraphs
of the page:
Page 58 of 214
CQ 5.2 WCM
Copyright 1993-2009 Day Management AG
Multi Site Manager
3.
The status of the paragraphs are displayed on the page as follows:
Page 59 of 214
CQ 5.2 WCM
Copyright 1993-2009 Day Management AG
Multi Site Manager
Each paragraph within a Live Copy page has one of the following statuses:
Table 7.3.
Frame
color / Icon
Description
The Live Copy paragraph is in lockstep with the Blueprint paragraph: modifications
to the Blueprint paragraph will be propagated to the Live Copy paragraph.
(green frame)
This is the default status after creating a Live Copy page.
The Live Copy paragraph is not in lockstep with the Blueprint paragraph. Deletion,
update or reordering of the Blueprint paragraph does not affect the Live Copy
paragraph anymore.
(red frame)
The paragraph has this status when:
Page 60 of 214
CQ 5.2 WCM
Copyright 1993-2009 Day Management AG
Multi Site Manager
Frame
color / Icon
Description
• the Live Copy paragraph has been modified (e.g. when modifying some text or
styles)
• the inheritance has been cancelled by clicking the lock icon of the Live Copy
paragraph
When a Live Copy paragraph container (e.g. a paragraph system) has this status,
the order of the paragraphs inside the container is not inherited from the Blueprint
anymore.
no frame / no
icon
The paragraph has been created in the Live Copy page. It does not appear in the
Blueprint page.
7.4.4.2.2 Cancelling the inheritance of a paragraph
To cancel the inheritance of a paragraph:
1.
Follow the steps according to the procedure in the section called “Viewing the paragraph
status of a Live Copy page”.
2.
On the page displaying the status of the appropriate paragraph, click the closed lock icon of
that paragraph.
3.
In the dialog, click Yes to cancel the inheritance .
4.
After the page has been refreshed, the open lock icon will be displayed.
7.4.4.2.3 Reverting the inheritance of a paragraph
To revert the inheritance of a paragraph:
1.
Follow the steps according to the procedure in the section called “Viewing the paragraph
status of a Live Copy page”.
2.
On the page displaying the status of the appropriate paragraph, click the open lock icon of
that paragraph.
3.
In the dialog, click Yes to revert the inheritance .
4.
After the page has been refreshed, the closed lock icon will be displayed.
Page 61 of 214
CQ 5.2 WCM
Copyright 1993-2009 Day Management AG
Multi Site Manager
7.4.5 Managing Blueprints and Live Copies
This section describes:
• how to display the list of existing Blueprints
• how to manage a Blueprint and its Live Copies
7.4.5.1 Displaying the list of Blueprints
To display the list of existing Blueprints:
1.
Select the Tools tab.
2.
In the left pane, double-click the Blueprints folder.
3.
A list of all Blueprints is displayed, with the following parameters:
• Thumbnail
• Title
• Description
• Site Path
• View / Edit: click the link to edit the Blueprint.
• Rollout: click the link to roll out the changes to the Live Copies.
7.4.5.2 Editing a Blueprint
To edit a Blueprint:
1.
Open the Blueprint definition page:
• Either: in the Tools tab, in the left pane, select Blueprints and open the desired
Blueprint definition page.
Page 62 of 214
CQ 5.2 WCM
Copyright 1993-2009 Day Management AG
Multi Site Manager
• Or: from the Blueprints list, click the desired link in the Status column.
2.
The Blueprint definition page is displayed as follows:
• The first part displays the Blueprint settings:
• The second part displays a button to edit the Blueprint settings:
• The last part displays following matrix:
• The first column displays the Blueprint site which can be expanded by clicking the +
beside the page.
• The following columns display the status of the Live Copy pages linked to the Blueprint.
Hovering the mouse cursor over the status icon displays a precise description of the
status.
Page 63 of 214
CQ 5.2 WCM
Copyright 1993-2009 Day Management AG
Multi Site Manager
3.
Select a Blueprint page from the matrix to edit its properties:
4.
Modify the properties. Click Save to save the modifications.
5.
Select a Live Copy page from the matrix to edit its properties:
6.
Modify the properties. Click Save to save the modifications.
7.4.6 Moving Blueprint and/or Live Copy pages
Following behaviors apply when moving Blueprint and/or Live Copy pages:
• When you move a Blueprint root page, you have to reference all the pages of all the Live Copies
in the appropriate dialog. The Blueprint root page is moved and all the Live Copy pages remain
linked to this Blueprint.
• When you move any other Blueprint page, the page is moved but it is considered deleted on the
Blueprint by the Live Copy. The Live Copy page will be deleted on the next rollout.
• When you move a Live Copy root page, the page and all its sub-pages are moved and remain
linked to the Blueprint.
• When you move any other Live Copy page, the page is moved. If a version of the page has not
been created, the original page will be re-created on the next rollout. Otherwise, the page is
considered as deleted.
Page 64 of 214
CQ 5.2 WCM
Copyright 1993-2009 Day Management AG
8 Upgrading to CQ5
8.1 How to Upgrade Your CommuniquГ© Instance (3 or 4) to CQ5
The upgrade tool allows you to launch a standardized upgrade process. It is delivered with a
configuration to be used “out of the box,” though several settings can be updated when necessary.
You:
• provide the URL of the Communiqué instance to be upgraded, together with the superuser
access credentials
• can configure a list of page handles to be included in the upgrade
• can set debug parameters if required.
Note
The following procedure uses a standard CommuniquГ© 4 installation, complete with
Playground and DesignGround, to illustrate the upgrade process.
Important
If the remote CommuniquГ© 4 instance is accessed through the dispatcher, the dispatcher
configuration must not exclude /system from being served. Many dispatcher
configurations exclude /system. You can also list the URLs that need to be accessible
through the dispatcher for the upgrade script.
1.
Navigate to the Upgrade window, by one of the following methods:
a.
Select the Tools tab in CQ WCM, click on Importers to open the folder, then
Double-click on the Upgrade from CQ3/CQ4 Page to open.
b.
Navigate directly to http://<cq-context-path>/etc/importers/upgrade.html
for example, http://localhost:4502/etc//importers/upgrade.html (if not
already logged in you will be required to).
In either case the following form displays:
Page 65 of 214
CQ 5.2 WCM
Copyright 1993-2009 Day Management AG
Upgrading to CQ5
2.
Update any of the default settings if required.
Important
The upgrade tool uses the password superuser as default. Please ensure that the
password is correct for the instance you are upgrading.
3.
Click Migrate to start the process. A status message will shown and information about the
individual pages being processed will be added while the upgrade is running:
Page 66 of 214
CQ 5.2 WCM
Copyright 1993-2009 Day Management AG
Upgrading to CQ5
4.
When complete you can access the upgraded items in your CQ5 instance:
Important
You must test the operation of the upgraded website; highly customized items may
need to be upgraded separately.
Note
This mechanism can also be used as the basis for a customized upgrade routine,
developed as part of your project.
8.2 Upgrading from CQ 5.1 to CQ 5.2
8.2.1 Important information to read before starting the upgrade
Please read the following points and take action where necessary:
• This upgrade procedure only works if the CQ 5.1 installation was performed with Quickstart. As
opposed to installation with a third party application server.
• You must test the operation of the upgraded website; highly customized items may need to be
upgraded separately.
Page 67 of 214
CQ 5.2 WCM
Copyright 1993-2009 Day Management AG
Upgrading to CQ5
• Beginning with CQ 5.2 the Text Components add a HTML paragraph tag around the text.
Prior versions did not always do that. Adding the paragraph tag might cause visual differences.
Make advance tests (edit a test object) to confirm whether this occurs with your installation. If
necessary adapt the CSS selector, and note the changes necessary after the upgrade.
• Check whether you have any extremely large character strings in your repository.
See Step 6 for further information.
• If OSGi bundles and configurations have been setup directly from the OSGi console (as opposed
to storing them in the JCR repository) the configuration should be saved before the upgrade.
This is done by:
• saving the output of /system/console/config
and
• saving a copy of the crx-quickstart/launchpad folder
As the crx-quickstart/launchpad folder is deleted before the upgrade, then the bundles
and configurations must be restored manually after the upgrade,
• Be aware that certain default content is impacted by the upgrade:
• Default content under /etc is replaced by the upgrade.
If you need this content then please save the original content tree (for example, as etc_51)
before the upgrade. After the upgrade is complete you can re-insert any differences manually.
• Any changes that you have made to the repository folders containing CQ 5.1 software (/libs
and others) might be lost after this upgrade.
• Content packages delete everything under the path(s) that they impact. Therefore, content
created under /content/geometrixx will be deleted by the upgrade to CQ 5.2.
• The upgrade procedure deletes everything under:
• /content/geometrixx
• /apps/geometrixx
• /etc/designs/geometrixx
• /libs/
• The cq-security-content package is not reinstalled when upgrading, the old version is kept.
You must manually update the permissions after the upgrade. You must make the group
contributor a member of the group uploader.
• Replication configuration settings are reset during the update. You need to reconfigure these
after the upgrade, using the new Replication configuration under Tools.
• The default workflows are overwritten during the upgrade, so any customizations are lost. Please
take a copy of these if required.
8.2.2 Preparing for the upgrade from CQ 5.1 to CQ 5.2
All preparation steps must be checked to ensure a smooth upgrade:
Page 68 of 214
CQ 5.2 WCM
Copyright 1993-2009 Day Management AG
Upgrading to CQ5
1.
Ensure you have a full backup of your CQ 5.1 instance.
2.
Ensure that the CQ 5.1 installation was made using Quickstart.
3.
Ensure that you have at least 2GB of free diskspace.
4.
Ensure that the system account you are using has sufficient privileges to replace the jar file.
5.
Ensure that the crx-quickstart/repository folder that contains your repository data is
binary compatible between the CQ 5.1 and 5.2 versions.
Note
Ensure that no changes (hotfixes or customizations) have been applied to the
repository folder that make it incompatible with the 5.2 version that is about to be
installed.
If you are in doubt please check with Day.
6.
Request the cleanupMessage.jsp script from Day.
8.2.3 Upgrading your CQ 5.1 instance to CQ 5.2
Updating your CQ 5.1 instance to a CQ 5.2 instance requires the following steps:
Important
Please read the section called “Important information to read before starting the upgrade”
before starting the upgrade.
Important
Please complete all preparation steps as in the section called “Preparing for the upgrade
from CQ 5.1 to CQ 5.2”.
1.
Delete the crx-quickstart/launchpad folder.
2.
Run the cleanupMessage script:
1.
Copy the cleanupMessage.jsp file to your author environment:
<cq-installation-dir>/crx-quickstart/server/runtime/0/_crx/
config/cleanupMessage.jsp
Adapt the path as necessary.
2.
Start your CQ 5.1 instance, then navigate to your CRX console, for example:
http://localhost:4502/crx (adapt as necessary).
3.
Log in as admin to the workspace where CQ is installed; for example crx.default.
4.
Open the script at:
http://localhost:4502/crx/config/cleanupMessage.jsp (adapt as
necessary).
5.
Only the following properties are changed:
• with the name “message” under the specified node
• those that are longer than the specified size
Page 69 of 214
CQ 5.2 WCM
Copyright 1993-2009 Day Management AG
Upgrading to CQ5
The default settings should be correct in all cases.
6.
Start the script using 'clean'.
7.
The output is formed of the nodes that contain a message property.
The prefix “cleaned:” means the text was truncated, while “ignored:” means the text was
short and therefore unchanged.
Tip
After the script is run, you may reduce the repository size using Tar PM
Optimization.
3.
Stop your CQ 5.1 instance.
4.
Copy the new jar file to the location of the currently installed jar file:
<cq-installation-dir>/
Caution
If you had changed the name of your CQ 5.1 jar file, then rename the CQ 5.2 jar file
to that of the existing file.
For example, if it had been renamed for an author environment:
<cq-installation-dir>/cq-author-4502.jar
Or a corresponding publish environment:
<cq-installation-dir>/cq-publish-4503.jar
5.
Start CQ 5.2; in the same manner as with your CQ 5.1 instance, by a double-click on the
jar file, or from the command line.
Note
This step will take longer than a normal startup as the new 5.2 content packages
have to be installed.
6.
Restart CQ 5.2. The upgrade will now be complete.
8.2.4 Upgrading your CQ 5.1 Digital Assets
The structure of digital assets has changed between CQ 5.1 and CQ 5.2. For this reason a wizard
is included to automate the process of moving the assets to the new structure:
1.
Ensure that you have a backup of your newly upgraded repository.
2.
Start your newly upgraded CQ 5.2 instance.
3.
Navigate to:
http://localhost:4502/libs/dam/migrate.html
Page 70 of 214
CQ 5.2 WCM
Copyright 1993-2009 Day Management AG
Upgrading to CQ5
4.
Click Start migration. A status message will be shown upon completion:
Note
After the upgrade script has finished it might take some time until all assets
reappear for use, as they are being processed in the background. You can monitor
stdout.log to see when everything has been finished.
Note
The upgrade removes the replication state on the assets.
8.2.5 Tasks to perform after the upgrade
The following tasks should be performed after the upgrade:
1.
The CQ 5.1 jar file is not needed after the upgrade and if still present, should be removed
from the installation folder to avoid confusion.
2.
Reinstall any customized OSGi bundles (if you had manually installed them before).
3.
Restore any customized configurations you had made on the file system:
• /server/runtime/0/_crx/WEB-INF/repository.xml; for example, search engine
settings.
• /server/etc/; for example, LDAP configurations.
4.
Restore any customized configurations from the Apache Felix Console:
• Mail Service
• Day Commons GFX Font Helper
Page 71 of 214
CQ 5.2 WCM
Copyright 1993-2009 Day Management AG
Upgrading to CQ5
• SSO Authentication Handler
• Apache Sling Resource Resolver
Note
CQ 5.2 adds a new default rule /content/-/ that you might want to remove.
5.
Restore any customized configurations in CRX:
• URL to tracker.js: /libs/wcm/config.publish/
com.day.cq.wcm.core.stats.PageViewStatistics
6.
Reconfigure the replication configuration settings, using the new Replication configuration
under Tools.
7.
The cq-security-content package is not reinstalled when upgrading, the old version is
kept.
You must manually update the permissions after the upgrade, by making the group
contributor a member of the group uploader.
8.
Check all forms on the site. If you had used the custom form action you need to change the
dialog to fit the new structure.
9.
Beginning with CQ 5.2 the Text Components add a HTML paragraph tag around the text.
Prior versions did not do always do that. Adding the paragraph tag might cause visual
differences. If necessary adapt the CSS selector - as according to your tests in Important
information to read before starting the upgrade.
8.2.6 The final status of your upgraded instance
The resulting system is identical to a fresh CQ 5.2 installation, with the user's content preserved
(assuming it was not stored in any repository folders that contained the CQ 5.1 software).
Page 72 of 214
CQ 5.2 WCM
Copyright 1993-2009 Day Management AG
9 Installing CQ5
9.1 How to Install CQ WCM Author and Publish Instances using
Quickstart
This section describes how to install CQ WCM.
Generally, when you set up CQ WCM, you need to set up an Author and a Publish instance see the section called “Author and Publish Environments” for further details on the two types of
environment.
Installation procedures for these are described in Installing an Author instance and Installing a
Publish instance. If, for testing or other purposes, you need to install CQ WCM out of the box (an
author instance with default settings and file names), you can use the generic procedure.
9.1.1 Installing an Author Instance
This procedure describes how to set up a default Author instance on port 4502 of the desired host.
To install an author instance:
1.
On the host file system, create a directory and name it author.
2.
Copy the CQ5 cq-wcm-quickstart-<version>.jar file into author/.
3.
Rename cq-wcm-quickstart-<version>.jar to cq5-author-4502.jar. If you need
a different port this can be set in the filename.
4.
Copy a valid license.properties file into author/ as well (the same directory as the
cq5-author-4502.jar file).
Note
If when starting the application, you do not provide the license.properties file,
CQ WCM redirects you to the Welcome screen where you enter a valid license key.
You can also request a valid license key from Day at this time.
5.
Start CQ WCM Quickstart:
• If using a GUI file-system explorer, double-click the cq5-author-4502.jar file.
• If using the command line, type:
java -jar cq5-author-4502.jar
• Use a custom script located in the crx quickstartfolder, such as server.bat to start
CQ. The Start and Stop scripts are for UNIX, Linux, and Macintosh. The server.bat
script is for Windows.
Important
You cannot use a custom script when you install the quickstart.jar file
unless you expand the file first. Use the -unpack option on the command line
to unpack the contents before running the script as in java -jar cq-wcmquickstart-<version>.jar -unpack.
6.
When the installation is completed, you are automatically redirected to http://
localhost:4502/bin/login.html.
Page 73 of 214
CQ 5.2 WCM
Copyright 1993-2009 Day Management AG
Installing CQ5
Note
With the default settings, the syndication agent points toward the publish instance at
http://localhost:4503/.
9.1.2 Installing a Publish Instance
To set up a publish instance on port 4503 of the desired host, you perform the same steps as
in installing an author instance except that you create a directory named publish (instead of
author) and you rename the quickstart.jar file as cq5-publish-4503.jar. You can select any
port number.
To install a publish instance:
1.
On the host file system, create a directory and name it publish.
2.
Copy the CQ WCM cq-wcm-quickstart-<version>.jar file into publish/.
3.
Rename cq-wcm-quickstart-<version>.jar to cq5-publish-4503.jar. If you
need a different port this can be set in the filename.
4.
Copy a valid license.properties file into publish/ as well (the same directory as the
cq5-publish-4503.jar file).
Note
If when starting the application, you do not provide the license.properties file,
CQ WCM redirects you to the Welcome screen where you enter a valid license key.
You can also request a valid license key from Day at this time.
5.
Start CQ WCM Quickstart:
• If using a GUI file-system explorer, double-click the cq5-publish-4503.jar file.
• If using the command line, type:
java -jar cq5-publish-4503.jar
• Use a custom script located in the crx quickstartfolder, such as server.bat to start
CQ. The Start and Stop scripts are for UNIX, Linux, and Macintosh. The server.bat
script is for Windows.
Important
You cannot use a custom script when you install the quickstart.jar file unless
you expand the file first. Use the -unpack option on the command line to unpack
the contents before running the script as in java -jar cq-wcm-quickstart<version>.jar -unpack.
6.
When the installation is completed, you can browse your site (for example, http://
localhost:4503/content/geometrixx/en/company.html)
9.1.3 Installing a CQ WCM Instance - Generic Procedure
This procedure is a generic, quickstart procedure for installing CQ WCM; it installs an author
instance using default settings and file names. It is often used when testing, or other scenarios
when you need a quickly available instance.
Page 74 of 214
CQ 5.2 WCM
Copyright 1993-2009 Day Management AG
Installing CQ5
Note
You do not need to perform this procedure before installing author or publish instances.
To install an author or publish instance, see Installing an Author instance and Installing
the Publish instance.
To install a generic CQ WCM instance (author):
1.
Copy the CQ WCM cq-wcm-quickstart-<version>.jar file (for example, cq-wcmquickstart-5.2.0.20090319.jar) to the desired directory on the host file system.
2.
Copy a valid license.properties file into the same directory as the cq-wcmquickstart-<version>.jar file.
Note
If when starting the application, you do not provide the license.properties file,
CQ WCM redirects you to the Welcome screen where you enter a valid license key.
You can also request a valid license key from Day at this time.
3.
Start CQ WCM Quickstart by doing one of the following:
• If using a GUI file-system explorer, double-click the cq-wcm-quickstart<version>.jar file. This installs and automatically starts the server.
Note
The repository data is stored in the subdirectory crx-quickstart/
repository.
• If using the command line, type the following:
java -jar cq-wcm-quickstart-<version>.jar
• Use a custom script located in the crx quickstart folder, such as server.bat to
start CQ. The Start and Stop scripts are for UNIX, Linux, and Macintosh. The server.bat
script is for Windows.
Note
You cannot use a custom script when you install the quickstart.jar file
unless you expand the file first. Use the -unpack option on the command line
to unpack the contents before running the script as in java -jar cq-wcmquickstart-<version>.jar -unpack.
4.
When the installation is complete, you are automatically redirected to http://
localhost:4502/bin/login.html.
Note
CQ WCM quickstart selects the first available port from the following list:
4502,8080,8081,8082,8083,8084,8085,8888,9362,<random>. You can
also set the port number. See installing an author instance for an example on how to
set a port number.
9.2 How to install CQ5 with an Application Server
The following sections detail how to install CQ5 in conjunction with various application servers:
• WebSphere v6.1
Page 75 of 214
CQ 5.2 WCM
Copyright 1993-2009 Day Management AG
Installing CQ5
• WebLogic v10.1
• Tomcat v6
• JBoss v4
A generic overview is also given for general usage and information:
• Generic Procedures
9.2.1 WebSphere v6.1
After installing WebSphere v6.1 you:
9.2.1.1 Install CQ5
1.
Unpack the installation files of the CQ5 Quickstart into a directory (without starting the server);
the installation directory will be referred to as <cq-installation-dir>:
•
Start the CQ5 Quickstart jar with the option -unpack; for example:
java -jar cq-wcm-quickstart-5.2.0.jar -unpack
This will create a folder <cq-installation-dir>crx-quickstart containing the
files and folders used for installation, without actually starting the installation.
Important
This must be done from the command line. If you open the jar file directly you will
activate the Quickstart installation and start the server.
2.
Copy the following jar files to the application server folder holding shared libraries:
a.
CRX\server\lib\container\jcr-1.0.jar
b.
CRX\server\lib\container\crx-shared.jar
3.
Restart WebSphere.
4.
Deploy the following web applications; they can be found in <cq-installationdir>\crx-quickstart\server\webapps:
a.
CRX webapp; crx-explorer_crx.war.
For example, deploy with the context path /crx.
b.
Launchpad webapp; crx-launchpad.war.
For example, deploy with the context path /launchpad.
5.
Start the two applications.
6.
Register your CRX license:
a.
Access your CRX installation:
http://<server>:<port>/<context-path>/index.jsp
for example: http://<server>:<port>/crx/index.jsp
b.
Click the red warning message - “Click here...” (the message is a link).
c.
Enter your license key.
Page 76 of 214
CQ 5.2 WCM
Copyright 1993-2009 Day Management AG
Installing CQ5
9.2.1.2 Configure the default JDK
WebSphere v6.1 uses JDK 1.5. By default the SAMLv2 JSP JDK source level uses JDK 1.3. As the
SAMLv2 sample configuration uses the JDK 1.5 syntax, running it with the default source level will
not work. The following steps should be used to configure the source level as 1.5:
1.
Within the deployed crx-explorer_crx.war, edit ibm-web-ext.xmi and add the
following configuration parameter to specify the JSP engine:
<jspAttributes xmi:id="JSPAttribute_1225281520121"
name="jdkSourceLevel" value="15"/>
Note
The integer (n) referenced in JSPAttribute_<n> must be unique within the file.
2.
Repeat for crx-launchpad.war.
Note
The default configuration directory for the web module is:
<WAS_ROOT>\profiles\profilename\config\cells\cellname
\applications\enterpriseappname\ deployments\deployedname
\webmodulename\WEB-INF\
If you have already checked the option Use Binary Configuration the files are
extracted to the following directory, where they can be edited:
<WAS_ROOT>\profiles\profilename\installedApps\nodename
\enterpriseappname\webmodulename\
Where <WAS_ROOT> is the root directory of the web application server installation.
3.
Restart Websphere.
9.2.1.3 Install your Content Packages
1.
Stop CQ5.
2.
Edit the workspace configuration file:
a.
Open the following file for edit:
<cq-installation-dir>\crx-quickstart\repository\workspaces
\workspace.xml
b.
Scroll down to the <SearchIndex> parameter section.
c.
Add <param name="indexingConfiguration" value=""/> to the
<SearchIndex> parameter section.
3.
Start CQ5.
4.
Access the CRX main console.
5.
Log in to the crx.system workspace as admin.
6.
Navigate to the Package Manager in CRX.
7.
Upload and install the following CQ5 package from <cq-installation-dir>\crxquickstart\repository\install\system:
Page 77 of 214
CQ 5.2 WCM
Copyright 1993-2009 Day Management AG
Installing CQ5
•
WCM Security Content Package; cq-security-content-<cq-version>.jar.
8.
Switch to the crx.default workspace, again as admin
9.
Upload and install the following CQ5 packages from <cq-installation-dir>\crxquickstart\repository\install in the following order:
a.
Sling Content Package; 0001-cq-wcm-sling-content-<cq-version>.jar.
b.
WCM Content Package; 0002-cq-wcm-content-<cq-version>.jar.
9.2.1.4 Enable Replication for Author instances of CQ5
For an author instance of CQ5 you must configure it to start in “author run mode” so that you can
perform replications.
1.
Open the file: <cq-installation-dir>\crx-quickstart\launchpad
\sling.properties for edit.
2.
Add the following two properties to the file:
sling.jcrinstall.folder.name.regexp = .*/(install|config)(.author)?$
sling.run.modes = author
3.
Restart the crx-launchpad web application.
9.2.2 WebLogic v10.3
After installing WebLogic v10.3 and creating your domain you:
9.2.2.1 Configure the Server Locale
When you deploy CQ5 with WebLogic 10.3 you must have the server locale set to en_US to avoid
errors such as:
java.lang.IllegalArgumentException: Bad date header: 'Wed, 12 Nov 2008
16:34:28 GMT'
These can occur when, for example, requesting a resource such as /libs/widgets/0.gif.
To configure the server locale on Microsoft Windows:
1.
Open the Control Panel.
2.
Open Regional and Languages Options.
3.
In the Regional Options tab, for Standards and formats select English(United
States).
To configure the server locale on Linux or Unix:
•
set the environment variable LANG to en_US.
9.2.2.2 Enable Basic Authentication Headers
To enable out-of-the-box authentication of users in CQ5, authentication by the application server
must be switched off:
1.
Open <WebLogic-installation-dir>/user_projects/domains/<your-domain>/
config/config.xml.
2.
Locate the element <security-configuration>.
Page 78 of 214
CQ 5.2 WCM
Copyright 1993-2009 Day Management AG
Installing CQ5
3.
Add the following child element to it:
<enforce-valid-basic-auth-credentials>
false
</enforce-valid-basic-auth-credentials>
4.
If you had already started WebLogic then you will need to restart it.
9.2.2.3 Install CQ5
1.
Unpack the installation files of the CQ5 Quickstart into a directory (without starting the server);
the installation directory will be referred to as <cq-installation-dir>:
•
Start the CQ5 Quickstart jar with the option -unpack; for example:
java -jar cq-wcm-quickstart-5.2.0.jar -unpack
This will create a folder <cq-installation-dir>crx-quickstart containing the
files and folders used for installation, without actually starting the installation.
Important
This must be done from the command line. If you open the jar file directly you will
activate the Quickstart installation and start the server.
2.
Copy the following jar files to the application server folder holding shared libraries:
a.
CRX\server\lib\container\jcr-1.0.jar
b.
CRX\server\lib\container\crx-shared.jar
3.
Restart WebLogic.
4.
Deploy the following web applications; they can be found in <cq-installationdir>\crx-quickstart\server\webapps:
a.
CRX webapp; crx-explorer_crx.war.
For example, deploy with the context path /crx.
b.
Launchpad webapp; crx-launchpad.war.
For example, deploy with the context path /launchpad.
5.
Start the two applications.
6.
Register your CRX license:
a.
Access your CRX installation:
http://<server>:<port>/<context-path>/index.jsp
for example: http://<server>:<port>/crx/index.jsp
b.
Click the red warning message - “Click here...” (the message is a link).
c.
Enter your license key.
9.2.2.4 Install your Content Packages
1.
Stop CQ5.
2.
Edit the workspace configuration file:
Page 79 of 214
CQ 5.2 WCM
Copyright 1993-2009 Day Management AG
Installing CQ5
a.
Open the following file for edit:
<cq-installation-dir>\crx-quickstart\repository\workspaces
\workspace.xml
b.
Scroll down to the <SearchIndex> parameter section.
c.
Add <param name="indexingConfiguration" value=""/> to the
<SearchIndex> parameter section.
3.
Start CQ5.
4.
Access the CRX main console.
5.
Log in to the crx.system workspace as admin.
6.
Navigate to the Package Manager in CRX.
7.
Upload and install the following CQ5 package from <cq-installation-dir>\crxquickstart\repository\install\system:
•
WCM Security Content Package; cq-security-content-<cq-version>.jar.
8.
Switch to the crx.default workspace, again as admin
9.
Upload and install the following CQ5 packages from <cq-installation-dir>\crxquickstart\repository\install in the following order:
a.
Sling Content Package; 0001-cq-wcm-sling-content-<cq-version>.jar.
b.
WCM Content Package; 0002-cq-wcm-content-<cq-version>.jar.
9.2.2.5 Enable Replication for Author instances of CQ5
For an author instance of CQ5 you must configure it to start in “author run mode” so that you can
perform replications.
1.
Open the file: <cq-installation-dir>\crx-quickstart\launchpad
\sling.properties for edit.
2.
Add the following two properties to the file:
sling.jcrinstall.folder.name.regexp = .*/(install|config)(.author)?$
sling.run.modes = author
3.
Restart the crx-launchpad web application.
9.2.3 Tomcat v6
After installing Tomcat v6 you:
9.2.3.1 Configure Tomcat access accounts
Tomcat enables neither admin nor manager access at installation.
Therefore you have to manually edit tomcat-users.xml to allow access for these accounts:
1.
Navigate to the Tomcat configuration folder.
2.
Edit tomcat-users.xml to include access for admin and manager. The configuration
should look similar to the following example:
Page 80 of 214
CQ 5.2 WCM
Copyright 1993-2009 Day Management AG
Installing CQ5
<?xml version='1.0' encoding='utf-8'?>
<tomcat-users>
<role rolename="manager"/>
<role rolename="tomcat"/>
<role rolename="admin"/>
<role rolename="role1"/>
<user username="both" password="tomcat" roles="tomcat,role1"/>
<user username="tomcat" password="tomcat" roles="tomcat"/>
<user username="admin" password="admin" roles="admin,manager"/>
<user username="role1" password="tomcat" roles="role1"/>
</tomcat-users>
9.2.3.2 Install CQ5
1.
Unpack the installation files of the CQ5 Quickstart into a directory (without starting the server);
the installation directory will be referred to as <cq-installation-dir>:
•
Start the CQ5 Quickstart jar with the option -unpack; for example:
java -jar cq-wcm-quickstart-5.2.0.jar -unpack
This will create a folder <cq-installation-dir>crx-quickstart containing the
files and folders used for installation, without actually starting the installation.
Important
This must be done from the command line. If you open the jar file directly you will
activate the Quickstart installation and start the server.
2.
Copy the following jar files to the application server folder holding shared libraries:
a.
CRX\server\lib\container\jcr-1.0.jar
b.
CRX\server\lib\container\crx-shared.jar
3.
Restart Tomcat.
4.
Deploy the following web applications; they can be found in <cq-installationdir>\crx-quickstart\server\webapps:
a.
CRX webapp; crx-explorer_crx.war.
For example, deploy with the context path /crx.
b.
Launchpad webapp; crx-launchpad.war.
For example, deploy with the context path /launchpad.
5.
Start the two applications.
6.
Register your CRX license:
a.
Access your CRX installation:
http://<server>:<port>/<context-path>/index.jsp
for example: http://<server>:<port>/crx/index.jsp
b.
Click the red warning message - “Click here...” (the message is a link).
c.
Enter your license key.
Page 81 of 214
CQ 5.2 WCM
Copyright 1993-2009 Day Management AG
Installing CQ5
9.2.3.3 Install your Content Packages
1.
Stop CQ5.
2.
Edit the workspace configuration file:
a.
Open the following file for edit:
<cq-installation-dir>\crx-quickstart\repository\workspaces
\workspace.xml
b.
Scroll down to the <SearchIndex> parameter section.
c.
Add <param name="indexingConfiguration" value=""/> to the
<SearchIndex> parameter section.
3.
Start CQ5.
4.
Access the CRX main console.
5.
Log in to the crx.system workspace as admin.
6.
Navigate to the Package Manager in CRX.
7.
Upload and install the following CQ5 package from <cq-installation-dir>\crxquickstart\repository\install\system:
•
WCM Security Content Package; cq-security-content-<cq-version>.jar.
8.
Switch to the crx.default workspace, again as admin
9.
Upload and install the following CQ5 packages from <cq-installation-dir>\crxquickstart\repository\install in the following order:
a.
Sling Content Package; 0001-cq-wcm-sling-content-<cq-version>.jar.
b.
WCM Content Package; 0002-cq-wcm-content-<cq-version>.jar.
9.2.3.4 Enable Replication for Author instances of CQ5
For an author instance of CQ5 you must configure it to start in “author run mode” so that you can
perform replications.
1.
Open the file: <cq-installation-dir>\crx-quickstart\launchpad
\sling.properties for edit.
2.
Add the following two properties to the file:
sling.jcrinstall.folder.name.regexp = .*/(install|config)(.author)?$
sling.run.modes = author
3.
Restart the crx-launchpad web application.
9.2.4 JBoss v4
After installing JBoss v4 you:
9.2.4.1 Install CQ5
1.
Unpack the installation files of the CQ5 Quickstart into a directory (without starting the server);
the installation directory is referred to as <cq-installation-dir>:
Page 82 of 214
CQ 5.2 WCM
Copyright 1993-2009 Day Management AG
Installing CQ5
•
Start the CQ5 Quickstart jar with the option -unpack; for example:
java -jar cq-wcm-quickstart-5.2.0.jar -unpack
This creates a folder <cq-installation-dir>crx-quickstart containing the files
and folders used for installation, without actually starting the installation.
Important
This must be done from the command line. If you open the jar file directly you will
activate the Quickstart installation and start the server.
2.
Copy the following jar files to the application server folder holding shared libraries
(<JBOSS_HOME]\server\default\lib>):
a.
CRX\server\lib\container\jcr-1.0.jar
b.
CRX\server\lib\container\crx-shared.jar
3.
Restart JBoss.
4.
Unpack the crx-explorer_crx.war file located in the <cq-installation-dir>\crxquickstart\server\webapps folder.
Note
In Windows, change the .war extension to .zip and unpack like any zip file. In
Linux, type jar xvf crx-explorer_crx.war to unpack.
5.
In the WEB-INF folder, open log4j.xml.
6.
Remove or comment the line <appender-ref ref="console"/> which is in the Loggers
section of the file and save your changes and exit the file. This disables console logging in the
CRX web application.
7.
In the WEB-INF folder, navigate to the lib folder and delete the following files:
• jcr-1.0.jar
• jackrabbit-api-1.4.jar
• day-commons-naming-1.1.1.jar
• crx-api-1.4.1.jar
8.
Pack the crx-explorer_crx.war file.
Note
In Windows, run the zip utility to compress it and rename the crxexplorer_crx.zip file to crx-explorer_crx.war. In Linux, type jar cvf
crx-explorer_crx.war.
9.
Deploy the following web applications; they can be found in <cq-installationdir>\crx-quickstart\server\webapps:
a.
CRX webapp; crx-explorer_crx.war.
For example, deploy with the context path /crx.
b.
Launchpad webapp; crx-launchpad.war.
Page 83 of 214
CQ 5.2 WCM
Copyright 1993-2009 Day Management AG
Installing CQ5
For example, deploy with the context path /launchpad.
JBoss supports Hot Deployment, so you can simply drag the two files to <JBOSS_HOME>
\server\default\deploy.
10. Start the two applications.
11. Register your CRX license:
a.
Access your CRX installation:
http://<server>:<port>/<context-path>/index.jsp
for example: http://<server>:<port>/crx/index.jsp
b.
Click the red warning message - “Click here...” (the message is a link).
c.
Enter your license key.
9.2.4.2 Configure the JBoss Server Login Module
By default JBoss' default login configuration attempts to authenticate users against a list of users
in the users.properties file. You must configure JBoss as follows to let login attempts by
unknown users to pass to the web application (CRX Explorer). The web application will then
process authentication by itself.
1.
Open the file for editing:
<JBOSS_HOME>\server\default\conf\login-config.xml
2.
In the section application-policy name="other" (at the bottom of the file) add the
attribute:
unauthenticatedIdentity="nobody"
to the login-module entry.
9.2.4.3 Install your Content Packages
Once you have installed CQ5 you will want to install content packages.
1.
Stop CQ5.
2.
Edit the workspace configuration file:
a.
Open the following file for edit:
<cq-installation-dir>\crx-quickstart\repository\workspaces
\workspace.xml
b.
Scroll down to the <SearchIndex> parameter section.
c.
Add <param name="indexingConfiguration" value=""/> to the
<SearchIndex> parameter section.
3.
Start CQ5.
4.
Access the CRX main console:
http://<server>:<port>/crx-explorer_crx/index.jsp
5.
Log in to the crx.system workspace as admin.
Page 84 of 214
CQ 5.2 WCM
Copyright 1993-2009 Day Management AG
Installing CQ5
6.
Navigate to the Package Manager in CRX.
7.
Upload and install the following CQ5 package from <cq-installation-dir>\crxquickstart\repository\install\system:
•
WCM Security Content Package; cq-security-content-<cq-version>.jar.
8.
Switch to the crx.default workspace, again as admin
9.
Upload and install the following CQ5 packages from <cq-installation-dir>\crxquickstart\repository\install in the following order:
a.
Sling Content Package; 0001-cq-wcm-sling-content-<cq-version>.jar.
b.
WCM Content Package; 0002-cq-wcm-content-<cq-version>.jar.
10. Restart JBoss.
9.2.4.4 Enable Replication for Author instances of CQ5
For an author instance of CQ5 you must configure it to start in “author run mode” so that you can
perform replications.
1.
Open the file: <cq-installation-dir>\crx-quickstart\launchpad
\sling.properties for edit.
2.
Add the following two properties to the file:
sling.jcrinstall.folder.name.regexp = .*/(install|config)(.author)?$
sling.run.modes = author
3.
Restart the crx-launchpad web application.
9.2.5 Generic Procedures
After installing the appropriate web application server you:
9.2.5.1 Generic Installation Procedure
This section provides generic information about installing CQ5 with an application server.
1.
Unpack the installation files of the CQ5 Quickstart into a directory (without starting the server);
the installation directory will be referred to as <cq-installation-dir>:
•
Start the CQ5 Quickstart jar with the option -unpack; for example:
java -jar cq-wcm-quickstart-5.2.0.jar -unpack
This will create a folder <cq-installation-dir>crx-quickstart containing the
files and folders used for installation, without actually starting the installation.
Important
This must be done from the command line. If you open the jar file directly you will
activate the Quickstart installation and start the server.
2.
Copy the following jar files to the application server folder holding shared libraries:
a.
CRX\server\lib\container\jcr-1.0.jar
b.
CRX\server\lib\container\crx-shared.jar
Page 85 of 214
CQ 5.2 WCM
Copyright 1993-2009 Day Management AG
Installing CQ5
3.
Restart your web application server.
4.
Deploy the following web applications; they can be found in <cq-installationdir>\crx-quickstart\server\webapps:
a.
CRX webapp; crx-explorer_crx.war.
For example, deploy with the context path /crx.
b.
Launchpad webapp; crx-launchpad.war.
For example, deploy with the context path /launchpad.
5.
Start the two applications.
6.
Register your CRX license:
a.
Access your CRX installation:
http://<server>:<port>/<context-path>/index.jsp
for example: http://<server>:<port>/crx/index.jsp
b.
Click the red warning message - “Click here...” (the message is a link).
c.
Enter your license key.
9.2.5.2 Install Content Packages
Once you have installed CQ5 you will want to install content packages.
1.
Stop CQ5.
2.
Edit the workspace configuration file:
a.
Open the following file for edit:
<cq-installation-dir>\crx-quickstart\repository\workspaces
\workspace.xml
b.
Scroll down to the <SearchIndex> parameter section.
c.
Add <param name="indexingConfiguration" value=""/> to the
<SearchIndex> parameter section.
3.
Start CQ5.
4.
Access the CRX main console.
5.
Log in to the crx.system workspace as admin.
6.
Navigate to the Package Manager in CRX.
7.
Upload and install the following CQ5 package from <cq-installation-dir>\crxquickstart\repository\install\system:
•
WCM Security Content Package; cq-security-content-<cq-version>.jar.
8.
Switch to the crx.default workspace, again as admin
9.
Upload and install the following CQ5 packages from <cq-installation-dir>\crxquickstart\repository\install in the following order:
Page 86 of 214
CQ 5.2 WCM
Copyright 1993-2009 Day Management AG
Installing CQ5
a.
Sling Content Package; 0001-cq-wcm-sling-content-<cq-version>.jar.
b.
WCM Content Package; 0002-cq-wcm-content-<cq-version>.jar.
9.2.5.3 Enable Replication for Author instances of CQ5
For an author instance of CQ5 you must configure it to start in “author run mode” so that you can
perform replications.
1.
Open the file: <cq-installation-dir>\crx-quickstart\launchpad
\sling.properties for edit.
2.
Add the following two properties to the file:
sling.jcrinstall.folder.name.regexp = .*/(install|config)(.author)?$
sling.run.modes = author
3.
Restart the crx-launchpad web application.
Page 87 of 214
CQ 5.2 WCM
Copyright 1993-2009 Day Management AG
10 How to Use, Create, and Edit a
Page
10.1 Managing Pages within CQ WCM
This section describes how to create a page within CQ WCM and then create content on that page.
Important
Your account needs the appropriate access rights to create or edit pages.
10.1.1 Creating a New Page
Unless all pages have been created for you in advance, before you can start creating content, you
must create a page:
1.
From the wcm/siteadmin window, select the level at which you want to create a new page.
In the following example, you are creating a page under the level English - shown in the left
pane; the right pane shows the existing pages at this level.
2.
In the New... menu (click the arrow next to New...), select New Page.... The Create
Page window opens.
Note
Clicking New... itself also acts as a shortcut to the New Page... option.
3.
In the Title field, select a title that is displayed to the user.
4.
In the Name field, select a name that is used to create the URI.
5.
Click the template you want to use to create the new page; for example, to determine the
basic layout of a content page.
Page 88 of 214
CQ 5.2 WCM
Copyright 1993-2009 Day Management AG
How to Use, Create, and Edit a Page
6.
Click Create to create the page. You return to the wcm/siteadmin window where you can
see an entry for the new page.
This provides information about the page (for example when it was last edited and by whom)
which is updated as necessary.
Page 89 of 214
CQ 5.2 WCM
Copyright 1993-2009 Day Management AG
How to Use, Create, and Edit a Page
10.1.2 Editing a Page
After the page has been created, you can edit its content. When you first create a page, the page
includes only the text and elements from the template. You add content by double-clicking or
dragging and dropping components onto the page.
10.1.2.1 Opening a page
You can open the page to be edited by one of several methods:
• From wcm/siteadmin, you can double-click the page title to open it for editing.
• From wcm/siteadmin, you can right-click the page item, then select Open from the menu:
• After you have opened a page, you can navigate to other pages within the site to edit them by
clicking hyperlinks.
10.1.2.2 Inserting a new paragraph
After you open the page, you can start to add content. You do this by adding paragraphs (also
called components).
To insert a new paragraph:
1.
Double-click the area labeled Drag components or assets here... or drag a
component from the floating toolbar (called sidekick) to insert a new paragraph. This
area appears wherever new content can be added, such as at the end of the list if other
paragraphs exist or at the end of a column.
Note
If a paragraph already exists, you can right-click the paragraph and select
Insert. This inserts the new paragraph before the existing one.
Page 90 of 214
CQ 5.2 WCM
Copyright 1993-2009 Day Management AG
How to Use, Create, and Edit a Page
2.
After you select to insert a paragraph, you see a list of the available paragraph types.
Note
Depending on your production environment, these choices may differ. For complete
details on components, see Default Components.
3.
Click the component that you want. A window opens that allows you to configure your
paragraph and add content.
10.1.2.3 Editing a paragraph
To edit an existing paragraph, do one of the following:
Page 91 of 214
CQ 5.2 WCM
Copyright 1993-2009 Day Management AG
How to Use, Create, and Edit a Page
• Double-click the paragraph to open it. You see the same window as when you created the
paragraph with the existing content. Make your changes and click OK.
• Right-click the paragraph and click Edit.
10.1.2.4 Moving a paragraph
To move a paragraph:
1.
Click the paragraph you want to move. CQ WCM highlights the paragraph.
2.
Drag the paragraph to the new location - CQ WCM indicates where paragraphs can be
moved to with a green checkmark. Drop it in your desired location:
3.
Your paragraph is moved.
10.1.2.5 Deleting a paragraph
To delete a paragraph:
Page 92 of 214
CQ 5.2 WCM
Copyright 1993-2009 Day Management AG
How to Use, Create, and Edit a Page
1.
Select the paragraph and right-click.
2.
Select Delete from the menu. CQ WCM requests confirmation that you want to delete the
paragraph as this action cannot be undone.
3.
Click OK.
10.1.3 Find & Replace
A Find & Replace menu option allows you to search for, and replace multiple instances of a
string, within a section of the website.
1.
Select the root page, or folder, where you want the “Find and Replace” action to take place.
2.
Select Tools then Find & Replace:
3.
The Find & Replace dialog will:
• confirm the root path where the find action should start
• define the term to be found
• define the term that should replace it
• indicate whether the search should be case-sensitive
• whether only whole words should be found (otherwise substrings will also be found)
Clicking Preview will list where the term has been found. You can select / deselect specific
instances to be replaced:
Page 93 of 214
CQ 5.2 WCM
Copyright 1993-2009 Day Management AG
How to Use, Create, and Edit a Page
4.
Click Replace to actually replace all instances. You will be asked to confirm the action.
Note
The default scope for the find and replace servlet covers the following properties:
• jcr:title
• jcr:description
• jcr:text
• text
This can be changed using the Apache Felix Web Management Console (for
example, at http://localhost:4502/system/console/configMgr) for
com.day.cq.wcm.core.impl.servlets.FindReplaceServlet.
10.1.4 Moving or Renaming Page
The procedure to move or rename a page is the same. You do not need to do both: you can
rename a page without moving it or vice versa.
To move or rename a page:
1.
From the wcm/siteadmin window, click to select the page, then select Move.... (You can
also select the page item, then right-click and select Move....) The Move window
opens where you can either specify a new location, a new name for the page, or both.
Page 94 of 214
CQ 5.2 WCM
Copyright 1993-2009 Day Management AG
How to Use, Create, and Edit a Page
2.
Fill in the following fields, as appropriate:
Move
Specify the page to be moved - this is usually filled in by default, depending on how and
where you started the move action.
to
Use the sitemap (available via the drop-down menu
) to select the location where the page should be moved to. If you are only renaming the
page, ignore this field.
Rename to
The current page label displays by default. Specify the new page label, if required.
3.
Click Move. CQ WCM confirms that you want to move or rename the current page. Click OK to
confirm.
10.1.5 Deleting a Page
1.
You can delete a page from various locations:
• Within the wcm/siteadmin window, click to select the page, then right-click and
select Delete from the resulting menu.
• Within sidekick use the Page actions tab to select Delete - this deletes the page that is
currently open
2.
After you have selected to delete a page you must confirm the request - as the action cannot
be undone.
Note
If the page has been published you can restore the latest (or a specific) version,
but this may not have exactly the same content as your last version if further
modifications had been made. See the section called “How To Restore Pages” for
further details.
Page 95 of 214
CQ 5.2 WCM
Copyright 1993-2009 Day Management AG
How to Use, Create, and Edit a Page
10.1.6 Setting the Page Properties
Page Properties define the various properties of the page, such as titles, when they appear on the
website and others.
1.
Open the page you want to edit.
2.
In the sidekick, click the Page icon. Select Page Properties... from the list.
3.
In the window that opens, you can modify the global, advanced, tags, impressions, and page
analytics of a page:
a.
Global
Page 96 of 214
CQ 5.2 WCM
Copyright 1993-2009 Day Management AG
How to Use, Create, and Edit a Page
Title Text
The page title - as appears in the siteadmin list.
Page Title
A title to be used on the page.
Navigation Title
A title for the page for use within the navigation map. Often shorter than the full title.
Subtitle
A subtitle for use on the page.
Hide Page in Navigation
A toggle switch to indicate whether the page is shown or hidden in the page
navigation.
b.
Advanced
Page 97 of 214
CQ 5.2 WCM
Copyright 1993-2009 Day Management AG
How to Use, Create, and Edit a Page
On Time
The date and time at which the published page will be activated. When published this
page will be kept dormant until the specified time. Leave these fields empty for pages
you want to publish immediately (the normal scenario).
Off Time
The time at which the published page will be deactivated. Again leave these fields
empty for pages you want to publish immediately.
Vanity URL
Allows you to enter a vanity URL for this page.
Redirect Vanity URL
Indicates whether you want the page to use the vanity URL.
Page Language
Defined language of the page.
Redirect Target
Target to which the page should be redirected.
Design Path
Path of the page design.
c.
Tags/Keywords
Here you can add, or remove tags from the page by updating the list in the selection box:
• A completely new tag can be entered by typing the name in an empty space in the
selection box.
• With the drop-down functionality you can select from existing tags.
• An x appears when you mouse-over a tag entry in the selection box; this can be used
to remove that tag for this page.
Page 98 of 214
CQ 5.2 WCM
Copyright 1993-2009 Day Management AG
How to Use, Create, and Edit a Page
d.
Impressions
This shows the activity on the page as in the impressions generated.
e.
Page Analytics
External Provider
The provider who is generating the analytical statistics.
ID / Snippet
The ID or code snippet to be included on the page.
f.
Live Copy:
Page 99 of 214
CQ 5.2 WCM
Copyright 1993-2009 Day Management AG
How to Use, Create, and Edit a Page
Live Copy From
Define the source path.
Live Copy suspended
Suspend the Live Copy.
Sync Trigger
Defines when the modifications on the Blueprint are propagated to the Live Copy.
Sync Actions
Update Content
Controls whether, or not, modifications to the Blueprint will be propagated.
Enable Notification
Activate to be notified when the modifications are propagated.
Start Workflow
Select the workflow to be started when the synchronisation actions are triggered.
Read only for
Select the group that will have read-only access to the Live Copy.
Important
See Chapter 1, for full details.
g.
Blueprint:
Page 100 of 214
CQ 5.2 WCM
Copyright 1993-2009 Day Management AG
How to Use, Create, and Edit a Page
Current Live Copies
Show the current live copies.
Sync Actions
Actions defined for the blueprint:
Update Content
Enables content update.
Enable Notification
Enables notifications.
Start Workflow
Select a workflow to be started upon synchronization.
Read only for
Select the groups that will have read-only access to the copies.
Important
See Chapter 1, for full details.
4.
Click OK to save the new properties.
Page 101 of 214
CQ 5.2 WCM
Copyright 1993-2009 Day Management AG
11 How to Publish a Page
11.1 How To Publish Pages
This section describes how to publish pages in CQ WCM. To publish a page, you activate its
contents. Conversely, to remove a page from publication, you deactivate its contents.
When you are working on pages that you are modifying, you can lock the pages so other users
cannot make changes or accidentally activate the content. In addition, you preview a page before
publishing by selecting Preview Mode in the sidekick.
If you are a system administrator and need to test the publish environment, see How to install CQ5
author and publish instances.
11.1.1 Activating Content
You activate pages in the wcm/siteadmin window. After you have opened a page and modified
its contents, you return to the wcm/siteadmin window to activate the content of that page or of an
entire tree of pages.
To activate page content:
1.
In the siteadmin/wcm window, select the page that you want to activate.
2.
Select Activate, either from the top menu, or the drop-down menu on the selected page
item.
Note
To activate the content of the page and all its sub-pages use the Tools tab.
3.
CQ WCM activates the selected content. To see that the page and its sub-pages (if selected)
have been published, refresh the page. The published page or pages appears in the
siteadmin/wcm window with information about who activated the content as well as date and
time of activation.
Page 102 of 214
CQ 5.2 WCM
Copyright 1993-2009 Day Management AG
How to Publish a Page
11.1.2 Deactivating Content
To remove a page from the publish environment, you deactivate the content.
To deactivate a page:
1.
In the siteadmin/wcm window, select the page that you want to deactivate.
2.
Select Deactivate, either from the top menu, or the drop-down menu on the selected page
item. You are asked to confirm the deletion.
3.
Refresh the siteadmin/wcm window and the content is no longer published:
Page 103 of 214
CQ 5.2 WCM
Copyright 1993-2009 Day Management AG
How to Publish a Page
11.1.3 Determining Page Publication Status
The colors next to pages in the siteadmin/wcm window indicate publication status.
Table 11.1.
Color
Description
Green
Publication was successful. Content is published.
Yellow
Publication is pending. Confirmation of publication has not yet
been received by the system.
Red
Publication failed. There is no connection with the publish
instance. This can also mean that the content was deactivated.
blank
This page has never been published.
11.1.4 Locking Pages
To lock a page that you are working on so no one can modify the contents or activate it:
1.
In the siteadmin/wcm window, select the page that you want to lock.
2.
Double-click the page to open it for edit.
Page 104 of 214
CQ 5.2 WCM
Copyright 1993-2009 Day Management AG
How to Publish a Page
3.
In the Page tab of sidekick, select Lock Page:
4.
A message shows that your page is locked to other users:
5.
CQ WCM displays the page as locked and indicates which user has locked the page.
11.1.5 Unlocking Pages
You can only unlock locked pages if you locked the page or if you have administrator privileges.
To unlock a page:
1.
In the siteadmin/wcm window, select the page you want to unlock.
Page 105 of 214
CQ 5.2 WCM
Copyright 1993-2009 Day Management AG
How to Publish a Page
2.
Double-click the page to open it for edit.
3.
In the Page tab of sidekick, select Unlock Page:
11.1.6 Using Preview Mode
This mode allows you to preview the page as if it were appearing on your website in its final form.
To access Preview mode:
1.
In the siteadmin/wcm window, open the page you want to view in Edit mode.
2.
In the sidekick, click the magnifying glass (preview mode). CQ WCM displays the page as it
appears on your web site in its final form.
Page 106 of 214
CQ 5.2 WCM
Copyright 1993-2009 Day Management AG
12 How to Restore a Page
12.1 How To Restore Pages
This section describes how to restore pages that have been previously deleted.
Note
Only pages that have been previously activated can be restored. Each time you activate a
page or tree, CQ WCM creates a new version of that page or tree.
To restore a page to a previous version:
1.
In the wcm/siteadmin window, navigate to the page you want to restore and select it.
2.
From the top menu select Tools, then Restore:
3.
Selecting Restore Version... lists previous versions of the document. Selecting
Restore Tree... lists previous versions of the content tree.
Page 107 of 214
CQ 5.2 WCM
Copyright 1993-2009 Day Management AG
How to Restore a Page
4.
Click Restore. CQ WCM restores the version(s) (or trees) that you select.
Page 108 of 214
CQ 5.2 WCM
Copyright 1993-2009 Day Management AG
13 How to Create Templates
13.1 Developing Page Templates
CQ5 page templates are simply models used to create new pages. They can contain as little, or as
much, initial content as needed, their role being to create the correct initial node structures, with the
required properties (primarily sling:resourceType) set to allow editing and rendering.
13.1.1 Creating a new Template (based on an existing template)
Needless to say a new template can be created completely from scratch, but often an existing
template will be copied and updated to save you time and effort. For example, the templates within
Geometrixx can be used to get you started.
1.
Copy an existing template (preferably with a definition as close as possible to what you want
to achieve) to a new node.
Note
Templates are usually stored in /apps/<website-name>/templates/
<template-name>.
2.
Change the jcr:title of the new template node to reflect its new role. You can also update the
jcr:description if appropriate.
3.
Copy the component on which the template is based (this is indicated by the
sling:resourceType property of the jcr:content node within the template) to create a new
instance.
Note
Components are usually stored in /apps/<website-name>/components/
<component-name>.
4.
Update the jcr:title and jcr:description of the new component.
5.
Replace the thumbnail.png if you want a new thumbnail picture to be shown in the
template selection list.
6.
Update the sling:resourceType of the template's jcr:content node to reference the new
component.
7.
Make any further changes to the functionality or design of the template and/or its underlying
component.
Changes made to the /apps/<website>/templates/<template-name> node will affect
the template instance (as in the selection list).
Changes made to the /apps/<website>/components/<component-name> node will
affect the content page created when the template is used.
You can now create a page within your website using the new template.
Page 109 of 214
CQ 5.2 WCM
Copyright 1993-2009 Day Management AG
14 How to activate a section of your
website
14.1 How to activate a complete section (tree) of your website
From wcm/siteadmin you can activate the individual pages. When you have entered, or updated, a
considerable number of content pages - all of which are resident under the same root page - it can
be easier to activate the entire tree in one action. You can also perform a Dry Run to emulate an
activation and highlight which pages would be activated.
To activate a complete tree of your website:
1.
Access the Tools tab in CQ.
2.
Click on Replication - the folder will expand.
3.
Then double-click on Activate Tree.
4.
The following dialog screen will be shown:
5.
Enter the Start Path. This specifies the path to the root of the section you want to activate
(publish). This page, and all pages underneath, will be considered for activation (or used in
the emulation if a Dry Run is selected).
6.
Activate the selection criteria as required:
• Only Modified: only activate pages that have been modified.
• Only Activated: only activate pages that have (already) been activated. Acts as a form
of reactivation.
• Ignore Deactivated: ignore any pages which have been deactivated.
7.
Select the action you want to perform:
a.
Select Dry Run if you want to check which pages would be activated. This is only an
emulation, no pages will be activated.
b.
Select Activate if you want to activate the pages.
Page 110 of 214
CQ 5.2 WCM
Copyright 1993-2009 Day Management AG
15 How to Use Tags
15.1 How to Manage Tags in CQ WCM
15.1.1 Using Sidekick to access and assign Tags
Many users will assign tags directly to the page they are editing. This can be done using the
sidekick:
1.
Within sidekick select the Page tab.
2.
Click Page Properties....
3.
Select the Tags/Keywords tab.
Here you can either enter a tag by typing a new name or by selecting an existing tag from the
list of matching tags:
Or selecting a tag according to namespace by using the drop-down option:
Page 111 of 214
CQ 5.2 WCM
Copyright 1993-2009 Day Management AG
How to Use Tags
15.1.2 The Tag Administration Console
The Tag Administration console can be used to manage your tags and taxonomies.
It shows information about the tags already created for your website, and a count of how often they
are referenced in the website:
From here you can perform various actions on tags and/or namespaces.
Page 112 of 214
CQ 5.2 WCM
Copyright 1993-2009 Day Management AG
How to Use Tags
15.1.2.1 Creating or Editing Tags and Namespaces
1.
2.
Depending on the level you are starting from you can create either a tag or a namespace
using Create:
a.
If you select Tags you can create a namespace:
b.
If you select a namespace (for example Demo) you can create a tag within that
namespace:
In both cases enter a name, title, and description then click Create.
15.1.2.2 Deleting Tags
1.
In the right-hand pane, select the namespace or tag that you want to delete.
2.
Click Delete.
3.
You are asked to confirm the delete action. Click Yes to delete the item.
15.1.2.3 Activating and Deactivating Tags
1.
In the right-hand pane, select the namespace or tag that you want to activate or deactivate.
2.
Click Activate, Activate Tree, or Deactivate as required.
15.1.2.4 List - showing where tags are referenced
List opens a new window showing the paths of all pages using the highlighted tag:
Page 113 of 214
CQ 5.2 WCM
Copyright 1993-2009 Day Management AG
How to Use Tags
15.1.3 Searching for Tags
You can search for tags in both the author and publish environments.
15.1.3.1 Searching for tags with the Search component
The search component covers tags and can be used in both the author and publish environments.
15.1.3.2 Searching for tags with the Content Finder
In the author environment you can use the content finder to search for tags:
1.
Select the Pages tab in the content finder.
2.
Enter the tag you want to search for.
Using the prefix “tags:” limits the search to tags only.
Page 114 of 214
CQ 5.2 WCM
Copyright 1993-2009 Day Management AG
How to Use Tags
Page 115 of 214
CQ 5.2 WCM
Copyright 1993-2009 Day Management AG
16 How to use Social Collaboration
16.1 How to Blog with CQ
16.1.1 Creating a new blog
To create a new blog:
1.
Open the CQ WCM siteadmin.
2.
Select the location where you want to create your blog.
3.
Select the New... menu (click the arrow next to New...).
4.
Select New Page....
5.
Enter a Title for your new page and the Name if you do not want the default.
6.
Select the Blog Template.
7.
Click Create to create the new blog page. A new page looks as follows:
16.1.2 Posting a new blog entry
To post a new entry to your blog:
1.
Open your blog page:
Page 116 of 214
CQ 5.2 WCM
Copyright 1993-2009 Day Management AG
How to use Social Collaboration
2.
Click the link here to open the dialog:
Here you can enter a heading and body text. Assigning a category (tag) to this entry lists this
entry under the appropriate category.
Page 117 of 214
CQ 5.2 WCM
Copyright 1993-2009 Day Management AG
How to use Social Collaboration
3.
Click Submit Entry to save the blog entry. It appears as follows:
16.1.3 Adding quick reference links to your blog
To add quick reference links to your blog overview page:
1.
Open the blog overview page.
2.
From the sidekick you can add various quick reference components to the right column:
Blog Archive
Allows quick reference to blog entries according to their dates of entry.
Blog Categories
Allows quick reference to blog entries according to their categories (tags).
Page 118 of 214
CQ 5.2 WCM
Copyright 1993-2009 Day Management AG
How to use Social Collaboration
Blog Search
A search box that allows the user to search all blog entries.
Tag Cloud
Displays tags; either from the entire website or the current page.
16.1.4 Importing RSS Feeds
You can import RSS feeds into your blog in CQ WCM by using the polling importer.
To import blogs from other websites into your blog:
1.
Navigate to the Tools window.
2.
In the Tools window, expand the Importers folder and double-click the Feed Importer.
Page 119 of 214
CQ 5.2 WCM
Copyright 1993-2009 Day Management AG
How to use Social Collaboration
3.
Click Add to open the New Importer Configuration window.
4.
In the Feed URL, enter the source url for the blog data. The format is rss:<URL_OF_BLOG>,
for example, rss:http://blog.nameofblog.com/feed.xml.
5.
In the Import to Path field, add the path where the imported blog should be stored, such
as /content/blogs/myblogs.
6.
In the Update Interval in Seconds field, enter a time in seconds. The minimum is 300
seconds. The first import of blog information happens after the time you specify (you do not
see content import until after the specified time).
Note
The minimum can be reconfigured in the OSGi interface to less than 300 seconds,
but reconfiguring the minimum is only recommended for testing purposes.
Page 120 of 214
CQ 5.2 WCM
Copyright 1993-2009 Day Management AG
How to use Social Collaboration
7.
Click OK. Your import configuration is stored.
8.
Navigate to your blog. After the specified interval, imported data appears on the blog.
16.2 Managing the Social Collaboration Profiles
To use the social collaboration features, users need to register for an account, then log in so that
they:
• have an identity to be used for communication with other website users
• can configure specific pages to their own requirements
16.2.1 Registering and editing a user profile
When users want to use the social collaboration functionality with CQ, they must register:
1.
Users log in using the Login option on the toolbar:
2.
This provides them with the following fields for registering the basic details required:
3.
Once registered, users can edit their profiles:
Page 121 of 214
CQ 5.2 WCM
Copyright 1993-2009 Day Management AG
How to use Social Collaboration
16.2.2 Finding the profiles in CRX
When a visitor registers for a new social collaboration profile, it is saved in CRX:
•
The profile can be found in CRX under /home/users:
Page 122 of 214
CQ 5.2 WCM
Copyright 1993-2009 Day Management AG
17 How to import offline documents
17.1 How to import documents generated offline
The offline importer allows you to import documents generated offline. Currently documents
generated with the following tools are supported:
• Microsoft Word
To import a document use the following steps:
1.
Click the Tools tab in CQ.
2.
Click Importers in the left pane to open the folder.
3.
Double-click Offline Importer in either the left or right pane.The following dialog opens:
4.
Use the Browse... button to select the Word Document you want to import into CQ.
5.
Select the site navigator
to select the Path to the node at which point this document should be imported.
6.
If necessary, you can change the components to be used for the various paragraph
definitions. Choose from a list of available components from the drop down lists.
7.
Click Import to start the import.
8.
Return to the wcm/site admin and navigate to the location you specified. Under the specified
page you can see the new pages generated from the imported document. You can now edit
the content directly within CQ.
Page 123 of 214
CQ 5.2 WCM
Copyright 1993-2009 Day Management AG
18 Validating External Links
18.1 How to validate external links
An external link checker is provided within CQ. The link checker:
• scans all content pages
• generates a list of all valid and invalid links
• marks invalid links as broken in situ on the individual content pages
To use the external link checker:
1.
Access the Tools tab within CQ.
2.
Double-click on External Link Checker (either the right or left pane). A list of all
links is generated.
3.
You can highlight a specific link then select Check for the link to be validated:
Information such as:
• status of the link
• URL
• time since the link was last validated
• time since the link was last available
• time since the link was last accessed
is displayed.
4.
On the individual content pages any invalid links will now be shown as broken:
Page 124 of 214
CQ 5.2 WCM
Copyright 1993-2009 Day Management AG
19 How to Find Logs and Audit
Entries
19.1 Working with Audit Records and Log Files
Auditing records and log files relating to CQ5 can be found at various locations. The following is
provided to give you a overview of what you can find where.
Note
As CQ WCM is based on CRX, some of the log files listed below are actually generated
by CRX. Please see the CRX documentation for full details of these.
19.1.1 Finding the Audit Records
Audit records are held to provide a record of who did what when. Different audit records are
generated for both CQ WCM and OSGi events.
19.1.1.1 CQ WCM Audit records from within the siteadmin
1.
Open a page.
2.
From the sidekick you can select the
tab, then double-click on Audit Log...
3.
A new window will open showing the list of audit records for the current page.
4.
Click OK when you want to close the window.
19.1.1.2 CQ WCM Auditing records within the repository
Within the /var/audit folder, audit records are held according to the resource. You can drill
down until you can see the individual records and the information they contain.
Note
These entries hold the same information as displayed above in the siteadmin.
Page 125 of 214
CQ 5.2 WCM
Copyright 1993-2009 Day Management AG
How to Find Logs and Audit Entries
19.1.1.3 OSGi Audit records from within the Felix console
OSGi events also generate audit records which can be seen from the Audit Log tab in the Felix
Web Management Console:
19.1.2 Finding the Log Files
Various log files are held on the file server where you installed CQ5:
• <cq-installation-dir>\crx-quickstart\launchpad\logs
• error.log
Error messages, of varying levels of severity, related to the CRX Quick launchpad are
registered here.
• <cq-installation-dir>\crx-quickstart\logs
• access.log
All access requests to CQ WCM and the repository are registered here.
• error.log
Error messages (of varying levels of severity) are registered here.
• request.log
Each access request is registered here together with the response.
• server.log
All actions made by the server are registered here.
• stderr.log
Holds error messages, again of varying levels of severity, generated during startup.
• stdout.log
Holds logging messages indicating events during startup.
Page 126 of 214
CQ 5.2 WCM
Copyright 1993-2009 Day Management AG
How to Find Logs and Audit Entries
• <cq-installation-dir>\crx-quickstart\logs\crx
• error.log
Error messages (of varying levels of severity) related to the repository are registered here.
• translation.log
Translation journaling.
• <cq-installation-dir>\crx-quickstart\repository\
• revision.log
Revision journaling information.
• <cq-installation-dir>\crx-quickstart\repository\repository\index
• redo.log
Redo event journaling.
• <cq-installation-dir>\crx-quickstart\repository\shared\journal
• journal.log<.x>
Event journaling on the repository; multiple versions.
• <cq-installation-dir>\crx-quickstart\repository\workspaces\<workspace>
\index
• indexing_queue.log
Index journaling.
• redo.log
Redo event journaling.
• <cq-installation-dir>\crx-quickstart\server\logs
• access.log
All access requests to CQ WCM and the repository are registered here.
• startup.log
Server startup.
19.1.3 Activating the DEBUG Log Level
The default log level is INFO, that is, DEBUG messages are not logged.
To activate DEBUG log level, use the CRX explorer to set the /libs/
sling/config/org.apache.sling.commons.log.LogManager/
org.apache.sling.commons.log.level property to debug.
Caution
Do not leave the log at the DEBUG log level longer than necessary, as it generates a lot
of log entries, thus consuming resources.
A line in the debug file usually starts with DEBUG, and then provides the log level, the installer
action and the log message. For example:
Page 127 of 214
CQ 5.2 WCM
Copyright 1993-2009 Day Management AG
How to Find Logs and Audit Entries
DEBUG 3 WebApp Panel: WebApp successfully deployed
The log levels are as follows:
Table 19.1. Log Levels
0
Fatal error
The action has failed, and the installer cannot proceed.
1
Error
The action has failed. The installation proceeds, but a part of CQ
WCM was not installed correctly and will not work.
2
Warning
The action has succeeded but encountered problems. CQ WCM
may or may not work correctly.
3
Information
The action has succeeded.
19.1.4 Create a Custom Log File
In certain circumstance you may want to create a custom log file. You can do this by:
1.
Open the Apache Felix Web Management Console; for example at http://
localhost:4502/system/console/.
2.
Go to the Configuration page.
3.
Select Sling Logging Writer Configuration from the Factory Configurations
drop down list.
4.
Enter the name of your custom log file; for example, logs/custom.log:
5.
Click Save.
A new entry is now listed in the Configurations drop down list.
Page 128 of 214
CQ 5.2 WCM
Copyright 1993-2009 Day Management AG
How to Find Logs and Audit Entries
6.
Select Sling Logging Logger Configuration from the Factory Configurations
drop down list.
7.
Configure the following:
a.
Set the Log Level; for example Debug.
b.
Enter the name of your Log File - the same as earlier; in this example logs/
custom.log.
c.
Set the Categories to com.day.cq.wcm.foundation.
8.
Click Save.
9.
Restart CQ.
Note
This is necessary to ensure that any static loggers used access the new
configuration.
10. Read your new log file with your chosen tool.
Page 129 of 214
CQ 5.2 WCM
Copyright 1993-2009 Day Management AG
20 How to monitor, and configure,
your Replication Agents
Replication agents are central to CQ as they are used to publish (activate) content from one
environment to another, often from an author to a publish environment. They are also used to
explicitly flush content from the Dispatcher cache.
20.1 How to monitor your Replication Agents
To monitor a replication agent:
1.
Access the Tools tab in CQ.
2.
Click Replication.
3.
Double-click the link to agents for the appropriate environment (either the left or the right
pane); for example Agents on author.The resulting window shows an overview of all your
replication agents for the author environment, including their target and status:
4.
Click the appropriate agent name (which is a link) to show detailed information on that agent:
Page 130 of 214
CQ 5.2 WCM
Copyright 1993-2009 Day Management AG
How to monitor, and configure, your Replication Agents
Here you can:
• See whether the agent is enabled.
• See the target of any replications.
• See whether the replication queue is currently active, and if so any items in the queue.
• View Log to access the log of any actions by the replication agent.
• Test Connection to the target instance.
• Refresh or Clear the display of queue entries.
• Force Retry on any queue items if required.
20.2 How to configure your Replication Agents
20.2.1 Configuring your Replication Agents from wcm/siteadmin
From siteadmin in the author environment you can configure replication agents that reside in
either the author environment (Agents on author) or the publish environment (Agents
on publish). The following procedures illustrate the configuration of an agent in the author
environment, but can be used for both.
To configure a replication agent from siteadmin:
1.
Access the Tools tab in CQ.
2.
Click Replication (left pane to open the folder).
3.
Double-click Agents on author (either the left or the right pane).
Page 131 of 214
CQ 5.2 WCM
Copyright 1993-2009 Day Management AG
How to monitor, and configure, your Replication Agents
4.
Click the appropriate agent name (which is a link) to show detailed information on that agent.
5.
Click Edit to open the configuration dialog:
6.
The values provided should be sufficient for a default installation. If you make changes then
click OK to save them (see the section called “Replication Agents - Configuration Parameters”
for more details of the individual parameters).
20.2.2 Configuring your Replication Agents from the CRX Explorer
Various parameters of your replication agents can be configured using the CRX Explorer.
If you navigate to /etc/replication you can see the following three nodes:
• agents.author
• agents.publish
• treeactivation
The two agents hold configuration information about the appropriate environment, and are only
active when that environment is running. For example, agents.publish will only be used in the
publish environment. The following screenshot shows the publish agent in the author environment,
as included with CQ WCM:
Page 132 of 214
CQ 5.2 WCM
Copyright 1993-2009 Day Management AG
How to monitor, and configure, your Replication Agents
20.2.3 Configuring Reverse Replication
Reverse replication is used to get user content generated on a publish instance back to an author
instance. This is commonly used for moderated forums, blogs, surveys and registration forms,
amongst others.
For security reasons, most network topologies do not allow connections from the “Demilitarized
Zone” (a subnetwork that exposes the external services to an untrusted network such as the
Internet).
As the publish environment is usually in the DMZ, to get content back to the author environment
the connection must be initiated from the author instance. This is done with:
• an outbox in the publish environment where the content is placed.
• an agent (publish) in the author environment which periodically polls the outbox for new content.
To do this you need:
A reverse replication agent in the author environment
This acts as the active component to collect information from the outbox in the publish
environment:
Page 133 of 214
CQ 5.2 WCM
Copyright 1993-2009 Day Management AG
How to monitor, and configure, your Replication Agents
If you want to use reverse replication then ensure that this agent is activated.
A reverse replication agent in the publish environment (an outbox)
This is the passive element as it acts as an “outbox.” User input is placed here, from where it is
collected by the agent in the author environment.
Page 134 of 214
CQ 5.2 WCM
Copyright 1993-2009 Day Management AG
How to monitor, and configure, your Replication Agents
20.2.4 Configuring Replication for Multiple Publish Instances
Upon installation a default agent is already configured for replication to a publish instance running
on port 4503 of the localhost.
To configure replication for an additional publish instance you need to create, and configure, a new
replication agent:
1.
Log in to the site administration of CQ5 on the author instance.
2.
Open the Tools tab; for example, at http://localhost:4502/libs/wcm/content/
misc.html.
3.
Select Replication, then Agents on author in the left panel.
4.
Select New....
5.
Set the Title and Name, then select Replication Agent.
6.
Click Create to create the new agent.
7.
Double-click the new agent item to open the configuration panel.
8.
Click Edit - the Agent Settings dialog will open - the Serialization Type is already
defined as Default, this must remain so.
a.
b.
In the Settings tab:
i.
Activate Enabled.
ii.
Enter a Description.
iii.
Set the Retry Delay to 60000.
iv.
Leave the Serialization Type as Default.
In the Transport tab:
•
Enter the required URI for the new publish instance; for example, http://
localhost:4504/bin/receive.
You can configure other parameters as required.
9.
Click OK to save the settings.
Tip
You can then test operation by updating, then publishing, a page in the author
environment.
The updates will appear on all publish instances that have been configured as above.
If you encounter any problems, you can check the logs on the author instance.
Depending on the level of detail required you can also set the Log Level to Debug.
using the Agent Settings dialog as above.
20.2.5 Configuring a Dispatcher Flush agent
Default agents are included with the installation. However, certain configuration is still needed and
the same applies if you are defining a new agent:
1.
Log in to the site administration of CQ5 on the author instance.
Page 135 of 214
CQ 5.2 WCM
Copyright 1993-2009 Day Management AG
How to monitor, and configure, your Replication Agents
2.
Open the Tools tab; for example, at http://localhost:4502/libs/wcm/content/
misc.html.
3.
Select Replication, then Agents on publish in the left panel.
4.
Double-click on the Dispatcher Flush item to open the overview.
5.
Click Edit - the Agent Settings dialog will open:
a.
b.
In the Settings tab:
i.
Activate Enabled.
ii.
Enter a Description.
iii.
Leave the Serialization Type as Dispatcher Flush, or set it as such if
creating a new agent.
In the Transport tab:
•
Enter the required URI for the new publish instance; for example, http://
localhost:80/dispatcher/invalidate.cache.
You can configure other parameters as required.
6.
Click OK to save the changes.
7.
Return to the Tools tab, from here you can Activate the Dispatcher Flush agent
(Agents on publish).
Note
The Dispatcher Flush replication agent is not active on author. You can access
the same page in the publish environment by using the equivalent URI; for example,
http://localhost:4503/etc/replication/agents.publish/flush.html.
Page 136 of 214
CQ 5.2 WCM
Copyright 1993-2009 Day Management AG
21 Troubleshooting CQ WCM
The following section covers some issues that you might encounter when using CQ, together with
suggestions on how to troubleshoot them.
As this section covers many aspects of CQ WCM it is targeted as various roles.
21.1 Troubleshooting scenarios by Role(s)
The following table gives an overview of problems you may need to troubleshoot according to the
role (most probably) impacted:
Table 21.1. Troubleshooting scenarios by Role(s)
Role(s)
Problem
System Administrator
Double-clicking the Quickstart jar does not have any effect or
opens the jar file with another program (for example, archive
manager)
System Administrator
My application running on CRX throws out-of-memory errors
System Administrator
The CQ WCM Welcome screen does not display in the browser
after double-clicking CQ WCM Quickstart
System Administrator
Making a Thread Dump
admin user
System Administrator
Checking for unclosed JCR sessions
admin user
User
Old page version still showing
User
Sidekick not visible
User
Find & Replace - not all instances of the find term on a page
are replaced
21.2 Troubleshooting Scenarios
The following sections lists some common troubleshooting scenarios.
21.2.1 Common Installation Issues
The following section describes some installation issues and their solutions.
21.2.1.1 Double-clicking the Quickstart jar does not have any effect or opens
the jar file with another program (for example, archive manager)
This usually indicates a problem with the way your operating system's desktop environment is
configured to open files with extension .jar. It may also indicate that you do not have Java
installed, or that you are using an unsupported version of Java.
As jar files use the ubiquitous ZIP format, some of the archiving programs may automatically
configure the desktop to open jar files as archive files.
To troubleshoot, do the following:
Page 137 of 214
CQ 5.2 WCM
Copyright 1993-2009 Day Management AG
Troubleshooting CQ WCM
• Double check that you have at least Java version 1.5 installed.
• Try a context menu (usually right-mouse click) on the CQ WCM Quickstart, and select "Open
With...."
• Check if Java or Sun Java is listed, and try to run CQ WCM with it. If you have multiple Java
versions installed, select the supported one.
Note
If you succeed with this step, and your operating systems offers an option to always
use the selected program to run the .jar files, select it. Double-clicking should work from
now on.
• Sometimes reinstalling the supported Java version helps restore the correct association.
• You can always run CRX using the command line or start/stop scripts as described earlier in this
document.
21.2.1.2 My application running on CRX throws out-of-memory errors
CRX itself has a very low memory footprint. If the application running within CRX has bigger
memory requirements or requests memory-heavy operations (for example, large transactions), the
JVM instance where CRX runs needs to be started with appropriate memory settings. Use Java
command options to define memory settings of the JVM (for example, java -Xmx512m -jar crx*.jar
to set heapsize to 512MB).
Note
Specify the memory setting option while starting CQ WCM from the command line. The
CQ WCM start/stop scripts or custom scripts for managing CQ WCM startup can also be
modified to define the required memory settings.
21.2.1.3 The CQ WCM Welcome screen does not display in the browser after
double-clicking CQ WCM Quickstart
In certain situations, the CQ WCM Welcome screens does not automatically display even though
the repository itself is successfully running. This may depend on operating system setup, browser
configuration, or similar factors.
The usual symptom is that the CQ WCM Quickstart window displays "CQ WCM starting up, waiting
for server startup...." If that message displays for a relatively long time, enter the CQ WCM URL
into the browser window manually, using the default 4502 port, or the port on which the instance is
running: http://localhost:4502/.
Also, logs may reveal the reason for the browser not starting.
Sometimes, the CQ WCM Quickstart window has the message "CQ WCM running on http://
localhost:port/" and the browser does not start automatically. In this case, click on the URL in the
CQ WCM Quickstart window (it is a hyperlink) or manually enter the URL in the browser.
If everything else fails, check the logs to find out what has happened.
21.2.2 Possible Issues with the GUI
21.2.2.1 Old page version still showing
You have made changes to the publish site, but the old version of the page is still being shown.
There are various possibilities here:
Page 138 of 214
CQ 5.2 WCM
Copyright 1993-2009 Day Management AG
Troubleshooting CQ WCM
• Clear the cache in your local browser and try to reaccess your page.
• Add “?” to the end of the page URL. For example, instead of
• http://home.html
enter:
• http://home.html?
This will request the page directly from CQ5 and bypass the Dispatcher. If you receive the
updated page, it is an indication that you should clear the Dispatcher cache.
21.2.2.2 Sidekick not visible
In rare cases you might have managed to position the header of your sidekick outside the scope of
your current window. This means you cannot reposition it again.
Log out from your current session and log back in again.
Sidekick will return to the default position.
21.2.2.3 Find & Replace - not all instances of the find term on a page are
replaced
Find & Replace - not all instances of the find term on a page are replaced.
The capability of Find & Replace depends on how the content is saved, and whether it can be
searched upon.
For example, a blog text is stored in jcr:text property which is not configured to be searched upon.
The default scope for the find and replace servlet covers the following properties:
• jcr:title
• jcr:description
• jcr:text
• text
This can be changed using the Apache Felix Web Management Console (for
example, at http://localhost:4502/system/console/configMgr) for
com.day.cq.wcm.core.impl.servlets.FindReplaceServlet.
21.2.3 Methods for Troubleshooting Analysis
21.2.3.1 Making a Thread Dump
The thread dump is a list of all the Java threads that are currently active. If CQ5 does not respond
properly, the thread dump can help you identify deadlocks or other problems.
21.2.3.1.1 Using Sling Thread Dumper
1.
Open the Apache Felix Web Management Console; for example at http://
localhost:4502/system/console/.
2.
Go to the Threads page:
Page 139 of 214
CQ 5.2 WCM
Copyright 1993-2009 Day Management AG
Troubleshooting CQ WCM
21.2.3.1.2 Using javadump
1.
Find the PID (process id) of your Java instance.
2.
Run:
javadump.exe <pid>
3.
Open <cq-installation-dir>/crx-quickstart/server/log/startup.log. This
will show the thread dump.
21.2.3.1.3 Using jstack (command line)
1.
Find the PID (process id) of the CQ Java instance.
For example, you can use ps -ef or jps.
2.
Run:
jstack <pid>
3.
This will show the thread dump.
21.2.3.2 Checking for unclosed JCR sessions
When functionality is developed for CQ WCM, JCR Sessions may be opened (comparable to
opening a database connection). If the opened sessions are never closed, your system may
experience following symptoms: • The system gets slower and slower Miscellaneous • You have
a lot of "CacheManager: resizeAll" entries in the log file (the number behind size=... is the number
of caches; each sessions opens a few caches) • From time to time the system runs out of memory
(after a few hours, days, or weeks - depending on the severity)
• The system becomes slower.
• You can see a lot of CacheManager: resizeAll entries in the log file; the following number
(size=<x>) shows the number of caches, each sessions opens several caches.
Page 140 of 214
CQ 5.2 WCM
Copyright 1993-2009 Day Management AG
Troubleshooting CQ WCM
• From time to time the system runs out of memory (after a few hours, days, or weeks - depending
on the severity).
Unfortunately, unclosed sessions are not covered by garbage collection. To find out if there are any
unclosed sessions, first run:
jps -l
This will show you the process id of all Java processes.
Then run:
jmap -histo <pid> | grep "CRXSessionImpl"
For the appropriate process (<pid>).
The second column is the instance count, showing the number of sessions currently open (not
closed) and currently are in memory. If the number is higher than 100 then you should investigate
further.
21.2.3.2.1 Locating the code that didn't close JCR sessions
To analyze where the sessions were started (for CRX 1.4.x) start CQ / CRX with the following JVM
Option:
java -Dcrx.debug.sessions=true ...
Then analyze the startup.log file with OpenSessions.java:
javac OpenSessions.java
java OpenSessions <installation_path>/crx-quickstart/server/logs/startup.log | sort >
test.txt
This will generate a new file test.txt that contains the stack trace of unclosed sessions, sorted
by stack trace content. Each stack trace is one line, and 'compressed' (repeated prefixes are
removed). The session id is at the end of the line. For example:
com.day.crx.j2ee.JCRExplorerServlet.login(JCRExplorerServlet.java:521)
ResourceServlet.spoolResource(ResourceServlet.java:148)
java.lang.Thread.run(Thread.java:595): session# 10023
The above example shows that session #10023 was not closed. With this information you can find
the corresponding stacktrace in the startup.log.
21.2.3.3 Using the Apache Felix Web Management Console
The status of the OSGi bundles can also give an early indication of possible issues.
1.
Open the Apache Felix Web Management Console; for example at http://
localhost:4502/system/console/.
2.
Go to the Bundles page:
Page 141 of 214
CQ 5.2 WCM
Copyright 1993-2009 Day Management AG
Troubleshooting CQ WCM
3.
Check:
• the Status of the bundles. If any are Inactive or Unsatisfied, then try to stop
and restart
the bundle. If the issue persists then you may need to investigate further using other
methods.
• whether any of the bundles have missing dependencies. Such details can be seen by
clicking on the individual bundle Name, which is a link (the following example does not have
any issues):
Page 142 of 214
CQ 5.2 WCM
Copyright 1993-2009 Day Management AG
Troubleshooting CQ WCM
Page 143 of 214
CQ 5.2 WCM
Copyright 1993-2009 Day Management AG
22 How to Backup your CQ WCM
instance
It is good practice to take backups of:
• your software installation - before/after significant changes in configuration
• the content held within the repository - regular
22.1 Backing up your software installation
After installation, or significant changes in the configuration, it is advisable to take a backup of your
software installation.
To do this you need to take a backup of your repository then:
• stop CQ WCM
• backup the entire <cq-installation-dir> from your file system
Caution
If you are operating a cluster then the “shared” folder might be in a different location and
will also need to be backed-up. See the section called “How to Set Up a Cluster in CQ”
for information about configuring a cluster.
Caution
If you are operating a third party application server, then additional folders may be in a
different location and also need to be backed-up. See the section called “How to install
CQ5 with an Application Server” for information about installing application servers.
Caution
Incremental backups should not be used with TarPM as file names can change.
Note
Disk mirroring can also be used as a backup mechanism.
22.2 Backing up your repository
The Backup and Restore section of the CRX documentation covers all issues related to backups of
the CRX repository. Both on- and/or offline.
For full details of making an online “Hot” backup see Creating an Online Backup.
Page 144 of 214
CQ 5.2 WCM
Copyright 1993-2009 Day Management AG
23 Security Checklists
This section deals with various steps you should take to ensure that your CQ5 installation is
secure.
23.1 Security Checklist for System Administrators
The following actions should be taken, or at least reviewed:
• Change Default Passwords
• Disable WebDAV
• Restrict Access via the Dispatcher
• Check for Cross-Site Scripting (XSS)
23.2 Security Checklist for Power Users
The following actions should be taken, or at least reviewed:
• Change Default Passwords
23.3 Security Checklist for Developers
The following actions should be taken, or at least reviewed:
• Use the user session, not the administrative session
• Check for Cross-Site Scripting (XSS)
23.4 Disable WebDAV
WebDAV should be disabled on the publish environment.
This needs action at two levels:
1.
Reconfigure the CRX webapp:
a.
Open the web.xml of the CRX webapp; this is usually found in <cq-installationdir>/crx-quickstart/server/runtime/0/_crx/WEB-INF.
b.
Comment out the following servlets in the S E R V L E T M A P P I N G section to
effectively disable WebDAV access to the repository:
• Webdav
• JCRWebdavServer
• CqResource
c.
The resulting configuration should look like:
<!-- ====================================================================== -->
<!-- S E R V L E T
M A P P I N G
-->
<!-- ====================================================================== -->
<servlet-mapping>
<servlet-name>NodeTree</servlet-name>
<url-pattern>/ui/nodetree/*</url-pattern>
Page 145 of 214
CQ 5.2 WCM
Copyright 1993-2009 Day Management AG
Security Checklists
</servlet-mapping>
<!--servlet-mapping>
<servlet-name>Webdav</servlet-name>
<url-pattern>/repository/*</url-pattern>
</servlet-mapping-->
<servlet-mapping>
<servlet-name>Export</servlet-name>
<url-pattern>/export/*</url-pattern>
</servlet-mapping>
<!--servlet-mapping>
<servlet-name>JCRWebdavServer</servlet-name>
<url-pattern>/server/*</url-pattern>
</servlet-mapping-->
<!--servlet-mapping>
<servlet-name>CqResource</servlet-name>
<url-pattern>/cqresource/*</url-pattern>
</servlet-mapping-->
<servlet-mapping>
<servlet-name>JCRExplorer</servlet-name>
<url-pattern>/</url-pattern>
</servlet-mapping>
d.
2.
Restart your CQ/CRX instance to make the changes take effect.
Configure CQ by stopping the appropriate bundle:
a.
Connect to the Felix Management Console running on http://<host>:<port>/
system/console; for example http://localhost:4503/system/console/
bundles.
b.
In the list of bundles, find the bundle named Sling - Simple WebDAV Access to
repositories.
c.
Click the stop button
to stop this bundle. A restart is not required.
23.5 Restrict Access via the Dispatcher
By configuring the Dispatcher you should restrict access so that only the following are available to
external visitors:
• /content - Site content
• /etc - Miscellaneous content such as designs
The following should be entered in the configuration file dispatcher.any:
# only handle the requests in the following acl. default is 'none'
# the glob pattern is matched against the first request line
/filter
{
/0001
{
/glob "*"
/type "deny"
}
/0002
{
/glob "* /content[./]"
/type "allow"
}
/0003
{
/glob "* /etc[./]"
Page 146 of 214
CQ 5.2 WCM
Copyright 1993-2009 Day Management AG
Security Checklists
/type "allow"
}
Note
This configuration includes the following restrictions:
1. Restricts access to the Servlet Engine Administration /admin
2. Restricts access to the Sling Console /system
3. Restricts access to CRX /crx
4. Restricts access to the following application specific folders:
• /apps – Application data
• /libs – CQ5 Library
• /var – var folder
• /etc – Miscellaneous folder
• /home – User’s home folder
5. Restricts access to /tmp
6. Denies POST requests in case forms are not used.
23.6 Check for Cross-Site Scripting (XSS)
Cross-site scripting (XSS) allows attackers to inject code into web pages viewed by other users.
This security vulnerability can be exploited by malicious web users to bypass access controls.
Warning
CQ5 example code is not protected against such attacks.
23.7 Change Default Passwords
Day strongly recommends that you change the passwords for the following (privileged) admin
accounts (on all instances) after installation:
1.
The CQ admin account.
Important
The CQ admin account and the CRX admin accounts are actually one and the
same. So once you have changed the password for the “CQ admin” account, you
will need to use the new password when accessing CRX.
Important
To change the password for the CQ / CRX admin account, you need to make
changes in both CRX and the OSGi Console. See the section called “Changing the
CQ admin password in the CRX console” and the section called “Changing the CQ
admin password in the OSGi Apache Felix console”.
2.
The CQSE (CommuniquГ© Servlet Engine) admin account.
3.
The Apache Felix Web Management Console admin password.
Page 147 of 214
CQ 5.2 WCM
Copyright 1993-2009 Day Management AG
Security Checklists
Note
Further actions are described in the table the section called “Default Users and Groups”,
which gives an overview of the default users and groups included in the standard
installation.
23.7.1 Changing the CQ admin password
To change the password for the CQ admin account, you need to make changes in both CRX and
the OSGi Console.
23.7.1.1 Changing the CQ admin password in the CRX console
To change the admin account in the CRX console:
1.
Navigate to http://<server>:<port_number>/crx to open the CRX console.
2.
Log in as admin to the crx.system workspace.
3.
Open the Content Explorer and navigate to the admin user and select it.
4.
In the Security menu, select Set User Password. A Set User Password window
opens.
Page 148 of 214
CQ 5.2 WCM
Copyright 1993-2009 Day Management AG
Security Checklists
5.
Enter the new password and re-enter to confirm and click OK to save your changes.
Note
The new password is instantly persisted in the repository, a dedicated click on Save
All is not required.
23.7.1.2 Changing the CQ admin password in the OSGi Apache Felix console
To change the admin account in the OSGi Apache Felix console:
1.
Navigate to http://<server>:<port_number>/system/console/configMgr, and
login as admin, to open Configurations in the Apache Felix console.
2.
In the Configurations menu, select CRX Sling Client Repository.
Page 149 of 214
CQ 5.2 WCM
Copyright 1993-2009 Day Management AG
Security Checklists
3.
In the Admin password field, change the password to match the one you entered in the CRX
console.
4.
Click Save to save your changes.
23.7.2 Changing the admin password for CQSE
To change the admin account in the CQSE console:
1.
Navigate to http://<server>:<port_number>/admin to open the CRX console.
2.
Log in as admin (the default password is admin).
3.
Select the Change Password tab:
Page 150 of 214
CQ 5.2 WCM
Copyright 1993-2009 Day Management AG
Security Checklists
4.
Enter the Old Password, your New Password, then Confirm the new password.
5.
Click Change to save the new password.
23.7.3 Changing the admin password for the Apache Felix Web Management
Console
To change the admin account in the OSGi Apache Felix console:
1.
Navigate to http://<server>:<port_number>/system/console/configMgr, and
login as admin, to open Configurations in the Apache Felix console.
2.
In the Configurations menu, select Apache Felix OSGi Management Console.
3.
In the Password field, change the password.
4.
Click Save to save your changes.
23.8 Use the user session, not the administrative session
This means you should use:
slingRequest.getResourceResolver().adaptTo(Session.class);
Page 151 of 214
CQ 5.2 WCM
Copyright 1993-2009 Day Management AG
24 Defining Performance Tests on
Your Publish Environment
24.1 Introduction
Performance is of prime importance to your publish environment. Therefore, you need to
carefully plan and analyze the performance tests you will make for the publish environment while
implementing your project.
This section aims to give a standardized overview of the issues involved with defining a Test
Concept specifically for performance tests on your publish environment. This is primarily of interest
to QA engineers, project managers and system administrators.
24.2 Phases to be used
This document covers a standardized approach to performance tests for a CQ5 application on the
Publish environment. This involves the following 5 phases (which will be covered in more detail in
the next 5 sections):
1. Verification of Knowledge
2. Definition of Scope
3. Definition of Performance Goals
4. Test Methodologies
5. Optimization
Controlling is an additional, all-encompassing process - necessary but not limited to testing.
Figure 24.1. The 5 Phases of Performance Testing on your Publish
Environment
24.3 Verification of Knowledge
A first step is to document the basis information which you need to know before you can start
testing:
Page 152 of 214
CQ 5.2 WCM
Copyright 1993-2009 Day Management AG
Defining Performance Tests on Your Publish Environment
• the architecture of your test environment
• an application map detailing the internal elements which will need testing (both in isolation and
combination)
24.3.1 Test Architecture
You should clearly document the architecture of the test environment being used for your
performance testing.
You will need a reproduction of your planned production Publish environment, together with
Dispatcher and Load Balancer.
24.3.2 Application Map
To get a clear overview you can create a map of the entire application (you may well have this from
tests on the Author environment).
A diagram representation of the internal elements of the application, can give an overview of the
testing requirements; with color-coding it can also act as a basis for reporting.
The example below illustrates the level of detail appropriate:
Figure 24.2. Verification Map
24.4 Scope Definition
An application will usually have a selection of use cases. Some will be very important, others less
so.
To focus the scope of the performance testing on publish, we recommend that you define the:
• most important business use cases
• most critical technical use cases
The number of use cases is up to you, but it should be limited to an easily manageable number
(e.g. between 5 to 10).
Once the key use cases have been selected, then the key performance indicators (KPI) and the
tools used to measure them can be defined for each case. Examples of common KPIs include:
Page 153 of 214
CQ 5.2 WCM
Copyright 1993-2009 Day Management AG
Defining Performance Tests on Your Publish Environment
• End to end response time
• Servlet response time
• Response time for a single component
• Response time for the services
• Number of idle threads in the thread pool
• Number of free connections
• System resources such as CPU and I/O access
24.5 Test Methodologies
This concept has 4 scenarios used for defining and testing the performance goals:
1. Single component tests
2. Combined component tests
3. Going Live scenario
4. Error scenarios
Based on the following principles.
Component Breakpoints
Each component has a specific breaking point when related to performance. This means
that a component can show good performance until a specific point is reached, after which
performance will degrade rapidly.
To get a full overview of the application, you must first verify your components to determine
when the breakpoint of each is reached.
To find the breakpoint you can perform a load test where, over a period of time, you increase
the number of users to create an increasing load. By monitoring this load, and the response of
the components, you will encounter specific performance behavior when the breaking point of
the component is reached. The point can be qualified by the number of concurrent transactions
per second, together with the number of concurrent users (if the component is sensitive to this
KPI).
This information can then act as a benchmark for improvements, indicate the efficiency of the
measures being used, and help define test scenarios.
Transactions
The term transaction is used to represent the request of a complete web page, including the
page itself and all subsequent calls; i.e. the page request, any AJAX calls, images and other
objects.
Request Drill Down
To fully analyze each request you can represent each element of the call stack, then total the
average processing time for each.
24.6 Defining the Performance Goals
Once the scope, and related KPIs have been defined, the specific performance goals can be set.
This involves devising test scenarios, together with target values.
Page 154 of 214
CQ 5.2 WCM
Copyright 1993-2009 Day Management AG
Defining Performance Tests on Your Publish Environment
You will need to test performance under both average and peak conditions. In addition, you will
need Going Live scenario tests to ensure that you can cater for increased interest in your website
when it is first made available.
Any experience, or statistics which you may have collected from an existing website can also be
useful in determining future goals; for example top traffic from your live website.
Note
As already mentioned, performance is of prime importance to a CQ5 project. Therefore
the goals (for both individual components and scenarios) should be defined at the
beginning of the project and verified during the implementation phase.
See also the Target Metrics section in the Project Manager Guide.
24.6.1 Single Component Tests
Critical components will need to be tested - under both average and peak conditions.
In both cases, you can define the expected number of transactions per second when a predefined
number of users are using the system.
Table 24.1. Example - Single Component Test
Component
Homepage Single User
Homepage 100 Users
Test Type
#Users
Tx/sec
(Expected)
Average
1
1
Peak
1
3
Average
100
3
Peak
100
3
Tx/sec
(Tested)
Description
24.6.2 Combined Component Tests
Testing the components in combination gives a closer reflection of the applications behavior. Again
average and peak conditions must be tested.
Table 24.2. Example - Combined Component Tests
Scenario
Component
Mixed average Homepage
Mixed peak
#Users
Tx/sec
(Expected)
10
1
Search
10
1
News
10
2
Events
10
1
Activations
10
3
Homepage
100
5
Search
50
5
News
100
10
Events
100
10
Activations
20
20
Page 155 of 214
Tx/sec
(Tested)
Description
Simulation of author
behavior.
Simulation of author
behavior.
CQ 5.2 WCM
Copyright 1993-2009 Day Management AG
Defining Performance Tests on Your Publish Environment
24.6.3 Going Live Tests
During the first few days after your website is made available, you can expect an increased level
of interest. This will probably be even greater than the peak values you have been testing for. It
is strongly recommended to test Going Live scenarios to ensure that the system can cater for this
situation.
Table 24.3. Example - Going Live Tests
Scenario
Going Live peak
Test Type
#Users
Tx/sec
(Expected)
Homepage
200
20
Search
100
10
News
200
20
Events
200
20
Activations
20
20
Tx/sec
(Tested)
Description
Simulation
of author
behavior.
24.6.4 Error Tests
Error scenarios must also be tested to ensure that the system reacts correctly and appropriately.
Not only in how the error itself is handled, but the impact it may have on performance. For
example:
• what happens when the user tries to input an invalid search term in the search box
• what happens when the search term is so general that it returns an excessive number of results
When devising these tests it should be remembered that not all scenarios will occur regularly.
However, their impact on the entire system is important.
Table 24.4. Example - Error Scenario Tests
Error
Scenario
Search
component
overload
Error Type
#Users
Tx/sec
(Expected)
Tx/sec
(Tested)
Description
Search on global
wildcard (asterisk)
10
1
Only *** are
searched.
Stop word
20
2
Searching for a
stop word.
Empty string
10
1
Searching
for an empty
string.
Special characters
10
1
Searching
for special
characters.
24.6.5 Endurance Tests
Certain issues will only be encountered after the system has been running for a continued period of
time; be that either hours or even days. An endurance test is used to test an constant average load
over a required period of time. Any performance degradation can then be analyzed.
Page 156 of 214
CQ 5.2 WCM
Copyright 1993-2009 Day Management AG
Defining Performance Tests on Your Publish Environment
Table 24.5. Example - Endurance Tests
Scenario
Test Type
Endurance test Homepage
(72 hours)
#Users
Tx/sec
(Expected)
10
1
Search
10
1
News
20
2
Events
10
1
Activations
1
3
Tx/sec
(Tested)
Description
Simulation of author
behavior.
24.7 Optimization
In the later stages of implementation you will need to optimize the application to fulfill / maximize
the performance goals.
Any optimizations made must be tested to ensure they have not affected the functionality and
verified with the load tests before being released.
A selection of tools is available to help you with load-generation, performance monitoring and/or
results analysis:
• JMeter
• Load Runner (HP)
• CA Wily Introscope
• Determyne InsideApps
• InfraRED
• Java Interactive Profile
• many more...
After optimization, you will need to test again to confirm the impact.
24.8 Reporting
On-going reporting will be needed to keep everyone informed of the status; as mentioned
previously with color-coding the Architecture Map can be used for this.
After all tests have been completed you will want to report on:
• any critical errors encountered
• non-critical issues which will still need further investigation
• any assumptions made during testing
• any recommendations to arise from the testing
Page 157 of 214
CQ 5.2 WCM
Copyright 1993-2009 Day Management AG
25 Extending CQ documentation and
Online Help
25.1 How to extend the documentation and online help
Although closely related, there are different methods involved, depending on what your endproduct is to be:
25.1.1 To extend the online help delivered with CQ
1.
Click the Tools tab.
2.
In the left pane, select Custom Documentation.
3.
From the top menu, click the arrow next to New... then select New Page:
4.
Enter a Title for the new DocBook element and a Name if you do not want the default.
5.
Select a template corresponding to the DocBook element you want to create.
6.
Click Create to create the page.
7.
Double-click the page to open it for editing using the available components:
Page 158 of 214
CQ 5.2 WCM
Copyright 1993-2009 Day Management AG
Extending CQ documentation and Online Help
Note
Ensure that the page is in Edit mode. This is shown by the Edit/View toggle link
at the top right. You are in Edit mode when the link reads View (as it switches to
View mode).
Or from within the Online Help browser:
To generate new content:
Page 159 of 214
CQ 5.2 WCM
Copyright 1993-2009 Day Management AG
Extending CQ documentation and Online Help
Important
The pages containing the online help must not be published (activated) as they contain
proprietary information that is the property of Day.
Page 160 of 214
CQ 5.2 WCM
Copyright 1993-2009 Day Management AG
26 How to Create a Fully Featured
Internet Website
How to Create a Fully Featured Internet Website
Page 161 of 214
CQ 5.2 WCM
Copyright 1993-2009 Day Management AG
27 How to Set Up the Development
Environment with Eclipse
27.1 How to Set Up the Development Environment with Eclipse
This document describes the process of setting up a local development environment for a simple
CQ5 project with Eclipse. It then describes how to integrate logic into the project through Java
coding and JSP scripting. Lastly, it points to open source software to enable collaborative and
automated developing.
The setup described here is an alternative among others and may vary from project to project.
The local development environment involves:
• A CQ5 installation that will act as your local environment.
• CRX Explorer within the CQ5 instance to create and edit nodes and properties within the CRX
repository.
• FileVault (VLT), a Day developed utility that maps the CRX repository to your file system.
• Eclipse to edit the project source on your local file system.
• Apache Maven to run local snapshot builds.
27.1.1 Creating the Project Structure in CQ5
This section describes the creation of a simple project structure in CQ5:
1.
Install CQ5 on your machine. Please refer to the section called “Installing a CQ WCM
Instance - Generic Procedure” for the detailed procedure. In the current context, CQ5 runs
locally on port 4502.
If already installed then ensure it is running and connect.
2.
3.
In the CRX Explorer, create the project structure:
1.
Under the /apps folder, create the nt:folder myApp.
2.
Under the myApp folder, create the nt:folder components.
3.
Under the myApp folder, create the nt:folder templates.
4.
Under the myApp folder, create the nt:folder install.
In your browser, navigate to the Tools tab. Under designs, create the design page of your
application:
• Title: My Application Design Page.
• Name: myApp.
• Template: Design Page Template.
27.1.2 Installing FileVault (VLT)
FileVault (VLT) is a tool developed by Day that maps the content of a CRX instance to your
file system. The VLT tool has similar functionalities to those of an SVN client, providing normal
check in, check out and management operations, as well as configuration options for flexible
representation of the project content.
Page 162 of 214
CQ 5.2 WCM
Copyright 1993-2009 Day Management AG
How to Set Up the Development Environment with Eclipse
To install VLT, follow the steps:
1.
In your file system, go to <cq-installation-dir>/crx-quickstart/opt/filevault.
The build is available in both tgz and zip formats.
2.
Extract the archive.
3.
Add <cq-installation-dir>/crx-quickstart/opt/filevault/vault-cli<version>/bin to your environment PATH so that the command files vlt or vlt.bat are
accessed as appropriate. For example, <cq-installation-dir>/crx-quickstart/
opt/filevault/vault-cli-1.1.2/bin
4.
Open a command line shell and execute vlt --help. Make sure it displays the following help
screen:
27.1.3 Installing Eclipse
Eclipse is open source software used to edit the project source locally on your file system. Apache
Maven is also open source software, used to run local snapshot builds: it compiles Java code and
stores the compiled code in a jar file.
In this section, you will install Eclipse and a Maven plugin which embeds the Maven functionality
within Eclipse:
1.
Download Eclipse - select the Eclipse IDE for Java EE Developers option.
2.
Install Eclipse: extract from the downloaded zip file to your destination directory.
3.
Start Eclipse:
4.
a.
Navigate to the directory into which you extracted the contents of the Eclipse installation
zip file. For example C:\Program Files\Eclipse\.
b.
Double-click on eclipse.exe (or eclipse.app) to start Eclipse.
Create a new workspace for your project and name it myApp.
Page 163 of 214
CQ 5.2 WCM
Copyright 1993-2009 Day Management AG
How to Set Up the Development Environment with Eclipse
5.
Install the Maven plugin (m2) from Sonatype. Disable Maven SCM handler for Subclipse
(Optional) and Maven Integration for AJDT (Optional).
6.
After installation it is recommended to restart Eclipse.
27.1.4 Creating the Project Structure in Eclipse
In this section, you will create two Maven projects:
• one called UI (after User Interface) which contains the CQ5 project structure with the JSP scripts.
• the other called Core which contains the Java code (source and compiled). The compiled code is
stored in a jar file.
The advantage of such a structure is that it adds modularity and autonomy to the logic of your
application because each jar file (bundle) can be managed separately.
27.1.4.1 Create the UI Maven Project
To create the UI Maven project, follow the steps:
1.
In Eclipse open the Workbench.
2.
Create the UI Maven project:
1.
In the Menu bar, click File, select New, then Other... .
2.
In the dialog, expand the Maven folder, select Maven Project and click Next.
3.
Check the Create a simple project box and the Use default Workspace
locations box, then click Next.
4.
Define the Maven project:
• Group Id: com.day.cq5.myapp
• Artifact Id: ui
• Name: CQ5 MyApp UI
• Description: This is the UI module
5.
3.
Click Finish.
Set the Java Compiler to version 1.5:
1.
Right-click the ui project, select Properties.
2.
Select Java Compiler and set following properties to 1.5:
• Compiler compliance level
• Generated .class files compatibility
• Source compatibility
4.
3.
Click OK.
4.
In the dialog window, click Yes.
Create the filter.xml file which defines the content that will be exported by VLT:
1.
In Eclipse, navigate to ui/scr/main and create the content folder.
Page 164 of 214
CQ 5.2 WCM
Copyright 1993-2009 Day Management AG
How to Set Up the Development Environment with Eclipse
2.
Under content, create the META-INF folder.
3.
Under META-INF, create the vault folder.
4.
Under vault, create the filter.xml file.
5.
In filter.xml, copy the following code to filter.xml:
<?xml version="1.0" encoding="UTF-8"?>
<!-Defines which repository items are generally included
-->
<workspaceFilter vesion="1.0">
<filter root="/apps/myApp" />
<filter root="/etc/designs/myApp" />
</workspaceFilter>
6.
5.
Save the changes.
Check out the CQ5 content into your ui project with VLT:
1.
From the system command line, navigate to the directory holding your Eclipse
workspace <eclipse>/<workspace>/myApp/ui/src/main/content.
2.
Execute the command: vlt --credentials admin:admin co http://localhost:4502/crx
This command creates the folder jcr_root under <eclipse>/<workspace>/
myApp/ui/src/main/content. This maps to the CRX root (/). Under jcr_root the
following files and folders are created, as defined in filter.xml:
• apps/myApp
• etc/designs/myApp
It also creates two files, config.xml and settings.xml in <eclipse>/
<workspace>/myApp/ui/src/main/content/META-INF/vault. These are used
by VLT.
6.
7.
To enable Eclipse to map the file paths used in the JSP scripts, create a link to the apps
folder under ui:
1.
Right-click ui, select New, then Folder.
2.
In the dialog window, click Advanced and check the Link to folder in the file
system box.
3.
Click Browse, then specify <eclipse>/<workspace>/myApp/ui/src/main/
content/jcr_root/apps.
4.
Click OK.
5.
Click Finish.
To enable Eclipse to identify the Java classes, methods and objects used in the JSP scripts,
export the needed Java libraries from the CQ5 server to your file system and reference them
in the ui project.
In this example, you will reference the following libraries:
• libs/cq/install stored in the CQ5 server
• libs/sling/install stored in the CQ5 server
Page 165 of 214
CQ 5.2 WCM
Copyright 1993-2009 Day Management AG
How to Set Up the Development Environment with Eclipse
• libs/wcm/install stored in the CQ5 server
• <cq-installation-dir>/crx-quickstart/server/lib/container stored in
your file system
Proceed as follows:
1.
In your file system, create a CQ5 libraries folder called cq5libs. This folder can be
created anywhere.
2.
Under cq5libs, create the folders: cq, sling and wcm.
3.
From the system command line go to .../cq5libs/cq and execute vlt co http://
localhost:4502/crx /libs/cq/install . to export the libraries stored under /libs/cq/
install from the CQ5 server.
4.
From the system command line go to .../cq5libs/sling and execute vlt co http://
localhost:4502/crx /libs/sling/install . to export the libraries stored under /libs/
sling/install from the CQ5 server.
5.
From the system command line go to .../cq5libs/wcm and execute vlt co http://
localhost:4502/crx /libs/wcm/install . to export the libraries stored under /libs/wcm/
install from the CQ5 server.
6.
In Eclipse, right-click the ui project, select Build Path, then Configure Build
Path. In the dialog select the Libraries tab.
7.
Click Add External JARS..., navigate to .../cq5libs/cq/jcr_root, select all
the jar files and click Open.
8.
Click Add External JARS..., navigate to .../cq5libs/sling/jcr_root, select
all the jar files and click Open.
9.
Click Add External JARS..., navigate to .../cq5libs/wcm/jcr_root, select all
the jar files and click Open.
10. Click Add External JARS..., navigate to <cq-installation-dir>/crxquickstart/server/lib/container, select all the jar files and click Open.
11. Click OK.
27.1.4.2 Create the Core Maven Project
To create the Core Maven project, follow the steps:
1.
In Eclipse, create the Core Maven project:
1.
In the Menu bar, click File, select New, then Other... .
2.
In the dialog, expand the Maven folder, select Maven Project and click Next.
3.
Check the Create a simple project box and the Use default Workspace
locations box, then click Next.
4.
Define the Maven project:
• Group Id: com.day.cq5.myapp
• Artifact Id: core
• Name: CQ5 MyApp Core
Page 166 of 214
CQ 5.2 WCM
Copyright 1993-2009 Day Management AG
How to Set Up the Development Environment with Eclipse
• Description: This is the Core module
5.
2.
Click Finish.
Add the necessary plugins and dependencies to the core project:
1.
Open the pom.xml file under core.
2.
Copy-paste following code before the </project> tag:
<packaging>bundle</packaging>
<build>
<plugins>
<plugin>
<groupId>org.apache.maven.plugins</groupId>
<artifactId>maven-compiler-plugin</artifactId>
<configuration>
<source>1.5</source>
<target>1.5</target>
</configuration>
</plugin>
<plugin>
<groupId>org.apache.felix</groupId>
<artifactId>maven-bundle-plugin</artifactId>
<version>1.4.3</version>
<extensions>true</extensions>
<configuration>
<instructions>
<Export-Package> com.day.cq5.myapp.*;version=
${pom.version}
</Export-Package>
</instructions>
</configuration>
</plugin>
</plugins>
</build>
<dependencies>
<dependency>
<groupId>com.day.cq.wcm</groupId>
<artifactId>cq-wcm-api</artifactId>
<version>5.1.20</version>
</dependency>
<dependency>
<groupId>com.day.cq</groupId>
<artifactId>cq-commons</artifactId>
<version>5.1.18</version>
</dependency>
<dependency>
<groupId>org.apache.sling</groupId>
<artifactId>org.apache.sling.api</artifactId>
<version>2.0.3-incubator-R708951</version>
</dependency>
</dependencies>
3.
3.
Save the changes.
Deploy the CQ5 specific artifacts as defined in the pom.xml (cq-wcm-api, cq-commons and
org.apache.sling.api) to the local Maven repository:
Page 167 of 214
CQ 5.2 WCM
Copyright 1993-2009 Day Management AG
How to Set Up the Development Environment with Eclipse
1.
From the system command line go to <your-user-dir>/.m2/repository/com/
day/cq/wcm/cq-wcm-api/5.1.20 (create the folders if they don't exist) and execute
vlt co http://localhost:4502/crx /libs/wcm/install/cq-wcm-api-5.1.20.jar . to export the
library from the CQ5 server.
2.
From the system command line go to <your-user-dir>/.m2/repository/com/
day/cq/cq-commons/5.1.18 (create the folders if they don't exist) and execute vlt
co http://localhost:4502/crx /libs/cq/install/cq-commons-5.1.18.jar . to export the
library from the CQ5 server.
3.
From the system command line go to <your-user-dir>/.m2/repository/org/
apache/sling/org.apache.sling.api/2.0.3-incubator-R708951 (create
the folders if they don't exist) and execute vlt co http://localhost:4502/crx /libs/sling/
install/org.apache.sling.api-2.0.3-incubator-R708951.jar . to export the library from
the CQ5 server.
Note
You don't need to perform this step if the three CQ5 artifacts are globally deployed
for the project on a Maven repository (e.g. using Apache Archiva).
4.
Set the Java Compiler to version 1.5:
1.
Right-click the core project, select Properties.
2.
Select Java Compiler and set following properties to 1.5:
• Compiler compliance level
• Generated .class files compatibility
• Source compatibility
5.
3.
Click OK.
4.
In the dialog window, click Yes.
Create the package com.day.cq5.myapp that will contain the Java classes under core/
src/main/java:
1.
Under core, right-click src/main/java, select New, then Package.
2.
Name it com.day.cq5.myapp and click Finish.
27.1.5 Scripting with Eclipse and CQ5
When editing UI code use the following sequence:
• Create a template and a component with the CRX Explorer.
• Update the changes with VLT (export from the repository to your file system) .
• Create a component script (JSP) with Eclipse.
• Check in the changes from the file system into the repository with VLT.
The following example illustrates this process:
1.
Create a new template with the CRX Explorer:
1.
In the CRX Explorer, under /apps/myApp/templates, create a new template: Name:
contentpage Type: cq:Template
Page 168 of 214
CQ 5.2 WCM
Copyright 1993-2009 Day Management AG
How to Set Up the Development Environment with Eclipse
2.
2.
Under the contentpage Node, edit the Property jcr:title and add as Value:
MyApp Content Page Template
3.
Under the contentpage Node, add a new Node: Name: jcr:content Type:
cq:PageContent
4.
Under the jcr:content Node, edit the Property sling:resourceType and add as
Value: myApp/components/contentpage
5.
Under the jcr:content Node, add a new Property: Name: personName Value:
myName
Create a new component with the CRX Explorer:
•
3.
4.
In the CRX Explorer, under /apps/myApp/components, create a new component:
Name: contentpage Type: cq:Component
Use VLT to update the changes made from your repository to your file system, and therefore
Eclipse:
1.
From the system command line navigate to <eclipse>/<workspace>/myApp/ui/
src/main/content/jcr_root.
2.
Execute: vlt st --show-update to see the changes made on the repository.
3.
Execute: vlt up to update the changes from the repository to your file system.
Create the component script (JSP) with Eclipse:
1.
In Eclipse, navigate to ui/src/main/content/jcr_root/apps/myApp/
components/contentpage.
2.
Right-click contentpage, select New, then File.
3.
In the dialog, name the file contentpage.jsp and click Finish.
4.
Copy the following code into contentpage.jsp:
This is the contentpage component.
5.
5.
6.
Save the changes.
With VLT check in the changes from the file system into the repository:
1.
From the system command line navigate to <eclipse>/<workspace>/myApp/ui/
src/main/content/jcr_root.
2.
Execute: vlt st to see the changes made on the file system.
3.
Execute: vlt add apps/myApp/components/contentpage/contentpage.jsp to add the
contentpage.jsp file to VLT control.
4.
Execute: vlt ci to commit the contentpage.jsp file to the repository.
From CQ5 create a page based on this template. Open the page to make sure it displays the
following message:
This is the contentpage component.
Page 169 of 214
CQ 5.2 WCM
Copyright 1993-2009 Day Management AG
How to Set Up the Development Environment with Eclipse
Tip
It is possible to define the VLT commands as External Tools in Eclipse. This enables you
to run the VLT commands from within Eclipse.
27.1.6 Java Developing with Eclipse and CQ5
When editing Core code use the following sequence:
• Create a Java class.
• Compile the Java class.
• Reference the jar file in the ui library.
• Embed the Java Class logic into the JSP script.
• Use VLT to check these changes to the JSP script (in the file system) into the repository.
• Use VLT to deploy the jar file (with the compiled class) from the file system into the repository.
The following example illustrates this process:
1.
Create the Java class:
1.
In Eclipse, under core/src/main/java, right-click the com.day.cq5.myapp
package, select New, then Class.
2.
In the dialog window, name the Java Class HelloPerson and click Finish. Eclipse
creates and opens the file HelloPerson.java.
3.
In HelloPerson.java replace the existing code with the following:
package com.day.cq5.myapp;
import com.day.cq.wcm.api.Page;
public class HelloPerson {
private Page personPage;
public static final String PN_PERSON_NAME = "personName";
public HelloPerson(Page personPage) {
this.personPage = personPage;
}
public String getHelloMessage() {
String personName = personPage.getProperties().get(PN_PERSON_NAME).toString();
return personName != null ? personName : "--empty--";
}
}
4.
2.
3.
Save the changes.
Compile the Java class:
1.
Right-click the core project, select Run As, then Maven Install.
2.
Make sure that a new file core-0.0.1-SNAPSHOT.jar (containing the compiled
class) is created under core/target.
Reference this jar file in the ui library to enable the code completion when accessing this
class with the JSP script:
Page 170 of 214
CQ 5.2 WCM
Copyright 1993-2009 Day Management AG
How to Set Up the Development Environment with Eclipse
4.
1.
In Eclipse, right-click the ui project, select Build Path, then Configure Build
Path. In the dialog select the Libraries tab.
2.
Click Add JARS... and navigate to core/target, select the core-0.0.1SNAPSHOT.jar file and click OK.
3.
Click OK to close the dialog.
Embed the Java Class logic into the JSP script:
1.
In Eclipse, open the JSP script contentpage.jsp in ui/src/main/content/
jcr_root/apps/myApp/components/contentpage.
2.
Replace the existing code with the following:
<%@ page import="com.day.cq5.myapp.HelloPerson" %>
<%@include file="/libs/wcm/global.jsp"%>
<%
HelloPerson hello = new HelloPerson(currentPage);
String msg = hello.getHelloMessage();
%>
Hello, <%= msg %>.</br></br>
This is the contenpage component.
3.
5.
6.
7.
Save the changes.
With VTL check in the changes to the JSP script from the file system to the repository:
1.
From the system command line navigate to <eclipse>/<workspace>/myApp/ui/
src/main/content/jcr_root.
2.
Execute: vlt st to see the changes made on the file system.
3.
Execute: vlt ci to commit the modified contentpage.jsp file to the repository.
Deploy the jar file containing the compiled class from the file system into the repository with
VLT:
1.
In Eclipse, under core/target, copy the core-0.0.1-SNAPSHOT.jar file.
2.
In Eclipse navigate to ui/scr/main/content/jcr_root/apps/myapp/install
and paste the copied file.
3.
From the system command line navigate to <eclipse>/<workspace>/myApp/ui/
src/main/content/jcr_root.
4.
Execute: vlt st to see the changes made on the file system.
5.
Execute: vlt add apps/myApp/install/core-0.0.1-SNAPSHOT.jar to add the jar file to
VLT control.
6.
Execute: vlt ci to commit the jar file to the repository.
In your browser, refresh the CQ5 page to make sure it displays following message:
Hello, myName.
This is the contentpage component.
8.
In CRX Explorer, change the value myName and make sure that the new value is displayed
when you refresh the page.
Page 171 of 214
CQ 5.2 WCM
Copyright 1993-2009 Day Management AG
How to Set Up the Development Environment with Eclipse
27.1.7 Building collaborative and automated projects
This section points to three open source softwares which enhance the development of CQ5
projects by adding collaboration and automation features:
• Subversion (SVN) to manage a central repository where all the developers involved in the project
can commit and retrieve the code and the content they generate on their local instance.
• Apache Archiva to centrally store and retrieve the project libraries.
• Apache Continuum to automate the build process.
27.1.7.1 Collaboration with Subversion (SVN)
As the CQ5 repository can be mapped to your file system with VLT, it is now easy to set up a
central repository with SVN. This is used by all developers in the project as a place they can
commit, and retrieve, the code and content they generate on their local instances.
The setup of an SVN server is not covered in this document as many tutorials are already available
online.
When VLT is in operation it creates .vlt files within the local directory structure. These .vlt files hold
timestamps and other VLT-specific information that should not be checked into the SVN repository.
This can be prevented by adding .vlt to the ignore list of the local SVN setup. To do this you add
the following code to the local SVN setup file - settings.xml in the .subversion directory of your
user's HOME directory:
[miscellany]
### Set global-ignores to a set of whitespace-delimited globs
### which Subversion will ignore in its 'status' output, and
### while importing or adding files and directories.
global-ignores = .vlt
27.1.7.2 Central dependency management with Apache Archiva
Java libraries, called artifacts in Maven language, can be managed centrally through Apache
Archiva, an artifact repository that is used to store and retrieve the project artifacts. The setup of
Archiva is well detailed online and can be referenced during setup. The Archiva server requires
little management outside that of configuring local developer accounts to obtain access to the
snapshots and full releases.
27.1.7.3 Build automation with Apache Continuum
Once the project content and code is centrally available through an SVN server, it is possible to
automate the build process and run the build on a daily basis (for example a nightly build). This is
done with Apache Continuum, a continuous integration server with the sole duty of providing build
management of artifacts and releases.
The setup of Continuum is also well detailed online.
Page 172 of 214
CQ 5.2 WCM
Copyright 1993-2009 Day Management AG
28 Multi Site Manager for Developers
This document describes:
• What happens in the repository when you set up MSM.
• How MSM can be extended to meet the specific needs of your application.
Please refer to Chapter 1, for instructions on setting up MSM.
28.1 MSM in the Repository
This section describes what happens in the repository when you set up MSM. The first part
describes the Nodes, Node Types, and Properties that are specific to MSM. The second part
describes how MSM works at the repository level.
28.1.1 MSM-specific Nodes, Node Types, and Properties
This section describes the Nodes, Node Types, and Properties that are specific to MSM.
28.1.1.1 cq:LiveRelationship mixin
The cq:LiveRelationship mixin is used as a supertype for the cq:LiveSync mixin.
It adds the following properties to the jcr:content node of the Live Copy page:
cq:lastRolledout
date and time of the last rollout
cq:lastRolledoutBy
indicates who performed the last rollout
cq:msmSyncState
not used anymore
28.1.1.2 cq:LiveSync mixin
The cq:LiveSync mixin adds the following nodes and properties to the jcr:content node of
the Live Copy page:
Page 173 of 214
CQ 5.2 WCM
Copyright 1993-2009 Day Management AG
Multi Site Manager for Developers
• the three properties defined by the cqLiveRelationship mixin, which is the supertype of
cq:LiveSync, which has the following three properties: cq:lastRolledout, cq:lastRolledoutBy
and cq:msmSyncState.
• the cq:LiveSyncConfig and the cq:LiveSyncAction nodes (see the following description).
28.1.1.3 cq:LiveSyncConfig node and node type
The cq:LiveSyncConfig node is of type cq:LiveSyncConfig and has the three following
properties storing the configuration of the Live Copy page:
cq:isDeep
Boolean defining whether the Live Copy is only for the page (when false) or for the complete
sub tree (when true). The default value is true. It is not accessible through the Siteadmin of
CQ5.
cq:master
String defining the path of the Blueprint.
cq:trigger
String defining the event triggering the synchronization. The default values are rollout,
modification, or publish.
Page 174 of 214
CQ 5.2 WCM
Copyright 1993-2009 Day Management AG
Multi Site Manager for Developers
28.1.1.4 cq:LiveSyncAction node and node type
The cq:LiveSyncAction node is of the type cq:LiveSyncAction and defines the synchronization
actions performed on the Live Copy page and on each node of its jcr:content node
(paragraphs) when the Blueprint is rolled out.
Each of its child node is an action: its name is the action name and its node type is
cq:LiveSyncAction. It must match one action in the client side action set and one server
synchronization action service. The following nodes exist by default:
mandatory
this node has a property called target defining the group that has read-only access to the Live
Copy, for example: surfer.
notify
this node has a property called target defining whether the notification has been enabled (when
true).
updateContent
this node has a property called status defining whether modifications to the Blueprint will be
propagated (when true).
workflow
this node has a property called target defining the path of the workflow that is started when
the synchronization actions are triggered, for example: /etc/workflow/models/dam/
update_asset.
28.1.1.5 cq:LiveSyncCancelled mixin
When a Live Copy is suspended, the cq:LiveSyncCancelled mixin is added to the
jcr:content node of the page or to the paragraph node.
The cq:LiveSyncCancelled mixin adds the boolean property cq:isCancelledForChildren: when
true, the Live Copy is cancelled for the complete sub tree. This property is not accessible through
the Siteadmin of CQ5.
Page 175 of 214
CQ 5.2 WCM
Copyright 1993-2009 Day Management AG
Multi Site Manager for Developers
28.1.1.6 cq:BlueprintAction node and node type
The cq:BlueprintAction node is the equivalent of the cq:LiveSyncAction node on the
Blueprint side. It defines the synchronization actions performed on the Live Copy page and on each
node of its jcr:content node (paragraphs) when the Blueprint is rolled out.
Each one of its child node represents an action: its name is the action name and its node type
is cq:LiveSyncAction. It must match one action in the client side action set and one server
synchronization action service. The following nodes exist by default:
mandatory
this node has a property called target defining the group who has a read only access to the
Live Copy, for example: surfer.
notify
this node has a property called target defining whether the notification has been enabled (when
true).
updateContent
this node has a property called status defining whether modifications to the Blueprint will be
propagated (when true).
workflow
this node has a property called target defining the path of the workflow that is started when
the synchronization actions are triggered, for example: /etc/workflow/models/dam/
update_asset.
28.1.2 MSM mechanisms in the repository
When configuring synchronization actions, following mechanisms take place in the repository:
• When a Blueprint is created, a cq:Page node is created under /etc/blueprints.
• When a Live Copy is created, a cq:LiveSyncConfig node and a cq:LiveSyncAction node
are created under the jcr:content node of the Live Copy root page and only there.
• When a synchronization action is configured on a Blueprint page, a cq:BlueprintAction
node is created under the jcr:content node of the page. For each action a
cq:LiveSyncAction node is created under the cq:BlueprintAction node.
• When a synchronization action is configured on a Live Copy page, a cq:LiveSyncConfig
node and a cq:LiveSyncAction node are created under the jcr:content node of the Live
Copy page.
Page 176 of 214
CQ 5.2 WCM
Copyright 1993-2009 Day Management AG
Multi Site Manager for Developers
• The configuration of a Live Copy page is defined as follows:
• if a cq:LiveSyncConfig node is stored under its jcr:content node, the configuration is
taken from this cq:LiveSyncConfig node.
• otherwise, the configuration is inherited from the first parent page with a
cq:LiveSyncConfig node stored to it.
• The actions to be performed on a Live Copy page are defined according to the following process:
1. In a first step:
• if a cq:LiveSyncAction node is stored under its jcr:content node, the actions are
taken from the cq:LiveSyncAction node.
• otherwise, the actions are inherited from the first parent page with a cq:LiveSyncAction
node stored to it.
2. If for this given Live Copy page, an action is defined on its Blueprint page (it has a
cq:LiveSyncAction node stored to it):
• if the action does not exist on the Live Copy page, the Blueprint action is added to the
action set and is performed.
• if the action exists on the Live Copy page, the Blueprint action replaces it and is performed.
• When a Live Copy is suspended, the cq:LiveSyncCancelled mixin is added to the
jcr:content node of the page or to the paragraph node.
28.2 Extending MSM Functionalities
28.2.1 How to extend synchronization actions
The set of synchronization actions available in the Create Site and Create Live Copy
dialogs or in the Live Copy and the Blueprint tabs is extensible: custom actions can be added
or complete actions set can be refactored.
CQ.wcm.msm.MSM.ACTIONS is a static JavaScript array that contains client-side configuration
from the synchronization actions. It is rendered into a CQ.Ext.form.FieldSet.
The code for CQ.wcm.msm.MSM.ACTIONS looks as follows:
CQ.wcm.msm.MSM.ACTIONS = [
CQ.wcm.msm.MSM.UpdateContentAction,
CQ.wcm.msm.MSM.NotifyAction,
CQ.wcm.msm.MSM.WorkflowAction,
CQ.wcm.msm.MSM.MandatoryAction
];
CQ.wcm.msm.MSM.UpdateContentAction, CQ.wcm.msm.MSM.NotifyAction,
CQ.wcm.msm.MSM.WorkflowAction and CQ.wcm.msm.MSM.MandatoryAction are objects
representing the default configurations for standard synchronization actions.
28.2.1.1 How to change the order of appearance of an action
You can customize the order of the actions by editing the array CQ.wcm.msm.MSM.ACTIONS and
reordering the actions within it.
28.2.1.2 How to remove an action
You can remove an action by editing the array CQ.wcm.msm.MSM.ACTIONS and removing an
action from it.
Page 177 of 214
CQ 5.2 WCM
Copyright 1993-2009 Day Management AG
Multi Site Manager for Developers
28.2.1.3 How to create an action
You can create a new action. To do so, two parts have to be configured:
• the JavaScript client side
• the custom synchronization action must be deployed on the server
The following procedure shows you how to add a new synchronization action called "Mandatory
Structure": the user selects a user-group that will be able to modify the Live Copy page content but
will not be able to delete or move the page.
28.2.1.3.1 Client side
To add a new synchronization action on the client side, proceed as follows:
1.
In CRX Explorer, create a new node under the /apps node. Name = myApp, Type =
nt:folder.
2.
Create a new node under /apps/myApp: Name = widgets, Type =
cq:ClientLibraryFolder. Then:
• edit the property categories and set cq.wcm.edit as Value.
• edit the property dependencies and set cq.widgets as Value.
• add a new property: Name = sling:resourceType, Type = String, Value = widgets/
clientlib.
3.
Create a new node under /apps/myApp/widgets: Name = source, Type =
sling:Folder.
4.
Create the js.txt file with the following code and store it under /apps/myApp/widgets
(for example with WebDAV):
#base=source
myMsmActions.js
Note
To connect to the CRX repository using the WebDAV protocol, check the CRX
documentation on WebDAV access.
5.
Create the myMsmActions.js file with the following code and store it under /apps/myApp/
widgets/source (for example with WebDAV):
CQ.wcm.msm.MSM.MandatoryStructureAction = {
"xtype": "combo",
"fieldLabel": CQ.I18n.getMessage("Mandatory Structure for"),
"name": "actionMandatoryStructure",
"hiddenName": "msm:actionMandatoryStructure/target",
"actionName":"msm:actionMandatoryStructure",
"stateful": false,
"typeAhead":true,
"triggerAction":"all",
"inputType":"text",
"displayField":"name",
"emptyText": "",
"minChars":0,
"editable":true,
"lazyInit": false,
"queryParam": "filter",
Page 178 of 214
CQ 5.2 WCM
Copyright 1993-2009 Day Management AG
Multi Site Manager for Developers
"fieldDescription": CQ.I18n.getMessage("Select the groups that will not be able to
modify the Live Copy structure."),
"tpl" :new CQ.Ext.XTemplate(
'<tpl for=".">',
'<div class="cq-msm-list cq-msm-mandatory-list">',
'<div class="cq-msm-list-entry cq-msm-mandatory-listentry">{[values.name==""? values.id: values.name]}</div>',
'</div>',
'</tpl>'),
"itemSelector" :"div.cq-msm-mandatory-list",
"store": new CQ.Ext.data.Store({
"autoLoad":false,
"proxy": new CQ.Ext.data.HttpProxy({
"url": "/bin/security/authorizables.json?limit=25&hideUsers=true",
"method":"GET"
}),
"reader": new CQ.Ext.data.JsonReader({
"root":"authorizables",
"totalProperty":"results",
"id":"id",
"fields":["name","id"]})
}),
"defaultValue": ""
};
// Adds the new action to the CQ.wcm.msm.MSM.ACTIONS array
CQ.wcm.msm.MSM.ACTIONS.push(CQ.wcm.msm.MSM.MandatoryStructureAction);
6.
The project structure looks as follows in CRX Explorer:
7.
In CQ5, open a Live Copy page. In the Page tab of the sidekick, click Page Properties....
Select the Live Copy tab to view the newly created widget:
Page 179 of 214
CQ 5.2 WCM
Copyright 1993-2009 Day Management AG
Multi Site Manager for Developers
28.2.1.3.2 Server side
To implement the new action on the Server side, proceed as follows:
Note
Refer to the section called “Installing Eclipse” for installing and setting up Eclipse with a
Maven plugin.
1.
In Eclipse, create the Core Maven project:
1.
In the Menu bar, click File, select New, then Other... .
2.
In the dialog, expand the Maven folder, select Maven Project and click Next.
3.
Check the Create a simple project box and the Use default Workspace
locations box, then click Next.
4.
Define the Maven project:
• Group Id: com.day.cq5.mymsm
• Artifact Id: core
• Name: CQ5 MyMsm Core
• Description: This is the CQ5 MyMsm Core
5.
Click Finish.
Page 180 of 214
CQ 5.2 WCM
Copyright 1993-2009 Day Management AG
Multi Site Manager for Developers
2.
Set the Java Compiler to version 1.5:
1.
Right-click the core project, select Properties.
2.
Select Java Compiler and set following properties to 1.5:
• Compiler compliance level
• Generated .class files compatibility
• Source compatibility
3.
3.
Click OK.
4.
In the dialog window, click Yes.
Replace the code in the pom.xml with the following code:
<project xmlns="http://maven.apache.org/POM/4.0.0" xmlns:xsi="http://www.w3.org/2001/
XMLSchema-instance"
xsi:schemaLocation="http://maven.apache.org/POM/4.0.0 http://maven.apache.org/
maven-v4_0_0.xsd">
<modelVersion>4.0.0</modelVersion>
<groupId>com.day.cq5.mymsm</groupId>
<artifactId>core</artifactId>
<name>CQ5 MyMsm Core</name>
<version>0.0.1-SNAPSHOT</version>
<description>This is the CQ5 MyMsm Core</description>
<packaging>bundle</packaging>
<build>
<plugins>
<plugin>
<groupId>org.apache.maven.plugins</groupId>
<artifactId>maven-compiler-plugin</artifactId>
<configuration>
<source>1.5</source>
<target>1.5</target>
</configuration>
</plugin>
<plugin>
<groupId>org.apache.felix</groupId>
<artifactId>maven-bundle-plugin</artifactId>
<version>1.4.3</version>
<extensions>true</extensions>
<configuration>
<instructions>
<Export-Package> com.day.cq5.mymsm.*;version=${pom.version}
</Export-Package>
</instructions>
</configuration>
</plugin>
<plugin>
<groupId>org.apache.felix</groupId>
<artifactId>maven-scr-plugin</artifactId>
<version>1.0.8</version>
<executions>
<execution>
<id>generate-scr-scrdescriptor</id>
<goals>
<goal>scr</goal>
</goals>
</execution>
</executions>
</plugin>
</plugins>
Page 181 of 214
CQ 5.2 WCM
Copyright 1993-2009 Day Management AG
Multi Site Manager for Developers
</build>
<dependencies>
<dependency>
<groupId>com.day.cq.wcm</groupId>
<artifactId>cq-wcm-api</artifactId>
<version>5.2.22</version>
<scope>provided</scope>
</dependency>
<dependency>
<groupId>com.day.cq</groupId>
<artifactId>cq-security</artifactId>
<version>5.2.22</version>
<scope>provided</scope>
</dependency>
<dependency>
<groupId>com.day.cq</groupId>
<artifactId>cq-security-api</artifactId>
<version>5.2.6</version>
<scope>provided</scope>
</dependency>
<dependency>
<groupId>com.day.crx.sling</groupId>
<artifactId>com.day.crx.sling.client</artifactId>
<version>1.4.2</version>
<scope>provided</scope>
</dependency>
<dependency>
<groupId>org.apache.sling</groupId>
<artifactId>org.apache.sling.jcr.api</artifactId>
<version>2.0.2-incubator</version>
<scope>provided</scope>
</dependency>
<dependency>
<groupId>com.day.cq</groupId>
<artifactId>cq-commons</artifactId>
<version>5.2.20</version>
<scope>provided</scope>
</dependency>
<dependency>
<groupId>org.apache.sling</groupId>
<artifactId>org.apache.sling.api</artifactId>
<version>2.0.3-incubator-R746167</version>
<scope>provided</scope>
</dependency>
<dependency>
<groupId>org.osgi</groupId>
<artifactId>osgi_R4_core</artifactId>
<version>1.0</version>
<scope>provided</scope>
</dependency>
<dependency>
<groupId>org.osgi</groupId>
<artifactId>osgi_R4_compendium</artifactId>
<version>1.0</version>
<scope>provided</scope>
</dependency>
</dependencies>
<repositories>
<repository>
Page 182 of 214
CQ 5.2 WCM
Copyright 1993-2009 Day Management AG
Multi Site Manager for Developers
<id>day-external-central</id>
<name>Day Central Repository</name>
<url>http://repo.day.com/archiva/repository/day-central</url>
<releases>
<enabled>true</enabled>
</releases>
<snapshots>
<enabled>false</enabled>
</snapshots>
</repository>
<repository>
<id>apache-incubating-repository</id>
<name>Apache Incubating Repository</name>
<url>http://people.apache.org/repo/m2-incubating-repository</url>
<releases>
<enabled>true</enabled>
</releases>
<snapshots>
<enabled>false</enabled>
</snapshots>
</repository>
</repositories>
<pluginRepositories>
<pluginRepository>
<id>day-external-central</id>
<name>Day Central Repository</name>
<url>http://repo.day.com/archiva/repository/day-central</url>
<releases>
<enabled>true</enabled>
</releases>
<snapshots>
<enabled>false</enabled>
</snapshots>
</pluginRepository>
<pluginRepository>
<id>apache-incubating-repository</id>
<name>Apache Incubating Repository</name>
<url>http://people.apache.org/repo/m2-incubating-repository</url>
<releases>
<enabled>true</enabled>
</releases>
<snapshots>
<enabled>false</enabled>
</snapshots>
</pluginRepository>
</pluginRepositories>
</project>
4.
Add the credentials into the settings.xml file of your <maven-install-dir>/.m2
directory: copy/paste the following code into the <servers></servers> tags:
<server>
<id>day-external-central</id>
<username>cq5_training</username>
<password>tr41n1ng</password>
</server>
5.
Create the package com.day.cq5.mymsm that will contain the Java classes under core/
src/main/java:
1.
Under core, right-click src/main/java, select New, then Package.
2.
Name it com.day.cq5.mymsm and click Finish.
Page 183 of 214
CQ 5.2 WCM
Copyright 1993-2009 Day Management AG
Multi Site Manager for Developers
6.
Create the Java class MandatoryStructureAction:
1.
In Eclipse, under core/src/main/java, right-click the com.day.cq5.mymsm
package, select New, then Class.
2.
In the dialog window, name the Java Class MandatoryStructureAction and click
Finish. Eclipse creates and opens the file MandatoryStructureAction.java.
3.
In MandatoryStructureAction.java replace the existing code with the following:
package com.day.cq5.mymsm;
import javax.jcr.Node;
import org.apache.sling.api.resource.Resource;
import org.apache.sling.api.resource.ResourceResolver;
import org.osgi.service.component.ComponentContext;
import
import
import
import
import
import
import
import
import
import
import
com.day.cq.security.util.ActionSet;
com.day.cq.security.util.CRXPolicyManager;
com.day.cq.wcm.api.NameConstants;
com.day.cq.wcm.api.Page;
com.day.cq.wcm.api.PageManager;
com.day.cq.wcm.api.WCMException;
com.day.cq.wcm.api.msm.ActionConfig;
com.day.cq.wcm.api.msm.ActionManager;
com.day.cq.wcm.api.msm.LiveAction;
com.day.cq.wcm.api.msm.LiveRelationship;
com.day.crx.CRXSession;
/**
* Set read-ony to group defined in the action config of the relationship (for
pages only). Denied ACL are: <ul>
* <li>ActionSet.ACTION_NAME_REMOVE</li>
* <li>ActionSet.ACTION_NAME_SET_PROPERTY</li>
* <li>ActionSet.ACTION_NAME_ACL_MODIFY</li>
* </ul>
* @scr.component metatype="false"
name="com.day.cq5.mymsm.MandatoryStructureAction" immediate="true"
* label="%mandatoryaction.name" description="%mandatoryaction.description"
* @scr.service interface="com.day.cq.wcm.api.msm.LiveAction"
*/
public class MandatoryStructureAction implements LiveAction {
//name of the action in the repository
public static final String ACTION_NAME = "mandatoryStructure";
//name of the request parameter used to get/post action properties
public static final String ACTION_PARAM_NAME =
"msm:actionMandatoryStructure";
public static final int ACTION_RANK = 602;
public static final String ACTION_PARAM_TARGET = "target";
//name of the request parameter used to get/post action properties
private String[] properties = {MandatoryStructureAction.ACTION_PARAM_TARGET};
/**
* @scr.reference
*/
@SuppressWarnings("UnusedDeclaration")
private ActionManager actionManager;
protected void activate(ComponentContext context) {
actionManager.registerAcion(this);
}
protected void deactivate(ComponentContext context) {
actionManager.unregisterAcion(this);
}
Page 184 of 214
CQ 5.2 WCM
Copyright 1993-2009 Day Management AG
Multi Site Manager for Developers
public String getName() {
return ACTION_NAME;
}
public int getRank() {
return ACTION_RANK;
}
public String[] getPropertiesNames() {
return properties;
}
public String getParameterName() {
return ACTION_PARAM_NAME;
}
public void execute(ResourceResolver resolver, LiveRelationship relation,
ActionConfig config, boolean autoSave) throws WCMException {
try {
if (!relation.getStatus().isCancelled() && config != null) {
if (config.hasProperty(ACTION_PARAM_TARGET)) {
String target = config.getProperty(ACTION_PARAM_TARGET);
if (target != null && !target.equals("")) {
Resource r = resolver.getResource(relation.getTargetPath());
Node slaveNode = r != null ? r.adaptTo(Node.class):
null;//Utils.getNode(resolver, relation.getTargetPath());
if (slaveNode != null) {
//set mandatory only on pages
if
(NameConstants.NN_CONTENT.equals(slaveNode.getName()) &&
slaveNode.getParent().isNodeType(NameConstants.NT_PAGE)) {
//at this point, action is executed only for a
page.
PageManager pm =
resolver.adaptTo(PageManager.class);
Page p =
pm.getContainingPage(resolver.getResource(slaveNode.getPath()));
if (p != null) {
CRXPolicyManager policyMgr = new
CRXPolicyManager((CRXSession) slaveNode.getSession());
policyMgr.enact(p.getPath(), target, false,
ActionSet.create(new String[]{
ActionSet.ACTION_NAME_REMOVE,
//
ActionSet.ACTION_NAME_SET_PROPERTY,
//
ActionSet.ACTION_NAME_ACL_MODIFY})
);
}
}
}
}
}
}
} catch (Exception re) {
throw new WCMException("Error while executing " + getName() + "
action", re);
}
}
}
4.
Save the changes.
Note
The synchronization action parameter name must match the value returned by
LiveAction#getParameterName.
Page 185 of 214
CQ 5.2 WCM
Copyright 1993-2009 Day Management AG
Multi Site Manager for Developers
A synchronization action is an OSGI service that must implement the interface
com.day.cq.wcm.api.msm.LiveAction and must register itself to the RolloutManager.
As you can see in the above code, a rank has been set to the action (the value of
the field ACTION_RANK). The actions are executed by following the order of the
ranks. For the default synchronization actions, the ranks are:
• UpdateContentAction = CUDAction service: 301
• NotifyAction = NotifyAction service: 501
• MandatoryAction = MandatoryAction service: 601
• WorkflowAction = WorkflowAction service: 701
7.
Compile the Java class and create the bundle:
1.
Right-click the core project, select Run As, then Maven Install.
2.
The bundle core-0.0.1-SNAPSHOT.jar (containing the compiled class) is created
under core/target.
8.
In CRX Explorer, create a new node under /apps/myApp. Name = install, Type =
nt:folder.
9.
Copy the bundle core-0.0.1-SNAPSHOT.jar and store it under /apps/myApp/install
(for example with WebDAV).
10. In your browser, in CQ5:
1.
Open a Live Copy page. In the Live Copy tab of the Page Properties, select a group
beside Mandatory Structure for. Click OK.
2.
Rollout the corresponding Blueprint page.
3.
Log out of CQ5 and log in as a member of the selected group.
4.
Refresh the Live Copy page: you can now edit the page but not delete it.
28.2.2 How to define the properties and the nodes that are copied to the Live
Copy
The MSM in CQ5 lets you define:
• which properties are copied by the Update Content synchronization action.
• which node types are part of the rollout process, that is, which synchronization actions are
performed on the node.
To do so:
1.
In your browser, open the Apache Felix Web Management Console Configuration
(for example: http://localhost:4502/system/console/configMgr).
2.
In Configuration, select CQ WCM Rollout Manager.
Page 186 of 214
CQ 5.2 WCM
Copyright 1993-2009 Day Management AG
Multi Site Manager for Developers
3.
Configure these two parameters:
Excluded Properties
java regexes that define the property names to not copy. If the property name matches
one regex, it will not be copied.
Excluded Nodetypes
java regexes that define the node types to exclude from rollout. If the node type matches
one regex, it will not be included by the rollout manager.
28.2.3 How to remove the "Chapters" step in the "Create Site" wizard
In some cases, the Chapters selection is not required in the Create Site wizard but only the
Languages selection. To remove this step in the default Geometrixx blueprint:
1.
In CRX Explorer, remove the node /etc/blueprints/geometrixx/jcr:content/
dialog/items/tabs/items/tab_chap.
2.
Navigate to /libs/wcm/msm/templates/blueprint/defaults/livecopy_tab/
items and create a new node. Name = chapters, Type = cq:Widget.
3.
Add following properties to the new node:
• Name = name, Type = String, Value = msm:chapterPages
• Name = value, Type = String, Value = all
• Name = xtype, Type = String, Value = hidden
Page 187 of 214
CQ 5.2 WCM
Copyright 1993-2009 Day Management AG
29 JSP Tag Libraries
29.1 JSP Tag Libraries
The CQ and Sling tab libraries give you access to specific functions for use in the JSP script of
your templates and components.
29.1.1 CQ Tag Library
The CQ tag library contains helpful CQ functions.
To use the CQ Tag Library in your script, the script must start with the following code:
<%@taglib prefix="cq" uri="http://www.day.com/taglibs/cq/1.0" %>
Note
When the /libs/wcm/global.jsp file is included in the script, the cq taglib is
automatically declared.
Tip
When you develop the jsp script of a CQ5 component, it is recommended to include
following code at the top of the script:
<%@include file="/libs/wcm/global.jsp"%>
It declares the sling, cq and jstl taglibs and exposes the regularly used scripting objects
defined by the <cq:defineObjects /> tag. This shortens and simplifies the jsp code of your
component.
29.1.1.1 <cq:setContentBundle>
The <cq:setContentBundle> tag creates an i18n localization context and stores it in the
javax.servlet.jsp.jstl.fmt.localizationContext configuration variable.
It has the following attribute:
language
The language of the locale for which to retrieve the resource bundle.
The "content bundle" can be simply used by standard JSTL <fmt:message> tags. The lookup of
messages by keys is two-fold:
1. First, the JCR properties of the underlying resource that is currently rendered are searched for
translations. This allows you to define a simple component dialog to edit those values.
2. If the node does not contain a property named exactly like the key, the fallback is to load a
resource bundle from the sling request (SlingHttpServletRequest.getResourceBundle(Locale)).
The language or locale for this bundle is defined this way:
a. First, if the parameter language of the<cq:setContentBundle> tag is set, this is used.
b. Otherwise, the locale of the page is looked up. This is defined by the LanguageManager of
CQ5 (language copy function), which is typically taken from the page path (eg. the path /
content/site/en/some/page produces the "en" locale).
c. Finally, if there is no page language defined, the default locale of the current request is used,
which is equivalent to calling request.getResourceBundle(null).
Page 188 of 214
CQ 5.2 WCM
Copyright 1993-2009 Day Management AG
JSP Tag Libraries
Example:
<%@include file="/libs/wcm/global.jsp"%><%
%><%@ page import="com.day.cq.wcm.foundation.forms.ValidationInfo,
com.day.cq.wcm.foundation.forms.FormsConstants,
com.day.cq.wcm.foundation.forms.FormsHelper,
org.apache.sling.api.resource.Resource,
org.apache.sling.api.resource.ResourceUtil,
org.apache.sling.api.resource.ValueMap" %><%
%><cq:setContentBundle/>
29.1.1.2 <cq:include>
The <cq:include> tag includes a resource into the current page.
It has the following attributes:
flush
A boolean defining whether to flush the output before including the target.
path
The path to the resource object to be included in the current request processing. If this path is
relative it is appended to the path of the current resource whose script is including the given
resource. Either path and resourceType, or script must be specified.
resourceType
The resource type of the resource to be included. If the resource type is set, the path must be
the exact path to a resource object: in this case, adding parameters, selectors and extensions
to the path is not supported.
If the resource to be included is specified with the path attribute that cannot be resolved to a
resource, the tag may create a synthetic resource object out of the path and this resource type.
Either path and resourceType, or script must be specified.
script
The jsp script to include. Either path and resourceType, or script must be specified.
ignoreComponentHierarchy
A boolean controlling whether the component hierarchy should be ignored for script resolution.
If true, only the search paths are respected.
Example:
<%@taglib prefix="cq" uri="http://www.day.com/taglibs/cq/1.0" %><%
%><div class="center">
<cq:include path="trail" resourceType="foundation/components/breadcrumb" />
<cq:include path="title" resourceType="foundation/components/title" />
<cq:include script="redirect.jsp"/>
<cq:include path="par" resourceType="foundation/components/parsys" />
</div>
Note
Should you use <%@ include file="myScript.jsp" %> or <cq:include script="myScript.jsp"
%> to include a script?
• The <%@ include file="myScript.jsp" %> directive informs the JSP compiler to include
a complete file into the current file. It is as if the contents of the included file were
pasted directly into the original file.
• With the <cq:include script="myScript.jsp" %> directive, the file is included at runtime.
Page 189 of 214
CQ 5.2 WCM
Copyright 1993-2009 Day Management AG
JSP Tag Libraries
Note
Should you use <cq:include> or <sling:include>?
• When developing CQ5 components, Day recommends that you use <cq:include>.
• <cq:include> allows you to directly include script files by their name when using the
script attribute. This takes component and resource type inheritance into account, and
is often simpler than strict adherence to Sling's script resolution using selectors and
extensions.
29.1.1.3 <cq:defineObjects>
The <cq:defineObjects> tag exposes the following, regularly used, scripting objects which can be
referenced by the developer. It also exposes the objects defined by the <sling:defineObjects> tag.
componentContext
the current component context object of the request
(com.day.cq.wcm.api.components.ComponentContext interface).
component
the current CQ5 component object of the current resource
(com.day.cq.wcm.api.components.Component interface).
currentDesign
the current design object of the current page (com.day.cq.wcm.api.designer.Design interface).
currentPage
the current CQ WCM page object (com.day.cq.wcm.api.Page interface).
currentStyle
the current style object of the current cell (com.day.cq.wcm.api.designer.Style interface).
designer
the designer object used to access design information (com.day.cq.wcm.api.designer.Designer
interface).
editContext
the edit context object of the CQ5 component (com.day.cq.wcm.api.components.EditContext
interface).
pageManager
the page manager object for page level operations (com.day.cq.wcm.api.PageManager
interface).
pageProperties
the page properties object of the current page (org.apache.sling.api.resource.ValueMap).
properties
the properties object of the current resource (org.apache.sling.api.resource.ValueMap).
resourceDesign
the design object of the resource page (com.day.cq.wcm.api.designer.Design interface).
resourcePage
the resource page object (com.day.cq.wcm.api.Page interface).
It has the following attributes:
requestName
inherited from sling
Page 190 of 214
CQ 5.2 WCM
Copyright 1993-2009 Day Management AG
JSP Tag Libraries
responseName
inherited from sling
resourceName
inherited from sling
nodeName
inherited from sling
logName
inherited from sling
resourceResolverName
inherited from sling
slingName
inherited from sling
componentContextName
specific to wcm
editContextName
specific to wcm
propertiesName
specific to wcm
pageManagerName
specific to wcm
currentPageName
specific to wcm
resourcePageName
specific to wcm
pagePropertiesName
specific to wcm
componentName
specific to wcm
designerName
specific to wcm
currentDesignName
specific to wcm
resourceDesignName
specific to wcm
currentStyleName
specific to wcm
Example:
<%@page session="false" contentType="text/html; charset=utf-8" %><%
%><%@ page import="com.day.cq.wcm.api.WCMMode" %><%
%><%@taglib prefix="cq" uri="http://www.day.com/taglibs/cq/1.0" %><%
%><cq:defineObjects/>
Page 191 of 214
CQ 5.2 WCM
Copyright 1993-2009 Day Management AG
JSP Tag Libraries
Note
When the /libs/wcm/global.jsp file is included in the script, the <cq:defineObjects /
> tag is automatically included.
29.1.1.4 <cq:requestURL>
The <cq:requestURL> tag writes the current request URL to the JspWriter. The two tags
<cq:addParam> and <cq:removeParam> may be used inside the body of this tag to modify the
current request URL before it is written.
It allows you to create links to the current page with varying parameters. For example, it enables
you to transform the request:
mypage.html?mode=view&query=something into mypage.html?query=something.
The use of addParam or removeParam only changes the occurence of the given parameter, all
other parameters are unaffected.
<cq:requestURL> does not have any attribute.
Examples:
<a href="<cq:requestURL><cq:removeParam name="language"/></cq:requestURL>">remove filter</
a>
<a title="filter results" href="<cq:requestURL><cq:addParam name="language"
value="${bucket.value}"/></cq:requestURL>">${label} (${bucket.count})</a>
29.1.1.5 <cq:addParam>
The <cq:addParam> tag adds a request parameter with the given name and value to the enclosing
<cq:requestURL> tag.
It has the following attributes:
name
name of the parameter to be added
value
value of the parameter to be added
Example:
<a title="filter results" href="<cq:requestURL><cq:addParam name="language"
value="${bucket.value}"/></cq:requestURL>">${label} (${bucket.count})</a>
29.1.1.6 <cq:removeParam>
The <cq:removeParam> tag removes a request parameter with the given name and value from
the enclosing <cq:requestURL> tag. If no value is provided all parameters with the given name are
removed.
It has the following attributes:
name
name of the parameter to be removed
Example:
<a href="<cq:requestURL><cq:removeParam name="language"/></cq:requestURL>">remove filter</
a>
Page 192 of 214
CQ 5.2 WCM
Copyright 1993-2009 Day Management AG
JSP Tag Libraries
29.1.2 Sling Tag Library
The Sling tag library contains helpful Sling functions.
When you use the Sling Tag Library in your script, the script must start with the following code:
<%@ taglib prefix="sling" uri="http://sling.apache.org/taglibs/sling/1.0" %>
Note
When the /libs/wcm/global.jsp file is included in the script, the sling taglib is
automatically declared.
29.1.2.1 <sling:include>
The <sling:include> tag includes a resource into the current page.
It has the following attributes:
flush
A boolean defining whether to flush the output before including the target.
resource
The resource object to be included in the current request processing. Either resource or path
must be specified. If both are specified, the resource takes precedence.
path
The path to the resource object to be included in the current request processing. If this path is
relative it is appended to the path of the current resource whose script is including the given
resource. Either resource or path must be specified. If both are specified, the resource takes
precedence.
resourceType
The resource type of the resource to be included. If the resource type is set, the path must be
the exact path to a resource object: in this case, adding parameters, selectors and extensions
to the path is not supported.
If the resource to be included is specified with the path attribute that cannot be resolved to a
resource, the tag may create a synthetic resource object out of the path and this resource type.
replaceSelectors
When dispatching, the selectors are replaced with the value of this attribute.
addSelectors
When dispatching, the value of this attribute is added to the selectors.
replaceSuffix
When dispatching, the suffix is replaced by the value of this attribute.
Note
The resolution of the resource and the script that are included with the <sling:include> tag
is the same as for a normal sling URL resolution. By default, the selectors, extension, etc.
from the current request are used for the included script as well. They can be modified
through the tag attributes: for example replaceSelectors="foo.bar" allows you to overwrite
the selectors.
Examples:
<div class="item"><sling:include path="<%= pathtoinclude %>"/></div>
Page 193 of 214
CQ 5.2 WCM
Copyright 1993-2009 Day Management AG
JSP Tag Libraries
<sling:include resource="<%= par %>"/>
<sling:include addSelectors="spool"/>
<sling:include resource="<%= par %>" resourceType="<%= newType %>"/>
<sling:include replaceSelectors="content" />
29.1.2.2 <sling:defineObjects>
The <sling:defineObjects> tag exposes the following, regularly used, scripting objects which can be
referenced by the developer:
slingRequest
SlingHttpServletRequest object, providing access to the HTTP request header information extends the standard HttpServletRequest - and provides access to Sling-specific things like
resource, path info, selector, etc.
slingResponse
SlingHttpServletResponse object, providing access for the HTTP response that is created by
the server. This is currently the same as the HttpServletResponse from which it extends.
request
The standard JSP request object which is a pure HttpServletRequest.
response
The standard JSP response object which is a pure HttpServletResponse.
resourceResolver
The current ResourceResolver object. It is the same as slingRequest.getResourceResolver().
sling
A SlingScriptHelper object, containing convenience methods for scripts, mainly sling.include('/
some/other/resource') for including the responses of other resources inside this response (eg.
embedding header html snippets) and sling.getService(foo.bar.Service.class) to retrieve OSGi
services available in Sling (Class notation depending on scripting language).
resource
the current Resource object to handle, depending on the URL of the request. It is the same as
slingRequest.getResource().
currentNode
If the current resource points to a JCR node (which is typically the case in Sling), this gives
direct access to the Node object. Otherwise this object is not defined.
log
Provides an SLF4J Logger for logging to the Sling log system from within scripts, eg.
log.info("Executing my script").
It has the following attributes:
requestName
responseName
resourceName
nodeName
logName
Page 194 of 214
CQ 5.2 WCM
Copyright 1993-2009 Day Management AG
JSP Tag Libraries
resourceResolverName
slingName
Example:
<%@page session="false" %><%
%><%@page import="com.day.cq.wcm.foundation.forms.ValidationHelper"%><%
%><%@taglib prefix="sling" uri="http://sling.apache.org/taglibs/sling/1.0" %><%
%><sling:defineObjects/>
Page 195 of 214
CQ 5.2 WCM
Copyright 1993-2009 Day Management AG
30 DAM Media Handlers
CQ5 DAM comes with a set of default workflows and media handlers to process assets. The
workflow defines the general tasks to be executed on the assets, then delegates the specific tasks
to the media handlers, for example thumbnail generation or metadata extraction.
Media handlers are services inside CQ5 DAM that perform specific actions on assets. For example,
when an MP3 audio file is uploaded into CQ5, a workflow triggers an MP3 handler that extracts
the metadata and generates a thumbnail. Media handlers are usually used in combination with
workflows. Most common MIME types are supported within CQ5. Specific tasks can be performed
on assets by either extending/creating workflows, extending/creating media handlers or disabling/
enabling media handlers.
30.1 Default Media Handlers
The following media handlers are available within CQ5 DAM and handle the most common MIME
types (click the handler name to access its Javadocs):
Table 30.1.
Handler name
Service Name (in the
System Console)
Supported MIME types
TextHandler
com.day.cq.dam.core.impl.handler.TextHandler
text/plain
PdfHandler
com.day.cq.dam.handler.standard.pdf.PdfHandler
application/pdf
JpegHandler
com.day.cq.dam.core.impl.handler.JpegHandler
image/jpeg
image/jpg
Mp3Handler
com.day.cq.dam.handler.standard.mp3.Mp3Handler
audio/mpeg
ZipHandler
com.day.cq.dam.handler.standard.zip.ZipHandler
application/java-archive
application/zip
PictHandler
com.day.cq.dam.handler.standard.pict.PictHandler
image/pict
StandardImageHandler
com.day.cq.dam.core.impl.handler.StandardImageHandler
image/gif
image/png
application/photoshop
image/jpeg
image/tiff
image/x-ms-bmp
image/bmp
GenericAssetHandler
com.day.cq.dam.core.impl.handler.GenericAssetHandler
fallback in case no other handler was found to
extract data from an asset
All the handlers perform the following tasks:
• extracting all available metadata from the asset.
• creating a thumbnail image out of the asset.
Page 196 of 214
CQ 5.2 WCM
Copyright 1993-2009 Day Management AG
DAM Media Handlers
Beside those tasks other MIME type specific tasks are available: refer to the Javadocs for detailed
information.
It is possible to view the active media handlers:
1.
In your browser, navigate to http://<host>:<port>/system/console/components.
2.
Click the link com.day.cq.dam.core.impl.store.AssetStoreImpl.
3.
A list with all the active media handlers is displayed. For example:
30.2 Using Media Handlers in Workflows to perform tasks on
Assets
Media handlers are services that are usually used in combination with workflows.
CQ5 has the following default workflows to process assets:
• DAM Asset Sync and Metadata Extractor
• DAM Delete Asset
• DAM Delete Dam Asset under /content/dam
• DAM Sub Asset Processor
• DAM Update Asset
Existing workflows can be extended and new ones can be created to process assets according to
specific requirements.
By default, when a PDF document is uploaded into the /var/dam/geometrixx/documents
folder, the default DAM Asset Sync and Metadata Extractor process:
• copies the document into the /content/dam/geometrixx/documents folder
• asks the AssetStore for a handler that is able to process pdf
Then, the pdf handler:
• extracts the metadata
Page 197 of 214
CQ 5.2 WCM
Copyright 1993-2009 Day Management AG
DAM Media Handlers
• generates a thumbnail
• creates sub-assets: each page of the document becomes a sub-asset
The following example shows how to disable the sub-asset creation for PDF documents by
extending the workflow: the Process Subassets step will be replaced by an OR-split that checks
the asset filename:
• if it ends with .pdf, the asset reaches the End step.
• if it does not end with .pdf, the asset goes through a Process Subassets step that
generates sub-assets.
The workflow will look as follows:
Proceed as follows:
1.
Create a service (for example com.day.cq5.myprocess.DoNothingProcess) that does
not affect the asset and install it in CQ5. This service will be used to bypass the sub-asset
creation step.
Tip
You can refer to the section called “Example: create a specific Text Handler” to see
how to create a service and install it in CQ5.
Page 198 of 214
CQ 5.2 WCM
Copyright 1993-2009 Day Management AG
DAM Media Handlers
2.
In your browser, open the Workflow Console (for example: http://localhost:4502/
libs/workflow/content/console.html).
3.
Select the Models tab and edit the DAM Asset Sync and Metadata Extractor
workflow.
4.
Drag and drop an OR Split between the Thumbnail Creation step and the Process
Subassets step.
5.
Click the configuration button of the left step of the OR Split and set the following properties in
the right panel:
• Type: select Process
• Description: This process creates subassets if handler is able to
extract subassets
• Handler Advance: true
• Implementation: select com.day.cq.dam.core.process.CreateSubAssetsProcess
• Process Arguments: /etc/workflow/models/dam/sub_asset_processor
• Timeout: Off
• Timeout Handler:
• Title: Process Subassets
6.
Click the configuration button of the right step of the OR Split and set the following properties
in the right panel:
• Type: select Process
• Description: This process does not affect the asset and leads to the
next step
• Handler Advance: true
• Implementation: type the name of the service here (the service created in step 1; for
example: com.day.cq5.myprocess.DoNothingProcess)
• Process Arguments:
• Timeout: Off
• Timeout Handler:
• Title: Do Nothing
7.
Delete the Process Subassets step that comes after the end of the OR Split.
8.
Create an ecma-script function that is set to true if the filename ends with .pdf, to false
otherwise:
1.
In CQDE, create a file under /etc/workflow/scripts and call it
myPdfCheck.ecma.
2.
Copy-paste the following code into it:
function check() {
if (workflowData.getPayloadType() == "JCR_PATH") {
var path = workflowData.getPayload().toString();
Page 199 of 214
CQ 5.2 WCM
Copyright 1993-2009 Day Management AG
DAM Media Handlers
var node = jcrSession.getItem(path);
if (node.getPath().indexOf(".pdf") >= 0) {
return true;
} else {
return false;
}
} else {
return false;
}
}
3.
9.
Save the file.
Create an ecma-script function that is set to true if the filename does not end with .pdf, to
false otherwise:
1.
In CQDE, create a file under /etc/workflow/scripts and call it
myNotPdfCheck.ecma.
2.
Copy-paste the following code into it:
function check() {
if (workflowData.getPayloadType() == "JCR_PATH") {
var path = workflowData.getPayload().toString();
var node = jcrSession.getItem(path);
if (node.getPath().indexOf(".pdf") >= 0) {
return false;
} else {
return true;
}
} else {
return true;
}
}
3.
Save the file.
10. In your browser, set the rule of the Process Subassets step of the OR Split: type /etc/
workflow/scripts/myPdfCheck.ecma as value of the Rule.
11. Set the rule of the Do Nothing step of the OR Split: type /etc/workflow/scripts/
myNotPdfCheck.ecma as value of the Rule.
12. Save the workflow.
From now on, whenever a pdf file is uploaded into the /var/dam/geometrixx/documents
folder, the file is copied into /content/dam/geometrixx/documents, its metadata are
extracted and thumbnails are generated. Subassets are not created anymore.
30.3 Disabling/Enabling a Media Handler
The media handlers can be disabled or enabled through the Apache Felix Web Management
Console. When the media handler is disabled, its tasks are not performed on the assets.
To enable/disable a media handler:
1.
In your browser, navigate to http://<host>:<port>/system/console/components.
2.
Click the Disable button right beside the name of the media handler. For example:
com.day.cq.dam.handler.standard.mp3.Mp3Handler.
3.
Refresh the page: a Disabled icon is displayed beside the media handler.
4.
To enable the media handler, click the Enable button beside the name of the media handler.
Page 200 of 214
CQ 5.2 WCM
Copyright 1993-2009 Day Management AG
DAM Media Handlers
30.4 Creating a new Media Handler
To support a new media type or to execute specific tasks on an asset, it is necessary to create a
new media handler. This section describes how to proceed.
30.4.1 Important Classes and Interfaces
The best way to start an implementation is to inherit from a provided abstract implementation
that takes care of most things and provides reasonable default behaviour: the
com.day.cq.dam.core.AbstractAssetHandler Class.
Note
This class already provides an abstract service descriptor. So if you inherit from this class
and use the maven-sling-plugin, make sure that you set the inherit flag to true.
The following methods need to be implemented:
• extractMetadata(): this method extracts all available metadata.
• getThumbnailImage(): this method creates a thumbnail image out of the passed asset.
• getMimeTypes(): this method returns the asset mime type(s).
Here is an example template:
package my.own.stuff;
/**
* @scr.component inherit="true"
* @scr.service
*/
public class MyMediaHandler extends com.day.cq.dam.core.AbstractAssetHandler {
// implement the relevant parts
}
The interface and classes include:
com.day.cq.dam.api.handler.AssetHandler Interface
This interface describes the service which adds support for specific mime types. Adding a new
mime type requires to implement this interface. The interface contains methods for importing
and exporting the specific documents, for creating thumbnails and extracting metadata.
For more information refer to the Javadocs.
com.day.cq.dam.core.AbstractAssetHandler Class
This class serves as basis for all other asset handler implementations and provides common
used functionality.
For more information refer to the Javadocs.
com.day.cq.dam.core.AbstractSubAssetHandler Class:
This class serves as basis for all other asset handler implementations and provides common
used functionality plus common used functionality for subasset extraction
For more information refer to the Javadocs.
30.4.2 Example: create a specific Text Handler
In this section, you will create a specific Text Handler that generates thumbnails with a watermark.
Proceed as follows:
Page 201 of 214
CQ 5.2 WCM
Copyright 1993-2009 Day Management AG
DAM Media Handlers
Note
Refer to the section called “Installing Eclipse” for installing and setting up Eclipse with a
Maven plugin and for setting up the dependencies that are needed for the Maven project.
1.
In Eclipse, create the myBundle Maven project:
1.
In the Menu bar, click File, select New, then Other... .
2.
In the dialog, expand the Maven folder, select Maven Project and click Next.
3.
Check the Create a simple project box and the Use default Workspace
locations box, then click Next.
4.
Define the Maven project:
• Group Id: com.day.cq5.myhandler
• Artifact Id: myBundle
• Name: My CQ5 bundle
• Description: This is my CQ5 bundle
5.
2.
Click Finish.
Set the Java Compiler to version 1.5:
1.
Right-click the myBundle project, select Properties.
2.
Select Java Compiler and set following properties to 1.5:
• Compiler compliance level
• Generated .class files compatibility
• Source compatibility
3.
3.
Click OK.
4.
In the dialog window, click Yes.
Replace the code in the pom.xml file with the following code:
<project xmlns="http://maven.apache.org/POM/4.0.0" xmlns:xsi="http://www.w3.org/2001/
XMLSchema-instance" xsi:schemaLocation="http://maven.apache.org/POM/4.0.0 http://
maven.apache.org/maven-v4_0_0.xsd">
<modelVersion>4.0.0</modelVersion>
<!-- ====================================================================== -->
<!-- P A R E N T P R O J E C T D E S C R I P T I O N
-->
<!-- ====================================================================== -->
<parent>
<groupId>com.day.cq.dam</groupId>
<artifactId>dam</artifactId>
<version>5.2.14</version>
<relativePath>../parent</relativePath>
</parent>
<!-- ====================================================================== -->
<!-- P R O J E C T D E S C R I P T I O N
-->
<!-- ====================================================================== -->
<groupId>com.day.cq5.myhandler</groupId>
<artifactId>myBundle</artifactId>
<name>My CQ5 bundle</name>
<version>0.0.1-SNAPSHOT</version>
<description>This is my CQ5 bundle</description>
Page 202 of 214
CQ 5.2 WCM
Copyright 1993-2009 Day Management AG
DAM Media Handlers
<packaging>bundle</packaging>
<!-- ====================================================================== -->
<!-- B U I L D
D E F I N I T I O N
-->
<!-- ====================================================================== -->
<build>
<plugins>
<plugin>
<groupId>org.apache.felix</groupId>
<artifactId>maven-scr-plugin</artifactId>
</plugin>
<plugin>
<groupId>org.apache.sling</groupId>
<artifactId>maven-sling-plugin</artifactId>
<configuration>
<slingUrlSuffix>/libs/dam/install/</slingUrlSuffix>
</configuration>
</plugin>
<plugin>
<groupId>org.apache.felix</groupId>
<artifactId>maven-bundle-plugin</artifactId>
<extensions>true</extensions>
<configuration>
<instructions>
<Bundle-Category>cq5</Bundle-Category>
<Export-Package>
com.day.cq5.myhandler
</Export-Package>
</instructions>
</configuration>
</plugin>
</plugins>
</build>
<!-- ====================================================================== -->
<!-- D E P E N D E N C I E S
-->
<!-- ====================================================================== -->
<dependencies>
<dependency>
<groupId>com.day.cq.dam</groupId>
<artifactId>cq-dam-api</artifactId>
<version>5.2.10</version>
<scope>provided</scope>
</dependency>
<dependency>
<groupId>com.day.cq.dam</groupId>
<artifactId>cq-dam-core</artifactId>
<version>5.2.10</version>
<scope>provided</scope>
</dependency>
<dependency>
<groupId>com.day.cq</groupId>
<artifactId>cq-commons</artifactId>
</dependency>
<dependency>
<groupId>javax.jcr</groupId>
<artifactId>jcr</artifactId>
</dependency>
<dependency>
<groupId>org.apache.felix</groupId>
<artifactId>org.osgi.compendium</artifactId>
</dependency>
<dependency>
<groupId>org.slf4j</groupId>
<artifactId>slf4j-api</artifactId>
</dependency>
<dependency>
<groupId>commons-lang</groupId>
<artifactId>commons-lang</artifactId>
</dependency>
<dependency>
<groupId>commons-collections</groupId>
Page 203 of 214
CQ 5.2 WCM
Copyright 1993-2009 Day Management AG
DAM Media Handlers
<artifactId>commons-collections</artifactId>
</dependency>
<dependency>
<groupId>commons-io</groupId>
<artifactId>commons-io</artifactId>
</dependency>
<dependency>
<groupId>com.day.commons</groupId>
<artifactId>day-commons-gfx</artifactId>
</dependency>
<dependency>
<groupId>com.day.commons</groupId>
<artifactId>day-commons-text</artifactId>
</dependency>
<dependency>
<groupId>com.day.cq.workflow</groupId>
<artifactId>cq-workflow-api</artifactId>
</dependency>
<dependency>
<groupId>com.day.cq.wcm</groupId>
<artifactId>cq-wcm-foundation</artifactId>
<version>5.2.22</version>
</dependency>
</dependencies>
</project>
4.
5.
Create the package com.day.cq5.myhandler that will contain the Java classes under
myBundle/src/main/java:
1.
Under myBundle, right-click src/main/java, select New, then Package.
2.
Name it com.day.cq5.myhandler and click Finish.
Create the Java class MyHandler:
1.
In Eclipse, under myBundle/src/main/java, right-click the
com.day.cq5.myhandler package, select New, then Class.
2.
In the dialog window, name the Java Class MyHandler and click Finish. Eclipse
creates and opens the file MyHandler.java.
3.
In MyHandler.java replace the existing code with the following:
package com.day.cq5.myhandler;
import
import
import
import
import
import
java.awt.Color;
java.awt.Rectangle;
java.awt.image.BufferedImage;
java.io.IOException;
java.io.InputStream;
java.io.InputStreamReader;
import javax.jcr.Node;
import javax.jcr.RepositoryException;
import javax.jcr.Session;
import org.apache.commons.io.IOUtils;
import org.slf4j.Logger;
import org.slf4j.LoggerFactory;
import
import
import
import
import
com.day.cq.dam.api.metadata.ExtractedMetadata;
com.day.cq.dam.core.AbstractAssetHandler;
com.day.image.Font;
com.day.image.Layer;
com.day.cq.wcm.foundation.ImageHelper;
/**
Page 204 of 214
CQ 5.2 WCM
Copyright 1993-2009 Day Management AG
DAM Media Handlers
* The <code>MyHandler</code> can extract text files
*
* @scr.component inherit="true" immediate="true" metatype="false"
* @scr.service
*/
public class MyHandler extends AbstractAssetHandler {
/**
* Logger instance for this class.
*/
private static final Logger log = LoggerFactory.getLogger(MyHandler.class);
/**
* Music icon margin
*/
private static final int MARGIN = 10;
/**
* @see com.day.cq.dam.api.handler.AssetHandler#getMimeTypes()
*/
public String[] getMimeTypes() {
return new String[] {"text/plain"};
}
public ExtractedMetadata extractMetadata(Node asset) {
ExtractedMetadata extractedMetadata = new ExtractedMetadata();
InputStream data = getInputStream(asset);
try {
// read text data
InputStreamReader reader = new InputStreamReader(data);
char[] buffer = new char[4096];
String text = "";
while (reader.read(buffer) != -1) {
text += new String(buffer);
}
reader.close();
long wordCount = this.wordCount(text);
extractedMetadata.setProperty("text", text);
extractedMetadata.setMetaDataProperty("Word Count",wordCount);
setMimetype(extractedMetadata, asset);
} catch (Throwable t) {
log.error("handling error: " + t.toString(), t);
} finally {
IOUtils.closeQuietly(data);
}
return extractedMetadata;
}
// ----------------------< helpers >---------------------------------------protected BufferedImage getThumbnailImage(Node node) {
ExtractedMetadata metadata = extractMetadata(node);
final String text = (String) metadata.getProperty("text");
// create text layer
final Layer layer = new Layer(500, 600, Color.WHITE);
layer.setPaint(Color.black);
Font font = new Font("Arial", 12);
String displayText = this.getDisplayText(text, 600, 12);
if(displayText!=null && displayText.length() > 0) {
// commons-gfx Font class would throw IllegalArgumentException on
empty or null text
layer.drawText(10, 10, 500, 600, displayText, font, Font.ALIGN_LEFT,
0, 0);
}
// create watermark and merge with text layer
Layer watermarkLayer;
try {
final Session session = node.getSession();
Page 205 of 214
CQ 5.2 WCM
Copyright 1993-2009 Day Management AG
DAM Media Handlers
watermarkLayer = ImageHelper.createLayer(session, "/var/dam/geometrixx/icons/
certificate.png");
watermarkLayer.setX(MARGIN);
watermarkLayer.setY(MARGIN);
layer.merge(watermarkLayer);
} catch (RepositoryException e) {
// TODO Auto-generated catch block
e.printStackTrace();
} catch (IOException e) {
// TODO Auto-generated catch block
e.printStackTrace();
}
layer.crop(new Rectangle(510, 600));
return layer.getImage();
}
// ---------------< private >----------------------------------------------/**
* This method cuts lines if the text file is too long..
*
* @param text
*
text to check
* @param height
*
text box height (px)
* @param fontheight
*
font height (px)
* @return the text which will fit into the box
*/
private String getDisplayText(String text, int height, int fontheight) {
String trimmedText = text.trim();
int numOfLines = height / fontheight;
String lines[] = trimmedText.split("\n");
if (lines.length <= numOfLines) {
return trimmedText;
} else {
String cuttetText = "";
for (int i = 0; i < numOfLines; i++) {
cuttetText += lines[i] + "\n";
}
return cuttetText;
}
}
/**
* This method counts the number of words in a string
*
* @param text the String whose words would like to be counted
* @return the number of words in the string
*/
private long wordCount(String text) {
// We need to keep track of the last character, if we have two white
spaces in a row we dont want to double count
// The starting of the document is always a whitespace
boolean prevWhiteSpace = true;
boolean currentWhiteSpace = true;
char c;
long numwords = 0;
int j = text.length();
int i = 0;
while (i < j) {
c = text.charAt(i++);
if (c == 0) {
break;
}
currentWhiteSpace = Character.isWhitespace(c);
if (currentWhiteSpace && !prevWhiteSpace) {
numwords++;
}
prevWhiteSpace = currentWhiteSpace;
}
Page 206 of 214
CQ 5.2 WCM
Copyright 1993-2009 Day Management AG
DAM Media Handlers
// If we do not end with a white space then we need to add one extra
word
if (!currentWhiteSpace) {
numwords++;
}
return numwords;
}
}
4.
6.
Save the changes.
Compile the Java class and create the bundle:
1.
Right-click the myBundle project, select Run As, then Maven Install.
2.
The bundle myBundle-0.0.1-SNAPSHOT.jar (containing the compiled class) is
created under myBundle/target.
7.
In CRX Explorer, create a new node under /apps/myApp. Name = install, Type =
nt:folder.
8.
Copy the bundle myBundle-0.0.1-SNAPSHOT.jar and store it under /apps/myApp/
install (for example with WebDAV).
Note
The new text handler is now active in CQ5.
9.
In your browser, open the Apache Felix Web Management Console and disable the default
text handler com.day.cq.dam.core.impl.handler.TextHandler.
From now on, whenever you upload a txt file into CQ5 under the /var/dam/documents folder,
the file is copied into /content/dam/documents, its metadata are extracted and two thumbnails
with a watermark are generated.
Page 207 of 214
CQ 5.2 WCM
Copyright 1993-2009 Day Management AG
31 How to Model Data
31.1 Data Modeling - David Nuescheler's Model
31.1.1 Source
The following details are ideas and comments expressed by David Nuescheler.
David is co-founder and CTO of Day Software AG, a leading provider of global content
management and content infrastructure software. He also leads the development of JSR-170, the
Java Content Repository (JCR) application programming interface (API), the technology standard
for content management.
Further updates can also be seen on http://wiki.apache.org/jackrabbit/DavidsModel.
31.1.2 Introduction from David
In various discussions I found that developers are somewhat at unease with the features and
functionalities presented by JCR when it comes to content modeling. There is no guide and very
little experience yet on how to model content in a repository and why one content model is better
than the other.
While in the relational world the software industry has a lot of experience on how to model data, we
are still at the early stages for the content repository space.
I would like to start filling this void by expressing my personal opinions on how content should
be modeled, hoping that this could some day graduate into something more meaningful to the
developers community, which is not just "my opinion" but something that is more generally
applicable. So consider this my quickly evolving first stab at it.
Important
Disclaimer: These guidelines express my personal, sometimes controversial views. I am
looking forward to debate these guidelines and refine them.
31.1.3 Seven Simple Rules
31.1.3.1 Rule #1: Data First, Structure Later. Maybe.
31.1.3.1.1 Explanation
I recommend not to worry about a declared data structure in an ERD sense. Initially.
Learn to love nt:unstructured (& friends) in development.
I think Stefano pretty much sums this one up.
My bottom-line: Structure is expensive and in many cases it is entirely unnecessary to explicitly
declare structure to the underlying storage.
There is an implicit contract about structure that your application inherently uses. Let's say I store
the modification date of a blog post in a lastModified property. My App will automatically know
to read the modification date from that same property again, there is really no need to declare that
explicitly.
Further data constraints like mandatory or type and value constraints should only be applied where
required for data integrity reasons.
Page 208 of 214
CQ 5.2 WCM
Copyright 1993-2009 Day Management AG
How to Model Data
31.1.3.1.2 Example
The above example of using a "lastModified" Date property on for example "blog post" node, really
does not mean that there is a need for a special nodetype. I would definitely use "nt:unstructured"
for my blog post nodes at least initially. Since in my blogging application all I am going to do is to
display the lastModified date anyway (possibly "order by" it) I barely care if it is a Date at all. Since
I implicitly trust my blog-writing application to put a "date" there anyway, there really is no need to
declare the presence of a "lastModified" date in the form a of nodetype.
31.1.3.1.3 Discussion
http://www.nabble.com/DM-Rule-#1:-Data-First,-Structure-Later.-Maybe.-tf4039967.html
31.1.3.2 Rule #2: Drive the content hierarchy, don't let it happen.
31.1.3.2.1 Explanation
The content hierarchy is a very valuable asset. So don't just let it happen, design it. If you don't
have a "good", human-readable name for a node, that's probably that you should reconsider.
Arbitrary numbers are hardly ever a "good name".
While it may be extremely easy to quickly put an existing relational model into a hierarchical model,
one should put some thought in that process.
In my experience if one thinks of access control and containment usually good drivers for the
content hierarchy. Think of it as if it was your file system. Maybe even use files and folders to
model it on your local disk.
Personally I prefer hierarchy conventions over the nodetyping system in a lot of cases initially, and
introduce the typing later.
31.1.3.2.2 Example
I would model a simple blogging system as follows. Please note that initially I don't even care about
the respective nodetypes that I use at this point.
/content/myblog
/content/myblog/posts
/content/myblog/posts/what_i_learned_today
/content/myblog/posts/iphone_shipping
/content/myblog/comments/iphone_shipping/i_like_it_too
/content/myblog/comments/iphone_shipping/i_like_it_too/i_hate_it
I think one of the things that become apparent is that we all understand the structure of the content
based on the example without any further explanations.
What may be unexpected initially is why I wouldn't store the "comments" with the "post", which is
due to access control which I would like to be applied in a reasonably hierarchical way.
Using the above content model I can easily allow the "anonymous" user to "create" comments, but
keep the anonymous user on a read-only basis for the rest of the workspace.
31.1.3.2.3 Discussion
http://www.nabble.com/DM-Rule-#2:-Drive-the-content-hierarchy,-don't-let-it-happen.tf4039994.html
31.1.3.3 Rule #3: Workspaces are for clone(), merge() and update().
31.1.3.3.1 Explanation
If you don't use clone(), merge() or update() methods in your application a single workspace is
probably the way to go.
Page 209 of 214
CQ 5.2 WCM
Copyright 1993-2009 Day Management AG
How to Model Data
"Corresponding nodes" is a concept defined in the JCR spec. Essentially, it boils down to nodes
that represent the same content, in different so-called workspaces.
JCR introduces the very abstract concept of Workspaces which leaves a lot of developers unclear
on what to do with them. I would like to propose to put your use of workspaces to the following to
test.
If you have a considerable overlap of "corresponding" nodes (essentially the nodes with the same
UUID) in multiple workspaces you probably put workspaces to good use.
If there is no overlap of nodes with the same UUID you are probably abusing workspaces.
Workspaces should not be used for access control. Visibility of content for a particular group of
users is not a good argument to separate things into different workspaces. JCR features "Access
Control" in the content repository to provide for that.
Workspaces are the boundary for references and query.
31.1.3.3.2 Example
Use workspaces for things like:
• v1.2 of your project vs. a v1.3 of your project
• a "development", "QA" and a "published" state of content
Do not use workspaces for things like:
• user home directories
• distinct content for different target audiences like public, private, local, ...
• mail-inboxes for different users
31.1.3.3.3 Discussion
http://www.nabble.com/DM-Rule-#3:-Workspaces-are-for-corresponding-nodes.-tf4040010.html
31.1.3.4 Rule #4: Beware of Same Name Siblings.
31.1.3.4.1 Explanation
While Same Name Siblings (SNS) have been introduced into the spec to allow compatibility with
data structures that are designed for and expressed through XML and therefore are extremely
valuable to JCR, SNS come with a substantial overhead and complexity for the repository.
Any path into the content repository that contains an SNS in one of its path segments becomes
much less stable, if an SNS is removed or reordered, it has an impact on the paths of all the other
SNS and their children.
For import of XML or interaction with existing XML SNS maybe necessary and useful but I have
never used SNS, and never will in my "green field" data models.
31.1.3.4.2 Example
Use
/content/myblog/posts/what_i_learned_today
/content/myblog/posts/iphone_shipping
instead of
Page 210 of 214
CQ 5.2 WCM
Copyright 1993-2009 Day Management AG
How to Model Data
/content/blog[1]/post[1]
/content/blog[1]/post[2]
31.1.3.4.3 Discussion
http://www.nabble.com/DM-Rule-#4:-Beware-of-Same-Name-Siblings.-tf4040024.html
31.1.3.5 Rule #5: References considered harmful.
31.1.3.5.1 Explanation
References imply referential integrity. I find it important to understand that references do not just
add additional cost for the repository managing the referential integrity, but they also are costly
from a content flexibility perspective.
Personally I make sure I only ever use references when I really cannot deal with a dangling
reference and otherwise use a path, a name or a string UUID to refer to another node.
31.1.3.5.2 Example
Let's assume I allow "references" from a document (a) to another document (b). If I model this
relation using reference properties this means that the two documents are linked on a repository
level. I cannot export/import document (a) individually, since the reference property's target may
not exist. Other operations like merge, update, restore or clone are affected as well.
So I would either model those references as "weak-references" (in JCR v1.0 this essentially boils
down to string properties that contain the uuid of the target node) or simply use a path. Sometimes
the path is more meaningful to begin with.
I think there are use cases where a system really can't work if a reference is dangling, but I just
can't come up with a good "real" yet simple example from my direct experience.
31.1.3.5.3 Discussion
http://www.nabble.com/DM-Rule-#5:-References-considered-harmful.-tf4040042.html
31.1.3.6 Rule #6: Files are Files are Files.
31.1.3.6.1 Explanation
If a content model exposes something that even remotely smells like a file or a folder I try to use (or
extend from) nt:file, nt:folder and nt:resource.
In my experience a lot of generic applications allow interaction with nt:folder and nt:files implicitly
and know how to handle and display those event if they are enriched with additional metainformation. For example a direct interaction with file server implementations like CIFS or WebDAV
sitting on top of JCR become implicit.
I think as good rule of thumb one could use the following: If you need to store the filename and
the mime-type then nt:file/nt:resource is a very good match. If you could have multiple "files" an
nt:folder is a good place to store them.
If you need to add meta information for your resource, let's say an "author" or a "description"
property, extend nt:resource not the nt:file. I rarely extend nt:file and frequently extend nt:resource.
31.1.3.6.2 Example
Let's assume that someone would like to upload an image to a blog entry at:
/content/myblog/posts/iphone_shipping
Page 211 of 214
CQ 5.2 WCM
Copyright 1993-2009 Day Management AG
How to Model Data
and maybe the initial gut reaction would be to add a binary property containing the picture.
While there certainly are good use cases to use just a binary property (let's say the name is
irrelevant and the mime-type is implicit) in this case I would recommend the following structure for
my blog example.
/content/myblog/posts/iphone_shipping/attachments [nt:folder]
/content/myblog/posts/iphone_shipping/attachments/front.jpg [nt:file]
/content/myblog/posts/iphone_shipping/attachments/front.jpg/jcr:content [nt:resource]
31.1.3.6.3 Discussion
http://www.nabble.com/DM-Rule-#6:-Files-are-Files-are-Files.-tf4040063.html
31.1.3.7 Rule #7: IDs are evil.
31.1.3.7.1 Explanation
In relational databases IDs are a necessary means to express relations, so people tend to use
them in content models as well. Mostly for the wrong reasons through.
If your content model is full of properties that end in "Id" you probably are not leveraging the
hierarchy properly.
It is true that some nodes need a stable identification throughout their live cycle. Much fewer than
you might think though. mix:referenceable provides such a mechanism built into the repository,
so there really is no need to come up with an additional means of identifying a node in a stable
fashion.
Keep also in mind that items can be identified by path, and as much as "symlinks" make way
more sense for most users than hardlinks in a unix filesystem, a path makes a sense for most
applications to refer to a target node.
More importantly, it is **mix**:referenceable which means that it can be applied to a node at the
point in time when you actually need to reference it.
So let's say just because you would like to be able to potentially reference a node of type
"Document" does not mean that your "Document" nodetype has to extend from mix:referenceable
in a static fashion since it can be added to any instance of the "Document" dynamically.
31.1.3.7.2 Example
use:
/content/myblog/posts/iphone_shipping/attachments/front.jpg
instead of:
[Blog]
- blogId
- author
[Post]
- postId
- blogId
- title
- text
- date
[Attachment]
- attachmentId
- postId
- filename
Page 212 of 214
CQ 5.2 WCM
Copyright 1993-2009 Day Management AG
How to Model Data
+ resource (nt:resource)
31.1.3.7.3 Discussion
http://www.nabble.com/DM-Rule-#7:-IDs-are-evil.-tf4040076.html
Page 213 of 214
CQ 5.2 WCM
Copyright 1993-2009 Day Management AG
Appendix A. Copyright, Licenses and
Formatting Conventions
For all copyright statements and license agreements see Copyright, Licenses and Disclaimers.
A.1 Formatting Conventions
The following tables detail formatting conventions used within this guide:
Table A.1. Formatting Conventions - Text
Style
Description
Example
Cross-reference
Cross-reference to external documents.
See the Microsoft Manual of
Style for Technical Publications.
GUI Item
User interface items.
Click Save.
Keyboard shortcut
Keyboard shortcuts.
Press Ctrl+A.
Mouse Button
Mouse buttons.
Secondary-mouse button
(usually the right-mouse
button).
Link
Link to anchor-points within the current
document and/or external sources.
http://www.day.com
Code
Example of programming code.
if (weather == sunny) smile;
User Input
Example of text, or commands, that you
type.
<Variable User
Input>
Example of variable text - you type the
actual value needed.
ls <cq-installation-dir>
[Optional
Parameter]
An optional parameter.
ls [<option>] [<filename>]
Computer Output
Logging and error messages.
ls *.xml
ls: cannot access
error.log:
Table A.2. Formatting Conventions - Actions
When you see this...
It means do this...
Ctrl+A
Hold down the Ctrl key, then press the A key.
Right-click
Press the right-mouse button (or the left-mouse button if your mouse
has been configured for left-handed use).
Drag
Hold down the left mouse button while moving the item, then release the
mouse button at the new location (or the right mouse button if your mouse
has been configured for left-handed use).
Page 214 of 214
CQ 5.2 WCM
Copyright 1993-2009 Day Management AG
© Copyright 2026 Paperzz