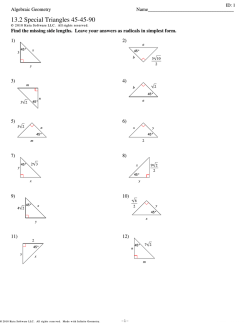
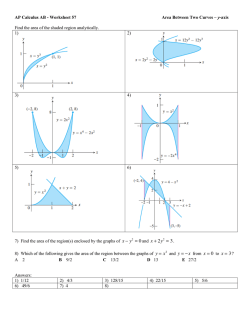
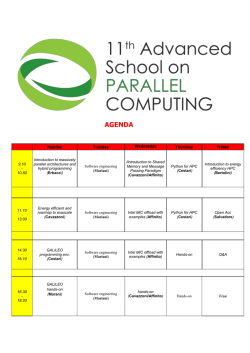
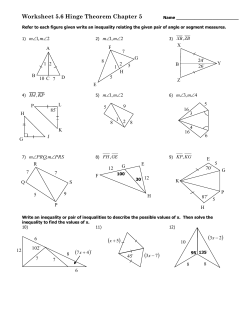
22/3/2014
Setting up Python 3: Worksheet | ispython.com
ispython.com
a new skin
Setting up Python 3: Worksheet
Assumptions
T his worksheet is designed to be used in a computer laboratory as a class exercise.
Whether in a lab or not, this worksheet assumes the availability of Python3 and
IDLE – a helpful Integrated Development Environment for Python3.
Broad Aims
We will use a minimum set of instructions of the T urtle graphics package which is
part of the libraries attached to Python , in order to accomplish our main task: to
introduce, use and learn some of the concepts and control structures associated
with programming in the language Python3.
What you need
No knowledge of programming in Python or T urtle graphics
to learn how to highlight text, copy with Ctrl-C, paste with Ctrl-V and cut with
Ctrl-X
A sense of direction, and turning through an angle of degrees, and a little
geometry would be useful later on, but not essential
A recognition that making mistakes is an essential part of the learning
process. Python 3 and Idle will help you find.
T enacity to correct mistakes as you go
Willingness to ask for help
Willingness to indulge in thinking in some detail how procedures(algorithms)
get put together
http://ispython.com/wp/?page_id=89
1/6
22/3/2014
Setting up Python 3: Worksheet | ispython.com
Setting Thing s Up
Begin:
by double-clicking on, or typing in: Idle if you are using a system already set
up
Go to USB disc space area (COMPUT ER)and double-click on Removable Disc,
then on Portable Python 3.2.5.1 if you are using Portable Python on a USB
stick.
T hen double-click on IDLE-Portable. It may take a few seconds to upload.
Either way you should see the following screen:
Figure 1 Screen 1: The Interactive Shell
The Interactive Screen
T his screen is the interactive screen which announces, at the top of Screen 1, the
version of Python we are running. Check that the version of python starts with a 3.
For this worksheet, the interactive shell, Screen 1, is where you will
http://ispython.com/wp/?page_id=89
2/6
22/3/2014
Setting up Python 3: Worksheet | ispython.com
be able to open Screen 2 by clicking on File at the top of Screen 1, and clicking
on New Window in the Drop-down menu. (See Figure 2)
see error messages, when they occur, from Screen 2 programs
be able to experiment with single instructions of Python 3, before we go on to
write and SAVE and RUN whole programs in Screen 2.
If your program in Screen 2 communicates with a user, messages(print()) for
the user will appear on Screen 1.
It is also the screen where you can open a New Window when you start, and
open files in which you have stored your Python3 programs.
Figure 2. Generating Screen 2 from Drop-down menu on Screen 1
If Screen 2 appears first, just carry on from section �T urtle: Lab Worksheet 1′.
Screen 1 will appear when you RUN your first program. T hen you can align Screens
1 and 2 as in fig.4.
If you click your mouse on �File’ at the top of Screen 1 and then click on �New
Window’ on the drop-down menu, another screen appears – Screen 2:
http://ispython.com/wp/?page_id=89
3/6
22/3/2014
Setting up Python 3: Worksheet | ispython.com
Figure 3. Screen 2 : Type in your program here
T hese two screens may overlap. Separate them by dragging them by their top
edges. Adjust their widths if you need to, so that they are sitting side by side:
Figure 4 Screens 1 and 2 side by side
http://ispython.com/wp/?page_id=89
4/6
22/3/2014
Setting up Python 3: Worksheet | ispython.com
Lab Worksheet 1
A few practical pointers:
When you want to work in Screen 2, which is where you type your program,
you need to CLICK ON the screen before typing
When you have completed typing, you need to SAVE your program by clicking
on �File’ at the top of Screen 2, and then clicking on �Save’ half way down the
drop-down menu. (Alternatively you can use Ctrl+S). You will be asked to name
your program file the first time you try to save it. Choose a name with .py at
the end, like pop.py
T hen RUN your program by clicking on �Run’ at top of Screen 2, and then
clicking on �Run Module’ at the bottom of the the drop-down menu (or press
the F5 key to RUN it)
See figures 5 and 6 below
Figure 5: Save your program with a name ending in .py
http://ispython.com/wp/?page_id=89
5/6
22/3/2014
Setting up Python 3: Worksheet | ispython.com
Figure 6 RUN your program
Where are we g oing ?
In Computer Science we are looking to see how things work, how to complete a
task using the capabilities of a computer. In this exercise we are looking to find a
way to draw regular polygons and circles to tackle some related problems; later to
make a function for public use that returns any regular polygon and any circle in
Python3 and in T urtle Graphics. On the way we are looking for patterns which
repeat so that we can harness the power of the computer to repeat instructions
and to process them quickly. Our main aim is learn how to become proficient in
solving problems through programming.
http://ispython.com/wp/?page_id=89
6/6
© Copyright 2026 Paperzz