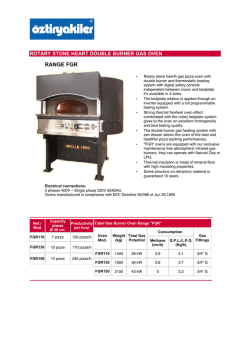
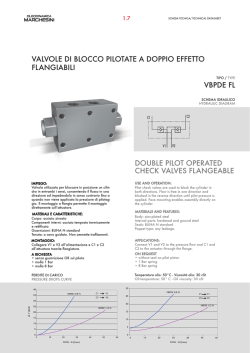
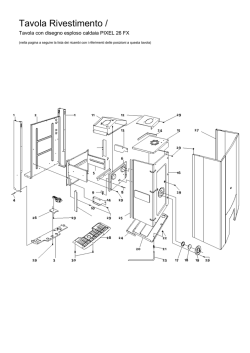
2
ITALIANO
Leggere attentamente le istruzioni ed avvertenze contenute sul presente libretto in quanto forniscono
importanti indicazioni riguardanti la sicurezza d’installazione, d’uso e di manutenzione. Conservare
con cura questo libretto per ogni ulteriore consultazione.
L’installazione deve essere effettuata da personale qualificato che sarà responsabile del rispetto
delle norme di sicurezza vigenti.
21
ENGLISH
Read carefully all warnings and instructions contained in this manual as they give important safety
instructions regarding installation, use and maintenance. Keep this manual for future reference. Installation must be carried out by qualified personnel who will be responsible for respecting existing
safety regulations.
INDICE
PAGINA
ALLEGATO DI DICHIARAZIONE DI CONFORMITÁ________________________ 3
AVVERTENZE GENERALI_ _____________________________________________ 4
SPEDIZIONE - DIMENSIONI___________________________________________ 8
CARATTERISTICHE TECNICHE_ ________________________________________ 9
CAMPI DI LAVORO__________________________________________________ 10
TUBAZIONE DI ALIMENTAZIONE OLIO COMBUSTIBILE__________________ 11
SCHEMA ELETTRICO________________________________________________ 12
APPLICAZIONE DEL BRUCIATORE - SCHEMA TUBAZIONE GAS_ __________ 14
IMPIANTO ELETTRICO_______________________________________________ 15
REGOLAZIONE ARIA________________________________________________ 16
REGOLAZIONE ANELLO DI PRESSURIZZAZIONE________________________ 20
REGOLAZIONE PORTATA GAS PER VALVOLA PILOTA_____________________ 20
REGOLAZIONE PORTATA GAS VALVOLA PRINCIPALE____________________ 21
PRESSOSTATO ARIA_________________________________________________ 21
PRESSOSTATO GAS MINIMA-MASSIMA_ _______________________________ 22
INNESCO POMPA_ _________________________________________________ 23
MANUTENZIONE___________________________________________________ 26
NOMENCLATURA___________________________________________________ 27
SCHEMA PER L’ESECUZIONE DELLA TUBAZIONE ADDUZIONE GAS_______ 29
Complimenti...
...Per l’ottima scelta. La ringraziamo per la preferenza accordata ai ns. prodotti.
LAMBORGHINI è dal 1959 attivamente presente in Italia e nel mondo con una rete capillare di
Agenti e concessionari, che garantiscono costantemente la presenza del prodotto sul mercato.
Si affianca a questo un servizio di assistenza tecnica, «LAMBORGHINI SERVICE», al quale è affidata una qualificata manutenzione del prodotto.
IMPORTANTE - L’installazione del bruciatore deve seguire scrupolosamente le normative
vigenti; utilizzare e acquistare componenti di serie o a richiesta presso i centri vendita
ed assistenza LAMBORGHINI.
L’inadempienza delle stesse e l’inosservanza di quanto riportato, esonerano la ditta
costruttrice da qualsiasi responsabilità.
ALLEGATO DI DICHIARAZIONE DI CONFORMITÀ
Allegato alla dichiarazione di conformità - Annex to the conformity declaration
Annexe à la déclaration de conformité - Anlage zur Übereinstimmungserklärung
Anexo a la declaración de conformidad - Bijlage bij de eenvormigheidsverklaring
Descrizione dell’apparecchio
Equipment description
Descriptif de l’appareil
Gerätebeschreibung
Descripción de equipe
Beschrijving van het materiaal
Serie
Series
Serie
Conformità alla Direttiva Europea
Comply to the European Directive
Conformité à la Directive Européenne
In Übereinstimmung mit den EG-Richtlinien
Conformidad con la Directiva Europea
Voldoen aan de Europese Richtlijn
Bruciatore di gasolio
Oil burner
Brûleurs de fioul domestique
Gasölbrenner
Quemadores de gasóleo
Stookoliebranders
AZ
HT
OIL
G
GP
JOIL
73/23/CEE
Bruciatore di nafta
Heavy oil burners
Brûleurs de fioul lourd
Ölbrenner
Quemadores de fuel-oil
Zware stookoliebranders
N
NP
89/336/CEE
89/392/CEE
73/23/CEE
89/336/CEE
89/392/CEE
Bruciatore di gas
Gas burners
Brûleurs de gaz
Gasbrenner
Quemadores de gas
Gasbranders
AZ
HT
GAS
GAS P
Bruciatori misti di gas e gasolio
Dual fuel mixed burners
Brûleurs mixtes de gaz et fioul
Mischbrenner für Gas und Gasöl
Quemadores mixtos de gas y gasóleo
Kombibranders
MIX G
MIX GP
TWIN
73/23/CEE
89/336/CEE
89/392/CEE
90/396/CEE
73/23/CEE
89/336/CEE
89/392/CEE
90/396/CEE
Conformità alla norma
Comply to norm
Conformité à la norme
In Übereinstimmung mit den Normen
Conformidad con la normativa
Voldoen aan de norm
EN 267
EN 55014 (1993)
EN 55104 (1995)
EN 61000-3-2 (1995)
EN 61000-3-3 (1995)
EN 61000-4-2 (1995)
EN 61000-4-4 (1995)
EN 61000-4-5 (1995)
EN 61000-4-11 (1994)
ENV 50140 (1993)
ENV 50141 (1993)
ENV 50165 (1997)
EN 55014 (1993)
EN 55104 (1995)
EN 61000-3-2 (1995)
EN 61000-3-3 (1995)
EN 61000-4-2 (1995)
EN 61000-4-4 (1995)
EN 61000-4-5 (1995)
EN 61000-4-11 (1994)
ENV 50140 (1993)
ENV 50141 (1993)
ENV 50165 (1997)
EN 676
EN 55014 (1993)
EN 55104 (1995)
EN 61000-3-2 (1995)
EN 61000-3-3 (1995)
EN 61000-4-2 (1995)
EN 61000-4-4 (1995)
EN 61000-4-5 (1995)
EN 61000-4-11 (1994)
ENV 50140 (1993)
ENV 50141 (1993)
ENV 50165 (1997)
EN 267
EN 676
EN 55014 (1993)
EN 55104 (1995)
EN 61000-3-2 (1995)
EN 61000-3-3 (1995)
EN 61000-4-2 (1995)
EN 61000-4-4 (1995)
EN 61000-4-5 (1995)
EN 61000-4-11 (1994)
ENV 50140 (1993)
ENV 50141 (1993)
ENV 50165 (1997)
AVVERTENZE GENERALI
- Il libretto d’istruzioni costituisce parte integrante ed essenziale del prodotto e dovrà essere consegnato all’utilizzatore.
- Leggere attentamente le avvertenze contenute nel libretto in quanto forniscono importanti indica
zioni riguardanti la sicurezza di installazione, d’uso e manutenzione.
- Conservare con cura il libretto per ogni ulteriore consultazione.
- L’installazione deve essere effetuata in ottemperranza alle norme vigenti, secodo le istruzioni del costruttore e da personale professionalmente qualificato.
- Per personale professionalmente qualificato si intende quello avente competenza tecnica nel setto
re dei componenti di impianti di riscaldamento ad uso civile e produzione di acqua calda ad uso sanitario e, in particolare, i centri assistenza autorizzati dal costruttore.
- Un’errata installazione può causare danni a persone, animali o cose, per i quali il costruttore non è responsabile.
- Dopo aver tolto ogni imballagio assicurarsi dell’integrità del contenuto.
- In caso di dubbio non utilizzare l’appaecchio e rivolgersi al fornitore.
- Gli elementi dell’imballaggio ( gabbia di legno, chiodi, graffe, sacchetti di plastica, polstirolo espanso, ecc.) non devono essere lasciati alla portata dei bambini in quanto potenziali font di pericolo.
- Prima di effettuare qualsiasi operazione di pulizia o di manutenzione, disinserire l’apparecchio dalla rete di alimentazione agendo sull’interruttore dell’ impianto e/o attraverso gli appositi orga-
ni di intercettazione.
- Non ostruire le griglie di aspirazione o di dissipazione.
- In caso di guasto e/o di cattivo funzionamento dell’appaecchio, disattivarlo, astenendosi da qual-
siasi tentativo di riparazione o di intervento diretto.
- Rivolgersi esclusivamente a personale professionalmente qualificato.
- L’eventuale riparazione dei prodotti dovrà essere effettuata solamente da un centro di assistenza autorizzato dalla casa costruttrice utilizzando esclusivamente ricambi originali.
- Il mancato rispetto di quanto sopra può compromettere la sicurezza dell’apparecchio. Per garan-
tire l’efficienza dell’apparecchio e per il suo corretto funzionamento è indispensabile fare effettua
re, da personale professionalmente qualificato la manutenzione periodica attenendosi alle indica-
zioni del costruttore.
- Allorchè si decida di non utilizzare più l’apparecchio, si dovranno rendere innocue quelle parti suscettibili di causare potenziali fonti di pericolo.
- Se l’apparecchio dovesse essere venduto o trasferito ad un altro prorpietario o se si dovesse traslocare e lasciare l’apparecchio assicurarsi sempre che il libretto accompagni l’apparecchio in modo che possa essere consultato dal nuovo prorietario e/o dall’installatore.
- Per tutti gli apparecchi con optionals o kit (compresi quelli elettrici) si dovranno utilizzare solo accessori originali.
- Questo apparecchio dovrà essere destinato all’uso per il quale è stato espressamente previsto. Ogni altro uso è da cosiderarsi improprio e quindi pericoloso.E’esclusa qualsiasi responsabilità contrattuale ed extra contrattuale del costruttore per i danni causati da errori nell’installazione e nell’uso, e comunque da innosservanza delle istruzioni date dal costruttore stesso.
AVVERTENZE PARTICOLARI PER BRUCIATORI BRUCIATORI
- Il bruciatore deve essere installato in locale adatto con aperture minime di ventilazione secondo quanto prescritto dalle norme vigenti e comunque sufficenti ad ottenere una perfetta combutione.
- Devono essere utilizzati solo bruciatori costruiti secondo le norme vigenti.
- Questo bruciatore dovrà essere destinato solo all’uso per il quale è stato espressamente previsto.
- Prima di collegare il bruciatore accertarsi che i dati di targa siano corrispondenti a quelli della rete di alimentazione(elettrica, gas, gasolio o altro combustibile).
- Non toccare parti calde del bruciatore. Queste, normalmente situate in vicinanza della fiamma e dell’eventuale sistema di preriscaldamento del combustibile, diventano calde durante il
funzionamento e permangono tali anche dopo un arresto non prolungato del bruciatore.
- Allorchè si decide di non utilizzare in via definitiva il bruciatore, si dovranno far effettuare da personale professionalmente qualificato le seguenti operazioni:
a) Disinserire l’alimentazione elettrica staccando il cavo di alimentazione dell’interruttore generale.
b) Chiudere l’alimentazione del combustibile attraverso la valvola manuale di intercettazione asportando i volantini di comando dalla loro sede.
AVVERTENZE PARTICOLARI
- Accertarsi che chi ha eseguito l’installazione del bruciatore lo abbia fissato saldamente al generatore di calore in modo che la fiamma si generi all’interno della camera di combustione del generatore stesso.
- Prima di avviare il bruciatore, e almeno una volta all’anno,far effettuare da personale
professionalmente qualificato le seguenti operazioni:
a) Tarare la portata di combustibile del bruciatore secondo la potenza richiesta dal generatore di calore.
b) Regolare la portata d’aria comburente per ottenere un valore di rendimento di combustione almeno pari al minimo imposto dalle norme vigenti.
c) Eseguire il controllo della combustione onde evitare la formazione di incombusti nocivi o inquinanti oltre i limiti cosentiti dalle norme vigenti.
d) Verificare la funzionalità dei dispositivi di regolazione e di sicurezza.
e) Verificare la corretta funzionalità del condotto di evacuzione dei prodotti della combustione.
f) Controllare al termite delle regolazioni che tutti i sistemi di bloccaggio meccanico dei disposiivi di regolazione siano ben serrati.
g) Accertarsi che nel locale caldaia siano presenti anche le istruzioni relative all’uso e menuten-
zione del bruciatore.
- in caso di ripetuti arresti di blocco del bruciatore non insistere con le procedere di riarmo manua-
le, ma rivolgersi a personale professionalmente qualificato per ovviare a tale situazione anomala.
- La conduzione e la manutenzione devono essere effettuate esclusivamente da personale profes-
sionalmente qualificato, in ottemperanza alle disposizioni vigenti.
AVVERTENZE GENERALI IN FUNZIONE DEL TIPO DI ALIMENTAZIONE
ALIMENTAZIONE ELETRICA
- La sicurezza elettrica dell’apparecchio è raggiunta soltanto quando lo stesso è correttamente colle
gato ad un’ efficace impianto di messa a terra, eseguito come previsto dalle vigenti norme di
sicurezza.
E’necessario verificare questo fondamentale requisito di sicurezza. In caso di dubbio, richiedere
un controllo accurato dell l’impianto elettrico da parte di personale professionalmente qualicato,
poichè il costruttore non è responsabile per eventuali danni causati dalla mancanza di messa a
terra dell’impianto.
- Far verificare da personale professionalmente qualificato che l’impianto elettrico sia adeguato
alla potenza massima assorbita dall’apparecchio, indicato in targa, accertando in particolare che
la sezione dei cavi dell’impianto sia idonea alla potenza assorbita dall’ apparecchio.
- Per l’alimentazione generale dell’ apparecchio dalla rete elettrica, non è consentito l’uso di adattatori, prese multiple e/o prolunghe.
- Per allacciamento alla rete occorre prevedere un interruttore omnipolare come previsto dalle
normative di sicurezza vigenti.
- L’uso di un qualsiasi componente che utilizza energia elettrica comporta l’ osservanza di alcune
regole fondamentali quali:
- non toccare l’apparecchio con parti del corpo bagnate o umide e/o a piedi nudi.
- non tirare i cavi elettrici.
- non lasciare esposto l’apparecchio ad agenti atmosferici ( pioggia, sole, ecc.) a meno che non
sia espressamente previsto.
- non permettere che l’apparecchio sia usato da bambini o da persone inesperte.
- Il cavo di alimentazione dell’apparecchio non deve essere sostituito dall’ utente.
In caso di danneggiamento del cavo, spegnere l’ apparecchio, e, per la sua sostituzione, rivolgersi esclusivamente a personale professionalmente qualificato.
- Allorché si decida di non utilizzare l’apparecchio per un certo periodo, é opportuno disinserire
l’interruttore elettrico di alimentazione a tutti i componenti dell’impianto che utilizzano energia
elettrica ( pompe, bruciatore, ecc.).
ALIMENTAZIONE CON GAS, GASOLIO, O ALTRI COMBUSTIBILI
Avvertenze generali
- L’installazione del bruciatore deve essere eseguita da personale professionalmente qualificato e in
conformità alle norme e disposizioni vigenti, poichè un’errata installazione può causare danni a
pesone, animali o cose, nei confronti dei quali il costruttore non può essere considerato responsabile.
- Prima dell’ installazione, si consiglia di effettuare un’ accurata pulizia interna di tutte le tubazioni
dell’ impianto di adduzione del combustile onde rimuovere eventuali residui che potrebbero
compromettere il buon funzionamento del bruciatore.
- Per la prima messa in funzione del bruciatore, far effettuare da personale professionalmente
qualificato le seguenti verifiche:
a) il controllo della tenuta interna ed esterna dell’impianto di adduzione del combustibile;
b) la regolazione della portata del combustibile secondo la potenza richiesta dal bruciatore;
c) che il bruciatore sia alimentato dal tipo di combustibile per il quale é predisposto;
d) che la pressione di alimentazione del combustibile sia compresa nei valori riportati in targhetta;
e) che l’ impianto di alimentazione del combustibile sia dimensionato per la portata necessaria
al bruciatore e che sia dotato di tutti i dispositivi di sicurezza e controllo prescritti dalle norme
vigenti.
- Allorchè si decida di non utilzzare il bruciatore per un certo periodo, chiudere il rubinetto o i rubinetti di alimentazione del combustibile.
AVVERTENZE PARTICOLARI PER L’ USO DEL GAS
- Far verificare da personale professionalmente qualificato:
a) che la linea di adduzione e la rampa gas siano conformi alle norme e prescrizioni vigenti;
b) che tutte le connessioni gas siano a tenuta;
c) che le aperture di areazione del locale caldaia siano dimensionate in modo da garantire l’
afflusso di aria stabilito dalle normative vigenti e comunque sufficienti ad ottenere una perfetta
combustione.
- Non utilizzare i tubi del gas come messa a terra di apparecchi elettrici.
- Non lasciare il bruciatore inutilmente inserito quando lo stesso non é utilizzato e chiudere sempre
il rubinetto del gas.
- In caso di assenza prolungata dell’ utente, chiudere il rubinetto principale di adduzione del gas al
bruciatore.
- Avvertendo odore di gas;
a) non azionare interruttori elettrici, il telefono e qualsiasi altro oggetto che possa provocare
scintille;
b) aprire immediatamente porte e finestre per creare una corrente d’ aria che purifichi il locale;
c) chiudere i rubinetti del gas;
d) chiedere l’intervento di personale professionalment qualificato.
- Non ostruire le aperture di areazione del locale dove è Installato un apparecchio a gas; per evitare situazioni pericolose quali la formazione di miscele tossiche ed esplosive.
SPEDIZIONE
l bruciatori vengono spediti completamente montati e fissati su un pianale con gabbia di protezione
in legno contenenti anche il libretto istruzioni e gli accessori.
N.B.: Consigliamo di togliere il bruciatore dall’imballo solo al momento dell’applicazione sulla caldaia; questo per evitare che, accidentalmente, possa essere danneggiato.
DIMENSIONI mm
�
�
�
�
�
�
�
���
�
�
�
�
�
�
�
�
�
�
���
���
�
��
Fig-1
�
�
�
Modello
A
Twin
950
120/2
*1205
*Twin
180/2L
1355
B
C
D
760
525
725
760
525
865
E
225
*480
490
F
ØG
H
K
ØL
M
N
O
Q
S
U
V
X
W
380
230
200
1/2” Gas
235
440
290
320
735
325
420
1020
DN.65
580
380
320
300
1/2” Gas
335
440
370
320
760
340
420
1020
DN.80
760
* Bruciatori in versione a “bocca lunga”
CARATTERISTICHE TECNICHE
Tipo
Twin 120/2
Potenzialità
Min.
Max.
kW
Twin 180/2L
801,4
897
kcal/h
689200
771420
BTU/h
2734920
43061190
kW
kcal/h
BTU/h
1309
1993
1126000
1713980
4468250
6801508
Motore elettrico
3 kW trifase+N
V 230/400 - 50 Hz
2800 giri/min.
4,8 kW trifase+N
V 230/400 - 50 Hz
2800 giri/min.
Telesalvamotore
Bobina 230V
Bobina 230V
6-9A
9 - 12 A
Campo di taratura
Motore elettrico pompa comb.
0,37 kW - trifase+N V 230/400 - 50 Hz 2800 giri/min.
Telesalvamotore - campo taratura
Bobina 230 V - 1 - 1,6 A
Trasformatore d’accensione
230 V - 50Hz 2,3 A - 12 kV - 35 mA
Apparecchiatura controllo fiamma
LANDIS & GYR LFL 1.622 ciclica
Controllo fiamma
Fotocellula
Combustibile gassoso
Potere calorifico
Pressione alimentazione
Portata gas
G 25
G 30
G 31
6987 kcal/m3
13365 kcal/kg
13563 kcal/kg
25 mbar
28-30 mbar
37 mbar
Twin 120/2
166,17 m3/h
86,87 kg/h
85,6 kg/h
Twin 180/2L
246,17 m3/h
128,69 kg/h
126,8 kg/h
Comando aria
Motoriduttore con air stop
Pressostato aria
Pressione funzionamento 0,6 - 5 mbar
Pressostato gas
Attacco gas
Pressione funzionamento 5 - 50 mbar
20 mbar
Combustibile liquido
Flangia DN 65
Flangia DN 80
Gasolio p.c.i. 10210 kcal/kg Viscosità max. 1,5°E (6cst) a 20°C
Pompa combustibile
J7
Pressione di esercizio
15 bar
Tubazione flessibile gasolio
Aspirazione e Ritorno 1/2” gas
Peso
kg
130 (135BL)
160
N.B. I valori di portata si riferiscono a gas con 15°C di temperatura e con 1013 mbar di pressione atmosferica.
TABELLA UGELLI
Portata minima
Portata media
Portata massima
1° stadio
TWIN 120/2
TWIN 180/2L
9,00 gph 60° cono pieno
9,50 gph 60° cono pieno
2° stadio
6,00 gph 60° cono pieno
6,00 gph 60° cono pieno
1° stadio
11,00 gph 60° cono pieno
11,00 gph 60° cono pieno
2° stadio
10,00 gph 60° cono pieno
10,00 gph 60° cono pieno
1° stadio
13,00 gph 60° cono pieno
18,00 gph 60° cono pieno
2° stadio
12,00 gph 60° cono pieno
16,00 gph 60° cono pieno
CAMPI DI LAVORO
PRESSIONE AL FOCOLARE - PORTATA COMBUSTIBILE
�����
����
���
��
���
��
���
��
���
��
���
��
���
��
��
�
��
�
��
�
��
�
�
�
������������
����������
Fig-2
�
��
���
��
���
��
���
��
���
����
���
����
���
����
���
����
���
����
���
����
���
����
���
����
����
����
��
Le curve rappresentate in diagramma sono state ottenute effettuando le prove di combustione
secondo le norme vigenti nazionali ed internazionali.
La portata massima di lavoro del bruciatore è in funzione della contropressione al focolare del
generatore di calore.
DIAGRAMMA PER LA DETERMINAZIONE DEL DIAMETRO DELLA TUBAZIONE DI ADDUZIONE GAS
Portata in m3/h (metano con densità relativa 0,6)
CADUTA DI PRESSIONE mm H2O
Esempio:
Portata:
30 m3/h
Diametro:2”
Lunghezza: 45m
Usando un gas di densità di 0,6
si avrà una caduta di pressione
di 10 mm di colonna d’acqua.
Fig-3
PRESSIONE SPECIFICO ALTRI GAS
Coefficiente
moltiplicatore
0,6......................................................... 1,00
0,65....................................................... 1,04
0,7......................................................... 1,08
0,75....................................................... 1,12
0,8......................................................... 1,16
0,85....................................................... 1,28
10
DIAGRAMMA PRESSIONE MINIMA DI ALIMENTAZIONE PORTATA GAS
La curva indicata in diagramma mette in relazione la pressione di alimentaziorle del gas con la portata in m3/h del bruciatore. Il valore di pressionè del gas è rilevalo sul pressostato con il bruciatore in
funzione al massimo e camera di combustione con pressione di 0 mmH2O.
Operando su caldaie pressurizzate la potenzialità voluta del bruciatore si ottiene soltanto se la pressione del gas è uguale a quella indicata in diagramma più il valore di contropressione rilevato in
camera di combustione.
����
��
��
�����
��
�
�
�����
�
�
�
�
��
��
��
��
���
���
���
���
���
���
���
�
����
Fig-4
TUBAZIONE DI ALIMENTAZIONE OLIO COMBUSTIBILE
�
�
�
��
��
��
��
��
��
����
���
��
�
�
��
�������������������
����
����
��
����
��
����
�����
�
��
�
Fig-5
�
��
��
��
��
��
���������������������������
l bruciatori sono adatti per funzionare con olii combustibili aventi viscosità massima di 1.5°E a 20°C
(6 cSt).
Lo schema rappresentato in figura indica i due metodi più utilizzati per l’alimentazione del combustibile:
- impianto in aspirazione ed impianto per caduta. Sul diagramma, in funzione delle distanze L e delle
prevalenze H, è possibile determinare con notevole approssimazione qual’ é il diametro delle tubazioni di alimentazione del combustibile affinchè si abbia un regolare funzionamento della pompa.
11
SCHEMA ELETTRICO
12
FASE
13
APPLICAZIONE DEL BRUCIATORE ALLA CALDAIA
- Predisporre sul frontone della caldaia i fissaggi al bruciatore secondo quanto riportato in Fig.6
- Fissare il bruciatore al frontone della caldaia interponendo la guarnizione di amianto (3).
- Eseguire l’allacciamento al gruppo valvole gas e della pompa del combustibile.
Fig-6
SCHEMA DELLA TUBAZIONE DI ADDUZIONE GAS
Fig-7
A - Rubinetto di intercettazione gas
(fornito su richiesta)
B - Filtro gas (fornito su richiesta)
C - Stabilizzatore di pressione
(fornito su richiesta)
D - Pressostato gas
E - Presa pressione gas
F - Elettrovalvola principale
G - Elettrovalvola pilota
H - Rubinetto regolazione; portata
elettrovalvola pilota
Per un buon funzionamento del bruciatore si consiglia sempre di montare nell’ordine, partendo dal
bruciatore, i seguenti accessori:
- regolatore di pressione (press. di alimentazione 150 : 200 mm H2O);
- filtro per gas;
- rubinetto intercettazione rapida.
N.B. : I fori di sfiato della membrana dello stabilizzatore e del pressostato gas devono essere collegati ad un tubo di pari diametro e portati all’esterno del locale caldaia in una posizione tale da non
costituire pericolo in caso di fuoriuscita di gas; lontano cioè da finestre e balconi e ad una altezza di
almeno tre metri dal piano praticabile.
14
IMPIANTO ELETTRICO
Eseguire i collegamenti come indicato nello schema allegato.
a) La linea di alimentazione deve giungere al bruciatore tramite un interruttore generale da 25 A e deve essere protetto con valvole fusibili da:
15 A 400V oppure 20 A 230V per TWIN 120/ 2; 20A . 400V oppure 35A. 230V per TWIN 180/2
N.B. : Usare cavo con isolamento di almeno 2000 V e sezione non inferiore a:
5 mm2 a 400V oppure 6,5 mm2 a 230V per TWIN 120/2.
6 mm2 a 400V oppure 8mm2 a 230V per TWIN 180/2L
b) La linea al termostato caldaia, termostato ambiente a lampada di segnalazione deve essere colle
gata come indicata nello schema elettrico.
Eventuali interruttori orari e apparecchi di comando supplementari si possono collegare in serie ai
termostati di comando. Per i collegamenti delle linee elettriche dei termostati e lampade, usare cavi
con isolamento di 2000 V e sezione non inferiore a1,2 mmq.
Fig-8
15
REGOLAZIONE ARIA
Nel motoriduttore Landis & Gyr l’azionamento dei contatti ausiliari e di fine corsa è ottenuto con
cammes facilmente accessibili e regolabili la cui taratura è facilitata da scale graduate.
Un’apposita tacca sull’estremità superiore dell’albero visibile attraverso una finestrella, serve ad indicare il senso di rotazione, e, accoppiando opportunamente la serranda, consente di rilevare anche
la posizione di quest’ultima.
TARATURA DEL PUNTO DI SCATTO DEI CONTATTI
Avvertenze generali
- “A” Fine corsa per la posizione APERTA (potenza massima)
“Z” Fine corsa per la posizione CHIUSA della serranda
“M” Contatto ausiliario per la posizione MINIMA della serranda (potenza minima)
“V” Contatto ausiliario per il consenso di apertura alla valvola di combustibile in funzione della posizione della serranda
- Le cammes si possono spostare a piacere con un cacciavite inserendolo nella fenditura. Durante
questa operazione tenere fermo l’albero di guida infilando un piccolo cacciavite nell’asola (ved.
figura 9).
- Per la taratura del punto di scatto di “Z” vale la scala che si trova dalla parte della serranda (scala
Z). La posizione della fenqitura della camma “Z” indica su tale scala anche la posizione della
serranda.
- Per la taratura ‘del punto di scatto degli altri contatti vale la scala sulla cassa del riduttore, (scala
A,V,M) quando la serranda è in posizione chiusa.
Fig-9
16
Nel motoriduttore SQN 31.101 A 2700 l’azionamento dei contatti ausiliari e di fine corsa è ottenuto
con camme facilmente accessibili e regolabili.
L’indice della scala graduata consente di rilevare la posizione della serranda aria
Taratura del punto di scatto dei contatti
Avvertenze Generali
I
- Fine corsa per la posizione di apertura massìma della serranda
(potenza massima con entrambi gli stadi in funzione)
II - Fine corsa non utilizzato
III - Camma per la posizione di apertura minima della serranda
(potenza minima con il solo l° stadio in funzione)
IV - Camma non utilizzata
V
- Camma ausiliaria per il consenso all’ apertura della valvola del
2° stadio.
Avvertenze pratiche per la regolazione del motoriduttore
Il motoriduttore è tarato in sede di collaudo con le seguenti posizioni:
Camma I :
Camma II :
Camma III :
Camma IV :
Camma V :
posizione a 60° circa
posizione a 0° (NON SPOSTARE MAI)
posizione 20°
non utilizza
posizione 30°
Modifiche a questa taratura in sede di installazione sono eseguibili anche a bruciatore in funzione
ruotando le rispettive camme sui valori desiderati.
N.B. : E’ possibile svincolare la serranda presa aria del motoriduttore premendo il pulsante A.
Fig-10
17
- I contatti “Z”, “M” e “A” quando scattano mettono sotto tensione il morsetto 112 (ved. schema elet
trico) e segnalano così il raggiungimento della posizione comandata della serranda.
A Taratura del punto di scatto del contatto “Z”
- Dare tensione al morsetto 2 e verificare se la serranda è chiusa correttamente e anche il morsetto112 è sotto tensione. In caso contrario, spostare in senso antiorario la camma “Z”, aprire un
poco la serranda (tensione al morsetto 1) e richiuderla nuovamente (tensione al morsetto 2).
Se invece il contatto commuta prima che la serranda sia chiusa, ruotare la camma “Z” in sensoorario, finchè la serranda è chiusa e il morsetto112 è in tensione.
B Taratura del punto di scatto degli altri contatti
- Portare il servocomando in posizione CHIUSA, dando tensione al morsetto 2.
- Tarare le cammes sulle posizioni volute mediante il cacciavite (scala sulla cassa del riduttore).
- Verificare se le posizioni volute rispondono alle esigenze della combustione e correggere eventualmente i punti di scatto.
Durante il collaudo in Stabilimento il contatto “Z” è già tarato quindi la verifica del punto A dovrà
essere eseguita solo nel caso di sostituzione del motoriduttore.
Viceversa la taratura degli altri punti di scatto dovrà essere effettuata in funzione delle portate di gas
minime e massime richieste al bruciatore.
Avvertenze pratiche per la regolazione del motoriduttore.
Posizionare l’alberino del motoriduttore con la tacca rivolta nella posizione di serranda chiusa (vedere l’indicazione sul coperchio del motoriduttore).
Camma Z = ruotarla fino a portare l’asola nella posizione 0 : 5° letti sulla scala Z (corrispondente a 90° ÷ 85° se letti sulla scala A,V,M) e verificare che sia scattato il micro.
Camma A = posizionarla con l’asola a 50° ÷ 70° letti sulla scala A,V,M, (corrispondenti a 40° ÷ 20° se letti sulla scala Z) se le portate di combustibile sono medie. Nel caso di portate più elevate aumentare l’angolazione letta sulla scala A,V,M (ovvero diminuire l’angola
zione se letta sulla scala Z); viceversa per portate minori.
Camma M =posizionarla con l’asola a 10° ÷ 30° letti sulla scala A,V,M,
(corrispondenti a 80° ÷ 60° se letti sulla scala Z) se le portate di combustibile sono medie. Nel caso di portate più elevate aumentare l’angolazione letta sulla scala A,V,M (ovvero diminuire l’angolazione se letta sula scala Z); viceversa per portate
minori.
Camma V = Posizionarla con l’asola a 40° ÷ 50° letti sulla scala A,V,M (corrispondenti a 50° ÷ 40° se letti sulla scala Z). Per anticipare l’apertura della valvola del 2° stadio diminui
re l’angolazione letta sulla scala A,V,M (ovvero aumentare l’angolazione se letta
sulla scala Z); viceversa per ritardare l’apertura.
Nel motoriduttore RHA 1L l’azionamento dei contatti ausiliari e di fine corsa è ottenuto rispettivamente con camme e microinterruttori facilmente accessibili e regolabili.
L’indice E con la relativa scala graduata consente di rilevare la posizione della serranda presa aria.
18
Taratura del punto di scatto dei contatti
Avvertenze generali
C - Fine corsa non utilizzato (NON .SPOSTARE MAI)
A - Fine corsa per la posizione di apertura massima della serranda (potenza massima con entram
bi gli stadi in funzione)
D - Camma per la posizione di apertura minima della serranda (potenza minima con il solo 1° stadio in funzione)
V - Camma ausiliaria per il consenso all’apertura della valvola del 2° stadio.
Avertenze pratiche per la regolazione del motoriduttore
Il motoriduttore è tarato in sede di collaudo con le seguenti posizioni:
Fine corsa C : posizionato a 0° (NON SPOSTARE MAI)
Fine corsa A : posizionato a 60° circa
Camma D : posizionato in modo che la serranda si trovi a 15° ÷ 30°
Camma V : posizionato in modo che l’elettrovalvola del 2° stadio si apra quando la serranda si trova a 30° ÷ 45°
Modifiche a questa taratura in sede di installazione sono eseguibili anche
a bruciatore in funzione agendo nel modo seguente:
Fine corsa A : Camma D : Camma V : per aumentare l’apertura della serranda presa aria ruotare la vite in senso orario, viceversa ruotarla in senso antiorario per diminuire l’apertura
per aumentare l’apertura della serranda presa aria, ruotare la camma in senso orario, viceversa ruotarla in senso antiorario per diminuire la portata d’aria
per ritardare l’apertura dell’elettrovalvola del 2° stadio, ruotare la camma in senso orario, viceversa ruotarla in senso antiorario per anticiparne l’apertura.
N.B.: A regolazione avvenuta bloccare le viti A e C con i rispettivi grani.
Fig-11
19
REGOLAZIONE ANELLO DI PRESSURIZZAZIONE
Per ottenere valori di combustione e condizioni di avviamento soddisfacenti si può spostare longitudinalmente l’asta solidale all’ anello di pressurizzazione: per fare ciò occorre:
Allentare le viti (X e Y) e togliere la vite X o Y se, rispettivamente, si vuole un campo di regolazione
dell’anello che fornisca minore o maggiore portata d’aria.
Orientativamente si può affermare che l’ anello di pressurizzazione (18) deve essere arretrato per il
funzionamento su caldaie pressurizzate e/o con portate di combustibile prossime alla massima; proporzionalmente si deve avanzare l’anello di pressurizzazione quando si opera con caldaie poco
pressurizzate o con portate di combustibile ridotte.
Fig-12
REGOLAZIONE PORTATA GAS PER ELETTROVALVOLA PILOTA
Per effettuare la regolazione della portata dell’ elettrovalvola pilota procedere nel seguente modo a
seconda del tipo di valvola:
- ruotare la vite in senso antiorario per aumentare la portata e, viceversa, in senso orario per dimi nuirla.
ELETTROVALVOLA PILOTA IN ALTERNATIVA
COPERCHIO
VITE REGOLAZ. PORTATA
CONTRODADO
- Togliere il coperchio di protezione.
- Allentare il controdado.
- Ruotare la vite in senso antiorario per aumentare la portata e, viceversa,
in senso orario per diminuirla.
Fig-13
20
REGOLAZIONE PORTATA GAS PER ELETTROVALVOLA PRINCIPALE
Fig-14
Fig-15
Per ottenere un aumento della portata occorrerà ruotare le viti in senso antiorario; viceversa per
diminuire la portata occorrerà ruotarle in senso orario.
PRESSOSTATO ARIA
La taratura del pressostato aria deve essere effettuata tramite la ghiera indicata in figura in modo
tale che in caso di riduzione della pressione in coclea il pressostato arresti il bruciatore in blocco.
Avvitando la ghiera si aumenta la pressione viceversa la si diminuisce. A regolazioe avvenuta
Fissare la ghiera tramite la vite.
Fig-16
21
PRESSOSTATO GAS MINIMA-MASSIMA
La taratura del pressostato gas si effettua tramite la vite (41) per la pressione MINI e tramite la vite
(42) per la pressione MAXI.
Regolare a + 20% della pressione di alimentazione per la massima (MAXI) e a -20% della pressione di alimentazione per la minima (MINI).
N.B. Avvitando le viti, la pressione diminuisce: viceversa la pressione aumenta.
Fig-17
ATTENZIONE! La vite che si trova all’interno del raccordo di prelievo pressione (dettaglio X), deve
essere avvitata a fondo. Non appena effettuata la misurazione della pressione del gas, onde evitare
una fuoriuscita del gas.
AVVERTENZA
Non appena effettuata la misurazione della pressione del gas aver cura di riavvitare a fondo la vile
di chiusura del raccordo presa pressione.
22
INNESCO POMPA
- Chiudere la saracinesca sulla tubazione di ritorno, staccare il flessibile ed introdurlo in una latta da 15 ...20 litri per racco.rsliere l’olio combustibile di eccedenza durante l’innesco.
- Chiudere la saracinesca di aspirazione. Togliere il coperchio del filtro e riempirlo di olio combustibile.
- Accertarsi che l’interruttore generale sia aperto, che l’interruttore marcia arresto (35) sul bruciatore,
sia in posizione di 0 e posizionare il commutatore (33) sulla voce olio.
- Chiudere l’interruttore generale ed inserire l’interruttore di marcia (35) contemporaneamente, o
al massimo dopo qualche attimo il motore si avvierà. Se durante il primo ciclo di prelavaggio la
pompa non si innesca premere il pulsante ricarica blocco (10) e ripetere il ciclo.
- Per facilitare l’innesco, togliere il tappo (47) sulla pompa e rimontarlo appena fuoriuscirà olio
combustibile.
- Eseguito l’innesco sarà necessario ripristinare il livello del filtro mantenendo, per alcuni minuti, il
bruciatore in funzionamento.
- Fermare il bruciatore dall’interruttore generale e rimontare il coperchio del filtro.
- Aprire la saracinesca sulla tubazione di aspirazione.
- Rimettere in funzione il bruciatore con l’interruttore generale lasciandolo girare fintanto che dal
tubo flessibile di ritorno non esca un flusso continuo di olio combustibile, senza presenze di bolle
d’aria.
- Arrestare il bruciatore tramite l’interruttore generale.
- Ricollegare il tubo flessibile di ritorno e riaprire la saracinesca.
REGOLAZIONE PRESSIONE POMPA
La pressione della pompa è tarata in stabilimento al valore di 15 bar. Nel caso si volesse variare
detta pressione occorrerà agire sulla vite (43); per aumentare la pressione ruotare la vite in senso
orario, per diminuirla occorrerà ruotarla in senso antiorario. Il controllo del valore di pressione sarà
possibile effettuarlo montando un manometro sul raccordo (37).
CONTROLLI PRELIMINARI DELL’IMPIANTO
Prima della messa in funzione del bruciatore è bene assicurarsi che:
- la caldaia e l’impianto siano carichi, con le eventuali saracinesche aperte;
- le serrande registro fumi della caldaia e del camino siano aperte;
- le valvole fusibili del circuito elettrico siano di giusto valore.
- sia stato effettuato lo spurgo dell’ aria dalla tubazione gas tramite il raccordo di presa pressione;
- il termostato di caldaia sia tarato ad un valore superiore alla temperatura esistente in caldaia;
- l’interruttore (35) sul bruciatore sia in posizione “1”;
- l’interruttore generale sia aperto;
- eventuali altri apparecchi di controllo (umidostati, pressostati, interruttori ad orologeria, ecc)
abbiano i contatti chiusi.
CICLO DI FUNZIONAMENTO
- Preventilazione con apertura totale aria.
- Chiusura aria al minimo, inserimento trasformatore di accensione.
Funzionamento a gas
- Apertura elettrovalvola pilota.
- Controllo fiamma.
- Apertura 1° stadio elettrovalvola principale.
- Apertura aria e 2° stadio elettrovalvola principale.
- Funzionamento.
- Arresto e chiusura totale aria.
Funzionamento a gasolio
- Apertura elettrovalvola 1° stadio
- Controllo fiamma.
- Apertura aria ed elettrovalvole 2° stadio
- Funzionamento.
- Arresto e chiusura totale aria.
N.B.: Il bruciatore è predisposto per il funzionamento alternato ed automatico con i due combustibili.
La scelta del combustibile avviene tramite commutatore (33) oppure con comando a distanza come
indicato sullo schema elettrico.
23
Per ottenere le varie combinazioni di funzionamento con comando a distanza è necessario montare
sulla tubazione del gas una valvola di sfiato in atmosfera ed una valvola di sicurezza collegate
elettricamente in parallelo al motore del ventilatore del bruciatore.
Il commutatore 33 dovrà essere in posizione OIL.
Il passaggio da uno all’ altro dei combustibili può essere programmato tramite orologio o pressostato gas.
- Durante il normale ciclo di funzionamento, il bruciatore si arresta soltanto per l’intervento degli apparecchi di controllo e comando.
- Se accidentalmente venisse a mancare la fiamma, l’apparecchiatura di controllo provvederà a
chiudere immediatamente l’ afflusso del combustibile e ad arrestare il bruciatore in blocco.
- Il bruciatore non potrà più essere messo in funzione se non verrà prima
manualmente ricaricato il dispositivo di blocco.
- Interruttori termici proteggono il motore elettrico del ventilatore e quello
della pompa da sovraccarichi di corrente, l’intervento del termico provoca l’arresto
del bruciatore.
Per ripristinare il funzionamento occorre azionare il pulsante di ricarica relè termico.
PRIMA ACCENSIONE E REGOLAZIONE DELLA FIAMMA A GAS
- Posizionare il commutatore 33 sulla voce gas.
- Aprire la regolazione aria di circa 1/3:
- aprire di circa 2/3 la vite di regolazione portata all’ elettrovalvola pilota;
una buona rilevazione in fase di avviamento si ottiene con un appropriato rapporto aria/gas; di
conseguenza è necessario verificare la portata del gas; in funzione dell’aria, regolando opportunamente l’apertura dell’elettrovalvola pilota;
- regolare a circa 1/3 l’apertura della portata dell 1° stadio dell’eléttrovalvola principale;
- aprire il rubinetto del gas;
- portare l’interruttore Marica-Arresto (35) in posizione di marcia e l’interruttore Min-Max (55) in
posizione Min quindi avviare il bruciatore tramite l’interruttore generale.
Dopo il tempo di preventilazione il bruciatore si avvierà e funzionerà soltanto con il 1° stadio gas.
Effettuare la regolazione dell’aria in funzione della portata di gas che si vuole ottenere per il 1°stadio.
Portare poi l’interruttore Min-Max in posizione Max e, se il pressostato od il termostato di autoregolazione richiederanno calore, in breve tempo il servocomando porterà il bruciatore a funzionare
con i due stadi.
Regolare la portata del 2° stadio.
Anche per la portata massima è necessario regolare l’apertura della serranda presa aria.
La taratura del pressostato gas deve essere effettuata ad una pressione tale che, in caso di riduzione della pressione del gas in rete, arresti il bruciatore prima che si raggiungano mìscelazioni
precarie per il regolare funzionamento del bruciatore.
La taratura del pressostato aria deve essere effettuata ad una pressione tale che, in caso di riduzione della pressione in coclea, il pressostato intervenga arrestando l’afflusso del gas e mandando il
bruciatore in blocco.
Il controllo della combustione (CO, CO2) deve essere e:seguito con caldaia a regime di
temperatura.
24
PRIMA ACCENSIONE E REGOLAZIONE DELLA FIAMMA A GASOLIO
Accertarsi che nella tubazione del gas non vi sia pressione, in caso contrario sfiatarla altrimenti il
bruciatore non partirà.
- Posizienare il commutatore 33 sulla voce OIL.
- Aprire la regolazione dell’aria di circa 1/3.
- Portare l’interruttore marcia-arresto (35) in posizione di marcia e l’interruttore Min-Max (55)
in posizione Min. quindi avviare il bruciatore tramite l’interruttore generale e procedere analogamente a quanto detto precedentemente per il funzionamento a gas.
N.B.: Per entrambi i funzionamenti a gas e a gasolio, per ottenere una affinazione della combus-
tione si può spostare, in senso longitudinale l’anello di pressurizzazione; con questo accorgi
mento, si migliorano inoltre le condizioni di avviamento su caldaie pressurizate.
In sede di collaudo, controllare l’efficienza del termostato o presotato di sicurezza della
caldaia.
REGOLAZIONE DELLA FIAMMA
- Le regolazioni devono essere eseguite con caldaia a regime di temperatura;
- una buona messa a punto del bruciatore sarà possibile ottenerla se si effettua la regolazione mantenendo in camera di combustione il valore di pressione consigliato dal costruttore dal generatore
di calore.
Per il funzionamento a gasolio occorre verificare dopo circa un’ora di funzionamento che i componenti della testa di combustione rimangano sufficientemente puliti.
AVVERTENZE SUI VARI TIPI DI FUNZIONAMENTO
ATTENZIONE!
E’indispensabile che con ogni tipo di funzionamento del bruciatore, sul canotto portaugelli siano
montati sia l’ugello gasolio del lo stadio che quello del 2° stadio onde evitare che, inavvertitamente,
passando da un tipo di funzionamento ad un altro si possa immettere in caldaia del combustibile non
polverizzato e creare quindi situazioni estremamente pericolose.
- Per passare dal funzionamento a GAS al funzionamento a GASOLIO occorrerà sfiatare la tubazione del GAS allentando la vite sul raccordo prelievo pressione esistente sul pressostato del GAS
e poi riavvitarla.
25
MANUTENZIONE
Tutte le operazioni devono essere eseguite dopo aver tolto corrente dall’interruttore generale ed aver
arrestato l’afflusso dei combustibili.
ELETTRODI DI ACCENSIONE
Per estrarre gli elettrodi di accensione procedere nel modo seguente:
a - smontare il coperchio coclea (6) togliendo le viti (5);
b -disinnestare i cavi di alta tensione (23) dai corrispondenti attacchi sul trasformatore d’accen
sione;
c -sfilare la fotocellula dal suo supporto;
d -allentare la vite (48) ed estrarre la canna portaugelli senza dannegiare le guarnizioni OR (53).
La pulizia degli elettrodi (22) deve essere effettuata senza spostarli, possibilmente, dalla posizione
primitiva; nel caso ciò accadesse verificare in sede di montaggio, che siano rispettate le posizioni e
le dimensioni indicate in Fig.19
UGELLI
Estrarre dalla canna portaugelli il supporto porta elettrodi allentando le viti (54).
Smontare gli ugelli e procedere alla loro pulizia lavando i fori ed i tagli di polverizzazione con benzina senza usare attrezzi che possano rovinare le superfici dell’ugello.
TESTA DI COMBUSTIONE
Per estrarre la testa di combustione procedere nel modo seguente:
- punti a, b, c, d, del paragrafo ELETTRODI DI ACCENSIONE;
- togliere le viti (15) ed estrarre l’insieme tubo adduzione gas senza danneggiare la
guarnizione OR (17);
- procedere all’eventuale pulizia del disco deflettore (20).
FOTOCELLULA
Pulire accuratamente la parte fotosensibile e nel rimontarla verificare che sia ben innestata.
FILTRO SULLA TUBAZIONE
- Chiudere le saracinesche sull’aspirazione e sul ritorno e, secondo il tipo, procedere ad una ac
curata pulizia dell’elemento filtrante.
FILTRO DELLA POMPA
- Chiudere le saracinesche sull’aspirazione e sul ritorno;
- smontare il coperchio della pompa;
- estrarre la cartuccia a maglia, lavarla con benzina e rimontarla avendo cura di asciugare bene le sedi e la guarnizione del coperchio.
FILTRO SULLA TUBAZIONE DEL GAS
Chiudere il rubinetto intercettazione gas della tubazione e procedere ad un’ accurata pulizia della
parte filtrante.
FILTRO SULLE ELETTROVALVOLE GAS
Dopo aver chiuso il rubinetto del gas allentare le viti sul corpo delle elettrovalvole accedendo in tal
modo al filtro.
Quindi sfilarlo e pulirlo accuratamente.
Rimontarlo facendo attenzione di non danneggiare le guarnizioni.
Controllare in ultimo che non vi siano perdite di gas.
26
NOMENCLATURA
l -
2 -
3 -
4 -
5 -
6 -
7 -
9 -
10 -
11 -
12 -
14 -
15 -
16 -
17 -
18 -
19 -
20 -
21 -
22 -
23 -
24 -
25 -
26 -
27 -
28 -
Bocca fuoco
Prolunga per bocca fuoco
Isolante
Piastra attacco alla caldaia
Viti fissaggio coperchio coclea
Coperchio coclea
Spia controllo fiamma
Apparecchiat .controllo fiamma
Pulsante luminoso di ricarica blocco
Telesalvamotore motore ventilato
Coperchio quadro elettrico
Vite di terra
Viti dl fissaggio tubazione adduzione gas
Targhetta immatricolazione
Guarnizione OR
Anello di pressurizzazione
Viti di fissaggio bocca fuoco
Disco deflettore
Ugello primo stadio gasolio
Elettrodi d’accensione
Cavi per elettrodi di accensione
Motore elettrico ventilatore
Elettrovalvola primo stadio gasolio
Elettrovalvola secondo stadio gasolio
Motore pompa combustibile
Servocomando regolazione aria
29 - Fissaggio asta comando anello
30 - Viti fissaggio prolunga bocca fuoco
31 - Serrande presa aria
32 - Convogliatore aria
33 - Commutatore gas-gasolio
35 - Interruttore Marcia-Arresto
36 - Pressostato aria
37 - Raccordo prelievo pressione gasolio
38 - Pressostato gas
39 - Elettrovalvola pilota
40 - Elettrovalvola principale
41 - Trasformatore d’accensione
42 - Tubazione adduzione gas
43 - Vite regolazione pressione pompa
44 - Pompa combustibile
45 - Attacco vuotometro
46 - Tubazioni flessibili
47 - Attacco manometro
48 - Vite fissaggio tubazione adduz.gasolio
49 - Supporto per fotocellula
50 - Fotocellula
52- Ugello secondo stadio gasolio
53 - Guarnizione OR
54 - Viti fissaggio supporto portaelet.
55 - Interruttore MIN-MAX
Fig-18
27
Fig-19
Fig-20
28
SCHEMA PER L’ESECUZIONE DELLA TUBAZIONE DI ADDUZIONE GAS
1 -
2 -
3 -
4 -
5 -
6 -
7 -
8 -
9 -
10 -
11 -
12 -
13 -
Rubinetto di intercettazione con garanzia di tenuta a 1 bar e perdita di carico < 0,5 bar
Giunto antivibrante
Presa di pressione
Filtro gas
Regolatore pressione gas
Organo di controllo della minima pressione gas (pressostato)
Elettrovalvola di sicurezza classe A. Tempo di chiusura Tc ≤ 1”
Elettrovalvola di regolazione ad apertura lenta o a più stati classe A con organo di regolazio
ne della portata gas incorporato. Tempo chiusura Tc ≤ 1”
Organo di regolazione della portata gas, normalmente inserito nella elettrovalvola 7 o 8.
Testa combustione
Organo di controllo della minima pressione aria
Organo di controllo della massima pressione gas (se non previsto il regolatore 5)
Dispositivo controllo di tenuta (A RICHIESTA)
Per un buon funzionamento del bruciatore si consiglia sempre di montare nell’ordine, partendo dal
bruciatore, i seguenti accessori:
- regolatore di pressione; - giunto amivibrante;
- filtro per gas; - rubinetto intercettazione rapida.
N.B.I fori di sfiato della membrana dello stabilizzatore e del pressostato gas devono essere colle
gati ad un tubo di pari diametro e portati all’esterno del locale caldaia in una posizione tale da non costituire pericolo in caso di fuoriuscita di gas; lontano cioè da finestre e balconi ad un’altezza di almeno tre metri dal piano praticabile.
-La tubazione de! gas deve essere conforme alle vigenti norme e tanto gli accessori quanto la tubazione del gas dovranno avere un diametro proporzionale alla lunghezza della tubazione ed alla pressione di alimentazione del gas (vedi diagramma pagina 9).
29
21
ENGLISH
Read carefully all warnings and instructions contained in this manual as they give important safety
instructions regarding installation, use and maintenance. Keep this manual for future reference. Installation must be carried out by qualified personnel who will be responsible for respecting existing
safety regulations.
Lamborghini Caloreclima S.p.A. was one of the very first Italian companies to obtain
certification of its quality system
in accordance with the international standards
EN 29001 - ISO 9001
For installation and positioning of the water softener
STRICTLY COMPLY WITH THE LOCAL REGULATIONS IN FORCE
Congratulations...
...on the excellent choice you have made. Thank you for choosing our products.
Since 1959 LAMBORGHINI CALORECLIMA has actively been present in Italy and around
the world with a widespread network of agents and dealers who assure constant presence
of our products on the market, assisted by LAMBORGHINI SERVICE who assure qualified
service and maintenance of the machines..
30
INDICE
PAGINA
DECLARATION OF CONFORMITY______________________________________ 3
GENERAL WARNINGS_______________________________________________ 32
SHIPPING - DIMENSIONS____________________________________________ 36
TECNICAL CHARACTERISTICS________________________________________ 37
OPERATING RANGE_________________________________________________ 38
FUEL OIL FEEDING PIPES____________________________________________ 39
ELECTRICAL DIAGRAM_ _____________________________________________ 40
FITTING BURNER TO BOILER - GAS FEEDING PIPE DIAGRAM_____________ 42
ELECTRICAL SYSTEM_ _______________________________________________ 43
AIR ADJUSTMENT___________________________________________________ 44
PRESSURE RING ADJUSTMENT________________________________________ 48
GAS FLOW ADJUSTMENT FOR PILOT ELECTROVALVE____________________ 48
GAS FLOW ADJUSTMENT FOR MAIN VALVE____________________________ 49
AIR PRESSURE SWITCH_______________________________________________ 49
MINIMUM-MAXIMUM GAS PRESSURE SWITCH__________________________ 50
PUMP PRIMING_____________________________________________________ 51
MAINTENANCE_____________________________________________________ 54
NOMENCLATURE___________________________________________________ 55
GAS FEED PIPE INSTALLATION________________________________________ 57
31
GENERAL WARNINGS
- This instruction manual constitutes an integral and essential part of the product and must be handed to the user.
- Carefully read the warnings contained in this manual as they provide important instructions regarding safety of installation, use and maintenance.
- Carefully keep this manual for further consultation.
- The burner must be installed by qualified personnel in compliance with the regulations in force and in accordance with the instructions of the manufacturer.
- Qualified personnel means persons with technical skills in the sector of heating system compo
nents for civil use and production of hot water for sanitary use and, in particular, the authorised service centres of the manufacturer.
- Incorrect installation may cause harm to persons, animals or things for which the manufacturer does not undertake any liability.
- After unpacking, check that all the parts are intact.
- In case of doubt, do not use the burner and contact the manufacturer.
- Keep the packaging (wooden crate, nails, staples, plastic bags, expanded polystyrene, etc.) out of reach of children since it is a potential source of danger.
- Before carrying out any cleaning or maintenance operation, disconnect the burner from the mains by turning off the system switch and/or activating the shutoff devices.
- Do not obstruct the intake or dissipation grilles.
-
In the event of failure and/or bad functioning of the burner, deactivate it and do not attempt to repair or work on it yourself. Only professionally qualified personnel may work on the machine.
Any repairs must be carried out by a service centre authorised by the manufacturer using original spare parts only.
-
Failure to comply with the above instructions may compromise the safety of the burner. To gua
rantee efficiency and proper functioning of the burner, it is essential that the periodic maintenan
ce be carried out by professionally qualified personnel in compliance with the instructions given by the manufacturer.
- If you decide to no longer use the burner, the parts that may pose a potential hazard must be made harmless.
- Should the burner be sold or transferred to another owner or should you move and leave the bur
ner in place, always make sure that the manual accompanies the burner so that it may be consul
ted by the new owner and/or installer.
- Use only original accessories for all burners with optionals or kits (including electrical).
-
This machine is intended solely for the use for which it was designed. Any other use is to be con
sidered improper and hence dangerous. The manufacturer does not undertake any contractual or extracontractual liability for damage caused by installation or operation errors or inobservance of the instructions given by the manufacturer.
32
PARTICULAR WARNINGS FOR BURNERS
- The burner must be installed in a suitable place with the minimum number of vents as required by the regulations in force and in any case sufficient to obtain perfect combustion.
- Only burners constructed in accordance with the regulations in force may be used.
- This burner is intended only for the use for which it was specifically designed.
- Before connecting the burner, check that the rated values on the plate correspond to those of the main supplies (electrical, gas, diesel oil or other fuel).
- Do not touch the hot parts of the burner near the flames and the fuel pre-heating system, as they heat up during operation and remain hot also some time after the burner has been turned off.
- If you decide to put the burner out of use, have professionally qualified personnel carry out the following operations:
a)Disconnect the electrical power supply by detaching the power cable and turning off the main switch.
b)Close the fuel supply by means of the manual shutoff valve and remove the control handwheels from their seat.
PARTICULAR WARNINGS
- Ensure that the person who has installed the burner has firmly fixed it to the heat generator so that the flame is generated inside the combustion chamber of the generator.
- Before starting the burner and at least once a year, have professionally qualified personnel carry out the following operations:
a)Calibrate the burner fuel flow rate according to the required output of the heat generator.
b)Adjust the combustion air flow rate to obtain a combustion efficiency value at least equal to the minimum set out in the regulations in force.
c)Carry out a combustion test in order to prevent the formation of noxious or polluting unburnt fuel outside the limits permitted by the regulations in force.
d)Check functionality of the adjustment and safety devices.
e)Check proper functioning of the venting duct for the products of combustion.
f) After adjustment check that all the mechanical locking systems of the adjustment devices are well tightened.
g)Ensure that the instructions for use and maintenance of the burner are at hand in the boiler room.
- In the event of repeated locking stops of the burner, do not insist with the manual reset procedu-
res, but have professionally qualified personnel correct the fault.
• Operation and maintenance may exclusively be carried out by professionally qualified personnel in compliance with the regulations in force.
33
GENERAL WARNINGS
ELECTRICAL POWER SUPPLY
- The electrical safety of the burner is achieved only when it is properly connected to an efficient earthing system in accordance with the safety regulations in force.
- This fundamental safety requirement must be verified. In case of doubt, have professionally qua-
lified personnel carefully inspect the electrical system. The manufacturer is not responsible for any damage caused by failure to earth the system.
- Have professionally qualified personnel check that the electrical system is suited to the maximum power absorbed by the machine as indicated on the plate, and in particular, that the cross-section of the system cables is suited to the power absorbed by the machine.
- It is not permitted to use adapters, multiple sockets and/or extensions for the mains power supply of the machine.
- Fit an omnipolar switch for the connection to the mains in accordance with the safety regulations in force.
-
-
-
-
-
The use of any component that utilizes electrical energy implies observance of some fundamental rules, such as:
Do not touch the machine with wet or moist parts of the body and/or with bare feet.
Do not pull on the electric cables.
Do not leave the machine exposed to atmospheric agents (rain, sun, etc.) unless specifically othe
rwise specified.
Do not allow children or inexpert persons to operate the machine.
- The power cable of the machine may not be replaced by the user. If the cable is damaged, switch off the machine and have professionally qualified personnel replace it.
- If you decide not to use the machine for a certain period of time, disconnect the electrical power switch to all the system components that use electrical energy (pumps, burner, etc.)
GAS, DIESEL OIL OR OTHER FUELS
General warnings
- The burner must be installed by professionally qualified personnel in conformity with the regulat-
ions and provisions in force. Incorrect installation may cause damage to persons, animals or things for which the manufacturer cannot be held responsible.
34
- Before installation, it is advisable to thoroughly clean the inside of all the fuel feed pipes in order to remove any residues which might compromise good functioning of the burner.
- Before starting the burner for the first time, have professionally qualified personnel carry out the following operations:
a)Check the internal and external seal of the fuel feed system.
b)Adjust the fuel flow rate according to the required burner output.
c)Check that the burner is fed with the type of fuel for which it was designed.
d)Check that the fuel feed pressure is within the values shown on the plate.
e)Check that the fuel feed system is dimensioned for the required burner output and that all the sa-
fety and control devices as required by current regulations have been fitted.
• If you decide not to use the burner for a certain period of time, close the fuel feed cock/s.
PARTICULAR WARNINGS FOR THE USE OF GAS
• Have the following checked by professionally qualified personnel:
a)that the feed line and the gas ramp are in conformity with the regulations and provisions in force.
b)that all the gas connections are gas-tight
c)that the vents in the boiler room are dimensioned so as to guarantee the flow of air required by
current regulations and in any case sufficient to obtain perfect combustion.
- Do not use the gas pipes as earthing for the electrical equipment.
- Do not leave the burner on needlessly when it is not being used, and always close the gas cock.
- In case of extended absence of the user, close the main gas feed cock to the burner.
- If you smell gas:
a)Do not activate electrical switches, the telephone and any other object that may cause sparks.
b)Immediately open the doors and windows to create a flow of air to clear the room.
c)Close the gas cocks.
d)Call in professionally qualified personnel.
- Do not obstruct the vents of the room where the gas burner is installed to prevent hazardous con-
ditions such as the formation of toxic and explosive mixtures.
35
SHIPPING
The burner is shipped fully assembled and fixed on a pallet with a protective wooden crate also containing the instruction manual and accessories.
We recommend you unpack the burner just before installation on the boiler in order to prevent that
accidental knocking damages it.
DIMENSIONI mm
�
�
�
�
�
�
�
���
�
�
�
�
�
�
�
�
�
�
���
���
�
��
Fig-1
�
�
�
Model
A
Twin
950
120/2
*1205
*Twin
180/2L
1355
B
C
D
760
525
725
760
525
865
E
225
*480
490
F
ØG
H
K
ØL
M
N
O
Q
S
U
V
X
W
380
230
200
1/2” Gas
235
440
290
320
735
325
420
1020
DN.65
580
380
320
300
1/2” Gas
335
440
370
320
760
340
420
1020
DN.80
760
* BURNERS IN “LONG OUTLET” VERSION
36
TECNICAL CHARACTERISTICS
Type
Twin 120/2
Capacity
Min.
Max.
kW
Twin 180/2L
801,4
897
kcal/h
689200
771420
BTU/h
2734920
43061190
kW
kcal/h
BTU/h
Electric motor
1993
1126000
1713980
4468250
6801508
3 kW three-phase+N
V 230/400 - 50 Hz
2800 rpm
4,8 kW three-phase+N
V 230/400 - 50 Hz
2800 rpm
230V coil
230V coil
6-9A
9 - 12 A
Overload cutout
Calibration range
Fuel pump electric motor
1309
0,37 kW - three-phase+N V 230/400 - 50 Hz 2800 rpm
Overload cutout - calibration range
230 V - 1 - 1,6 A coil
Ignition transformer
230 V - 50Hz 2,3 A - 12 kV - 35 mA
Flame control device
LANDIS & GYR LFL 1.622 cyclic
Flame control
Photocell
Gaseous fuel
G 25
G 30
G 31
Calorific value
6987 kcal/m3
13365 kcal/kg
13563 kcal/kg
Feed pressure
Gas flow rate
25 mbar
28-30 mbar
37 mbar
Twin 120/2
166,17 m3/h
86,87 kg/h
85,6 kg/h
Twin 180/2L
246,17 m3/h
128,69 kg/h
126,8 kg/h
Air control
Gear motor with air stop
Air pressure switch
Operating pressure 0,6 - 5 mbar
Gas pressure switch
Gas coupling
Operating pressure 5 - 50 mbar
20 mbar
Liquid fuel
Flange DN 65
Flange DN 80
Diesel oil pci 10210 kcal/kg Viscosity max. 1,5°E (6cst) a 20°C
Fuel pump
J7
Operating pressure
15 bar
Diesel oil flexible tube
Intake and return 1/2” gas
Weight
kg
130 (135BL)
160
Note: The above values refer to gas with a temperature of 15° C and an atmospheric pressure of 1013 mbar.
NOZZLE TABLE
Minimum flow rate
Mean flow rate
Maximum flow rate
1° stage
TWIN 120/2
TWIN 180/2L
9,00 gph 60° full cone
9,50 gph 60° full cone
2° stage
6,00 gph 60° full cone
6,00 gph 60° full cone
1° stage
11,00 gph 60° full cone
11,00 gph 60° full cone
2° stage
10,00 gph 60° full cone
10,00 gph 60° full cone
1° stage
13,00 gph 60° full cone
18,00 gph 60° full cone
2° stage
12,00 gph 60° full cone
16,00 gph 60° full cone
37
OPERATING RANGE
FLUE PRESSURE – FUEL FLOW RATE
�����
����
���
��
���
��
���
��
���
��
���
��
���
��
��
�
��
�
��
�
��
�
�
�
������������
����������
Fig-2
�
��
���
��
���
��
���
��
���
����
���
����
���
����
���
����
���
����
���
����
���
����
���
����
����
����
��
The curves shown in the diagram were obtained by conducting the combustion tests in accordance
with the national and international regulations in force. The maximum operating flow rate of the
burner depends on the counterpressure at the flue of the heat generator.
DIAGRAM FOR THE DETERMINATION OF THE GAS FEED PIPE DIAMETER
FLOW RATE IN m3/h (NATURAL GAS WITH RELATIVE DENSITY OF 0.6)
Pip
ing
len
gh
t in
me
ter
s
Pipe diameter in inches
Pressure drop mm H2O
PRESSURE DROP mm H2O
EXAMPLE
FLOW RATE: 20 m3/h
DIAMETER: 2”
LENGTH: 45 m
Using a gas with density of 0.6
there will be a pressure drop of 10
mmH2O.
Fig-3
SPECIFIC WEIGHT OF OTHER GASES MULTIPLICATION COEFFICIENT
0,6......................................................... 1,00
0,65....................................................... 1,04
0,7......................................................... 1,08
0,75....................................................... 1,12
0,8......................................................... 1,16
0,85....................................................... 1,28
38
MINIMUM GAS FEED PRESSURE DIAGRAM
The curve shown in the diagram places the gas feed pressure in relation to the burner flow rate in
nm3/h. The gas pressure value is measured on the pressure switch with the burner operating at maximum power and the combustion chamber at a pressure of 0 mmH2O. Operating on pressurised
boilers, the desired burner capacity is obtained only if the gas pressure is equal to that shown in the
diagram plus the counterpressure value measured in the combustion chamber.
����
��
��
�����
��
�
�
�����
�
�
�
�
��
��
��
��
���
���
���
���
���
���
�
���
����
Fig-4
FUEL OIL FEEDING PIPES
�
�
�
��
��
��
��
��
��
����
���
��
�
�
��
�������������������
HEAD
IN METRES
����
����
��
����
��
����
�����
�
��
�
Fig-5
�
��
��
��
��
��
PIPE���������������������������
DEVELOPMENT IN METERS
The burners are suitable for operation with fuel oils having a maximum viscosity of 1.5°E at 20°C (6 cSt).
The above diagram indicates the two most used fuel feed methods: the suction system and the gravity system.
On hand of the diagram, depending on the distances L and the heads H, the fuel feed pipe diameter can be
determined with good approximation in order to obtain regular pump operation.
39
ELECTRICAL DIAGRAM
40
LEGEND
1 CONTROL BOX
2 AUTO TRANSFORNER
3 REMOTE CONTROL FOR FUEL CHANGE
4 FUEL CHANGE CONTROL
5 REMOTE CONTROL FOR MIN.-MAX. OPERATION
6 MIN. - MAX. WORKlNG CONTROL
7 6 POLES CONNECTOR RECEPTACLE
8 7 POLES CONNECTOR RECEPTACLE
9 AUXILIARY BREAKER
10 GAS SOLENOID VALVES SEALINGS DEVICE
11 GAS PILOT SOLENOID VALVE
12 GAS ADJUSTMENT SOLENOID VALVE 1ST AND 2ND STAGE
13 SAFETY VALVE ON GAS SUPPLY
14 GAS VENT VALVE
15 1ST STAGE OIL SOLENOID VALVE
16 2ND STAGE OIL SOLENOID VALVE
17 7 POLES SOCKET
18 7 POLES PLUG
19 MAIN CIRCUIT FUSES
20 AUXILIARY CIRCUIT FUSES
21 ISOLATING SWITCH (MAIN)
22 ON-OFF SWITCH
23
24
25
26
27
28
29
30
31
32
33
34
35
36
37
38
39
40
41
42
43
REMOTE LOCK-OUT WARNING LIGHT FOR SEALING
ON INDICATOR LAMP
LOCK-OUT WARNING LIGHT
REMOTE LOCK-OUT WARNING LIGHT
CONTROL MICROSWITCH FOR GAS VENT VALVE CLOSING
POWER SUPPLY TERMINAL BOARD
LOWER AUXILIARY TERMINAL BOARD
UPPER AUXILIARY TERMINAL BOARD
FUEL PUMP MOTOR
FAN MOTOR
AIR PRESSURE SWITCH
MIN. - MAX. GAS PRESSURE SWITCH
MIN. GAS PRESSURE SWITCH
FLAME DETECTOR
GEAR MOTOR FOR AIR SHUTTER OPENING
PUMP MOTOR OVERLOAD CUT-OUT
FAN MOTOR OVERLOAD CUT-OUT
ROOM THERMOSTAT
BOILER THERMOSTAT
IGNITION TRANSFORMER
ELECTRIC FILTER
0
1
2
3
4
5
6
7
8
9
BLACK
BROWN
RED
ORANGE
YELLOW
GREEN
BLUE
VIOLET
GREY
WHITE
T
N
Ph
GROUND
NEUTRAL
PHASE
41
FITTING THE BURNER TO THE BOILER
- Arrange the fittings to secure the burner to the front of the boiler as shown in Fig. 6.
- Fix the burner to the front of the boiler interposing the asbestos gasket (3).
- Make the connection to the gas valve unit and the fuel pump.
Fig-6
GAS FEEDING PIPE DIAGRAM
Fig-7
A
B
C
D
Gas shutoff cock (supplied on request)
Gas filter (supplied on request)
Pressure stabilizer (supplied on request)
Gas pressure switch
E
F
G
H
Bas pressure outlet
Main electrovalve
Pilot electrovalve
Pilot electrovalve capacity adjustment cock
For good functioning of the burner it is recommended to always fit the following accessories in the
order indicated starting from the burner:
- Pressure regulator (feed pressure 150-200 mmH2O)
- Gas filter
- Fast shutoff cock.
N.B. The vent holes of the stabilizer membrane and the gas pressure switch must be connected to a
pipe of equal diameter and vent to the outside of the boiler room in such a position as not to pose a
hazard in the event of gas leaks, i.e. away from windows and balconies and at a height of at least 3
metres from the practicable surface.
42
ELECTRICAL SYSTEM
Make the connections as indicated in the attached diagram.
a) The power supply line must be connected to the burner by means of a 25A main switch pro-
tected with fuse valves as follows:
15A 400V or 20A 230V for TWIN 120/2
20A 400V or 35A 230V for TWIN 180/2
N.B. Use a cable with at least 2000 V insulation and a cross-section of not less than:
3.5 mm2 at 400V or 5 mm2 at 230 V for TWIN 75/2
5 mm2 at 400V or 6.5 mm2 at 230 V for TWIN 120/2
6 mm2 at 400V or 8 mm2 at 230 V for TWIN 180/2L
b) The line to the boiler thermostat, ambient thermostat and signalling light must be connected as shown in the wiring diagram.
Any time switches and auxiliary control devices can be connected in series to the control thermostats.
For the connections of the electrical lines of the thermostats and lights, use cables with 2000V insulation and a cross-section not less than 1.2 mm2
Fig-8
43
AIR ADJUSTMENT
The auxiliary contacts and limit switches in the Landis & Gyr gearmotor are activated with easily accessible and adjustable cams whose calibration is facilitated by graduated scales.
A notch on the upper end of the shaft, visible through a sightglass, indicates the direction of rotation
and, by appropriately connecting the valve, also allows measuring the position of the latter.
CALIBRATING THE CONTACT TRIGGER POINT
General notes
-
A - Limit switch for OPEN position (maximum power)
Z - Limit switch for CLOSED valve position
M - Auxiliary contact for the MINIMUM valve position (minimum power)
V - Auxiliary contact for enabling fuel valve opening depending on the valve position.
- The cams can be moved at will with a screw driver by inserting it in the slot. During this opera-
tion hold the drive shaft still by inserting a small screwdriver in the slot (see Figure 9).
- To calibrate the trigger point Z the scale on the valve side is valid (Z-scale).
The position of the Z-cam slot also indicates the valve position on this scale.
- To calibrate the trigger point for the other contacts the scale on the gearmotor casing is valid (A,V,M scale) when the valve is in closed position.
Fig-9
44
The auxiliary contacts and limit switches in the SQN 31.101 A 2700 gearmotor are activated with
easily accessible and adjustable cams. The graduated scale index allows measuring the air valve
position.
Calibrating the trigger point of the contacts
General notes
I
II III
IV
V
Limit switch for maximum valve opening position (maximum power with both stages active)
Limit switch not used
Cam for minimum valve opening position (minimum power with only the 1st stage active)
Cam not used
Auxiliary cam for enabling 2nd stage valve opening
Practical notes on gearmotor adjustment
The gearmotor is calibrated during testing to the following positions:
Cam I:
approximately 60°
Cam II:
0° (NEVER MOVE IT)
Cam III:20°
Cam IV: not used
Cam V:
30°
This calibration can be modified during installation also when the burner is running by turning the
respective cams to the desired values.
N.B. The gearmotor air intake valve can be freed by pressing the button A.
Fig-10
45
When triggered, the Z, M and A contacts energize terminal 112 (see wiring diagram) and thus signal
that the controlled valve position has been reached.
A Calibrating the trigger point of the Z-contact
Energise terminal 2 and check if the valve is closed properly and that terminal 112 is also energised.
If not, move the Z-cam anticlockwise, slightly open the valve (energise terminal 1) and close it again
(energise terminal 2).
If the contact switches before the valve is closed, turn the Z-cam clockwise until the valve is closed and
terminal 112 energised.
B Calibrating the trigger point of the other contacts
-
-
-
Move the servocontrol to the CLOSED position, energising terminal 2.
Calibrate the cams to the desired positions using a screwdriver (scale on gearmotor casing)
Check if the desired positions meet the combustion requirements and correct the trigger point if necessary.
The Z-contact is calibrated at the factory during testing, therefore, point A needs to be checked only
if the gearmotor is replaced.
However, the other trigger points need to be calibrated depending on the minimum and maximum
flow rates required for the burner.
Practical notes for gearmotor adjustment
Position the gearmotor shaft with the notch facing the valve closed position (see indication on gearmotor cover).
Z-camTurn it until the slot is in the 0-5° position read on the Z scale (corresponding to 90°-85° if read on the A,V,M scale) and check that the microswitch has triggered.
A-cam
Position it with the slot in 50°-70° position read on the A,V,M scale (corresponding to 40°-20° if read on the Z scale) if the fuel flow rates are average. If the flow rates are hi-
gher, increase the angle read on the A,V,M scale (i.e. reduce the angle if read on the Z scale); viceversa for lower flow rates.
M-cam
Position it with the slot in 10°-30° position read on the A,V,M scale (corresponding to 80°-60° if read on the Z scale) if the fuel flow rates are average. If the flow rates are hi-
gher, increase the angle read on the A,V,M scale (i.e. reduce the angle if read on the Z scale); viceversa for lower flow rates.
V-cam
Position it with the slot in 40°-50° position read on the A,V,M scale (corresponding to 50°-40° if read on the Z scale). To anticipate opening of the 2nd stage valve, reduce the angle read on the A,V,M scale (i.e. increase the angle if read on the Z scale); vice versa to delay opening.
The auxiliary contacts and limits switches in the RHA 1L gearmotor are activated with easily accessible
and adjustable cams and microswitches. The E index with relevant graduated scale allows measuring
the air intake valve position.
46
Calibrating the trigger point of the contacts
General notes
C -
A -
D -
V -
Limit switch not used (NEVER MOVE IT)
Limit switch for maximum valve opening position (maximum power with both stages active)
Cam for minimum valve opening position (minimum power with only the 1st stage active)
Auxiliary cam for enabling 2nd stage valve opening
Practical notes on gearmotor adjustment
The gearmotor is calibrated during testing to the following positions:
L imit switch C:
Limit switch A:
Cam D:
Cam V:
0° (NEVER MOVE IT)
Approximately 60°
Positioned so that the valve is on 15°-30°
Positioned so that the 2nd stage electrovalve opens when the valve is on 30°-45°
This calibration can be modified during installation also when the burner is running as follows:
L imit switch A:
Cam D:
Cam V:
To increase the air intake valve opening, turn the screw clockwise, vice versa turn it anticlockwise to decrease opening.
To increase the air intake valve opening, turn the cam clockwise, vice versa turn it anticlockwise to decrease the air flow.
To delay 2nd stage electrovalve opening, turn the cam clockwise, vice versa turn it anticlockwise to anticipate opening.
N.B. After adjustment lock the screws A and C with the respective dowels.
Fig-11
47
PRESSURE RING ADJUSTMENT
In order to obtain satisfactory combustion values and starting conditions, the rod integral with the
pressurization ring can be moved longitudinally. To do this for TWIN 120/2 and TWIN 180/2L:
Loosen the screws (X and Y) and remove the screw X or Y, respectively, if requiring a ring adjustment
range that supplies less or more air flow.
As an approximate indication, the pressurization ring (18) must be positioned backward for operation
with pressurized boilers and/or with fuel flow rates close to maximum. Conversely, the pressurization
ring must be positioned forward for operation with little pressurized boilers or with reduced fuel flow
rates.
Fig-12
GAS FLOW ADJUSTMENT FOR PILOT ELECTROVALVE
To adjust the gas flow of the pilot electrovalve proceed as follows depending on the type of valve:
- Turn the screw anticlockwise to increase the flow and clockwise to decrease it.
ALTERNATIVE PILOT ELECTROVALVE
COVER
FLOW ADJUSTMENT SCREW
COUNTER-NUT
-
-
-
Fig-13
48
Remove the protective cover
Loosen the counternut
Turn the screw anticlockwise to increase the flow and clockwise to decrease it.
GAS FLOW ADJUSTMENT FOR MAIN VALVE
1st stage flow adjustment
Fig-14
2nd stage flow adjustment
Turn the screws anticlockwise to increase the flow and clockwise to decrease it.
AIR PRESSURE SWITCH
The air pressure switch has to be calibrated using the ring nut shown in the figure in such a way that
if the auger pressure drops, the pressure switch locks the burner.
Tighten the ring nut to increase the pressure and vice versa to decrease it. After adjustment, secure
the ring nut with the screw.
ADJUSTMENT RING NUT
RETAINING SCREW
GRADUATED SCALE
Fig-16
49
MINIMUM MAXIMUM GAS PRESSURE SWITCH
The calibration of the gas pressure switch is carried out through the screw (41) for the minimal
pressure and through the screw (42) for the maximal pressure.
It is necessary to regulate to +20% of the boost for the maximum (MAXI) and to -20% of the boost
for the minimum (MINI).
Attention: Screw down the screw, the pressure decreases: whereas the pressure increases.
GAS PRESSURE OUTLET
DETAIL X
MINI ADJUSTMENT SCREW 41
MAXI ADJUSTMENT SCREW 42
Fig-17
CAUTION! The screw inside the pressure outlet connector (detail X) must be screwed down to the
bottom as soon as the gas pressure measurement has been made in order to prevent gas leaks.
WARNING!
As soon as the gas pressure measurement has been made, fully screw down the closing screw of the
pressure outlet connector.
50
PUMP PRIMING
-
-
-
-
-
-
-
-
-
-
-
Close the gate valve on the return pipe, detach the flexible hose and insert it in a 15-20 litre can to collect the excess fuel oil during priming.
Close the intake gate valve. Remove the filter cover and fill it with fuel oil.
Check that the main switch is open, that the start/stop switch (35) on the burner is in position 0 and position the switch (33) on OIL.
Close the main switch and turn on the start switch (35); the motor will start immediately or after a few seconds. If during the first pre-washing cycle the pump does not prime, press the lock reset button (10) and repeat the cycle.
To facilitate priming, remove the cap (47) on the pump and refit it as soon as fuel oil starts to flow out.
When priming has been completed, restore the filter level, letting the burner run for a few minu-
tes.
Stop the burner by operating the main switch and refit the filter cover.
Open the gate valve on the intake pipe.
Restart the burner by operating the main switch, letting it run until there is a steady flow of fuel oil without air bubbles from the flexible return hose.
Stop the burner by operating the main switch.
Reconnect the flexible return hose and reopen the gate valve.
PUMP PRESSURE ADJUSTMENT
The pump pressure is calibrated to 15 bar at the factory. If you wish to change the pressure, turn the
screw (43) clockwise to increase the pressure and anticlockwise to decrease it.
The pressure can be controlled by fitting a pressure gauge on the connector (37).
PRELIMINARY SYSTEM CHECKS
Before starting the burner, check that:
- the boiler and the system are loaded with the gate valves open
- the flue gas registers of the boiler and stack are open
- the electrical circuit fuse valves are set to the correct value
- the air has been bled from the gas pipe through the pressure outlet connector
- the boiler thermostat is calibrated to a value higher than the boiler temperature
- the burner switch (35) is in position 1
- the main switch is open.
- the contacts of any other control devices (humidistats, pressure switches, time switches, etc.) are closed.
OPERATING CYCLE
- Pre-ventilation with total opening of the air valve
- Air closure to minimum and ignition transformer on
Gas-powered burner
Oil-powered burner
•
•
•
•
•
•
•
•
•
•
•
Opening of the pilot electrovalve
Flame control
Opening of the 1st stage of the main
electrovalve
Opening of the air valve and the 2nd stage
of the main electrovalve
Operation
Stopping and total closing of the air valve
Opening of the 1st stage of the electrovalve
Flame control
Opening of the air valve and the 2nd stage of the electrovalve
Operation
Stopping and total closing of the air valve
N.B. The burner is capable of automatic alternate operation with the two types of fuel.
The type of fuel is selected with the switch (33) or with the remote control as indicated in the wiring
diagram.
51
To obtain the various operating combinations with the remote control, a gas vent valve and a safety
valve must be fitted on the gas pipe, electrically connected in parallel to the burner fan motor.
The switch (33) must be in the OIL position.
The switch from one fuel to the other can be programmed through the clock or gas pressure switch.
-
-
-
-
During the normal operating cycle, the burner stops only when the control and drive devices intervene.
Should the flame accidentally go out, the control device will immediately close the fuel flow and lock the burner.
The burner cannot be restarted until the locking device has manually been reset.
Thermal switches protect the electric motors of the fan and the pump from current overloads; when the switch is triggered, the burner stops. To restore operation, activate the thermal relay reset button.
FIRST SWITCHING ON AND GAS FLAME ADJUSTMENT
-
-
-
-
-
-
Position the switch (33) on GAS.
Open the air intake valve by about 1/3
Open the flow adjustment screw on the pilot electrovalve by about 2/3. A good air flow during the starting phase is obtained with an appropriate air/gas ratio. Therefore, check the gas flow in relation to the air flow and appropriately adjust the aperture of the pilot electrovalve.
Adjust the valve opening of the 1st stage of the main electrovalve to about 1/3
Open the gas cock
Set the START/STOP switch (35) to the START position and the MIN/MAX switch (55) to the MIN position, then start the burner by turning on the main switch.
After the pre-ventilation time, the burner will start and operate only with the 1st gas stage.
Adjust the air in relation to the desired gas flow rate for the 1st stage.
Then set the MIN/MAX switch to the MAX position and, if the pressure switch or self-adjusting thermostat require heat, the servo control will rapidly activate the burner with the two stages.
Adjust the flow rate for the 2nd stage.
The air intake valve must be adjusted also for the maximum flow rate.
The gas pressure switch must be calibrated to such a pressure that in the event of a pressure drop
in the gas network, the burner is stopped before reaching hazardous mixtures for regular burner
operation.
The air pressure switch must be calibrated to such a pressure that in the event of a pressure drop in
the auger, the pressure switch intervenes stopping the gas flow and locking the burner.
Check combustion (CO, CO2) with the boiler at operating temperature.
52
FIRST SWITCHING ON AND OIL FLAME ADJUSTMENT
Check that there is no pressure in the gas pipe, if so, vent it otherwise the burner will not start.
- Position the switch (33) on OIL.
- Open the air intake valve by about 1/3
- Set the START/STOP switch (35) to the START position and the MIN/MAX switch (55) to the MIN position, then start the burner by turning on the main switch. Proceed as described above for the gas-powered burner.
N.B. For both oil- and gas-powered burners, combustion can be fine adjusted by longitudinally moving the pressurization ring, moreover improving the starting conditions for pressurised boilers.
During testing, check the efficiency of the boiler thermostat or safety pressure switch.
FLAME ADJUSTMENT
- Make the adjustments with the boiler at operating temperature.
- For good burner setup make the adjustment with the pressure in the combustion chamber at the value recommended by the heat generator manufacturer.
For oil-powered burners check after about one hour of operation that the combustion head components remain sufficiently clean.
WARNINGS ON THE VARIOUS TYPES OF OPERATION
CAUTION!
It is essential that with each type of burner operation, both the 1st stage and 2nd stage oil nozzle
is fitted on the nozzle holder in order to prevent that when changing from one type of operation to
the other, unatomised fuel is inadvertently injected into the boiler thus creating extremely hazardous
conditions.
To change from GAS to OIL, vent the GAS pipe by loosening the screw on the pressure outlet connector on the GAS pressure switch and then retighten it.
53
MAINTENANCE
All the operations must be carried out after cutting the power by turning off the main switch and
stopping the fuel flow.
IGNITION ELECTRODES
Proceed as follows to remove the electrodes:
a) Remove the auger cover (6) by undoing the screws (5).
b) Disconnect the high-voltage cables (23) from the corresponding attachments on the ignition transformer.
c) Slip the photocell off its holder.
d) Loosen the screw (48) and remove the nozzle holder tube taking care not to damage the
O-rings (53).
Clean the electrodes (22) without moving them from their original position, if possible. Should they be
moved, ensure when refitting that the positions and dimensions indicated in Fig. 20 are respected.
NOZZLES
Extract the electrode support from the nozzle holder tube by loosening the screws (54).
Remove the nozzles and clean them by washing the atomising grooves and holes with petrol. Do not
use tools that may damage the nozzle surfaces.
COMBUSTION HEAD
To extract the combustion head, proceed as follows:
- See a-d in the paragraph on IGNITION ELECTRODES.
- Remove the screws (15) and extract the gas feed pipe unit taking care not to damage
the O-ring (17).
- Clean the baffle disc (20) if necessary.
PHOTOCELL
Thoroughly clean the photosensitive part and securely fit it back into place.
PIPE FILTER
- Close the gate valves on the intake and return pipes and, depending on the type, thoroughly cleanthe filter element.
PUMP FILTER
- Close the gate valves on the intake and return pipes.
- Remove the pump cover.
- Extract the mesh cartridge, wash it with petrol and refit it taking care to dry the seats and the
cover seals well.
GAS PIPE FILTER
Close the gas pipe shutoff cock and thoroughly clean the filter part.
GAS ELECTROVALVE FILTER
After closing the gas cock loosen the screws on the electrovalve body to access the filter.
Then remove it and clean it thoroughly.
Refit it taking care not to damage the seals.
Finally, check that there are no gas leaks.
54
NOMENCLATURE
1 – Flame nozzle
2 – Flame nozzle extension
3 – Insulation gasket
4 – Boiler coupling plate
5 – Auger cover retaining screw
6 – Auger cover
7 – Flame control light
9 – Flame control device
10 – Lock reset luminous button
11 – Fan motor overload cutout
12 – Electric panel cover
14 – Ground screw
15 – Gas feed pipe retaining screws
16 – Serial number plate
17 – O-ring
18 – Pressurization ring
19 – Flame nozzle retaining screws
20 – Baffle disc
21 – Oil first stage nozzle
22 – Ignition electrodes
23 – Ignition electrode cables
24 – Fan electric motor
25 – Oil 1st stage electrovalve
26 - Oil 2nd stage electrovalve
27 – Fuel pump motor
28 – Air adjustment servocontrol
29 – Pressurization ring control rod fixture
30 – Flame nozzle extension retaining screws
31 – Air intake valves
32 – Air conveyor
33 – Gas/oil switch
35 – Start/stop switch
36 – Air pressure switch
37 – Oil pressure outlet connector
38 – Gas pressure switch
39 – Pilot electrovalve
40 – Main electrovalve
41 – Ignition transformer
42 – Gas feed pipe
43 – Pump pressure adjustment screw
44 – Fuel pump
45 – Vacuometer attachment
46 – Flexible hoses
47 – Pressure gauge attachment
48 – Oil feed pipe retaining screw
49 – Photocell holder
50 – Photocell
52 - Oil 2nd stage nozzle
53 – O-ring
54 – Electrode support retaining screws
55 – MIN/MAX switch
Fig-18
55
Fig-19
Fig-20
56
GAS FEED PIPE INSTALLATION
1
2
3
4
5
6
7
8
9
10
11
12
13
Shutoff cock with guarantee of tightness up to 1 bar and pressure drop < 0.5 bar
Vibration-damping joint
Pressure outlet
Gas filter
Gas pressure regulator
Minimum gas pressure control device (pressure switch)
Class A safety electrovalve. Closing time Tc < 1”
Class A slow-opening or multi-stage adjustment electrovalve with incorporated gas flow adjust
ment device Tc < 1”
Gas flow adjustment device, normally fitted in the electrovalve 7 or 8
Combustion head
Minimum air pressure control device
Maximum gas pressure control device (if the regulator 5 is not fitted)
Leak control device (supplied on request)
BASIC BURNER EQUIPMENT
For good functioning of the burner it is recommended to install the following accessories in the order
indicated starting from the burner:
- Pressure regulator
- Gas filter
- Vibration-damping joint
- Quick shutoff cock
N.B. The vent holes of the stabilizer membrane and the gas pressure switch must be connected to a
pipe of equal diameter and vent to the outside of the boiler room in such a position as not to pose a
hazard in the event of gas leaks, i.e. away from windows and balconies and at a height of at least 3
metres from the practicable surface.
The gas pipe must be in conformity with the regulations in force and both the accessories and the gas
pipe must have a diameter proportional to the length of the pipe and the gas feed pressure.
57
© Copyright 2026 Paperzz