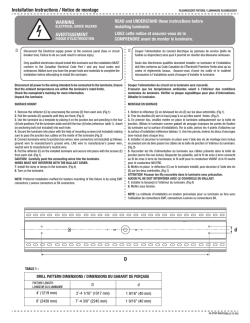
INSTALLATION INSTRUCTIONS
FBX LED HIGHBAY
CAUTION: THE INSTALLATION AND SERVICING OF
THIS PRODUCT SHOULD BE PERFORMED BY A
QUALIFIED ELECTRICIAN OR SERVICE PERSONNEL
Page 1 of 1
NOTE: There must be a minimum clearance of 6" between top of fixture
and solid mounting surface.
NOTE : entre le dessus du luminaire et la surface de montage solide, il
doit y avoir un d gagement minimum de 6 po.
Access Plate
Plaque d'acc s
1) Remove unit from carton and inspect to ensure no shipping damage
has occurred.
Retirer l'unit de la bo te et inspecter la marchandise afin de s'assurer
qu'aucun dommage ne soit survenu.
2) This luminaire is supplied with an access plate for wiring access.
If access to the LED driver compartment is required (for through
feed wiring, etc), refer to ACCESSING LED DRIVER
COMPARTMENT below.
Ce luminaire offre une plaque d'acc s pour faciliter le c blage. Si l'on
doit acc der au logement du pilote de DEL (pour le c blage de
circuit en d rivation, etc.) consulter la section ACC S AU
LOGEMENT DU PILOTE DE DEL ci-dessous.
3) To install with optional chain/hanger kit (ORDERED SEPARATELY):
Remove the V-Hook and chains from the bag pack.
Chain Hanger
Hook the V-Hook into each end of the luminaire in the holes
Support de cha ne
located at each end.
The chains should then be attached to the permanent structure
of the building. (See FIG. 1)
Pour l'installation de la trousse cha ne/support en option (DOIT TRE
INSTALL E S PAR MENT) :
Retirer le crochet en V et les cha nes du sac.
Ins rer les crochets en V dans les orifices chaque extr mit du luminaire.
Les cha nes devraient alors tre attach es la structure permanente
de l'immeuble (voir FIG. 1)
ACCESSING LED DRIVER COMPARTMENT
End Cap
1) Remove (2) screws in the wire way cover and remove the cover.
Screw
Capuchon d'Extr mit
Supprimer (2) vis du couvercle de mani re fil et retirez le couvercle.
Vis
2) If required, remove (2) screws holding the End Cap and remove.
The K.O. in end cap can be used for conduit entry.
Si n cessaire, retirer (2) vis retenant le capuchon d'extr mit et
enlever. Le K.O. en capuchon d'extr mit peut tre utilis
pour l'entr e conduit.
3) Make wiring connections. Effectuer les connexions de c blage.
Wire Way Cover
Couvert de chemin
de c blage
4) Re-install End Cap and Wire Way Cover, taking care not to pinch any
wires. Secure in place with screws removed in steps 1 & 2.
Re-installer
Capuchon d'Extr mit et couvercle de mani re fil, en
Screw
prenant
soin de ne pas pincer les fils. Fixez en place avec les
Vis
vis retir es dans les tapes 1 et 2.
CAUTION: This fixture is designed for permanent installation in ordinary (Non-Hazardous) locations in accordance with the National Electrical Code and
all applicable local codes. Do not use in areas of limited ventilation or in high ambient enclosures. The lamp and fixture operate at high temperatures.
Contact with combustible materials can cause fire and personal contact can cause severe burns.
Philips Lighting Company
200 Franklin Square Drive
Somerset, NJ 08873
Phone: 855-486-2216
www.philips.com/luminaires
Philips Lighting Company
281 Hillmount Road
Markham ON, Canada L6C 2S3
Phone: 800-668-9008
www.philips.com/luminaires
7-29433-101 2/26/2014
(ENGLISH)
© Copyright 2026 Paperzz