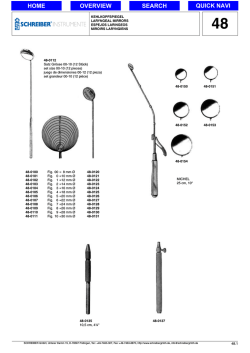
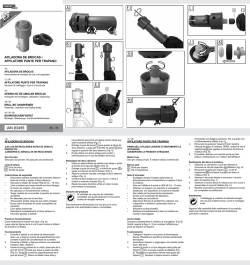
Visierwechsel bei folgenden Helmmodellen: Probiker KX3/KX4/KX4 Z-Link/KX5/KX5 Z-Link 2.0 Wechsel des Helmvisiers Legen Sie Ihren Helm bei allen Arbeiten unbedingt auf eine weiche, rutschfeste Unterlage, um diesen vor Kratzern und sonstigen Schäden zu schützen. Bei Schwierigkeiten oder Fragen während des Visierwechsels brechen Sie Ihre Arbeiten am Helm oder am Visier ab, bevor Schäden entstehen. Wenden Sie sich vertrauensvoll an Ihren Verkäufer oder das Louis Technikcenter. So gewährleisten Sie gemeinsam mit Louis, dass der Visierwechsel korrekt durchgeführt wird. Abb.1 1. Klappen Sie das Visier vollständig auf (Abb. 1). Das Kinnteil bleibt geschlossen. Abb.2 2. Spreizen Sie das Kinnteil an der Mechanik mit einer Hand etwas vom Helm ab und ziehen Sie mit der anderen das Visier an der jeweiligen Seite aus der Mechanik heraus (Abb. 2). 3. Nehmen Sie das neue Visier in die Hand. Setzen Sie die gabelförmige Aufnahme einer Visierseite in den Schlitz zwischen Helm und Kinnteil (Abb. 3). Der untere Teil der Aufnahme wird hierzu in den bereits vorhandenen Schlitz zwischen Helm und Kinnteil eingeführt. Der obere Teil der Aufnahme wird eingeführt indem Sie mit leichtem Druck einen Spalt zwischen beweglichem Mechanikelement und Kinnteil schaffen. (Abb. 4). Wiederholen Sie den Vorgang auf der anderen Seite. Abb.3 Abb.4 Der Visierwechsel ist abgeschlossen. Überprüfen Sie noch einmal, ob das Visier gut in den Nuten läuft und einwandfrei rastet, bevor Sie Ihren Helm wieder benutzen. Bei Fragen zum Produkt und dieser Anleitung kontaktieren Sie vor der Montage bzw. vor dem ersten Gebrauch des Produktes unser Technikcenter unter der Faxnummer 040 - 734 193 58 bzw. E-Mail: [email protected]. Wir helfen Ihnen schnell weiter. So gewährleisten wir gemeinsam, dass das Produkt richtig montiert und richtig benutzt wird. Exklusiv-Vertrieb: Detlev Louis Motorradvertriebs GmbH • Rungedamm 35 • 21035 Hamburg • www.louis.de • E-Mail: [email protected] 20015890_Visier-Umbau_Anleitung_Typo_14.indd 1 Stand 06/14 12.06.14 16:26 Visor replacement for the following helmet models: Probiker KX3/KX4/KX4 Z-Link/KX5/KX5 Z-Link 2.0 Replace the helmet visor Always place your helmet on a soft, non-slip surface while you work to prevent it from getting scratched or otherwise damaged. If you have any difficulties or questions while changing the visor, stop working on the helmet or visor before it gets damaged. Consult the vendor or the Louis Technical Centre for reliable advice. That way, Louis can help you to ensure that your visor is changed properly. Fig.1 1. Flip up the visor fully (Fig. 1). The chin piece remains closed. Fig.2 2. With one hand, pull one side of the chin piece a little away from the helmet at the mechanism and, with the other, pull the visor out of the mechanism on the same side (Fig. 2). 3. Take the new visor and place the fork-shaped mount of one visor side in the slit between helmet and chin piece (Fig. 3). The bottom part of the mount is inserted into the intended slit between helmet and chin piece. The upper part of the mount is inserted by using gentle pressure to create a gap between the moveable element of the mechanism and the chin piece. (Fig. 4). Repeat these steps for the other side. Fig.3 Fig.4 Visor replacement is now complete. Check again that the visor is sitting well in the grooves and engages perfectly before you use your helmet again. If you have any questions about the product or these instructions, please contact our Technical Centre by fax on 00 49 (0)40 -734 193 58 or by e-mail at: [email protected] before you install or use the product. We will be pleased to provide prompt assistance. This is the best way to ensure that your product is installed properly and used correctly. Exclusive Distributor: Detlev Louis Motorradvertriebs GmbH • Rungedamm 35 • 21035 Hamburg • Germany • www.louis.eu • E-mail: [email protected] 20015890_Visier-Umbau_Anleitung_Typo_14.indd 2 As at: 06/14 12.06.14 16:26 Changement de la visière pour les modèles de casques suivants: Probiker KX3/KX4/KX4 Z-Link/KX5/KX5 Z-Link 2.0 Changement de l‘écran du casque Veillez à toujours poser votre casque sur un support souple antidérapant avant tous travaux afin de le protéger des rayures et d‘autres endommagements. En cas de difficultés ou de questions lors du remplacement de l‘écran, interrompez les travaux sur le casque ou l‘écran avant que des dommages ne puissent être occasionnés. Vous pouvez vous adresser en toute confiance à votre vendeur ou au centre technique Louis. De cette manière, vous garantissez avec Louis le remplacement correct de l‘écran. ill.1 1. Ouvrez entièrement l‘écran (ill. 1). La mentonnière reste fermée. ill.2 2. Au niveau du mécanisme, écartez légèrement d‘une main la mentonnière du casque, et de l‘autre, retirez l‘écran du mécanisme de chaque côté (ill. 2). 3. Prenez le nouvel écran. Glissez le logement en forme de fourche de l‘un des côtés de l‘écran dans la fente située entre le casque et la mentonnière (ill. 3). Pour cela, insérez la partie inférieure du logement dans la fente prévue à cet effet entre le casque et la mentonnière. Pour insérer la partie supérieure du logement, exercez une légère pression pour créer une fente entre l‘élément mobile du mécanisme et la mentonnière (ill. 4). Répétez cette opération de l‘autre côté. ill.3 ill.4 Le remplacement de l‘écran est terminé. Avant d‘utiliser à nouveau votre casque, vérifiez que l‘écran se trouve bien dans les rainures et qu‘il s‘enclenche parfaitement. Pour toutes questions concernant le produit et le présent mode d‘emploi, veuillez contacter, avant le montage ou la première utilisation du produit, notre Centre technique par fax au numéro 00 49 40 734 193-58 ou par e-mail à l‘adresse : [email protected]. Nous vous aiderons dans les plus brefs délais. De cette manière, nous garantissons ensemble un montage et une utilisation corrects du produit. Distribution exclusive : Detlev Louis Motorradvertriebs GmbH • Rungedamm 35 • 21035 Hambourg • www.louis-moto.fr • E-mail : [email protected] 20015890_Visier-Umbau_Anleitung_Typo_14.indd 3 Dernière mise à jour : 06/14 12.06.14 16:26
© Copyright 2026 Paperzz