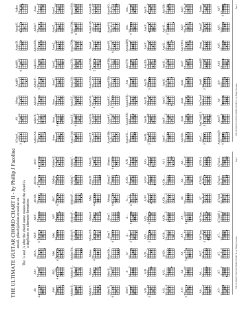
1 The Ultimate Guide To Playing The Guitar By Paul Bright – www.GuitaristAcademy.com Table of Contents Chapter 1: Unleashing The Guitar Hero In You ........................................... 3 Chapter 2: The Basics of The Guitar ............................................................ 6 Chapter 3: How To Hold Your Guitar & Guitar Pick Correctly .....................21 Chapter 4: How To Tune Your Guitar .........................................................24 Chapter 5: How To Play Chords .................................................................27 Chapter 6: How To Improve Your Chord Changes ......................................37 Chapter 7: How To Strum Your Guitar .......................................................42 Chapter 8: C.P + S = S2 ...............................................................................45 Chapter 9: How To Play Barre Chords ........................................................49 Chapter 10: How To Read Tablature..........................................................53 Chapter 11: Top 10 Lead Guitar Techniques ..............................................56 Chapter 12: The Best Way To Practice Guitar ............................................67 Chapter 13: Let’s Wrap This Up .................................................................70 2 The Ultimate Guide To Playing The Guitar By Paul Bright – www.GuitaristAcademy.com Chapter 1: Unleashing The Guitar Hero In You Hi Paul Bright, Founder of the Guitarist Academy here. I hope you enjoy your copy of вЂ�The Ultimate Guide To Playing Guitar’, where I’ll be teaching you how to play the guitar from the comfort of your own home the Fast, Fun & Easy Way. Please feel free to email this e-book to any of your friends, family, or co-workers that you think would enjoy these topics. They will surely be thrilled that you shared all of this information with them! I know how frustrating it can be to learn and play the guitar when starting out... There's so many things you need to be able to know and do like holding your guitar and your guitar pick, guitar chords, tuning you guitar, barre chords, scales, riffs and licks, reading tablature, music theory, techniques such as hammer-ons, pull-offs, vibrato etc... That it can all get frustrating and overwhelming. I’ve been teaching people how to play the guitar from the comfort of their own homes for the past few years. I’ve been playing guitar for over 11 years, have built a successful guitar coaching business, created over a dozen products, have helped thousands of people from around the world to be successful with the guitar, and have a worldwide following of loyal customers. I don’t say any of that to brag (those who know me know that I am not a “bighead”) but to illustrate that I know what I’m talking about when it comes to learning and playing the guitar. Again, that’s not to be boastful, but to show that I have a reputation as someone who not only is experienced and knowledgeable, but also trustworthy. I Used To Be Just Like You… Unfortunately when I was starting out, I struggled with the guitar. For as long as I can remember, I’ve always dreamed of playing guitar. So a bit over 10 years ago I reached a point in my life where I was so desperate to learn how to play the guitar that I made a decision to figure it out for myself. I went out and read every book, I watched every video I could find, and I went through every course on playing the guitar. As far as learning to play the guitar goes, I tried everything I could get my hands on. You name it – I tried it! The Ultimate Guide To Playing The Guitar 3 By Paul Bright – www.GuitaristAcademy.com And you know what… none of it worked very well for me. It was all hit and miss stuff. I struggled to get through all the pointless boring theory and repetitive drills the courses wanted me to do, and couldn’t figure out how to apply the things I was learning to play my favorite songs on the guitar. Do You Suffer From These Experiences? To make matters worse… When playing chords I would get weird buzzing sounds and dead notes. I had a difficult time changing from chord to chord quick enough. My Strumming was awkward and felt as if I was trying to rub my stomach in circles while patting my head at the same time. My fingers would get sore, my wrist would cramp up, and I didn’t have much time to practice. I didn’t know where to turn or what else to try. I was about to give up on my dream of playing the guitar. But Then It All Changed… But in a last ditch effort to learn the guitar, and really out of desperation, I spent the next few years getting to know and really studying people who were experts at the guitar, and I saw things, and I learned things that I could not have imagined. I discovered that by making a small adjustment in where I was placing my thumb on the guitar neck, I could eliminate almost all the dead notes and weird buzzing sounds I was getting when playing chords. I discovered a secret from my friend вЂ�Jason Scheff’ who is the lead singer and bass guitarist from the Grammy Award winning band вЂ�Chicago’ that allowed me to play with perfect timing and rhythm. I learned a simple вЂ�hack’ that allowed me to play over 30+ songs with just 4 easy chords. I discovered that musicians are unconsciously using a simple 3-step system that allows them to play almost any song on the guitar in half the time, with less frustration. And much, much more… Well after I learned these things I created a system... A simple step by step, a to z system that can teach anyone, regardless of age, musical ability and talent, how to play the guitar from the comfort of their own homes by using a song based learning approach. 4 The Ultimate Guide To Playing The Guitar By Paul Bright – www.GuitaristAcademy.com I call it my Guitar KickStarter System, and in the next few minutes, I’ll be sharing with you some of the essentials from my system that you must know if you want to be able to play the guitar like the way you’ve always dreamed. This is going to be fun, so let’s get started… 5 The Ultimate Guide To Playing The Guitar By Paul Bright – www.GuitaristAcademy.com Chapter 2: The Basics of The Guitar What is a Guitar? According to Wikipedia, “The guitar is a plucked string instrument, usually played with fingers or a pick. The guitar consists of a body with a rigid neck to which the strings, generally six in number, are attached. Guitars are traditionally constructed of various woods and strung with animal gut or, more recently, with either nylon or steel strings. Some modern guitars are made of polycarbonate materials. Guitars are made and repaired by luthiers. There are two primary families of guitars: acoustic and electric.” The Parts of the Guitar In this section we’ll be learning the essential parts of both an acoustic and electric guitar, which unfortunately is sometimes taken for granted by some guitarists. The main parts of the guitar are the Head/Headstock, the Neck, and the Body. Here’s a brief description of the other parts of the guitar: п‚· п‚· Tuning pegs / Tuners – These are wound clockwise or counter – clockwise which either loosen or tighten the strings in order to change the pitch of the string. Used to basically tune the guitar. Nut – The white plastic or sometimes a bone strip at the top of the neck and right below the headstock. It is basically the starting point of the string that produces sound. 6 The Ultimate Guide To Playing The Guitar By Paul Bright – www.GuitaristAcademy.com п‚· п‚· п‚· п‚· п‚· п‚· п‚· Fretwires – The metal “humps” on the guitar neck parallel to the nut Fretboard/fingerboard – The face of the neck where the fret wires are embedded. Frets – The spaces between the fret wires Inlay/Position Markers – These are dots on the frets to indicate the 3rd, 5th, 7th, 9th, 12th, 15th and 17th frets on the guitar to make it easier to the player Soundhole – An opening on the body of the guitar in order to project and produce sound Pickguard – A piece of plastic to protect the guitar from damage from the pick Bridge – Anchors the strings to the body of the guitar Here are the basics for Parts of your Electric Guitar. 7 The Ultimate Guide To Playing The Guitar By Paul Bright – www.GuitaristAcademy.com Strings Electric guitars usually have steel strings, whereas acoustics sometimes have Nylon. Strings can also be made out of other materials such as Bronze. The strings vibrating at different lengths when they are played is what makes the Guitar produce different notes- but I should that hope you already know that from High School Physics lessons пЃЉ Pick Ups/ Humbuckers Electric Guitars have “pick-ups” which literally: “pick up” the vibrations of the strings and send them through your lead and into your amplifier. Some Guitars use a type of pick-up called: “Humbuckers” which basically use 2 coils instead of 1 to pick up the sound. It’s all very Scienceey; but essentially it helps to gets rid of unwanted humming noises. Jack/ Jack Lead A “Jack” or “Jack Output” is the hole in the guitar where you plug in your “Jack Lead”. The Jack Lead literally carries the sound signals to the amplifier. Neck/ Fretboard The neck/ fretboard is where the strings lie. They can be made out of many different types of wood. Frets/ Fret-Markings Frets are the different sections of the Neck that producer different notes. For example playing the 3rd fret of the A string in Standard Tuning would produce a C note, whereas playing the 5th fret instead would produce a D note. “Fret-Markings” or “Fret Inlays” or “Fret Dots” (they have a lot of names) are there to help to guide the player around the Fretboard. In the diagram they are at frets 3, 5, 7, 9, 12, 15, 17, 19 and 21. This is pretty standard. Tone/ Volume Dials/ Selector Switches Electric guitars have dials for controlling the volume and tone; so you might want it quiet and bass-y, or loud and treble-y. They also have a: “Pick-up selector switch”, so you can select which pick-up you want to use. Tremolo/ Whammy Bar Some electric guitars also have a “Tremolo Arm” or “Whammy Bar”, and if you've ever played Guitar Hero then you'll know all about these. A Whammy Bar is basically a lever than you quick push up and down to make your notes/chords “bend” up and down in pitch, creating a 8 The Ultimate Guide To Playing The Guitar By Paul Bright – www.GuitaristAcademy.com “wobbling” note effect. They are also used commonly in guitar solos to make them sound even more awesome. Bridge The Bridge is where the strings join on to the body of the guitar. Some types of Guitar have “Intonation Adjustments” to fine-tune the strings. Tuning Pegs/ Headstock The Tuning Pegs are the Pegs on the Headstock (top/ head) of the Guitar. They are used for primarily tuning the strings, and the strings usually wrap tightly around them at the top. Nut The Nut is the bar-thing (I don’t know how else to describe it) that the strings pass over between the neck and the headstock of the Guitar. Why it’s called a Nut is beyond me but there you go! Guitar Gear & Accessories Here is a list of guitar accessories to consider (in order of the most popular): п‚· п‚· п‚· п‚· п‚· п‚· п‚· п‚· п‚· п‚· п‚· п‚· п‚· п‚· п‚· п‚· п‚· п‚· Guitar bag or case Guitar tuner/pitch pipe Guitar strings Effects pedals/Foot Switches Amplifiers Guitar stands Plectrums (also known as picks) Guitar Leads/Cables Guitar straps Guitar Capo Guitar Slide Headphones Metronome Cleaning and maintenance (polish, nut file set, wrench set, fret file set) Footstool Stringwinder (also known as a pegwinder) Straplok set Power adaptor for effects pedals 9 The Ultimate Guide To Playing The Guitar By Paul Bright – www.GuitaristAcademy.com Guitar Bags and Cases If you plan on gigging a lot or travelling on planes/trains etc. I recommend buying a guitar case, otherwise a padded gig bag will do just fine. The Kinsman guitar cases and guitar bags are a very good quality and are also one of the most popular. The Kinsman guitar bags come in three grades. 1) Standard – hardly any padding and one small pouch for music books and accessories 2) Deluxe – quite well padded, with two pouches 3) Premium – extremely well padded, with large and small pouches and a shoulder strap. The Kinsman guitar cases are made for Stratocasters, Telecasters, Les Paul shape, electric, acoustic or bass guitars. 10 The Ultimate Guide To Playing The Guitar By Paul Bright – www.GuitaristAcademy.com Guitar tuner/pitch pipe Boss Tu-12: The Tuner I Use There are hundreds of guitar tuners to choose from on the market. The best to consider are: п‚· п‚· п‚· п‚· п‚· п‚· п‚· п‚· Korg Stagg Yamaha Intelli Seiko Qwik Tune Boss Ibanez The two guitar tuners that stand out from the rest are the Stagg Automatic Guitar/Bass Tuner and the Korg TM-40. These two guitar tuners are sold more than any other guitar tuner on the market. 11 The Ultimate Guide To Playing The Guitar By Paul Bright – www.GuitaristAcademy.com Guitar strings What are the various types of guitar strings? Acoustic guitars can be of two types- the folk guitar and the classical guitar. The type of guitar strings you buy would depend on the type of guitar you have and also on the type of music you want to play in future. The three main varieties of guitar strings are: STEEL STRINGS- these strings are made of a combination of bronze and brass and are typically used in folk music, country and rock and roll. They have a more strident, snappier sound which is more amplified as compared to nylon strings. Folk guitars usually come with steel strings or silk-steel strings that make them good for finger picking and strumming sharper sounds. Silk and steel strings are recommended for beginners as they create more balance between structure, sound and tension while steel strings alone can be a bit sharper and difficult to fret for a beginner. NYLON STRINGS- these are meant for classical guitars with a deep, mellow sound and for a more resounding base. They are more touch-responsive and easier to fret although learners would experience a little discomfort initially because of the widely spaced strings. The warm, rounded tones of jazz and classical music come due to these strings. Nylon strings can be used on a folk guitar although they may not vibrate enough to produce the same sound quality, but it would be disastrous to put steel strings on a classical guitar as the high tension may cause the neck to warp. ELECTRIC GUITAR STRINGS- these are nickel, nickel-plated or stainless steel strings meant only for Electric guitars. They are easier for beginners because chord changing, playing succession notes and finger picking can be done with much less discomfort. However, these strings cannot be used or interchanged on acoustic guitars for technical reasons. The strings are made of magnetic alloys so as to be read by the pickup. 12 The Ultimate Guide To Playing The Guitar By Paul Bright – www.GuitaristAcademy.com What are the most popular brands? Some of the most popular brands of guitar strings are D’Addario, Elixir, Fender, Gibson, Martin, Dunlop and John Pearse. Consider the cost that you are willing to spend on them and make sure that as a beginner you do not initially spend on expensive strings. You may not be able to sustain on expensive strings for too long as most strings need to be changed every 2-3 months (depending on their use)if not earlier. What do gauge and thickness refer to? The gauge and thickness of strings are determined by the experience and needs of players and the body of your guitar. Gauge is nothing but a measure of elasticity and flexibility. There are three basic gauges- light, medium and heavy. Higher gauges present more of a tension on the neck of the guitar. Lighter gauges are easier for beginners to play, although they produce a thinner tone as compared to heavy gauge strings. LIGHT GAUGE - Extra light and light gauge strings are the thinnest. They are easier to fret which means that they can be pressed easily to the neck without tiring the fingers. This makes them ideal for beginners as they are also more responsive to vibratos, slides and bends. They can be strung on either electric or acoustic guitars. If you play guitar melodies often or prefer a higher pitch, lighter gauges would suit you best. MEDIUM GAUGE- The two most popular body styles of guitars are the Grand Auditorium and the Dreadnought. The Grand Auditorium is more curved and narrow while the latter has a wider body. Medium strings suit a Dreadnought while lighter strings suit a Grand Auditorium. Medium strings give a deeper and bold sound with more bass while lighter strings bring out the brilliance in sound by accentuating the highs. LIGHT-MEDIUM- A combination of light and medium where you have the first 3 strings (bottom 3) that are light gauge while the last three strings (top 3) are medium gauge. Some players prefer them as they are good for both finger-picking and strumming. HEAVY GAUGE- they produce a lot of tension on the neck of the guitar and would need to suit the body of the guitar. They would suit you if you prefer a higher volume and use a lot of chords. We Recommend… I personally recommend either D’Addarios or Elixr strings as I have been using them both off and on for over 10 years now. They sound very good and are long lasting and have been very faithful to me with no problems on or off the stage. They produce a high quality and clarity in sound and are fairly common among the general circle of musicians. 13 The Ultimate Guide To Playing The Guitar By Paul Bright – www.GuitaristAcademy.com Effects pedals For some groovy sounds you will need to buy an effects pedal. The two most popular are the Jim Dunlop GCB-95 Original Cry Baby Wah Wah Effects Pedal and the Boss ME25 Guitar Multi Effects Pedal. Here is a list of the top brands in order of popularity*: п‚· п‚· п‚· п‚· п‚· п‚· п‚· Ibanez Jim Dunlop Korg DigiTech Vox MXR Yamaha 14 The Ultimate Guide To Playing The Guitar By Paul Bright – www.GuitaristAcademy.com Amplifiers Marshall MG100HCFX Amplifiers are used with electric guitars, bass guitars and electro-acoustic guitars. You will need to buy a lead to connect it up to your guitar. There are many types of guitar amplifiers ranging from the smallest, which is normally 10 watts. Anywhere up to 500 watts! п‚· п‚· п‚· п‚· п‚· п‚· п‚· п‚· Practice amps (these are normally quite small eg. 10 – 15 watts) Standard amps (used for playing in bands or gigging) Bass amps (used only with bass guitars) Keyboard amps (used with electronic keyboards and stage pianos) Mixer amps Speakers and Monitors Combo amps (also known as combination amplifiers) Amp heads Which brand of Amplifier do I choose? There are a number of brands of guitar amplifiers, here is a list of some of our favorite amps. п‚· п‚· п‚· п‚· Marshall Fender Vox Peavey 15 The Ultimate Guide To Playing The Guitar By Paul Bright – www.GuitaristAcademy.com п‚· п‚· п‚· п‚· Orange Laney Line 6 Mesa Boogie All guitar amplifiers sound different. Some like Marshall are good for Rock and Roll, others have a softer and less bright sound like the popular Vox amps and Mesa Boogie. If you’re just starting out, I highly recommend the Fender Mustang 1 Electric Guitar Amplifier Guitar stands or Guitar Hangers There are lots of different types of guitar stands, it really depends on which stand is more suited to you. There is the standard guitar stand, the universal guitar stand, the auto grab guitar stand, the double and triple guitar stand and the wall mounted guitar stand. The standard guitar stand is the most popular and comes in three different types: i) electric/bass, ii) classical and iii) universal. Plectrums (also known as picks) Guitar plectrums come in different gauges (ie. Thickness) and styles. Usually the thinner ones, somewhere between .40mm and .60mm work better for acoustic strumming. They're more flexible and therefore easier to strum with. 16 The Ultimate Guide To Playing The Guitar By Paul Bright – www.GuitaristAcademy.com TIP: If you’re getting started on the guitar, I highly recommend starting with a thinner guitar pick as you’ll find it easier to strum with, and it won’t get knocked out of your hand as you strum with it. Medium gauged picks, generally in the range of .60mm to .80mm are the most popular thickness and choice for guitarists. This is because they’re the perfect combination of stiffness and flexibility needed for both rhythm and lead guitar playing. Heavier gauged picks, which are generally anything past .80mm, produce a heavier sound and therefore most used when playing lead guitar and solos. There are lots of different types and brands of plectrums. So I highly recommend dropping by your local music store and trying a few different varieties, and thicknesses out to find which feels the most comfortable for you. Guitar Leads/Cables Guitar Leads normally come in different lengths: The most common is the 15 feet/4.5 metre leads. This length is ample if you are playing in a band. Guitar straps If you want to buy a gift for a guitarist, there is nothing better than a nice leather guitar strap. Levys and Gibson are the most famous brands of guitar straps. Guitar Capo In basic terms, a “capo” is a simple mechanical device that when clamped around the neck of a guitar temporarily moves the “nut” to a new position. (Another way to look at it is that a capo temporarily shortens the length of all strings simultaneously–creating a new “zero” fret at different positions on the fingerboard.) 17 The Ultimate Guide To Playing The Guitar By Paul Bright – www.GuitaristAcademy.com Why is This Useful? Two basic reasons. For one, if you’re like most beginner guitar players, you will have noticed an obvious tonal difference between your open-string chords and your barre chords. (Openstringed, or “naturals,” sound truer than those you’ve added a barre to.) And for another, using a capo allows you to take those little single-string licks you’ve learned at the lower end of the neck and move them up the neck–anywhere you want. (A capo is essentially an artificial barre.) Do I Really Need a Capo? In a word, “no.” Guitars weren’t designed to need a capo the way they need strings. (In fact, until sixty years ago, using a capo was considered cheating.) Like guitar picks, capos are optional tools that are up to each player to use or not use. But . . . As every guitar player soon discovers, there are a number of things you can do with a capo that you can’t do without. For one thing, if you’re looking to copy particular songs that were composed using a capo (George Harrison’s “Here Comes the Sun,” for instance), if you want your version to sound authentic, then you’ll have to play it as George did: using a capo. Also, many genres of music — both electric and acoustic — including Country, Rock, Folk, Traditional Irish/Celtic, Bluegrass, and Blues, traditionally make use of a capo. So if your musical tastes go in those directions, a time will come when you’ll need to buy one. Types (Evolution of the Capo) Since first invented in the 17th century, capos have gone from expensive machines that were very difficult to use, to relatively inexpensive, reliable gizmos. (A decent, quality capo can be had today for between $10 and $20.) In the past sixty years alone, capos have gone from simple elastic or fabric straps holding a rubber pad across the strings, to the adjustable “screwin” style, to the breakthrough Shubb design (which uses a lever-operated over-centre locking action clamp), to one of the most popular today, the Jim Dunlop easy release “trigger” model. (Then, of course, there are “partial” capos used for special tunings–like “Drop-D.”) Anything Else to Consider? One of the most practical uses of a capo is for transposing a chord progression instantly– without having to actually transpose each chord. For example, say you have a song in the key of “G” using a GM-CM-DM chord progression (all played as open-string or “natural” chords) and you want to transpose the whole song to the key of “C.” By fixing the capo on the 5th fret, the same open-string fingering used in “G” is now magically transformed to the key of “C” (CM-FMGM). (And this works anywhere on the neck!) 18 The Ultimate Guide To Playing The Guitar By Paul Bright – www.GuitaristAcademy.com Choosing a Capo The first thing to understand is that even though certain styles of capos go in and out of popularity — and all your guitar-playing friends are using them — there are a number of brands and models to choose from for a very good reason: no one type of capo will work well on every guitar. A capo that works great on a Fender Thinline Telecaster, for instance, may not work well on a Gretsch Falcon; one that works perfectly on an old Martin acoustic, may leave the strings of your new Ibanez buzzing. And when it comes to Classical, Spanish, and other nylon-string instruments, they generally require a different type of capo altogether. A good analogy to consider is how you choose a new pair of shoes. Just because you know you wear a size nine, you wouldn’t choose the first pair that caught your eye, because you know there’s more to how a shoe fits than just length. Width, toe-room, material, and style all go into how they will ultimately fit your feet. Capos — like shoes — need to be fitted to your particular guitar because neck width and thickness, string gauge, and action of the guitar all need to be considered. A good place to start is the very popular Jim Dunlop series capos. But be prepared to bring your instrument into the guitar shop and try several other models. The trick is to find a capo that isn’t so tight that it detunes the guitar or damages the neck, and not so loose that it causes unpleasant buzzing when you strum the strings. The right capo should apply pressure evenly across all strings — whether your instrument has 4, 6, or more — and stay in tune both when the capo is on, and when you take it off. If you have to retune each time you use it–it’s the wrong capo for your guitar. Guitar Slide The guitar slide is a tube of some hard material about one to two inches long. Commonly, it’s made from glass and metals. Each type of guitar slide has distinct characteristics, tonality, and overall sound. The guitar slide is pressed lightly against the strings so as not to touch the strings of the fret, producing a sustained tone which can be varied in pitch by moving the slide across the neck. A quick side-to-side motion is often used in this way to generate vibrato. The most popular brand to go for is Dunlop. 19 The Ultimate Guide To Playing The Guitar By Paul Bright – www.GuitaristAcademy.com Metronome If you want to play your guitar in time then you are going to need to buy a metronome. You can choose from modern electronic metronomes or traditional mechanical metronomes. Traditional metronomes look very nice and are made from either plastic or wood, they are also known as pendulum metronomes because the ticking sound is produced by a small pendulum that swings back and forth, much like the old Grandfather clocks. The Traditional wooden or plastic metronomes tend to be a lot more expensive than the electronic metronomes. Our Top Guitar Accessories Under $40 AmpliTube iRig ($39.99) This is one of the most amazing innovations ever! This is actually an easy-to-use instrument interface adapter and a guitar and bass tone mobile software all rolled into one. You can then simply plug in your iRig interface into your iPhone, iPad, or iPod Touch; plug in your instrument to the right jack, plug in your headphones, amp and speakers and then you can have worldclass quality sound to rock the world Snark Clip-On Tuner ($9.71) This is the most accurate and the fastest guitar tuner ever! It has other features like a rotatable colored display and can definitely be used even in the midst of a guitar performance. Other amazing features include a nice sturdy clip, a tap tempo metronome, and great transpose features which lets you tune the guitar even with a capo on. G7th Performance Capo ($29.95) Probably one of the best capos ever made. This has a very great grip and ultra-precise clamping placement. This capo even works for 12-string guitars, classic guitars, and a banjo or mandolin. Danelectro Mini Amp ($19.95) These little babies are really a novelty! They look so very rock-star-ish and totally cool. Don’t be fooled by its looks, it is said that these amps sound decent enough and even comes with a few settings to “perfectly mix” the guitar sound. The best thing of all: it’s only for 20 bucks! 20 The Ultimate Guide To Playing The Guitar By Paul Bright – www.GuitaristAcademy.com Chapter 3: How To Hold Your Guitar & Guitar Pick Correctly Here we will be studying how to properly hold the guitar to maximize learning and lessen the strains of having bad posture. Whether you are sitting or standing, there is really no need to exert stress when holding the guitar… that is if you are doing it right. There are three ways you can hold the guitar. 1. The casual method: The casual method is the easiest one where the guitar sits on your right leg comfortably and the guitar is close to your body. Make sure it doesn’t slide down and keep your back straight as well. Don’t hunch. The casual method is great for a more loosened-up practice session on the guitar. 21 The Ultimate Guide To Playing The Guitar By Paul Bright – www.GuitaristAcademy.com 2. The Classical Method: This method needs you to use a footstool because you are going to place your left foot on the footstool and let the guitar rest on your left leg. This position gives you more access to the guitar neck as you play advanced riffs or do guitar solos. 3. The Standing Up Method: To do this, you are going to need a guitar strap to hold the guitar in place. You have to find the most comfortable position as to where the body of the guitar is in line with, either higher or lower. Don’t position it too low though because that will make it difficult to access the guitar neck. 22 The Ultimate Guide To Playing The Guitar By Paul Bright – www.GuitaristAcademy.com Holding Your Guitar Pick This teeny tiny accessory may be small, yet it plays a very significant role in your guitar playing. It will help produce a better sound from your guitar, and will lessen the stress on your strumming hand. Though some people prefer just to use their fingers, it is still important to know how to use this, just in case you might need it someday. To properly hold the pick, you must remember that you shouldn’t hold it too firmly so that it can flex easily over the strings as you strum. You need to hold the pick between the tips of your fingers. Here’s how to do it: You need to form your fingers this way… Then place the pick in between the index fingers and the thumb like this: The thumb will give the support of the base of the pick while the index fingers to the tip part of the pick. So that’s basically how to hold a pick or a plectrum. 23 The Ultimate Guide To Playing The Guitar By Paul Bright – www.GuitaristAcademy.com Chapter 4: How To Tune Your Guitar Now that you have learned a little bit about the guitar, you are now ready to learn about how to tune it. The best way to do this is with a guitar tuner. A guitar tuner, in very basic terms, is a device that will help you to tune your guitar quickly and accurately. They come in all shapes and sizes, but they all basically perform the same function, and that is to get your guitar strings back in tune. Different brands of guitar tuners may also vary in their price – some may be more expensive than others, but there is nothing wrong with getting yourself a cheaper one first as long as you are able to use it properly and you have a gauge for telling if your guitar strings are in tune or not. Guitar tuners are very useful in situations where you can’t really tune your guitar by ear. For example, you are playing a gig at a bar, and it’s very noisy, tuning your guitar by ear is not really an option now, is it? It would be difficult to get your guitar in tune if you can’t even hear it properly in the first place. It’s also very useful if you do not have the time to spare to tune a guitar by ear, such as impromptu performances. Because guitar tuners take much less time and effort than tuning by ear, this method is generally preferred in fast-paced situations or in noisy environments. How does it work? A guitar tuner will help you get in tune by the reference needle that will point out if your string is either flat, sharp, or in tune. This needle will indicate if the string you are tuning is either too low (meaning it is flat), or it is too high (sharp). Aside from the needle, guitar tuners are equipped with LED display lights – usually in red and green, wherein the green light indicates being in tune, while the red lights will indicate a sharp or flat. Standard tuning for guitar strings – which means that the strings are set in EADGBe tuning – uses 440Hz as its standard measure for being in tune. For you to be able to tell if your string is in tune or not, make sure your tuner is pointing to this frequency. Tuners for acoustic guitars have a built-in microphone, so that it is able to pick up the sound created. The downside with this is that you will have to find a really quiet spot where you can tune your guitar, otherwise, the tuner will pick up other noises in different frequencies, which will make tuning hard for you. For electric and electro-acoustic guitars, on the other hand, there are tuners that have input and output where you can simply plug your guitar into, and then plug the amplifier into the output socket. This is very useful when you are tuning during gigs or jam sessions, because when the guitar is plugged into the tuner, it does not pick up any other sound which might tend to mess up the tuning process. 24 The Ultimate Guide To Playing The Guitar By Paul Bright – www.GuitaristAcademy.com Where do I get one? A guitar tuner is very easy to find. You can always go to your local music shops, and inquire about guitar tuners, and for sure, they will present you with more than one kind available. Otherwise, you can always go to online stores such as www.amazon.com and browse through their available products. Various designs Guitar tuners come in the clip-on kind, and the foot-pedal variation. The clip on guitar tuners are clipped onto the guitar, usually at the head stock, and it picks up the vibrations made when you play a string. Foot pedal tuners, just like the name suggests, are larger – they have a larger screen, and it has a stomp button, which will allow you to tune up on stage. The Snark Sn-1 is a great guitar tuner which I use daily, and be purchased for under $10 on Amazon.com You don’t really need to get yourself a very expensive guitar tuner, as long as it does what it is supposed to do then you should be all set. How to tune your guitar using a tuner Now that you know the basics on guitar tuners, we can now proceed to learning how to tune your guitar using this device. Before we proceed on tuning, you must first know the guitar strings and their names. Starting from the top, the thickest string on your guitar is the sixth string. It is also known as the E string. The one below that, the fifth string, is the A string. The fourth string is D, the third is G, the second is B, and the first string is E. The E of the first string is the high E, while the one on the sixth string is the low E. Tuning an acoustic guitar If you are using an acoustic guitar, it is important for you to do your tuning in a quiet place so that the guitar tuner will not pick up other noises that could interfere with the tuning. When you have found a quiet spot, turn on the tuner, and then pick the string you wish to tune, and see where the tuner’s needle points, if the note is sharp or flat. Observe also the lights on the tuner as you make adjustments on the string. When the needle points at 0, and when the light is steady at green, then you have your string in tune. Tuning an electric guitar For electric guitars, it is more convenient to use the plug-in type of tuners, especially when you are jamming with others. Plug-in tuners, as mentioned earlier, are the type that have input and 25 The Ultimate Guide To Playing The Guitar By Paul Bright – www.GuitaristAcademy.com output, so you can just plug your guitar into it, and plug the amplifier on the output. This way, outside sounds do not interfere with your tuning. Once you have plugged the guitar into the tuner, and you have connected the tuner to the amplifier, you can tune your strings pretty much the same way as with the process for the acoustic guitar. Tuning Your Guitar By Ear Using The 5th Fret Method The 5th Fret Tuning Method is a simple way to check your tuning and to tune your guitar by ear. With this method you have to get at least one of your strings in tune (preferably the low E string), because from that string you will tune the rest of your strings using that as a reference. If you don't have access to a tuning fork, keyboard, or other tuning device, then that's fine. You can get one string as close as you can by ear and then tune the rest of the guitar to it. The guitar will be in tune with itself and will sound just fine, even if every string is a little sharp or flat. Step #1: Fret the 5th fret on the 6th String, If your guitar is in tune or close, then if you pluck the fretted 6th string and the open 5th String, they should sound pretty close. Tune the pegs on your 5th string until they match the 6th String. Step #2: Now that the 5th String is in tune we can now tune the 4th String to it. It is the same process as before, fret the 5th fret on the 5th string and play the string and the Open 4th String, and then turn the pegs on the 4th String till they match. Step #3: Same process again, fret the 5th fret on the 4th String, and tune the Open 3rd String to the fretted 4rd String. Step #4: Now this is where it changes, Instead of fretting the 5th fret on the 3rd String, you fret the 4th, (Just like it shows in the picture). So you fret the 4th fret on the 3rd String and tune the Open 2nd string to it Step 5: For the last string, we fret the 5th fret on the 2nd String this time. We then tune the Open 1st String, to the 5th fretted 2nd String. 26 The Ultimate Guide To Playing The Guitar By Paul Bright – www.GuitaristAcademy.com Chapter 5: How To Play Chords Now for the fun part, actually playing the guitar! It is essential to practice the guitar on a daily basis, even if it’s for just a few minutes. It is not that difficult to make sounds on the guitar but if you want to make those sounds pleasing to the ear, you have to practice. Finger Basics Before getting started, let's talk for a moment on hand and finger basics. You have one fretting hand, which is the hand responsible for creating chords or single notes, and you have your picking or strumming hand. Both hands are equally important. I believe that anyone can create a chord with their fretting hand, but the real magic happens with your strumming hand as there are so many ways to make sounds come out of the strings Above is a diagram of your fretting hand and how to refer to your fingers. This will be a great visual aid for correct chord placement. It will be tempting to cheat with finger placement on some of the chords, but there are specific reasons for using specific fingers for constructing the chords. There is a correct way and an incorrect way to hold a pick with your strumming hand. You'll want to lightly rest the pick between your thumb and forefinger. Your forefinger needs to be arced so that it forms a semi-circle. The pick will rest between the first and second knuckles on the forefinger. Each finger consists of three knuckles, one right above the fingernail, one half way up the finger and the last where the finger meets with the hand. The first and second are referring to the ones right above the fingernail and half way up the finger. 27 The Ultimate Guide To Playing The Guitar By Paul Bright – www.GuitaristAcademy.com From here you will place your thumb on the pick creating a loose yet stable pressure. As you become more advanced in your guitar playing, you will learn that there are several ways to hold a pick and all of which will be held between the thumb and forefinger. Do not let yourself fall into the trap of holding the pick with the tips of your thumb, forefinger and middle finger. This is incorrect and is a very bad habit to break. Strings If you’ve got a guitar, electric or acoustic, you’d probably already have noticed that there are six strings strung on the guitar. I’ll quickly let you know what strings are what so you know which strings to put your fingers on. If you are holding the guitar, the string closet to you (starting at the top) is the low-E string, known as the 6th string. Moving our way down the guitar (towards the ground) we have our A string known as the 5th string. Moving a string down we have our D string (4th String). Our next string is our 3rd string (this is our G string). Our next string is the B string (2nd string). Lastly we have our high-e string, which is our 1st string. So to summarize, here are our strings from top (thickest string) to bottom (thinnest string): п‚· Low-e string (thickest string) = 6th string п‚· A string = 5th String п‚· D string = 4th string п‚· G string = 3rd string п‚· B string = 2nd string п‚· High-e string (thinnest string) = 1st string Frets With the number of frets varying from guitar to guitar, in the course we will be mainly playing in the first three frets. There are a couple of chords that we will play a couple of frets higher, however, most will be played in frets 1 to 3. Let’s begin with open chords. Open chords are basic chord formations that all guitar players learn how to play first. The first chord we will be learning is…. 28 The Ultimate Guide To Playing The Guitar By Paul Bright – www.GuitaristAcademy.com The E Chord For me, the E chord was the very first chord I learnt to play when I was getting started with the guitar. I’ve decided to start with this chord first because out of all the different chords available, I believe the E chord is probably the easiest to master as your fingers are grouped closely together, it’s easy to remember, and you can strum every string unlike some other chords like D Major Chord, where you can’t play the two thickest stings. Step 1: Press your 2nd finger on the 5th string, in the 2nd fret Step 2: Press your 3rd finger on the 4th string (directly below your 2nd finger) in the 2nd fret. Step 3: Press your 1st finger on the 3rd string in the 1st fret. Step 4: Strum the guitar from the 6th string to the 1st string. As I mentioned earlier, the E chord is a great chord because you’re allowed to strum every single string, even those that aren’t pressed down like the 6th, 2nd & 1st string. This makes it easier as you don’t need to worry about what stings you’re strumming, allowing you to focus on the proper placement of your fingers. 29 The Ultimate Guide To Playing The Guitar By Paul Bright – www.GuitaristAcademy.com The A Chord I love the A Chord, and to be perfectly honest, I was debating on whether I should feature this chord first instead of the E Chord. The only reason why I chose the E chord over the A chord, is because when you strum this chord, you need to make sure you don’t play the 6th (low-E) string. We’ll chat about that a little more in a few moments, but let’s learn how to play the A Chord first. Step 1: Press your 2nd finger on the 4th string in the 2nd fret Step 2: Press your 3rd finger on the 3rd string in the 2nd fret. (Directly below your 2nd finger) Step 3: Press your 4th Finger on the 2nd string in the 2nd fret (Directly below your 3rd finger) Step 4: To strum the A Chord, you begin playing the chord at the 5 th string. So make sure you do not play the 6th (Low-E) string otherwise your chord will sound off. Side Note: Even though the 5th string & 1st string aren’t pressed, ensure you include those strings when you strum. Those 2 strings are played open, meaning not pressed. 30 The Ultimate Guide To Playing The Guitar By Paul Bright – www.GuitaristAcademy.com The G Chord The next chord we will master is the G chord. I believe the G chord is slightly harder to play than the E Chord because you need to stretch your fingers a little more. However like the E chord, you can strum every string, even those that are not pressed down. Step 1: Press your 2nd Finger on the 6th string in the 3rd fret. Step 2: Press your 1st finger on the 5th string in the 2nd fret. Step 3: Press your 3rd finger, on the 1st string in the 3rd fret. Step 4: Strum the guitar starting from the 6th string. Ensure you include every string along the way. How did you go with the G Chord? Can you play it? When I first learnt the G Chord, I remember having a few issues with getting my 3 rd finger all the way down to the 1st (High-E) string, while keeping my other 2 fingers pressed down on the first 2 strings. If you’re having issues with this too, don’t stress, because with some repetition and practice, this chord will become a walk in the park. 31 The Ultimate Guide To Playing The Guitar By Paul Bright – www.GuitaristAcademy.com The D Chord Step 1: Press your 1st finger on the 3rd string in the 2nd fret. Step 2: Press your 2nd finger on the 1st string in the 2nd fret. Step 3: Press your 3rd finger on the 2nd string in the 3rd fret. Step 4: To strum the D Chord, you begin playing the chord at the 4 th string. This means the 4th string is played open. With this chord, you’ll need to pay special attention to ensuring you don’t strum the top 2 strings (ie. 6th & 5th Strings). When I got started playing this chord I remember I would accidentally strum the top 2 strings without meaning it. This will happen from time to time, and all you can do is take it slow and be careful. With the guitar practice makes perfect, and practice is something you’ll need to do, even if its 5 minutes per day. 32 The Ultimate Guide To Playing The Guitar By Paul Bright – www.GuitaristAcademy.com The C Chord Step 1: Press your 3rd finger on the 5th string in the 3rd fret. Step 2: Press your 2nd finger on the 4th string in the 2nd fret. Step 3: Press your 1st finger on the 2nd string in the 1st fret. Step 4: To strum the C chord, simply strum staring at the 5 th string. The 4th and 1st strings are played open. However the 6th (low-E) string is not played in this chord. At first it can seem impossible to stretch your finger all the way down to the 1 string, but with some practice, and stretching it shouldn’t take long until you can play a C major chord easily. st In my Guitar KickStarter Home Study System, I demonstrate how to play all these chords and a whole bunch more. For more information, please click here. 33 The Ultimate Guide To Playing The Guitar By Paul Bright – www.GuitaristAcademy.com Chord Charts – Major Chords A Major B Major C Major D Major E Major F Major G Major 34 The Ultimate Guide To Playing The Guitar By Paul Bright – www.GuitaristAcademy.com Chord Charts – Minor Chords A Minor B Minor C Minor D Minor E Minor F Minor G Minor 35 The Ultimate Guide To Playing The Guitar By Paul Bright – www.GuitaristAcademy.com Chord Charts – 7th Chords A7 B7 C7 D7 E7 F7 G7 36 The Ultimate Guide To Playing The Guitar By Paul Bright – www.GuitaristAcademy.com Chapter 6: How To Improve Your Chord Changes Changing from one chord to the next chord quickly and smoothly is one of the most difficult and frustrating parts of the guitar learning process that you need to overcome. If you visit any guitar forum, you will see a lot of beginners out there sharing their difficulties with mastering chord changes. This is a big problem because if you can’t change from one chord to the next fast enough, this creates an unnecessary “pause” in your performance which totally destroys the idea of playing a song smoothly on the guitar. It’s not only frustrating; it’s rather annoying to have a lot of pauses while playing a song. So with this in mind, I have created this section in order to make your life easier. So let’s go ahead and start the ball rolling and start improving our chord changes! Step 1: Pick a Song The first step is to choose a song you would like to learn. You have to choose carefully and you have to consider your comfort level too. Start with easy guitar songs first, then you can go ahead and choose a more challenging song down the track. I’ve compiled a list here of easy songs that are great to practice your chord changes: 1. Bad Moon Rising by Credence Clearwater Revival 2. Last Kiss by Pearl Jam 3. Stand by Me by Oasis 4. Good Riddance (Time of your Life) by Greenday 5. Free Falling by Tom Petty 6. Wild Thing by the Troggs 7. I’m Yours by Jason Mraz 8. Leaving on a Jetplane by John Denver 9. Teardrops On My Guitar by Taylor Swift 10. Knocking on Heavens Door by Bob Dylan The list is just endless. You can even pick your favorite song and use it for your practice. It’s really your choice – which makes it great. For this guide, I will be using Last Kiss by Pearl Jam (which is one of my personal favorites) to show you how to do it. 37 The Ultimate Guide To Playing The Guitar By Paul Bright – www.GuitaristAcademy.com Step 2: Learn the Chords Now that you have your song, the next step is to search for the chords. If you know the chords already, then that’s great. If you don’t then that’s no problem at all. With the internet, you can easily find the chords to any song that you could think of. The site I normally recommended is http://www.ultimate-guitar.com/ which has all the information that we need. For our example, I will search for the chords of the song Last Kiss. 1. You just type your song in the search box 2. Select the song from the search results 38 The Ultimate Guide To Playing The Guitar By Paul Bright – www.GuitaristAcademy.com Step 3: Get a Metronome The next step is to secure a metronome. According to the web, “A metronome is a practice tool that produces a steady pulse (or beat) to help musicians play rhythms accurately. The pulses are measured in beats-per-minute (BPM). Most metronomes are capable of playing beats from 35 to 250 BPM. Common uses of the metronome are helping you to maintain an established tempo while practicing, and learning difficult passages.” This device will you give you steady and timed. You will use the beats to change from one chord to another and work on increasing the speed of the beats gradually. You will understand the whole concept when you get to use it – which is in the next step of this guide. You may think a metronome is unnecessary, but this device is really important to help you improve your chord changes. Another benefit is you will also see your progress and how good you’re doing as you increase the tempo/speed. Where to Get One Option #1: You can buy a physical metronome at Amazon, like this one here: Option #2: If you are hesitant to fork out a few dollars for this device, then you can always get free metronomes online. Here’s one that you can use for free: http://www.metronomeonline.com/ Aside from that, you can also download a metronome app for iPhone or Android phones too. Just pick what is the most convenient for you at the moment. Step 4: Start Slow Alright! So now that we have a metronome, it’s time to start improving our chord changes. So for our example, let’s go back to the song Last Kiss by Pearl Jam – which we know from step #2 uses the chords G – Em – C – D, which is repeated throughout the whole song. So here’s what we’ve got to do: 1. Set the metronome to a slow tempo. 60 beats per minute is a great tempo to start with. 2. Now, we are going to do four counts. Literally that’s 1..2..3..4 and 1..2..3..4 and so on, in time with the beating from the metronome. 3. The next step that is to combine the metronome with our song. Using вЂ�Last Kiss By Pearl Jam’ as an example, we start with the G major chord on the first beat, then count 39 The Ultimate Guide To Playing The Guitar By Paul Bright – www.GuitaristAcademy.com 2…3…4 in time with our metronome. We then go the Em chord and count 2…3…4. Next we go to C major chord then count 2…3…4 in time with the metronome, then go to the D and count 2…3…4… and go back to the G again. Side Note: You need to make sure you do it in time with the beating from the metronome. If 60 bpm is too fast for you, you can change it to 40 or 50 bpm – it depends on what you are most comfortable with. At this point, you don’t need to strum yet. We’ll deal with that later on, because right now we are mainly focusing on improving our chord changes in this exercise. Step 5: Gradually increase the speed The next step that we will be doing is to gradually increase the progression of your speed. Once you are comfortable changing form one chord to another with your initial metronome BPM, then it’s time to increase the pace. You can do it by gradually increasing your metronome by 10 bpm. Once you are again comfortable with the said pace, increase it by another 10 bpm – until you can confidently and smoothly change from one chord to another effortlessly. Additional Tips Here are some additional tips that will help you make chord changes easy: If you find those chord changes too overwhelming, you can always break up the song into smaller chunks and do “micro practice” until you get it right. In our example which is Last Kiss, instead of going from G, to Em, to C, and then to D, you start first with G, then go to Em, then back to G, then to Em until you are comfortable with it. Then, you can move on to Em to C, then finally from C to D. Then, after all that’s done, you can then go back to the correct pattern: G, to Em, to C, and then finally to D and gradually increase the pace. Another tip is to find out which chord changes you are having the most difficulty with, and then focus on working that out. For most people, they don’t have problems changing from G to Em, and C to D, but have much more difficulty changing from Em to C. So that’s the part that you need to focus on practicing. So applying the principle, start slow then gradually increase the pace. As you can see, the metronome is really useful for this exercise. 40 The Ultimate Guide To Playing The Guitar By Paul Bright – www.GuitaristAcademy.com The steps that I have shown you are not magic tricks – you still need to consistently practice because unfortunately you cannot improve your chord changes overnight. But what I can guarantee is that the tips and the methods that I’ve introduced to you today will make it simpler, and its results are guaranteed. Chord changes are indeed hard – but it can be managed. Even professional guitar players had difficulties with this when they were still starting out too. So just hang in there. Do the practice steps, follow the methods that I have shared, consistently do it every single day, and I’m pretty sure that in no time at all, you’ll be able to command your audience’s attention and leave them in awe with your performance as you confidently play your favorite songs on your guitar with perfection. 41 The Ultimate Guide To Playing The Guitar By Paul Bright – www.GuitaristAcademy.com Chapter 7: How To Strum Your Guitar So, now that we have learned a bunch of chords where we were mostly working with our left hand (known as our fretting hand), it’s now time to start working on our right hand as we learn some very basic strumming patterns. SIDE NOTE: If you’re a left handed guitarist, your fretting hand is your right hand, and your strumming hand is your left hand. This can be fairly challenging because it takes a great deal of practice to put everything together to perform a flawless song on the guitar. Strumming Pattern 1 This for me is the easiest and perhaps one of the most popular strumming patterns on the guitar. Here’s how the pattern goes… 1 & D 2 & D 3 & D 4 & D Strumming Pattern 2 A slight extension to the first strumming pattern is where we add an up strum on the end 1 D 42 & 2 D & 3 & D The Ultimate Guide To Playing The Guitar By Paul Bright – www.GuitaristAcademy.com 4 & D U Our Top Strumming Tips Tip #1: If you are playing an acoustic guitar, make sure to strum directly over the sound hole. On an electric guitar, strum over the pickups. Tip #2: Make sure all strings are ringing clearly. Tip #3: Make sure the volume of your down strums and up strums are equal. Tip #4: Be careful not to strum too hard, as this often causes strings to rattle, and produces an undesirable sound. Be careful not to strum too softly, as this will produce a "wimpy" sound. Strumming Pattern 3 1 & D 2 & D 3 & 4 & D U D U 3 & 4 & U D U Strumming Pattern 4 1 D 43 & 2 D & The Ultimate Guide To Playing The Guitar By Paul Bright – www.GuitaristAcademy.com Strumming Pattern 5 This is my favorite strumming pattern of all time as it’s used in a bunch of easy and great sounding songs on the guitar. Songs such as Brown Eyed Girl by Van Morrison, Last Kiss by Pearl Jam, Good Riddance by Green Day, to name a few, all use this strumming pattern. 1 D & 2 & D U 3 & 4 & U D U Stuck or Having Trouble? In our best-selling course called Guitar KickStarter Home Study System, we demonstrate and detail step by step, how to play those different strumming patterns. If you’re looking to fast track your guitar playing, then be sure to check this out. 44 The Ultimate Guide To Playing The Guitar By Paul Bright – www.GuitaristAcademy.com Chapter 8: C.P + S = S2 I imagine that right now you’re probably looking at the title of this chapter and thinking to yourself something along the lines of… “What in the world does C.P + S = S2 mean?” To tell you the truth, it’s actually a very simple formula I teach to our students here at the Guitarist Academy. And it’s the exact same formula I use to learn songs on the guitar in half the time and with less frustration. Here’s what C.P + S = S2 stands for: C.P. = Chord Progression S = Strumming S2 = Song Here’s what the extend version of my simple song learning formula looks like: Chord Progression + Strumming = Song We’ll come back to how to use this simple formula in a moment, but before we do, I haven’t met anyone yet who has bought a guitar saying “oh boy, I can’t wait to do a whole bunch of boring drills and exercises for no good reason”. Everyone I know who has bought a guitar has told me all the songs they’re looking forward to being able to play once they get good enough. I find that most people have their personal favorites whether it is their favorite songs, favorite bands, or favorite pieces of music. Almost everyone knows their favorite songs by heart and is anxious to play them. This is great. However, it is best to slow down and learn a few basic songs that can assist you in getting the feel for the structure of songs and the feel for timing. Would you like to know… What are some easy songs to play on the guitar? If you just answered “Yes”, Here's a list of 33 songs that are both FUN to play, and SOUND GREAT. 1. "Last Kiss" By Pearl Jam 2. "Bad Moon Rising" by CCR 3. "Knocking On Heavens Door" by Bob Dylan 4. "Have You Ever Seen The Rain?" by CCR 5. "Save Tonight" by Eagle Eye Cheers 6. "Ring of Fire" by Johnny Cash 7. "Space Oddity" by David Bowie 8. "Sweet Home Alabama" by Lynyrd Skynyrd 9. "Love Story" by Taylor Swift The Ultimate Guide To Playing The Guitar 45 By Paul Bright – www.GuitaristAcademy.com 10. "Everlong" (acoustic) - Foo Fighters 11. "Californication" - RHCP 12. "Gloria" by Van Morrison 13. "Brown Eyed Girl" by Van Morrison 14. "Wild Thing" by The Troggs 15. "Hound Dog" by Elvis 16. "Hallelujah" by Jeff Buckley 17. “Big Yellow Taxi” by Joni Mitchell 18. “Born to Be Wild” by Steppenwolf 19. “Come as You Are” by Nirvana 20. “Come Away With Me” by Norah Jones 21. “Don’t Stop Believing” by Journey 22. "Let it Be" by The Beatles 23. “Hey, Soul Sister” by Train 24. “Ho Hey” by The Lumineers 25. “Honky Tonk Women” by The Rolling Stones 26. “House of the Rising Sun” by The Animals 27. “Sweet Caroline” by Neil Diamond 28. “No Woman, No Cry” by Bob Marley 29. “Pumped Up Kicks” by Foster the People 30. “Somebody That I Used to Know” by Gotye 31. “Stand by Me” by Ben E. King 32. “Take It Easy” by The Eagles 33. “Twist and Shout” The Beatles Bonus: "Good Riddance" by Green Day Bonus: “You Shook Me All Night Long” by AC/DC Bonus: “Wanted Dead or Alive” by Bon Jovi Bonus: "Desire" by U2 Bonus: "Blister In The Sun" by The Violent Femmes So let’s get back to our simple C.P + S = S2 formula and take a look at how to use it to learn a song on the guitar. Step #1: Pick Songs You Want To Learn The first step when learning any song on the guitar is to first pick which song you would actually like to learn. For this example, let’s learn вЂ�Knocking On Heavens Door’ By Bob Dylan. 46 The Ultimate Guide To Playing The Guitar By Paul Bright – www.GuitaristAcademy.com Step #2: Chord Progression You’ll notice that this is the first part of our song learning formula. After we’ve picked a song we want to learn and play on the guitar, the next step is to figure out what chords are played in the song, and in what order they’re played. This is also known as the вЂ�Chord Progression’. A simple way to find this out, is to head over to Ultimate-Guitar.com and bring up the вЂ�Chords’ version of the song, which will give you something like this… Looking at the picture above, you’ll notice that the chord progression of вЂ�Knocking On Heaven’s Door’ is G Major пѓ D Major пѓ A Minor пѓ A Minor. And then it’s G Major пѓ D Major пѓ C Major пѓ C Major. The thing I love about this song is that it has a very repetitive progression, making it a great song to learn when starting out. You may have noticed that I added an extra A Minor & C Major chord before. This is because both the A Minor & C Major chords in this song are held for two bars, instead of just one bar like the other chords. 47 The Ultimate Guide To Playing The Guitar By Paul Bright – www.GuitaristAcademy.com Step #3: Strumming Now before moving to this step, what you want to try and do first, is play the Chord Progression with just a simple down strum per chord. You need to practice going from chord to chord before adding another element into the mix. Playing the guitar can feel a little like rubbing your tummy in a circular motion while patting yourself on the head. At the beginning it feels awkward and unnatural, but if you practice each part on its own, it becomes easier to do the whole thing when you add them together. A simple strumming pattern you can use to get started with this song is a slight adaption on Exercise #2 from our previous chapter. 1 D & 2 D & 3 & D 4 & D U Looking back at our metaphor or rubbing your belly while patting yourself on the head. If chords were вЂ�Rubbing your belly in a circular motion’, then strumming would be вЂ�Patting yourself on the head’. And doing both things together would be the song you want to play. Like I mentioned before, the fastest way I believe to learn a new song is to practice both the Chord Progression and Strumming individually. Once you can do each part properly, it’s simply a matter of putting them both together. 48 The Ultimate Guide To Playing The Guitar By Paul Bright – www.GuitaristAcademy.com Chapter 9: How To Play Barre Chords What Are Barre Chords? A barre chord (also known as “bar chord”) is a type of guitar chord that is played by pressing your index finger down on multiple strings across the fret board. Because your finger acts like a bar pressing down on the guitar strings, it became known as the bar chord. Barre chords will widen your playing horizons because with this type of chord, you’re no longer restricted to just the first few frets of the guitar where you would normally play open chords like the A Major, D Major, and C Major chords for example. And because of the way that your hand is positioned when playing a barre chord, your hand can easily be moved up and down the guitar neck in one movement to play different chords – hence, barre chords are also known as “moveable chords”. What Are The Different Types of Barre Chords? For this chapter, we will tackle two main types of barre chords: the E shape, and the A shape. Under these two chord shapes fall four subcategories, and these are: п‚· The major chords п‚· The 7th Chords п‚· The Minor Chords п‚· The Minor 7th Chords Although it would be good to know the different types of chords, for now, we are only going to focus on the major chords in the E and A shape. Let’s begin learning the F Major Chord. It is one of the common barre chords that are held in the shape of вЂ�E’ . Remember that barre chords are also called “movable chords”. If you will recall, we already mentioned earlier that barre chords are the kind of chords you can easily move up and down the guitar’s neck. By learning the F Major Chord and mastering it, learning other barre chords will become a lot easier because you simply have to move your hand up and down the guitar’s neck to get different chords like the G Major, A Major, B Major, F# Major, and so forth! 49 The Ultimate Guide To Playing The Guitar By Paul Bright – www.GuitaristAcademy.com How To Play Barre Chords Held In The Shape of вЂ�E’ As you can see in the picture above, if you disregard the “bar” or the index finger, you will notice that what is left is the form of an E Major chord. We are basically moving the E Major chord to another location, then we bar, or press down the open strings with our index finger. You can also relate the index finger, or the bar to the nut of the guitar. This is the reason why bar chords are called “movable chords” because of this capability. We are just simply transferring the E major chord and the nut (in the form of index finger to bar the open strings) to another fret to achieve, or create another chord. Here’s my 3 step system for playing barre chords held in the shape of вЂ�E’. Step 1: Index Finger Step 2: Alternate E Chord Step 3: Putting It Together Step 1: The Index Finger 1. Lay the index finger (your first finger) across all six strings in the first fret. 2. Once you have done so, pick each string individually to make sure that each note is clear. 50 The Ultimate Guide To Playing The Guitar By Paul Bright – www.GuitaristAcademy.com Common Problem Encountered at this Step: A common problem with “barring” is that one or more strings will sound muted. Solution: Instead of laying the index finger flat on the strings, try rolling your finger a bit so that the outer edge is pressing down on the strings and not the soft part of your finger. You may have to adjust your wrist to be able to achieve this, but with practice, you will get the hang of it. Step 2: The Alternate E Major Chord 1. Remember the E major chord? Playing the alternate E major chord is very similar to that, except that we will have to move your fingers. 2. Now, recall the shape of the E major chord. The second finger will take the first finger’s place, so it will press down on the 3rd string on the first fret. 3. The third and fourth fingers will be positioned in the second fret, and these will be pressing down on the 5th and 4th strings. Common Problem Encountered at this Step: Sometimes, the fourth finger tends to overlap onto another string. When this happens, one or more notes of the chord will end up sounding muted. Tip for this step: Rest your index finger on the nut of the guitar. As for the overlapping of the fourth finger, this will take a bit of practice. Adjust the position of your wrist by rolling it down until you can position your pinky finger in such a way that it no longer overlaps another string. Just keep practicing this, and you will eventually be able to overcome this little hurdle. 51 The Ultimate Guide To Playing The Guitar By Paul Bright – www.GuitaristAcademy.com Step 3: Putting It All Together 1. Play the alternate E Major chord – be sure to pluck each string to make sure that each note is properly sounding out. 2. Now move that alternate E major chord one fret up – your second finger will now be in the 3rd string on the second fret, while the third and fourth fingers will be positioned on the third fret, on the 5th and 4th strings. Once you have your fingers positioned, pick each string to be sure that all notes are ringing out properly. 3. Now lay your index finger across the first fret (keep in mind the tips we studied earlier to make that bar correctly). 4. Once you have your barre chord in place, pluck each string to make sure that there are no muted strings. Positioning your thumb: So far we have only discussed the index, middle, ring, and little fingers. You may be wondering, “What am I going to do with my thumb, then?” Remember that your thumb should always be behind the guitar neck, and not on top of it. Your thumb basically acts as the support of the rest of your fingers when playing barre chords. The neck of your guitar should be “sandwiched” in between your thumb and the rest of your fingers playing the chords. It’s almost as if you’re pinching the guitar neck. Barre chords can be extremely difficult to master when starting out, so don’t worry too much if you can’t do them right now. They’ll come with some time and practice. 52 The Ultimate Guide To Playing The Guitar By Paul Bright – www.GuitaristAcademy.com Chapter 10: How To Read Tablature Guitar tablature is a form of music notation for a guitarist which tells you how a song is played on the guitar. Reading tablature (ie. TAB) is easy, especially when compared to traditional sheet music. As you know by now from our previous chapters, guitars usually have six strings (there are 7 string and 12 string guitars also, we'll ignore them now). The first thing you will notice about tabs is that there are six lines. They represent the six strings of the guitar and looks like this. e -----------------------B -----------------------G -----------------------D -----------------------A -----------------------E -----------------------I have written the string names (the note each string plays when you don't hold down any frets) on the left, this may not be given in all tabs. If it is not given, you have to assume that it is the same as I have written. Note that the top string of your guitar, (the 6th or thick low-E string) is written at the bottom of the tab, and the bottom string (1st of thinnest high-e string) is written at the top. A lot of people get confused at this, but this is the standard way to write tabs (don't ask me why). Also note that in some cases the string names may be written differently. These are the cases when the song is not played with standard tuning. That means the open strings don't play the notes E, A, D, G, B, e but some other notes. As this lesson is for beginners, we will stick to standard tuning guitar tabs. The next thing you notice on a tab is the numbers. The numbers represent frets. 1 means the 1st fret, 2 means the second fret and so on. A 0 (zero) means an open string. For example: e ---------------2---------------B ------------3-----3------------G --------2------------2--------D ----0--------------------------A -------------------------------E -------------------------------- 53 The Ultimate Guide To Playing The Guitar By Paul Bright – www.GuitaristAcademy.com Tablature is read from left to right, just like when reading a book. So this tab means, first you play the D string at open fret, then G string at the 2nd Fret, then then B string at the 3rd fret and so on. Let’s take a look at how chords are notated in tablature. Below you’ll see an example of how the D Major chord is notated in tablature form. Chord Chart Notated In Tablature e --2--B --3--G --2--D --0--A --x--E --x--- The difference between this tab and the first tab is that in this tab, multiple strings are hit at the same time, so this indicates a chord. Let’s take a look at another example with a few different chords played in succession. e B G D A E --0—-0----0----2--2---------------0—-0----2----3--3---------------1—-1----2----2--2---------------2--2----2----0--0---------------2--2----0----x--x---------------0--0----x----x--x-------------- At first you hold down and A and D strings in the 2nd fret, and the G string in 1st fret and play all 6 strings. If you recall from Chapter 5, then you might notice that this is E-major chord. According to the tab, the E-major chord is strummed twice. The next chord is A-major which is strummed once and then the D-major is strummed twice. The x indicates that that string is not played. Meaning you do not hit that string with your strumming hand. 54 The Ultimate Guide To Playing The Guitar By Paul Bright – www.GuitaristAcademy.com Now let’s take a look at the different symbols used in Tablature: p = pull off h = hammer on \ = slide (downward) b = string bend / = slide (upward) ~ = string vibrato In our next chapter we’ll be talking more about how to play these different techniques and how they’re used on the guitar. But before we move on, here are two, infamous and simple riffs, try them out: Smoke on the Water by Deep Purple: E|---------------------------B|---------------------------G|---------------------------D|---------------------------A|---------------------------E|0-3-5---0-3-6-5---0-3-5--3-0 Ring a bell? Note that the whole song is played on the thickest/deepest pitch string. Come As You Are by Nirvana: E|-----------------------------B|-----------------------------G|-----------------------------D|-----------------------------A|--------0---0---------2-----2E|0-0-1-2---2---2-2-1-0---0-0--- This song is played on the top two strings of your guitar. It looks hard but do it slowly at first and you'll have it in no time. These two riffs were one of the very first things I learnt on the guitar. 55 The Ultimate Guide To Playing The Guitar By Paul Bright – www.GuitaristAcademy.com Chapter 11: Top 10 Lead Guitar Techniques Technique #1: Vibrato Vibrato is one of the most, if not the most expressive tools that us guitarists have in our arsenal of techniques. The aim of vibrato is to make the guitar sing. Take a little time listen closely to a great singer and try and notice the way that they hold a note and let it's pitch go gently up and down. That is usually what you are trying to achieve on the guitar with vibrato. Vibrato is produced on by cyclic hand movements. Despite the name, normally the entire hand moves, and sometimes the entire upper arm. How To Do It Step 1: Play the note Step 2: Now using your finger, push and pull the string slightly up and down. This should cause a change in pitch Tablature Symbol & Example In tablature you’ll normally see Vibrato notated by a ~ symbol. Example: You’ll see Vibrato notated like this… 56 The Ultimate Guide To Playing The Guitar By Paul Bright – www.GuitaristAcademy.com Technique #2: Double Stops When we’re starting out on the guitar, generally we start off by learning how to play only single-string melodies. Learning how to play double-stops on the guitar lets you use the whole neck to express your musical ideas. In fact, playing double-stops is a great way to play in harmony with yourself. A double-stop is nothing more than two notes that you play at the same time. It falls somewhere between a single note (one note) and a chord (three or more notes). You can play a double-stop on adjacent strings or on nonadjacent strings (by skipping strings). You don't need to do anything special in fretting the notes of a double-stop. Fret them the same way that you do chords or single notes. Example 57 The Ultimate Guide To Playing The Guitar By Paul Bright – www.GuitaristAcademy.com Technique #3: Slides A slide is when you go from one note to another by keeping contact with the string the whole time. After picking the string to sound the initial note, you then let your finger glide over the frets to a second, targeted note somewhere along the same string. Successful slides are a matter of touch. When you first pick the string, fret the note as you normally do. As soon as you start your slide, ease up slightly on your fretting finger so it will glide smoothly over the frets to the next note. Too much pressure, and your finger won’t slide; too little, and you won’t create the sound of the slide. Tablature Symbol & Example In tablature you’ll normally see a Slide notated by a / symbol. Example: You’ll see a Slide notated like this… 58 TheFrom Guitar Slide From Somewhere The Ultimate Guide To Playing Slide Nowhere By Paul Bright – www.GuitaristAcademy.com Technique #4: Hammer-ons The concept of the hammer-on is fairly simple - playing a note, then, WITHOUT re-picking, playing another note on a higher fret on the same string. A 'hammer on' is when a note is sounded, and while it is still ringing, a left hand finger is used to quickly press down a fret that is on the same string, and close to the original fret. This will result in the sounding of the second note, even though the right hand did nothing but sound the first note. The vibrations that occurred from the sounding of the first note will be carried on to sound the second note. Tablature Symbol & Example In tablature you’ll normally see a Hammer-on notated by a h symbol or and connecting line. Example: You’ll see a hammer-on notated like this… 59 The Ultimate Guide To Playing The Guitar By Paul Bright – www.GuitaristAcademy.com Technique #5: Pull-offs The pull-off is a guitar technique that is, in a way, exactly the opposite of a hammer-on. We can use a finger to fret a note, and then sound that note. While the note is still sounding, a finger can be placed directly behind the first finger, and then the first finger can be 'pulled off'. In doing this, it is in effect the same as plucking the string with a finger, it creates vibrations. And now the note that is being fretted directly behind the first finger will be sounded Tablature Symbol & Example In tablature you’ll normally see a Pull-off notated by a p symbol or and connecting line. Example: You’ll see a hammer-on notated like this… 60 The Ultimate Guide To Playing The Guitar By Paul Bright – www.GuitaristAcademy.com Technique #6: Alternate Picking Alternate picking is a right-hand picking technique that uses both downstrokes (toward the floor) and upstrokes (toward the ceiling). When you learn how to play the guitar using alternate picking, you can play rapid, successive notes in a smooth, flowing manner. Single notes that you need to play relatively fast almost always require alternate picking. Exercise #1 - Down Picking Exercise #2 - Alternate Picking 61 The Ultimate Guide To Playing The Guitar By Paul Bright – www.GuitaristAcademy.com Technique #7: Palm Muting "Palm muting" is a technique used to muffle the strings slightly, while simultaneously hitting the strings with the pick which produces a muted sound. The name is a slight misnomer, as the muting is performed by the side of the hand, not the palm. To do a plan mute simply lay the side of your picking hand very close to the bridge, and then pluck the strings while the damping sound is in effect. Tablature Symbol & Example In tablature you’ll normally see a Palm Mute notated by a P.M. symbol. Example: You’ll see a Palm Mute notated like this… 62 The Ultimate Guide To Playing The Guitar By Paul Bright – www.GuitaristAcademy.com Technique #8: Half & Full Bends Normally when you fret a note, you push it straight down on the fingerboard. When you push or pull a string up or down, you are bending the string. This causes the fretted note to go sharp. Depending on how much you bend the string, you can change the note up to a step and a half higher than the original. Bending strings doesn’t require strong fingers as much as it does good ears. You need to be able to hear the note you want to achieve on the bend in order to successfully perform this slur. And when first learning how to bend, it’s best to have all your fingers involved. Full Bend A full bend is the equivalent of playing a note two frets (ie. A whole step) above the original that note you’re playing. For example if you were to press down and play the 13th fret of the High E String, you would be playing an F note. To successfully do a full bend, you would need to bend up until the note of your bend matches the note TWO frets up. Which in this example would the the 15th fret, which is a G note. Tip: When learning bends for the first time, we recommend that you bend using your 3rd (ring) finger, and place your 1st and 2nd fingers on the frets before it. Doing this will help support your fingers and make is much easier to achieve a successful bend. Tip: When starting out… Use a tuner to help identify the original note and the note a whole step up. Using the tuner, bend the string and make sure the note matches the note you’re bending to. Examples 63 The Ultimate Guide To Playing The Guitar By Paul Bright – www.GuitaristAcademy.com Half Bend A half bend is almost identical to a full bend. The difference is that you are now trying to play note ONE fret (ie. A half step) above the original note that you’re playing. For example if you were to press down and play the 13th fret of the High E String, you would be playing an F note. To successfully do a full bend, you would need to bend up until the note of your bend matches the note ONE fret up. Which in this example would the the 14th fret, which is a F# (aka: F Sharp). Example 64 The Ultimate Guide To Playing The Guitar By Paul Bright – www.GuitaristAcademy.com Technique #9: Prebends The pre-bend differs slightly from a half/full bend in that you actually bend the string BEFORE you play it. For example…. With a half or full bend, you play the note and then bend. But with a Pre Bend you bend the string like you would normally do first, pick the string, and bring the bend down. Bend the tenth fret of the second string up to the 12th fret, then hit the string with your pick. Now, release the bend, so the pitch returns to normal. This can be tricky, since you have to estimate how far to bend the note, without being able to hear it. Example 65 The Ultimate Guide To Playing The Guitar By Paul Bright – www.GuitaristAcademy.com Technique #10: Anchor Bends An anchor bend is so named because it connects almost immediately to another note afterwards. As you can see in the example below, an anchor bend is used when performing a full bend on the 14th fret on the 3rd string, and using your 4th finger to play the 15th fret on the 2nd string. The first bend as mentioned before is held up in position, while playing the 15th fret on the 2nd string. After that note is played, a prebend is used to release the bend back down. Example 66 The Ultimate Guide To Playing The Guitar By Paul Bright – www.GuitaristAcademy.com Chapter 12: The Best Way To Practice Guitar If you are like most guitar players you probably feel frustrated with your guitar playing at times. You know mastering the guitar takes time, energy and effort. It seems like a huge mountain to climb in order to reach the highly advanced levels of guitar playing. You know that few people who attempt to climb that mountain will actually achieve it… but if you are truly determined to reach these goals you certainly can! Fact is one of the biggest reasons why so few people become great guitarists is not because they lack talent, but rather due to not knowing all of the things they need to do or practice in order to reach their goal. People usually have more than enough things to practice (licks, techniques, exercises, scales etc.) but struggle most with creating an overall plan to get them the result they want. Taking your guitar playing ability from wherever it is right now to exactly where you always dreamed it could be in the shortest amount of time can be done. Having a well-structured (yet flexible) guitar practice regimen is a key first step in doing this. What’s The Best Way To Practice Guitar? Now that is a tough one! When it comes to practicing the guitar; it really all comes down to you, and what you feel capable of. As with all things in life, some people who take up guitar will be “naturals” and “overachievers”- whereas others will struggle more and take longer. I know people who have started learning Guitar at similar times- and some just naturally progress quicker than others. Its human nature- it’s just annoying when you draw the short straw! I personally recommend that you practice as much as you feel comfortable. Everyone has different amounts of free time- so I can’t really sit here and say: “YOU MUST PRACTICE 3 HOURS A DAY” if you have a full-time job and a family- it just isn’t realistic. More than 15 minutes a day is ideal- but if you can’t fit that in then do what you can. Playing guitar should be about having fun- not stressing out! Now, the question of: “What to practice?” One thing I’ve always tried to do is follow a Daily 5-5-5 Routine, which only takes just 15 minutes to complete. 67 The Ultimate Guide To Playing The Guitar By Paul Bright – www.GuitaristAcademy.com It’s easy with the guitar to focus on the things you find easier and more enjoyable, and forget about the things that aren’t as fun in the beginning, but will make a massive difference to your playing over the longer term. So what is my вЂ�My Daily 5-5-5 Routine’? It consists of spending at least five minutes focusing on… 1. Guitar Chords & Scales 2. Strumming & Technical Playing 3. Songs & Musical Playing To keep things fresh, what I like to do is pick one item from the list below and focus on that solely for at least 5 minutes. If I have additional time to practice or I’m really getting into it, I’ll extend each section and repeat the process with another item from the list. Section #1: Guitar Chords & Scales Total Time: 5 Minutes In this section I recommend learning and playing guitar chords & scales. These can be chords/scales that you already know, or can be new chords/scales you would like to learn. Simply pick one of the items from the list below to practice in this section: п‚· Common Major & Minor Guitar Chords (e.g. A Major, G Major, D Minor, F Major etc…) п‚· Barre Chords (F Major, C# Minor, B Major etc…) п‚· Chord Progressions (e.g. G major пѓ E minor пѓ C Major пѓ D Major etc…) п‚· Pentatonic & Blues Scales (e.g. A Minor Pentatonic Scale, C Blues Scale etc…) п‚· Minor & Major Scales (e.g. G Major Scale, G Minor Scales etc… Section #2: Strumming & Technical Playing Total Time: 5 Minutes In this section I recommend focusing on your strumming and techniques. Simply pick one of the items from the list below to practice in this section: п‚· Strumming (e.g. Strumming patterns & figuring out new strumming patterns) п‚· Alternate picking п‚· Bends &/or Slides п‚· Hammer-ons &/or Pull-offs п‚· Other techniques (e.g. Palm muting, harmonics, rakes, double stops, vibrato, etc…) Section #3: Songs & Musical Playing Total Time: 5 Minutes In this section I recommend using everything you learn in the previous sections to play songs, riffs, licks & solos. 68 The Ultimate Guide To Playing The Guitar By Paul Bright – www.GuitaristAcademy.com Simply pick one the items from the list below to practice in this section: п‚· Learning A New Song п‚· Playing & Perfecting A Song You Already Know п‚· Play-Along Songs п‚· Playing Along or Improvising With Jam Tracks п‚· Learning A New Riff or Lick п‚· Playing & Perfecting A Riffs or Lick You Already Know п‚· Learning A New Guitar Solo п‚· Playing & Perfecting A Solo You Already Know If you would like to get good at the guitar fast, one thing that I highly recommend you do is ensure that no two days are the same. For example, if today you practice barre chords, strumming & learning a new riff. Tomorrow you could practice pentatonic scales, bends & practicing a song you already know. The key is to mix things up as much as possible so you’re continually being challenged. 69 The Ultimate Guide To Playing The Guitar By Paul Bright – www.GuitaristAcademy.com Chapter 13: Let’s Wrap This Up We’ve covered a lot of ground and I’m thrilled you’ve stayed with me 'til the end. I’m guessing you’re one of the folks I’d love as a client. Quite frankly, you’ve qualified yourself. I realize this is a lot but I’m here to help you. To be honest, we’ve only scratched the surface here. For this reason I offer Coaching Programs, Online Courses & DVD's. If you’ve submitted your e-mail to receive this eBook, you’re already on my list and will be the first to hear about them and special offers we occasionally run from time to time. Meanwhile, please share the love. If you really enjoyed this, send my link www.GuitaristAcademy.com to your friends & family. Or why not tweet or facebook it? I’d greatly appreciate it. :-) And until next time, I’d like to leave you with a list of seven of the biggest mistakes most guitarists make and how to stay away from them. Enjoy пЃЉ Big Mistake # 1: Practicing Incorrectly. Practicing for long hours on the guitar can be mentally stressful, but you shouldn't be physically burned out. If you feel tired even after half an hour of practice, chances are that you are doing it incorrectly. Improper posture and positioning of the guitar can paramount to unnecessary physical stress that can make practice time a struggle. Here are a couple tips to help you out: Try not to hunch your back, keep your guitar angled towards you slightly, and ensure the dip of the guitar is resting on your lap on the same side as your strumming hand. Big Mistake # 2: Expecting Miracles and Lightning Results. Like learning anything new, playing the guitar takes time, patience and a lot of practice! If you are mislead by others to thinking that playing the guitar can happen overnight then, you are on a long, frustrating journey. Be prepared to face challenges, practice, and encounter mistakes along the way. With your hard work and patience, rewards will surely await you. Big Mistake # 3: Choosing the Wrong Songs To Practice 70 The Ultimate Guide To Playing The Guitar By Paul Bright – www.GuitaristAcademy.com Trying to play songs that are clearly out of your interest zone is like trying to stomach down a moldy sandwich - it just doesn't work. Since you will be spending long hours trying to perfect something on the guitar, better choose the songs that are closest to your heart. Not only will you be excited to perfect the piece, you will also find that time will just slip by without you noticing. Beginner guitar songs don't need to be boring. There are a ton of songs perfect for first-time guitar players which I’ve listed previously in step #4. Big Mistake # 4: Pushing Beyond Your Limits Pushing yourself beyond what is right isn't only emotionally and physically straining, but it'll also dampen your motivation and lead you to the dead end road of frustration. Still having difficulties perfecting the F barre chord after long hours of practice? Stand up and go for a walk. Distract yourself to something that doesn't involve the guitar, music or chords. Read a good book, play a relaxing game or take Buddy out for a breath of fresh air. Once you are calmed, relaxed and de-stressed, pick up your guitar again. Never try to practice when you are on the brink of frustration. Remember, these things take time. Be patient. Big Mistake # 5: Not Having a Roadmap to Success Always make a clear set of goals that you want to achieve on the guitar. Try to plan out the songs that you want to play, the chords associated with it, and the other things that you plan to learn. Having a guide or a "roadmap to success" will clearly illustrate the things that you have achieved so far and things that you have yet to accomplish. Big Mistake # 6: Learning Just Theory Trying to memorize hundreds of chords and scales, and how to execute them is totally useless if you can't appreciate how they apply to your guitar playing. For a better way to learn guitar, try the "song approach". Choose your favorite beginner song (take note of mistake #3), search for the chords and practice playing it. Once you have mastered the song, choose another song and do the same steps. 71 The Ultimate Guide To Playing The Guitar By Paul Bright – www.GuitaristAcademy.com This way, you put into heart the chords that you have learned and you get to apply it by playing your favorite song! Over time, you will learn various chords, scales and different finger plucking in a pace that's less frustrating and thoroughly enjoyable. Big Mistake # 7: Giving Up Lastly, if you feel beaten down, frustrated and extremely tired, NEVER GIVE UP. Van Halen, Steve Vai, John Lennon and other prominent guitarists all faced the same difficulties that you're facing right now at some point while they were still learning to strum, fret and learn to play the guitar. Do You Want To Get Good At The Guitar Fast? If you would like to get good at the guitar FAST, then I highly recommend grabbing a copy of our best-selling course called the Guitar KickStarter Home Study Course. 72 The Ultimate Guide To Playing The Guitar By Paul Bright – www.GuitaristAcademy.com
© Copyright 2026 Paperzz