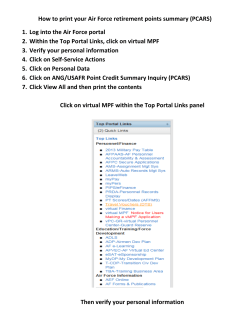
Configuration Guide How to Configure a Captive Portal on the DWC-1000 Overview This guide describes how to configure and customize a captive portal on the D-Link DWC-1000 Unified Controller for user authentication. How to Configure a Captive Portal on the DWC-1000 Users can enable the captive portal function on one or multiple SSIDs. When a user accesses an SSID for which captive portal has been enabled, the Unified Access Point (UAP) redirects the access page to an authentication page (captive portal page) if the user has not been authenticated. If the user enters the correct username and password, he will be granted Internet access. If not, the user’s access request is blocked by the UAP. The authentication methods include local database and external RADIUS server. Users can also customize the captive portal page by changing the banner and background, and adding text. Situation Note Many companies, businesses, and public facilities have enabled wired or wireless Internet connections in their public spaces such as meeting rooms, libraries, restaurants, and parks. Through user authentication, these places can easily control their Internet resources and manage user accounts. Most require users to input a valid username and password in order to access the Internet. The scenario in this guide shows you how to configure a Captive Portal for the dlink_guest SSID, dlink_obu SSID, dlink_hq SSID, and VLAN4. All connections from those SSIDs and VLAN 4 require performing authentication before being granted Internet access. The authentication methods on each SSID or VLAN 4 are difference:  dlink_guest SSID: This SSID is for guest or visitor used. The guest or visitor is allowed get access after he agrees Service-level Agreement (SLA).  dlink_obu SSID: This SSID is for D-Link overseas employee while he visits D-Link headquarter. The overseas employee uses temporary account to get access. The temporary account generation is associated with Gust Management service. The captive portal login page is customized with international images.  dlink_hq SSID: This SSID is for D-Link headquarter employee. The authentication method is used external RADIUS. The captive portal login page is used default profile. NOTE: The screenshots in this guide are from the DWC-1000’s firmware version 4.2.0.2_WW. If you are using an earlier version of the firmware, the screenshots may not be identical to what you see on your browser. How to Configure a Captive Portal on the DWC-1000  VLAN4: This VLAN is for IT administrator used. The authentication method is used local database. The captive portal login page is used default profile. Configuration Steps 1. Set up the AP profile and VLANs based on the network architecture. Please refer to the “How to Configure an AP Profile on DWC-1000” guide. 2. Discover and manage an AP from the network. Please refer to the “How to Configure Layer 2 Discovery on the DWC-1000” guide. 3. Set authentication database. There are two authentication methods: (a) local database, and (b) external RADIUS. To set local database: 3-a-1. Build up the user list in the User Database. Go to ADVANCED> Users> Group. Click Add to add a new user group. 3-a-2. Fill in the necessary information under Group Configuration, enter a Group Name such as “Auth_IT” in the below screenshot, and select “Captive Portal User” under User Type. Click Save Settings. How to Configure a Captive Portal on the DWC-1000 3-a-3. Go to ADVANCED> Users> Users. Click Add to add a new user account. How to Configure a Captive Portal on the DWC-1000 3-a-4. Fill in the necessary information under Users Configuration. For Select Group, choose “Auth_IT” which was created in the previous step. Enable “MultiLogin” if allow multiple device simultaneously log in with the same account. Click Save Settings. The new record will then be displayed in the database list. How to Configure a Captive Portal on the DWC-1000 To set external RADIUS server: 3-b-1. Go to ADVANCED> Radius Settings. Fill in the external RADIUS info for the primary RADIUS server. Click Save Settings. 4. Customize the content of SLA. Go to SETUP> Captive Portal> SLA. Click Edit to change the SLA contents. Click Save Settings to save the changes. How to Configure a Captive Portal on the DWC-1000 5. Customize the captive portal page. The DWC-1000 provides one default profile for Captive Portal. You can customize the appearance of the Captive Portal page. Go to SETUP> Captive Portal> Captive Portal Setup. Click Add to add a new captive portal profile. How to Configure a Captive Portal on the DWC-1000 You can then change the settings for General Details, Header Details, Login Details, Advertisement Details and Footer details. Click Save Settings when finished. Regarding color customization, you can find more information about color hex codes from the Internet. These recommended websites may provide useful information:  Color-Hex.Com http://www.color-hex.com/  HTML Color code info http://html-color-codes.info/ For the background image, please notice that the maximum size of the image you can upload is 100 KB; for the banner image, please notice that the maximum size of the image you can upload is 50 KB. How to Configure a Captive Portal on the DWC-1000 Click Show Preview to review your customized authentication page. 6. Enable Captive Portal. Captive Portal can be applied to both (a) wireless and (b) wired users. To apply Captive Portal on dlink_gust, dlink_obu and dlink_hq SSID for wireless user: 6-a-1. Select the SSID you want to enable user authentication on. Navigate to SETUP> Captive Portal> Captive Portal SSID Setup. Select an SSID/interface from the Interface List. To enable SLA on dlink_guest SSID, select “dlink_guest,” and click Edit. How to Configure a Captive Portal on the DWC-1000 6-a-2. Select “SLA” for Captive Portal Type. Click Save Settings. 6-a-3. To enable Captive Portal on dlink_obu SSID, select “dlink_obu,” and click Edit. Select “Temporary User” for Captive Portal and select “Global” for Captive Portal Profile. Click Save Settings. How to Configure a Captive Portal on the DWC-1000 6-a-4. To enable Captive Portal on dlink_hq SSID, select “dlink_hq,” and click Edit. Select “Permanent User” for Captive Portal. Select “Radius Server” for Authentication Server. Select “default” for Captive Portal Profile. Click Save Settings. How to Configure a Captive Portal on the DWC-1000 To apply Captive Portal on VLAN 4 for wired user: 4-b-1. Go to SETUP> VLAN Settings> VLAN Configuration. Click Add to add a new VLAN. 4-b-2. Fill in the necessary information under VLAN Configuration. Enter a VLAN name such as “IT” and VLAN ID “4”. Select “Permanent User” for Captive Portal. Select “Local User Database” for Authentication Server. Select “default” for Captive Portal Profile. Click Save Settings. How to Configure a Captive Portal on the DWC-1000 DWC-1000 supports multiple captive portal profiles since this firmware version. You can find the relationship between the captive portal profile and its associated interface from SETUP> Captive Portal> Captive Portal Configuration. How to Configure a Captive Portal on the DWC-1000 7. Set a billing profile for temporary account. Please refer to the “How to Configure Guest Management on the DWC-1000” guide for the settings of Guest Management service. How to Configure a Captive Portal on the DWC-1000 www.dlink.com D-Link, D-Link logo, D-Link sub brand logos and D-Link product trademarks are trademarks or registered trademarks of D-Link Corporation and its subsidiaries. All other third party marks mentioned herein are trademarks of the respective owners. Copyright © 2013 D-Link Corporation. All Rights Reserved.
© Copyright 2026 Paperzz