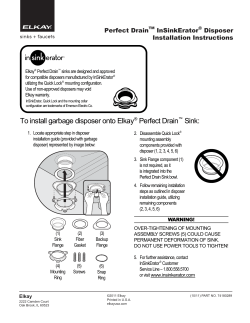
Hotel card lock ALV2 Ptype Installation manual Manual No. 838H5231-1 1. Installing the lock case and front panel 4. Installing the inside mounting plate пј€пј‘пј‰ Position the case into the mortise. Note : Lead the case cable to the inside of the door from the square hole before inserting lock case. пј€пј’пј‰Fasten the lock case with two case mounting screws. Universal screw пј€пј“пј‰Fasten the front panel with two front panel mounting screws. гЂЂгЂЂ Lock case ※Before installation of lock case, please check lock case’s handingгЂЂ ※Case mounting screw Directions of latches and triggers for right and left handing Left Hand Screw M5 Door Case cable Inside Latch Latch Trigger Trigger Front panel Latch bolt Front panel mounting screw M4Г—6 Mounting screws ※The screw length varies depending on the door thickness. 35 - 45гЂЃ55 - 66пјљ22mm 45 - 55гЂЂ гЂЂгЂЂпјљ32mm в—‹Use 4 AA alkaline batteries. в—‹Do not use batteries of different brands or mix any new and old batteries. Door Inside Battery cable Be sure to connect it to the upper connector гѓ»Take care that the cable are not caught in between the door and the mounting plate. гЂЂM5Г—20 гЂЂUniversal screw Right hand Connectorпј€2-pinпј‰ Cable holder Outside Outside (1) Install the inside mounting plate and fasten with two mounting screws (2) Connect the battery cable to the upper connector of the board of the outside escutcheon (2-pin) (3) Bind the battery cable with the cable holder Screw tip 4.8-diam Trigger Dead bolt пј‹ в€’ в€’ пј‹ пј‹ в€’ в€’ пј‹ Mounting plate Caution when replacing batteries Check the polarity of the batteries, and set them in the correct direction. When installing the escutcheon, take care that the battery cable not caught in. Take care that the case wire is not caught in Ensure that the cable has been correctly connected. 2. Installing the outside escutcheon Take care not to drop the outside escutcheon. Incorrect use of batteries may cause leakage or rupture. Position the outside escutcheon onto the door, inserting the handle spindle into the lock case while keeping the handle horizontally. 5. Installing the inside escutcheon Optional cylinder type Keep cylinder tail piece in the horizontal state using a screwdriver to insert it to the lock case. (1) Position the inside escutcheon onto the door. Note: Keep the handle horizontal and the thumb turn vertically. Take care that the cables are not caught in between the case and escutcheon. (2) Temporarily fasten the inside escutcheon with two mounting screws. (3) Turn the handle to make sure that the handle can return to the horizontal position, and then tighten the escutcheon mounting screws. Outside escutcheon Inside escutcheon handle Cylinder tail piece Cylinder tail piece Escutcheon mounting screw M5Г—10 Mounting plate This hole is only for the optional cylinder type. Keep horizontally Thumb turn 3. Connecting the case cable 6. Installing the strike plate Connect the case cable to the connector (12-pin) in the outside escutcheon. Install the strike plate and strike box with two mounting screws. Connectorпј€12-pinпј‰ ※Before installation of lock case, please check lock case’s handingгЂЂ Case cable Frame Strike box Strike Directions of latches and triggers for right and left handing Place the cable into the space of the hole Left Hand Outside Right hand Outside Door Inside Door Inside Strike The hole with a notch must be positioned upward (latch side) ※Mounting screw гЂЂпј5Г—20 Strike Ensure that the cable has been correctlly connected. гЂђCautionsгЂ‘ The abobe figures show the procedures for installing the lock for inward opening right-hand door. 1. Ensure that the cables have been correctly connected. 2. Check that the poles of the batteries are correctly positioned. 3. After the card lock is installed, never close the door until operational check with the card lock is completed.
© Copyright 2026 Paperzz