App Extension Programming Guide
Contents
App Extension Essentials 6
App Extensions Increase Your Impact 7
There Are Several Types of App Extensions 7
Xcode and the App Store Help You Create and Deliver App Extensions 8
Users Experience App Extensions in Different Contexts 9
Understand How an App Extension Works 10
An App Extension’s Life Cycle 10
How an App Extension Communicates 11
Some APIs Are Unavailable to App Extensions 12
Creating an App Extension 14
Begin Development By Choosing the Right Extension Point 14
Examine the Default App Extension Template 16
Respond to the Host App’s Request 17
Optimize Efficiency and Performance 19
Design a Streamlined UI 19
Ensure Your iOS App Extension Works on All Devices 20
Debug, Profile, and Test Your App Extension 21
Distribute the Containing App 23
Handling Common Scenarios 24
Using an Embedded Framework to Share Code 24
Sharing Data with Your Containing App 25
Accessing a Webpage 26
Performing Uploads and Downloads 29
Declaring Supported Data Types for a Share or Action Extension 30
Deploying a Containing App to Older Versions of iOS 33
App Extension Types 35
Today 36
Understand Today Widgets 36
2014-10-20 | Copyright В© 2014 Apple Inc. All Rights Reserved.
2
Contents
Use the Xcode Today Template 37
Design the UI 38
Updating Content 39
Specifying When a Widget Should Appear 39
Opening the Containing App 40
Supporting Edits (OS X Only) 40
Testing a Today Widget 40
Share 42
Understand Share Extensions 42
Use the Xcode Share Template 43
Design the UI 44
Posting Content 45
Validating Input 46
Previewing Content (iOS Only) 47
Configuring a Post (iOS Only) 47
Action 49
Understand Action Extensions 49
Use the Xcode Action Extension Template 50
Design the UI 51
Returning Edited Content to the Host 52
Photo Editing 53
Understand How a Photo Editing Extension Works with Photos 53
Use the Xcode Photo Editing Template 54
Design the UI 55
Handling Memory Constraints 55
Testing a Photo Editing Extension 55
Finder Sync 57
Understand Finder Sync 57
Creating a Finder Sync Extension in Xcode 58
Set the Required Property List Values 58
Specify Folders to Monitor 59
Set Up Badge Images 60
Implement FIFinderSync methods 60
A Typical Finder Sync Use Case 62
Performance Concerns 63
2014-10-20 | Copyright В© 2014 Apple Inc. All Rights Reserved.
3
Contents
Document Provider 64
Understand Document Provider Extensions 64
Document Picker View Controller Extension 65
Life Cycle 66
Creating the Document Picker View Controller Extension 67
File Provider Extension 71
Creating the File Provider Extension 71
Providing a Great User Experience in an Uncertain World 75
File Coordination 75
Downloading Files 76
Detecting and Communicating Conflicts 77
Logging in and out 77
Custom Keyboard 79
Understand User Expectations for Keyboards 79
Keyboard Features That iOS Users Expect 79
System Keyboard Features Unavailable to Custom Keyboards 80
API Quick Start for Custom Keyboards 82
Development Essentials for Custom Keyboards 85
Designing for User Trust 85
Providing a Way to Switch to Another Keyboard 89
Getting Started with Custom Keyboard Development 90
Using the Xcode Custom Keyboard Template 90
Configuring the Info.plist file for a Custom Keyboard 92
Document Revision History 95
2014-10-20 | Copyright В© 2014 Apple Inc. All Rights Reserved.
4
Figures, Tables, and Listings
App Extensions Increase Your Impact 7
Table 1-1
Extension points in iOS and OS X 7
Understand How an App Extension Works 10
Figure 2-1
Figure 2-2
Figure 2-3
The basic life cycle of an app extension 10
An app extension communicates directly only with the host app 11
An app extension can communicate indirectly with its containing app 12
Creating an App Extension 14
Figure 3-1
Xcode supplies several app extension templates you can use 15
Handling Common Scenarios 24
Figure 4-1
Listing 4-1
Listing 4-2
An app extension’s container is distinct from its containing app’s container 26
Example run() and finalize() functions 27
An example of configuring an NSURLSession object and starting a download 29
Share 42
Listing 6-1
Listing 6-2
An example implementation of didSelectPost 45
An example implementation of isContentValid 46
Action 49
Listing 7-1
Sending edited items to the host app 52
Document Provider 64
Figure 10-1
Layout of the Document Picker View Controller 66
Custom Keyboard 79
Figure 11-1
Figure 11-2
Table 11-1
Table 11-2
Table 11-3
Basic structure of a custom keyboard 82
The system keyboard’s globe key 89
Standard and open access (network-enabled) keyboards—capabilities and privacy considerations
86
Open-access keyboard user benefits and developer responsibilities 88
User interface strings specified in target and containing app Info.plist files 91
2014-10-20 | Copyright В© 2014 Apple Inc. All Rights Reserved.
5
App Extension Essentials
в—Џ
App Extensions Increase Your Impact (page 7)
в—Џ
Understand How an App Extension Works (page 10)
в—Џ
Creating an App Extension (page 14)
в—Џ
Handling Common Scenarios (page 24)
2014-10-20 | Copyright В© 2014 Apple Inc. All Rights Reserved.
6
App Extensions Increase Your Impact
Starting in iOS 8.0 and OS X v10.10, an app extension lets you extend custom functionality and content beyond
your app and make it available to users while they’re using other apps or the system. You create an app
extension to enable a specific task; after users get your extension, they can use it to perform that task in a
variety of contexts. For example, if you provide an extension that enables sharing to your social sharing website,
users can use it to post a remark while surfing the web. Or if you provide an extension that displays current
sports scores, users can put it in Notification Center so that they can get the latest scores when they open the
Today view. You can even create an extension that provides a custom keyboard that users can use in place of
the iOS system keyboard.
There Are Several Types of App Extensions
iOS and OS X define several types of app extensions, each of which is tied to an area of the system, such as
sharing, Notification Center, and the iOS keyboard. A system area that supports extensions is called an extension
point. Each extension point defines usage policies and provides APIs that you use when you create an extension
for that area. You choose an extension point to use based on the functionality you want to provide.
Table 1-1 lists the extension points in iOS and OS X and gives an example of tasks you might enable in an app
extension for each extension point.
Table 1-1
Extension points in iOS and OS X
Extension point
Typical app extension functionality
Today (iOS and OS X)
Get a quick update or perform a quick task in the Today view
of Notification Center
(A Today extension is called a widget)
Share (iOS and OS X)
Post to a sharing website or share content with others
Action (iOS and OS X; UI and non-UI
variants)
Manipulate or view content originating in a host app
Photo Editing (iOS)
Edit a photo or video within the Photos app
Finder Sync (OS X)
Present information about file sync state directly in Finder.
2014-10-20 | Copyright В© 2014 Apple Inc. All Rights Reserved.
7
App Extensions Increase Your Impact
Xcode and the App Store Help You Create and Deliver App Extensions
Extension point
Typical app extension functionality
Document Provider (iOS; UI and non-UI
variants)
Provide access to and manage a repository of files.
Custom Keyboard (iOS)
Replace the iOS system keyboard with a custom keyboard for
use in all apps
Because the system defines specific areas for app extensions, it’s important to choose the area that best matches
the functionality you want to deliver. For example, if you want to create an extension that enables a sharing
experience, use the Share extension point, starting with the Share Extension Xcode template.
Important: Each app extension you create matches exactly one of the extension points listed in Table 1-1.
You don’t create a generic extension that matches more than one extension point.
Xcode and the App Store Help You Create and Deliver App
Extensions
An app extension is different from an app. Although you must use an app to contain and deliver your extensions,
each extension is a separate binary that runs independent of the app used to deliver it.
You create an app extension by adding a new target to an app. As with any target, an extension target specifies
settings and files that combine to build a product within your app project. You can add multiple extension
targets to a single app (an app that contains one or more extensions is called a containing app).
The best way to start developing an app extension is to use one of the templates that Xcode provides for each
extension point on both platforms. Each template includes extension point–specific implementation files and
settings, and produces a separate binary that gets added to your containing app’s bundle.
To distribute app extensions to users, you submit a containing app to the App Store. When a user installs your
containing app, the extensions it contains are also installed.
After installing an app extension, a user must take action to enable it. Often, users can enable an extension
within the context of their current task. If your extension is a Today widget, for example, users can edit the
Today view in Notification Center to enable your extension. In other cases, users can use Settings (in iOS) or
System Preferences (in OS X) to enable and manage the extensions they install.
2014-10-20 | Copyright В© 2014 Apple Inc. All Rights Reserved.
8
App Extensions Increase Your Impact
Users Experience App Extensions in Different Contexts
Users Experience App Extensions in Different Contexts
Although each type of app extension enables a different type of task, there are some parts of the user experience
that are common to most extensions. As you think about designing an extension, it’s important to understand
the user experience that’s intended by the extension point you choose. At a high level, the best user experience
for all extensions is quick, streamlined, and focused on a single task.
Users open your app extension by interacting with some system-provided user interface (UI). For example, a
user accesses a Share extension by activating the system-provided Share button in an app and choosing the
extension from the list that’s displayed.
Although most app extensions provide at least some custom UI elements, users don’t see your custom UI until
they enter your extension. When users enter your extension, your custom UI can help to show them that they’re
shifting into a new context. Because users can distinguish your extension from the current app, they can
appreciate the unique functionality that you provide. Users’ awareness of extensions as separate entities also
means that they can identify and remove extensions that misbehave or don’t perform well.
To give users a smooth transition into your app extension, you generally want to balance your custom design
with the UI that’s associated with the extension point. For example, it’s a good idea to make your widget look
like it belongs in the Today view. Similarly, in your Photo Editing extension, it works well to create a UI that
harmonizes with Photos in iOS.
Note: Even if your app extension doesn’t display any custom UI (other than an icon), users still
understand that your extension is different from the current app because they took a specific action
to activate it.
2014-10-20 | Copyright В© 2014 Apple Inc. All Rights Reserved.
9
Understand How an App Extension Works
An app extension is not an app. It implements a specific, well scoped task that adheres to the policies defined
by a particular extension point.
An App Extension’s Life Cycle
Because an app extension is not an app, its life cycle and environment are different. In most cases, an extension
launches when a user chooses it from an app’s UI or from a presented activity view controller. An app that a
user employs to choose an app extension is called a host app. A host app defines the context provided to the
extension and kicks off the extension life cycle when it sends a request in response to a user action. An extension
typically terminates soon after it completes the request it received from the host app.
For example, imagine that a user selects some text in an OS X host app, activates the Share button, and chooses
an app extension from the sharing list to help them post the text to a social sharing website. The host app
responds to the user’s choice by issuing to the extension a request that contains the selected text. A generalized
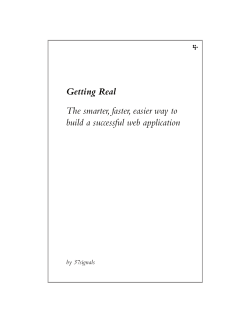
version of this situation is pictured in step 1 of Figure 2-1.
Figure 2-1
The basic life cycle of an app extension
In step 2 of Figure 2-1, the system instantiates the app extension identified in the host app’s request and sets
up a communication channel between them. The extension displays its view within the context of the host
app and then uses the items it received in the host app’s request to perform its task (in this example, the
extension receives the selected text).
2014-10-20 | Copyright В© 2014 Apple Inc. All Rights Reserved.
10
Understand How an App Extension Works
How an App Extension Communicates
In step 3 of Figure 2-1, the user performs or cancels the task in the app extension and dismisses it. In response
to this action, the extension completes the host app’s request by immediately performing the user’s task or,
if necessary, initiating a background process to perform it. The host app tears down the extension’s view and
the user returns to their previous context within the host app. When the extension’s task is finished, whether
immediately or later, a result may be returned to the host app.
Shortly after the app extension performs its task (or starts a background session to perform it), the system
terminates the extension, as shown in step 4.
How an App Extension Communicates
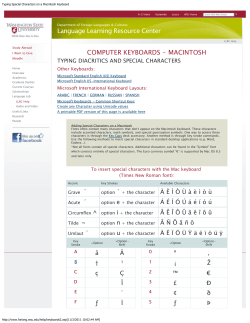
An app extension communicates primarily with its host app, and does so in terms reminiscent of transaction
processing: There is a request from the host and a response from the extension. Figure 2-2 shows a simplified
view of the relationship between a running extension, the host app that launched it, and the containing app.
Figure 2-2
An app extension communicates directly only with the host app
There is no direct communication between an app extension and its containing app; typically, the containing
app isn’t even running while a contained extension is running. An app extension’s containing app and the
host app don’t communicate at all.
In a typical request/response transaction, the system opens an app extension on behalf of a host app, conveying
data in an extension context provided by the host. The extension displays a user interface, performs some
work, and, if appropriate for the extension’s purpose, returns data to the host.
The dotted line in Figure 2-2 represents the limited interaction available between an app extension and its
containing app. A Today widget (and no other app extension type) can ask the system to open its containing
app by calling the openURL:completionHandler: method of the NSExtensionContext class. As indicated
2014-10-20 | Copyright В© 2014 Apple Inc. All Rights Reserved.
11
Understand How an App Extension Works
Some APIs Are Unavailable to App Extensions
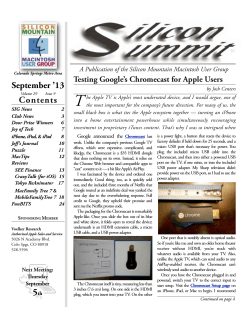
by the Read/Write arrows in Figure 2-3, any app extension and its containing app can access shared data in a
privately defined shared container. The full vocabulary of communication between an extension, its host app,
and its containing app is shown in simple form in Figure 2-3.
Figure 2-3
An app extension can communicate indirectly with its containing app
Note: Behind the scenes, the system uses interprocess communication to ensure that the host app
and an app extension can work together to enable a cohesive experience. In your code, you never
have to think about this underlying communication mechanism, because you use the higher-level
APIs provided by the extension point and the system.
Some APIs Are Unavailable to App Extensions
Because of its focused role in the system, an app extension is ineligible to participate in certain activities. An
app extension cannot:
в—Џ
Access a sharedApplication object, and so cannot use any of the methods on that object
в—Џ
Use any API marked in header files with the NS_EXTENSION_UNAVAILABLE macro, or similar unavailability
macro, or any API in an unavailable framework
For example, in iOS 8.0, the HealthKit framework and EventKit UI framework are unavailable to app
extensions.
в—Џ
Access the camera or microphone on an iOS device
в—Џ
Perform long-running background tasks
The specifics of this limitation vary by platform, as described in the extension point chapters in this
document.
(An app extension can initiate uploads or downloads using an NSURLSession object, with results of those
operations reported to the containing app.)
2014-10-20 | Copyright В© 2014 Apple Inc. All Rights Reserved.
12
Understand How an App Extension Works
Some APIs Are Unavailable to App Extensions
в—Џ
Receive data using AirDrop
(An app extension can send data using AirDrop in the same way an app does: by employing the
UIActivityViewController class.)
2014-10-20 | Copyright В© 2014 Apple Inc. All Rights Reserved.
13
Creating an App Extension
When you’re ready to develop an app extension, begin by choosing the extension point that supports the user
task you want to facilitate. Use the corresponding Xcode app extension template and enhance the default files
with custom code and user interface (UI). After you optimize and test your app extension, you’re ready to
distribute it within your containing app.
Begin Development By Choosing the Right Extension Point
Because each extension point targets a well-defined user scenario, your first job is to choose the extension
point that supports the type of functionality you plan to deliver. This choice is an important one because it
determines the APIs that are available to you and, in some cases, the ways in which APIs behave.
The extension points supported in iOS and OS X, along with their Info.plist extension point identifier keys,
are described in the section NSExtensionPointIdentifier in Information Property List Key Reference .
After you choose the extension point that makes sense for your app extension, add a new target to your
containing app. The easiest way to add an app extension target is to use an Xcode template that provides a
target preconfigured for your extension point.
2014-10-20 | Copyright В© 2014 Apple Inc. All Rights Reserved.
14
Creating an App Extension
Begin Development By Choosing the Right Extension Point
To add a new target to your Xcode app project, choose File > New > Target. In the sidebar on the left side of
the new target dialog, choose Application Extension for iOS or OS X. In the pane on the right side of the dialog,
Xcode displays the templates you can choose. For example, Figure 3-1 shows the templates you can use to
create an iOS app extension.
Figure 3-1
Xcode supplies several app extension templates you can use
After you choose a template and finish adding the target to your project, you should be able to build and run
the project even before you customize the extension code. When you build an extension based on an Xcode
template, you get an extension bundle that ends in .appex.
2014-10-20 | Copyright В© 2014 Apple Inc. All Rights Reserved.
15
Creating an App Extension
Examine the Default App Extension Template
Note about 64-bit architecture: An app extension target must include the arm64 (iOS) or x86_64
architecture (OS X) in its Architectures build settings or it will be rejected by the App Store. Xcode
includes the appropriate 64-bit architecture with its “Standard architectures” setting when you create
a new app extension target.
If your containing app target links to an embedded framework, the app must also include 64-bit
architecture or it will be rejected by the App Store.
For more information about 64-bit development, see 64-Bit Transition Guide for Cocoa Touch or
64-Bit Transition Guide for Cocoa , depending on your target platform.
In most cases, you can test the default app extension by enabling it in System Preferences or Settings and then
accessing it through another app. For example, you can test an OS X Share extension by opening a webpage
in Safari, clicking the Share toolbar button, and choosing your extension in the menu that appears.
Examine the Default App Extension Template
Each app extension template includes a property list file (that is, an Info.plist file), a view controller class,
and a default user interface, all of which are defined by the extension point. The default view controller class
(or principal class) can contain stubs for the extension point methods you should implement.
An app extension target’s Info.plist file identifies the extension point and may specify some details about
your extension. At a minimum, the file includes the NSExtension key and a dictionary of keys and values that
the extension point specifies. For example, the value of the required NSExtensionPointIdentifier key is
the extension point’s reverse DNS name, such as com.apple.widget-extension. Here are some of the
other keys and values you may see in your extension’s NSExtension dictionary:
в—Џ
NSExtensionAttributes
A dictionary of extension point–specific attributes, such as PHSupportedMediaTypes for a Photo Editing
extension.
в—Џ
NSExtensionPrincipalClass
The name of the principal view controller class created by the template, such as SharingViewController.
When a host app invokes your extension, the extension point instantiates this class.
в—Џ
NSExtensionMainStoryboard (iOS extensions only)
The default storyboard file for the extension, usually named MainInterface.
2014-10-20 | Copyright В© 2014 Apple Inc. All Rights Reserved.
16
Creating an App Extension
Respond to the Host App’s Request
In addition to the property list settings, a template may set some capabilities by default. Each extension point
can define capabilities that make sense for the type of task the extension point supports. For example, an iOS
Document Provider extension includes the com.apple.security.application-groups entitlement.
All templates for OS X app extensions include the App Sandbox and
com.apple.security.files.user-selected.read-only entitlements by default. You might need to
define additional capabilities for your extension if it needs to do things like use the network or access the user’s
photos or contact information.
Note: In general, when users give a containing app access to their private data, all extensions in
the containing app also receive access.
Respond to the Host App’s Request
As you learned in Understand How an Extension Works (page 10), an app extension opens when a user chooses
the extension within a host app and the host app issues a request. At a high level, your extension receives the
request, helps the user perform a task, and completes or cancels the request, according to the user’s action.
For example, a Share extension receives a request from a host app and responds by displaying its view. After
users compose content in the view, they choose to post the content or cancel the post, and the extension
completes or cancels the request accordingly.
When a host app sends a request to an app extension, it specifies an extension context. For many extensions,
the most important part of the context is the set of items a user wants to work with while they’re in the
extension. For example, the context for an OS X Share extension might include a selection of text that a user
wants to post.
As soon as a host app issues its request (typically, by calling the beginRequestWithExtensionContext:
method), your app extension can use the extensionContext property on its principal view controller to get
the context. Child view controllers also have access to this property through chaining.
Next, you use the NSExtensionContext class to examine the context and get the items within it. Often, it
works well to get the context and items in your view controller’s loadView method so that you can display
the information in your view. To get your extension’s context you can use code like the following:
NSExtensionContext *myExtensionContext = self.extensionContext;
2014-10-20 | Copyright В© 2014 Apple Inc. All Rights Reserved.
17
Creating an App Extension
Respond to the Host App’s Request
Of particular interest is the context object’s inputItems property, which can contain the items your app
extension needs to use. The inputItems property contains an array of NSExtensionItem objects, each of
which contains an item the extension can work on. To get the items from the context object, you might use
code like this:
NSArray *inputItems = myExtensionContext.inputItems;
Each NSExtensionItem object contains a number of properties that describe aspects of the item, such as its
title, content text, attachments, and user info.
Note that the attachments property contains an array of media data that’s associated with the item. For
example, in an item associated with a sharing request, the attachments property might contain a
representation of the webpage a user wants to share.
After users work with the input items (if doing so is part of using the app extension), an app extension typically
gives users a choice between completing or canceling the task. Depending on the user’s choice, you call either
the completeRequestReturningItems:completionHandler: method, optionally returning
NSExtensionItem objects to the host app, or the cancelRequestWithError: method, returning an error
code.
Important: If your app extension calls the completeRequestReturningItems:completionHandler:
method, provide a completionHandler block to, at minimum, suspend your app extension should the
system ask you to. For details, read the documentation for the completionHandler block of this method,
in NSExtensionContext Class Reference .
In iOS, your app extension might need a bit more time to complete a potentially lengthy task, such as uploading
content to a website. When this is the case, you can use the NSURLSession class to initiate a transfer in the
background. Because a background transfer uses a separate process, the transfer can continue, as a low priority
task, after your extension completes the host app’s request and gets terminated. To learn more about using
NSURLSession in your extension, see Performing Uploads and Downloads (page 29).
2014-10-20 | Copyright В© 2014 Apple Inc. All Rights Reserved.
18
Creating an App Extension
Optimize Efficiency and Performance
Important: Although you can set up a background URL upload or download task, other types of background
tasks, such as supporting VoIP or playing background audio, are not available to extensions.
If you include the UIBackgroundModes key in your app extension’s Info.plist file, the extension will
be rejected by the App Store. (To learn more about this key, see UIBackgroundModes in Information Property
List Key Reference .)
Optimize Efficiency and Performance
App extensions should feel nimble and lightweight to users. Design your app extension to launch quickly,
aiming for well under one second. An extension that launches too slowly is terminated by the system.
Memory limits for running app extensions are significantly lower than the memory limits imposed on a
foreground app. On both platforms, the system may aggressively terminate extensions because users want to
return to their main goal in the host app. Some extensions may have lower memory limits than others: For
example, widgets must be especially efficient because users are likely to have several widgets open at the
same time.
Your app extension doesn’t own the main run loop, so it’s crucial that you follow the established rules for good
behavior in main run loops. For example, if your extension blocks the main run loop, it can create a bad user
experience in another extension or app.
Keep in mind that the GPU is a shared resource in the system. App extensions do not get top priority for shared
resources; for example, a Today widget that runs a graphics-intensive game might give users a bad experience.
The system is likely to terminate such an extension because of memory pressure. Functionality that makes
heavy use of system resources is appropriate for an app, not an app extension.
Design a Streamlined UI
Most extension points require you to supply at least some custom UI that users see when they open your app
extension. An extension’s UI should be simple, restrained, and focused on facilitating a single task. To improve
performance and the user’s experience, avoid including extraneous UI that doesn’t support your extension’s
main task.
Most Xcode app extension templates provide a placeholder UI that you can use to get started.
Users identify your app extension by its icon and its name. An extension’s icon must be the same as the app
icon of its containing app. Using the containing app’s icon helps a user be confident that an extension is in
fact provided by the app they installed.
2014-10-20 | Copyright В© 2014 Apple Inc. All Rights Reserved.
19
Creating an App Extension
Ensure Your iOS App Extension Works on All Devices
In iOS, a custom Action extension uses a template image version of its containing app’s icon, which you must
provide.
iOS Share extensions automatically employ the containing app’s icon. If you provide a separate icon in your
Share extension target, Xcode ignores it. For all other app extension types, you must provide an icon that
matches the containing app’s icon.
For information on how to add an icon to your app extension, see Creating an Asset Catalog and Adding an
App Icon Set or Launch Image Set. For more about icon requirements for iOS app extensions, see “App
Extensions” in iOS Human Interface Guidelines
An app extension needs a short, recognizable name that includes the name of the containing app, using the
pattern <Containing app name>—<App extension name> . This makes it easier for users to manage extensions
throughout the system. You can, optionally, use the containing app’s name as-is for your extension, in the
common case that your containing app provides exactly one extension.
The displayed name of your app extension is provided by the extension target’s CFBundleDisplayName
value, which you can edit in the extension’s Info.plist file. If you don’t provide a value for the
CFBundleDisplayName key, your extension uses the name of its containing app, as it appears in the
CFBundleName value.
Make sure you localize the app extension’s name when you provide a localized app extension.
Some app extensions also need short descriptions. For example, an OS X widget displays a description to help
users choose the widgets they want to see in the Today view. To provide this text, edit the value of the
widget.description key in your widget’s InfoPlist.strings file.
Ensure Your iOS App Extension Works on All Devices
You must ensure that your submitted app extension is universal: it must work on iPhone, iPod touch, and iPad.
This requirement applies no matter which targeted device family you choose for your containing app. The app
extension templates in Xcode are configured correctly for the universal targeted device family.
To declare that your app extension is universal, use the targeted device family build setting in Xcode, specifying
the “iPhone/iPad” value.
To ensure that your app extension is universal
1.
In the Xcode project navigator for your keyboard project, select the project file.
If the project & targets list in the project editor is hidden, show it. To do this, click the button at the left of
the project editor tab bar.
2014-10-20 | Copyright В© 2014 Apple Inc. All Rights Reserved.
20
Creating an App Extension
Debug, Profile, and Test Your App Extension
2.
In the targets group in the project & targets list, select the target for your app extension.
3.
Choose the Build Settings tab in the project editor.
Ensure that the Basic and Combined buttons are selected, to make it easier for you to locate the settings
you need here.
4.
In the Deployment group in the project editor, view the Targeted Device Family setting. For both the
Debug and Release configuration, the value should be “iPhone/iPad.”
If you find different values, correct them to be “iPhone/iPad.”
Employ Auto Layout and size classes when designing and building your app extension. Test your app extension
to ensure it behaves as you expect it to for all device sizes and orientations. Do this in iOS Simulator, as described
in iOS Simulator User Guide , and, if possible, also test on physical devices in both orientations.
Important: To pass App Review, you must specify “iPhone/iPad” (sometimes called universal ) as the
targeted device family for your app extension, no matter which targeted device family you choose for your
containing app.
Remember that even if your containing app targets only the iPad device family, your contained app extension
can appear in the context of an iPhone app running in compatibility mode.
Debug, Profile, and Test Your App Extension
Note: You must code sign your containing app and its contained app extensions.
All the targets in your Xcode project must be code signed in the same way. For example, during
testing you can employ ad hoc code signing or use your developer certificate, but must use the
same approach for all the targets in your project. For submission to the App Store, use your
distribution certificate for all the targets.
Using Xcode to debug an app extension is a lot like using Xcode to debug any other process, but with one
important difference: In your extension scheme’s Run phase, you specify a host app as the executable. Upon
accessing the extension through that specified host’s UI, the Xcode debugger attaches to the extension.
The scheme in an Xcode app extension template uses the Ask On Launch option for the executable. With this
option, each time you build and run your project you’re prompted to pick a host app. If you want to instead
specify a particular host to use every time, open the scheme editor and use the Info tab for the app extension
scheme’s Run phase.
The steps for attaching the Xcode debugger to your app extension are:
2014-10-20 | Copyright В© 2014 Apple Inc. All Rights Reserved.
21
Creating an App Extension
Debug, Profile, and Test Your App Extension
1.
Enable the app extension’s scheme by choosing Product > Scheme > MyExtensionName or by clicking
the scheme pop-up menu in the Xcode toolbar and choosing MyExtensionName.
2.
Click the Build and Run button to tell Xcode to launch your specified host app.
The Debug navigator indicates it is waiting for you to invoke the app extension.
3.
Invoke the app extension by way of the host app’s UI.
The Xcode debugger attaches to the extension’s process, sets active breakpoints, and lets the extension
execute. At this point, you can use the same Xcode debugging features that you use to debug other
processes.
Note: Before you build and run your app extension project, ensure the extension’s scheme is selected.
If you instead build and run using the containing app scheme, Xcode does not attach to your app
extension unless you invoke it from the containing app, which is an unusual scenario and might not
be what you want.
If you access your app extension from a host app different from the one specified in the scheme,
the Xcode debugger does not attach to the extension.
In OS X, you need to perform the user step of enabling an app extension before you can access it from a host
app for testing and debugging. You enable most extension types by using the Extensions pane of System
Preferences. You can also open the Extensions pane by choosing More in the Share or Action menu.
For an OS X Today widget, use the Widget Simulator to test and debug it. (There is no separate step for you
to perform in System Preferences to enable the widget.)
For a custom keyboard in iOS, use Settings to enable the app extension (Settings > General > Keyboard >
Keyboards).
Xcode registers a built app extension for the duration of the debugging session on OS X. This means that if
you want to install the development version of your extension on OS X you need to use the Finder to copy it
from the build location to a location such as the Applications folder.
Note: In the Xcode debug console logs, an app extension’s binary might be associated with the
value of the CFBundleIdentifier property, instead of the value of the CFBundleDisplayName
property.
Because app extensions must be responsive and efficient, it's a good idea to watch the debug gauges in the
debug navigator while you're running your extension. The debug gauges show how your extension uses the
CPU, memory, and other system resources while it runs. If you see evidence of performance problems, such
2014-10-20 | Copyright В© 2014 Apple Inc. All Rights Reserved.
22
Creating an App Extension
Distribute the Containing App
as an unusual spike in CPU usage, you can use Instruments to profile your extension and identify areas for
improvement. You can open Instruments while you’re in a debugging session by clicking Profile in Instruments
in any debug gauge report (to view a debug gauge report, click the gauge in the debug area). To learn more
about the debug gauges, see Debug Your App in Xcode Overview ; to learn how to use Instruments, see
Instruments User Guide .
Note: Choosing Product > Profile in Xcode builds and runs an app extension in Instruments directly.
Instruments uses the executable set in the Profile section of the scheme as the host for the extension.
To test an app extension using the Xcode testing framework (that is, the XCTest APIs), write tests that exercise
the extension code using your containing app as the host environment. To learn more about testing, see
Testing with Xcode .
Distribute the Containing App
You can’t submit an app extension to the App Store unless it’s inside a containing app, and you can’t transfer
an extension from one app to another.
To deliver an iOS app extension, you must submit a containing app to the App Store.
To deliver an OS X app extension, it’s recommended that you submit your containing app to the App Store,
but it’s not required.
Note: If you distribute an OS X app extension outside of the Mac App Store, Gatekeeper prevents
the extension from running until the user opens and approves the containing app. Further, if you
code sign with a certificate other than your Developer ID, users must explicitly override Gatekeeper
to open the containing app to make your extension available.
To pass app review, your containing app must provide functionality to users; it can’t just contain app extensions.
2014-10-20 | Copyright В© 2014 Apple Inc. All Rights Reserved.
23
Handling Common Scenarios
As you write custom code that performs your app extension’s task, you may need to handle some scenarios
that are common to many types of extensions. Use the code and recommendations in this chapter to help you
implement your solutions.
Using an Embedded Framework to Share Code
You can create an embedded framework to share code between your app extension and its containing app.
For example, if you develop an image filter for use in your Photo Editing extension as well as in its containing
app, put the filter’s code in a framework and embed the framework in both targets.
Make sure your embedded framework does not contain APIs unavailable to app extensions, as described in
Some APIs Are Unavailable to App Extensions (page 12). If you have a custom framework that does contain
such APIs, you can safely link to it from your containing app but cannot share that code with the app’s contained
extensions. The App Store rejects any app extension that links to such frameworks or that otherwise uses
unavailable APIs.
To configure an app extension target to use an embedded framework, set the target’s “Require Only
App-Extension-Safe API” build setting to Yes. If you don’t, Xcode reminds you to do so by displaying the warning
“linking against dylib not safe for use in application extensions” .
Important: A containing app that links to an embedded framework must include the arm64 (iOS) or x86_64
(OS X) architecture build setting or it will be rejected by the App Store. (As described in Creating an App
Extension (page 14), all app extensions must include the appropriate 64-bit architecture build setting.)
When configuring your Xcode project, you must choose “Frameworks” as the destination for your embedded
framework in the Copy Files build phase.
Important: Always choose “Frameworks” as your Copy Files build phase destination. If you instead choose
the “SharedFramework” destination, the App Sore will reject your submission.
You can make a containing app available to users running iOS 7 or earlier, but then must take precautions to
safely link embedded frameworks when running in iOS 8 or later. Read Deploying a Containing App to Older
Versions of iOS (page 33) for details.
2014-10-20 | Copyright В© 2014 Apple Inc. All Rights Reserved.
24
Handling Common Scenarios
Sharing Data with Your Containing App
For more on creating and using embedded frameworks, watch the WWDC 2014 video “Building Modern
Frameworks,” available at https://developer.apple.com/videos/wwdc/2014.
Sharing Data with Your Containing App
The security domains for an app extension and its containing app are distinct, even though the extension
bundle is nested within the containing app’s bundle. By default, your extension and its containing app have
no direct access to each other’s containers.
You can, however, enable data sharing. For example, you might want to allow your app extension and its
containing app to share a single large set of data, such as prerendered assets.
To enable data sharing, use Xcode or the Developer portal to enable app groups for the containing app and
its contained app extensions. Next, register the app group in the portal and specify the app group to use in
the containing app. To learn about working with app groups, see Adding an App to an App Group in Entitlement
Key Reference .
After you enable app groups, an app extension and its containing app can both use the NSUserDefaults
API to share access to user preferences. To enable this sharing, use the initWithSuiteName: method to
instantiate a new NSUserDefaults object, passing in the identifier of the shared group. For example, a Share
extension might update the user’s most recently used sharing account, using code like this:
// Create and share access to an NSUserDefaults object.
NSUserDefaults *mySharedDefaults = [[NSUserDefaults alloc]
initWithSuiteName:@"com.example.domain.MyShareExtension"];
// Use the shared user defaults object to update the user's account.
[mySharedDefaults setObject:theAccountName forKey:@"lastAccountName"];
2014-10-20 | Copyright В© 2014 Apple Inc. All Rights Reserved.
25
Handling Common Scenarios
Accessing a Webpage
Figure 4-1shows how an extension and its containing app can use a shared container to share data.
Figure 4-1
An app extension’s container is distinct from its containing app’s container
Important: You must set up a shared container if your app extension uses the NSURLSession class to
perform a background upload or download, so that both the extension and its containing app can access
the transferred data. To learn how to perform an upload or download in the background, see Performing
Uploads and Downloads (page 29).
When you set up a shared container, the containing app—and each contained app extension that you allow
to participate in data sharing—have read and write access to the shared container. To avoid data corruption,
you must synchronize data accesses. Use Core Data, SQLite, or Posix locks to help coordinate data access in a
shared container.
Accessing a Webpage
In Share extensions (on both platforms) and Action extensions (iOS only), you can give users access to web
content by asking Safari to run a JavaScript file and return the results to the extension. You can also use the
JavaScript file to access a webpage before your extension runs (on both platforms), or to access or modify the
webpage after your extension completes its task (iOS only). For example, a Share extension can help users
share content from a webpage, or an Action extension in iOS might display a translation of the user’s current
webpage.
To add webpage access and manipulation to your app extension, perform the following steps:
в—Џ
Create a JavaScript file that includes a global object named ExtensionPreprocessingJS. Assign a new
instance of your custom JavaScript class to this object.
2014-10-20 | Copyright В© 2014 Apple Inc. All Rights Reserved.
26
Handling Common Scenarios
Accessing a Webpage
в—Џ
In the NSExtensionActivationRule dictionary in your app extension’s Info.plist file, give the
NSExtensionActivationSupportsWebPageWithMaxCount key a nonzero value. (To learn more about
the activation rule dictionary, see Declaring Supported Data Types for a Share or Action Extension (page
30).)
в—Џ
When your app extension starts, use the NSItemProvider class to get the results returned by the execution
of the JavaScript file.
в—Џ
In an iOS app extension, pass values to the JavaScript file if you want Safari to modify the webpage when
your extension completes its task. (You use the NSItemProvider class in this step, too.)
To tell Safari that your app extension includes a JavaScript file, add the
NSExtensionJavaScriptPreprocessingFile key to the NSExtensionAttributes dictionary. The value
of the key should be the file that you want Safari to load before your extension starts. For example:
<key>NSExtensionAttributes</key>
<dict>
<key>NSExtensionJavaScriptPreprocessingFile</key>
<string>MyJavaScriptFile</string> <!-- Do not include the ".js" filename
extension -->
</dict>
On both platforms, your custom JavaScript class can define a run() function that Safari invokes as soon as it
loads the JavaScript file. In the run() function, Safari provides an argument named completionFunction,
with which you can pass results to your app extension in the form of a key-value object.
In iOS, you can also define a finalize() function that Safari invokes when your app extension calls
completeRequestReturningItems:completion: at the end of its task. A finalize() function can use
items your extension passes in completeRequestReturningItems:completion: to change the webpage
as desired.
For example, if your iOS app extension needs the base URI of a webpage when it starts and it changes the
background color of the webpage when it stops, you might write JavaScript code like that shown in Listing
4-1.
Listing 4-1
Example run() and finalize() functions
var MyExtensionJavaScriptClass = function() {};
MyExtensionJavaScriptClass.prototype = {
run: function(arguments) {
2014-10-20 | Copyright В© 2014 Apple Inc. All Rights Reserved.
27
Handling Common Scenarios
Accessing a Webpage
// Pass the baseURI of the webpage to the extension.
arguments.completionFunction({"baseURI": document.baseURI});
},
// Note that the finalize function is only available in iOS.
finalize: function(arguments) {
// arguments contains the value the extension provides in [NSExtensionContext
completeRequestReturningItems:completion:].
// In this example, the extension provides a color as a returning item.
document.body.style.backgroundColor = arguments["bgColor"];
}
};
// The JavaScript file must contain a global object named "ExtensionPreprocessingJS".
var ExtensionPreprocessingJS = new MyExtensionJavaScriptClass;
On both platforms, you need to write code to handle the values that get passed back from your run() function.
To get the dictionary of results, specify the kUTTypePropertyList type identifier in the NSItemProvider
method loadItemForTypeIdentifier:options:completionHandler:. In the dictionary, use the
NSExtensionJavaScriptPreprocessingResultsKey key to get the result item. For example, to get the
base URI passed in the run() function in Listing 4-1 (page 27), you might use code like this:
[imageProvider loadItemForTypeIdentifier:kUTTypePropertyList options:nil
completionHandler:^(NSDictionary *item, NSError *error) {
NSDictionary *results = (NSDictionary *)item;
NSString *baseURI = [[results
objectForKey:NSExtensionJavaScriptPreprocessingResultsKey] objectForKey:@"baseURI"];
}];
To pass a value to the finalize() function when your iOS app extension finishes its task, use the
NSItemProvider initWithItem:typeIdentifier: method to pack the value in the dictionary for the
NSExtensionJavaScriptFinalizeArgumentKey key. For example, to specify red for the background color
used in the finalize() function in Listing 4-1 (page 27), your extension might use code like this:
NSExtensionItem *extensionItem = [[NSExtensionItem alloc] init];
2014-10-20 | Copyright В© 2014 Apple Inc. All Rights Reserved.
28
Handling Common Scenarios
Performing Uploads and Downloads
extensionItem.attachments = @[[[NSItemProvider alloc] initWithItem:
@{NSExtensionJavaScriptFinalizeArgumentKey: @{@"bgColor":@"red"}}
typeIdentifier:(NSString *)kUTTypePropertyList]];
[[self extensionContext] completeRequestReturningItems:@[extensionItem]
completion:nil];
Performing Uploads and Downloads
Users tend to return to the host app immediately after they finish their task in your app extension. If the task
involves a potentially lengthy upload or download, you need to ensure that it can finish after your extension
gets terminated. To perform an upload or download, use the NSURLSession class to create a URL session and
initiate a background upload or download task.
Note: Recall that other types of background tasks, such as supporting VoIP or playing background
audio, are not available to app extensions. For more information, see Respond to the Host App’s
Request (page 17).
After your app extension initiates the upload or download task, the extension can complete the host app’s
request and be terminated without affecting the outcome of the task. To learn more about how an extension
handles the request from a host app, see Respond to the Host App’s Request (page 17). In iOS, if your extension
isn’t running when a background task completes, the system launches your containing app in the background
and calls the application:handleEventsForBackgroundURLSession:completionHandler: app
delegate method.
Important: If your app extension initiates a background NSURLSession task, you must also set up a shared
container that both the extension and its containing app can access. Use the sharedContainerIdentifier
property of the NSURLSessionConfiguration class to specify an identifier for the shared container so
that you can access it later.
Refer to Sharing Data with Your Containing App (page 25) for guidance on setting up a shared container.
Listing 4-2 shows one way to configure a URL session and use it to initiate a download.
Listing 4-2
An example of configuring an NSURLSession object and starting a download
NSURLSession *mySession = [self configureMySession];
NSURL *url = [NSURL URLWithString:@"http://www.example.com/LargeFile.zip"];
NSURLSessionTask *myTask = [mySession downloadTaskWithURL:url];
2014-10-20 | Copyright В© 2014 Apple Inc. All Rights Reserved.
29
Handling Common Scenarios
Declaring Supported Data Types for a Share or Action Extension
[myTask resume];
- (NSURLSession *) configureMySession {
if (!mySession) {
NSURLSessionConfiguration* config = [NSURLSessionConfiguration
backgroundSessionConfigurationWithIdentifier:@“com.mycompany.myapp.backgroundsession”];
// To access the shared container you set up, use the sharedContainerIdentifier
property on your configuration object.
config.sharedContainerIdentifier = @“com.mycompany.myappgroupidentifier”;
mySession = [NSURLSession sessionWithConfiguration:config delegate:self
delegateQueue:nil];
}
return mySession;
}
Because only one process can use a background session at a time, you need to create a different background
session for the containing app and each of its app extensions. (Each background session should have a unique
identifier.) It’s recommended that your containing app only use a background session that was created by one
of its extensions when the app is launched in the background to handle events for that extension. If you need
to perform other network-related tasks in your containing app, create different URL sessions for them.
If you need to complete the host app’s request before you initiate a background URL session, make sure that
the code that creates and uses the session is efficient. After your app extension calls
completeRequestReturningItems:completionHandler: to tell the host app that its request is complete,
the system can terminate your extension at any time.
Declaring Supported Data Types for a Share or Action Extension
In your Share or Action extension, it’s likely that you can work with some types of data but not others. To ensure
that a host app offers your extension only when the user has selected data of a type that you support, add the
NSExtensionActivationRule key to your extension’s Info.plist property list file. You can also use this
key to specify a maximum number of items of each type that your extension can handle.
When your extension runs, the system compares the NSExtensionActivationRule key’s values with the
information in an extension item’s attachments property. For a complete list of keys you can use with this
key, see Action Extension Keys in Information Property List Key Reference .
2014-10-20 | Copyright В© 2014 Apple Inc. All Rights Reserved.
30
Handling Common Scenarios
Declaring Supported Data Types for a Share or Action Extension
For example, to declare that your Share extension can support up to ten images, one movie, and one webpage
URL, you might use the following dictionary for the value of the NSExtensionAttributes key:
<key>NSExtensionAttributes</key>
<dict>
<key>NSExtensionActivationRule</key>
<dict>
<key>NSExtensionActivationSupportsImageWithMaxCount</key>
<integer>10</integer>
<key>NSExtensionActivationSupportsMovieWithMaxCount</key>
<integer>1</integer>
<key>NSExtensionActivationSupportsWebURLWithMaxCount</key>
<integer>1</integer>
</dict>
</dict>
If you don’t support a particular data type, use 0 for the value of the corresponding key or remove the key
from your NSExtensionActivationRule dictionary.
Note: If your Share or iOS Action extension needs to access a webpage, you must include the
NSExtensionActivationSupportsWebPageWithMaxCount key with a nonzero value. (To learn
how to use JavaScript to access a webpage from your extension, see Accessing a Webpage (page
26).)
The keys in the NSExtensionActivationRule dictionary are sufficient to meet the filtering needs of typical
app extensions. If you need to do more complex or more specific filtering, such as distinguishing between
public.url and public.image, you can create a predicate statement. Then, use the bare string that
represents the predicate as the value of the NSExtensionActivationRule key. (At runtime, the system
compiles this string into an NSPredicate object.)
For example, an app extension item's attachments property can specify a PDF file like this:
{extensionItems = ({
attachments = ({
registeredTypeIdentifiers = (
"com.adobe.pdf",
"public.file-url"
2014-10-20 | Copyright В© 2014 Apple Inc. All Rights Reserved.
31
Handling Common Scenarios
Declaring Supported Data Types for a Share or Action Extension
);
});
})}
To specify that your app extension can handle exactly one PDF file, you might create a predicate string like
this:
SUBQUERY (
extensionItems,
$extensionItem,
SUBQUERY (
$extensionItem.attachments,
$attachment,
ANY $attachment.registeredTypeIdentifiers UTI-CONFORMS-TO "com.adobe.pdf"
).@count == $extensionItem.attachments.@count
).@count == 1
Here is an example of a more complex predicate statement:
SUBQUERY (
extensionItems,
$extensionItem,
SUBQUERY (
$extensionItem.attachments,
$attachment,
ANY $attachment.registeredTypeIdentifiers UTI-CONFORMS-TO
"org.appextension.action-one" ||
ANY $attachment.registeredTypeIdentifiers UTI-CONFORMS-TO
"org.appextension.action-two"
).@count == $extensionItem.attachments.@count
).@count == 1
This statement iterates over an array of NSExtensionItem objects, and secondarily over the attachments
array in each extension item. For each attachment, the predicate evaluates the uniform type identifier (UTI)
for each representation in the attachment. When an attachment representation UTI conforms to any of of two
2014-10-20 | Copyright В© 2014 Apple Inc. All Rights Reserved.
32
Handling Common Scenarios
Deploying a Containing App to Older Versions of iOS
different specified UTIs (which you see on the right-hand side of each UTI-CONFORMS-TO operator), collect
that UTI for the final comparison test. The final line returns TRUE if the app extension was given exactly one
extension item attachment with a supported UTI.
During development only, you can use the TRUEPREDICATE constant (which always evaluates to true) as a
stub predicate statement, to test your code path before you implement your predicate statement.
Important: Before you submit your containing app to the App Store, be sure to replace all uses of
TRUEPREDICATE stub predicates with functional predicate statements or with
NSExtensionActivationRule keys. If any app extensions in your containing app include the string
TRUEPREDICATE, the app will be rejected.
To learn more about the syntax of predicate statements, see Predicate Format String Syntax in Predicate
Programming Guide .
Deploying a Containing App to Older Versions of iOS
If you link to an embedded framework from your containing app, you can still deploy it to versions of iOS older
than 8.0, even though embedded frameworks are not available in those versions.
The mechanism that lets you do this is the dlopen command, which you use to conditionally link and load a
framework bundle. You employ this command as an alternative to the build-time linking you can specify in
the Xcode General or Build Phases target editor. The main idea is to link embedded frameworks into your
containing app only when running in iOS 8.0 or newer.
You must use Objective-C, not Swift, in your code statements that conditionally load a framework bundle. The
rest of your app can be written in either language, and the embedded framework itself can likewise be written
in either language.
After calling dlopen, access the embedded framework classes using the following type of statement:
MyLoadedClass *loadedClass = [[NSClassFromString (@"MyClass") alloc] init];
Important: If your containing app target links to an embedded framework, it must include the arm64
architecture or it will be rejected by the App Store.
To set up an app extension Xcode project to take advantage of conditional linking
1.
For each of your contained app extensions, set the deployment target to be iOS 8.0 or later, as usual.
Do this in the “Deployment info” section of the General tab in the Xcode target editor.
2014-10-20 | Copyright В© 2014 Apple Inc. All Rights Reserved.
33
Handling Common Scenarios
Deploying a Containing App to Older Versions of iOS
2.
For your containing app, set the deployment target to be the oldest version of iOS that you want to support.
3.
In your containing app, conditionalize calls to the dlopen command within a runtime check for the iOS
version by using the systemVersion method.
Call the dlopen command only if your containing app is running in iOS 8.0 or later. Be sure to use
Objective-C, not Swift, when making this call.
Certain iOS APIs use embedded frameworks via the dlopen command. You must conditionalize your use of
these APIs just as you do when calling dlopen directly. These APIs are from the CFBundleRef opaque type:
в—Џ
CFBundleGetFunctionPointerForName
в—Џ
CFBundleGetFunctionPointersforNames
And from the NSBundle class:
в—Џ
load
в—Џ
loadAndReturnError:
в—Џ
classNamed:
In a containing app you are deploying to versions of iOS older than 8.0, call these APIs only within a runtime
check that ensures you are running in iOS 8.0 or newer, and call these APIs using Objective-C.
2014-10-20 | Copyright В© 2014 Apple Inc. All Rights Reserved.
34
App Extension Types
в—Џ
Today (page 36)
в—Џ
Share (page 42)
в—Џ
Action (page 49)
в—Џ
Photo Editing (page 53)
в—Џ
Finder Sync (page 57)
в—Џ
Document Provider (page 64)
в—Џ
Custom Keyboard (page 79)
2014-10-20 | Copyright В© 2014 Apple Inc. All Rights Reserved.
35
Today
App extensions in the Today view are called widgets. Widgets give users quick access to information that’s
important right now. For example, users open the Today view to check current stock prices or weather conditions,
see today’s schedule, or perform a quick task such as marking an item as done. Users tend to open the Today
view frequently, and they expect the information they’re interested in to be instantly available.
A Today widget can appear on the lock screen of an iOS device.
Before you begin: Make sure that the Today extension point is appropriate for the functionality
you want to provide. The best widgets give users quick updates or enable very simple tasks. If you
want to create an app extension that enables a multistep task or helps users perform a lengthy task,
such as uploading or downloading content, the Today extension point is not the right choice.
To learn about other types of app extensions you can create, see Table 1-1 (page 7).
Understand Today Widgets
On both platforms, a Today widget should:
в—Џ
Ensure that content always looks up to date
в—Џ
Respond appropriately to user interactions
в—Џ
Perform well (in particular, iOS widgets must use memory wisely or the system may terminate them)
Because user interaction with Today widgets is quick and limited, you should design a simple, streamlined UI
that highlights the information users are interested in. In general, it’s a good idea to limit the number of
interactive items in a widget. In particular, note that iOS widgets don’t support keyboard entry.
Note: Avoid putting a scroll view inside a Today widget. It’s difficult for users to scroll within a
widget without inadvertently scrolling the Today view.
Users configure Today widgets differently depending on the platform they’re using.
2014-10-20 | Copyright В© 2014 Apple Inc. All Rights Reserved.
36
Today
Use the Xcode Today Template
iOS. Because Today widgets don’t allow keyboard entry, users need to be able to use the containing app to
configure a widget’s content and behavior. In the Stocks widget, for example, users can switch between different
representations of a symbol’s value, but they must open the Stocks app to manage the list of symbols.
OS X. The containing app might not perform any functions, so the Today widget may need to give users ways
to configure it while it’s running. For example, the Stocks widget in OS X lets users find and add market symbols
they want to track. The Notification Center API in OS X includes methods you can use to let users configure
widgets.
After users install an app that contains a Today widget, they can add the widget to the Today view. When users
choose Edit in the Today view, Notification Center reveals a view that lets users add, reorder, and remove
widgets.
Use the Xcode Today Template
The Xcode Today template provides default header and implementation files for the principal class (named
TodayViewController), an Info.plist file, and an interface file (that is, a storyboard or xib file).
By default, the Today template supplies the following Info.plist keys and values (shown here for an OS X
target):
<key>NSExtension</key>
<dict>
<key>NSExtensionPointIdentifier</key>
<string>com.apple.widget-extension</string>
<key>NSExtensionPrincipalClass</key>
<string>TodayViewController</string>
</dict>
If you use a custom view controller subclass, use the custom class name to replace the TodayViewController
value for the NSExtensionPrincipalClass key.
iOS. If you don’t want to use the storyboard file provided by the template, remove the
NSExtensionMainStoryboard key and add the NSExtensionPrincipalClass key, using the name of
your view controller for the value.
Most of the work you do to create a Today widget involves designing the UI and implementing a view controller
subclass that performs your custom functionality.
2014-10-20 | Copyright В© 2014 Apple Inc. All Rights Reserved.
37
Today
Design the UI
Design the UI
Important: For best results, use Auto Layout to design the view of a Today widget.
Because space in the Today view is limited and the expected user experience is quick and focused, you shouldn’t
create a widget that's too big by default. On both platforms, a Today widget must fit within the width of the
Today view, but it can increase in height to display more content.
A Today widget created using the Xcode Today template includes Auto Layout constraints for standard margin
insets. To get the inset values for your calculations, implement the
widgetMarginInsetsForProposedMarginInsets: method. (The template’s principal view controller
conforms to the NCWidgetProviding protocol, which provides this method.) Be sure to draw all your widget
content within these standard margin insets. To learn more about designing the appearance of your widget,
see Today Widgets in iOS Human Interface Guidelines .
If a widget has additional content to display, you can rely on Auto Layout constraints to adjust the widget’s
height as appropriate. If you don’t use Auto Layout, you can use the UIViewController property
preferredContentSize to request a height for the widget. For example:
- (void)receivedAdditionalContent {
self.preferredContentSize = [self sizeNeededToShowAdditionalContent];
}
Note: Don’t specify a height for your widget that would require a user to scroll to see all its content.
iOS. If you want to animate the display of your content to coincide with the resize animation, implement
viewWillTransitionToSize:withTransitionCoordinator:, using
animateAlongsideTransition:completion: to add your animations to the coordinator parameter.
To ensure that your widget gets the vibrancy effect that’s appropriate for displaying items in the Today view,
use notificationCenterVibrancyEffect.
OS X. Widgets inherit NSAppearanceNameVibrantDark from the view their view controller is placed in.
When you use standard controls, you automatically get the right appearance. If you use custom colors, be sure
to choose colors that look good in a vibrant dark view.
2014-10-20 | Copyright В© 2014 Apple Inc. All Rights Reserved.
38
Today
Updating Content
Updating Content
The Today extension point provides API for managing a widget’s state and handling updates to its content
(you can read about this API in the Notification Center Framework Reference ). Although there are a few
platform-specific differences in the Today API, the functionality supported on both platforms is mostly the
same.
To help your widget look up to date, the system occasionally captures snapshots of your widget’s view. When
the widget becomes visible again, the most recent snapshot is displayed until the system replaces it with a
live version of the view.
To update a widget’s state before a snapshot is taken, be sure to conform to the NCWidgetProviding protocol.
When your widget receives the widgetPerformUpdateWithCompletionHandler: call, update your widget’s
view with the most recent content and call the completion handler, using one of the following constants to
describe the result of the update:
в—Џ
NCUpdateResultNewData—The new content required you to redraw the view
в—Џ
NCUpdateResultNoData—The widget doesn’t require updating
в—Џ
NCUpdateResultFailed—An error occurred during the update process
Specifying When a Widget Should Appear
If your widget should be visible in the Today view only in certain circumstances—such as when it has new or
noteworthy content—use the setHasContent:forWidgetWithBundleIdentifier: method from
NCWidgetController class. This method lets you declare the state of a widget’s content, which in turn
prompts the system to show or hide the widget.
You can call the setHasContent:forWidgetWithBundleIdentifier: method from your widget or from
its containing app. Indeed, the containing app can call this method even while the widget isn’t running. For
example, you can employ a push notification to the containing app to trigger a call to this method. The next
time a user opens the Today view, your widget is visible.
To declare that your widget has no content and can therefore be hidden, call the
setHasContent:forWidgetWithBundleIdentifier: method with a flag parameter value of NO.
Notification Center won’t launch your widget again until the containing app calls this method passing YES in
the flag parameter, to specify that the widget has content to display.
2014-10-20 | Copyright В© 2014 Apple Inc. All Rights Reserved.
39
Today
Opening the Containing App
Opening the Containing App
In some cases, it can make sense for a Today widget to request its containing app to open. For example, the
Calendar widget in OS X opens Calendar when users click an event. (Note that in iOS, a user may have to unlock
the device before the containing app can open.) To ensure that your containing app opens in a way that makes
sense in the context of the user’s current task, you need to define a custom URL scheme that both the app
and its widgets can use.
A widget doesn’t directly tell its containing app to open; instead, it uses the openURL:completionHandler:
method of NSExtensionContext to tell the system to open its containing app. When a widget uses this
method to open a URL, the system validates the request before fulfilling it.
Supporting Edits (OS X Only)
To support an editing mode within your OS X widget, conform to the NCWidgetProviding protocol. When
you set the widgetAllowsEditing property to YES, the Info button is automatically displayed in your widget’s
header area. (When users click the Info button, it automatically switches to a Done button.) When you use the
NCWidgetProviding protocol to support editing, the Edit, Done, and Cancel buttons are automatically
provided when the view goes into editing mode.
To observe changes between editing and nonediting modes in a widget, use the widgetDidBeginEditing
and widgetDidEndEditing methods of the NCWidgetProviding protocol.
If you also want to present a modal search UI while users are editing your widget, use the
NCWidgetProvidingPresentationStyles category on NSViewController to present your search view
controller. When users indicate that they’re done searching, use the
dismissViewControllerAnimated:completion: method to dismiss the search view controller. (Note
that you can also use the presentViewControllerInWidget: method to present a nonsearch modal view
that needs a Cancel button in the header area.)
Testing a Today Widget
iOS. You can test an iOS widget in iOS Simulator or on a device.
OS X. To test a widget in OS X, it’s easiest to use the Xcode Widget Simulator, because Notification Center
dismisses as soon as you switch to another app, or click outside its bounds. You can specify the Widget Simulator
in a scheme for the widget target.
2014-10-20 | Copyright В© 2014 Apple Inc. All Rights Reserved.
40
Today
Testing a Today Widget
To learn about debugging app extensions in general, see Debug, Profile, and Test Your App Extension (page
21).
2014-10-20 | Copyright В© 2014 Apple Inc. All Rights Reserved.
41
Share
Share extensions give users a convenient way to share content with other entities, such as social sharing
websites or upload services. For example, in an app that includes a Share button, users can choose a Share
extension that represents a social sharing website and then use it to post a comment or other content.
Before you begin: Make sure that the Share extension point is appropriate for your purpose. The
best Share extensions make it easy for users to share content with websites. If you want to create
an extension that lets users perform a different task with their content or that gives users updates
on information they care about, the Share extension point is not the right choice.
To find out about other types of app extensions you can create, see Table 1-1 (page 7).
Understand Share Extensions
On both platforms, a Share extension should:
в—Џ
Make it easy for users to post content
в—Џ
Let users preview, edit, annotate, and configure content, if appropriate
в—Џ
Validate the user’s content before sending it
Note: You may want to specify the types of content your Share extension can work with so that
users understand what they can share. You can learn more about specifying content types in Declaring
Supported Data Types for a Share or Action Extension (page 30).
Users get access to Share extensions in the system-provided UI. In iOS, users tap the Share button and choose
a Share extension from the sharing area of the activity view controller that appears. In OS X, users can reveal
the list of sharing services in a few different ways. For example:
в—Џ
Click the Share button in an app.
в—Џ
View the Social area in Notification Center.
в—Џ
Select some content, Control-click to reveal a contextual menu, and choose Share.
2014-10-20 | Copyright В© 2014 Apple Inc. All Rights Reserved.
42
Share
Use the Xcode Share Template
When users choose your Share extension, you display a view in which they compose their content and post
it. You can base your view on the system-provided compose view controller, or you can create a completely
custom compose view. The system-provided compose view controller builds in some support for common
tasks, such as previewing and validating standard items, synchronizing content and view animation, and
configuring a post.
Use the Xcode Share Template
The Xcode Share template provides default header and implementation files for the principal view controller
class (called SharingViewController), an Info.plist file, and an interface file (that is, a storyboard or
xib file).
Note: To provide a custom compose view instead of the standard one, deselect “Use standard social
compose interface” in the Xcode target-adding pane. When this checkbox is deselected, the default
SharingViewController class is based on NSViewController or UIViewController,
depending on the platform you chose.
When you create a target that uses the standard compose view UI, the principal view controller class inherits
from SLComposeServiceViewController and the default files include stubs for methods such as
didSelectPost and isContentValid.
By default, the Share template supplies the following Info.plist keys and values (shown here for an iOS
target):
<key>NSExtension</key>
<dict>
<key>NSExtensionMainStoryboard</key>
<string>MainInterface</string>
<key>NSExtensionPointIdentifier</key>
<string>com.apple.share-services</string>
</dict>
Depending on the functionality of your Share extension, you might need to add keys and values to the default
property list. For example, to provide a JavaScript file that accesses a webpage, add the
NSExtensionAttributes key and a dictionary that specifies the file. (To learn more about how to use
2014-10-20 | Copyright В© 2014 Apple Inc. All Rights Reserved.
43
Share
Design the UI
JavaScript to access a webpage, see Accessing a Webpage (page 26).) You also add keys and values if you
want to specify the data types your extension works with (to learn more, see Declaring Supported Data Types
for a Share or Action Extension (page 30)).
A Share extension uses its principal view controller’s extensionContext property to get the
NSExtensionContext object that contains the user’s initial text and any attachments for a post, such as links,
images, or videos. The extension context object also contains information about the status of the posting
operation. (To learn more about how an extension can interact with its context, see Respond to the Host App’s
Request (page 17).)
The default SLComposeServiceViewController object includes a text view that displays the user’s editable
text content. When a user chooses Post, a Share extension validates the text view’s content (in addition to
attachments, if any) and calls the completeRequestReturningItems:expirationHandler:completion:
method of NSExtensionContext, using code like the following:
NSExtensionItem *outputItem = [[NSExtensionItem alloc] init];
// Set the appropriate value in outputItem
NSArray *outputItems = @[outputItem];
[self.extensionContext completeRequestReturningItems:outputItems
expirationHandler:nil completion:nil];
Design the UI
Important: For best results, use Auto Layout to design a Share extension.
The sharing UI on both platforms is constrained in size. In particular, your Share extension can’t increase in
width, and although it may increase in height, you don’t want to force users to scroll too much.
If the system-supplied compose view meets your needs, you don’t need to supply any custom UI.
In general, you don’t want to overcomplicate a simple task, but you also want to give users the options they
expect. For example, you want users to be able to post a simple remark with very little effort, but you may also
want to help users preview an attachment, tag a post, or specify details, such as a privacy setting or an album
to use.
When you have additional content to display, you can rely on Auto Layout constraints to adjust the view’s
height as appropriate. If you don’t use Auto Layout, you can use the UIViewController property
preferredContentSize to specify the view’s new height.
2014-10-20 | Copyright В© 2014 Apple Inc. All Rights Reserved.
44
Share
Posting Content
iOS. If you want to animate the display of your content to coincide with the resize animation, implement
viewWillTransitionToSize:withTransitionCoordinator:, using
animateAlongsideTransition:completion: to add your animations to the coordinator parameter.
Posting Content
The primary purpose of a Share extension is to help users post content. When a user chooses the Post or Send
button in your Share extension, a system-provided animation provides feedback that the action is being
processed. The system then calls the didSelectPost method of the SLComposeServiceViewController
class. Implement this method to:
в—Џ
Set up a background-mode URL session (using the NSURLSession class) that includes the content to post
в—Џ
Initiate the upload
в—Џ
Call the completeRequestReturningItems:completionHandler: method, which signals the host
app that its original request is complete
в—Џ
Prepare to be terminated by the system
Listing 6-1 (page 45) shows one way to implement the didSelectPost method.
Listing 6-1
An example implementation of didSelectPost
- (void)didSelectPost {
// Perform the post operation.
// When the operation is complete (probably asynchronously), the Share extension
should notify the success or failure, as well as the items that were actually
shared.
NSExtensionItem *inputItem = self.extensionContext.inputItems.firstObject;
NSExtensionItem *outputItem = [inputItem copy];
outputItem.attributedContentText = [[NSAttributedString alloc]
initWithString:self.contentText attributes:nil];
// Complete this implementation by setting the appropriate value on the output
item.
NSArray *outputItems = @[outputItem];
2014-10-20 | Copyright В© 2014 Apple Inc. All Rights Reserved.
45
Share
Validating Input
[self.extensionContext completeRequestReturningItems:outputItems
expirationHandler:nil completion:nil];
// Or call [super didSelectPost] to use the superclass's default completion behavior.
}
Note: Calling the completeRequestReturningItems:completionHandler: method can cause
the associated compose view controller to be dismissed.
If a user cancels a post, or if a post is canceled for some other reason, the system calls the Share extension’s
didSelectCancel method when the feedback animation completes. Implement this method if it makes
sense to customize the extension context’s completion operation.
Validating Input
Share extensions should validate the user’s content before posting it. It’s best when the compose view gives
users feedback about their content by enabling or disabling the Post button and, optionally, by displaying the
current character count.
If you’re using the standard compose view controller (an instance of the SLComposeServiceViewController
class), check the validity of the user’s current content by implementing the isContentValid method. The
system calls isContentValid when the user changes the text in the standard compose view, so you can
display the current character count and enable the Post button when appropriate. Listing 6-2 (page 46) shows
an example implementation of the isContentValid method for a sharing service that requires posts to
contain fewer than 100 characters.
Listing 6-2
An example implementation of isContentValid
- (BOOL)isContentValid {
NSInteger messageLength = [[self.contentText
stringByTrimmingCharactersInSet:[NSCharacterSet whitespaceCharacterSet]] length];
NSInteger charactersRemaining = 100 - messageLength;
self.charactersRemaining = @(charactersRemaining);
if (charactersRemaining >= 0) {
return YES;
}
2014-10-20 | Copyright В© 2014 Apple Inc. All Rights Reserved.
46
Share
Previewing Content (iOS Only)
return NO;
}
If your Share extension needs to validate content in custom ways, do the validation in an implementation of
the validateContent method. Depending on the result, you can return the correct value in your
isContentValid method.
For example, if you need to shrink an asset before letting users upload it, you don’t want to enable the Post
button until the shrinking is complete. To find out if the shrinking is done, call validateContent within your
isContentValid method and return the appropriate result.
Previewing Content (iOS Only)
To help users preview their selected content, the system-provided compose view controller
(SLComposeServiceViewController) provides a default view that can automatically display previews of
standard data types, such as photos, videos, and webpages. If your iOS Share extension can handle nonstandard
data types, you can implement the loadPreviewView method to display them. Typically, an iOS Share
extension checks the content in the attachments property of an extension item and provides a custom
preview view, if appropriate.
iOS displays preview views next to the text-editing area in the sharing UI. As much as possible, you should
create small preview views to avoid making the text area uncomfortably small. And although the sharing UI
can expand in height, greater height can cause your content to display behind the keyboard, forcing users to
scroll.
Configuring a Post (iOS Only)
The SLComposeSheetConfigurationItem class makes it easy for iOS Share extensions to provide a list of
items that help users configure a post. For example, you might let users choose an account to post from, specify
privacy settings, or autocomplete a custom text entry, such as a Twitter mention. By default, the standard
compose view controller (SLComposeServiceViewController) displays your configuration items in a table
view at the bottom of the sharing UI.
A Share extension uses the configurationItems property of the SLComposeServiceViewController
class to return an array of SLComposeSheetConfigurationItem instances, each of which identifies a type
of configuration the user can make. When a user taps a configuration item, the item can display a custom view
controller that lets the user perform the configuration.
2014-10-20 | Copyright В© 2014 Apple Inc. All Rights Reserved.
47
Share
Configuring a Post (iOS Only)
To display a custom configuration view controller, you typically define a block of type
SLComposeSheetConfigurationItemTapHandler (in which you create the view controller) and then call
pushConfigurationViewController: to display it. The standard compose view controller uses a
UINavigationController instance to display your configuration view controller, so users can tap the Back
button to return to the sharing UI. You can also call popConfigurationViewController to return to the
sharing UI in response to some other user action.
If appropriate, you can replace the list of configuration items with a custom view controller that displays custom
autocompletion suggestions while a user is entering text. You might want to do this if your sharing service
defines certain textual items that users are likely to enter.
2014-10-20 | Copyright В© 2014 Apple Inc. All Rights Reserved.
48
Action
An Action extension helps users view or transform content originating in a host app. For example, an Action
extension might help users edit an image in a document that they’re viewing in a text editor. Another type of
Action extension might let users view a selected item in a different way, such as viewing an image in a different
format or reading text in a different language.
The system offers an Action extension to users only when the extension declares it can work with the type of
content a user is currently using. For example, if an Action extension declares it works only with text, it isn’t
made available when a user is viewing images.
To learn how to declare the types of content an Action extension can work with, read Declaring Supported
Data Types for a Share or Action Extension (page 30)).
Before you begin: Make sure the Action extension point is appropriate for your purpose. Action
extensions enable targeted, lightweight tasks that display or change content. If you want to help
users share content on a social website or give users updates on information they care about, the
Action extension point is not the right choice.
To find out about other types of app extensions you can create, see Table 1-1 (page 7).
Understand Action Extensions
Action extensions behave differently depending on the platform. In OS X, an Action extension:
в—Џ
Can be an editor, in which users can make changes to selected content, or a viewer, in which users can
view selected content in a new way
в—Џ
Can transmit to the host app the content changes that users make within the app extension
в—Џ
Can appear in a modal view that emerges from the host app’s window or in a custom view that surrounds
the user’s selected items
в—Џ
Automatically receives the user’s selected content as part of the extension context
In iOS, an Action extension:
в—Џ
Helps users view the current document in a different way
2014-10-20 | Copyright В© 2014 Apple Inc. All Rights Reserved.
49
Action
Use the Xcode Action Extension Template
в—Џ
Always appears in an action sheet or full-screen modal view
в—Џ
Receives selected content only if explicitly provided by the host app
On both platforms, users get access to Action extensions in the system-provided UI. In iOS, an Action extension
is listed in the action area of the activity view controller that appears when users tap the Share button. In OS X,
there are a few ways in which users can reveal a list of Action extensions. For example, users can:
в—Џ
Move the pointer over some selected content and click the button that appears
в—Џ
Click the Share toolbar button
в—Џ
Click the Action extension’s custom toolbar button
Note: In OS X, an Action extension that enables content viewing may work on multiple selected
items, but an extension that enables editing can work on only one item at a time.
Use the Xcode Action Extension Template
The Xcode Action extension template provides default source files for the principal view controller class (called
ActionViewController), an Info.plist file, and an interface file (that is, a storyboard or xib file).
By default, the Action template supplies the following Info.plist keys and values, shown here for an OS X
target:
<key>NSExtension</key>
<dict>
<key>NSExtensionAttributes</key>
<dict>
<key>NSExtensionServiceRoleType</key>
<string>NSExtensionServiceRoleTypeEditor</string>
</dict>
<key>NSExtensionPointIdentifier</key>
<string>com.apple.ui-services</string>
<key>NSExtensionPrincipalClass</key>
<string>ActionViewController</string>
</dict>
2014-10-20 | Copyright В© 2014 Apple Inc. All Rights Reserved.
50
Action
Design the UI
To specify the task your OS X Action extension enables, use one of the following values for the required
NSExtensionServiceRoleType key:
в—Џ
NSExtensionServiceRoleTypeEditor—The extension enables editing or other content transformation
and returns the user’s edits to the host app
в—Џ
NSExtensionServiceRoleTypeViewer—The extension lets users view the selected content in a
different way, such as in a different format
An Action extension uses the view controller’s extensionContext property to get an NSExtensionContext
object. In OS X, the extension context contains the user’s selected content as well as the size and position of
that content.
In iOS, an extension context has content specified explicitly by the host app; this can, at the discretion of the
host, include user selected content.
To learn more about the extension context, see Respond to the Host App’s Request (page 17).
Design the UI
Important: For best results, use Auto Layout to design the UI of an Action extension.
OS X. Use the size and position of the selected content in the host app to inform the size and position of the
Action extension’s view.
Use the preferredContentSize property of NSViewController to specify the extension view’s preferred
size, based on the size of the selected content. (You can also specify minimum and maximum sizes for the
extension’s view, to ensure that a host app doesn’t make unreasonable adjustments to your view.) To specify
a preferred position for the extension view, set the preferredScreenOrigin property to the lower-left
corner of the extension’s view.
iOS. Create a template image that represents your Action extension. A template image is an image that iOS
uses as a mask to create the final icon that users see in the activity view controller. To create a template image
that looks good in the final UI, follow these guidelines:
в—Џ
Use black or white with appropriate alpha transparency.
в—Џ
Don’t include a drop shadow.
в—Џ
Use antialiasing.
в—Џ
Create the image in two sizes:
в—Џ
For iPhone, the image should look good centered in an area that measures 60 x 60 points.
2014-10-20 | Copyright В© 2014 Apple Inc. All Rights Reserved.
51
Action
Returning Edited Content to the Host
в—Џ
For iPad, the image should look good centered in an area that measures 76 x 76 points.
If you want to present your iOS Action extension in full screen, add the following key-value pair to the extension’s
NSExtension dictionary:
<key>NSExtensionActionWantsFullScreenPresentation</key>
<true/>
Returning Edited Content to the Host
On both platforms, an Action extension uses an NSExtensionContext method to send the user’s edits to
the host app. Listing 7-1 (page 52) shows code that returns edited text to the host app when the user chooses
a Done button.
Listing 7-1
Sending edited items to the host app
- (IBAction)done:(id)sender {
NSExtensionItem *outputItem = [[NSExtensionItem alloc] init];
outputItem.attributedContentText = self.myTextView.attributedString;
NSArray *outputItems = @[outputItem];
[self.extensionContext completeRequestReturningItems:outputItems];
}
2014-10-20 | Copyright В© 2014 Apple Inc. All Rights Reserved.
52
Photo Editing
In iOS, a Photo Editing extension lets users edit a photo or video within the Photos app. After users confirm
the changes they make in a Photo Editing extension, the adjusted content is available in Photos. Photos always
keeps the original version of the content, too, so that users can revert the changes they make in an extension.
Before you begin: Make sure that the Photo Editing extension point is appropriate for the
functionality you want to provide. A Photo Editing extension should make it easy for users to make
quick, targeted adjustments to a photo or video without requiring too much user interaction. If you
want to enable a more generic task or help users share photos and videos with others, the Photo
Editing extension point is not the right choice.
To learn about other types of app extensions you can create, see Table 1-1 (page 7).
Understand How a Photo Editing Extension Works with Photos
To support a consistent editing experience, Photos keeps multiple versions of each media asset’s image or
video data, in addition to adjustment data, which describes past edits made to the asset. For each asset, Photos
stores the original version, the current version (which includes the most recent adjustments), and the set of
adjustments that were applied to the original version to create the current version.
When a user chooses a Photo Editing extension, Photos asks the extension if it can read the adjustment data.
If the app extension supports the adjustment data, Photos provides the original version of the asset as input
to the editing session. After the extension reads the adjustment data and reconstructs the past edits, it can
allow users to alter or revert past edits or add new edits. For example, if the adjustment data describes filters
applied to a photo, the extension reapplies those filters to the original asset and can let users change filter
parameters, add new filters, or remove filters.
If the extension doesn’t support an asset’s adjustment data, Photos provides the current version of the asset
as input to the editing session. Because the current version contains the rendered output of all past edits, the
extension can let users apply new edits to the asset but not alter or revert past edits.
2014-10-20 | Copyright В© 2014 Apple Inc. All Rights Reserved.
53
Photo Editing
Use the Xcode Photo Editing Template
Important: Photos does not store a current version of video assets. If your extension can’t read a video
asset’s adjustment data, it must work with the original version of the video, overwriting past edits.
When a user finishes using a Photo Editing extension, the extension returns the edited asset and the adjustment
data.
iOS users get access to Photo Editing extensions in the Photos app. When a user chooses your extension,
display a view that provides a custom editing interface. To present this view, use a view controller that adopts
the PHContentEditingController protocol.
Important: Embed no more than one Photo Editing extension for each media type (photo, video) in a
containing app. The Photos app displays to the user, at most, one extension of each type from a given
containing app.
Use the Xcode Photo Editing Template
The Xcode Photo Editing template provides default header and implementation files for the principal view
controller class (called PhotoEditingViewController), an Info.plist file, and an interface file (that is,
a storyboard file).
By default, the Photo Editing template supplies the following Info.plist keys and values:
<key>NSExtension</key>
<dict>
<key>NSExtensionAttributes</key>
<dict>
<key>PHSupportedMediaTypes</key>
<array>
<string>Image</string>
</array>
</dict>
<key>NSExtensionMainStoryboard</key>
<string>MainInterface</string>
<key>NSExtensionPointIdentifier</key>
<string>com.apple.photo-editing</string>
</dict>
2014-10-20 | Copyright В© 2014 Apple Inc. All Rights Reserved.
54
Photo Editing
Design the UI
In particular, make sure that the PHSupportedMediaTypes array specifies the types of media assets your app
extension can edit. The default value is Image, but you can also use Video.
Design the UI
Important: For best results, use Auto Layout to design the view of a Photo Editing extension.
The Photos app displays a Photo Editing extension within a navigation bar, so you should avoid designing a
navigation bar–based UI for your extension.
Photos automatically displays your extension’s view so that it occupies the full height of the screen, including
the area behind the navigation bar. If you want your content view to appear below the bar, and not underneath
it, be sure to use the view’s top layout guide appropriately.
It’s best when a Photo Editing extension lets users preview the results of their edits. Giving users a preview
while they’re still using your extension means that they can get the effect they want without repeatedly exiting
and reentering the extension.
Because users are likely to spend time editing a photo or movie in your app extension, you don’t want them
to lose their work if they accidentally choose Cancel. To improve the user experience, be sure to implement
the shouldShowCancelConfirmation method in your view controller, returning YES if there are unsaved
changes. When this method returns YES, Photos displays confirmation UI so that users can confirm if they
really want to cancel their changes.
Handling Memory Constraints
Because a Photo Editing extension often needs to work with large high-resolution images and videos, the
extension is likely to experience memory pressures when running on a device. It’s recommended that you
examine your existing image-processing code and make sure that it performs to a high standard before you
use it in your app extension.
Testing a Photo Editing Extension
Avoid making assumptions about the media formats that your app extension may receive. Be sure to test your
filtering and other image-processing code with a wide range of media formats; don’t just test with content
from the device camera.
2014-10-20 | Copyright В© 2014 Apple Inc. All Rights Reserved.
55
Photo Editing
Testing a Photo Editing Extension
To learn about debugging app extensions in general, see Debug, Profile, and Test Your App Extension (page
21).
2014-10-20 | Copyright В© 2014 Apple Inc. All Rights Reserved.
56
Finder Sync
In OS X, the Finder Sync extension point lets you cleanly and safely modify the Finder’s user interface to express
file synchronization status and control. Unlike most extension points, Finder Sync does not add features to a
host app. Instead, it lets you modify the behavior of the Finder itself.
Understand Finder Sync
With a Finder Sync extension you register one or more folders for the system to monitor. Your Finder Sync
extension then sets badges, labels, and contextual menus for any items in the monitored folders. You can also
use the extension point’s API to add a toolbar button to the Finder window.
Finder Sync supports apps that synchronize the contents of a local folder with a remote data source. It improves
user experience by providing immediate visual feedback directly in the Finder. Badges display the sync state
of each item, and contextual menus let users manage folder contents. Custom toolbar buttons can invoke
global actions, such as opening a monitored folder or forcing a sync operation.
Note: The Finder Sync extension point lets you modify an item’s appearance in the Finder. It does
not provide support for syncing the files. You are responsible for creating your own syncing
component.
A Finder Sync extension can:
в—Џ
Register a set of folders to monitor.
в—Џ
Receive notifications when the user starts or stops browsing the content of a monitored folder.
For example, the extension receives notification when the user opens a monitored folder in the Finder or
in an Open or Save dialog.
в—Џ
Add, remove, and update badges and labels on items in a monitored folder.
в—Џ
Display a contextual menu when the user Control-clicks an item inside a monitored folder.
в—Џ
Add a custom button to the Finder’s toolbar.
Unlike badges and contextual menu items, this button is always available, even when the user is not
currently browsing a monitored folder.
2014-10-20 | Copyright В© 2014 Apple Inc. All Rights Reserved.
57
Finder Sync
Creating a Finder Sync Extension in Xcode
Before You Begin: Make sure the Finder Sync extension point is appropriate for the functionality
you plan to provide. The best Finder Sync extensions support apps that sync the contents of a local
folder with a remote data source. Finder Sync is not intended as a general tool for modifying the
Finder’s user interface.
To learn about other types of app extensions you can create, see Table 1-1 (page 7).
Creating a Finder Sync Extension in Xcode
To create a Finder Sync extension, add a new target to your OS X project using the Finder Sync Extension
template. This template contains a custom subclass of the FIFinderSync class. This subclass acts as your
extension’s primary class. The system automatically instantiates this class and calls the protocol methods in
response to user actions.
For detailed information on adding extensions, see Creating an Extension (page 14).
Set the Required Property List Values
For OS X to recognize and automatically load the Finder Sync extension, the extension target’s info.plist
file must contain the following entries:
<key>NSExtension</key>
<dict>
<key>NSExtensionAttributes</key>
<dict/>
<key>NSExtensionPointIdentifier</key>
<string>com.apple.FinderSync</string>
<key>NSExtensionPrincipalClass</key>
<string>$(PRODUCT_MODULE_NAME).FinderSync</string>
</dict>
In particular, the NSExtensionPrincipalClass key must provide the name of your FIFinderSync subclass.
The system automatically instantiates this class when the Finder first launches. It instantiates an additional
copy whenever an Open or Save dialog is displayed. Each copy runs in its own process.
The Finder Sync Extension Xcode template configures these Info.plist keys automatically. If you want to
change the principal class, modify the value of the NSExtensionPrincipalClass key.
2014-10-20 | Copyright В© 2014 Apple Inc. All Rights Reserved.
58
Finder Sync
Creating a Finder Sync Extension in Xcode
Specify Folders to Monitor
You specify the folders you want to monitor in your Finder Sync extension’s init method, using the default
FIFinderSyncController object. In most cases, you want to let the user specify these folders in UI provided
by the containing app. You can pass this data between the containing app and your Finder Sync extension
using shared user defaults.
To enable shared user defaults, first add both your Finder Sync extension and its containing app to an app
group. This group creates a shared container that both processes can access. For each target, open the Xcode
capabilities pane and turn on the App Groups capability. Provide a unique identifier for the shared group. Be
sure to use the same identifier for both the Finder Sync extension and the containing app.
This process adds a com.apple.security.application-groups entry to the targets’ entitlements.
<key>com.apple.security.application-groups</key>
<array>
<string>com.example.domain.MyFirstFinderSyncApp</string>
</array>
For more information about app groups, see Adding an App to an App Group in Entitlement Key Reference .
Next, instantiate a new NSUserDefaults object by calling initWithSuiteName: and passing in the shared
group’s identifier. This init method creates a user default object that loads and saves data to the shared
container.
// Set up the folder we are syncing.
NSUserDefaults *sharedDefaults =
[[NSUserDefaults alloc]
initWithSuiteName:@"com.example.domain.MyFirstFinderSyncExtension"];
self.myFolderURL = [sharedDefaults URLForKey:MyFolderKey];
if (self.myFolderURL == nil) {
self.myFolderURL = [NSURL
fileURLWithPath:[@"~/Documents/MyFirstFinderSyncExtension Documents"
stringByExpandingTildeInPath]];;
}
[FIFinderSyncController defaultController].folderURLs = [NSSet
setWithObject:self.myFolderURL];
2014-10-20 | Copyright В© 2014 Apple Inc. All Rights Reserved.
59
Finder Sync
Creating a Finder Sync Extension in Xcode
Set Up Badge Images
Create your badge images so that each can be drawn at up to 320x320 pixels. For each image, fill the entire
frame edge-to-edge with your artwork (in other words, use no padding). The system determines the size and
placement of a badge image on a monitored item. The pixel size ranges at which your badge might be displayed
are as follows:
Retina screens 12x12 through 320x320
Nonretina screens 8x8 through 160x160
To add a badge image to your Finder Sync controller’s configuration, use the
setBadgeImage:label:forBadgeIdentifier: method, as shown here:
[[FIFinderSyncController defaultController]
setBadgeImage: uploadedImage
label: NSLocalizedString(@"Uploaded", nil)
forBadgeIdentifier: @"UploadComplete"];
FIFinderSyncController.defaultController().setBadgeImage(uploadedImage,
label: NSLocalizedString("Uploaded", comment: "Upload complete label"),
forBadgeIdentifier: "UploadComplete")
You would typically do this in the sync controller’s initialization method. You can set up as many badge images
as you need. The badge identifier string that you specify here allows you to later retrieve the image for applying
it to a monitored item, as described in A Typical Finder Sync Use Case (page 62).
Implement FIFinderSync methods
The FIFinderSync class declares a number of methods that you can override to monitor and control the
Finder.
Receiving Notifications When Users Observe Monitored Items
Override these methods to receive notifications as the user browses through the contents of the monitored
folders.
в—Џ
beginObservingDirectoryAtURL:
The system calls this method when the user begins looking at the contents of a monitored folder or one
of its subfolders. It passes the URL of the currently open folder as an argument.
2014-10-20 | Copyright В© 2014 Apple Inc. All Rights Reserved.
60
Finder Sync
Creating a Finder Sync Extension in Xcode
The system calls beginObservingDirectoryAtURL: only once for each unique URL. As long as the
content remains visible in at least one Finder window, any additional Finder windows that open to the
same URL are ignored.
Note: The system creates additional instances of your extension for any Open and Save dialogs.
These extensions receive their own calls to beginObservingDirectoryAtURL:, even if the
folder is already open in a Finder window.
в—Џ
endObservingDirectoryAtURL:
The system calls this method when the user is no longer looking at the contents of the given URL. As with
beginObservingDirectoryAtURL:, the Open and Save dialogs are tracked separately from the Finder.
в—Џ
requestBadgeIdentifierForURL:
The system calls this method when a new item inside the monitored folder becomes visible to the user.
This method is called once for each file initially shown in the Finder’s view. The system continues to call
this method as each new file scrolls into view.
You typically implement this method to check the state of the item at the provided URL, and then call the
Finder Sync controller’s setBadgeIdentifier:forURL: method to set the appropriate badge. You
might also want to track these URLs, in order to update their badges whenever their state changes.
Adding Contextual Menu Items
Override the menuForMenuKind: method to provide a custom contextual menu. The menu argument indicates
the type of menu that your extension should create. Each menu kind corresponds to a different type of user
interaction.
в—Џ
FIMenuKindContextualMenuForItems
The user Control-clicked one or more items inside your monitored folder. Your extension should present
menu items that affect the selected items.
в—Џ
FIMenuKindContextualMenuForContainer
The user Control-clicked the Finder window’s background while browsing the monitored folder. Your
extension should present menu items that affect the contents of the current folder.
в—Џ
FIMenuKindContextualMenuForSidebar
The user Control-clicked a sidebar item that represents the monitored folder or part of its contents. Your
extension should present menu items that effect the contents of the selected item.
в—Џ
FIMenuKindToolbarItemMenu
2014-10-20 | Copyright В© 2014 Apple Inc. All Rights Reserved.
61
Finder Sync
A Typical Finder Sync Use Case
The user clicked on the toolbar button provided by the extension. Because the toolbar button is always
available, the user may or may not be browsing the monitored folder at this time. Your extension may
present menu items that represent global actions that should always be available to the user. It can also
present menu items that affect selected items inside your monitored folder, if any exist.
You can get additional information about the currently selected items using the Finder Sync controller’s
targetedURL and selectedItemURLs methods. The targetedURL method returns the URL of the file or
folder that the user Control-clicked. The selectedItemURLs method returns an array containing the URLs
of all the currently selected items in the Finder window.
targetedURL and selectedItemURLs return valid values only inside the menuForMenuKind: method or
inside one of its menu actions. If the user is not browsing the monitored folder (for example, if the user clicked
the toolbar button while outside the monitored folder), both of these methods return nil.
Adding a Custom Toolbar Button
To add a custom toolbar button to the Finder window, override the getter methods for the following properties:
в—Џ
toolbarItemName—Return the button’s name
в—Џ
toolbarItemImage—Return the button’s image
в—Џ
toolbarItemToolTip—Return the tooltip text for the button
When the user clicks the toolbar button, the system calls your primary class’s menuForMenuKind: method,
passing FIMenuKindToolbarItemMenu as the menu kind. Your extension must return an appropriate menu.
The system then displays this menu.
A Typical Finder Sync Use Case
This section presents a typical use case. Your app manages and badges all the items inside the monitored
folder. Because the user can populate the monitored folder with an arbitrary number of subfolders and files,
the list of monitored items could grow to be very large. You must therefore consider the performance
implications of adding and updating all of these badges. Specifically, avoid adding or updating the badge of
any item that is not currently visible.
When dealing with a potentially large number of items, always provide the badges on demand. Provide badges
to items only as they appear in the Finder window, and record all the URLs for the badges you set, so that you
can update them as necessary.
1.
The system calls beginObservingDirectoryAtURL: when the user first opens the monitored folder
or one of its subfolders.
2014-10-20 | Copyright В© 2014 Apple Inc. All Rights Reserved.
62
Finder Sync
Performance Concerns
2.
The system calls requestBadgeIdentifierForURL: for each item that is currently being drawn onscreen.
Inside this method, do the following:
a.
Check the state of the item and set its badge by calling setBadgeIdentifier:forURL:.
Your app is responsible for defining the states and their corresponding badges. For example, a typical
syncing app might have badges that indicate unsynced local changes, syncing operations in progress,
successfully synced items, and items with syncing errors or conflicts.
b.
Record the URL of every item that has received a badge.
Your app must to continue to monitor the state of these items and update their badges as necessary.
When an item’s state changes, update its badge by calling setBadgeIdentifier:forURL:.
3.
The system calls endObservingDirectoryAtURL: when the user closes the folder. Delete all the URLs
for the badged items inside that folder and stop monitoring their state.
Performance Concerns
Finder Sync extensions may have a much longer lifespan than most other extensions. Because of this long
lifespan, you must take particular care to avoid any possible performance issues. Ideally, Finder Sync extensions
should spend most of their time running but idle. Limit the number of resources the extension consumes. Most
important, be sure to avoid leaking any resources. Over time, even a small trickle can grow into a serious
problem.
The system may also launch additional copies of your extension whenever an Open or Save dialog is displayed.
This means that the user may have multiple copies of your extension running at once. Therefore, it’s generally
best if the extension focuses on handling the badges, contextual menus, and toolbar buttons. Place in a separate
XPC service any code that performs the sync, updates state, or communicates with remote data sources. This
approach ensures that there is only one syncing service running at a time.
For more information about XPC services, see Creating XPC Services in Daemons and Services Programming
Guide in Daemons and Services Programming Guide .
2014-10-20 | Copyright В© 2014 Apple Inc. All Rights Reserved.
63
Document Provider
In iOS, any app that remotely stores commonly used document formats should consider creating a Document
Provider extension. This extension (sometimes shortened here to document provider ) allows other apps to
access the documents managed by your app. Additionally, apps that are strongly associated with a specific
document type may benefit from creating a document provider for their documents. Here, the document
provider act as a local repository for a particular type of document, letting the user gather all those documents
into one place.
Documents managed by your Document Provider extension can be accessed by any app using a document
picker view controller. This combination gives users a lot of flexibility when it comes to managing and sharing
their documents.
Understand Document Provider Extensions
The Document Provider extension acts as the interface between the files that your app manages and the other
apps on the users’ devices. It lets other apps import or open the files, uploading and downloading them from
your server as needed. Apps can also export or move their documents into your extension’s shared container.
The Document Provider extension consists of two separate parts: the Document Picker View Controller extension
and the File Provider extension. The Document Picker View Controller extension provides your document
provider’s user interface. The system displays this interface when the host app presents a document picker
view controller for your document provider. This interface should let users browse through and select documents
and destinations from inside your document provider. This extension can also perform basic import and export
operations without any additional support.
To support open and move operations, you must also create a File Provider extension. This extension grants
the host app access to files outside its sandbox. It also creates placeholders for remote files, downloads local
copies when needed, and uploads any changes made by the host app.
Ideally your document provider should support all four operations, giving your users the most flexibility when
it comes to working with your documents. However, producing a robust document provider with a solid user
experience is a nontrivial task.
If you want only to share documents from your app, you can create a UIDocumentPickerViewController
object to export or move your documents. Alternatively, you can share your documents using iCloud Drive.
2014-10-20 | Copyright В© 2014 Apple Inc. All Rights Reserved.
64
Document Provider
Document Picker View Controller Extension
To opt-in to iCloud Drive support, open the Xcode capabilities pane and turn on iCloud documents. Next, open
the app’s info.plist file. You will need to add an entry for your iCloud containers, and then define how you
wish to share each container. A sample entry is shown below:
<key>NSUbiquitousContainers</key>
<dict>
<key>iCloud.com.example.MyApp</key>
<dict>
<key>NSUbiquitousContainerIsDocumentScopePublic</key>
<true/>
<key>NSUbiquitousContainerSupportedFolderLevels</key>
<string>Any</string>
<key>NSUbiquitousContainerName</key>
<string>MyApp</string>
</dict>
</dict>
These settings let iCloud Drive provide access to the files stored in your app’s iCloud container. For a detailed
description of the valid keys and values, See Cocoa Keys in Information Property List Key Reference chapter in
Information Property List Key Reference .
Important: When using iCloud Drive in iOS 8.0, do not use file presenters or the UIDocument class to
access files. You can use file coordinators, Posix locks, Core Data, or SQLite.
Before You Begin: Make sure the document provider extension point is appropriate for the
functionality you plan to provide. The best document providers act as a public document repository
for other apps. If you just want to share your app’s files, a document provider is not the right choice.
To learn about other types of extensions you can create, see Table 1-1 (page 7).
Document Picker View Controller Extension
The Document Picker View Controller extension provides the user interface for import, export, open, and move
operations to or from your extension’s shared container. To create a Document Picker View Controller extension
(sometimes shortened here to document picker ), subclass the UIDocumentPickerExtensionViewController
2014-10-20 | Copyright В© 2014 Apple Inc. All Rights Reserved.
65
Document Provider
Document Picker View Controller Extension
class. Your subclass is instantiated when the user selects your document provider from a
UIDocumentMenuViewController object or when the host app opens your document provider directly
using a UIDocumentPickerViewController object.
In either case, the host app presents a document picker view controller. The system then imbeds your Document
Picker View Controller extension inside the app’s view controller. The app’s view controller provides a navigation
bar with the document provider’s name, a location switcher, and a Done button. Your extension must provide
the rest of the user interface. Figure 10-1 (page 66) shows the relative position of these UI elements.
Figure 10-1
Layout of the Document Picker View Controller
Life Cycle
1.
The host app presents a UIDocumentMenuViewController.
2.
The user selects your document provider from the list.
3.
Your UIDocumentPickerViewExtensionViewController subclass is instantiated.
2014-10-20 | Copyright В© 2014 Apple Inc. All Rights Reserved.
66
Document Provider
Document Picker View Controller Extension
4.
The prepareForPresentationInMode: method is called on your extension. The extension must present
an appropriate user interface for the given mode. The open and import modes often require a different
set of controls than the move or export modes. Your extension should therefore check the mode and
present the correct user interface.
The UIDocumentPickerExtensionViewController object acts as the root view controller for your
user interface; therefore, it is often convenient to make it a container controller. You can then create a
separate child view controllers for each mode, and your extension simply presents the appropriate child
view controller in your prepareForPresentationInMode: method.
5.
Your extension is presented within the host app.
6.
When the user makes their selection, your extension calls its dismissGrantingAccessToURL: method.
This method dismisses the user interface and passes the provided URL back to the host app, calling its
-[UIDocumentPickerViewControllerDelegate documentPicker:didPickDocumentAtURL:]
method.
7.
The UIDocumentPickerExtensionViewController instance is dismissed
Creating the Document Picker View Controller Extension
To create a new Document Picker View Controller extension in Xcode, add a new target to your iOS project
using the Document Picker Extension template. For detailed information, see Creating an Extension (page 14).
When creating the Document Picker View Controller extension, you have the option of creating the
corresponding File Provider extension at the same time. For more information, see Creating the File Provider
Extension (page 71).
The Document Picker Extension template adds a UIDocumentPickerExtensionViewController subclass
to your project. It also adds a storyboard for your document picker’s user interface and an info.plist file.
Setting the Required Property List Entries
For the system to automatically recognize and load your extension, its property list must contain the following
entries:
<key>NSExtension</key>
<dict>
<key>NSExtensionAttributes</key>
<dict>
<key>UIDocumentPickerModes</key>
<array>
<string>UIDocumentPickerModeImport</string>
2014-10-20 | Copyright В© 2014 Apple Inc. All Rights Reserved.
67
Document Provider
Document Picker View Controller Extension
<string>UIDocumentPickerModeOpen</string>
<string>UIDocumentPickerModeExportToService</string>
<string>UIDocumentPickerModeMoveToService</string>
</array>
<key>UIDocumentPickerSupportedFileTypes</key>
<array>
<string>public.content</string>
</array>
</dict>
<key>NSExtensionMainStoryboard</key>
<string>MainInterface</string>
<key>NSExtensionPointIdentifier</key>
<string>com.apple.fileprovider-ui</string>
</dict>
These entries are automatically set by the Document Picker Extension template. Edit them only if you plan to
change your extension’s default behavior. In particular, the UIDocumentPickerModes array contains entries
for all the modes that your document picker supports. If you don’t plan to implementing a File Provider
extension, remove the entries for UIDocumentPickerModeOpen and
UIDocumentPickerModeMoveToService.
Similarly, if you want to create a secure drop box—where users can export files to your extension but can’t
open, browse, or otherwise view them—remove all the modes except
UIDocumentPickerModeExportToService.
The UIDocumentPickerSupportedFileTypes array contains a list of uniform type identifiers that your
extension supports. Your extension appears as an option only when the type of files being transferred match
at least one of the UTIs listed in this array. By default, the public.content UTI matches all document types.
The NSExtensionMainStoryboard entry holds the name of your extension’s storyboard. The storyboard’s
initial view controller must be your UIDocumentPickerExtensionViewController subclass. You can edit
this key to change how your extension instantiates its view controller and how it creates its view hierarchy.
For example, if you replace the NSExtensionMainStoryboard entry with an NSExtensionPrincipalClass
key whose value is the name of your UIDocumentPickerExtensionViewController subclass, the extension
then loads the view controller directly. This approach allows you to load your user interface from a .xib file,
or to create your user interface programmatically.
2014-10-20 | Copyright В© 2014 Apple Inc. All Rights Reserved.
68
Document Provider
Document Picker View Controller Extension
Subclassing UIDocumentPickerExtensionViewController
The Document Picker Extension template provides a simple UIDocumentPickerExtensionViewController
subclass. Modify this subclass to manage your user interface and respond to user interactions, just as you would
for most view controllers. Still, there are a couple of UIDocumentPickerExtensionViewController specific
methods and properties worth noting.
в—Џ
prepareForPresentationInMode:
If necessary, override this method to set up any required resources. In particular, if your app uses different
view hierarchies for the different modes, set up the correct view hierarchy in your implementation.
в—Џ
dismissGrantingAccessToURL:
Call this method to dismiss the document picker view controller and grant access to the provided URL.
Each mode has its own requirements for the URL. For the complete details, see Dismissing the User
Interface (page 70).
в—Џ
documentPickerMode
This read-only property returns the document picker’s mode. It is valid only after the system calls your
prepareForPresentationInMode: method.
в—Џ
originalURL
This read-only property contains the original file’s URL when in export or move mode. Otherwise it contains
nil.
в—Џ
validTypes
This read-only property contains the array of valid UTIs when in import or open mode. Otherwise it contains
nil.
в—Џ
providerIdentifier
This read-only property contains the value returned by your File Provider extension’s providerIdentifier
method. If you do not provide a File Provider extension, it returns nil.
в—Џ
documentStorageURL
This read-only property contains the value returned by your File Provider extension’s documentStorageURL
method. If you do not provide a File Provider extension, it returns nil.
Creating the User Interface
The Document Picker View Controller extension’s main purpose is to let users select files for import or open
operations, and select destinations for export and move operations.
When importing or opening, your extension should create a list of all the available files and present this list to
the user. Users should only be able to select files that match one of the UTIs from your validTypes property.
If other files are included in the list, they must be clearly marked as unavailable. You may also want to provide
2014-10-20 | Copyright В© 2014 Apple Inc. All Rights Reserved.
69
Document Provider
Document Picker View Controller Extension
useful metadata about the files, including size, creation date, and whether it’s local or remote. You may even
want to create and display thumbnail images of the file. For more information about working with metadata
and thumbnails, see NSURL Class Reference .
Your document picker can present a flat list of all the available files or it can display a complex hierarchy with
directories and subdirectories. It all depends on your app’s needs. Regardless, after the user chooses a file,
dismiss the user interface and pass the URL back to the host app.
For export and move operations, let the user select the destination for their file. For simple extensions, you
might just provide a confirmation button. More complex extensions might let the user navigate through a
hierarchy of directories and even create his or her own subdirectories. After the user has chosen a destination,
dismiss the user interface.
You may also decide to handle logins, downloads, and similar tasks directly in the Document Picker View
Controller extension. There are only two places where you can directly interact with the user: in the containing
app and in the Document Picker View Controller extension. This means that all account management, error
notifications and progress updates must be handled by one of these two components.
If you want to handle these tasks in the containing app, you can use notifications and badges to notify the
user. The extensions can contact your server and request an appropriate push notification. This notification
then launches the containing app in the background, letting it run in response. The containing app can also
use local notifications and badges to alert the user to important events. However, the user must either select
one of the notifications or open the containing app to bring it to the foreground. Therefore, this approach
often requires active participation by the user, and users can miss, ignore, or even disable these notifications
and badges.
Often, you can provide a better user experience by handling these tasks in the Document Picker View Controller
extension directly. For more informations, see Providing a Great User Experience in an Uncertain World (page
75).
Dismissing the User Interface
When the user makes an appropriate selection, call dismissGrantingAccessToURL: and return a properly
formatted URL. The URL must meet all of the following conditions:
в—Џ
Import Document Picker mode. Provide a URL for the selected file. The URL must point to a local file that
the Document Picker View Controller extension can access. If the user selected a remote file, your extension
should download the file and save a local copy before calling dismissGrantingAccessToURL:.
Alternatively, if you are also providing a File Provider extension, you can just provide a URL that meets the
requirements for the open operation and let the file provider download it for you.
2014-10-20 | Copyright В© 2014 Apple Inc. All Rights Reserved.
70
Document Provider
File Provider Extension
в—Џ
Open Document Picker mode. Provide a URL for the selected file. If the file does not yet exist at this
location, your File Provider extension is called to create a placeholder or to produce the file as needed.
The URL must point to a location inside the directory hierarchy referred to by your documentStorageURL
property. This property simply calls your file provider’s documentStorageURL method and returns its
value.
в—Џ
Export Document Picker mode. Provide a URL for the selected destination. This URL needs to be accessible
only by the Document Picker View Controller extension. The system saves a copy of the document at this
URL and returns the URL to the host app to indicate success. The host app cannot access the document
at this URL.
в—Џ
Move Document Picker mode. Provide a URL for the selected destination. The URL needs to be contained
inside the hierarchy referred to by your documentStorageURL property. The system moves the document
to this URL and returns the URL to the host app. The host app can then access the document at the new
URL.
File Provider Extension
The File Provider extension grants access to files outside the host app’s sandbox with the open and move
actions. This extension (sometimes shortened here to file provider ) also allows the host app to download files
without presenting a document picker view controller. This feature lets the host app access previously opened
documents using secure URL bookmarks, even if those files are no longer stored on the device.
The File Provider extension uses placeholders to represent remote files. When the host app tries to access one
of these placeholders using a coordinated read, the extension begins downloading the file. After the download
is finished, the coordinated read proceeds. If the download fails, the error is propagated back to the file
coordinator.
This extension also receives notifications when a file has changed, letting you upload the changes back to your
remote server. It also receives notifications when the host app is no longer editing the document. At this point,
your extension can delete the file and replace it with a placeholder to free up storage space.
Creating the File Provider Extension
You can create the File Provider extension as part of the Document Picker Extension template. See Creating
the Document Picker Extension (page 67). When you include the File Provider extension, the template creates
a separate target for the extension. It also creates an NSFileProviderExtension subclass for this target
and an info.plist file with the required entries.
2014-10-20 | Copyright В© 2014 Apple Inc. All Rights Reserved.
71
Document Provider
File Provider Extension
Setting the Required Property List Entries
For the system to automatically recognize and load your extension, its property list must contain the following
entries:
<key>NSExtension</key>
<dict>
<key>NSExtensionAttributes</key>
<key>NSExtensionFileProviderDocumentGroup</key>
<string>com.apple.devpubs</string>
<key>NSExtensionPointIdentifier</key>
<string>com.apple.fileprovider-nonui</string>
<key>NSExtensionPrincipalClass</key>
<string>FileProvider</string>
</dict>
These entries are automatically created by the Document Picker Extension template. Modify them only if you
want to change the extension’s default settings.
The NSExtensionPrincipalClass key must hold the name of an NSFileProviderExtension subclass.
The system automatically instantiates this class whenever it needs to provide documents to the host app.
The NSExtensionFileProviderDocumentGroup entry must hold the identifier for a shared container that
can be accessed by both the Document Picker and the File Provider extension. This is used by the extension’s
documentStorageURL method. If you change your shared container’s identifier, be sure to update this setting
as well.
Setting up the Shared Container
By default, the extension template sets up a shared container that can be accessed by both the Document
Picker View Controller extension and the File Provider extension. Typically, though, you want to share this
container with the containing app as well.
Open the Xcode capabilities pane and turn on the App Groups capability for your containing app. Add the
identifier for the shared group. You can copy this identifier from the File Provider extension’s target.
This capability adds a com.apple.security.application-groups entry to the targets’ entitlements.
<key>com.apple.security.application-groups</key>
<array>
2014-10-20 | Copyright В© 2014 Apple Inc. All Rights Reserved.
72
Document Provider
File Provider Extension
<string>com.example.domain.MyFirstDocumentPickerExtension</string>
</array>
For more information about app groups, see Adding an App to an App Group in Entitlement Key Reference .
Subclass NSFileProviderExtension
The NSFileProviderExtension class provides a number of different methods—some that you must not
override, a few that you may override, and several that you must override. These methods are described below.
Do Not Overwrite These Class Methods
в—Џ
writePlaceholderAtURL:withMetadata:error:
Call this method whenever you need to create a placeholder. Use placeholderURLForURL: to generate
the correct URL based on the local file’s URL. The metadata that you provide depends largely on the needs
of your document picker’s user interface, but the common options include file size, filename, and thumbnails.
в—Џ
placeholderURLForURL:
This method maps file URLs into their corresponding placeholder URLs. You typically call this method to
generate the placeholder URL before calling writePlaceholderAtURL:withMetadata:error:
You May Overwrite These Methods
The default implementation of these methods should work for most extensions; however, you may want to
override them to fine-tune your extension’s behavior.
в—Џ
providerIdentifier
An identifier unique to this NSFileProviderExtension subclass. By default, this method returns the
bundle identifier of the containing app.
At least four separate processes may be trying to access the files provided by this extension at any one
time; therefore, you must use file coordinators for all read and write operations.
Both the Document Picker View Controller extension and the File Provider extension should pass the
provider identifier to their file coordinator’s setPurposeIdentifier: method. Sharing the purpose
identifier lets the extensions coordinate with each other and prevents possible deadlocks between them.
в—Џ
documentStorageURL
The root URL for all provided documents. The URL must be writeable by this extension, and it should
probably be in a container shared by both the UIDocumentPickerExtensionViewController and
the containing app.
2014-10-20 | Copyright В© 2014 Apple Inc. All Rights Reserved.
73
Document Provider
File Provider Extension
By default, this method returns a subdirectory of the app group container directory shared by the
UIDocumentPickerExtensionViewController and NSFileProviderExtension extensions. Specify
the shared container by using the NSExtensionFileProviderDocumentGroup key in the File Provider
extension’s info.plist file.
в—Џ
persistentIdentifierForItemAtURL:
Defines a static mapping between URLs and their persistent identifiers. By default, the identifier is simply
the path relative to URL returned by the documentStorageURL method. You can override the
persistentIdentifierForItemAtURL: method to provide a different mapping.
в—Џ
URLForItemWithPersistentIdentifier:
This is the inverse of persistentIdentifierForItemAtURL:. It provides a URL for the given identifier.
You Must Overwrite These Methods
You must override these methods, even if you provide only an empty method. Do not call super in your
implementations.
в—Џ
providePlaceholderAtURL:completionHandler:
The system calls this method when the file is accessed. Both the
providePlaceholderAtURL:completionHandler: and
startProvidingItemAtURL:completionHandler: methods may be triggered as the user interacts
with the document picker view controller or with a coordinated read.
Exactly which methods get triggered, and what their sequence is, depend on the intent of the access. For
example, a coordinated read using
theNSFileCoordinatorReadingImmediatelyAvailableMetadataOnly option just triggers the
creation of a placeholder. As a result, your extension should not create any dependencies between these
methods. They may be called any order.
в—Џ
startProvidingItemAtURL:completionHandler:
When this method is called, your extension should begin to download, create, or otherwise make a local
file ready for use. As soon as the file is available, call the provided completion handler. If any errors occur
during this process, pass the error to the completion handler. The system then passes the error back to
the original coordinated read.
в—Џ
itemChangedAtURL:
The system calls this method after the host app completes a coordinated write. You can override this
method to upload the changes back to your server or to otherwise respond to the change.
в—Џ
stopProvidingItemAtURL:
The system calls this method as soon as no processes are accessing the provided URL. You can override
this method to remove the document from the local file system, freeing up storage space.
2014-10-20 | Copyright В© 2014 Apple Inc. All Rights Reserved.
74
Document Provider
Providing a Great User Experience in an Uncertain World
Note: If your extension deletes files to free up space, it must replace them with placeholders by
calling placeholderURLForURL: and writePlaceholderAtURL:withMetadata:error:.
Providing a Great User Experience in an Uncertain World
Even with the simplest tasks, networking introduces uncertainty and unexpected problems. Suddenly you
have to deal with bad networks, slow connections, server errors, and even file-system errors. Your Document
Provider extension must carefully handle these complications.
Furthermore, your extension does not have complete control over its environment. It is launched to support
an unknown host app. Multiple processes can access the files you provide, and your extension must effectively
communicate its progress and any errors back to user in the host app.
Remember that your Document Provider extension has broad implications across the entire device, because
every app with a document picker view controller can access it. Therefore, you want to provide a solid, polished,
and reliable user experience.
File Coordination
Important: When using iCloud Drive in iOS 8.0, do not use file presenters or the UIDocument class to
access files. You can use file coordinators, Posix locks, Core Data, or SQLite.
Because multiple processes can access these files, use file coordination to perform all read and write operations.
This applies to the containing app, the Document Picker View Controller extension, the File Provider extension,
and the host app.
For the document picker and file provider, you must also set the file coordinator’s purpose identifier. Both
extensions provide a providerIdentifier method. You pass this method’s return value to the file
coordinator’s purposeIdentifier property before performing your coordinated read or write. By sharing a
purpose identifier, the two app extensions can coordinate with each other, preventing any possible deadlocks
between them.
File coordination plays a number of important roles. First and foremost, it guarantees that each process can
safely read and write to the provided files. However, because file coordination can also act as triggers for a
number of other actions, coordinated reads may cause the creation of placeholders or the downloading of
files from a remote server. Coordinated writes may likewise trigger an upload back to the remote server. Finally,
file coordinators permit the propagation of error messages across process boundaries.
2014-10-20 | Copyright В© 2014 Apple Inc. All Rights Reserved.
75
Document Provider
Providing a Great User Experience in an Uncertain World
Downloading Files
Even downloading small files can take an arbitrarily long amount of time. Things may work perfectly when
you test it on your office’s Wi-Fi connection—but anything might happen when a user opens your document
provider in the basement of a parking garage.
Because downloading is inherently unreliable, provide useful feedback wherever possible. For example, let
the user know which files are local and which are remote. Let them know when files are downloading, and
display the download’s progress. Finally, present meaningful error messages when problems occur.
Because you have access to the user interface only from the containing app and from the Document Picker
View Controller extension, you may want to provide a user interface to download files directly in the document
picker. Downloading files in the document picker has several advantages over downloading files in the file
provider.
в—Џ
You can display the file’s size, setting the user’s expectation for how long the download might take.
в—Џ
You can display the progress during the download.
в—Џ
You have full control over how errors are handled.
However, downloading data from the document picker presents its own set of problems. If the user dismisses
the document picker view controller, the system may terminate your app extension.
You can use an NSURLSession background transfer to download the files, but be sure to set the
NSURLSessionConfiguration object’s sharedContainerIdentifier property to a container shared by
the app extension and the containing app. This ensures that the results can be accessed by either the extension
or the containing app, as necessary.
Background transfers perform the download in a separate process, and the download continues even if your
document picker is terminated. If your document picker is not running when the download completes, the
system launches your containing app in the background and calls its
application:handleEventsForBackgroundURLSession:completionHandler: method.
Your containing app can use local notifications and badges to alert the user. If the user reopens the document
picker before the download completes, you can reconnect with your background transfers, presenting the
current status to the user, and handling the download’s completion directly.
Even if you download documents from within the Document Picker View Controller extension, you still need
to support downloading from the file provider’s startProvidingItemAtURL:completionHandler:
method. The host app may not always access your documents through a document picker view controller.
Any time the user opens a file, the host app can save a security-scoped bookmark for that file. This bookmark
lets the host app open that file directly. However, if the file provider has already deleted the local copy to free
up storage space, it must now download a new copy.
2014-10-20 | Copyright В© 2014 Apple Inc. All Rights Reserved.
76
Document Provider
Providing a Great User Experience in an Uncertain World
When downloading files in the File Provider extension, you do not have access to the user interface. If an error
occurs, you cannot display a message directly. Instead, you pass an NSError object to the
startProvidingItemAtURL:completionHandler: method's completion handler. The system then passes
this error back to the host app’s coordinated read.
There is also no way to report the download’s progress back to the user. The coordinated read that triggered
the download won’t run until after the download is complete. If not handled properly, the download can lead
to unexpected delays for the user.
This means that you may want to carefully balance the desire to conserve storage space with the desire to
avoid unnecessary downloads. If your extension is overeager about replacing files with placeholders in the File
Provider extension’s stopProvidingItemAtURL: method, your users may be surprised when an app suddenly
needs to redownload a file they were just working on. Also, if you know your user will want a given file, you
may want to preemptively download it to the shared container from your containing app. This makes the file
instantly available when the user asks for it.
Detecting and Communicating Conflicts
Whenever a user can modify a file on multiple devices, conflicts become inevitable. Therefore be prepared to
both detect and handle conflicts when they occur. For example, when your containing app or File Provider
extension downloads an updated version of a file, you must check and see if the updated file conflicts with
any local changes. Similarly, whenever you upload local changes back to the server, the server must be able
to detect and handle any conflicts it might find.
There is no way to directly alert the host app about these conflicts. Instead, your extension should contact
your server. You can either upload the local changes back to your server and handle the conflict there, or the
server can send a push notification to the containing app, letting the app handle the conflict.
Logging in and out
Think carefully about how your Document Picker View Controller extension is going to log users into and out
of your service.
You typically prompt the user to log in when your Document Picker View Controller extension is first displayed.
However, you also want to save your user’s credentials. As described earlier, the File Provider extension may
need to download or upload files without going through the document picker view controller. Therefore, it
also needs access to your user’s credentials.
Save the user credentials in a shared keychain using a Keychain Access group. In the Xcode capabilities pane,
turn on keychain sharing for the containing app and its extensions. Be sure to use the same group identifier
for all three targets. Then, when you create a shared keychain item, include the kSecAttrAccessGroup key
in the item’s attributes dictionary. The value of this key must be your shared identifier.
2014-10-20 | Copyright В© 2014 Apple Inc. All Rights Reserved.
77
Document Provider
Providing a Great User Experience in an Uncertain World
For more information on saving data to the keychain, see iOS Keychain Services Tasks in Keychain Services
Programming Guide .
When a user logs out, delete their login credentials and remove any placeholders to documents that they can
no longer access. You may also want to remove all the local copies of files stored on the server. In general,
users shouldn’t be able to access those files until they log back in.
2014-10-20 | Copyright В© 2014 Apple Inc. All Rights Reserved.
78
Custom Keyboard
A custom keyboard replaces the system keyboard for users who want capabilities such as a novel text input
method or the ability to enter text in a language not otherwise supported in iOS. The essential function of a
custom keyboard is simple: Respond to taps, gestures, or other input events and provide text, in the form of
an unattributed NSString object, at the text insertion point of the current text input object.
Before you begin: Make sure a custom, systemwide keyboard is indeed what you want to develop.
To provide a fully custom keyboard for just your app or to supplement the system keyboard with
custom keys in just your app, the iOS SDK provides other, better options. Read about custom input
views and input accessory views in Custom Views for Data Input in Text Programming Guide for iOS .
After a user chooses a custom keyboard, it becomes the keyboard for every app the user opens. For this reason,
a keyboard you create must, at minimum, provide certain base features. Most important, your keyboard must
allow the user to switch to another keyboard.
Understand User Expectations for Keyboards
To understand what users expect of your custom keyboard, study the system keyboard—it’s fast, responsive,
and capable. And it never interrupts the user with information or requests. If you provide features that require
user interaction, add them not to the keyboard but to your keyboard’s containing app.
Keyboard Features That iOS Users Expect
There is one feature that iOS users expect and that every custom keyboard must provide: a way to switch to
another keyboard. On the system keyboard, this affordance appears as a button called the globe key . iOS 8
provides specific API for your “next keyboard” control, described in Providing a Way to Switch to Another
Keyboard (page 89).
The system keyboard presents an appropriate key set or layout based on the UIKeyboardType trait of the
current text input object. With the insertion point in the To: field in Mail, for example, the system keyboard
period key changes: When you press and hold that key, you can pick from among a set of top-level domain
suffixes. Design your custom keyboard with keyboard type traits in mind.
2014-10-20 | Copyright В© 2014 Apple Inc. All Rights Reserved.
79
Custom Keyboard
Understand User Expectations for Keyboards
iOS users also expect autocapitalization: In a standard text field, the first letter of a sentence in a case-sensitive
language is automatically capitalized.
These features and others are listed next.
Appropriate layout and features based on keyboard type trait
Autocorrection and suggestion
Automatic capitalization
Automatic period upon double space
Caps lock support
Keycap artwork
Multistage input for ideographic languages
You can decide whether or not to implement such features; there is no dedicated API for any of the features
just listed, so providing them is a competitive advantage.
System Keyboard Features Unavailable to Custom Keyboards
Your custom keyboard does not have access to most of the general keyboard settings in the Settings app
(Settings > General > Keyboard), such as Auto-Capitalization and Enable Caps Lock. Nor does your keyboard
have access to the dictionary reset feature (Settings > General > Reset > Reset Keyboard Dictionary). To give
your users flexibility, create a standard settings bundle, as described in Implementing an iOS Settings Bundle
in Preferences and Settings Programming Guide . Your custom settings then appear in the Keyboard area in
Settings, associated with your keyboard.
There are certain text input objects that your custom keyboard is not eligible to type into. First is any secure
text input object. Such an object is defined by its secureTextEntry property being set to YES and is
distinguished by presenting typed characters as dots.
When a user taps in a secure text input object, the system temporarily replaces your custom keyboard with
the system keyboard. When the user then taps in a nonsecure text input object, your keyboard automatically
resumes.
Your custom keyboard is also ineligible to type into so-called phone pad objects, such as the phone number
fields in Contacts. These input objects are exclusively for strings built from a small set of alphanumeric characters
specified by telecommunications carriers and are identified by having one or another of the following two
keyboard type traits:
в—Џ
UIKeyboardTypePhonePad
в—Џ
UIKeyboardTypeNamePhonePad
2014-10-20 | Copyright В© 2014 Apple Inc. All Rights Reserved.
80
Custom Keyboard
Understand User Expectations for Keyboards
When a user taps in a phone pad object, the system temporarily replaces your keyboard with the appropriate,
standard system keyboard. When the user then taps in a different input object that requests a standard keyboard
via its type trait, your keyboard automatically resumes.
An app developer can elect to reject the use of all custom keyboards in their app. For example, the developer
of a banking app, or the developer of an app that must conform to the HIPAA privacy rule in the US, might do
this. Such an app employs the application:shouldAllowExtensionPointIdentifier: method from
the UIApplicationDelegate protocol (returning a value of NO), and thereby always uses the system keyboard.
Because a custom keyboard can draw only within the primary view of its UIInputViewController object,
it cannot select text. Text selection is under the control of the app that is using the keyboard. If that app
provides an editing menu interface (such as for Cut, Copy, and Paste), the keyboard has no access to it. A
custom keyboard cannot offer inline autocorrection controls near the insertion point.
Custom keyboards, like all app extensions in iOS 8.0, have no access to the device microphone, so dictation
input is not possible.
Finally, it is not possible to display key artwork above the top edge of a custom keyboard’s primary view, as
the system keyboard does on iPhone when you tap and hold a key in the top row.
2014-10-20 | Copyright В© 2014 Apple Inc. All Rights Reserved.
81
Custom Keyboard
API Quick Start for Custom Keyboards
API Quick Start for Custom Keyboards
This section gives you a quick tour of the APIs for building a keyboard. Figure 11-1 shows some of the important
objects in a running keyboard and where they come from in a typical development workflow.
Figure 11-1
Basic structure of a custom keyboard
The Custom Keyboard template (in the iOS “Application Extension” target template group) contains a subclass
of the UIInputViewController class, which serves as your keyboard’s primary view controller. The template
also includes a basic implementation of the required “next keyboard” button, which calls the
advanceToNextInputMode method of the UIInputViewController class. Add objects such as views,
controls, and gesture recognizers to the input view controller’s primary view (in its inputView property), as
suggested in Figure 11-1. As with other app extensions, there is no window in the target, and, therefore, no
root view controller per se.
The template’s Info.plist file comes preconfigured with the minimal values needed for a keyboard. See
the NSExtensionAttributes dictionary key in the keyboard target’s Info.plist file. The keys for configuring
a keyboard are described in Configuring the Info.plist file for a Custom Keyboard (page 92).
2014-10-20 | Copyright В© 2014 Apple Inc. All Rights Reserved.
82
Custom Keyboard
API Quick Start for Custom Keyboards
By default, a keyboard has no network access and cannot share a container with its containing app. To enable
these things, set the value of the RequestsOpenAccess Boolean key in the Info.plist file to YES. Doing
this expands the keyboard’s sandbox, as described in Establishing and Maintaining User Trust (page 85).
An input view controller conforms to various protocols for interacting with the content of a text input object:
в—Џ
To insert or delete text in response to touch events, employ the UIKeyInput protocol methods
insertText: and deleteBackward. Call these methods on the input view controller’s
textDocumentProxy property, which represents the current text input object and which conforms to
the UITextDocumentProxy protocol. For example:
[self.textDocumentProxy insertText:@"hello "]; // Inserts the string "hello
" at the insertion point
в—Џ
[self.textDocumentProxy deleteBackward];
to the left of the insertion point
// Deletes the character
[self.textDocumentProxy insertText:@"\n"];
a newline character at the insertion point
// In a text view, inserts
To get the data you need to determine how much text is appropriate to delete when you call the
deleteBackward method, obtain the textual context near the insertion point from the
documentContextBeforeInput property of the textDocumentProxy property, as follows:
NSString *precedingContext =
self.textDocumentProxy.documentContextBeforeInput;
You can then delete the appropriate text—for example, a single character, or everything back to a
whitespace character. To delete by semantic unit, such as by word, sentence, or paragraph, employ the
functions described in CFStringTokenizer Reference and refer to related documentation. Note that each
language has its own tokenization rules.
в—Џ
To control the insertion point position, such as to support text deletion in a forward direction, call the
adjustTextPositionByCharacterOffset: method of the UITextDocumentProxy protocol. For
example, to delete forward by one character, use code similar to this:
- (void) deleteForward {
[self.textDocumentProxy adjustTextPositionByCharacterOffset: 1];
[self.textDocumentProxy deleteBackward];
2014-10-20 | Copyright В© 2014 Apple Inc. All Rights Reserved.
83
Custom Keyboard
API Quick Start for Custom Keyboards
}
в—Џ
To respond to changes in the content of the active text object, or to respond to user-initiated changes in
the position of the insertion point, implement the methods of the UITextInputDelegate protocol.
To present a keyboard layout appropriate to the current text input object, respond to the object’s
UIKeyboardType property. For each trait you support, change the contents of your primary view accordingly.
To support more than one language in your custom keyboard, you have two options:
в—Џ
Create one keyboard per language, each as a separate target that you add to a common containing app
в—Џ
Create a single multilingual keyboard, dynamically switching its primary language as appropriate
To dynamically switch the primary language, use the primaryLanguage property of the
UIInputViewController class.
Depending on the number of languages you want to support and the user experience you want to provide,
pick the option that makes the most sense.
Every custom keyboard (independent of the value of its RequestsOpenAccess key) has access to a basic
autocorrection lexicon through the UILexicon class. Make use of this class, along with a lexicon of your own
design, to provide suggestions and autocorrections as users are entering text. The UILexicon object contains
words from various sources, including:
в—Џ
Unpaired first names and last names from the user’s Address Book database
в—Џ
Text shortcuts defined in the Settings > General > Keyboard > Shortcuts list
в—Џ
A common words dictionary
You can adjust the height of your custom keyboard’s primary view using Auto Layout. By default, a custom
keyboard is sized to match the system keyboard, according to screen size and device orientation. A custom
keyboard’s width is always set by the system to equal the current screen width. To adjust a custom keyboard’s
height, change its primary view's height constraint.
The following code lines show how you might define and add such a constraint:
CGFloat _expandedHeight = 500;
NSLayoutConstraint *_heightConstraint =
[NSLayoutConstraint constraintWithItem:
attribute:
relatedBy:
toItem:
self.view
NSLayoutAttributeHeight
NSLayoutRelationEqual
nil
2014-10-20 | Copyright В© 2014 Apple Inc. All Rights Reserved.
84
Custom Keyboard
Development Essentials for Custom Keyboards
attribute: NSLayoutAttributeNotAnAttribute
multiplier: 0.0
constant: _expandedHeight];
[self.view addConstraint: _heightConstraint];
Note: In iOS 8.0, you can adjust a custom keyboard’s height any time after its primary view initially
draws on screen.
Development Essentials for Custom Keyboards
There are two development essentials for every custom keyboard:
в—Џ
Trust. Your custom keyboard gives you access to what a user types, so trust between you and your user
is essential.
в—Џ
A “next keyboard” key. The affordance that lets a user switch to another keyboard is part of a keyboard’s
user interface; you must provide one in your keyboard.
Designing for User Trust
Your first consideration when creating a custom keyboard must be how you will establish and maintain user
trust. This trust hinges on your understanding of privacy best practices and knowing how to implement them.
Note: This section provides guidelines to help you create a custom keyboard that respects user
privacy, in terms of factors under your control and described here as responsibilities. To learn about
iOS program requirements, read App Store Review Guidelines , iOS Human Interface Guidelines , and
iOS Developer Program License Agreement , all linked to from Apple’s App Review Support page. Also
review Supporting User Privacy in App Programming Guide for iOS .
For keyboards, the following three areas are especially important for establishing and maintaining user trust:
Safety of keystroke data. Users want their keystrokes to go to the document or text field they’re typing into,
and not to be archived on a server or used for purposes that are not obvious to them.
Appropriate and minimized use of other user data. If your keyboard employs other user data, such as from
Location Services or the Address Book database, the burden is on you to explain and demonstrate the benefit
to your users.
2014-10-20 | Copyright В© 2014 Apple Inc. All Rights Reserved.
85
Custom Keyboard
Development Essentials for Custom Keyboards
Accuracy. Accuracy in converting input events to text is not a privacy issue per se but it impacts trust: With
every word typed, users see the accuracy of your code.
To design for trust, first consider whether to request open access. Although open access makes many things
possible for a custom keyboard, it also increases your responsibilities (see Table 11-1).
Table 11-1
Open
Standard and open access (network-enabled) keyboards—capabilities and privacy considerations
Capabilities and restrictions
Privacy considerations
access
Off
(default)
в—Џ
Keyboard can perform all the normal duties
expected of a basic keyboard
в—Џ
Access to a common words lexicon for autocorrect
and text suggestion
в—Џ
Access to the text shortcuts list in Settings
в—Џ
No shared container with containing app
в—Џ
No access to file system apart from keyboard’s own
container
в—Џ
No ability to participate directly or indirectly in
iCloud, Game Center, or In-App Purchase
в—Џ
2014-10-20 | Copyright В© 2014 Apple Inc. All Rights Reserved.
86
Users know that
keystrokes go only to
the app that is using the
keyboard
Custom Keyboard
Development Essentials for Custom Keyboards
Open
Capabilities and restrictions
Privacy considerations
access
On
в—Џ
All capabilities of a nonnetworked custom keyboard
в—Џ
Keyboard can access Location Services and Address
Book, with user permission
в—Џ
Keyboard and containing app can employ a shared
container
в—Џ
Keyboard can send keystrokes and other input
events for server-side processing
в—Џ
Containing app can provide editing interface for
keyboard’s custom autocorrect lexicon
в—Џ
Via containing app, keyboard can employ iCloud
to ensure settings and autocorrect lexicon are up
to date on all devices
в—Џ
Via containing app, keyboard can participate in
Game Center and In-App Purchase
в—Џ
If keyboard supports mobile device management
(MDM), it can work with managed apps
в—Џ
Users know that
keystrokes are available
to the keyboard
developer
в—Џ
You must adhere to
networked keyboard
guidelines in App Store
Review Guidelines and
iOS Developer Program
License Agreement ,
linked from Apple’s App
Review Support page.
If you build a keyboard without open access, the system ensures that keystrokes cannot be sent back to you
or anywhere else. Use a nonnetworked keyboard if your goal is to provide normal keyboard functionality.
Because of its restricted sandbox, a nonnetworked keyboard gives you a head start in meeting Apple’s data
privacy guidelines and in gaining user trust.
If you enable open access (as described Configuring the Info.plist file for a Custom Keyboard (page 92)), a
variety of possibilities open up but your responsibilities increase as well.
Note: To submit an open-access keyboard to the App Store, you must adhere to all pertinent
guidelines in the documents linked from Apple’s App Review Support page.
Each keyboard capability associated with open access carries responsibilities on your part as a developer, as
indicated in Table 11-2. In general, treat user data with the greatest possible respect and do not use it for any
purpose that is not obvious to the user.
2014-10-20 | Copyright В© 2014 Apple Inc. All Rights Reserved.
87
Custom Keyboard
Development Essentials for Custom Keyboards
Table 11-2
Open-access keyboard user benefits and developer responsibilities
Capability
Example user benefit
Developer responsibility
Shared container
with containing app
Management UI for keyboard’s
autocorrect lexicon
Consider the autocorrect lexicon to be
private user data. Do not send it to your
servers for any purpose that is not
obvious to the user.
Sending keystroke
data to your server
Enhanced touch-event
processing and input prediction
via developer’s computing
resources
Do not store received keystroke or voice
data except to provide services that are
obvious to the user.
Dynamic autocorrect
lexicon based on
network supplied
data
Names of people, places, and
current events in the news
added to autocorrection lexicon
Do not associate the user’s identity with
their use of trending or other
network-based information, for any
reason that is not obvious to the user.
Address Book access
Names, places, and phone
numbers relevant to the user
added to autocorrection lexicon
Do not use Address Book data for any
purpose that is not obvious to the user.
Location Services
access
Nearby place names added to
autocorrection lexicon
Do not use Location Services in the
background. Do not send location data
to your servers for any purpose that is not
obvious to the user.
An open-access keyboard and its containing app can send keystroke data to your server, which enables you
to apply your computing resources to such features as touch-event processing and input prediction. If you
employ this capability, do not store received keystroke or voice data beyond the time needed to provide text
back to the user or to provide features that you explain to the user. Refer to Table 11-2 for additional
responsibilities you have when using open-access-keyboard capabilities.
2014-10-20 | Copyright В© 2014 Apple Inc. All Rights Reserved.
88
Custom Keyboard
Development Essentials for Custom Keyboards
Providing a Way to Switch to Another Keyboard
The system keyboard’s globe key lets a user choose a keyboard when more than one keyboard is enabled. See
Figure 11-2.
Figure 11-2
The system keyboard’s globe key
Your custom keyboard must also provide a way to switch to another keyboard.
Note: To pass App Review, you must provide obvious UI in your custom keyboard to allow a user
to switch to another keyboard.
To ask the system to switch to another keyboard, call the advanceToNextInputMode method of the
UIInputViewController class. The system picks the appropriate “next” keyboard; there is no API to obtain
a list of enabled keyboards or for picking a particular keyboard to switch to.
The Xcode Custom Keyboard template includes the advanceToNextInputMode method as the action of its
Next Keyboard button. For best user experience, place your next-keyboard control close to the same screen
location as the system keyboard’s globe key.
2014-10-20 | Copyright В© 2014 Apple Inc. All Rights Reserved.
89
Custom Keyboard
Getting Started with Custom Keyboard Development
Getting Started with Custom Keyboard Development
In this section you learn how to create a custom keyboard, configure it according to your goals, and run it in
iOS Simulator or on a device. You’ll also learn about some UI factors to bear in mind when replacing the system
keyboard.
Using the Xcode Custom Keyboard Template
The steps to create a keyboard and its containing app differ slightly from those for other app extensions. This
section walks you through getting a basic keyboard up and running.
To create a custom keyboard in a containing app
1.
In Xcode, choose File > New > Project, and in the iOS Application template group choose the Single View
Application template.
2.
Click Next.
3.
Name the project (for example, “ContainingAppForKeyboard”), then click Next.
4.
Navigate to the location you want to save the project in, then click Create.
At this point, you have an empty app for your project to serve the simple role, for now, of containing the
keyboard target. Before you submit a containing app to the App Store, it must perform some useful
function. See App Store Review Guidelines , linked from Apple’s App Review Support page.
5.
Choose File > New > Target, and in the iOS template group choose the Custom Keyboard template, then
click Next.
6.
Name the target as you’d like the keyboard’s name to appear in the iOS user interface (for example, Custom
Keyboard).
7.
Ensure that the Project and the “Embed in Application” pop-up menus display the name of the containing
app, then click Finish.
If you are prompted to activate the scheme for the new keyboard target, click Activate.
You can now optionally customize the keyboard group name as it appears in the Purchased Keyboards list in
Settings, as described next.
To customize the keyboard group name
1.
In the Xcode project navigator, choose the containing app’s Info.plist file, located in the app’s
Supporting Files folder. The property list editor opens, showing the contents of the file.
2.
Hover the cursor over the “Bundle name” row, then click the “+” button that appears. This creates a new,
empty property list row and selects its Key field.
2014-10-20 | Copyright В© 2014 Apple Inc. All Rights Reserved.
90
Custom Keyboard
Getting Started with Custom Keyboard Development
3.
Start typing Bundle display name and when the name autocompletes, press Return.
4.
Double-click in the Value field in the same row to obtain a cursor there, then enter the keyboard group
name you want.
5.
Choose File > Save to save your changes to property list file.
Table 11-3summarizes the UI strings for your custom keyboard that you can configure in the Info.plist
files for the keyboard and its containing app.
Table 11-3
User interface strings specified in target and containing app Info.plist files
iOS user interface text
Info.plist key
в—Џ
Keyboard group name in Purchased Keyboards
list in Settings
Bundle display name in containing app’s
Info.plist file
в—Џ
Keyboard name in Settings
в—Џ
Keyboard name in globe key menu
Bundle display name in custom keyboard target’s
Info.plist file
Now you can run the template-based keyboard in iOS Simulator, or on a device, to explore its behavior and
capabilities.
To run the custom keyboard and attach the Xcode debugger
1.
In Xcode, set a breakpoint in your view controller implementation.
For example, set a breakpoint in the viewDidLoad method.
2.
Use the Xcode toolbar to ensure that the active scheme popup menu specifies the keyboard’s scheme
and an iOS Simulator or attached device.
3.
Choose Product > Run, or click the Play button at the upper left of the Xcode project window.
Xcode prompts you to select a host app. Select an app with a readily-available text field, such as Contacts
or Safari.
4.
Click Run.
Xcode runs your specified host app. If this is your first time deploying your keyboard extension to iOS
Simulator or a device, use Settings to add and enable the keyboard, as follows:
a.
Go to Settings > General > Keyboard > Keyboards.
b.
Tap Add New Keyboard.
c.
In the Purchased Keyboards group, tap the name of your new keyboard. A modal view appears with
a switch to enable your keyboard.
2014-10-20 | Copyright В© 2014 Apple Inc. All Rights Reserved.
91
Custom Keyboard
Getting Started with Custom Keyboard Development
5.
d.
Tap the switch to enable your keyboard. A warning alert appears.
e.
In the warning alert, tap Add Keyboard to finish enabling your new keyboard. Then tap Done.
In iOS Simulator or on the attached device, invoke your custom keyboard.
To do this, tap to place the insertion point in a text field—in any app, or in the Spotlight field in
Springboard—to display the system keyboard. Then press and hold the globe key and choose your custom
keyboard.
Now you can explore your custom keyboard’s behavior, but the debugger is not yet attached. The
bare-bones keyboard built from the template has only one behavior, indicated by its Next Keyboard button:
allowing you to switch back to the previously used keyboard.
Before continuing, ensure that your custom keyboard is active.
6.
Dismiss your keyboard (so that in step 8 you can hit the viewDidLoad breakpoint by again invoking the
keyboard).
7.
In Xcode, choose Debug > Attach to Process > By Process Identifier (PID) or Name.
In the sheet that appears, enter the name of your keyboard extension (including spaces) as you specified
it when creating it. By default, this is the name for the app extension’s group in the project navigator.
8.
Click Attach.
Xcode indicates in the Debug navigator that it is waiting to attach.
9.
In any app in iOS Simulator or the device (depending on which you are using), invoke the keyboard by
tapping in a text field.
As your keyboard’s main view begins to load, the Xcode debugger attaches to your keyboard and Xcode
hits your breakpoint.
Configuring the Info.plist file for a Custom Keyboard
The information property list (Info.plist file) keys that are specific to a custom keyboard let you statically
declare the salient characteristics of your keyboard, including its primary language and whether it requires
open access.
To examine these keys, open an Xcode project to which you’ve added a Custom Keyboard target template.
Now select the Info.plist file in the Project navigator (the Info.plist file is in the Supporting Files folder
for the keyboard target).
In source text form, the keys for a custom keyboard are as follows:
<key>NSExtension</key>
<dict>
2014-10-20 | Copyright В© 2014 Apple Inc. All Rights Reserved.
92
Custom Keyboard
Getting Started with Custom Keyboard Development
<key>NSExtensionAttributes</key>
<dict>
<key>IsASCIICapable</key>
<false/>
<key>PrefersRightToLeft</key>
<false/>
<key>PrimaryLanguage</key>
<string>en-US</string>
<key>RequestsOpenAccess</key>
<false/>
</dict>
<key>NSExtensionPointIdentifier</key>
<string>com.apple.keyboard-service</string>
<key>NSExtensionPrincipalClass</key>
<string>KeyboardViewController</string>
</dict>
Each of these keys is explained in the App Extension Keys in Information Property List Key Reference chapter
in Information Property List Key Reference . Use the keys in the NSExtensionAttributes dictionary to express
the characteristics and needs of your custom keyboard, as follows:
IsASCIICapable—This Boolean value, NO by default, expresses whether a custom keyboard can insert ASCII
strings into a document. Set this value to YES if you provide a keyboard type specifically for the
UIKeyboardTypeASCIICapable keyboard type trait.
PrefersRightToLeft—This Boolean value, also NO by default, expresses whether a custom keyboard is for
a right-to-left language. Set this value to YES if your keyboard’s primary language is right-to-left.
PrimaryLanguage—This string value, en-US (English for the US) by default, expresses the primary language
for your keyboard using the pattern <language>-<REGION>. You can find a list of strings corresponding to
languages and regions at http://www.opensource.apple.com/source/CF/CF-476.14/CFLocaleIdentifier.c.
RequestsOpenAccess—This Boolean value, NO by default, expresses whether a custom keyboard wants to
enlarge its sandbox beyond that needed for a basic keyboard. If you request open access by setting this key’s
value to YES, your keyboard gains the following capabilities, each with a concomitant responsibility in terms
of user trust:
в—Џ
Access to Location Services, the Address Book database, and the Camera Roll, each requiring user permission
on first access
2014-10-20 | Copyright В© 2014 Apple Inc. All Rights Reserved.
93
Custom Keyboard
Getting Started with Custom Keyboard Development
в—Џ
Option to use a shared container with the keyboard’s containing app, which enables features such as
providing a custom lexicon management UI in the containing app
в—Џ
Ability to send keystrokes and other input events over the network for server-side processing
в—Џ
Ability to use the UIPasteboard class
в—Џ
Ability to play audio, including keyboard clicks using the playInputClick method
в—Џ
Access to iCloud, which you can use, for example, to ensure that keyboard settings and your custom
autocorrect lexicon are up to date on all devices owned by the user
в—Џ
Access to Game Center and In-App Purchase, via the containing app
в—Џ
Ability to work with managed apps, if you design your keyboard to support mobile device management
(MDM)
When considering whether to set the RequestsOpenAccess key’s value to YES, be sure to read Designing
for User Trust (page 85), which describes your responsibilities for respecting and protecting user data.
2014-10-20 | Copyright В© 2014 Apple Inc. All Rights Reserved.
94
Document Revision History
This table describes the changes to App Extension Programming Guide .
Date
Notes
2014-10-20
Expanded the discussion in the "Specifying When a Widget Should Appear”
section.
Improved the list of capabilities enabled by the RequestsOpenAccess
Info.plist key, in Configuring the Info.plist file for a Custom Keyboard (page
92).
Added a new section: Ensure Your iOS App Extension Works on All
Devices (page 20).
2014-10-16
In the API Quick Start for Custom Keyboards (page 82) section, added a
code snippet for deleting forward and added a link to CFStringTokenizer
Reference .
Expanded the discussion in Specifying When a Widget Should
Appear (page 39).
2014-09-17
New document that describes how to develop an app extension, which
is a bundle that provides functionality to other apps in a specific context.
2014-10-20 | Copyright В© 2014 Apple Inc. All Rights Reserved.
95
Apple Inc.
Copyright В© 2014 Apple Inc.
All rights reserved.
No part of this publication may be reproduced,
stored in a retrieval system, or transmitted, in any
form or by any means, mechanical, electronic,
photocopying, recording, or otherwise, without
prior written permission of Apple Inc., with the
following exceptions: Any person is hereby
authorized to store documentation on a single
computer or device for personal use only and to
print copies of documentation for personal use
provided that the documentation contains
Apple’s copyright notice.
No licenses, express or implied, are granted with
respect to any of the technology described in this
document. Apple retains all intellectual property
rights associated with the technology described
in this document. This document is intended to
assist application developers to develop
applications only for Apple-branded products.
Apple Inc.
1 Infinite Loop
Cupertino, CA 95014
408-996-1010
Apple, the Apple logo, Cocoa, Cocoa Touch,
Finder, Instruments, iPad, iPhone, iPod, iPod
touch, Keychain, Mac, Objective-C, Safari, Sand,
Spotlight, and Xcode are trademarks of Apple
Inc., registered in the U.S. and other countries.
AirDrop and Retina are trademarks of Apple Inc.
iCloud is a service mark of Apple Inc., registered
in the U.S. and other countries.
App Store and Mac App Store are service marks
of Apple Inc.
IOS is a trademark or registered trademark of
Cisco in the U.S. and other countries and is used
under license.
Java is a registered trademark of Oracle and/or
its affiliates.
APPLE MAKES NO WARRANTY OR REPRESENTATION,
EITHER EXPRESS OR IMPLIED, WITH RESPECT TO THIS
DOCUMENT, ITS QUALITY, ACCURACY,
MERCHANTABILITY, OR FITNESS FOR A PARTICULAR
PURPOSE. AS A RESULT, THIS DOCUMENT IS PROVIDED
“AS IS,” AND YOU, THE READER, ARE ASSUMING THE
ENTIRE RISK AS TO ITS QUALITY AND ACCURACY.
IN NO EVENT WILL APPLE BE LIABLE FOR DIRECT,
INDIRECT, SPECIAL, INCIDENTAL, OR CONSEQUENTIAL
DAMAGES RESULTING FROM ANY DEFECT, ERROR OR
INACCURACY IN THIS DOCUMENT, even if advised of
the possibility of such damages.
Some jurisdictions do not allow the exclusion of
implied warranties or liability, so the above exclusion
may not apply to you.
© Copyright 2026 Paperzz