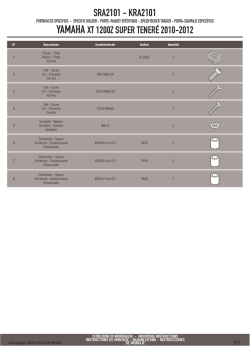
1. CODES AND DIMENSIONS
1. CODICI E DIMENSIONI
Stylos Line
Code - Codice:
5E1110423
Code - Codice:
5E1110123
Code - Codice:
5E1210423
Code - Codice:
5E1210123
Code - Codice:
5E00000435
A= 43.4 mm
B= 22.6 mm
C= 125.4 mm
A= 44.6 mm
B= 36 mm
C= 153.4 mm
A= 44.6 mm
B= 36 mm
C= 153.4 mm
A= 34.8 mm
B= 8.5 mm
C= 115.4 mm
www.iseozero1.com
>> DOWNLOAD AREA
C
SCARICARE - DOWNLOAD - DOWNLOADEN - TÉLÉCHARGER - DESCARGAR
IT CONFIGURAZIONE DELL’IMPIANTO; MANUALE D’USO SIMPLY PAD / SIMPLY SEQUENCE...
GB SYSTEM’S CONFIGURATION; USER MANUAL SIMPLY PAD / SIMPLY SEQUENCE...
A
B
D KONFIGURATION DER ANLAGE; BENUTZERANLEITUNG SIMPLY PAD / SIMPLY SEQUENCE...
Dimensions - Dimensioni:
F CONFIGURATION DE L’INSTALLATION; MANUEL D’UTILISATION SIMPLY PAD / SIMPLY SEQUENCE...
A= 43.4 mm
B= 22.6 mm
C= 125.4 mm
E SISTEMA DE CONFIGURACIÓN; MANUAL DE USUARIO SIMPLY PAD / SIMPLY SEQUENCE...
2.1 FIRST OPERATIONS
2.1 PRIME OPERAZIONI
2. FIRST OPERATIONS
2. PRIME OPERAZIONI
SIDE VIEW - VISTA LATERALE
INSERT AND TILT - INSERISCI E INCLINA
1
3
5
7
9
E
1
2
3
5
4
6
8
0
7
9
E
1
2
2
3
5
4
6
8
0
1
7
9
3
2
4
6
8
0
E
1
3
TILT - INCLINA
INSERT - INSERISCI
3. ELECTRICAL CONNECTIONS
3. CONNESSIONI ELETTRONICHE
LOCKBUS
(Communication Channel)
Power supply: 8 ÷30 VDC 0.5A
Minimum/maximum cross-section
of the cables is: 0.20÷1.5 mm²
(24÷15AWG).
BUS
ADDRESS
POSITIVE (+) Power Supply
NEGATIVE (-) GND
Back side view
Circuit board
La sezione minima/massima dei
cavi di collegamento è :
0.20÷1.5 mm² (24÷15AWG).
INDIRIZZO
BUS
JP 1
ADDRESS 1 =
POSITIVO (+) Alimentazione
NEGATIVO (-) GND
Lato posteriore
vista circuito
JP 1
INDIRIZZO 1 =
J2. J2. J2. J2.
1 2 3 4
ADDRESS 2 =
ADDRESS 3 =
ADDRESS 6 =
INDIRIZZO 3 =
J2. J2. J2. J2.
1 2 3 4
S1
JP 1
J2. J2. J2. J2.
1 2 3 4
INDIRIZZO 4 =
1.2.3
JP2
S1
INDIRIZZO 5 =
INDIRIZZO 6 =
ADDRESS 7 =
INDIRIZZO 7 =
ADDRESS 8 =
INDIRIZZO 8 =
JP 1
}
}
BUS
ADDRESS
INDIRIZZO 2 =
1.2.3
JP2
JP 1
ADDRESS 4 =
ADDRESS 5 =
LOCKBUS
(Canale di Comunicazione)
Alimentazione: 8 ÷30 VDC 0.5A
INDIRIZZO
BUS
1.2.3
JP2
J2. J2. J2. J2.
1 2 3 4
S1
JP 1
1.2.3
JP2
S1
4. INSTALLATION ON A METAL PROFILE
4. INSTALLAZIONE SU UN PROFILO METALLICO
DRILLING TEMPLATE (for installations without the spacer, see sections 4 and 4.2)
DIMA DI FORATURA (per installazioni senza il distanziale, vedi sezioni 4 a 4.2)
Ø 3.2 mm
(max)
BOTTOM - BASSO
26
Ø 26 mm
3.9 x 19 mm
TOP - ALTO
83
Ø 3.2 mm
(max)
4.2 INSTALLATION ON A WALL
4.2 INSTALLAZIONE SU UNA PARETE
4.1 INSTALLATION WITH THE SPACER ON A METAL PROFILE
4.1 INSTALLAZIONE CON IL DISTANZIALE SU UN PROFILO METALLICO
3.9 x 19 mm
3.9 x 30 mm
Ø 5 mm
83
83
Ø 3.2 mm
(max)
26
Ø 26 mm
Ø 3.2 mm
(max)
Ø 5 mm
5 x 25 mm
4.4 INSTALLATION (WITHOUT THE SPACER)
4.4 INSTALLAZIONE (SENZA IL DISTANZIALE)
4.3 INSTALLATION WITH A SPACER ON A WALL
4.3 INSTALLAZIONE CON IL DISTANZIALE SU UNA PARETE
Ø 5 mm
Take care not to damage
the cables while installing
the device.
3.9 x 30 mm
83
Check the connections on
section 3 before powering
up the device.
Installando il dispositivo
prestare attenzione a non
danneggiare i cavi.
Ø 5 mm
5 x 25 mm
4.5 INSTALLATION WITH THE SPACER
4.5 INSTALLAZIONE CON IL DISTANZIALE
4.6 INSTALLATION WITH THE FRAME MOUNTING (series BTicino Living International)
4.6 INSTALLAZIONE CON LA PLACCA AD INCASSO (serie BTicino Living International)
A
Check the connections on
section 3 before powering
up the device.
Installando il dispositivo
prestare attenzione a non
danneggiare i cavi.
Prima di alimentare il
dispositivo verificare le
connessioni descritte nella
sezione 3.
Remove the area A or B to
pass the cables for
connecting the Stylos
through the spacer.
Rimuovere l'area A o B per
far passare i cavi di
collegamento dello Stylos
attraverso il distanziale.
B
Check the connections on
section 3 before powering
up the device.
Installando il dispositivo
prestare attenzione a non
danneggiare i cavi.
Prima di alimentare il
dispositivo verificare le
connessioni descritte nella
sezione 3.
Stylos Line
TOP - ALTO
DRILLING TEMPLATE (for installations with the spacer, see sections 4.1 and 4.3)
DIMA DI FORATURA (per installazioni con il distanziale, vedi sezioni 4.1 a 4.3)
BOTTOM - BASSO
Take care not to damage
the cables while installing
the device.
®
w w w. i s e o. c o m
ELECTRONIC SUPPORT SERVICE
www.iseozero1.com
Non contractual document. Subject to change.
Documento non contrattuale. Con riserva di modifica.
Cod.: 60000STY0SI00 Manuale installazione Stylos Off Line.
(Eng/It) Rev. 000 data 31/01/2014
Take care not to damage
the cables while installing
the device.
Prima di alimentare il
dispositivo verificare le
connessioni descritte nella
sezione 3.
© Copyright 2026 Paperzz