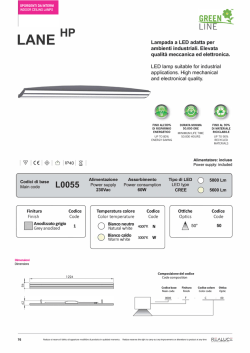
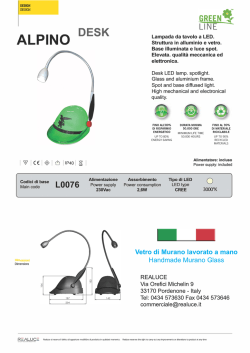
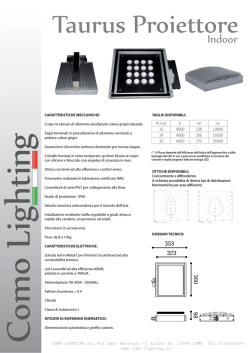
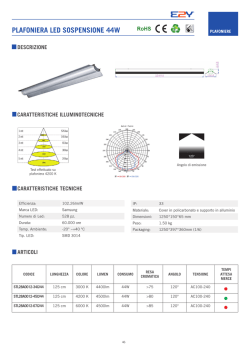
te LED-Tec
h
k
Mo
r ns
ni
de
von G E V
GEV GmbH
Heidehofweg 16
25499 Tangstedt
Germany
www.gev.de
[email protected]
Hotline: +49 (0)180/59 58 555
Typ: LBO 021679
Max. 14 Ct./Min aus dem deutschen Festnetz.
Mobil max. 42 Ct./Min.
International calls may vary.
11/2014 UW
www.gev.de
A
4
2
A
1
5
6
2
1
B
2
N
L
N L
3C
3
D
ca. 8 m
120°
2
3
Arbeitsweise
Die LED-Außenleuchte mit Bewegungsmelder hat
eingebaute nicht auswechselbare LED-Lampen.
Diese
Leuchte
hat
einen
eingebauten
Bewegungsmelder.
Der
Bewegungsmelder
arbeitet nach dem Prinzip der Passiv-InfrarotTechnik. Über einen PIR-Sensor nimmt der
Bewegungsmelder in seinem Erfassungsbereich
sich bewegende Wärmequellen wahr und
schaltet die Leuchte automatisch ein. Ruhende
Wärmequellen schalten die Leuchte nicht ein.
Der einstellbare Dämmerungsschalter sorgt dafür,
dass der Bewegungsmelder wahlweise bei Tag
und Nacht oder nur bei Dunkelheit arbeitet. Bei
erkannter Bewegung schaltet er die Leuchte je
nach Einstellung zwischen ca. 7 Sek. an und ca.
max. 5 Min. nach der letzten erkannten Bewegung
wieder aus.
Inbetriebnahme/ Sensoreinstellungen (Abb. C)
Um Zugang zu den Drehreglern für die
Sensoreinstellung zu erhalten, schieben Sie die
Haube des Bewegungsmelders in Pfeilrichtung
nach unten.
Mit den Drehreglern können Sie mit Hilfe eines
geeigneten Werkzeugs folgende stufenlose
Einstellungen vornehmen (linker Anschlag jeweils
minimaler Wert, rechter Anschlag maximaler Wert):
LUX Dämmerungsschalter ca. 5 - 2.000 Lux. Der
Regler dient der Einstellung zwischen Tageslicht
und Dunkelheit.
TIME Zeiteinstellung für die Einschaltdauer nach
der letzten erkannten Bewegung, ca. 7 Sek. - 5
Min.
Sicherheitshinweise
Die Montage darf nur von einem
Fachmann, unter Berücksichtigung der
landesüblichen Installationsvorschriften
ausgeführt werden. Es darf nur im
spannungsfreien Zustand gearbeitet werden. Dazu
unbedingt die Stromkreissicherung abschalten.
Überprüfen Sie, ob die Anschlussleitung
spannungsfrei ist!
Bei Schäden, die durch Nichtbeachtung dieser
Bedienungsanleitung
verursacht
werden,
erlischt der Garantieanspruch! Für Folgeschäden
übernehmen wir keine Haftung!
Bei Sach- oder Personenschäden, die durch
unsachgemäße Handhabung oder Nichtbeachtung
der Sicherheitshinweise verursacht werden,
übernehmen wir keine Haftung. In solchen Fällen
erlischt jeder Garantieanspruch.
Aus Sicherheits- und Zulassungsgründen ist das
eigenmächtige Umbauen und/oder Verändern des
Gerätes nicht gestattet.
Recycling-Hinweise
Dieses Gerät darf nicht mit dem unsortierten
Hausmüll entsorgt werden. Besitzer von
Altgeräten sind gesetzlich dazu verpflichtet,
dieses Gerät fachgerecht zu entsorgen.
Informationen erhalten Sie von Ihrer Stadt- bzw.
Gemeindeverwaltung.
DE
Störung
Ursache
Bewegungsmelder
schaltet zu spät
•EinstellungErfassung
•Bewegungfrontal
Maximale Reichweite
wird nicht erreicht
•Bewegungsmelderzuniedrig
• Höhermontieren
angebracht
•TemperaturdifferenzvonUmgebung
zur Wärmequelle ist zu gering
Lampen leuchten
ständig oder
unerwünschtes Schalten
der Leuchte
•StändigeWärmebewegung:
In den Erfassungsbereich fallen
Bereiche, die nicht erfasst werden
sollen, wie z. B. Gehwege, Straßen,
Bäume u.s.w.
Unerwartete Veränderung von
Wärmequellen durch Sturm,
Regen oder Ventilatoren.
Beeinflussung durch Sonneneinstrahlung direkt/indirekt.
Keine Reaktion bei
Fahrzeugen
•Fahrzeugnichtwarmgelaufen
•Motoriststarkisoliert
Technische Daten
Netzanschluss
Leistungsaufnahme LED
Leistungsaufnahme Bereitschaft
Lichtstrom
Lichtfarbe
Farbwiedergabeindex (Ra)
Erfassungsbereich
Reichweite
Zeiteinstellung
Dämmerungsschalter
Schutzart
Schutzklasse
Empfohlene Montagehöhe
Abmessungen
Abhilfe
230 V ~, 50 Hz
max. 6 W
ca. 0,45 W
ca. 510 lm
ca. 3500 K, warm-weiß
CRI > 80
120°
ca. 8 m frontal/4 m seitlich
ca. 7 Sek. - 5 Min. stufenlos einstellbar
ca. 5 - 2000 Lux stufenlos einstellbar
IP 44
II
1,8 m
B 250 x H 156 x T 73 mm
Montageort
Die sicherste Bewegungserfassung wird erzielt,
wenn man sich seitlich zum Bewegungsmelder
bewegt. Daher sollte ein Bewegungsmelder immer
so montiert werden das man sich nicht direkt auf
ihn zu bewegt.
Technische und optische Änderungen ohne Ankündigung vorbehalten.
4
5
FR
Fehleranalyse – Praktische Tipps
IT
Montieren Sie die LED-Außenleuchte mit
Bewegungsmelder LBO 21679 gemäß Abb. A1
bis A3.
Wählen Sie die Position der Leuchte aus und
bohren Sie die zwei Löcher in den Untergrund auf
dem die Leuchte montiert werden soll. Schließen
Sie die Netzanschlussleitung an die Klemmleiste
in der Leuchte an (Abb. B). Das LED Panel in der
Leuchte (Abb. A4) kann horizontal um wenige
Grad gekippt werden, um die für Sie beste
Ausleuchtung zu erzielen.
Deckel wieder aufsetzen und die Schrauben
festziehen (Abb. A5). Schalten Sie die Sicherung
wieder ein.
PL
Installation
Mit dem Kauf dieses Artikels haben Sie
sich für ein qualitativ hochwertiges GEV
Produkt entschieden. Bitte lesen Sie diese
Bedienungsanleitung sorgfältig durch, um ein
einwandfreies Funktionieren zu gewährleisten.
Bewahren Sie diese Anleitung sorgfältig auf, um
gegebenenfalls später nachlesen zu können.
GB
LED-Außenleuchte mit Bewegungsmelder LBO 21679
Operation
The outdoor LED light with motion detector
has in-built, non-replaceable LED lamps. This
light features an in-built motion detector which
functions using passive infrared technology
(PIR). If the motion detector’s PIR sensor detects
a moving heat source in its field of detection, it
automatically switches the light on. Static heat
sources, however, do not switch on the light. The
adjustable twilight switch allows you to select
whether the motion detector operates during
the day and night or only when it is dark. When
movement is detected, the motion detector
switchesthelightonandthenswitchesitoffagain
between approx. 5 seconds and a maximum of
4 minutes after the last movement is detected,
depending on the setting.
Activation/sensor settings (Fig. C)
To access the rotary controllers used for the
sensor settings, slide the motion detector cover
downwards in the direction of the arrow.
You can use the rotary controllers to carry out the
following infinitely variable settings using a suitable
tool (fully counterclockwise = minimum value, fully
clockwise = maximum value):
LUX Twilight switch approx. 5 to 2,000 lux.
The controller is used for adjusting the daylight/
darkness settings.
TIME Time setting for the ON period after the last
movement is detected, approx. 7 sec. to 5 min.
Safety instructions
Recycling instructions
This device must be installed by a
technician, in accordance with the
applicable regulations. The electrical
power supply and the circuit protection
mustbeswitchedoffduringtheentireinstallation
process. Please check that the connection
cable is disconnected!
Under no circumstances does the warranty cover
damage resulting from failure to observe these
instructions. Nor do we accept liability for any
indirect damage.
Similarly, we can accept no liability for any material
damage or bodily injury caused by mishandling
or failure to observe the safety instructions. No
warranty claim may be made in these cases.
In addition, for safety and compliance reasons,
you are not authorised to dismantle or alter the
device in any way.
This device may not be disposed of with
unsorted household waste. Owners of old
devices are required by law to dispose of
this device correctly. Contact your town
council for further information.
DE
Troubleshooting – practical advice
Cause
Motion detector comes
on too late
• Fieldofdetectionincorrectlyset
• Head-onmovement
Maximum range is not
reached
• Motiondetectormountedtoolow
• Differencebetweenambient
temperature and heat sources is too
low
Light stays on continually
or switches on for no
reason
•Constantmovementofheatsources:
the field of detection covers areas
that do not require monitoring, such as
pathways, roads and trees.
Unexpected change in heat sources
due to wind, rain or fans.
Influence of direct/indirect sunlight
No reaction to vehicles
• Vehiclenotwarmedup
• Engineareahighlyinsulated
Technicals data
Mains connection
Power consumption LED
Power consumption (in standby mode)
Luminous flux
Light colour
Colour rendering index (Ra)
Field of detection
Range
Time setting
Twilight switch
Protection type
Protection class
Recommended installation height
Dimensions
Solution
• Installhigher
230 V ~, 50 Hz
max. 6 W
approx. 0.45 W
approx. 510 lm
approx. 3,500 K, warm white
CRI > 80
120°
approx. 8 m for head-on/4 m for side
approx. 7 sec. to 5 min., infinitely variable
approx. 5 to 2,000 lux, infinitely variable
IP 44
II
1.8 m
W 250 x H 156 x D 73 mm
Mounting position
Motion detection is maximised when moving at
an angle to the motion detector. Therefore, the
motion detector should always be installed in a
position that ensures that objects/people do not
move directly towards the device.
Technical and design features may be subject to change.
6
FR
Fault
7
IT
Install the outdoor LED light with motion detector,
LBO 21679, according to Figs. A1 to A3.
Select a mounting position and drill 2 holes in
the surface on which you wish to install the LED
light. Connect the mains connection cable to the
lustre terminal in the light (Fig. B). The LED panel
(Fig. A 4) in the LED light can be tilted horizontally
by a few degrees to achieve optimum illumination.
Replace the cover and tighten the screws
(Fig. A5). Switch the fuse back on.
PL
Installation
By purchasing this item, you have chosen a
high-quality GEV product. Please read these
operating instructions carefully to ensure
correct operation. Keep these instructions in a
safe place so that you can refer back to them
if necessary.
GB
Outdoor LED light with motion detector, LBO 21679
Fonctionnement
Le luminaire d‘extérieur à LED avec détecteur
de mouvement est doté d‘ampoules à LED
intégrées non remplaçables. Ce luminaire est doté
d‘un détecteur de mouvement intégré utilisant
la technologie infrarouge passive. L‘éclairage
s‘allume automatiquement dès que le capteur
infrarouge passif du détecteur de mouvement
perçoit une source de chaleur en mouvement
dans sa zone de détection. Les sources de chaleur
immobiles, en revanche, ne déclenchent pas
l‘éclairage. L‘interrupteur crépusculaire réglable
sert à l‘activation et à la désactivation automatique
du détecteur de mouvement en fonction d‘un
seuil de luminosité prédéfini. Le détecteur active
l‘éclairage lorsqu‘il repère un mouvement et le
désactive en fonction du réglage de 5 s à 4 min
après le dernier mouvement perçu.
Mise en service/Réglage des capteurs
(fig. C)
Pour permettre l‘accès aux molettes de réglage
des capteurs, poussez le cache du détecteur de
mouvement vers le bas dans le sens de la flèche.
En tournant les molettes à l‘aide d‘un outil adapté
(butée de gauche = valeur minimale ; butée de
droite = valeur maximale), vous pouvez régler en
continu les paramètres suivants :
LUX Interrupteur crépusculaire d‘env. 5 à 2000
lux. La molette sert à définir la luminosité, entre
lumière du jour et obscurité, à laquelle le luminaire
est déclenché.
TIME Durée d‘allumage, entre env. 7 s et 5 min
après le dernier mouvement perçu.
Consignes de sécurité
L’installation de ce produit doit
impérativement être effectuée par un
spécialiste
et
conformément
aux
prescriptions en vigueur. L’alimentation
électrique doit obligatoirement être coupée (fusible
secteur déconnecté) pendant toute la durée de
l’installation. Le câble d’alimentation ne doit être
soumis à aucune tension.
La garantie ne couvre en aucun cas les dommages
dus à un non-respect de la présente notice. Nous
déclinons par ailleurs toute responsabilité quant
aux éventuels dommages indirects.
De même, nous ne pourrons être tenus pour
responsables
des
éventuels
dommages
matériels ou blessures corporelles résultant de
manipulations inappropriées ou du non-respect
des consignes de sécurité. Dans de tels cas de
figure, tout recours en garantie sera exclu.
En outre, pour des raisons de sécurité et de
conformité, le démontage et la modification du
produit sont interdits.
Remarques concernant le recyclage
Cet appareil ne doit en aucun cas être jeté
avec
les
ordures
ménagères.
Les
propriétaires d’équipements électriques ou
électroniquesusagésonteneffetl’obligation
légale de les déposer dans un centre de collecte
sélective. Informez-vous auprès de votre
municipalité sur les possibilités de recyclage.
DE
Problème
Causes possibles
Le détecteur de
mouvement réagit trop
tard
• Réglageincorrectdelazonede
détection
• Mouvementfrontal
La portée maximale
n’est pas atteinte
•Détecteurdemouvementinstallé
trop bas
• Écarttropfaibleentrelatempérature
ambiante et la température de la
source de chaleur
La lampe reste allumée
en permanence ou
s’allume de façon
intempestive
•Passageconstantdesourcesde chaleur :
la zone de détection est trop étendue
et intègre des éléments tels qu’un
trottoir, une rue, etc.
Modification inattendue des sources
de chaleur à cause du vent, de la pluie, etc.
Interférence liée à un ensoleillement
direct/indirect
Aucune réaction lors
du passage d’un
véhicule
• Levéhiculen’estpaschaud
• Lecompartimentmoteurestfortementisolé
Caractéristiques techniques
Alimentation secteur
Consommation des LED
Consommation en veille
Flux lumineux
Couleur de lumière
Indice de rendu des couleurs (Ra)
Zone de détection
Portée
Durée d‘activation
Interrupteur crépusculaire
Type de protection
Classe de protection
Hauteur de montage recommandée
Dimensions
Solution
• Montageplushaut
230 V ~, 50 Hz
6 W max.
env. 0,45 W
env. 510 lm
env. 3500 K, blanc chaud
CRI > 80
120°
env. 8 m pour frontaux/4 m pour latéraux
env. 7 s à 5 min, réglable en continu
env. 5 à 2000 lux, réglable en continu
IP 44
II
1,8 m
l 250 x h 156 x p 73 mm
Emplacement de montage et
positionnement
La détection de mouvement est optimale lorsque
le sens des déplacements est perpendiculaire au
détecteur. Il est donc important que le détecteur
soit fixé de sorte que les déplacements ne se
fassent pas directement dans sa direction.
Des modifications techniques et esthétiques peuvent être apportées sans notification préalable.
8
9
FR
Dysfonctionnements - Conseils pratiques
IT
Montez le luminaire d‘extérieur à LED avec
détecteur de mouvement LBO 21679 selon les
figures A1 - A3.
Choisissez l‘emplacement du luminaire à LED et
percez deux trous dans la surface sur laquelle il
doit être monté. Raccordez le câble d‘alimentation
au domino du luminaire (fig. B). Le panneau de LED
(fig. A 4) se trouvant dans le luminaire à LED peut
être basculé de quelques degrés à l‘horizontale
pour vous garantir un éclairage optimal.
Replacez le couvercle et serrez les vis (fig. A5).
Remettez en place le fusible.
PL
Installation
En achetant cet article, vous avez choisi
un produit GEV de qualité supérieure. Pour
l’utiliser dans les meilleures conditions, nous
vous recommandons de lire attentivement ce
mode d’emploi. Conservez soigneusement ce
document en vue d’une éventuelle consultation
future.
GB
Luminaire d‘extérieur à LED avec détecteur de mouvement
LBO 21679
Funzionamento
La lampada per esterni con rilevatore di movimento
è dotata di lampade a LED integrate non
sostituibili. Questa lampada è dotata di rilevatore
di movimento integrato, che sfrutta il principio alla
base della tecnologia a infrarossi passivi. Tramite
un sensore PIR, il dispositivo rileva fonti di calore
in movimento all‘interno del proprio angolo di
copertura e attiva automaticamente l‘illuminazione.
Le fonti di calore statiche non attivano la lampada.
L‘interruttore crepuscolare regolabile interviene
nel funzionamento del rilevatore di movimento, a
scelta, di giorno e di notte oppure soltanto nelle ore
di buio. L’illuminazione si accende ogni volta che
il rilevatore riconosce un movimento e, a seconda
delle impostazioni, si spegne dopo circa 5 secondi
- 4 minuti dall‘ultimo movimento rilevato.
Messa in funzione/Impostazioni
sensore (Fig. C)
DE
del
Per accedere alla manopola di regolazione che
consente l‘impostazione del sensore, spostare
la copertura del rilevatore di movimento verso il
basso in direzione della freccia.
Lamanopoladiregolazioneconsentedieffettuare,
utilizzando uno strumento adatto, le seguenti
impostazioni a regolazione continua (fine corsa a
sinistra valore minimo, fine corsa a destra valore
massimo):
interruttore crepuscolare
LUX da circa 5 a 2.000 Lux. Il regolatore consente
l‘impostazione secondo condizioni di luce diurna e
di buio.
Impostazione temporale
TIME per la durata di funzionamento dopo l‘ultimo
movimento rilevato, da circa 7 secondi a 5 minuti.
Indicazioni di sicurezza
Il montaggio deve essere svolto
esclusivamente
da
personale
specializzato, nel pieno rispetto delle
norme di installazione locali. Tale
operazionedeveessereeffettuatasoltantoprevia
interruzione dell’alimentazione di corrente del
circuito elettrico. Verificare che il cavo sia privo
di tensione!
In caso di danni derivanti dalla mancata osservanza
delle istruzioni per l’uso, la garanzia decade. Il
produttore non si assume alcuna responsabilità in
merito a tali danni.
Inoltre, il produttore non si assume alcuna
responsabilità in caso di danni a cose o persone
conseguenti a un utilizzo non corretto del
dispositivo o alla mancata osservanza delle norme
di sicurezza. Nei suddetti casi decade ogni diritto
di garanzia.
Per motivi relativi a sicurezza e certificazioni, non
è consentito apportare variazioni e/o modifiche
arbitrarie al dispositivo.
Indicazioni per il riciclaggio
Questo dispositivo non deve essere smaltito
come rifiuto indifferenziato. I possessori di
vecchi dispositivi non funzionanti sono
tenuti per legge allo smaltimento nel rispetto
delle normative in vigore. Per ulteriori informazioni
rivolgersi all’amministrazione comunale.
Analisi dei problemi - Consigli pratici
Causa
Il rilevatore di movimento
si attiva troppo tardi
• Regolazioneangolodicopertura
• Movimentofrontale
La portata massima non
viene raggiunta
• Ilrilevatoredimovimentoèdisposto
verso il basso
• Ladifferenzaditemperaturatra l’ambiente e le fonti di calore è troppo
piccola
La lampada è
costantemente accesa
oppure si attiva in modo
indesiderato
•Movimentodelcalorecostante:
nell’angolo di copertura sono presenti
elementi che non devono essere
rilevati, come ad esempio sentieri,
strade, alberi ecc.
Cambiamento imprevisto delle fonti di
calore a causa di tempeste, pioggia o
ventilatori.
Interferenza causata da radiazione
solare diretta/indiretta
Nessuna reazione alla
presenza di veicoli
•Ilveicolononsviluppacalore
•Ilvanomotoreèfortementeisolato
Dati tecnici
Collegamento di rete
Potenza assorbita dai LED
Potenza assorbita in stand-by
Flusso luminoso
Colore illuminazione
Indice di riproduzione del colore (Ra)
Angolo di copertura
Portata
Impostazione temporale
Interruttore crepuscolare
Tipo di protezione
Classe di protezione
Altezza di montaggio consigliata
Dimensioni
Soluzione
FR
Malfunzionamento
• Montareilsensorepiùin
alto
230 V ~, 50 Hz
max. 6 W
ca. 0,45 W
ca. 510 lm
ca. 3.500 K, bianco caldo
CRI > 80
120°
ca. 8 m frontalmente/4 m lateralmente
da 7 sec. a 5 min. ca., regolazione continua
da 5 a 2.000 Lux ca., regolazione continua
IP 44
II
1,8 m
L 250 x A 156 x P 73 mm
Luogo di installazione
Il rilevamento ottimale si ottiene quando la fonte
di movimento è trasversale rispetto al dispositivo.
Per questo motivo, i rilevatori di movimento
dovrebbero sempre essere installati in modo che il
movimento non sia frontale rispetto al dispositivo.
L’azienda si riserva il diritto di apportare modifiche tecniche ed estetiche senza preavviso.
10
11
IT
Montare la lampada a LED per esterni con
rilevatore di movimento LBO 21679 come illustrato
nelle Fig. A1 - A3.
Scegliere il punto in cui posizionare la lampada
a LED e praticare due fori nella base sulla quale
deve essere installata. Collegare il cavo di
alimentazione al morsetto isolante nella lampada
(Fig. B). Il pannello LED (Fig. A 4) all‘interno della
lampada può essere inclinato orizzontalmente di
qualche grado, in modo da ottenere l‘illuminazione
desiderata.
Riposizionare il coperchio e serrare le viti (Fig. A5).
Inserire nuovamente il fusibile.
PL
Installazione
Con l’acquisto di questo articolo si è scelto
un prodotto GEV di qualità superiore. Per
garantire un corretto funzionamento, leggere le
istruzioni per l’uso e conservarle con cura per
un’eventuale consultazione successiva.
GB
Lampada a LED per esterni con rilevatore di movimento
LBO 21679
Sposób działania
Zewnętrzne oświetlenie LED z czujką ruchu ma
wbudowane niewymienne lampy LED. Oświetlenie
to posiada wbudowaną czujkę ruchu. Czujki
ruchu działają według zasady biernej techniki
podczerwieni. Bierny czujnik podczerwieni
powoduje wykrywanie przez czujkę ruchu w
zakresie detekcji poruszających się źródeł ciepła i
automatyczne włączenie lampy. Nieruchome źródła
ciepła nie załączają lampy. Regulowany wyłącznik
zmierzchowy zapewnia wybór możliwości pracy: w
dzień i w nocy lub tylko w ciemności. Po wykryciu
ruchu załącza on oświetlenie i w zależności od
ustawienia, po upływie ok. 5 s do ok. maks. 4 min
od wykrycia ponownie je wyłącza.
Uruchomienie/ustawienia czujnika (rys. C)
Aby uzyskać dostęp do obrotowych regulatorów
ustawienia czujników, przesuń pokrywę czujki
ruchu w kierunku pokazanym strzałką.
Przy użyciu regulatorów obrotowych można za
pomocą odpowiedniego narzędzia przeprowadzić
następujące
bezstopniowe
ustawienia
(ograniczenie w lewo oznacza zawsze wartość
minimalną, a w prawo wartość maksymalną):
LUX Przełącznik zmierzchowy ok. 5 – 2000 lx.
Regulator służy do ustawiania pomiędzy światłem
dziennym a ciemnością.
TIME Ustawienie czasu załączenia oświetlenia po
ostatnio wykrytym ruchu ok. 7 s – 5 min.
Wskazówki bezpieczeństwa
Montaż może być wykonywany wyłącznie
przez specjalistę, przy przestrzeganiu
obowiązujących w danym kraju przepisów
dotyczących instalacji elektrycznych.
Dozwolona jest wyłącznie praca przy odłączonym
napięciu. W tym celu należy bezwzględnie
rozłączyć bezpiecznik obwodu prądowego.
Sprawdź, czy w przewodzie podłączeniowym
nie ma napięcia!
W
przypadku
szkód
spowodowanych
nieprzestrzeganiem niniejszej instrukcji obsługi
gwarancja wygasa! Za szkody wtórne nie
przyjmujemy żadnej odpowiedzialności!
Nie
przyjmujemy
odpowiedzialności
w
przypadku szkód rzeczowych i obrażeń ciała
spowodowanych nieumiejętnym postępowaniem
lub niestosowaniem się do uwag związanych z
bezpieczeństwem. W takich przypadkach wszelkie
roszczenia gwarancyjne wygasają.
Z przyczyn związanych z bezpieczeństwem
i dopuszczeniami technicznymi, samowolne
przeróbki lub modyfikacje urządzenia są
niedozwolone.
Uwagi dotyczące recyklingu
Niniejszego urządzenia nie wolno usuwać
razem
z
niesortowanymi
odpadami
domowymi. Posiadacze zużytego sprzętu są
ustawowo zobowiązani do zapewnienia
prawidłowej utylizacji urządzeń. Odpowiednie
informacje można uzyskać u odpowiednich władz
miejskich lub gminnych.
DE
Analiza błędów — wskazówki praktyczne
Przyczyna
•Ustawienieobszarudetekcji
•Ruchnawprost
Rozwiązanie
Nie jest uzyskiwany
maksymalny zasięg
•Czujkaruchuzamocowana
zbyt nisko
•Zbytmałaróżnicatemperatury
pomiędzy otoczeniem a źródłem
ciepła
FR
Usterka
Czujka ruchu zbyt późno
się załącza
•Zamontowaćwyżej
Lampa świeci
•Nieprzerwanyruchciepła:
nieprzerwanie lub załącza
W obszarze detekcji znajdują się
się w niepożądany
obszary, które nie powinny być
sposób
nią objęte, np. ścieżka, ulica,
drzewa itd.
Nieoczekiwane zmiany
właściwości źródeł ciepła w
wyniku burzy, deszczu lub
wentylatorów. Bezpośrednie lub
pośrednie oddziaływanie promieni
słonecznych
Brak reakcji na pojazdy
Dane techniczne
•Pojazdniejestrozgrzany
•Obszarsilnikajestmocnoizolowany
Przyłącze sieciowe
Pobór mocy przez diody LED
Pobór mocy w stanie gotowości
Strumień świetlny
Barwa światła
Wskaźnik odtwarzania kolorów (Ra)
Obszar detekcji
Zasięg
Ustawienie czasu
Wyłącznik zmierzchowy
Klasa ochronności
Klasa zabezpieczenia
Zalecana wysokość montażu
Wymiary
230 V ~, 50 Hz
maks. 6 W
ok. 0,45 W
ok. 510 lm
ok. 3500 K, ciepła biel
CRI > 80
120°
ok. 8 m na wprost/4 m bokiem do ruchu
ok. 7 s – 5 min, regulowane bezstopniowo
ok. 5 – 2000 lx, regulowany bezstopniowo
IP 44
II
1,8 m
250 x 156 x 73 mm (szer. x wys. x głęb.)
Miejsce montażu
Najbardziej pewne wykrywanie ruchu można
uzyskać, poruszając się poprzecznie względem
czujki ruchu. Z tego powodu czujkę ruchu należy
zawsze montować tak, aby nie poruszać się
bezpośrednio w jej stronę.
Zastrzega się możliwość wprowadzania zmian technicznych i wizualnych bez wcześniejszego
powiadomienia.
12
13
IT
Zamontuj zewnętrzne oświetlenie LED z czujką
ruchu LBO 21679 zgodnie z rys. A1 - A3.
Wybierz pozycję oświetlenia LED i wywierć
dwa otwory w podłożu, na którym ma zostać
zamontowane oświetlenie LED. Podłącz przewody
sieciowe do kostki zaciskowej w lampie (rys. B).
Panel LED (rys. A4) w lampie LED można obracać
o kilka stopni w poziomie, co umożliwia uzyskanie
najlepszego oświetlenia dla użytkownika.
Nałóż z powrotem pokrywę i dokręć wkręty
(rys. A5). Załącz ponownie bezpiecznik.
PL
Instalacja
Kupno niniejszego artykułu oznacza wybór
wysokiej jakości wyrobu marki GEV. Aby
zapewnić prawidłowe działanie wyrobu,
prosimy o uważne zapoznanie się z niniejszą
instrukcją obsługi. Instrukcję tę należy
starannie przechowywać do ewentualnego
późniejszego użytku.
GB
Oświetlenie zewnętrzne LED z czujką ruchu LBO 21679
14
15
© Copyright 2026 Paperzz