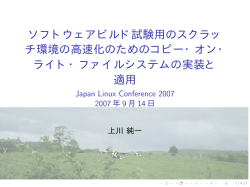
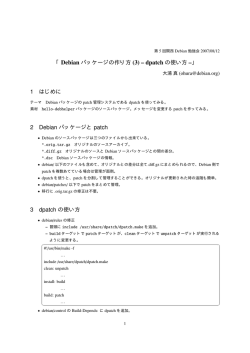
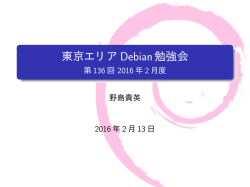
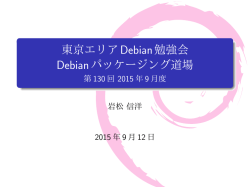
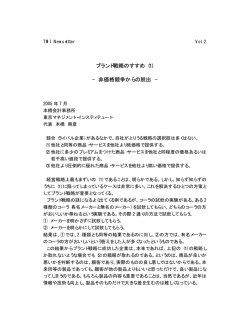
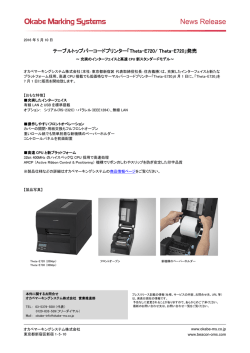
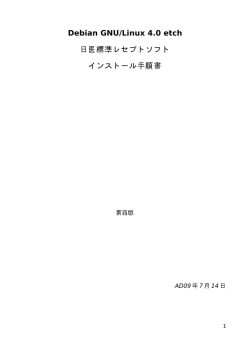
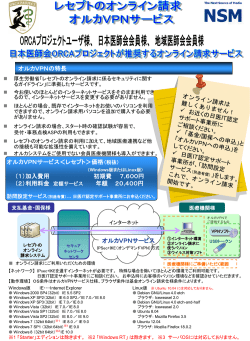
会
強
勉
an
i
b
e
D
西
関
/
ア
エリ
東京
あんどきゅめんてっど でびあん 2016 年夏号 2016 年 8 月 14 日 初版発行
デビアン勉強会
7
目次
1
Introduction
2
8
Buffalo Linkstation 向け Debian
Installer
tilegx という CPU アーキテクチャ
向けの Debian パッケージ移植
2
systemd に浸ってみた
3
Debian GNU/Linux 上での省電力
36
3
9
設定について
4
31
Debian の移植作業用のインフラ
を借りるには
39
9
10
LibreOffice の 最 近 の 動 向 と Debian での LibreOffice パッケージ
について
16
5
Debian モバイル wifi ルータ化
20
6
VyOS を入れて AP を構築してみ
た。
25
1
Debian で、Linux ftrace まわりを
いじってみた
42
11
勉強会資料の歩き方
46
12
Debian Trivia Quiz
49
13
Debian Trivia Quiz 問題回答
52
あんどきゅめんてっど でびあん 2016 年夏号
1 Introduction
野島 貴英, かわだ てつたろう
1.1 東京エリア Debian 勉強会
Debian 勉強会へようこそ。これから Debian の世界にあしを踏み入れるという方も、すでにどっぷりとつかってい
るという方も、月に一回 Debian について語りませんか?
Debian 勉強会の目的は下記です。
• Debian Developer (開発者) の育成。
• 日本語での「開発に関する情報」を整理してまとめ、アップデートする。
• 場 の提供。
– 普段ばらばらな場所にいる人々が face-to-face で出会える場を提供する。
– Debian のためになることを語る場を提供する。
– Debian について語る場を提供する。
Debian の勉強会ということで究極的には参加者全員が Debian Package をがりがりと作るスーパーハッカーになっ
た姿を妄想しています。情報の共有・活用を通して Debian の今後の能動的な展開への土台として、「場」としての空
間を提供するのが目的です。
1.2 関西 Debian 勉強会
関西 Debian 勉強会は Debian GNU/Linux のさまざまなトピック (新しいパッケージ、Debian 特有の機能の仕
組、Debian 界隈で起こった出来事、などなど)について話し合う会です。
目的として次の三つを考えています。
• メーリングリストや掲示板ではなく、直接顔を合わせる事での情報交換の促進
• 定期的に集まれる場所
• 資料の作成
それでは、楽しい一時をお楽しみ下さい。
2
あんどきゅめんてっど でびあん 2016 年夏号
2 systemd に浸ってみた
佐々木 洋平
All Your Control Groups Are Belong To Us! - Lennart Poettering, Red Hat Inc.
https://www.youtube.com/watch?v=MSG4jW187Is
2.1 はじめに
今回のお題は以下の通りです:
Jessie から default となった init である systemd ですが「全てが systemd になる」と揶揄されるように他
にも様々な機能があります。今回はパッケージで提供されている systemd 関連のツールを一通り試してみて、
どう使うのか/使えるのかについての検証結果を報告します。
というわけで、Jessie において提供されている幾つかの system-* 関連のソフトウェアを使ってみます。サービス
の起動に関連した systemd の使い方については、[前回 (2014 年 6 月) の勉強会資料/あんどきゅめんてっど でびあ
ん 2014 年冬号] 佐々木 (2014) をご覧下さい*1 。
2.2 どんな環境のお話?
調査対象は素の Debian ver.8 Jessie です。「どのぐらい『素』か?」というとインストール時に「SSH サーバ」以
外を外した状況です*2 。dpkg -l の出力結果は以下の通り
$ dpkg -l | grep ^ii | wc -l
279
まあ、minimal に比べれば多少多いですが。
さて、この段階で導入されている systemd 関連のパッケージはなんでしょうか。
$ dpkg
ii
ii
ii
-l | grep systemd
libsystemd0:amd64
systemd
systemd-sysv
215-17+deb8u3
215-17+deb8u3
215-17+deb8u3
amd64
amd64
amd64
systemd utility library
system and service manager
system and service manager - SysV links
というわけで基本セットが入っている状況です。しかしながら基本セットだけですと dbus がインストールされてい
ないため、後述の幾つかの daemon が動きません*3 。というわけで、dbus と、旧来の sysvinit のスクリプトを上手
*1
*2
*3
http://tokyodebian.alioth.debian.org/pdf/debianmeetingresume2014-fuyu.pdf もう二年前かよ . . .
普段使いの環境は sid なので、仮想環境として libvirt - KVM を利用しています。LXC でも同様なのか、は良くわかりません。親環境と
子環境がともに systemd だった場合にも LXC はちゃんと動くようになったのかしら。以前は祟りがあった様な . . .。どなたかご存知です
か?
systemd のパッケージでは dbus は Recommends になっています
3
く扱うために systemd-shim をインストールしておきます。
$ sudo apt-get install dbus systemd-shim --no-install-recommends
2.3 時計合わせ - systemd-timesyncd
時計合わせといえば NTP ですね。systemd の流儀に従うのであれば systemd-timesyncd を使うことになりま
す。とりあえず、現状を確認するために timedatectl を叩いてみましょう*4 。
$ timedatectl
Local time:
Universal time:
RTC time:
Time zone:
NTP enabled:
NTP synchronized:
RTC in local TZ:
DST active:
日 2016-03-27 06:16:54 JST
土 2016-03-26 21:16:54 UTC
土 2016-03-26 21:16:54
Asia/Tokyo (JST, +0900)
yes
no
no
n/a
特に設定をしていませんが、NTP enabled: yes です。status を確認してみましょう。
$ systemctl status systemd-timesyncd
● systemd-timesyncd.service - Network Time Synchronization
Loaded: loaded (/lib/systemd/system/systemd-timesyncd.service; enabled)
Active: active (running) since 日 2016-03-27 06:24:11 JST; 2min 3s ago
Docs: man:systemd-timesyncd.service(8)
Main PID: 3255 (systemd-timesyn)
Status: "Using Time Server 202.181.103.212:123 (0.debian.pool.ntp.org)."
CGroup: /system.slice/systemd-timesyncd.service
└─ 3255 /lib/systemd/systemd-timesyncd
さて、Status: "Using Time Server 202.181.103.212:123 (0.debian.pool.ntp.org)." とあるわけですが、
これはどこから出てきた設定でしょうか? 実は、Debian の systemd パッケージはビルド時に
DEFAULT_NTP_SERVERS = 0.debian.pool.ntp.org 1.debian.pool.ntp.org 2.debian.pool.ntp.org 3.debian.pool.ntp.org
を設定してビルドされています。そんな訳で、特に設定をしなくても systemd-timesyncd は DEFAULT_NTP_SERVERS
を見に行くようになっています。
とはいえ、環境によって使いたい NTP サーバを変えたい事もあるでしょう。そんな時は /etc/systemd/timesyncd.conf
の Servers 行を修正します。例えば
# This file is part of systemd.
- snip [Time]
Servers=ntp.kuins.kyoto-u.ac.jp
として systemd-timesyncd を再起動すると
$ sudo systemctl daemon-reload
$ sudo systemctl restart systemd-timesyncd
$ systemctl status systemd-timesyncd
● systemd-timesyncd.service - Network Time Synchronization
Loaded: loaded (/lib/systemd/system/systemd-timesyncd.service; enabled)
Active: active (running) since 日 2016-03-27 06:33:38 JST; 1s ago
Docs: man:systemd-timesyncd.service(8)
Main PID: 3444 (systemd-timesyn)
Status: "Using Time Server 130.54.240.26:123 (ntp.kuins.kyoto-u.ac.jp)."
CGroup: /system.slice/systemd-timesyncd.service
└─ 3444 /lib/systemd/systemd-timesyncd
$ timedatectl
Local time: 日 2016-03-27 06:34:12 JST
Universal time: 土 2016-03-26 21:34:12 UTC
RTC time: 土 2016-03-26 21:34:11
Time zone: Asia/Tokyo (JST, +0900)
NTP enabled: yes
NTP synchronized: yes
RTC in local TZ: no
DST active: n/a
*4
. . . 執筆時刻がバレますね
4
といった塩梅になります。
時刻合わせの状況を知りたい時には少したってから status を叩いてみましょう。
$ sudo systemctl status -l systemd-timesyncd
● systemd-timesyncd.service - Network Time Synchronization
Loaded: loaded (/lib/systemd/system/systemd-timesyncd.service; enabled)
Active: active (running) since 日 2016-03-27 08:37:02 JST; 5min ago
Docs: man:systemd-timesyncd.service(8)
Main PID: 1678 (systemd-timesyn)
Status: ‘‘Using Time Server 130.54.240.26:123 (ntp.kuins.kyoto-u.ac.jp).’’
CGroup: /system.slice/systemd-timesyncd.service
└─ 1678 /lib/systemd/systemd-timesyncd
3
3
3
3
月
月
月
月
27
27
27
27
08:37:02
08:37:02
08:38:06
08:40:14
kvm-jessie-amd64
kvm-jessie-amd64
kvm-jessie-amd64
kvm-jessie-amd64
systemd-timesyncd[1678]:
systemd-timesyncd[1678]:
systemd-timesyncd[1678]:
systemd-timesyncd[1678]:
Using NTP server 130.54.240.26:123 (ntp.kuins.kyoto-u.ac.jp).
interval/delta/delay/jitter/drift 64s/-0.000s/0.002s/0.000s/+0ppm
interval/delta/delay/jitter/drift 128s/+0.001s/0.003s/0.000s/+1ppm
interval/delta/delay/jitter/drift 256s/-0.001s/0.003s/0.001s/+0ppm
また、複数のサーバを指定したい場合には Servers 行に空白区切りでサーバを列挙します。
2.3.1 別の NTP サービスを使っている場合は?
ちょっと良くわかりません。以前は /etc/systemd/ntp-units.d 以下に拡張子 .list で使用しているサービス
(Chrony なり NTPD なり) を記述していけば、良きにはからってくれていたのですが . . .。
今回試した状況では、systemd-timesyncd と chrony が両方起動して、同時に別のサーバに時計を聞きに行く、
といった挙動をしています。
非常に無駄な気もしますが、例えば、
• chrony にローカルからの問い合わせに答える様にする
• timesyncd はローカルの chrony に問い合わせる
なんてことをすれば、まあ使えなくは無いです。
適切な NTP client が動作している場合にはそちらを見に行って NTP synchronized を判断して欲しいのです
が…*5
2.4 名前解決 - systemd-resolved
続いて DNS を良きに図らう (?) systemd-resolved について。とりえあず状況を確認すると . . .
$ systemctl status systemd-resolved
● systemd-resolved.service - Network Name Resolution
Loaded: loaded (/lib/systemd/system/systemd-resolved.service; disabled)
Active: inactive (dead)
Docs: man:systemd-resolved.service(8)
というわけで、自動起動はされていません。設定ファイルは /etc/systemd/resolved.conf で、ここに参照する DNS
を空白区切りで記述します。例えば
$ cat /etc/systemd/resolved.conf
# This file is part of systemd.
- snip [Resolve]
DNS=192.168.122.1
として、おもむろに有効にしてみると . . .
$ sudo systemctl enable systemd-resolved
$ sudo systemctl start systemd-resolved
状況は以下の様に変化します:
*5
ちなみに、Ver.216 の changelog には「もう /etc/systemd/ntp-units.d/ の下は見ねーからな? ちゃんと Conflicts 書けよ?」って書い
てあったりする。
5
$ systemctl status systemd-resolved
● systemd-resolved.service - Network Name Resolution
Loaded: loaded (/lib/systemd/system/systemd-resolved.service; enabled)
Active: active (running) since 日 2016-03-27 09:13:34 JST; 1s ago
Docs: man:systemd-resolved.service(8)
Main PID: 1741 (systemd-resolve)
Status: "Processing requests..."
CGroup: /system.slice/systemd-resolved.service
└─ 1741 /lib/systemd/systemd-resolved
この段階では /etc/resolv.conf の中身には変化がありません。実の所、systemd-resolved の生成するファイルは
/run/systemd/resolve/resolv.conf にあるので、/etc/resolv.conf をこちらへの symbolic link に変えておくと良い
でしょう。
$ cd /etc
$ sudo mv resolve.conf resolve.conf.bak
$ sudo sh -c ’ln -s /run/systemd/resolve/resolv.conf resolv.conf’
これで名前解決ができるか確認しておきましょう。
ただ、現状では、これだけだと何が嬉しいのかさっぱりわかりません*6 。例えば
•「caching」とあるのだけれど、cache の制御なんかは何処でやるの?
• search 行が指定できないのだけれど、面倒じゃない?
とか。
一応、後述の systemd-networkd と組み合わせるとネットワークに応じて DNS の切り替えができる、というの
は設定ファイルが散らばらないので楽かもしれませんが*7 。
2.5 ネットワーク設定 - systemd-networkd
お次はネットワーク設定を行なう systemd-networkd について。とりあえず現状は
$ systemctl status systemd-networkd
● systemd-networkd.service - Network Service
Loaded: loaded (/lib/systemd/system/systemd-networkd.service; disabled)
Active: inactive (dead)
Docs: man:systemd-networkd.service(8)
というわけで、これも自動起動はされていません。
多くの場合、有線ネットワークについては/etc/network/interfaces に設定が書かれているのではないかと思うの
で、その内容を元に systemd-networkd の設定ファイルを書いてみます。設定ファイルとして、例えば
$ cat /etc/systemd/network/wired.network
[Match]
Name=eth0
[Network]
Address=192.168.122.3/24
Gateway=192.168.122.1
DNS=192.168.122.1
# DNS=8.8.8.8
<-- DNS を複数指定する場合には、並べて書く。書かれた順に nameserver 行に並ぶ。
なんてモノを用意します。次に /etc/network/interfaces の中身を適当にコメントアウトして、systemd-networkd
を起動してみます。
*6
*7
本来の目的は「caching and validationg DNS/DNSSEC stub resolver」なので現状では機能が全然足りていない . . . sid にある
systemd ver. 229 の man では御託宣がいろいろと増えているが、結局の所は動作に変更が無い様な。
. . . しかし、オチがついた(笑)。systemd-networkd と組み合わせるのであれば、DNS は networkd の設定ファイルで指定しておいた
方が良いかも。
6
$ sudo systemctl enable systemd-networkd
$ sudo systemctl start systemd-networkd
$ /sbin/ifconfig
eth0
Link encap:イーサネット ハードウェアアドレス 52:54:00:98:46:73
inet アドレス:192.168.122.3 ブロードキャスト:192.168.122.255 マスク:255.255.255.0
inet6 アドレス: fe80::5054:ff:fe98:4673/64 範囲:リンク
UP BROADCAST RUNNING MULTICAST MTU:1500 メトリック:1
RX パケット:14999 エラー:0 損失:0 オーバラン:0 フレーム:0
TX パケット:10346 エラー:0 損失:0 オーバラン:0 キャリア:0
衝突 (Collisions):0 TX キュー長:1000
RX バイト:4989650 (4.7 MiB) TX バイト:1349343 (1.2 MiB)
...
という様になりました。ついで /etc/resolv.conf の中身を確認してみると
#
#
#
#
#
#
This file is managed by systemd-resolved(8). Do not edit.
Third party programs must not access this file directly, but
only through the symlink at /etc/resolv.conf. To manage
resolv.conf(5) in a different way, replace the symlink by a
static file or a different symlink.
nameserver 192.168.122.1
nameserver 192.168.122.1
. . . えっと重複は消してくれないんですかー?
というわけで、/etc/systemd/resolved.conf の DNS 行 をコメントアウトしてからおもむろに systemd-networkd
を restart しましょう。
さて、これだけだとあまり嬉しくない (/etc/network/interfaces に書くのと変わらない) かもしれません。もう少
し設定を解説すると
• Match では Name の他に「MACAddress」「Driver」「Host」なんてモノが使えます。
• Network では、当然「DHCP」「DHCPServer」等も使えます
• .network 以外にも .netdev, .link といった拡張子の設定ファイルが使えます。link の up/down や 仮想的な
network device の追加/削除といった事が可能になります。
というわけで、systemd が udev と連携していることから、/etc/network/intefaces に書いていた時よりも、より柔
軟にネットワークの設定ができます (ことになっています)*8 。
2.6 定期実行 - systemd-cron
さて、大物です。systemd-cron はその名の通り cron の置き換えです。おもむろに install しましょう
$ sudo apt-get install systemd-cron --no-install-recommends
パッケージリストを読み込んでいます... 完了
依存関係ツリーを作成しています
状態情報を読み取っています... 完了
以下の追加パッケージがインストールされます:
libpython-stdlib libpython2.7-minimal libpython2.7-stdlib mime-support python python-minimal
python2.7 python2.7-minimal
提案パッケージ:
python-doc python-tk python2.7-doc binutils binfmt-support
推奨パッケージ:
file
以下のパッケージは「削除」されます:
cron
以下のパッケージが新たにインストールされます:
libpython-stdlib libpython2.7-minimal libpython2.7-stdlib mime-support python python-minimal
python2.7 python2.7-minimal systemd-cron
...
現状では /etc/cron.hourly—daily—weekly—monthly などをそれぞれ
*8
とはいえ、ちょっとまだ設定項目が足りない、かなぁ...。sid の systemd になると、もっと細かく制御できるのですが。
7
$ systemctl list-unit-files | grep cron
cron-update.path
static
cron-daily.service
static
cron-hourly.service
static
cron-monthly.service
static
cron-update.service
static
cron-weekly.service
static
cron.service
masked
cron-daily.target
static
cron-hourly.target
static
cron-monthly.target
static
cron-weekly.target
static
cron.target
enabled
cron-daily.timer
static
cron-hourly.timer
static
cron-monthly.timer
static
cron-weekly.timer
static
といった塩梅に service と timer の units ファイルへ実行します。中身は
$ cat /lib/systemd/system/cron-hourly.timer
[Unit]
Description=systemd-cron hourly timer
Documentation=man:systemd.cron(7)
PartOf=cron.target
RefuseManualStart=yes
RefuseManualStop=yes
[Timer]
OnCalendar=hourly
Unit=cron-hourly.target
$ cat /lib/systemd/system/cron-hourly.service
[Unit]
Description=systemd-cron hourly script service
Documentation=man:systemd.cron(7)
PartOf=cron-hourly.target
RefuseManualStart=yes
RefuseManualStop=yes
ConditionDirectoryNotEmpty=/etc/cron.hourly
[Service]
Type=oneshot
ExecStart=/bin/run-parts --report /etc/cron.hourly
となっており、まあ /etc/crontab に設定されている内容であれば、ちゃんと実行できるのではないかなぁ、と期待
します (が、どうなのかなぁ...)。
ち な み に「 ユ ー ザ 毎 の crontab が ちゃん と migrate さ れ て い る の か 」も 試 し て み ま し た が 、こ れ は cron-
update.path,service によって /var/spool/cron/crontabls 以下のスクリプトが実行されている様で、一応使えて
いる様です。
ですが crontab -e を叩いてみると
$ crontab -e
Traceback (most recent call last):
File "/usr/bin/crontab", line 94, in <module>
action(cron_file, args)
File "/usr/bin/crontab", line 64, in edit
with open(cron_file, ’r’) as inp:
IOError: [Errno 2] No such file or directory: ’/var/spool/cron/crontabs/root’
となるので、更新ができません。この辺を上手く切り分けないと流石に移行は厳しそうですね。
2.7 まとめ . . .?
というわけで、systemd-timesyncd,resolved,networkd,cron について、ごく簡単に触った感じをまとめてみまし
た。ちまたに溢れる systemd の解説では「もっとイロイロできるよ」と書いてあったりしますが、version によって
設定ファイルの書き方が変わっていたり、機能が追加/削除されていたりするので、「頼れるのは man だけ」という、
なかなか楽しい試行錯誤でした (逆に man は非常きちんとしているのが他のプログラムとは違うところですね)。
8
あんどきゅめんてっど でびあん 2016 年夏号
3 Debian GNU/Linux 上での省電力設
定について
岩松
3.1 はじめに
Linux がインストールされたノート PC を利用している時、スペック通りにバッテリが持たない場合が多々ありま
す。数年前と比べると Linux 上の電源管理対応も進んでいますが、まだ Windows などの OS にはまだまだ及ばない
ところがあります。とは言ってもデフォルトの状態で使うより、少しパラメータを操作してみたり、管理用のツール
をインストールするだけでバッテリの持ちはよいものなります。少しでも Debian でのノート PC ライフを過ごすた
めに 今回は Debian GNU/Linux を題材にした 省電力設定方法について説明します。
3.2 省電力設定するためには
省電力設定するためにはどのような点で電力を消費しているのかを簡単に理解しておくことが重要です。Linux の
場合、大きく分けて以下の点が重要となってきます。
• CPU と制御
• 動作しているデバイス
• 動作しているプログラム
これらについて、Debian での対応方法について簡単に説明します。
3.2.1 CPU と制御
CPU ですが、Intel 製 CPU の CPU 状態遷移は図 1 のようになっており、CPU 稼働状態とスリープ状態の切り替
えが頻繁に行われています。CPU にはステート(C ステート)という状態があり、この状態によって消費電力が異な
り、CPU の復帰時間も変わってきます。最新の CPU ではもっと細かいステートが提供されるようになっています。
これらを制御しているのが ACPI となります。
9
図1
CPU 状態遷移簡易図
実際の CPU は C ステートだけではなく、CPU の電圧やクロック数なども関連してきます。Linux の場合は CPU
周波数スケーリング機能を使うことで、OS が自動的に制御できるようになっています。これは Linux カーネルの
cpufreq によって実装されています。現在の cpufreq に設定されている内容を確認するには cpufrequtils パッケージ
で提供されている cpufreq-info(図 2) コマンドを使います。
$ cpufreq-info
cpufrequtils 008: cpufreq-info (C) Dominik Brodowski 2004-2009
Report errors and bugs to [email protected], please.
analyzing CPU 0:
driver: intel_pstate
CPUs which run at the same hardware frequency: 0
CPUs which need to have their frequency coordinated by software: 0
maximum transition latency: 0.97 ms.
hardware limits: 800 MHz - 2.90 GHz
available cpufreq governors: performance, powersave
current policy: frequency should be within 800 MHz and 2.90 GHz.
The governor "powersave" may decide which speed to use
within this range.
current CPU frequency is 1.90 GHz.
....
図 2 cpufreq-info 実行結果
いくつか項目がありますが、重要となるのは 「available cpufreq governors」と「current policy」です。available
cpufreq governors は CPU の調整可能な速度調整名(ガバナー)であり、表 1 が用意されています。
ガバナー
内容
ondemand
CPU 負荷が大きい、または小さい時に CPU クロックを大きくに切り替える
conservative
CPU 負荷が大きい、または小さい時に CPU クロックを徐々に切り替える
performance
最大周波数で CPU を動作させる
powersave
最小周波数で CPU を動作させる
userspace
ユーザーが指定した周波数で CPU を動作させる
表1
指定できるガバナー
これらは実際には設定できる値カーネルや環境によって異なる点に注意が必要です。「current policy」は現在設定
されているガバナーが表示されます。
この以上から、上記の結果では
• CPU が 800MHz から 2.90GHz までをサポートしている
• powersave governor で動作している
10
• 最大値と最小値のポリシー設定により、800MHz から 2.90GHz の間で変動させている
ということがわかります。
これらを設定するには sysfs 経由で操作するか、cpufrequtils に含まれる cpufreq-set コマンドを使います。
• ガバナーを設定する
$ sudo cpufreq-set -c CPU 番号 -g ガバナー名
または
$ sudo sh -c "echo ガバナー名 > /sys/devices/system/cpu/cpuCPU 番号/cpufreq/scaling_governor"
• 最小クロックを設定する
$ sudo cpufreq-set -c CPU 番号 -d クロック値
または
$ sudo sh -c "echo クロック値 > /sys/devices/system/cpu/cpuCPU 番号/cpufreq/scaling_min_freq"
• 最大クロックを設定する
$ sudo cpufreq-set -c CPU 番号 -u クロック値
または
$ sudo sh -c "echo クロック値 > /sys/devices/system/cpu/cpuCPU 番号/cpufreq/scaling_max_freq"
• 現在のクロックを設定する
$ sudo cpufreq-set -c CPU 番号 -f クロック値
または
$ sudo sh -c "echo クロック値 > /sys/devices/system/cpu/cpuCPU 番号/cpufreq/scaling_cur_freq"
上記のようにして CPU クロックを制御することにより、環境によって無駄なく CPU を利用できるようになり
ます。設定した値は再起動すると消えるので、/etc/sysfs.conf に設定しておくか、cpufreq を設定するデーモン
cpufreqd を使うとよいでしょう。
3.2.2 動作しているデバイスの設定
使っている個々のデバイスの設定も重要となります。例えば無線 LAN や Bluetooth を使わないのに有効にしてい
るとそれだけで電力を消費してしまいます。よって使用する環境に応じてこれらを制御する必要が出てきます。
ここではよく利用されるデバイスに対する制御方法について説明します。
• ラップトップモード
Linux の場合はカーネルのモードとして、ラップトップモードが設定できるようになっています。これは以下
のようにして設定します。
$ sudo sh -c "echo 5 > /proc/sys/vm/laptop_mode"
あと NMI の watchdog(nmi watchdog) も無効化しておきます。これはこれはカーネルハングアップを定期
的にチェックする機構をコントロールするフラグです。
$ sudo sh -c "echo 0 > /proc/sys/kernel/nmi_watchdog"
• USB
USB は /sys/bus/usb/devices/ 以下に対して設定を行います。例えば、/sys/bus/usb/devices/usb1 に対し
て 電源供給を切りたい場合は /sys/bus/usb/devices/usb1/power/control を off に設定します。自動的にサ
スペンドさせたい場合には/sys/bus/usb/devices/usb1/power/autosuspend に対して 1 を設定します。
$ sudo sh -c "echo off > /sys/bus/usb/devices/usb1/power/control"
$ sudo sh -c "echo auto > /sys/bus/usb/devices/usb1/power/autosuspend"
設定を起動時に適用したい場合は、再起動時に初期化されてしまう事とデバイスの USB 位置が変わる事があ
11
りますので、 udev の rules ファイルを使って設定するのがよいでしょう。
実際は一行
$ cat /etc/udev/rules.d/70-my-usb-power.rules
ACTION=="add", SUBSYSTEM=="usb", ATTRS{idVendor}=="0x046d",
ATTR{idProduct}=="0x08cb", TEST=="power/control", ATTR{power/control}="off"
注意しなければいけない点としては USB をなんでも設定してしまうとキーボードが動作しなくなる可能性も
あるため、ベンダー ID、デバイス ID などを確認した上で設定しましょう。
• 無線 LAN
無線 LAN は iw パッケージに含まれる iw コマンドを使って設定します。無線 LAN が wlan0 の場合は 以下
のように設定することによって制御できます。
$ sudo iw dev wlan0 set power_save on
これも udev の rules ファイルを使って設定すると良いです。
$ cat /etc/udev/rules.d/70-my-wifi-power.rules
ACTION=="add", SUBSYSTEM=="net", KERNEL=="wlan*", RUN+="/usr/bin/iw dev %k set power_save on"
• サウンド
サウンドの場合も sysfs 経由で設定します。ドライバによって設定出来ない場合がありますが、INTEL のサウ
ンドコントローラの場合は、power save があるので、これを 1 に設定することによってパワーセーブモードに
設定できます。
$ sudo sh -c "echo 1 > /sys/module/snd_hda_intel/parameters/power_save"
• PCI/PCI-Express
PCI/PCI-Express の省電力に設定するには power/control を auto に設定します。この場合も sysfs 経由で設
定します。PCI も USB と同様に設定先がどのようなデバイスなのか確認してから設定するようにしましょう。
$ sudo sh -c "echo auto > /sys/bus/pci/devices/0000:00:00.0/power/control"
3.2.3 動作しているプログラムについて
動作しているプログラムは top コマンドなのでざっくりとした CPU 占有率を確認できますが、実際にどれぐらい
の頻度で使われてているのかわかりません。アイドル状態であるにもかかわらず、CPU 割り込みが多いプログラム・
プロセスが省電力の効果が得にくいものとなりますので、このようなプログラム・プロセスを調べる必要があります。
これらを調べるには下記で説明する PowerTop を使うとようでしょう。
3.3 省電力設定するためのツール
先では長々と書きましたが、知識がないユーザが上記を一つづつやっていくのは非常に大変です。Linux では専門
の知識がなくとも使っているマシンを省電力状態に設定できるツールがいくつか準備されています。以下ではそれら
の使い方について紹介します。
3.3.1 PowerTOP
PowerTOP は Intel が開発しているソフトウェアで、カーネル、ハードウェア、ユーザランドで制御可能な省電力
項目を有効にするツールです。プロセスを監視して、CPU 負荷やデバイスドライバの使用状況のレポートからプロ
セスの操作を行う事ができます。
1. インストール
PowerTOP は Debian でも提供されており、apt でインストールできます。
12
$ sudo apt-get install powertop
2. 起動
起動すると図 3 のような画面が表示されます。「The battery reports a discharge rate ...」 に現在の消費電力
が表示され、現在動作しているプロセスと使用状況がわかります。筆者の環境で、何も設定しない場合は 13W
のようです。
図3
PowerTOP 起動画面
Tunables タブを選択すると調整可能なシステムの設定が表示されます (図 4)。Bad が省電力に有効な項目に
もかかわらず無効な設定、Good が既に有効になっている設定となっています。
図4
Tunables 画面
この状態ではまだシステムに最適化された設定になっていないため、一度終了し、キャリブレーションを行い
ます。
3. キャリブレーション
設定する PC の状態を取得するためにキャリブレーションを行います。実行するとデバイスなどから使用状況
を読み取り、マシンに対して適切な設定を行います。ノート PC の場合はいきなりモニターのバックライトが
消えるので注意しましょう。
$ sudo powertop --calibrate
キャリブレーションが終わると、/var/cache/powertop/saved parameters.powertop 以下にデータが保
存されます。次回の PowerTOP 起動時からはキャリブレーションデータを元に省電力にされた環境で起動し
ます。
4. キャリブレーション後
キャリブレーション後に起動すると、「The battery reports a discharge rate ...」 の項目に表示される消費電
力値が変わり、システム全体で省電力で稼働していることが確認できるでしょう。
5. PowerTOP の起動時有効化
PowerTOP は起動すると保存されている設定を元に省電力状態にしてくれますが、PC を立ち上げるたびに
13
PowerTOP 自体を立ち上げる必要があります。
起動時に自動的に PowerTOP を立ち上げるようにするには、以下のように systemd の ユニットファイルを
用意し、有効にしておきます。
$ cat /etc/systemd/system/powertop.service
[Unit]
Description=PowerTOP
[Service]
Type=oneshot
ExecStart=/usr/bin/powertop
Environment="TERM=xterm"
[Install]
WantedBy=multi-user.target
$ sudo systemctl enable powertop
3.3.2 TLP を使った設定
PowerTOP の他に TLP というツールもあります。これは PowerTOP のように詳細なレポートは出してくれませ
んが、AC 接続時などの状況に応じたスクリプトが準備されており、インストールするだけである程度省電力設定を
行ってくれる便利なツールです。もちろん、Debian ではパッケージ化されており、apt でインストールできます。
$ sudo apt-get install tlp
無線 LAN の設定等に NetworkManager を使っているなら tlp-rdw パッケージもインストールしておくと無線
LAN、Bluetooth 関連の設定も行ってくれます。デフォルトの設定は /etc/default/tlp にあり、このファイルを変更
して環境に合わせた省電力設定を行います(図 5)。設定はよく使われる項目しかなく、使っている環境の設定がない
場合もあります。このような場合は T 自分で設定を追加するか、先に説明したように sysfs / procfs 経由の設定を別
途行う必要があります。
# Set to 0 to disable, 1 to enable TLP.
TLP_ENABLE=1
# Operation mode when no power supply can be detected: AC, BAT
# Concerns some desktop and embedded hardware only.
TLP_DEFAULT_MODE=AC
# Seconds laptop mode has to wait after the disk goes idle before doing a sync.
# Non-zero value enables, zero disables laptop mode.
DISK_IDLE_SECS_ON_AC=0
DISK_IDLE_SECS_ON_BAT=2
# Dirty page values (timeouts in secs).
MAX_LOST_WORK_SECS_ON_AC=15
MAX_LOST_WORK_SECS_ON_BAT=60
...
図5
/etc/default/tlp 例
TLP は systemd やその他 init 用の起動ファイルが用意されているので PC 起動時に設定が反映されるのも良い点
です。
3.3.3 省電力設定後
図 6 が省電力設定した後に PowerTOP で消費電力を確認した内容です。消費電力が 13W から 11W に下がって
いることがわかります。また PC 稼働時間も 5 時間半から 6 時間 50 分に伸びていることがわかります。
14
図6
省電力設定後
3.4 まとめ
Debian での省電力設定について説明しました。現在の状態をとりあえず確認するには cpufreq-info を使い、カー
ネルの設定やドライバの設定は sysfs や proc fs 経由で設定します。プログラムやプロセスの詳細な状態の確認する
には PowerTOP を使います。省電力設定できる項目もわかり、ユーザインターフェイスから各種設定ができるよう
になっています。また再立ち上げすると省電力設定を再設定する必要がありますので、sysytem 用の service ファイ
ルを別途用意するなどの対策が必要です。細かい設定を行わなくても、とりあえず省電力設定を行いたい場合は TLP
を使うのがよいでしょう。ただ全ての PC をサポートしているわけではありませんので、環境に合わせてプログラム
を修正するなりの対応が必要となります。
15
あんどきゅめんてっど でびあん 2016 年夏号
4 LibreOffice の最近の動向と Debian で
の LibreOffice パッケージについて
榎 真治
4.1 2015 年の LibreOffice を振り返って
• LibreOffice Online(LOOL) の開発が本格開始
• LibreOffice Viewer リリース
• 編集機能は実験的な段階
• 開発/リリースも順調に
• 機能面以外でも、UX の改善に取り組み
• 相互運用性(フィルタ)の改善
• 2015 年 9 月には5周年!
4.2 LibreOffice Online
• まだまだ開発中
• UI が HTML5、ブラウザで編集する
• 複数ユーザーの同時編集
• サーバープログラムとして提供
• 誰でもサーバーをたてられる
• ホスティングサービスも出てくるのでは
• ownCloud の編集画面で LOOL を使うデモ https://www.youtube.com/watch?v=jPGBRu085Dw
4.3 プロジェクトの状況
• Advisory Board(現在 web では 17)
• CIB, ミュンヘン市,Rusbitech がこの 1 年で参加
• アクティブなコミッターは毎月 100 人程度
• TDF のスタッフは 6 名(メンバー 211 名)
• TDF メンバー以外でもアクティブな人は多い
• ヨーロッパでは行政中心に導入が進行中
• イタリア国防省 15 万台
• フランス内務省 24 万台(これは以前から)
• イギリス政府も ODF 標準、Collabora とも契約し LibreOffice 導入へ
16
• 台湾も ODF 推進、自治体で LibreOffice 導入
4.4 今年の日本での活動
• 翻訳
• UI の翻訳率は高い,Help はますます追いついてない
(翻訳率は高くても誤訳を見つけて修正しきれてない、とのツッコミあり)
• 英語の Help も実装に追いついてないケースも
• ドキュメント系翻訳はアナウンスくらい
• 翻訳査読スプリントを開催 (査読が溜まってきていた + ルールの議論)
• 品質保証
• HackFest (Bug ハンティング)7 回
• クラッシュバグなどいくつか発見/レポート
4.5 今年の日本での活動 2
• 日本語コミュニティのイベント + ブース出展など 46 回
• HackFest を増やした(10 回)、来年も重点的に
• QA など集まってやることで作業がやりやすかった
• まだまだ参加者は少ない
• 開発向けも 1 回、LibreOffice のビルドネタで挑戦
• 関西 LibreOffice HackFest 2015-08-22(開発)
• LibreOffice Hackfest (翻訳査読スプリント) 2015-07-26 in 東京
4.6 LibreOffice Conference 2015
• 開催地:デンマーク・オーフス
• 日時:2015/9/23(水)-25(金)
• 約 80 のセッション
• 参加者:約 150 名
• 例年より多め、アジア勢も増えた
• 日本からは 3 名
• 小笠原さん、山本さん、榎
• NLP ワークショップ
• ITPro でのカンファレンスレポート http://itpro.nikkeibp.co.jp/atcl/column/15/102800252/
4.7 LibreOffice mini Conference 2016 in Japan を開催しました
• 日時:2016/1/9(土) 13:00-18:00
• 場所:GMO Yours!(グランフロント大阪)
• 参加者:48 名
• ITPro で の カ ン ファレ ン ス レ ポ ー ト http://itpro.nikkeibp.co.jp/atcl/column/14/090100053/
013100122/
17
4.8 Debian での LibreOffice パッケージ
TDF で提供されているソースコードを TDF 版、Debian で apt-get source で取得できるソースコードを Debian
版と、この資料では呼ぶことにします
4.9 TDF 版のソースを落としてみる
$ tar -Jxvf libreoffice-4.3.3.2.tar.xz
$ du -h libreoffice-4.3.3.2
931M libreoffice-4.3.3.2
Debian 版のソースを取得する Debian パッケージのソースを取得する(環境:安定版 jessie)
$ sudo aptitude install dpkg-dev
$ apt-get source libreoffice
$ ls -lh
drwxr-xr-x 153 eno eno 48K 12 月 26 21:06 libreoffice-4.3.3
-rw-r--r-1 eno eno 2.1M 9 月 5 03:25 libreoffice_4.3.3-2+deb8u2.debian.tar.xz
-rw-r--r-1 eno eno 26K 9 月 5 03:25 libreoffice_4.3.3-2+deb8u2.dsc
-rw-r--r-1 eno eno 308M 4 月 9 2015 libreoffice_4.3.3.orig-external.tar.xz
-rw-r--r-1 eno eno 1.4M 4 月 9 2015 libreoffice_4.3.3.orig-helpcontent2.tar.xz
-rw-r--r-1 eno eno 122M 4 月 9 2015 libreoffice_4.3.3.orig-translations.tar.xz
-rw-r--r-1 eno eno 143M 4 月 9 2015 libreoffice_4.3.3.orig.tar.xz
4.10 external は、他の OSS のこと
• Debian 版は、他の OSS 本体のソースコードを含む ”external/tarballs/ ”以下 Python3, hsqldb, poppler, 各
種フォントなど大量に
• TDF 版は、他の OSS へのパッチのみ初めて make する時に他の OSS の本体はダウンロードなので 1 回目の
ビルドは結構時間がかかる
4.11 ファイル一覧の diff(Debian 版にしかないもの)
/.pc/ 以下 745 .pc/以下は quilt の Debian 向け修正記録
/bridges/ 以下 7
/translations/以下 TDF 版は翻訳、ヘルプは別になっている
/helpcontent2/以下
/debian/以下 131 debian/以下は debian 独自パッチ
/external/tarballs/以下 109
/solenv/gbuild/platform/LINUX_AARCH64_GCC.mk それ以外に、3 ファイルほど追加されている...
/writerfilter/qa/cppunittests/rtftok/data/pass/sf_2063317381c4a46d642c79a4b1817dc0-101375-minimized.rtf
/writerfilter/qa/cppunittests/rtftok/data/pass/sf_2063317381c4a46d642c79a4b1817dc0-108116-minimized.rtf
\subsection{libreoffice-4.3.3 のディレクトリ構成}
$ du -h libreoffice-4.3.3/
...
2.7G libreoffice-4.3.3/
内、translations/以下が 1.5G と大きな割合を占める
$ cd libreoffice-4.3.3/
$ du -h debian/
4.0K
debian/pyuno-for-2.7
44K
debian/scripts
488K
debian/patches
12K
debian/source
8.0K
debian/branding
12K
debian/tests/patches
24K
debian/tests
2.9M
debian/templates
8.0K
debian/upstream
5.0M
debian/
4.12 libreoffice-4.3.3/debian/patches/に含まれるファイル
• 46 のパッチファイル
18
• セキュリティFIX のパッチは 6 つ、セキュリティFIX は対応できているよう*9
• libreoffice の master から取り込み 6 つ程度、それ以外の master から取り込みもある
• その他、Debian の設定やビルド周りのパッチで(ざっとみた感じでは)Debian 独自の機能はなさそう
4.13 Debian の LibreOffice バージョン (2015 年 12 月時点)
• experimental: 現在 1:5.1.0 rc1-1 LibreOffice の開発版。5.1 系 Alpha → Beta →リリース候補 (RC)
• sid(stretch も同じ): 現在 1:5.0.4 rc2-2 LibreOffice の最新版 (fresh) のリリース候補とリリース版
• jessie(Stable) : 現在 1:4.3.3-2+deb8u2 2 回アップデート (2015/3/26: CVE-2015-1774, 2015/8/28 : CVE2014-4551,VE-2015-5213,CVE-2015-5212,CVE-2015-5214) sid 時代に 1 回セキュリティFIX (2014/11/27 :
CVE-2014-9093)
• jessie-backports: 現在 1:5.0.4 rc2-2 LibreOffice の最新版 (fresh) とそのリリース候補安定版 (jessie) でも
LibreOffice の最新版が利用できる
Enjoy Debian and LibreOffice Life!
4.14 著者紹介
• 榎真治(えのきしんじ)
• LibreOffice 日本語チームメンバー (2011-現在) 主にイベント担当、2015 年は LibreOffice コミュニティイベン
ト 34 回くらい開催/参加
• The Document Foundation メンバー (2014/4-現在)
• フリーで LibreOffice のコンサル/サポート/トレーニング
• アイクラフト株式会社と組んで LibreOffice サポートビジネス(Collabora のサポートのリセールと L1/L2 サ
ポート)を開始
*9
https://www.libreoffice.org/about-us/security/advisories/
19
あんどきゅめんてっど でびあん 2016 年夏号
5 Debian モバイル wifi ルータ化
野島 貴英
5.1 はじめに
最近のモバイルルータは、7GBytes/月、300MBytes/日などの、一定の通信量を超えるとたちまち通信制限がか
かってしまい、とても実用にならないぐらいに通信帯域を絞られてしまいます。
たまたま、手元に通信制限が非常にゆるい(というか気にならない)FOMA のモデムがありましたので、こち
らと Debian を使ってモバイルルータが作れないかを試してみました。また、Linux で無線 AP を作る時の仕組みに
ついてもちょっと調べてみました。
5.2 用意するもの
用意するものは次のとおり。
• Debian の動くモバイル PC
• DoCoMo 社 L-05A (モデム。データ定額制の契約であること。)
• BUFFALO WLI-UC-GNM2 (備考:Ralink 製 Ralink RT3070 搭載。900 円/1 個ぐらいの小型 USB 無線
LAN アダプタ)
5.3 bridge を作る
Step 1-1 apt install bridge-utils
Step 1-2 vi /etc/network/interface して以下を追記
/etc/network/interface の追記部分:
auto br0
iface br0 inet static
address 192.168.0.1
netmask 255.255.255.0
bridge_ports none
bridge_stp off
bridge_fd 0
bridge_maxwait 0
Step 1-3 ifup br0
Step 1-4 vi /etc/sysctl.d/bridge-filter-workaround.conf
/etc/sysctl.d/bridge-filter-workaround.conf 中身:
20
net.bridge.bridge-nf-call-ip6tables = 0
net.bridge.bridge-nf-call-iptables = 0
net.bridge.bridge-nf-call-arptables = 0
Step 1-5 vi /etc/sysctl.d/forward-yes.conf
/etc/sysctl.d/forward-yes.conf 中身:
net.ipv4.ip_forward=1
Step 1-6 sysctl -p /etc/sysctl.d/bridge-filter-workaround.conf
Step 1-7 sysctl -p /etc/sysctl.d/forward-yes.conf 図7
bridge の設定の状況
5.4 L-05A 側設定
Step 2-1 apt install ppp
Step 2-2 vi /etc/ppp/peers/l-05a
/etc/ppp/peers/l-05a の中身:
hide-password
noauth
connect "/usr/sbin/chat -v -f /etc/chatscripts/l-05a"
debug
/dev/ttyACM0
115200
defaultroute
noipdefault
user ""
remotename l-05a
ipparam l-05a
persist
usepeerdns
idle 300
Step 2-3 vi /etc/chatscripts/l-05a
/etc/chatscripts/l-05a の中身:
ABORT BUSY ABORT ’NO CARRIER’ ABORT VOICE
ABORT ’NO DIALTONE’ ABORT ’NO DIAL TONE’
ABORT ’NO ANSWER’ ABORT DELAYED
’’ ATZ
OK-AT-OK "ATDT*99***5#"
CONNECT \d\c
Step 2-4 chown root:dip /etc/ppp/peers/l-05a /etc/chatscripts/l-05a
Step 2-5 chmod 640 /etc/ppp/peers/l-05a /etc/chatscripts/l-05a
21
Step 2-6 vi /etc/ppp/ip-up.d/bridge-up
/etc/ppp/ip-up.d/bridge-up の中身:
#!/bin/sh
iptables -t nat -A POSTROUTING -o $PPP_IFACE \
-j MASQUERADE
iptables -A FORWARD -i br0 -o $PPP_IFACE -j ACCEPT
iptables -A FORWARD -o br0 -i $PPP_IFACE -j ACCEPT
Step 2-7 vi /etc/ppp/ip-down.d/bridge-down
/etc/ppp/ip-down.d/bridge-down の中身:
#!/bin/sh
PATH=/bin:/usr/bin:/sbin:/usr/sbin
iptables -t nat -D POSTROUTING -o $PPP_IFACE \
-j MASQUERADE
iptables -D FORWARD -i br0 -o $PPP_IFACE -j ACCEPT
iptables -D FORWARD -o br0 -i $PPP_IFACE -j ACCEPT
Step 2-8 chown 755 /etc/ppp/ip-up.d/bridge-up /etc/ppp/ip-up.d/bridge-down
Step 2-9 pon l-05a
これで、L-05a はグローバルに接続されるようになります。
図 8 ppp の設定の状況
5.5 補足:L-05A 側トラブルシュート
つながらない時は次のとおりです。
• tail -f /var/log/debug /var/log/messages に詳細なログが出ます。こちらを見ると解決のためのヒントが見
つかります。
• pon l-05a をした後、ttyACM0 が見つからないというエラーが出ることがあります。この場合は、次の手続き
を取ると治ります。
modprobe -r uas;modprobe uas;eject /dev/sr0
5.6 hostapd の設定
いよいよ無線 AP を立てます。
22
Step 3-1 apt install hostapd firmware-ralink
Step 3-2 ここで、WLI-UC-GNM2 を PC に差し込む。
Step 3-3 lsmod して以下のモジュールがロードされたことを確認。
lsmod の結果抜粋
rt2800usb
rt2x00usb
rt2800lib
rt2x00lib
28672
24576
90112
53248
mac80211
630784
cfg80211
rfkill
532480
24576
0
1 rt2800usb
1 rt2800usb
3 rt2x00usb,rt2800lib,
rt2800usb
4 rt2x00lib,rt2x00usb,
rt2800lib
4 mac80211,rt2x00lib
5 cfg80211
5.7 hostapd の設定
Step 3-4 ip addr show して、wlxXXXXXXXXXXXX という名前の I/F を探す。
Step 3-5 vi /etc/hostapd/hostapd.conf
/etc/hostapd/hostapd.conf の中身:
interface=wlxXXXXXXXXXXXX
bridge=br0
driver=nl80211
hw_mode=g
ieee80211n=1
ssid=debianspot
wpa_passphrase=abcdef
macaddr_acl=0
wpa=2
channel=1
wpa_key_mgmt=WPA-PSK
wpa_pairwise=CCMP
logger_syslog=-1
logger_syslog_level=2
ctrl_interface=/var/run/hostapd
5.8 hostapd の設定
Step 3-6 chmod 600 /etc/hostapd/hostapd.conf
Step 3-7 systemctl start hostapd.service
これで無線 AP が稼働します。iphone/Android 端末で見ると、SSID: debianspot という SSID が見えるはずで
す。ただ、まだ、dhcp サービスを有効にしていないため、パスワードを入れても接続できません。
図 9 hostapd 稼働の状況
5.9 DHCP の設定
今回簡易的に dhcp サーバを立てるため、dnsmasq を利用します。
23
Step 4-1 apt install dnsmasq
Step 4-2 vi /etc/dnsmasq.d/dhcp.conf
dhcp.conf の中身:
interface=br0
bind-interfaces
dhcp-range=192.168.2.129,192.168.2.254,
255.255.255.0,1h
Step 4-3 systemctl start dnsmasq.service
以上で、dhcp サービスが br0 経由で開始され、無事、無線 AP として稼働します。iphone/Android からも SSID:
debianspot に接続し、パスワード’abcdef’ を入れると、WPA2-PSK にて接続されます。
図 11
図 10
nl80211 の図示
無線 AP 稼働の状況
5.10 hostapd はどのように WLI-UC-GNM2 を操作するのか?
cfg8011 と hostapd は通信をして WLI-UC-GNM2 を操作するのですが、こちらで使われるプロトコルは、linux
の NETLINK が利用されます。
24
あんどきゅめんてっど でびあん 2016 年夏号
6 VyOS を入れて AP を構築してみた。
かわだてつたろう
6.1 VyOS
VyOS*10 は Linux ベースのネットワークオペレーティングシステムです。ルーティング、ファイヤーウォール、
VPN の構築に使用されています。
元々は Vyatta 社が開発していた Vyatta Core でしたが開発元が買収された後に提供が終了したため、ここから
フォークし開発が開始されたのが VyOS になります。
VyOS は Debian をベースにしており、最新リリースの VyOS 1.1.6 (Helium) は Debian 6 Squeeze がベースと
なっています。
6.2 初期設定
インストーラの ISO イメージは Live CD として提供されていますので User Guide の Installation
*11
の手順通り
にインストールを進めます。
続いてルータとして使用するための設定を行ないます。ここでは User Guide の Quick Start Guide
*12
の通りに
設定します。これで外と内 (192.168.0.1/24) を繋ぐルータができあがります。
6.3 アクセスポイントの構築
アクセスポイントに使用する無線 LAN アダプタとして en:users:drivers [Linux Wireless]
*13
を参考に、
Linux が対応しており、アクセスポイントとして動作するアダプタを用意します。
今回は Atheros 製の AR9280 を使います。
このアダプタを先に設定した内側のネットワークに追加する形でアクセスポイントを設定します。
手順としてはブリッジを作成しそこに内側のインターフェース (eth0) と無線 LAN のインターフェース (wlan0) を
追加します。この際追加するインターフェースに address が設定されているとエラーになりますので先に削除しま
す。*14
*10
*11
*12
*13
*14
http://vyos.net
http://vyos.net/wiki/User_Guide#Installation
http://vyos.net/wiki/User_Guide#Quick_Start_Guide
https://wireless.wiki.kernel.org/en/users/drivers
http://orebibou.com/2015/01/apu1-c%E3%81%AB%E7%84%A1%E7%B7%9Alan%E3%82%A2%E3%83%B3%E3%83%86%E3%83%8A%E3%82%
92%E5%8F%96%E3%82%8A%E4%BB%98%E3%81%91%E3%81%A6vyos%E3%81%AE%E7%84%A1%E7%B7%9Alan%E3%83%AB%E3%83%BC%E3%82%
BF%E3%83%BC/
25
vyos@vyos:~$ configure
vyos@vyos# delete interfaces ethernet eth1 address 192.168.0.1/24
vyos@vyos# set interfaces bridge br0
vyos@vyos# set interfaces ethernet eth1 bridge-group bridge br0
vyos@vyos# set interfaces wireless wlan0 bridge-group bridge br0
vyos@vyos# set interfaces bridge br0 address 192.168.0.1/24
vyos@vyos# commit
vyos@vyos# save
続いて eth1 として設定したサービスを br0 に変更しておきます。
vyos@vyos#
vyos@vyos#
vyos@vyos#
vyos@vyos#
delete service dns forwarding listen-on eth1
set service dns forwarding listen-on br0
commit
save
そして無線 LAN アクセスポイントの設定を行います。
vyos@vyos#
vyos@vyos#
vyos@vyos#
vyos@vyos#
vyos@vyos#
vyos@vyos#
vyos@vyos#
vyos@vyos#
vyos@vyos#
set interfaces
set interfaces
set interfaces
set interfaces
set interfaces
set interfaces
set interfaces
commit
save
wireless
wireless
wireless
wireless
wireless
wireless
wireless
wlan0
wlan0
wlan0
wlan0
wlan0
wlan0
wlan0
country JP
mode g
channel 10
ssid vyos
security wpa mode wpa2
security wpa passphrase password
type access-point
これで IEEE802.11g のアクセスポイントができあがりました。
アクセスポイントに接続できない場合はアクセスポイントデーモンの hostapd が起動していないか dhcpd サーバ
が br0 を認識していないことが考えられますので、それぞれのデーモンを再起動してください。
もしくは一度再起動しておくとよいかもしれません。
vyos@vyos~$ sudo /opt/vyatta/sbin/hostapd-init start wlan0
vyos@vyos~$ configure
vyos@vyos# run restart dhcp server
vyos@vyos# exit
6.4 5GHz 帯と IEEE802.11n の使用
今回、使用した無線 LAN アダプタは 5GHz 帯と IEEE802.11n に対応していますのでこれらを使用できるように
してみます。
6.4.1 IEEE802.11a
まずは 5GHz 帯の IEEE802.11a の設定を行なってみます。
vyos@vyos~$ configure
vyos@vyos# set interfaces wireless wlan0 mode a
vyos@vyos# set interfaces wireless wlan0 channel 36
vyos@vyos# commit
[ interfaces wireless wlan0 channel 36 ]
Channel 36 is not available for wlan0
[[interfaces wireless wlan0]] failed
Commit failed
[edit]
となり、設定に失敗します。
iw コマンドでチャンネルを確認すると設定したチャンネルが Band 2 にあることが確認できます。
26
vyos@vyos:/opt/vyatta/sbin$ /usr/sbin/iw list
Wiphy phy0
Band 1:
<snip>
Band 2:
Capabilities: 0x11ce
HT20/HT40
SM Power Save disabled
RX HT40 SGI
TX STBC
RX STBC 1-stream
Max AMSDU length: 7935 bytes
DSSS/CCK HT40
Maximum RX AMPDU length 65535 bytes (exponent: 0x003)
Minimum RX AMPDU time spacing: 8 usec (0x06)
HT TX/RX MCS rate indexes supported: 0-15
Frequencies:
* 5180 MHz [36] (15.0 dBm) (passive scanning,
* 5200 MHz [40] (15.0 dBm) (passive scanning,
* 5220 MHz [44] (15.0 dBm) (passive scanning,
* 5240 MHz [48] (15.0 dBm) (passive scanning,
no
no
no
no
IBSS)
IBSS)
IBSS)
IBSS)
<snip>
これは設定スクリプトが Band 2 のチャンネルを見ていないためですので、とりあえずこの部分を潰して再度同じ
設定を行ないます。
vyos@vyos~$ configure
vyos@vyos# set interfaces wireless wlan0 mode a
vyos@vyos# set interfaces wireless wlan0 channel 36
vyos@vyos# commit
今度はエラーなく設定が完了します。しかし、アクセスポイントが表われず hostapd デーモンも起動していません。
これは設定したチャンネルが、(passive scanning, no IBSS) とあるように、パッシブスキャン状態でありアク
セスポイントとなることができないためです。
そこで設定スクリプトを再度修正し、パッシブスキャン状態のチャンネルも除外するようにします。先の修正とあ
わせて次のパッチのような感じになります。
--- /opt/vyatta/sbin/wireless-config.pl.org
2016-01-23 05:09:41.455210793 +0000
+++ /opt/vyatta/sbin/wireless-config.pl
2016-01-23 05:26:43.960649746 +0000
@@ -83,10 +83,10 @@
while (<$iwcmd>) {
chomp;
next if /\(disabled\)/;
+
next if /\(.*?(passive scanning|no IBSS).*?\)/;
last unless /\* \d+ MHz \[(\d+)\]/;
push @chans, $1;
}
last;
}
close $iwcmd;
return @chans;
ここまでの結果では 5GHz 帯で使用できるチャンネルは一つもないことになります。
6.4.2 カーネルドライバの変更
en/users/Drivers/ath - Linux Wireless
hints
*15
の
5 GHz with world regulatory domain and beacon
によると 5GHz 帯は全てパッシブスキャン状態となっているようです。
これは各国、地域ごとに使用できる周波数帯が異なるためだと思われます。日本においても無線 LAN で使用する
5GHz 帯は、屋外で使用できるチャンネル (W56) と使用できないチャンネル (W52, W53)、気象レーダと干渉する
ため運用制限があるチャンネル (W53, W56) があります。
屋内で使用するアクセスポイントを構築したいので、ここでは屋内で気象レーダと干渉しないチャンネル (W52)
をアクセスポイントとして使用できるようにカーネルドライバを変更して対応します。
Debian マシン上で VyOS のカーネルドライバを変更してビルドします。
*15
http://linuxwireless.org/en/users/Drivers/ath/#A5_GHz_with_world_regulatory_domain_and_beacon_hints
27
まずは Rebuild VyOS kernel Step*16 の手順に従ってカーネルソースツリーを取得します。
$
$
$
$
git clone git://github.com/vyos/build-iso.git /path/to/build-iso
cd /path/to/build-iso
git submodule update --init pkgs/linux-image
cd checkout helium
W52 のチャンネルをアクセスポイントとして使用できるよう OpenWRT のパッチ*17 を参考にドライバを変更し
ます。
diff --git a/drivers/net/wireless/ath/regd.c b/drivers/net/wireless/ath/regd.c
index 1217c52..74ce3df 100644
--- a/drivers/net/wireless/ath/regd.c
+++ b/drivers/net/wireless/ath/regd.c
@@ -42,7 +42,8 @@ static int __ath_regd_init(struct ath_regulatory *reg);
NL80211_RRF_PASSIVE_SCAN | NL80211_RRF_NO_OFDM)
/* We allow IBSS on these on a case by case basis by regulatory domain */
-#define ATH9K_5GHZ_5150_5350
REG_RULE(5150-10, 5350+10, 80, 0, 30,\
+#define ATH9K_5GHZ_5150_5350
REG_RULE(5150-10, 5240+10, 80, 0, 30, 0),\
+
REG_RULE(5260-10, 5350+10, 80, 0, 30,\
NL80211_RRF_PASSIVE_SCAN | NL80211_RRF_NO_IBSS)
#define ATH9K_5GHZ_5470_5850
REG_RULE(5470-10, 5850+10, 80, 0, 30,\
NL80211_RRF_PASSIVE_SCAN | NL80211_RRF_NO_IBSS)
@@ -63,7 +64,7 @@ static int __ath_regd_init(struct ath_regulatory *reg);
/* Can be used for:
* 0x60, 0x61, 0x62 */
static const struct ieee80211_regdomain ath_world_regdom_60_61_62 = {
.n_reg_rules = 5,
+
.n_reg_rules = 6,
.alpha2 = "99",
.reg_rules = {
ATH9K_2GHZ_ALL,
@@ -73,7 +74,7 @@ static const struct ieee80211_regdomain ath_world_regdom_60_61_62 = {
/* Can be used by 0x63 and 0x65 */
static const struct ieee80211_regdomain ath_world_regdom_63_65 = {
.n_reg_rules = 4,
+
.n_reg_rules = 5,
.alpha2 = "99",
.reg_rules = {
ATH9K_2GHZ_CH01_11,
@@ -84,7 +85,7 @@ static const struct ieee80211_regdomain ath_world_regdom_63_65 = {
/* Can be used by 0x64 only */
static const struct ieee80211_regdomain ath_world_regdom_64 = {
.n_reg_rules = 3,
+
.n_reg_rules = 4,
.alpha2 = "99",
.reg_rules = {
ATH9K_2GHZ_CH01_11,
@@ -94,7 +95,7 @@ static const struct ieee80211_regdomain ath_world_regdom_64 = {
/* Can be used by 0x66 and 0x69 */
static const struct ieee80211_regdomain ath_world_regdom_66_69 = {
.n_reg_rules = 3,
+
.n_reg_rules = 4,
.alpha2 = "99",
.reg_rules = {
ATH9K_2GHZ_CH01_11,
@@ -104,7 +105,7 @@ static const struct ieee80211_regdomain ath_world_regdom_66_69 = {
/* Can be used by 0x67, 0x68, 0x6A and 0x6C */
static const struct ieee80211_regdomain ath_world_regdom_67_68_6A_6C = {
.n_reg_rules = 4,
+
.n_reg_rules = 5,
.alpha2 = "99",
.reg_rules = {
ATH9K_2GHZ_CH01_11,
そして、ビルド環境として cowbuilder で squeeze 環境を用意してビルドします。*18
*16
*17
*18
http://vyos.net/wiki/Rebuild_VyOS_kernel_Step
https://dev.openwrt.org/browser/trunk/package/kernel/mac80211/patches/403-world_regd_fixup.patch?order=name
https://gist.github.com/hiroyuki-sato/201032fe75d2cf9f5801
https://gist.github.com/higebu/b4ee62b32c517b6598b2
28
$ sudo cowbuilder \
--create --distribution squeeze \
--basepath /var/cache/pbuilder/base-vyos-squeeze-amd64.cow
$ sudo cowbuilder \
--login \
--bindmount /path/to/build-iso \
--basepath /var/cache/pbuilder/base-vyos-squeeze-amd64.cow/
# apt-get install devscripts kernel-package python debhelper bc
# cd /path/to/build-iso/pkgs/linux-image
# ./debian/bin/build-flavour.sh amd64-vyos
# cd ../../
# make linux-image
ビルドが完了すると/path/to/build-iso/pkgs 以下に deb ファイルが生成されていますのでこの deb パッケージを
インストールしてドライバを更新します。
6.4.3 IEEE802.11a (再設定)
再度、IEEE802.11a の設定を行ないます。
まずは iw コマンドで W52 のチャンネルがパッシブスキャン状態となっていないことを確認します。
vyos@vyos:~$ /usr/sbin/iw list
Wiphy phy0
Band 1:
<snip>
Band 2:
Capabilities: 0x11ce
HT20/HT40
SM Power Save disabled
RX HT40 SGI
TX STBC
RX STBC 1-stream
Max AMSDU length: 7935 bytes
DSSS/CCK HT40
Maximum RX AMPDU length 65535 bytes (exponent: 0x003)
Minimum RX AMPDU time spacing: 8 usec (0x06)
HT TX/RX MCS rate indexes supported: 0-15
Frequencies:
* 5180 MHz [36] (15.0 dBm)
* 5200 MHz [40] (15.0 dBm)
* 5220 MHz [44] (15.0 dBm)
* 5240 MHz [48] (15.0 dBm)
* 5260 MHz [52] (17.0 dBm) (passive scanning, no IBSS, radar detection)
<snip>
再度 IEEE802.11a の設定を行なえば完了です。
6.4.4 IEEE802.11n
続いて IEEE802.11n に設定を変更します。
vyos@vyos~$ configure
vyos@vyos# set interfaces wireless wlan0 mode n
vyos@vyos# commit
エラーなく設定が完了しますが、実際には設定に失敗しておりアクセスポイントとして稼動していません。
hostapd.conf*19 の 設 定 例 に 従 え ば IEEE802.11n を 5GHz 帯 で 使 用 す る に は 、ieee80211n=1 と し た 上 で
hw mode=a と設定しなければいけません。
生 成 さ れ た 設 定 ファイ ル (/var/run/hostapd/wlan0.cfg) を 確 認 す る と ieee80211n=1 と なって い ま す が 、
hw mode=g となっています。設定ファイル生成スクリプトに問題がありますので修正します。
この修正で 5GHz 帯で IEEE802.11n は使用できるようになりますが、IEEE802.11n には拡張モードがありますの
でできればこれも使用できるようにしてみます。
しかし、どうやら VyOS は IEEE802.11n の拡張モードに対応していないようで、先程の設定ファイル生成スクリ
プトにも入力インターフェース側のスクリプトにも対応した処理がありません。
アダプタにあわせて設定できるように修正していくのは大変ですので、ここでは設定ファイル生成スクリプトに直
*19
https://w1.fi/cgit/hostap/tree/hostapd/hostapd.conf
29
書きすることで対応します。ただ、チャンネルボンディングの設定は使用するチャンネルにあわせて変更する必要が
あります。チャンネルを変更する度にスクリプトを書き換えるのは大変ですのでこの点にだけ対応しておきます。
ここまで対応させた設定ファイル生成スクリプトの変更は次のパッチのようになります。ht capab はご使用のアダ
プタにあわせて対応させる必要がありますのでご注意ください。
vyos@vyos:~$ diff -u /opt/vyatta/sbin/wireless-hostapd.pl{.org,}
--- /opt/vyatta/sbin/wireless-hostapd.pl.org
2016-01-23 08:55:16.208240635 +0000
+++ /opt/vyatta/sbin/wireless-hostapd.pl
2016-01-23 10:29:52.095371845 +0000
@@ -98,8 +98,21 @@
my $hw_mode = $config->returnValue(’mode’);
if ( $hw_mode eq ’n’ ) {
print "hw_mode=g\n";
print "ieee80211n=1\n"
+
if ( (34 <= $chan) and ($chan <=165) ) {
+
print "hw_mode=a\n";
+
} else {
+
print "hw_mode=g\n";
+
}
+
print "ieee80211n=1\n";
+
my @CH_HT40_PLUS = qw(1 2 3 4 5 6 7 8 9 36 44 52 60);
+
my @CH_HT40_MINUS = qw(5 6 7 8 9 10 11 12 13 40 48 56 64);
+
my $ht_capab = "[SHORT-GI-40][TX-STBC][RX-STBC1][DSSS_CCK-40]";
+
if ( grep {$_ eq $chan} @CH_HT40_PLUS ) {
+
$ht_capab = $ht_capab . "[HT40+]";
+
} elsif ( grep {$_ eq $chan} @CH_HT40_MINUS ) {
+
$ht_capab = $ht_capab . "[HT40-]";
+
}
+
print "ht_capab=$ht_capab\n"
} else {
print "hw_mode=$hw_mode\n";
}
これで、再度 IEEE802.11n の設定を行なえば完了です。
6.5 まとめ
VyOS で 2GHz 帯の無線 LAN アクセスポイント構築は簡単にできます。
しかし、5GHz 帯や IEEE802.11n を使用する場合は少し手間です。スクリプトの問題は VyOS 固有の問題ですが、
ドライバについては他の Linux ディストリビューションでも同じ問題に直面すると思います。en:users:drivers
[Linux Wireless] などを参考に問題の少ない無線 LAN アダプタを使用することが構築の近道かと思います。
30
あんどきゅめんてっど でびあん 2016 年夏号
7 Buffalo Linkstation 向け Debian
Installer
Roger Shimizu
7.1 始めに
VGA/HDMI port や Keyboard など付いてない機器、例えばサーバ向けて PC、それから ARM 開発ボードなど
の機器に、どうやって Debian を入れておくでしょうか?RAID 付きの Buffalo Linkstation NAS を例として、紹介
致します。
7.2 Buffalo Linkstation の歴史
• 第0世代: Linkstation / Kuro-Box
• 第1世代: Linkstation HG / Kuro-Box HG
– PowerPC architecture
– IDE/PATA のみ (SATA がなし)
– 現在あっても使いづらいと思います
• 第2世代*20 : Kuro-Box Pro / Linkstation Live / Linkstation LS-GL/LS-WTGL/LS-WSGL/LS-QL
– ARM architecture
∗ Debian Etch まで: arm OABI (Old ABI)
∗ Debian Lenny から: armel EABI (new Embedded ABI)
– Marvell orion5x 5182 chipset; SATA interface
• 第3世代: Linkstation LS-XHL/LS-CHL/LS-WXL & Linkstation LS-VL/LS-WVL/LS-QVL, etc
– Marvell kirkwood 6281 / 6282 chipset
– armel architecture なので、第2世代と rootfs の互換性があり、また Debian Kernel 4.4 から同じ
「-marvell」との flavour で共通に対応されます。*21
• 第4世代: LS-210/LS-220/LS-410/LS-420, etc
– Marvell armada-370 chipset
– armhf architecture (hard-float)
– 残念ながら、Linux Kernel の方がまだ対応されてないようです。
*20
*21
MIPS の Model も出たけれど、Model 数が少ないし、出てすぐデスコンになってしまったので、こちら省略させて頂きます。
HDD を異なる型番の機器に入れる前に、flash-kernel で適切な DTB を uImage.buffalo に入れ置かないと行けません。
31
7.3 Debian Installer の紹介
• Debian Installer (略は D-I となります) では、様々機器に Debian をインストールしてくれるツールとなり
ます。
– 非 Linux な OS でも対応される、例え kFreeBSD や GNU/Hurd など
– メディアは CD/DVD に限られず、PXE netboot や u-boot など様々柔軟なインストールメディアを提供
されております。
– モニターなど表示デバイスが付いてない機器でも対応される── network-console イメージ
⇒ ちょうど Buffalo Linkstation など NAS 機器に向け
• 現在 D-I に対応されている Linkstation リスト*22 :
– Kuro-Box Pro / Linkstation Pro/Live
– Linkstation LS-GL / LS-WSGL / LS-WTGL
– Linkstation LS-XHL / LS-CHLv2 / LS-WXL / LS-WSXL / LS-VL / LS-WVL / LS-QVL
⇒ armel の第2世代と第3世代はほとんど対応されてます
7.4 Linkstation へ Debian の インストール仕方
7.4.1 Linkstation に Debian Installer を起動させる
Buffalo Linkstation では、u-boot という boot loader が、1 番目の partition (/dev/sda1 又は /dev/md0) に保
存される kernel と initrd を読み込んで起動を行います。それから、D-I イメージを 1 番目の partition に置いとけ
ば、Debian Installer が起動されます。手順は下記の通りとなります。
• 1 番目の partition をフォーマットする*23 (既に存在するなら省略可)
• D-I kernel/initrd イメージを、1 番目の partition にコピーする。D-I イメージは下記 URL でダウンロード
出来ます。
– https://d-i.debian.org/daily-images/armel/daily
/orion5x/network-console/buffalo
– https://d-i.debian.org/daily-images/armel/daily
/kirkwood/network-console/buffalo
• D-I kernel/initrd image を入れた HDD を Linkstation に取り付けます。
• Linkstation を起動し、DHCP で IP Address を割り当てられるまで暫く待って、それから割り当てられた IP
Address に SSH で接続します。
• 画面に沿って、通常な Debian Install 行うことが出来ます。
7.4.2 詳細な手順: HDD Partition の作成
Linkstation の HDD を Linkstation から外し、SATA-USB アダプターなど方法経由で PC に接続します。例え
ば、その HDD が /dev/sdc として説明します。LS-WXL/WSXL/WVL/QVL など RAID 機器の場合は、すべて
の HDD を同じ partition にしても良いです。
*22
*23
d-i daily image が含まれる
1 番目の partition は ext2/ext3 に限られます。
32
$ sudo parted /dev/sdc
(parted) mklabel gpt
(parted) mkpart boot 2048s 1024MiB
(parted) mkpart root 1024MiB 6144MiB
(parted) mkpart swap 6144MiB 6400MiB
(parted) mkpart data 6400MiB -1
# 下記のコマンドは RAID 構成の機種だけ必要となります。
(parted) set 1 raid on
(parted) set 2 raid on
(parted) set 3 raid on
(parted) set 4 raid on
7.4.3 詳細な手順: HDD Partition の確認
• Partition を作ったら、確認するとこうなります。
(parted) print
Model: SAMSUNG HM250HI (scsi)
Disk /dev/sdc: 250GB
Sector size (logical/physical): 512B/512B
Partition Table: gpt
Disk Flags:
Num Start
End
Size
File sys Name
1 1049kB 1074MB 1073MB
boot
2 1074MB 6442MB 5369MB
root
3 6442MB 6711MB 268MB
swap
4 6711MB 250GB
243GB
data
Flags
raid
raid
raid
raid
# 最後に parted を終了させます。
(parted) quit
• RAID 構成の場合は他の HDD も同じようにセットしてください。
7.4.4 詳細な手順: boot image のセット
• boot image kernel/initrd を第1番目 partition にコピーします。(例え、LS-WXL のイメージ)
• RAID の複数 HDD の場合は、念のためすべて HDD をコピーしましょう。*24
$ sudo mkfs.ext3 /dev/sdc1
$ sudo mount /dev/sdc1 /mnt
$ wget https://d-i.debian.org/daily-images/armel\
/daily/kirkwood/network-console/buffalo/ls-wxl\
/uImage.buffalo
$ wget https://d-i.debian.org/daily-images/armel\
/daily/kirkwood/network-console/buffalo/ls-wxl\
/initrd.buffalo
$ sudo cp *.buffalo /mnt
$ sudo umount /mnt
7.4.5 詳細な手順: SSH で接続
• HDDs を Linkstation に戻して、起動させます。
• 暫く待つと、Android/iOS アプリ「Fing」のような IP/port scanner で Linkstation に割り当てた IP を見
つけます。また、DHCP サーバ側のログでも
• IP を分かると、SSH コマンドを叩くと debian installer 画面が出て来る:
$ ssh installer@<IP address of Linkstation>
• D-I のデフォルトパスワードは「install」となります。
• command line で操作や log 確認などのため、もう一本 SSH を接続しても良いです。
7.4.6 RAID 構成向け Install 時の注意事項
• LS-GL/CHL/XHL/VL など RAID 構成ではない機種だとスキップください。
*24
この時点に「mdadm –create」で RAID の構成をしなくても良いです。Install の際に RAID の作成を行います。
33
• もし RAID の設定が見つからない場合は、D-I Partman の画面から一旦「バック」し、「Download installer
components」に partman-md や sata-modules などモジュールを選択してから、出来るようになります。
• もし D-I で RAID を新規に作成する場合、一番目の /dev/md0 は metadata=0 (version 0.90) に設定しない
と再起動しなくなります。原因は u-boot が第1番目 partition の kernel/initrd を読み込まなくなるため。現
在 partman-md に設定出来なくて*25 、command line にしましょう:
# mdadm --create /dev/md0 --level=1 --raid-devices=2 \
--metadata=0 /dev/sda1 /dev/sdb1
• または (他の HDD が後にします)
# mdadm --create /dev/md0 --level=1 --raid-devices=2 \
--metadata=0 /dev/sda1 missing
• /dev/md0 以外の RAID は partman-md で設定しても良いです。
• RAID を新規に作成する (create) と同期化の作業がすぐに始めされ、とても重くて、進行中 Debian Install
の作業に影響ならないように /dev/md0 以外の同期化の速度を制限かけた方が良いです:
# echo 100 > /sys/block/md{1,2,3}/md/sync_speed_max
• インストールが終わって再起動したら、RAID の同期化の作業は自動的に再開されるので、その後の作業は特
に必要ありません。
7.4.7 Debian Install 後の設定
• u-boot 環境変数を確認・変更のため、コマンド fw printenv / fw setenv の設定*26
– ほとんどの機種は下記の設定が済みです:
$ sudo echo /dev/mtd2 0x00000 0x10000 0x10000 \
> /etc/fw_env.config
– Kuro-Box Pro は mtd/flash の数が異なるので、下記の設定にしてください。
$ sudo echo /dev/mtd5 0x00000 0x10000 0x10000 \
> /etc/fw_env.config
• 他の機器で Linkstation の起動ログを確認するため (あるいは、再起動不能の際にデバッグ手段として)、
netconsole の設定
– Linkstation 側の設定:
$ sudo cat << EOT >> /etc/initramfs-tools/modules
marvell
mv643xx_eth
netconsole [email protected]/,[email protected]/
mvmdio
EOT
$ sudo update-initramfs -u
– 他の機器でログ収集するコマンド:
$ sudo ip a add 192.168.11.1/24 dev eth0
$ nc -l -u -p 6666 | tee ~/netconsole.log
*25
*26
https://bugs.debian.org/815569
u-boot 環境変数を変更すると起動しない場合があり、修復手段があまりなくて、気をつけましょう。
34
7.5 終わりに
Kernel の Device-Tree を対応したり、Debian-Installer にパッチを投げたり、Linkstation に Debian Install は
やっと出来るようになりました。今後は Debian Installer を引き続き改善・進化を行って行きたいと思います。
• Debian Installer に GNU/screen 又は tmux を対応する*27 *28 *29
– SSH 接続が切れても、installer がバックグラウンドに回せて、SSH で再接続すると元の状態に再開でき
ます。
– シェルやログなどより便利にアクセス出来ます。
• partman-md へ RAID の metadata 指定できるように、対応する*30 。
• 第4世代、armhf/armada-370 の Linkstation を対応する
*27
*28
*29
*30
https://lists.debian.org/debian-boot/2016/02/msg00547.html
https://bugs.debian.org/819397
https://bugs.debian.org/819988
https://bugs.debian.org/815569
35
あんどきゅめんてっど でびあん 2016 年夏号
8 tilegx という CPU アーキテクチャ向
けの Debian パッケージ移植
wskoka
8.1 はじめに
8.1.1 tilegx ってなんだ
Tilera 社が開発したネットワーク用途に設計されたマルチコア CPU のこと。多くはホストサーバに PCI-E ボード
を装着してアクセラレータのように使う。グレードは 9,16,36,72 コアがありそれぞれ 24,28,40,80Gbps の転送速度を
持つ。PCI-E のインターフェイスは電源供給がメインで制御はホスト OS から行う。CPU-ASIC の関係に近い。ボー
ド内では独立して RedHat の OS が起動しているらしい。アプリは商用の開発ツール (MDE) を用いて作成する。非
常に高価なため一般に流通することはほとんど無い。Linux カーネルがサポートされていて、クロスコンパイル用の
GCC がフリーで公開されている。アーキテクチャ名は「tilegx」 。NIC のデバイスドライバは CPU 依存となるため
カーネルには含まれない。通常は開発ツールの環境に実装されているものを使う。2015 年 12 月に QEMU でサポー
トされた。
8.1.2 なにがいいの
ASIC などでの速度向上は使える機能に制限があるため動的な環境には不向きで FPGA などを利用する必要があ
る。また、サーバ OS で稼働しているアプリケーションの通信はホスト CPU, バス, インターフェイスなど介して行
うため速度ボトルネックが発生しやすく高速に通信するためには高価な部材をそろえる必要がある。すべてをソフト
ウェアで制御し高速な通信を行えるように設計された CPU なら大量のトラフィック処理を柔軟に対応できる。
8.1.3 実機はどこに
ごく一部の代理店で販売されているが、ほとんどが商用の開発環境なためライセンス料が加算されて非常に高価な
機材となっている。その他、量産モデルのルータとして販売されている機種がある。
8.1.4 オープンソースにならないの
GCC がメーカーから公開されているので、Linux カーネルや各種オープンソースのアプリケーションをビルドす
ることは可能。しかし実行環境がほとんど存在しないので商用以外に作られることがない。開発環境 (MDE) を使っ
て作成したものは商用ライセンスが適用されるため一般に公開されることはなく、tilegx をサポートした環境はまだ
ないが QEMU が対応したことにより今後に期待ができる。
8.1.5 OS 環境ってどうやって作るの
x86 64 の OS でクロスコンパイルすることから始めます。最初はカーネルで次に各種ライブラリと開発ツール
チェーンブート部分は BusyBox を使うと便利。具体的には glibc,busybox,binutils,zlib,gcc,make,bash,tar,perl... な
36
どのすべてをソースからビルドすることになる。ある程度必要なツール類が揃うとネイティブコンパイルが可能。全
部の依存関係を解決できるまでにはかなりの量が必要。
8.1.6 最小のブートシーケンス
カーネルが起動してからログインプロンプトの表示まではカーネル処理完了 → /sbin/init → /etc/inittab →
/etc/rc → login のような流れになる。inittab にコンソール接続のパラメータと rc へのリンクを記述し init に渡さ
れ rc のスタートアップ処理を行った後に login でプロンプトが表示される。init と login は busybox で代用可能。
8.1.7 ソースからしかインストールできないの
最 初 は そ う す る し か あ り ま せ ん が ビ ル ド 済 み の 環 境 を パッケ ー ジ 化 し て 再 利 用 す る こ と は 可 能 。config-
ure,make,make install が無事に通ったら make install DESTDIR=[ディレクトリ] で抽出したデータを圧縮して保
存することができる。rpm や deb などのパッケージにするには多くのツールが必要で特に rpm パッケージを作るた
めのコマンド (rpmbuild) を作成するには難易度が高いが deb パッケージなら比較的容易に作ることができる。
8.1.8 deb パッケージのつくりかたは
正式には Debian 新メンテナーガイドに書かれている通りの方法で公式サイトからソースをダウンロードして
解凍し dpkg-buildpackage でビルドする。しかし tilegx の debian 環境自体が無く dpkg-buildpackage が最初は
使えないので dpkg をソースからインストールする必要がある。dpkg をビルドするときに cputable に tilegx を
追加する。これをやらないと unknown architecture となってしまいビルドが出来てもほとんどが不完全なもの
になる。これにより「tilegx-linux-gnu」として扱うようになる。公開されているクロスコンパイル用の GCC は
「tilegx-unknown-linux-gnu」となっているためこれと区別する必要がある。
8.2 フルスクラッチ
8.2.1 GCC の入手
メーカサイトから tilegx-x86 64.tar.bz2 をダウンロードして解凍したら tilegx-x86 64 というフォルダにツール
チェーン一式がある。ディレクトリを環境変数に設定すればクロスコンパイルが可能。
PATH=$PATH:/usr/src/tilegx-x86_64/bin/export
LD_LIBRARY_PATH=/usr/src/tilegx-x86_64/lib
8.2.2 カーネルコンパイル
オフィシャルの「Linux Kernel Archives」からカーネルソースを download し config を設定したらビルド開始。
make ARCH=tilegx menuconfig
make ARCH=tilegx CROSS_COMPILE=tilegx-unknown-linux-gnu-
完走後に出てきた vmlinux が起動用のカーネルとなる。NAND 書き換え用に initramfs を ram ドライブから
起動させるものと外部ストレージや NAND ドライブから通常起動させるものが必要。特に指定がなければ最後
に/sbin/init へ処理が引き渡される。後に必要なカーネルヘッダも作っておく。
8.2.3 ユーザーランドの作成
OS 起動用の rootfs 環境を構築するため最低限必要なものは各種ルートディレクトリとパスワードファイルやデバ
イス情報を表示するためのシンボリックリンクあとは起動に必要な実行ファイル類。
mkdir -p bin root dev sys ram lib mnt tmp etc/lib sbin usr var proc opt var/opt var/tmp usr/share usr/share/lib mnt home
touch etc/passwd etc/shadow etc/gshadow etc/group etc/fstab etc/inittab etc/rc
ln -s /proc/mounts etc/mtab
カーネルヘッダ,BusyBOX 本体とコマンド用シンボリックリンクを配置。
37
inittab には「::sysinit:/etc/rc」と「console::respawn:/sbin/getty -L 115200 console」などを書いておく。BusyBOX
を使うとログイン部分や一般的なコマンド各種が使えるため別途ライブラリとバイナリを配置すれば最低限の実行環
境として動作する。
8.2.4 ネイティブコンパイル環境の整備
新たに起動した環境でビルドを行うために必要なものはクロスコンパイルで作っておく。
gcc, glibc, make, binutils, zlib
などがあれば
bash, tar, xz, gcc, sed, patch, bzip2, unzip60, perl, m4, libtool, binutils, gmp, ncurses, texinfo, gettext, coreutils,
newlib, libelf, libiconv, flex, bison, libpcap, libpipeline, attr, libcap, libxml2, pth, libgpg-error, libassuan, libksba,
libffi, npth, gawk, pkg-config, glibc, expat, Python, autoconf, automake, git, glib, file, openssl, readline, lua,
termcap, gdb, cmake, libgcrypt, gnupg, libssh2, Linux-PAM, shadow, cracklib, libsocket, prngd, openssh, tcl,
tk, sqlite-autoconf, vim, acl, curl, bind, util-linux, dhcp, ntp, bc, inetutils, kmod, rsync, nettle, gnutls, wget,
apr, apr-util, pcre, libtirpc, libevent, libnfsidmap, rpcbind, LVM, nfs-utils, fuse, gperf, parted, boost, dovecot,
at, subversion, icu, llvm, gsl, zabbix, httpd, php, mysql, nspr, nss, cpio, popt, libarchive, BerkeleyDB, rpm,
expect, bridge-utils, otp, LINC, dropbear, lagopus, eudev, SoftEther, nginx, php-fpm, webmin
といった順番でビルド/インストールすることができた。configure の引数はほぼ prefix=/usr になるが例外もあるの
で Linux from Scratch*31 等を参考。
おおよそこの辺りまで到達すると自前でカーネルがコンパイルできるようになる。
8.3 Debian 移植
8.3.1 移植のメリット
実行環境を用意するために都度ソースから入れていたのでは利用範囲が制限されるためパッケージから手軽に導入
できる環境が必要なので yum や apt-get で用途に応じた環境構築ができることを目的とした。さらにソースからの
インストールは configure オプションをどうするかの悩みが尽きないので各アプリ同士の連携を円滑に行うためには
ディストリビューションの導入が必須になる。
8.3.2 deb パッケージの作成
パッケージを作成する流れは公式サイトからソース 3 点セット*32 をダウンロード 。dpkg-source -x ****.dsc コマ
ンドで解凍 ディレクトリに移動して dpkg-buildpackage -uc -b
これが無事完走するとパッケージが出来あがる。しかし依存関係が解決出来てないうちは成功することは稀であるた
め手動で make を続行しインストールして環境を整備し続ける。
8.3.3 手動でのパッケージ化の例
• make install が成功する場合、checkinstall を使う
• buildpackage が通らない場合は dh auto configure から make を行う。
• make も終わらない場合はそれまでに出来たライブラリやバイナリを集めて手動でパッケージにする。
• 他アーキテクチャ用のパッケージを解体し*33 、control ファイルを書き換えて流用する
• dh gencontrol で control ファイルを作って、パッケージングするファイルリストを公式サイトで確認し、
dh builddeb で作成
*31
*32
*33
http://www.linuxfromscratch.org/ http://lfsbookja.osdn.jp/
dsc,orig.tar.xz,debian.tar.xz
解体用コマンド: ar xv ****.deb ; tar xf data.tar.xz
38
あんどきゅめんてっど でびあん 2016 年夏号
9 Debian の移植作業用のインフラを
借りるには
林 健太郎(@kenhys)
9.1 はじめに
そのへんに生えている Debian 使いにとって、メンテナンスしているパッケージのバグレポートというのはありが
たいものです。なぜなら、気づいていなかった問題をバグレポートをきっかけに改善できるからです。その一方で、実
機を持っていなかったりすると、いくら報告してもらえても、手元に環境がなくてつらい思いをすることがあります。
今回は Debian の移植作業用のインフラを借りる機会があったのでその内容を紹介します。*34
9.2 porterbox とは何か?
porterbox は移植作業用のベアメタルサーバーの総称です。Debian 開発者なら誰でも使えることになっています。
Debian ではさまざまなアーキテクチャをサポートしているので、アーキテクチャごとにサーバーが用意されてい
ます。
Debian の開発に用いられているサーバーのリストは https://db.debian.org/machines.cgi から入手するこ
とができます。ただし、移植作業用のサーバー以外のものも含まれているため、porterbox のみ知りたいときには向
きません。
そんなときに便利なのが、porterbox コマンドです。https://github.com/jbernard/porterbox から入手する
ことができます。シンプルな Python スクリプトで、これを実行すると移植作業用のサーバーのリストが得られます。
$ ./porterbox
Architecture
Hostname
Access
-------------------------------------------------------------------armel
abel.debian.org
public
arm64
asachi.debian.org
public
amd64
barriere.debian.org
public
mipsel
etler.debian.org
public
hurd-i386
exodar.debian.net
public (non-DSA-machine)
kfreebsd-amd64
falla.debian.org
public
kfreebsd-i386
fischer.debian.org
public
armhf
harris.debian.org
[unknown]
mips
minkus.debian.org
public
sparc64
notker.debian.net
public (non-DSA-machine)
powerpc
partch.debian.org
public
powerpc
pizzetti.debian.org
[unknown]
ppc64el
plummer.debian.org
[unknown]
sh4
sh4.g15.jp
public (non-DSA-machine)
sh4
sumotsu.debian.net
public (non-DSA-machine)
armhf
turfan.debian.net
public (non-DSA-machine)
s390x
zelenka.debian.org
public
Found 17 machines
*34
2016 年 3 月現在の情報で、現在では若干記述が古くなっている箇所があります。該当箇所には注記を入れてあります。
39
9.3 なぜ porterbox を借りたのか?
みなさんおなじみ、FTBFS*35 です。バグレポートがきました。しかも非 x86 64 アーキテクチャです。実機など当
然ありません。
しかも、以下の環境で問題があることがわかっていました。
• mips
• mipsel
• m68k
ふつうの Debian 使いには、なかなかつらい環境です。QEMU を使えばいいのかとも思いましたが、あまりその方
面に明るくなかったため、たまたまその存在を知った porterbox を借りることにしました。
9.4 どうやって借りたらいいのか?
ゲストアカウントの申請については、ドキュメントがまとめられています。(ただし、現在ではこの情報は古くなっ
ていて、https://nm.debian.org/ から porterbox のゲストアカウントの申請を行えるようになっているとのこと
です。便利になりましたね。そのため、以前はこうだったという紹介にとどめます。)
• Guest Access to porter machines*36
ざっくりまとめると以下の通りです。
Step 1. Debian 開発者を探す
Step 2. porterbox のアカウント申請メールを Debian 開発者に送付する
Step 3. Debian 開発者により rt.debian.org へチケットを起票してもらう
Step 4. ひたすら座して待つ
Step 5. LDAP ゲートウェイ (db.debian.org) を経由して ssh 鍵を登録する
最初の Step 1. ではスポンサーしてくれる Debian 開発者を探します。さすがにどこの馬の骨だかわからない人に
までサーバーを気前よく貸してくれたりはしません。次の Step 2. では必要事項を記入したアカウント申請メールを
スポンサーすることにこころよく応じてくれた Debian 開発者へと送ります。アカウント名や、DMUP への同意、借
りたいサーバーやその理由などをしたためます。
Step 3. ではスポンサーしてくれた Debian 開発者にお願いして http://rt.debian.org にそのためのチケットを
起票してもらいます。このチケットは基本的にふつうの Debian 使いには見れません。あとは、ひたすら DSA の中
の人がアカウントを用意してくれるのを待ちます。
アカウントの用意ができると、メールで中の人から通知が届きます。以下のようなコマンド*37 を実行すると、実際
に申請したアカウントの用意ができているか確認できます。
$ ldapsearch -LLL -b dc=debian,dc=org -x -h db.debian.org uid=(申請したユーザー名) \
allowedHost dn: uid=(申請したユーザー名),ou=users,dc=debian,dc=org
allowedHost: minkus.debian.org 20160427
allowedHost: etler.debian.org 20160427
上記の例だと、minkus*38 と etler*39 が使えることがわかります。
最後に忘れてはならないのが、ssh 鍵の登録です。次のようにして、ssh 鍵を登録します。
*35
*36
*37
*38
*39
Fails To Build From Source。あまり遭遇したくない魔法の言葉。GCC-6 への移行であなたもたぶん無縁ではいられない。
https://dsa.debian.org/doc/guest-account/
ldapscripts パッケージが必要です。
ホスト名の由来は作曲家・劇場指揮者・ヴァイオリニストである Leon Fedorovich Minkus から。
ホスト名の由来は作曲家・オーボエ奏者である Alvin Derald Etler から。CPU は龍芯 3 号 by 中国科学院だったりします。
40
• 公開鍵の先頭に allowed hosts=... を入れる(... は申請したホスト名)
• 公開鍵を gpg –armor –sign で署名する
• [email protected] に署名した内容をメールする
それぞれのサーバーに伝播するまでしばらく待ちましょう。ログインできるようになっているはずです。
9.5 おわりに
今回は、Debian のインフラのひとつである porterbox を借りる方法を紹介しました。実環境を用意するのが難し
い場合には、ぜひ活用するとよいのではないでしょうか。1 度の申請につき、3ヶ月くらい借りられます。
参考文献
[1]「Debian のインフラを借りるには」 第 137 回東京エリア Debian 勉強会資料,http://slide.rabbit-shocker.
org/authors/kenhys/tokyodebian-porterbox-20160305/
41
あんどきゅめんてっど でびあん 2016 年夏号
10 Debian で、Linux ftrace まわりをい
じってみた
野島 貴英
10.1 はじめに
Linux カーネルのデバッグ支援機能で人気のあるものに、ftrace という仕組みがあります。今回は Debian unstable
で提供されている linux-4.3.3 を利用して、ftrace を使ってみます。
10.2 ftrace とは
Linux カーネル内部の実行トレースを効率的に取れるようにしたデバッグ支援機構となります。カーネル内部の C
の関数単位でトレースが取れたりします。
人気があるせいか、機能拡張がどんどん続いています。最近では、ユーザプロセスのトレースも取れる機能が追加
される、kprobe との連携などが追加されています。
Debian のバグ潰しに、是非活用してみてはいかがでしょう!
10.3 ftrace 注意点
評価中に何度か経験したのですが、一部の ftrace の機能 (uevent,kprobe) にて、プローブの手続きを書き間違えた
りすると、カーネル全体が突然ハングアップしたり、マシンが突然リブートすることがありました。
利用にあたっては、必ず十分に事前に動作を検証してから、重要なサーバ上などで実行する事をおすすめします。
もちろん、重要でないサーバ上なら、いくらでも試行錯誤くださいませ(笑)
10.4 よく知られている使い方について
カーネル内部の関数の実行トレースを取ってみます。なお、実行にあたっては root 権限が必要。
# cd /sys/kernel/debug/tracing
# echo function > current_tracer
# head -15 trace もしくは、
# cat trace_pipe
結果:
42
# tracer: function
#
# entries-in-buffer/entries-written: 205013/84652723
#P:4
#
#
_-----=> irqs-off
#
/ _----=> need-resched
#
| / _---=> hardirq/softirq
#
|| / _--=> preempt-depth
#
||| /
delay
#
TASK-PID
CPU# ||||
TIMESTAMP FUNCTION
#
| |
|
||||
|
|
ksoftirqd/2-18
[002] ..s. 34273.981969: _raw_read_lock_bh
<-ppp_input
ksoftirqd/2-18
[002] ..s. 34273.981969: _raw_spin_lock_bh
<-ppp_input
ksoftirqd/2-18
[002] ..s. 34273.981969: ppp_receive_frame
<-ppp_input
ksoftirqd/2-18
[002] ..s. 34273.981969: ppp_receive_nonmp_frame
<-ppp_input
※紙面の都合で、一部改行を入れています。 また、<-XXX は XXX が呼び出し元。
カーネル内部の特定の関数の呼び出しをトレースしてみます。以下のコマンドラインは先程の続きの操作からとな
ります。
一旦、トレースを止める。
# echo nop > current_tracer
schedule 関数の呼び出しのみ取る。
# echo schedule > set_ftrace_filter
再開してみる
# echo function > current_tracer
# head -15 trace もしくは、
# cat trace_pipe
※ トレースを止めるには、tracing on ファイルに 0 や 1 を書き込んで止めるのが本式らしいのですが、今回は簡
易に nop を指定して止めています。
結果:
# tracer: function
#
# entries-in-buffer/entries-written: 205173/1017318
#P:4
#
#
_-----=> irqs-off
#
/ _----=> need-resched
#
| / _---=> hardirq/softirq
#
|| / _--=> preempt-depth
#
||| /
delay
#
TASK-PID
CPU# ||||
TIMESTAMP FUNCTION
#
| |
|
||||
|
|
<idle>-0
[001] .N.. 35985.931338: schedule
<-schedule_preempt_disabled
threaded-ml-30937 [001] .... 35985.931365: schedule
<-schedule_hrtimeout_range_clock.part.23
<idle>-0
[001] .N.. 35985.935088: schedule
<-schedule_preempt_disabled
kworker/1:1-30635 [001] .... 35985.935118: schedule
<-worker_thread
<idle>-0
[001] .N.. 35985.937301: schedule
<-schedule_preempt_disabled
※紙面の都合で、一部改行を入れています。 また、<-XXX は XXX が呼び出し元。
カーネル内部の特定の関数の呼び出しをトレースしてみます。以下のコマンドラインは先程の続きの操作からとな
ります。
一旦、トレースを止める。
# echo nop > current_tracer
schedule 関数の呼び出しのみ取る。
# echo schedule > set_ftrace_filter
再開してみる
# echo function > current_tracer
# head -15 trace もしくは、
# cat trace_pipe
補足:
• set ftrace filter には、*のワイルドカードが利用でき、例えば、
– echo ’*lock*’ > set_ftrace_filter
– echo ’ppp*’ > set_ftrace_filter
43
という指定が可能です。*lock*は lock を名前に含む関数がトレースされるようになります。ppp*は行頭が
ppp で始まる関数がトレースされるようになります。
• トレースから除外する関数を指定する場合は、set_ftrace_notrace に指定すると合致したものがトレース
から除外されます。
参考:set ftrace filter に指定可能な関数一覧
# lv available_filter_functions
run_init_process
try_to_run_init_process
do_one_initcall
match_dev_by_uuid
name_to_dev_t
rootfs_mount
... 中略 (相当量ある)...
コールツリーをとってみます。以下のコマンドラインは先程の続きの操作からとなります。
# echo nop > current_tracer
フィルタを一旦クリア
# echo > set_ftrace_filter
# echo do_sys_open > set_graph_function
# echo function_graph > current_tracer
# head -15 trace もしくは、
# tail -f trace
結果:
# tracer: function_graph
#
# CPU DURATION
FUNCTION CALLS
# |
|
|
|
|
|
|
2)
| do_sys_open() {
2)
|
getname() {
2)
|
getname_flags() {
2)
|
kmem_cache_alloc() {
2)
0.151 us
|
_cond_resched();
2)
1.725 us
|
}
2)
|
__do_page_fault() {
2)
0.194 us
|
down_read_trylock();
2)
0.090 us
|
_cond_resched();
2)
|
find_vma() {
2)
0.191 us
|
vmacache_find();
• 他 に も 、割 り 込 み が 長 時 間 止 め ら れ た 関 数 の ト レ ー ス (irqsoff) が あ り ま す が 、Debian の 標 準 の
linux-image パッケ ー ジ で は 有 効 に は なって い ま せ ん 。lv /boot/config-‘uname -r‘で 現 在 稼 働 中
の linux カ ー ネ ル の ビ ル ド 時 の 設 定 が 確 認 で き ま す。# CONFIG_IRQSOFF_TRACER is not set や 、
# CONFIG_SCHED_TRACER is not set とあるかと思います。
• 他に利用できるトレースは、available_tracers ファイルを確認するとよいと思います。 今回紹介した以上のよく知られている使い方のチュートリアルは、LWN の記事が良いです。*40
10.5 ユーザプロセスのトレースをやってみる
最近のカーネルの ftrace は、”use user-level statically defined tracing (USDT) probe” というユーザプロセス側
のトレースを取れる機能があります。まずはこちらを紹介します。
実際には、uprobe_events ファイルを操作するのですが、関数のエントリポイントのメモリアドレスを指定しな
ければならないなどの使い勝手の問題があるため、perf-tool というツール経由で操作する方法について述べます。
ところで、Debian unstable には、この perf-tool がパッケージ化されているのですが、残念ながら 2015 年 1 月
時点の upstream のソースであるため、USDT probe に対応したコマンドが入っていません*41 。仕方が無いので、
*40
*41
Ftrace: The hidden light switchhttps://lwn.net/Articles/608497/ Debugging the kernel using Ftracehttps://lwn.net/
Articles/365835/https://lwn.net/Articles/366796/ Secrets of the Ftrace function tracerhttps://lwn.net/Articles/
370423/
bug report 上げておきます。
44
upstream からソースを引っ張ってくることにします。なお、シェルスクリプトですので、手元に持ってくるだけで使
えます。
ソースの入手と準備
$ git clone https://github.com/brendangregg/perf-tools.git
$ cd perf-tools/bin
$ su root
#
試しに、Debian unstable 全体のプロセスを対象に、libc 中の open 関数を呼び出しをファイル名も含めてトレー
スしてみます。
# ./uprobe ’p:/lib/x86_64-linux-gnu/libc-2.21.so:open
+0(%di):string’
gkrellm-2283 [001] d... 32718.873326: open:
(0x7f5543ecf640) arg1="/proc/loadavg"
gkrellm-2283 [001] d... 32718.969105: open:
(0x7f5543ecf640) arg1="/proc/loadavg"
gkrellm-2283 [001] d... 32719.064968: open:
(0x7f5543ecf640) arg1="/proc/loadavg"
.... 中略...
※紙面の都合で改行を入れています。
uprobe の引数の文言についての説明は、linux ソースの Documentation/trace/uprobetracer.txt にその説明
があります。
先のページの例は、/lib/x86_64-linux-gnu/libc-2.21.so に含まれる open 関数について、関数の第一引数の
文字列が格納されている場所の指定(CPU の di レジスタが指し示す先のオフセット 0 番地を文字列データという指
定で)*42 を表示せよという意味となります。
uprobe はトレース条件も指定でき、例えば、/var/log/以下のファイルを open したプロセスのみをトレース表示
せよという指定は、
# ./uprobe ’p:/lib/x86_64-linux-gnu/libc-2.21.so:open
file=+0(%di):string’ ’file ~ /var/log/*’
となります。
10.6 kprobe 経由の ftrace を使ってみる
linux 3 系列のカーネルであれば、ftrace は kprobe 機能を活用したトレースを取ることが出来ます。トレース条件
に kprobe で指定できるような条件を指定できるので、kprobe に造形が深い場合は、こちらがよいかもしれません。
ここでは、先ほど入手した perf-tool に梱包されている kprobe を利用してみます。
使ってみる:
# ./kprobe ’p:myopen do_sys_open
filename=+0(%si):string’
gkrellm-2283 [000] d...
511.849329: myopen:
(do_sys_open+0x0/0x220) filename="/proc/loadavg"
gkrellm-2283 [000] d...
511.945166: myopen:
(do_sys_open+0x0/0x220) filename="/proc/loadavg"
gkrellm-2283 [000] d...
512.040938: myopen:
(do_sys_open+0x0/0x220) filename="/proc/loadavg"
... 中略...
※紙面の都合で改行を入れています。
10.7 ftrace についてさらに詳しく知る
他にも最新カーネルにはいくつもここでは語られない機能が ftrace に実装されています。さらに詳しく知りたい方
は Documentation/trace/以下のファイルを読むとよいと思います。Linux カーネルの ftrace 機能はいろいろと強
力です。今回紹介出来なかった、機能もまだまだ存在します。将来、Linux カーネルの挙動を追いかける必要が出て
きた時に、ftrace で出来ることをささっと調査できるようになっていると、何かと便利かと思います。
*42
AMD64 アーキテクチャでは正確には、edi レジスタですが、現状では di と指定するようです。
45
あんどきゅめんてっど でびあん 2016 年夏号
11 勉強会資料の歩き方
かわだてつたろう
11.1 はじめに
東京エリア/関西 Debian 勉強会では、開催時のセッションの内容をまとめた資料を冊子または PDF で事前配布資
料として配布しています。この資料には Debian に関する有益な情報がまとまっています。今回はその資料の所在、
編集方法などについて説明します。
11.2 読むには
毎月開催している東京エリア/関西 Debian 勉強会で事前配布していますので勉強会に参加すればその場で資料が手
に入ります。
過去の資料は PDF が公開されています。
• PDF
http://tokyodebian.alioth.debian.org/pdf/
各開催月の内容については勉強会開催案内ページを確認してください。
• 東京エリア Debian 勉強会
https://tokyodebian.alioth.debian.org/
• 関西 Debian 勉強会
https://wiki.debian.org/KansaiDebianMeeting/
また、半年に一回一冊にまとめ「あんどきゅめんてっど でびあん」として有志で紙媒体に印刷して有償で配布して
います。その PDF も公開されています。
• あんどきゅめんてっど でびあん
https://tokyodebian.alioth.debian.org/undocumenteddebian.html
11.2.1 関西 Debian 勉強会資料の Tips
kozo2 さんによって関西 Debian 勉強会資料の HTML 版が作成公開されています。ブラウザで表示、検索ができま
すので PDF はちょっとという方はこちらをどうぞ。KansaiDebianMeeting Archives
*43
の HTML 版の閲覧にリン
クがあります。
毎年 12 月は一年の振り返りを行なっており、12 月の資料にはそれまでに開催したトピックの一覧が掲載されてい
*43
https://wiki.debian.org/KansaiDebianMeeting/Archives
46
ます。
11.3 ソースは
勉強会資料は TEX で作成されており、そのソースは GPL-2+ のもと Alioth で公開されています。
http://anonscm.debian.org/cgit/tokyodebian/monthly-report.git/
ソースから PDF を生成するには LATEX 環境が必要になります。Debian sid でソース取得から PDF 生成までは次
の手順になります。
$ apt install texlive-lang-japanese texlive-latex-extra \
texlive-generic-recommended texlive-fonts-recommended \
ghostscript-x lv
$ git clone https://anonscm.debian.org/git/tokyodebian/monthly-report.git
$ cd monthly-report
$ cp git-pre-commit.sh .git/hooks/pre-comit
$ make
リポジトリの clone から、TEX Live のインストール、全 PDF の生成とかなり時間がかかりますのでのんびりと待
ちます。
11.4 関西 Debian 勉強会の資料を作ってみる
テンプレートファイル kansairesume.tex.template をコピーして開催月のファイルを作成します。ファイル
名の命名規則は debianmeetingresumeYYYYMM-kansai.tex となります。画像などの追加ファイルがある場合は、
imageYYYYMM ディレクトリに格納することになっています。このディレクトリは東京エリア Debian 勉強会と共有し
ている点に注意してください。
ここから TEX ファイルを編集していくことになりますが、よく使う勉強会用の拡張を 3 つ紹介します。その他の
拡張については kansaimonthlyreport.sty を参照してください。
• dancersection
\section{}の代わりに\dancersection{題名}{名前} のように使います。目次への掲載や Debian ロゴ表示
などを行なってくれます。
• commandline
コマンド出力などの引用に使います。
\begin{commandline}
$ uname -a
Linux snare 4.3.0-1-amd64 #1 SMP Debian 4.3.5-1 (2016-02-06) x86_64 GNU/Linux
\end{commandline}
$ uname -a
Linux snare 4.3.0-1-amd64 #1 SMP Debian 4.3.5-1 (2016-02-06) x86_64 GNU/Linux
• debianbug
Debian BTS への言及に使います。
\debianbug{815970}
Bug#815970*44
あとはあなたの文章と LATEX の力次第です。
*44
http://bugs.debian.org/815970
47
11.5 まとめ
勉強会資料の取得、作成について説明しました。LATEX 環境を整えるのが手間かもしれませんが、一旦整えてしま
えば手元で Debian 勉強会資料が参照できるようになります。作成手順も覚えてしまえばあとは勉強会で発表するだ
けです。
48
あんどきゅめんてっど でびあん 2016 年夏号
12 Debian Trivia Quiz
野島 貴英
ところで、みなさん Debian 関連の話題においついていますか?Debian 関連の話題はメーリングリストをよんで
いると追跡できます。ただよんでいるだけでははりあいがないので、理解度のテストをします。特に一人だけでは意
味がわからないところもあるかも知れません。みんなで一緒に読んでみましょう。
今回の出題範囲は [email protected] や [email protected] に投稿
された内容と Debian Project News からです。
問題 1. 2015/10/22 の DPN のメールから定期的になが
問題 5. 2016/1/12 にて、debian sid に php の新しい
れていたいくつかのトピックが Web のみに掲示される
バージョンを入れた件がアナウンスされました。どの
ようになりました。どこに掲示される?
バージョン?
□ A http://www.debian.or.jp/
□ A php 7.0
□ B http://www.debian.org/
□ B php 5.6
□ C http://bits.debian.org/
□ C phpって何?
問題 2. 2015/11/7 にて、とあるインスタントメッセン
問題 6. dbgsym パッケージですが、こちらを保管する
ジャー用プロトコルのサービスが全 Debian Developer
ミラー先はどこでしょう?
で使えるようになったとのアナウンスがありました。プ
□ A mirrors.debian.org
ロトコルの名前は次のどれ?
□ B debug.mirrors.debian.org
□ A XMPP
□ C ftp.jp.debian.org
□ B IRC
問題 7. LTS サポートが始まった Debian 7 (wheezy)。
□ C IP Messanger
Debian 6 (squeeze) からサポートするアーキテクチャー
問題 3. 2015/10/30 にて、Debian にて、2 回目の公募
が増えました。増えたアーキテクチャの正しい組み合わ
が行われた役まわりは次のどれ?
せはどれでしょうか?
□ A 2016 DPN
□ A armel と armhf
□ B technical commitee
□ B armel と arm64
□ C 2016 Debian JP 会長
□ C mipsel と ppc64el
問題 4. 2016/2/3 にて、debtag の tag 付けについての
問題 8. Debian GNU/Linux で apt による配布が始まっ
変更が流れました。以下のどれ?
た zfs-dkms パッケージ。どのコンポーネントで提供さ
□ A tag 付け廃止
れているでしょうか?
□ B tag 付けについてユーザ認証付きにする
□ A main
□ C tag のレビューをさらに強固にする
□ B contrib
□ C non-free
49
本資料のライセンスについて
本資料はフリー・ソフトウェアです。あなたは、Free Software Foundation が公表した GNU GENERAL PUBLIC
LICENSE の ”バージョン2”もしくはそれ以降が定める条項に従って本プログラムを再頒布または変更することがで
きます。
本プログラムは有用とは思いますが、頒布にあたっては、市場性及び特定目的適合性についての暗黙の保証を含め
て、いかなる保証も行ないません。詳細については GNU GENERAL PUBLIC LICENSE をお読みください。
GNU GENERAL PUBLIC LICENSE
Version 2, June 1991
whole or in part contains or is derived from the Program or any
part thereof, to be licensed as a whole at no charge to all third
parties under the terms of this License.
Copyright (C) 1989, 1991 Free Software Foundation, Inc.
51 Franklin St, Fifth Floor, Boston, MA 02110-1301 USA
Everyone is permitted to copy and distribute verbatim copies
of this license document, but changing it is not allowed.
c) If the modified program normally reads commands interactively
when run, you must cause it, when started running for such
interactive use in the most ordinary way, to print or display an
announcement including an appropriate copyright notice and a
notice that there is no warranty (or else, saying that you provide
a warranty) and that users may redistribute the program under
these conditions, and telling the user how to view a copy of this
License. (Exception: if the Program itself is interactive but
does not normally print such an announcement, your work based on
the Program is not required to print an announcement.)
Preamble
The licenses for most software are designed to take away your
freedom to share and change it. By contrast, the GNU General Public
License is intended to guarantee your freedom to share and change free
software--to make sure the software is free for all its users. This
General Public License applies to most of the Free Software
Foundation’s software and to any other program whose authors commit to
using it. (Some other Free Software Foundation software is covered by
the GNU Library General Public License instead.) You can apply it to
your programs, too.
These requirements apply to the modified work as a whole. If
identifiable sections of that work are not derived from the Program,
and can be reasonably considered independent and separate works in
themselves, then this License, and its terms, do not apply to those
sections when you distribute them as separate works. But when you
distribute the same sections as part of a whole which is a work based
on the Program, the distribution of the whole must be on the terms of
this License, whose permissions for other licensees extend to the
entire whole, and thus to each and every part regardless of who wrote it.
When we speak of free software, we are referring to freedom, not
price. Our General Public Licenses are designed to make sure that you
have the freedom to distribute copies of free software (and charge for
this service if you wish), that you receive source code or can get it
if you want it, that you can change the software or use pieces of it
in new free programs; and that you know you can do these things.
Thus, it is not the intent of this section to claim rights or contest
your rights to work written entirely by you; rather, the intent is to
exercise the right to control the distribution of derivative or
collective works based on the Program.
To protect your rights, we need to make restrictions that forbid
anyone to deny you these rights or to ask you to surrender the rights.
These restrictions translate to certain responsibilities for you if you
distribute copies of the software, or if you modify it.
In addition, mere aggregation of another work not based on the Program
with the Program (or with a work based on the Program) on a volume of
a storage or distribution medium does not bring the other work under
the scope of this License.
For example, if you distribute copies of such a program, whether
gratis or for a fee, you must give the recipients all the rights that
you have. You must make sure that they, too, receive or can get the
source code. And you must show them these terms so they know their
rights.
3. You may copy and distribute the Program (or a work based on it,
under Section 2) in object code or executable form under the terms of
Sections 1 and 2 above provided that you also do one of the following:
We protect your rights with two steps: (1) copyright the software, and
(2) offer you this license which gives you legal permission to copy,
distribute and/or modify the software.
a) Accompany it with the complete corresponding machine-readable
source code, which must be distributed under the terms of Sections
1 and 2 above on a medium customarily used for software interchange; or,
Also, for each author’s protection and ours, we want to make certain
that everyone understands that there is no warranty for this free
software. If the software is modified by someone else and passed on, we
want its recipients to know that what they have is not the original, so
that any problems introduced by others will not reflect on the original
authors’ reputations.
b) Accompany it with a written offer, valid for at least three
years, to give any third party, for a charge no more than your
cost of physically performing source distribution, a complete
machine-readable copy of the corresponding source code, to be
distributed under the terms of Sections 1 and 2 above on a medium
customarily used for software interchange; or,
Finally, any free program is threatened constantly by software
patents. We wish to avoid the danger that redistributors of a free
program will individually obtain patent licenses, in effect making the
program proprietary. To prevent this, we have made it clear that any
patent must be licensed for everyone’s free use or not licensed at all.
c) Accompany it with the information you received as to the offer
to distribute corresponding source code. (This alternative is
allowed only for noncommercial distribution and only if you
received the program in object code or executable form with such
an offer, in accord with Subsection b above.)
The precise terms and conditions for copying, distribution and
modification follow.
The source code for a work means the preferred form of the work for
making modifications to it. For an executable work, complete source
code means all the source code for all modules it contains, plus any
associated interface definition files, plus the scripts used to
control compilation and installation of the executable. However, as a
special exception, the source code distributed need not include
anything that is normally distributed (in either source or binary
form) with the major components (compiler, kernel, and so on) of the
operating system on which the executable runs, unless that component
itself accompanies the executable.
GNU GENERAL PUBLIC LICENSE
TERMS AND CONDITIONS FOR COPYING, DISTRIBUTION AND MODIFICATION
0. This License applies to any program or other work which contains
a notice placed by the copyright holder saying it may be distributed
under the terms of this General Public License. The "Program", below,
refers to any such program or work, and a "work based on the Program"
means either the Program or any derivative work under copyright law:
that is to say, a work containing the Program or a portion of it,
either verbatim or with modifications and/or translated into another
language. (Hereinafter, translation is included without limitation in
the term "modification".) Each licensee is addressed as "you".
If distribution of executable or object code is made by offering
access to copy from a designated place, then offering equivalent
access to copy the source code from the same place counts as
distribution of the source code, even though third parties are not
compelled to copy the source along with the object code.
Activities other than copying, distribution and modification are not
covered by this License; they are outside its scope. The act of
running the Program is not restricted, and the output from the Program
is covered only if its contents constitute a work based on the
Program (independent of having been made by running the Program).
Whether that is true depends on what the Program does.
4. You may not copy, modify, sublicense, or distribute the Program
except as expressly provided under this License. Any attempt
otherwise to copy, modify, sublicense or distribute the Program is
void, and will automatically terminate your rights under this License.
However, parties who have received copies, or rights, from you under
this License will not have their licenses terminated so long as such
parties remain in full compliance.
1. You may copy and distribute verbatim copies of the Program’s
source code as you receive it, in any medium, provided that you
conspicuously and appropriately publish on each copy an appropriate
copyright notice and disclaimer of warranty; keep intact all the
notices that refer to this License and to the absence of any warranty;
and give any other recipients of the Program a copy of this License
along with the Program.
5. You are not required to accept this License, since you have not
signed it. However, nothing else grants you permission to modify or
distribute the Program or its derivative works. These actions are
prohibited by law if you do not accept this License. Therefore, by
modifying or distributing the Program (or any work based on the
Program), you indicate your acceptance of this License to do so, and
all its terms and conditions for copying, distributing or modifying
the Program or works based on it.
You may charge a fee for the physical act of transferring a copy, and
you may at your option offer warranty protection in exchange for a fee.
2. You may modify your copy or copies of the Program or any portion
of it, thus forming a work based on the Program, and copy and
distribute such modifications or work under the terms of Section 1
above, provided that you also meet all of these conditions:
6. Each time you redistribute the Program (or any work based on the
Program), the recipient automatically receives a license from the
original licensor to copy, distribute or modify the Program subject to
these terms and conditions. You may not impose any further
restrictions on the recipients’ exercise of the rights granted herein.
You are not responsible for enforcing compliance by third parties to
this License.
a) You must cause the modified files to carry prominent notices
stating that you changed the files and the date of any change.
b) You must cause any work that you distribute or publish, that in
50
7. If, as a consequence of a court judgment or allegation of patent
infringement or for any other reason (not limited to patent issues),
conditions are imposed on you (whether by court order, agreement or
otherwise) that contradict the conditions of this License, they do not
excuse you from the conditions of this License. If you cannot
distribute so as to satisfy simultaneously your obligations under this
License and any other pertinent obligations, then as a consequence you
may not distribute the Program at all. For example, if a patent
license would not permit royalty-free redistribution of the Program by
all those who receive copies directly or indirectly through you, then
the only way you could satisfy both it and this License would be to
refrain entirely from distribution of the Program.
12. IN NO EVENT UNLESS REQUIRED BY APPLICABLE LAW OR AGREED TO IN WRITING
WILL ANY COPYRIGHT HOLDER, OR ANY OTHER PARTY WHO MAY MODIFY AND/OR
REDISTRIBUTE THE PROGRAM AS PERMITTED ABOVE, BE LIABLE TO YOU FOR DAMAGES,
INCLUDING ANY GENERAL, SPECIAL, INCIDENTAL OR CONSEQUENTIAL DAMAGES ARISING
OUT OF THE USE OR INABILITY TO USE THE PROGRAM (INCLUDING BUT NOT LIMITED
TO LOSS OF DATA OR DATA BEING RENDERED INACCURATE OR LOSSES SUSTAINED BY
YOU OR THIRD PARTIES OR A FAILURE OF THE PROGRAM TO OPERATE WITH ANY OTHER
PROGRAMS), EVEN IF SUCH HOLDER OR OTHER PARTY HAS BEEN ADVISED OF THE
POSSIBILITY OF SUCH DAMAGES.
END OF TERMS AND CONDITIONS
How to Apply These Terms to Your New Programs
If any portion of this section is held invalid or unenforceable under
any particular circumstance, the balance of the section is intended to
apply and the section as a whole is intended to apply in other
circumstances.
If you develop a new program, and you want it to be of the greatest
possible use to the public, the best way to achieve this is to make it
free software which everyone can redistribute and change under these terms.
To do so, attach the following notices to the
to attach them to the start of each source file
convey the exclusion of warranty; and each file
the "copyright" line and a pointer to where the
It is not the purpose of this section to induce you to infringe any
patents or other property right claims or to contest validity of any
such claims; this section has the sole purpose of protecting the
integrity of the free software distribution system, which is
implemented by public license practices. Many people have made
generous contributions to the wide range of software distributed
through that system in reliance on consistent application of that
system; it is up to the author/donor to decide if he or she is willing
to distribute software through any other system and a licensee cannot
impose that choice.
program. It is safest
to most effectively
should have at least
full notice is found.
<one line to give the program’s name and a brief idea of what it does.>
Copyright (C) <year> <name of author>
This program is free software; you can redistribute it and/or modify
it under the terms of the GNU General Public License as published by
the Free Software Foundation; either version 2 of the License, or
(at your option) any later version.
This section is intended to make thoroughly clear what is believed to
be a consequence of the rest of this License.
This program is distributed in the hope that it will be useful,
but WITHOUT ANY WARRANTY; without even the implied warranty of
MERCHANTABILITY or FITNESS FOR A PARTICULAR PURPOSE. See the
GNU General Public License for more details.
8. If the distribution and/or use of the Program is restricted in
certain countries either by patents or by copyrighted interfaces, the
original copyright holder who places the Program under this License
may add an explicit geographical distribution limitation excluding
those countries, so that distribution is permitted only in or among
countries not thus excluded. In such case, this License incorporates
the limitation as if written in the body of this License.
You should have received a copy of the GNU General Public License
along with this program; if not, write to the Free Software
Foundation, Inc., 51 Franklin St, Fifth Floor, Boston, MA 02110-1301 USA
9. The Free Software Foundation may publish revised and/or new versions
of the General Public License from time to time. Such new versions will
be similar in spirit to the present version, but may differ in detail to
address new problems or concerns.
Also add information on how to contact you by electronic and paper mail.
If the program is interactive, make it output a short notice like this
when it starts in an interactive mode:
Each version is given a distinguishing version number. If the Program
specifies a version number of this License which applies to it and "any
later version", you have the option of following the terms and conditions
either of that version or of any later version published by the Free
Software Foundation. If the Program does not specify a version number of
this License, you may choose any version ever published by the Free Software
Foundation.
10. If you wish to incorporate parts of the Program into other free
programs whose distribution conditions are different, write to the author
to ask for permission. For software which is copyrighted by the Free
Software Foundation, write to the Free Software Foundation; we sometimes
make exceptions for this. Our decision will be guided by the two goals
of preserving the free status of all derivatives of our free software and
of promoting the sharing and reuse of software generally.
Gnomovision version 69, Copyright (C) year name of author
Gnomovision comes with ABSOLUTELY NO WARRANTY; for details type ‘show w’.
This is free software, and you are welcome to redistribute it
under certain conditions; type ‘show c’ for details.
The hypothetical commands ‘show w’ and ‘show c’ should show the appropriate
parts of the General Public License. Of course, the commands you use may
be called something other than ‘show w’ and ‘show c’; they could even be
mouse-clicks or menu items--whatever suits your program.
You should also get your employer (if you work as a programmer) or your
school, if any, to sign a "copyright disclaimer" for the program, if
necessary. Here is a sample; alter the names:
Yoyodyne, Inc., hereby disclaims all copyright interest in the program
‘Gnomovision’ (which makes passes at compilers) written by James Hacker.
NO WARRANTY
<signature of Ty Coon>, 1 April 1989
Ty Coon, President of Vice
11. BECAUSE THE PROGRAM IS LICENSED FREE OF CHARGE, THERE IS NO WARRANTY
FOR THE PROGRAM, TO THE EXTENT PERMITTED BY APPLICABLE LAW. EXCEPT WHEN
OTHERWISE STATED IN WRITING THE COPYRIGHT HOLDERS AND/OR OTHER PARTIES
PROVIDE THE PROGRAM "AS IS" WITHOUT WARRANTY OF ANY KIND, EITHER EXPRESSED
OR IMPLIED, INCLUDING, BUT NOT LIMITED TO, THE IMPLIED WARRANTIES OF
MERCHANTABILITY AND FITNESS FOR A PARTICULAR PURPOSE. THE ENTIRE RISK AS
TO THE QUALITY AND PERFORMANCE OF THE PROGRAM IS WITH YOU. SHOULD THE
PROGRAM PROVE DEFECTIVE, YOU ASSUME THE COST OF ALL NECESSARY SERVICING,
REPAIR OR CORRECTION.
This General Public License does not permit incorporating your program into
proprietary programs. If your program is a subroutine library, you may
consider it more useful to permit linking proprietary applications with the
library. If this is what you want to do, use the GNU Library General
Public License instead of this License.
ソースコードについて
このプログラムは tex で記述されたものです。ソースコードは
git://anonscm.debian.org/tokyodebian/monthly-report.git
から取得できます。
Debian オープンユーズロゴ ライセンス
included in all copies or substantial portions of the Software.
Copyright (c) 1999 Software in the Public Interest
Permission is hereby granted, free of charge, to any person
obtaining a copy of this software and associated documentation
files (the "Software"), to deal in the Software without restriction,
including without limitation the rights to use, copy, modify, merge,
publish, distribute, sublicense, and/or sell copies of the Software,
and to permit persons to whom the Software is furnished to do so,
subject to the following conditions:
THE SOFTWARE IS PROVIDED "AS IS", WITHOUT WARRANTY OF ANY
KIND, EXPRESS OR IMPLIED, INCLUDING BUT NOT LIMITED TO THE
WARRANTIES OF MERCHANTABILITY, FITNESS FOR A PARTICULAR PURPOSE AND
NONINFRINGEMENT. IN NO EVENT SHALL THE AUTHORS OR COPYRIGHT HOLDERS
BE LIABLE FOR ANY CLAIM, DAMAGES OR OTHER LIABILITY, WHETHER IN
AN ACTION OF CONTRACT, TORT OR OTHERWISE, ARISING FROM, OUT OF OR
IN CONNECTION WITH THE SOFTWARE OR THE USE OR OTHER DEALINGS IN
THE SOFTWARE.
The above copyright notice and this permission notice shall be
51
あんどきゅめんてっど でびあん 2016 年夏号
13 Debian Trivia Quiz 問題回答
野島 貴英
Debian Trivia Quiz の問題回答です。 あなたは何問わかりましたか?
1. C: 2015/10/22 の DPN のメールから、従来流れていた DPN のメールの構成が刷新されました。こちらに伴い、セキュ
リティについてのアナウンスと、新しい DD/DM のアナウンスは、DPN のメールには含まれず、Web ページに掲載され
るのみとなりました。
2. A: XMPP はオープンなインスタントメッセンジャー用プロトコルの1つ。なお、Debian 関係者の利用にあたって詳しく
は、http://rtc.debian.org を参照。
3. B: 2 名ほど、Debian Developer の方で technical comittee で活躍できる方募集とのことです。現職 technical comittee
の人らが、2015/12/31 で任期が切れてしまうということで、それまでに候補者を挙げる必要があるとのことです。
4. B: debtag を編集できるサイトがいろいろリニューアルするというアナウンスが流れ、実際いくつも実行されたようで
す。まず、匿名による tag 付けの編集を廃止し、代わりに sso.debian.org によるシングルサインオンでユーザ認証しない
と 編 集 出 来 な い よ う に し た と の こ と 。ま た 、tag 編 集 の URL が 変 更 に なって お り、https://debtags.debian.org/
と な り ま し た 。他 に も い ろ い ろ 変 更 が 出 て い ま す の で 、詳 し く は https://lists.debian.org/debian-develannounce/2016/02/msg00000.html 参照。
5. A: php7.0 が debian sid にてリリースされました。ちなみに、php7 の目玉機能は大幅な実効速度改善です。これで次期
安定版バージョンである strech で、php7 が利用できる見込みがとても高くなってきましたね!
6. B: debhelper 9.20151219 以降にて、常にデバッグ用シンボルを収めたパッケージ(名前はパッケージ名-dbgsym) を生成
するようになりました。この-dbgsym パッケージの保管先がアナウンスされ、http://debug.mirrors.debian.org/debiandebug/と、http://snapshot.debian.org/archive/debian-debug/になったようです。
7. A: wheezy の LTS サポート開始直前に armel/armhf を LTS サポートに追加するか議論が進み、めでたく armel/armhf
が LTS サポートされることになりました。議論は以下のスレッドへどうぞ。 https://lists.debian.org/debian-lts/
2016/04/msg00045.html
8. B: ZFS の ソ ー ス コ ー ド は CDDL と い う ラ イ セ ン ス で 公 開 さ れ て い る た め 、GPLv2 で あ る Linux カ ー ネ ル の
ソ ー ス コ ー ド に マ ー ジ し て (linux と し て) 再 配 布 す る こ と が で き な い 、と さ れ て き た 経 緯 が あ り ま す。つ い に ラ
イ セ ン ス 問 題 が 解 決 さ れ 、contrib と し て ZFS の ソ ー ス コ ー ド を 配 布 し dkms に て ビ ル ド し て 利 用 す る 形 に 落
ち 着 き ま し た 。詳 細 は 以 下 の web ペ ー ジ と ペ ー ジ 内 の リ ン ク を ど う ぞ 。 https://bits.debian.org/2016/05/
what-does-it-mean-that-zfs-is-in-debian.html
『あんどきゅめんてっど でびあん』について
本書は、東京および関西周辺で毎月行なわれている『東京エリア Debian 勉強会』および『関
西 Debian 勉強会』(2015 年 12 月-2016 年 5 月)で使用された資料・小ネタ・必殺技などを
一冊にまとめたものです。内容は無保証、つっこみなどがあれば勉強会にて。
あんどきゅめんてっど でびあん 2016 年夏号
2016 年 8 月 14 日
初版第 1 刷発行
東京エリア Debian 勉強会/関西エリア Debian 勉強会 (編集・印刷・発行)
© Copyright 2026 Paperzz