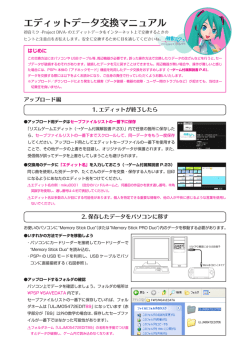
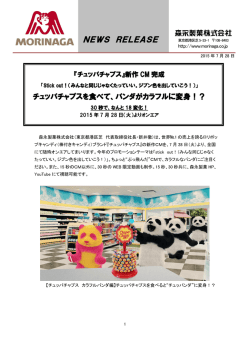
Operation Software for HD AUDIO/VIDEO
MULTIPLEXER
HKSP-105
User’s Guide
Universal Control Panel
UCP-8060
1st Edition [Japanese/English]
Software Version 1.10 and Later
権利者の許諾を得ることなく、このソフトウェアおよび取扱
NOTICE TO USERS
説明書の内容の全部または一部を複写すること、およびこの
ソフトウェアを賃貸に使用することは、著作権法上禁止され
ております。
©2003 Sony Corporation. All rights reserved. This manual or
the software described herein, in whole or in part, may not be
©2003 Sony Corporation
ソフトウェアを使用したことによるお客様の損害、または第
三者からのいかなる請求についても、当社は一切その責任を
負い兼ねます。
万一、製造上の原因による不良がありましたらお取り替えい
たします。それ以外の責はご容赦ください。
このソフトウェアは、指定された装置以外には使用できませ
ん。
このソフトウェアの仕様は、改良のため予告なく変更するこ
とがありますが、ご了承ください。
reproduced, translated or reduced to any machine readable
form without prior written approval from Sony Corporation.
SONY CORPORATION PROVIDES NO WARRANTY WITH
REGARD TO THIS MANUAL, THE SOFTWARE OR OTHER
INFORMATION CONTAINED HEREIN AND HEREBY
EXPRESSLY DISCLAIMS ANY IMPLIED WARRANTIES OF
MERCHANTABILITY OR FITNESS FOR ANY PARTICULAR
PURPOSE WITH REGARD TO THIS MANUAL, THE
SOFTWARE OR SUCH OTHER INFORMATION. IN NO
EVENT SHALL SONY CORPORATION BE LIABLE FOR
ANY INCIDENTAL, CONSEQUENTIAL OR SPECIAL
DAMAGES, WHETHER BASED ON TORT, CONTRACT, OR
OTHERWISE, ARISING OUT OF OR IN CONNECTION
WITH THIS MANUAL, THE SOFTWARE OR OTHER
INFORMATION CONTAINED HEREIN OR THE USE
THEREOF.
2
日本語
目次
概要 ............................................................................................................................................................4
オペレーションソフトウェアの最新バージョンについて ................................... 4
各部の名称と働き...................................................................................................................................5
メニュー....................................................................................................................................................7
メニューの構成 ................................................................................................. 7
メニュー項目の機能 .......................................................................................... 8
操作 .........................................................................................................................................................11
オペレーションソフトウェアの起動と終了...................................................... 11
調整項目の選択 ............................................................................................... 11
調整値の設定 .................................................................................................. 12
Unit ID の設定............................................................................................... 12
オプションメニューの設定.............................................................................. 13
ステータス表示 ............................................................................................... 15
スナップショットデータのセーブとリストア .................................................. 15
ロック機能...................................................................................................... 17
エラーおよび警告表示 .......................................................................................................................17
メモリースティック
を使う ........................................................................................................18
メモリースティック
について ..................................................................... 18
目次
3
概要
本ソフトウェアは、HD オーディオ / ビデオマルチプレク
サー HKSP‑105 用のオペレーションソフトウェアです。
ユニバーサルコントロールパネル UCP‑8060 にインス
トールして、ネットワーク上から複数の HKSP‑105 をコ
ントロールすることができます。
オペレーションソフトウェアの最新
バージョンについて
オペレーションソフトウェアの最新バージョンの入手方法
は、ソニーの営業担当にお問い合わせください。
◆ インストール方法については、UCP‑8060 の Operation
Manual をご覧ください。
4
概要
各部の名称と働き
d 表示窓
e タイトルバー
c ステータスインジケーター
f ステータスエリア
b システムインジケーター
g リストエリア h 調整値表示エリア
UCP-8060
SYSTEM
a メモリースティック
スロット
o 調整つまみ
m タスクバー
n セレクト L、R ボタン
l ステージパスエリア
k ファンクションボタン
j ジョグ L、R ボタン
i ジョグローラー
a メモリースティックスロット
f ステータスエリア
メモリースティックの挿入口です。ラベル面を上にして挿
入します。
HKSP‑105 が装着されているスロット番号やエラー表示な
ど、現在のステータスを表示します。
◆ 詳しくは、UCP‑8060 の Operation Manual をご覧くださ
い。
g リストエリア
b システムインジケーター
赤、オレンジまたは緑色に点灯し、システムの動作状態を
表示します。
c ステータスインジケーター
メモリ−スティックスロットへのアクセス状態や、接続し
たシステムの状態を赤、オレンジまたは緑色の点灯、点滅
で表示します。
このソフトウェアでコントロールできる項目がボタンとし
て表示されます。コントロールしたいボタンに触れると、
その項目を選択することができます。
h 調整値表示エリア
調整つまみ 1、2、3、4 に割り当てられているパラメー
ターとその調整値を表示します。表示されている調整値は、
対応する調整つまみを回して調整することができます。ま
た、調整したい調整値表示エリアに触れると数字入力画面
が表示され、数値を入力して調整することもできます。
d 表示窓
メニューやデータを表示します。画面はタッチパネルに
なっています。表示されている項目に触れて選択すること
ができます。
e タイトルバー
現在表示されている画面の名称を表示します。
i ジョグローラー
前後に回転し、項目の選択や数字の変更をします。また
ローラーを押すと、選択した項目を決定します。
j ジョグ L、R ボタン
左側をジョグ L ボタン、右側をジョグ R ボタンと呼びま
す。押して、メニュー階層の移動などに使用します。
各部の名称と働き
5
k ファンクションボタン
上からファンクションボタン1、2、. . 5と呼びます。操
作の状態により、緑、オレンジ、赤に点灯します。
ファンクションボタン1(ロック):押すたびにロック機能
を ON/OFF します。赤く点灯しているときはロック
機能が ON、消灯しているときはロック機能が OFF に
設定されています。
ファンクションボタン2、3、4、5:使用しません。
◆ ロック機能については、「ロック機能」(17 ページ)をご覧く
ださい。
l ステージパスエリア
メニューのパスを表示します。
m タスクバー
セレクト L、R ボタンで実行できる項目やキーボードアイ
コンなどが表示されます。
n セレクト L、R ボタン
左側をセレクト L ボタン、右側をセレクト R ボタンと呼び
ます。タスクバーの各スイッチに対応する位置に表示され
る機能を実行します。
o 調整つまみ
上から調整つまみ1、2、3、4と呼びます。パラメー
ターの調整などに使用します。
6
各部の名称と働き
メニュー
メニューの構成
このオペレーションソフトウェアのメニューは次のような
構成になっています。
Slot
Slot1
Slot2
Slot3
Slot4
Slot5
Slot6
Slot7
Slot8
Slot9
Slot10
Slot11
Slot12
Slot13
Slot14
Slot15
Slot16
Slot17
Unit ID
Setup
Surround Mode
ON
OFF
Recall/Store
Store
User Save
Recall
Factory
User
Output
Test SG
Audio SG Out Select
Audio SG
Burst
1K3K
1K1K
Video SG
Ramp
Color Bar
Test SG Mode
Audio Group Swap
Audio Channel
Input
Delay
9‑12ch
5‑8ch
1‑4ch
9‑16ch
1‑8ch
None
13‑16ch
ON
OFF
Format
1080i/59.94
1080i/60
1035i/59.94
1035i/60
Auto Scan
720p/59.94
720p/60
1080p/23.98sF
1080p/24sF
1080i/50
Audio Sample
OFF
ON
OFF
ON
Hanc Mask
Audio Delay
7/8ch Only
5/6ch Only
3/4ch Only
1/2ch Only
All ch On
All ch Off
OFF
ON
メニュー
7
メニュー項目の機能
Slot
コントロールする
スロットを選択し
ます。
Slot1 〜 Slot17:コントロールの対象となるスロット名(最大 4 文字)とそのスロットに装着され
ている基板のモデル名を表示します。
ご注意
PFV‑SP3300 に接続している場合は Slot1 から Slot17 まで、PFV‑SP3100 に接続している場
合は Slot1 から Slot4 までが表示されます。
Unit ID:現在接続している PFV‑SP3300 または PFV‑SP3100 のユニット名(最大 10 文字)を
表示します。設定範囲は 1 〜 254 で、数字入力画面を使って入力します。
ご注意
調整つまみでは設定できません。
◆ スロット名およびユニット名の設定方法は、HKSP‑300 のインストレーションマニュアルをご覧ください。
Setup
Surround Mode
入出力の設定を行い
ます。
Surround Mode の ON/OFF を設定します。
ON:Surround Mode を ON に設定します。
OFF:Surround Mode を OFF に設定します。
ご注意
Surround Mode が OFF のときにだけ設定できる機能(*印)を使用している状態から、
Surround Mode を ON にすると、その設定はデフォルトに戻ります。
たとえば Surround Mode が OFF で Audio SG Out Select を 1/2ch Only に設定してある状態か
ら Surround Mode を ON にすると、Audio SG Out Select の設定は All ch On になります。再度
Surround Mode を OFF にしても、Audio SG Out Select の設定は 1/2ch Only に戻りません。
必要な場合は再設定してください。
Recall/Store
Store
デフォルト値の管理
を行います。
デフォルト値をストアします。
User Save:現在の設定をユーザーデフォルトとして保存します。
Recall
デフォルト値の呼び出しを行います。
Factory:工場出荷時のデフォルト値を呼び出します。
User:ユーザーが設定したデフォルト値を呼び出します。
ご注意
User Save で設定を保存していない場合、User の初期設定値は工場出荷時
と同じになります。
8
メニュー
Setup(続き)
Output
Test SG
Audio SG Out Select
出力信号の設定を行
います。
Test SG の設定を行
います。
Audio SG の出力チャンネルを選択します。
7/8ch Only:7/8 チャンネルのみ出力*
5/6ch Only:5/6 チャンネルのみ出力*
3/4ch Only:3/4 チャンネルのみ出力*
1/2ch Only:1/2 チャンネルのみ出力*
All ch On:全 4 チャンネルペアを出力
All ch Off:全チャンネル未出力
ご注意
・ Test SG Mode が OFF の場合、選択ボタンは暗く表示
され選択できません。
・ Surround Mode が ON の場合、*印の選択ボタンは暗
く表示され選択できません。
Audio SG
Audio SG の種類を選択します。
Burst:1 フィールド分出力、5 フィールド分未出力
のバースト音声を出力します。その際のチャンネル
ペアは、A チャンネルを 1KHz、B チャンネルを
3KHz で出力します。
1K3K:チャンネルペアの A チャンネルを 1KHz、B
チャンネルを 3KHz で出力します。
1K1K:チャンネルペアの A チャンネルを 1KHz、B
チャンネルを 1KHz で出力します。
ご注意
Test SG Mode が OFF の場合、選択ボタンは暗く表
示され選択できません。
Video SG
Video SG の種類を選択します。
Ramp:Video SG 出力にランプ信号を選択します。
Color Bar:Video SG 出力にカラーバー信号を選択
します。
ご注意
Test SG Mode が OFF の場合、選択ボタンは暗く表
示され選択できません。
Test SG Mode
Tese SG 出力を設定します。
OFF:Test SG 出力を行いません。
ON:Test SG 出力を行います。
Audio Group Swap
オーディオグループスワップ機能を選択します。
OFF:スワップ機能を動作させません。
ON:スワップ機能を動作させます。
メニュー
9
Setup(続き)
Output(続き)
Audio Channel
オーディオ多重チャンネルを選択します。
9‑12ch:9 〜 12 チャンネルを多重*
5‑8ch:5 〜 8 チャンネルを多重*
1‑4ch:1 〜 4 チャンネルを多重*
9‑16ch:9 〜 16 チャンネルを多重
1‑8ch:1 〜 8 チャンネルを多重
None:多重しない
13‑16ch:13 〜 16 チャンネルを多重*
ご注意
Surround Mode が ON の場合、*印の選択ボタンは暗く表示され選択でき
ません。
Input
Hanc Mask
入力信号の設定を行
います。
HANC マスクの選択をします。
ON:HANC 領域をマスクします。
OFF:HANC 領域をマスクしません。
Format
HDTV SDI ビデオ入力信号のフォーマットを選択します。
1080i/59.94:1080 ライン、59.94Hz、インターレース
1080i/60:1080 ライン、60Hz、インターレース
1035i/59.94:1035 ライン、59.94Hz、インターレース
1035i/60:1035 ライン、60Hz、インターレース
Auto Scan:入力フォーマット自動検出モード
720p/59.94:720 ライン、59.94Hz、プログレッシブ
720p/60:720 ライン、60Hz、プログレッシブ
1080p/23.98sF:1080 ライン、23.98Hz、プログレッシブ・セグメン
テッド・フレーム
1080p/24sF:1080 ライン、24Hz、プログレッシブ・セグメンテッド・フ
レーム
1080i/50:1080 ライン、50Hz、インターレース
Delay
Audio Delay
DELAY 調整を行い
ます。
Audio Delay 処理の ON/OFF を設定します。
OFF:Audio Delay 処理を行いません。
ON:Audio Deley 処理を行える状態にします。
Audio Sample
Audio Delay をサンプル単位で設定します。
調整つまみを回すか、タッチパネル上の数字入力画面で直接設定します。
設定範囲:0 〜 4095 サンプル
工場出荷時の設定:0
10
メニュー
終了するには
操作
1
HKSP‑105 のトップ画面でセレクト L ボタン
(Option)を押す。
UCP‑8060 に電源が供給されると、システムインジケー
ターが赤色に点灯します。機器内部の初期化が正常に終了
するとインジケーターは緑色に点灯し、Main Screen(以
下メイン画面とする)が表示されます。表示窓に表示され
るメニューの選択や各種の設定は、ジョグローラー、ジョ
グボタン、セレクトボタン、調整つまみを使って行います。
表示窓はタッチパネルになっています。画面に表示されて
Option Menu が表示されます。
2
ジョグローラーを回して、8. Exit Application を選択
する。
3
ジョグローラーを押す。
HKSP‑105 が終了し、UCP‑8060 のメイン画面が表
いる項目に触れて選択することもできます。
示されます。
オペレーションソフトウェアの起動と
終了
Option Menu の 8. Exit Application を押して終了するこ
ともできます。
起動するには
調整項目の選択
1
ジョグローラーを回して、HKSP‑105 をメイン画面で
選択する。
画面に表示されているボタンに触れて希望する項目を選択
します。
表示されるボタンには次の3種類の機能があります。
2
ジョグローラーを押すか、セレクト R ボタン
・ 次の選択肢をリスト表示する。
・ 表示されている項目を設定または実行する。
(Launch)を押す。
・ 押すたびに ON/OFF の設定を交互に切り換える。
オペレーションソフトウェアが起動し、トップ画面が
表示されます。
HKSP-105 HD AUDIO/VIDEO MULTIPLEXER Version 1.xx
例えば Delay を調整したいときは、次の手順で調整項目を
選択します。
Audio Sample
Slot1
0
0
4095
1
Delay ボタンを押す。
リストエリアの左から2列目に選択肢が表示されま
す。
HKSP-105 HD AUDIO/VIDEO MULTIPLEXER Version 1.xx
Audio Sample
Slot1
0
0
Audio Delay
4095
ON
Delay
Option
13:01:01
Status
Slot
メイン画面で、HKSP‑105 ボタンを押して起動することも
できます。
Setup
Delay
Audio Delay
ON
オートスタート機能
起動時に、UCP‑8060 のメイン画面をパスして、直接オペ
レーションソフトウェアのトップ画面を表示することがで
きます。
Delay
Option
13:01:01
Status
押して選択する。
カーソル(黄色の枠)
◆ オートスタートの設定については、UCP‑8060 の Operation
Manual の「オートスタートの設定」をご覧ください。
操作
11
2
数字入力画面が消え、入力した数値が調整値表示エリ
表示された選択肢から、希望するボタンを押す。
アに表示されます。
さらに選択肢がある場合は、次の選択肢が表示されま
す。
ON/OFF を設定するボタンの場合は、押すたびに
ON/OFF の設定が切り換わります。
入力した数値を取り消すには、Enter または Trim ボタン
を押す前に Clear ボタンを押します。
数値入力を取り消すには
操作画面のカーソルについて
調整項目選択中の画面で、リストエリアのボタンに表示さ
れるカーソルは、UCP‑8060 のジョグローラーまたはジョ
グ L、R ボタンで操作したときのみ移動します。直接画面
上のボタンを押して操作した場合は、カーソルは移動しま
せん。
Cancel ボタンを押します。
設定されている値をデフォルトに戻すには
Unity ボタンを押します。ユーザーが設定したデフォルト
値に戻ります。
◆ 詳しくは、8 ページをご覧ください。
調整値の設定
調整値表示エリアに表示されるパラメーターの値は調整つ
まみを回すか、数値を入力して設定します。
Unit ID の設定
調整値表示エリアに表示される Unit ID の値は数値を入力
して設定します。
調整つまみを使う場合
調整したいパラメーターの右にある調整つまみを回します。
1
リストエリアの Slot ボタンを押す。
調整値表示エリアに Unit ID の調整値が表示されま
Unity 値の表示
す。
Audio Sample
現在の設定値
4000
0
4095
2
Unit ID の調整値表示を押す。
数字入力画面が表示されます。
バー
SELECT Unit ID Menu
v マーク
v マーク:Unity 位置(ユーザーデフォルト値を表示しま
す。
)
バー:Unity 値と現在の設定値が等しい場合、バーが黄色
になります。
SONY
7
8
9
Next
Record
4
5
6
Clear
1
2
0
1
調整したいパラメーターの調整値表示エリアを押す。
数字入力画面が表示されます。
Audio Sample
0 . . . 4095
Unity
3
1 _ 254
Unit Name
Group ID
数字入力画面を使う場合
1
Unit ID
1
3
Cancel
Connect
設定したい数値を入力し、Connect ボタンを押す。
数字入力画面が消え、入力した数値が調整値表示エリ
アに表示されます。
入力した数値を取り消すには、Connect ボタンを押す前に
Clear ボタンを押します。
7
8
9
–
4
5
6
Clear
数字入力画面を消すには
1
2
3
Trim
Cancel ボタンを押します。
0
.
Cancel
Enter
通信履歴のある Unit ID を選択するには
2
12
設定したい数値を入力し、Enter ボタンを押す。
Next Record ボタンを押します。現在の設定値以降の数値
が順番に表示されます。通信履歴のある Unit ID にユニッ
現在の設定値から増減するには、数値を入力して
Trim ボタンを押す。
ト名がある場合はユニット名を表示します。
操作
オプションメニューの設定
2. IP Address
セレクト L ボタン(Option)を押すと、Option Menu が
〜 254)を設定します。
表示されます。ここで設定した値は、電源を切っても保持
されます。
1
2. IP Address を選択する。
2
ジョグ L、R ボタンを押して変更したい項目を決定す
Option Menu
1. Help
2. IP Address
3. Top Page
4. Menu Tree
5. Screen Saver
6. Background
7. Alert Sound
8. Exit Application
Group ID(設定範囲:1 〜 63)、Unit ID(設定範囲:1
る。
3
ジョグローラーを回して、数値を変更する。
4
セレクト R ボタン(Save)を押す。
変更した値が保存されます。
Back
変更したくない場合は、セレクト L ボタン
(Cancel)を押します。
13:01:01
各項目の初期設定は次のとおりです。
他の項目の数値を変更したい場合は、手順 2、3 を繰
り返します。
2. IP Address
(PFV‑SP3100/
Group ID
:1
Category ID :4
SP3300 接続時)
Unit ID
IP Address
3. Top Page
Default Page
4. Menu Tree
Off
5. Screen Saver
On
:1
:10.129.4.1
Elapsed Period of Time (min):10
6. Background
Default
B:127、G:111、R:111
7. Alert Sound
On
設定する項目を選択するには
次のどちらかの手順で設定したい項目を選択します。
方法1
IP アドレスについて
DATA LAN は Category ID、Group ID、Unit ID の組み
合わせで IP アドレスを決定します。各接続機器は本ルール
で Category ID が決まっており、通常 Group ID は 1 に
設定し、Unit ID の指定のみで接続することができます。
通信履歴を消去するには
画面右下の Clear ボタンを押してから手順4を実行しま
す。Group ID と Unit ID の変更した値が保存され、通信
履歴が消去されます。
手順4を実行する前に Clear ボタンを再度押すと、消去は
キャンセルされます。
3. Top Page
本ソフトウェアを起動するときに、どの画面から起動する
設定したい項目を押す。
かを設定します。
Default Page:トップ画面から起動します。
方法2
This Page:Option Menu 選択直前の画面から起動しま
す。
1
2
ジョグローラーを回して設定したい項目を反転表示す
る。
1
3. Top Page を選択する。
ジョグローラーを押す。
2
ジョグL、
R ボタンでDefault PageまたはThis Page を
1. Help
ファンクションボタンの設定を表示します。
選択する。
3
セレクト R ボタン(Save)を押す。
手順2で選択したページと現在選択しているスロット
が保存されます。
操作
13
変更したくない場合は、セレクト L ボタン
7
(Cancel)を押します。
セレクト R ボタン(Save)を押す。
設定した時間が保存されます。
4. Menu Tree
変更したくない場合は、セレクト L ボタン
トップ画面に、最初のステージ(Slot/Setup/Delay)のボ
タンを表示するかどうかを設定します。
設定を On にすると、図のように画面の左側に選択ボタン
が表示されます。
(Cancel)を押します。
6. Background
表示窓の背景色を設定します。
HKSP-105 HD AUDIO/VIDEO MULTIPLEXER Version 1.xx
Audio Sample
Slot1
0
0
4095
ご注意
タスクバーは固定色となっているため、背景色を変えるこ
とはできません。
Slot
Background
Setup
Audio Delay
Delay
A
OFF
Delay
パレット
Option
1
2
13:01:01
Status
4. Menu Tree を選択する。
Present
ジョグ L、R ボタンで On または Off を選択する。
Cancel
3
セレクト R ボタン(Save)を押す。
手順 2 の選択が保存されます。
変更したくない場合は、セレクト L ボタン(Cancel)
を押します。
5. Screen Saver
Screen Saver モードの On/Off と、モード開始までの時
間(1 〜 60(min)
)を設定します。
1
5. Screen Saver を選択する。
2
ジョグ L、R ボタンで On または Off を選択する。
On を選択した場合は、次の手順で開始時間を変更し
ます。
Off を選択した場合は、手順 7 へ進みます。
3
ジョグローラーを回してカーソルを Elapsed Period
of Time に移動する。
4
ジョグローラーを押して、数字を反転表示する。
5
ジョグローラーを回して Screen Saver モードの開始
14
ジョグローラーを押して設定した時間を決定する。
操作
Select2
Select3
Select4
Default
カラー
バー
13:01:01
Save
黄色のマークが表示されているカラーバーを
調整することができます。
Present には現在の背景色が、パレット A には選択中の背
景色が表示されます。Select1 〜 4 と Default から好きな
色を選択できます。
カラーバーを使って、Present、Default、Select11 〜 4
のパレットの色を基準に、次の手順で背景色を変更するこ
とができます。Default と Select 1 〜 4 の色は、
6. Background を再度選択すると元の色に戻り、変更され
ません。変更した色が保持されるのは Present の背景色だ
けです。
1
6. Background を選択する。
2
変更したいパレットを選択する。
選択したパレットの色が A に表示されます。
3
ジョグローラーを回して変更したいカラーバーを選択
する。
4
ジョグ L、R ボタンを押して色を変更する。
手順 3、4 を繰り返して、3本のカラーバーで色を調
整します。
時間を設定する。
6
Select1
239
192
95
5
セレクト R ボタン(Save)を押す。
変更した背景色に変わります。
変更したくない場合は、セレクト L ボタン
(Cancel)を押します。
スナップショットデータのセーブとリ
ストア
HKSP‑105 の現在の設定状態をメモリースティックにファ
7. Alert Sound
イルとして保存したり、メモリースティックにファイルと
して保持している設定情報を HKSP‑105 の設定状態に反
映することができます。
警告音の On/Off を設定します。
1
7. Alert Sound を選択する。
ステータス表示画面でセレクト R ボタン(Snapshot)を
押すと、Save/Restore Snapshot File(スナップショット
2
ジョグ L、R ボタンを押してOn またはOff を選択する。
ファイルセーブ・リストア選択)画面が表示されます。
3
セレクト R ボタン(Save)を押す。
Save/Restore Snapshot File
Please choose operation. Save or Restore?
Save
Restore
手順 2 の選択が保存されます。
変更したくない場合は、セレクト L ボタン
(Cancel)を押します。
8. Exit Application
HKSP‑105 用オペレーションソフトウェアを終了し、現在
選択しているスロットを自動的に保存して電源立ち上げ時
のメイン画面へ戻ります。
セレクト L ボタン(Back)を押すと、操作画面に戻りま
す。
ステータス表示
セレクト R ボタン(Status)を押すと、HKSP‑105 の現
在の設定状態が一覧表示されます。
Status Menu
Slot
Slot1
Format
Hanc Mask
Audio Channel
Audio Group Swap
Test SG Mode
Video SG
Audio SG
Audio SG Out Select
Surround Mode
Auto Scan
On
1-8ch
Off
Off
Color Bar
1K1K
All ch On
On
Audio Delay
Off
Audio Delay (Audio Sample) 0
OK
13:01:01
スナップショットデータをセーブするには
1
ジョグ L、R ボタンを押して Save を選択する。
2
セレクト R ボタン(OK)を押す。
3
メモリースティックを挿入する。
4
セレクト R ボタン(Go)を押す。
Save Snapshot File(スナップショットファイルセー
ブ)画面が表示されます。
Save Snapshot File
Refresh
Exit
Cancel
13:01:01
File Name :
Modify
U002S05-01.AVM
Comments :
Modify
FDL 1080i/59.94
Snapshot
ステータス表示を更新するには、画面に表示されている
Refresh ボタンを押します。
Cancel
セレクト L ボタン (Exit) を押すと、オペレーションソフト
ウェアの設定画面に戻ります。
機能していないステータスはグレイ表示されます。
13:01:01
Execute
メモリースティックに保存するファイル名とファイル
に追記するコメントが表示されます。
ファイル名は Unit ID とスロットを元に自動的に作成
され、拡張子は AVM となります。
コメントは HKSP‑105 の現在の動作モードとフォー
マットの設定値になります
操作
15
参考
自動生成されるファイル名は、挿入されているメモ
リースティック内のファイル名を検索し、空き番号を
付けたファイル名になります。
例) U001 S05 ‑01.AVM
│
│
│
ユニット ID スロット 空き番号
スナップショットデータをリストアするに
は
1
ジョグ L、R ボタンを押して Restore を選択する。
2
セレクト R ボタン(OK)を押す。
3
メモリースティックを挿入する。
4
セレクト R ボタン(Go)を押す。
ご注意
メモリースティックに ASCII コード以外の文字を使用
したファイル名やフォルダー名が存在すると、ファイ
ル名が自動的に作成されない場合があります。
5
メモリースティックの /MSSONY/PRO/UCP/ にある
拡張子が AVM のファイル一覧(Snapshot List)を
表示します。更新日時の新しい順に上から表示しま
セレクト R ボタン(Excute)を押す。
す。
メモリースティックの /MSSONY/PRO/UCP/ に、上
記ファイル名で保存されます。
Restore Snapshot File
メモリースティックの /MSSONY/PRO/UCP/ がない
場合は、保存時に /MSSONY/PRO/UCP/ が作成され
Snapshot File List
U002S05-01.AVM
U001S05-09.AVM
U001S05-08.AVM
U001S05-07.AVM
U001S05-06.AVM
U001S05-03.AVM
U001S05-05.AVM
U001S05-04.AVM
U001S05-02.AVM
U001S05-01.AVM
U001S00-01.AVM
U254S05-01.AVM
ます。
6
セレクト R ボタン(Done)を押す。
ステータス表示画面に戻ります。
ファイル名を変更するには
1
2003-04-21 19:21
2003-02-27 10:16
2003-02-26 20:37
2003-02-26 20:19
2003-02-26 19:07
2003-02-26 18:20
2003-02-26 16:03
2003-02-26 12:02
2003-02-26 09:34
2003-02-25 20:26
2003-01-23 02:09
2003-01-20 05:22
Cancel
画面上のFile Name の下にあるModify ボタンを押す。
13:01:01
Select
ご注意
メモリースティックに ASCII コード以外の文字を使用
したファイル名やフォルダー名が存在すると、ファイ
現在のファイル名の拡張子 AVM が省かれた文字が表
示されます。
ル一覧を表示しない場合があります。
2
画面上のキーボードで編集する。
3
セレクト R ボタン(OK)を押す。
転表示させ、セレクト L ボタン(Select)を押す。
手順 2 で編集した文字に拡張子 AVM が追加されま
ファイルが保持している設定情報の一覧 ( スナップ
ショットファイルリストア画面)が表示されます。
す。
変更したくない場合は、セレクト L ボタン(Cancel)
を押します。
コメントを変更するには
1
画面上のCommentsの下にあるModifyボタンを押す。
5
ジョグローラーを回して、設定したいファイル名を反
Restore Snapshot File
Slot
Slot1
Format
Hanc Mask
Audio Channel
Audio Group Swap
Test SG Mode
Video SG
Audio SG
Audio SG Out Select
Surround Mode
Auto Scan
On
1-8ch
Off
Off
Color Bar
1K1K
All ch On
On
Audio Delay
Off
Audio Delay (Audio Sample) 0
現在のコメントの文字が表示されます。
2
画面上のキーボードで編集する。
Back
3
セレクト R ボタン(OK)を押す。
変更したくない場合は、セレクト L ボタン(Cancel)
を押します。
16
操作
13:01:01
Execute
6
セレクト R ボタン(Execute)を押す。
HKSP‑105 の設定状態への反映が行なわれます。
7
エラーおよび警告表示
セレクト R ボタン(Done)を押す。
ステータス表示画面に戻ります。
ロック機能
ジョグローラー、ジョグ L、R ボタン、タッチパネル、調
整つまみの操作を受け付けなくします。
エラーまたは警告状態のときにステータスエリアに次のア
イコンが表示されます。ステータスエリアに触れると、エ
ラーおよび警告コードを表示します。
(コミュニケーションエラー)
:通信ができません。
(警告)
:ワーニングメッセージがあります。
(エラー)
:エラーメッセージがあります。
ロック機能を設定するには
ファンクションボタン1を赤く点灯するまで押します。タ
コミュニケーションエラーの場合は、接続機器の IP アドレ
スクバーに Lock が表示されます。
スおよび接続状態を確認し、IP Address の設定をしてくだ
さい。
ご注意
・ ロック機能が設定されていても Option Menu、Status
◆ IP Address の設定については、
「2. IP Address」(13 ページ)
をご覧ください。
Menu へ移行することはできます。
・ Option Menu は、ファンクションボタン1が赤く点灯
していても操作することができます。
◆ エラーおよび警告コードの内容については、HKSP‑105 の
Installation Manual の「6‑1. エラー/ワーニングコード一
覧」をご覧ください。
・ Option Menu、Status Menu 画面では、ファンクショ
ンボタン1のロック機能は解除できません。
・ 数字入力画面が表示されているときは、ロック機能を設
定することはできません。
セレクト L ボタン(Back)を押すか、ステータスエリア
に触れると、エラーおよび警告表示を終了し、操作画面に
戻ります。
ロック機能を解除するには
ファンクションボタン1を消灯するまで押します。ロック
機能が解除されます。
エラーおよび警告表示
17
・ メモリースティック (メモリーセレクト機能付き)
メモリースティック
使う
メモリースティック
メモリースティック
メモリースティック
を
について
使用可能な
とは?
ピーディスクより容量が大きい新世代の IC 記録メディア
です。 メモリースティック 対応機器間でデータをやりと
りするのにお使いいただけるだけでなく、着脱可能な外部
記録メディアの 1 つとしてデータの保存にもお使いいただ
けます。
メモリースティック には、標準サイズのものとその小型
サイズの メモリースティック デュオ があります。 メ
モリースティック デュオ をメモリースティック デュオ
アダプターに入れると、標準サイズの メモリースティッ
ク と同じサイズになり、標準サイズの メモリース
ティック 対応機器でもお使いいただけます。
メモリースティック
あります。
の種類
・ メモリースティック‐ R
いったん記録されたデータが上書きされない メモリース
ティック です。 メモリースティック‐ R 対応機器での
みデータを記録できます。著作権保護技術(マジックゲー
ト)が必要なデータは記録できません。
・ メモリースティック
著作権保護技術(マジックゲート)が必要なデータ以外の、
メモリースティック
です。
・ マジックゲート メモリースティック
著作権保護技術(マジックゲート)を搭載した
スティック
メモリー
です。
あらかじめデータが記録されている、読み出し専用の
メ
です。データの記録や消去はできませ
・ メモリースティック PRO
メモリースティック PRO 対応機器でのみお使いいただ
ける、著作権保護技術(マジックゲート)を搭載した
モリースティック です。
18
ただけます。ただし、本機はマジックゲート規格に対応し
ていないため、本機で表示するデータはマジックゲートに
よる著作権の保護の対象にはなりません。
メモリースティック PRO
について
本機で使える メモリースティック PRO は 1GB までで
す。
メモリースティック デュオ
について
ク デュオ アダプターに入れてからお使いください。
・ メモリースティック デュオ をメモリースティック
デュオ アダプターに入れるときは、正しい挿入方向をご
確認ください。
・ メモリースティック デュオ をメモリースティック
デュオ アダプターに装着して本機でご使用になるとき
は、正しい挿入方向をご確認の上ご使用ください。間
違ったご使用は機器の破損の原因となりますのでご注意
ください。
・ メモリースティック デュオ アダプターに
メモリース
ティック デュオ が装着されていない状態で、 メモ
リースティック 対応機器に挿入しないでください。こ
のような使いかたをすると、機器に不具合が生じること
があります。
データ読み込み / 書き込みスピードについて
お使いの
メモリースティック
と機器の組み合わせに
よっては、データの読み込み / 書き込み速度が異なります。
・ メモリースティック‐ ROM
モリースティック
ん。
メモリースティック
本機では、 メモリースティック 、 メモリースティック
PRO 、 マジックゲート メモリースティック がご使用い
・ メモリースティック デュオ を本機でお使いの場合は、
必ず メモリースティック デュオ をメモリースティッ
には、用途に応じて以下の6種類が
あらゆるデータを記録できる
メモ
リースティック です。
メモリースティック 本体裏面のメモリーセレクトスイッ
チにより、用途に応じてご使用になるメモリーを選択でき
ます。各メモリーを同時に、また連続でご使用することが
できません。
は、小さくて軽く、しかもフロッ
メモリースティック
内部に複数のメモリー(128MB)を搭載している
メモリースティック
を使う
メ
マジックゲートとは?
マジックゲートは、暗号化技術を使って著作権を保護する
技術です。
メモリースティック
について
メモリースティック
マット)について
の初期化(フォー
メモリースティック は、出荷時に専用の標準フォーマッ
ト形式でフォーマットされています。お客様ご自身で メ
端子
モリースティック のフォーマットをされる場合には、本
機でフォーマットされることをおすすめします。
誤消去防止つまみ
メモリースティック をパソコンでフォー
マットするときのご注意
お手持ちのパソコンなどで メモリースティック を
フォーマットする場合は、次の点にご注意ください。
パソコンでフォーマットした メモリースティック は、
本機での動作を保証いたしません。一度パソコンでフォー
ラベル貼り付け部
・ 誤消去防止ツマミを「LOCK」にすると記録や編集、消
去ができなくなります。
・ 誤消去防止ツマミの位置や形状は、お使いの メモリー
スティック によって異なることがあります。
・ メモリースティック デュオ の誤消去防止スイッチを
動かすときは、先の細いもので動かしてください。
・ 以下の場合、データが破壊されることがあります。
― 読み込み中、書き込み中に メモリースティック
を
取り出したり、本機の電源を切った場合
― 静電気や電気的ノイズの影響を受ける場所で使用した
場合
・ 大切なデータは、バックアップを取っておくことをおす
すめします。
ご注意
・ ラベル貼り付け部には、専用ラベル以外は貼らないでく
ださい。
・ ラベルを貼るときは所定のラベル貼り付け部に貼ってく
ださい。はみ出さないようにご注意ください。
・ メモリースティック デュオ のメモエリアに書き込む
ときは、あまり強い圧力をかけないでください。
・ 持ち運びや保管の際は、付属の収納ケースに入れてくだ
さい。
マットした メモリースティック を、本機で使用するに
は、本機で再度フォーマットする必要があります。なお、
この場合 メモリースティック 内に記録してあるデータ
はすべて消去されますので、ご注意ください。
◆ メモリーステックのフォーマットのしかたについては、
UCP‑8060 の Operation Manual をご覧ください。
ステータスインジケーター点灯中および点
滅中は
データの読み込み(緑)、または書き込み(赤)を行ってい
ます。このとき、本機に振動や強い衝撃を与えないでくだ
さい。また、本機の電源を切ったり、 メモリースティッ
ク を取りはずしたりしないでください。データがこわれ
ることがあります。
使用上のご注意
・ データの損失を防ぐため、データは頻繁にバックアップを取る
ようにしてください。万一、データが損失した場合、当社は一
切その責任を負いかねます。
・ あなたが記録したものは、個人として楽しむなどのほかは、著
作権上、権利者に無断で使用できません。
・ 本機のソフトウェアの仕様は、改良のため予告なく変更するこ
とがありますが、ご了承ください。
・ 端子部には手や金属などで触れないでください。
・ 強い衝撃を与えたり、曲げたり、落としたりしないでく
・ Memory Stick Duo( メモリースティックデュオ )および
ださい。
・ 分解したり、改造したりしないでください。
・ Memory Stick( メモリースティック )および
・ 水にぬらさないでください。
・ 以下のような場所でのご使用や保管は避けてください。
― 高温になった車の中や炎天下など気温の高い場所
・ MagicGate Memory Stick( マジックゲートメモリー
― 直射日光のあたる場所
― 湿気の多い場所や腐食性のある場所
は、ソニー株式会社の商標です。
は、
ソニー株式会社の商標です。
スティック )および
は、ソニー株
式会社の商標です。
・ Memory Stick‑ROM( メモリースティック ‑ROM )およ
び
は、ソニー株式会社の商標です。
・ Memory Stick PRO( メモリースティック PRO )および
は、ソニー株式会社の商標です。
・ Memory Stick R( メモリースティック R )および
は、ソニー株式会社の商標です。
メモリースティック
を使う
19
20
メモリースティック
を使う
English
Table of Contents
Overview ............................................................................. 22
Latest Version of the Operation Software ............................... 22
Location and Function of Parts......................................... 23
Menu .................................................................................... 25
Menu Configuration................................................................. 25
Functions of the Menu Items .................................................. 26
Operations .......................................................................... 29
Starting and Terminating the Operation Software................... 29
Selecting an Item to be Adjusted ............................................. 29
Adjustment............................................................................... 30
Setting the Unit ID................................................................... 30
Setting the Option Menu.......................................................... 31
Status Display .......................................................................... 33
Saving and Restoring the Snapshot Data................................. 33
Lock Function.......................................................................... 35
Error and Warning Display ................................................ 35
Using a “Memory Stick”..................................................... 36
About a “Memory Stick” ......................................................... 36
Table of Contents
21
Overview
This operation software controls the HKSP-105 HD
Audio/Video Multiplexer. It is installed on the UCP-8060
Universal Control Panel and controls multiple HKSP-105
units via the network.
Latest Version of the Operation
Software
As for the latest version of the operation software, consult
your Sony representative.
To install the latest version, refer to the Operation
Manual for the UCP-8060.
22
Overview
Location and Function of Parts
d Display window
e Title bar
c Status indicator
f Status area
b System indicator
g List area
h Adjusted value display area
UCP-8060
SYSTEM
a Memory Stick slot
o Control knobs
n Select L, R buttons
m Task bar
l Stage path area
k Function buttons
j Jog L, R buttons
i Jog roller
a Memory Stick slot
Insert a Memory Stick with the label side up.
For details, refer to the Operation Manual of the
UCP-8060.
b System indicator
Lights in red, orange, or green to indicates the system
operation status.
c Status indicator
Lights in red, orange, or green to show the status of access
to the Memory Stick slot or of the connected system.
d Display window
Shows a menu or data. The window functions as a touch
panel, and you can select a function by touching an onscreen object representing it. The displayed items depend
on the operation software to be used.
g List area
Shows the items that are controlled with this operation
software as buttons. When you touch a button, the
function assigned to the button is performed.
h Adjusted value display area
Shows the parameters assigned to the corresponding
control knobs and the set values. A value can be adjusted
by turning the control knob. You can directly enter the
value on the number key screen displayed by touching the
desired area.
i Jog roller
Turn the roller to select an item or change a value. Press
the roller to execute the selection.
j Jog L, R buttons
The left button is called the jog L button, and the right one
the jog R button. Press to change the layer of the menu.
e Title bar
Shows the title of the displayed screen.
f Status area
Shows the current status such as the slot number where
the HKSP-105 is installed, error messages, etc.
Location and Function of Parts
23
k Function buttons
These buttons are called function button 1, 2, … 5 from
the top, and light in red, orange, or green according to the
operation status.
Function button 1 (lock): Turns on and off the lock
function.
When the button is lit in red, the lock function is set
to ON, and when the button is not lit, the function is
set to OFF.
Function button 2, 3, 4, and 5: Not used
For details on the lock function, see “Lock Function” on
page 35.
l Stage path area
Shows the path of the menu.
m Task bar
Shows the items performed by pressing the select L or R
button, keyboard icon, etc.
n Select L, R buttons
The left button is the select L button, and the right button
is the select R button. Press these buttons to perform the
function displayed at the corresponding position on the
task bar. The screen display will change accordingly.
o Control knobs
The knobs are called control knob 1, 2, 3, and 4 from the
top. These are for adjusting the values of parameters
displayed on the right of the display window.
24
Location and Function of Parts
Menu
Menu Configuration
The menu configuration of this software is as shown
below.
Slot
Slot1
Slot2
Slot3
Slot4
Slot5
Slot6
Slot7
Slot8
Slot9
Slot10
Slot11
Slot12
Slot13
Slot14
Slot15
Slot16
Slot17
Unit ID
Setup
Surround Mode
ON
OFF
Recall/Store
Store
User Save
Recall
Factory
User
Output
Test SG
Audio SG Out Select
Audio SG
Burst
1K3K
1K1K
Video SG
Ramp
Color Bar
Test SG Mode
Audio Group Swap
Audio Channel
Input
Delay
OFF
ON
OFF
ON
9-12ch
5-8ch
1-4ch
9-16ch
1-8ch
None
13-16ch
Hanc Mask
ON
OFF
Format
1080i/59.94
1080i/60
1035i/59.94
1035i/60
Auto Scan
720p/59.94
720p/60
1080p/23.98sF
1080p/24sF
1080i/50
Audio Delay
7/8ch Only
5/6ch Only
3/4ch Only
1/2ch Only
All ch On
All ch Off
OFF
ON
Audio Sample
Menu
25
Functions of the Menu Items
Slot
Select the slot
number where the
HKSP-105 to be
controlled is
installed.
Slot1 to Slot17: Shows the slot name (up to four characters) to be controlled, and the model
name of the board installed in the slot.
Note
When the PFV-SP3300 is connected, the slot number (Slot1 to Slot17) appears, and when the
PFV-SP3100 is connected, the slot number (Slot1 to Slot4) appears.
Unit ID: Shows the unit ID (up to 10 characters) of the PFV-SP3300 or PFV-SP3100 currently
connected. Available Unit IDs are 1 through 254. Set it using the on-screen numeric keypad.
Note
The Unit ID cannot be set using the control knob.
For details on setting the slot name and unit ID, refer to the Installation Manual for the HKSP-300.
Setup
Settings for the
system
Surround Mode
Sets the Surround Mode to ON or OFF.
ON: The Surround Mode is enabled.
OFF: The Surround Mode is disabled.
Note
The settings for the functions that can be enabled only when Surround Mode is set to OFF
(marked by *) are returned to the default when Surround Mode is set to ON. For example, if
Audio SG Out Select is set to 1/2 ch Only with Surround Mode set to OFF, and the setting of
Surround Mode is changed to ON, the All SG Out Select setting is automatically changed to All
ch On. Even if Surround Mode is set to OFF again, the All SG Out Select setting remains to be
All ch On (1/2 ch Only cannot be retrieved). Set All SG Out Select again if necessary.
Recall/Store
Managing the default
values.
Store
Stores the default values set by the user.
User Save: The current setting values are stored as the user default
values.
Recall
Retrieves the default values.
Factory: The default values set at the factory are retrieved.
User: The default values set by the user are retrieved.
Note
If no values have been stored by User Save, the defaults values for the
User and Factory are the same.
26
Menu
Setup
(continued)
Output
Settings for the
output signals.
Test SG
Sets the Test SG.
Audio SG Out Select
Select the output channel for the Audio SG.
7/8 ch Only: Only 7 and 8 channels*
5/6 ch Only: Only 5 and 6 channels*
3/4 ch Only: Only 3 and 4 channels*
1/2 ch Only: Only 1 and 2 channels*
All ch On: All four paired channels
All ch Off: No signals are output.
Notes
• If Test SG Mode is set to OFF, the select buttons
appear dark and cannot be selected.
• If Surround Mode is set to ON, the select buttons
marked by * appear dark and cannot be selected.
Audio SG
Selects the type of the Audio SG.
Burst: A burst audio signal, a signal for 1 field is
output and that for 5 fields is not output, is
output. The A-channel signal of a paired
channel is 1 kHz, and the B-channel signal is 3
kHz.
1K3K: The A-channel signal of a paired channel
is 1 kHz, and the B-channel signal is 3 kHz.
1K1K: The A-channel signal of a paired channel
is 1 kHz, and the B-channel signal is 1 kHz.
Note
If Test SG Mode is set to OFF, the select buttons
appear dark and cannot be selected.
Video SG
Select the type of the Video SG.
Ramp: Ramp signals
Color Bar: Color bar signals
Note
If Test SG Mode is set to OFF, the select buttons
appear dark and cannot be selected.
Test SG Mode
Sets the Test SG mode.
OFF: No Test SG is output.
ON: The Test SG is output.
Audio Group Swap
Selects the audio group swap function.
OFF: The swap function is disabled.
ON: The swap function is enabled.
Menu
27
Setup
(continued)
Output
(continued)
Audio Channel
Select the audio channels to be multiplexed.
9-12ch: Channels 9 to 12 are multiplexed.*
5-8ch: Channels 5 to 8 are multiplexed.*
1-4ch: Channels 1 to 4 are multiplexed.*
9-16ch: Channels 9 to 16 are multiplexed.
1-8ch: Channels 1 to 8 are multiplexed.
None: No channels are multiplexed.
13-16ch: Channels 13 to 16 are multiplexed.*
Note
If Surround Mode is set to ON, the select buttons marked by * appear dark and
cannot be selected.
Input
Setting for the input
signal
Hanc Mask
Selects the HANC Mask.
ON: The HANC area is masked.
OFF: The HANC area is not masked.
Format
Selects the format of the HDTV SDI video input signal.
1080i/59.94: 1080 lines, 59.94 Hz, interlaced
1080i/60: 1080 lines, 60 Hz, interlaced
1035i/59.94: 1035 lines, 59.94 Hz, interlaced
1035i/60: 1035 lines, 60 Hz, interlaced
Auto Scan: The format of the input signal is automatically detected.
720p/59.94: 720 lines, 59.94 Hz, progressive
720p/60: 720 lines, 60 Hz, progressive
1080p/23.98sF: 1080 lines, 23.98 Hz, progressive segmented frame
1080p/24sF: 1080 lines, 24 Hz, progressive segmented frame
1080i/50: 1080 lines, 50 Hz, interlaced
Delay
Adjusts the delay.
Audio Delay
Selects whether the audio signal is delayed or not.
OFF: The audio signal delayed is disabled.
ON: The audio signal delay is enabled.
Audio Sample
The audio delay is set in sample units.
Turn the control knob, or use the numeric key display to set the value.
Setting range: 0 to 4095 samples
Factory setting: 0
28
Menu
Terminating the operation software
Operations
1
When the power is supplied to the UCP-8060, the system
indicator lights in red. When initialization of the unit is
finished normally, the indicator lights in green, and the
Main Screen appears in the display window. You can
select the menu or items or adjust the parameters
displayed in the window with the jog roller, jog buttons,
select buttons, and control knobs. The display window
also functions as a touch panel, and you can select the
menu and items, by touching on-screen objects.
Starting and Terminating the
Operation Software
Starting the operation software
Press the select L button (Option) on the top page of
this operation software.
The Option Menu appears.
2
Turn the jog roller to select “8. Exit Application.”
3
Push the jog roller.
The operation software terminates, and the Main
Screen appears.
You can also select “8. Exit Application” by touching in
on the screen.
Selecting an Item to be Adjusted
1
Turn the jog roller to select the operation software to
be started on the Main Screen.
2
Push the jog roller or the select R button (Launch).
Touch a button on the touch panel to select your desired
item.
The buttons are classified into three types as follows:
• To display the next layer
• To set or perform the displayed item
• To toggle the item ON or OFF
The selected operation software is activated.
For example to adjust Delay, follow the procedures below.
1
HKSP-105 HD AUDIO/VIDEO MULTIPLEXER Version 1.xx
Audio Sample
Slot1
0
0
Press the Delay button.
4095
The list of choice appears on the second column from
the left.
HKSP-105 HD AUDIO/VIDEO MULTIPLEXER Version 1.xx
Audio Sample
Slot1
0
0
4095
Audio Delay
ON
Delay
Slot
Option
13:01:01
Status
Setup
You can select the operation software by touching the
appropriate on-screen object on the Main Screen.
Delay
Audio Delay
ON
Delay
Option
Auto Start Function
When the auto start function is set, the top page of this
operation software appears instead of the Main Screen of
the UCP-8060 when the power of the UCP-8060 is turned
on.
For details on setting the auto start function, refer to the
Operation Manual of the UCP-8060.
13:01:01
Status
Press to select an item.
Cursor (yellow)
2
Press the desired button among the displayed list.
The following list of choices appears if there are any.
If the button has a function to toggle ON or OFF,
setting is changed to ON or OFF each time the button
is pressed.
Operations
29
Cursor on the operation panel
A cursor displayed in list area moves only when you
select an item to be adjusted by using the jog roller or jog
L and R buttons are used. If you touch the button directly,
the cursor does not move.
To cancel the entered value
Press the Cancel button.
Retrieving the default values
Press the Unity button. The default values set by User
Save is retrieved.
Adjustment
For details, see page 26.
You can adjust the values displayed in the adjusted value
display area with the control knob or directly enter the
values.
Setting the Unit ID
Adjusting using the control knob
The Unit ID displayed in the adjusted value display area
is set by entering the numeric value.
Turn the control knob corresponding to the parameter to
be adjusted.
1
The Unit ID appears in the adjusted value display
area.
Displaying the Unity value
2
Audio Sample
Current setting
4000
0
4095
Press the Slot button in the list area.
Press Unit ID in the adjusted value display area.
The numeric keypad appears.
Bar
SELECT Unit ID Menu
1
v mark
SONY
7
8
9
Next
Record
4
5
6
Clear
1
2
3
Group ID
v mark: Unity position (shows the user default value)
Bar: The bar appears in yellow when the Unity value and
the current setting are the same.
Adjusting using the numeric key display
1
Touch the adjusted value display area whose value is
to be adjusted.
The numeric key display appears.
Audio Sample
0 . . . 4095
Unity
2
7
8
9
–
4
5
6
Clear
1
2
3
Trim
0
.
Cancel
Enter
Enter the value to be set, then press the Enter button.
To trim the set value, enter the value, then press the
Trim button.
The numeric key display disappears, and the entered
value is shown in the adjusted value display area.
To clear the entered value, press the Clear button before
pressing the Enter or Trim button.
30
Operations
0
3
1 _ 254
Unit Name
Unit ID
1
Cancel
Connect
Enter the value to be set, then press the Connect
button.
The numeric keypad disappears, and the entered
value is shown in the adjusted value display area.
To clear the entered value, press the Clear button before
pressing the Connect button.
To cancel the entered value
Press the Cancel button.
To select a Unit ID that includes the
communication history
Press the Next Record button. The values following the
current setting appear in order. If the Unit ID with the
communication history has a unit name, that also appears.
Setting the Option Menu
If you press the select L button (Option) on the display,
the Option Menu appears. The settings made on this menu
are retained even if the power is turned off.
3
Turn the jog roller to change the setting.
4
Press the select R button (Save).
The changed value is stored.
If you do not change the settings, press the select L
button (Cancel).
Option Menu
1. Help
2. IP Address
3. Top Page
4. Menu Tree
5. Screen Saver
6. Background
7. Alert Sound
8. Exit Application
To set another item, repeat steps 2 and 3.
IP address
The IP address of the DATA LAN is decided by the
combination of Category ID, Group ID, and Unit ID.
Normally the Category ID has been decided, and the
Group ID is set to 1 so that specifying the Unit ID is
enough to enable the connection.
Back
13:01:01
Default settings are as shown below.
2. IP Address
(when a PFV-SP3100/
SP3300 is connected)
Group ID:1
Category ID:4
Unit ID :1
IP Address:10.129.4.1
3. Top Page
Default Page
To clear the communication history
Press the Clear button inthe lower right of the display, and
perform step 4. The value whose Group ID and Unit ID
have been changed is stored, and the communication
history is cleared.
If you press the Clear button again before performing step
4, clearing of the communication history is canceled.
4. Menu Tree
Off
3. Top Page
5. Screen Saver
On
Elapsed Period of Time (min): 10
6. Background
Default
B:127, G: 111, R: 111
Select the start page displayed when this software starts.
Default Page: Top page is displayed.
This Page: The page just before the Option Menu is
selected is displayed.
7. Alert Sound
On
Selecting an item to be set
Select an item using either the following two methods:
Method 1
Touch an item you intend to set.
Method 2
1
Turn the jog roller to highlight the item to be set.
2
Press the jog roller.
1
Select “3. Top Page.”
2
Select Default Page or This Page with the jog L or R
button.
3
Press the select R button (Save).
The selection in step 2 and the currently selected slot
number are stored.
If you do not change the settings, press the select L
button (Cancel).
1. Help
Shows the setting for the function buttons.
2. IP Address
You may set the Group ID (setting range: 1 to 63) and
Unit ID (setting range: 1 to 254).
1
Select “2. IP Address.”
2
Press the jog L or R button to select an item to be
changed.
Operations
31
4. Menu Tree
6. Background
Set whether to display the buttons for the first stage (Slot/
Setup/Delay) or not. When set to On, the buttons appear
on the left of the display as shown below.
Set the background color of the display window.
HKSP-105 HD AUDIO/VIDEO MULTIPLEXER Version 1.xx
Audio Sample
Slot1
0
0
Note
The color of the task bar is fixed. You cannot change the
background color.
4095
Background
Slot
A
Setup
Pallete
Audio Delay
Delay
OFF
Delay
Present
Option
13:01:01
Status
1
Select “4. Menu Tree.”
2
Select On or Off with the jog L or R button.
3
Press the select R button (Save).
The selection in step 2 is stored.
If you do not change the settings, press the select L
button (Cancel).
5. Screen Saver
Set the screen saver function On or Off, and the period to
start the screen saver mode (1 to 60 minutes).
1
Select “5. Screen Saver.”
2
Select On or Off with the jog L or R button.
If you select On, set the period to start the screen
saver mode.
If you select Off, skip to step 7.
3
Turn the jog roller to move the cursor to Elapsed
Period of Time.
4
Press the jog roller to highlight the set value.
5
Turn the jog roller to set the period to start the screen
saver mode.
Select2
Select3
Cancel
Default
Color bars
13:01:01
Save
Palette Present shows the current background color, and
palette A shows the color to be adjusted. You can select
any desired color from Select 1 through 4, and Default.
The background color can be changed based on the color
of Present, Default, and Select 1 to 4 with the following
procedures. When 6. Background is selected again, the
color of Select 1 to 4 and Default returns to the original
color. The color of Present only is kept.
1
Select “6.Background.”
2
Select the palette to be changed.
The color of the selected palette appears in A.
3
Select a desired color bar by turning the jog roller.
4
Press the jog L or R button to change the color.
Adjust the color repeating steps 3 and 4 using three
color bars.
5
Press the select R button (Save).
The background color changes.
If you do not change the color, press the select L
button (Cancel).
Press the jog roller to decide the set period.
7
Press the select R button (Save).
7. Alert Sound
The set period is stored.
Set the alert sound On or Off.
Operations
Select4
Yellow dot shows the color bar
being adjusted.
6
If you do not change the settings, press the select L
button (Cancel).
32
Select1
239
192
95
1
Select “7. Alert Sound.”
2
Press the jog L or R button to select On or Off.
3
Press the select R button (Save).
The selection in step 2 is stored.
If you do not change the settings, press the select L
button (Cancel).
8. Exit Application
Terminates the operation software for the HKSP-105 and
stores the currently selected slot number automatically.
Then Main Screen is displayed.
When you press the select L button (Back), the operation
display appears.
Saving and Restoring the Snapshot
Data
The current settings of the HKSP-105 can be stored in a
Memory Stick as a file, and also the data stored in the
Memory Stick can be read and used by the HKSP-105.
Press the select R button (Snapshot) on the Status display.
The Save/Restore Snapshot File display appears.
Save/Restore Snapshot File
Please choose operation. Save or Restore?
Save
Restore
Status Display
Press the select R button (Status), and a list of settings for
the HKSP-105 is displayed.
Cancel
OK
13:01:01
Status Menu
Slot
Saving the snapshot data
Slot1
Format
Hanc Mask
Audio Channel
Audio Group Swap
Test SG Mode
Video SG
Audio SG
Audio SG Out Select
Surround Mode
Auto Scan
On
1-8ch
Off
Off
Color Bar
1K1K
All ch On
On
Audio Delay
Off
Audio Delay (Audio Sample) 0
Refresh
Exit
13:01:01
1
Press the jog L or R buttons to select Save.
2
Press the select R button (OK).
3
Insert the Memory Stick in the Memory Stick slot.
4
Press the select R button (Go).
Snapshot
To update the Status display, press the Refresh button.
The Save Snapshot File display appears.
Save Snapshot File
If you press the select L button (Exit), the setting display
for the operation software is retrieved.
The status of any disabled item is grayed.
File Name :
Modify
U002S05-01.AVM
Comments :
Modify
FDL 1080i/59.94
Cancel
13:01:01
Execute
File Name (to store data in the Memory Stick) and
Comments appear.
The filename is automatically created based on the
Unit ID and slot number, and has the extension
AVM.
Comments shows the current operating mode of the
HKSP-105 and the settings of the format.
Operations
33
Restoring the snapshot data
Information
The filename is automatically created by checking
the filename stored in the Memory Stick and
assigning an unused number.
Example: U001 S05-01.AVM
|
| |
Unit ID Slot Unused number
Note
If a filename or folder name having any non-ASCII
characters exists in the Memory Stick, the filename
may not be created automatically.
5
1
Press the jog L or R button to select Restore.
2
Press the select R button (OK).
3
Insert the Memory Stick into the Memory Stick slot.
4
Press the select R button (Go).
A list of files with the extension AVM in /MSSONY/
PRO/UCP/ in the Memory Stick (Snapshot File
Llist) appears.
Press the select R button (Execute).
Restore Snapshot File
The file is stored with the filename created above in
the folder /MSSONY/PRO/UCP/ in the Memory
Stick.
If /MSSONY/PRO/UCP/ does not exist in the
Memory Stick, it is created automatically when
storing data.
6
Snapshot File List
U002S05-01.AVM
U001S05-09.AVM
U001S05-08.AVM
U001S05-07.AVM
U001S05-06.AVM
U001S05-03.AVM
U001S05-05.AVM
U001S05-04.AVM
U001S05-02.AVM
U001S05-01.AVM
U001S00-01.AVM
U254S05-01.AVM
Press the select R button (Done).
2003-04-21 19:21
2003-02-27 10:16
2003-02-26 20:37
2003-02-26 20:19
2003-02-26 19:07
2003-02-26 18:20
2003-02-26 16:03
2003-02-26 12:02
2003-02-26 09:34
2003-02-25 20:26
2003-01-23 02:09
2003-01-20 05:22
The Status display is retrieved.
Cancel
To change the filename
1
2
Modify the filename using the keyboard on the
display.
3
Press the select R button (OK).
If a filename or folder name having any non-ASCII
characters exists in the Memory Stick, the file list
may not appear.
5
Turn the jog roller to highlight the filename to be set
on the HKSP-105, then press the select L button
(Select).
The setting status of the selected file appears.
The extension AVM is added to the characters
modified in step 2.
To cancel the modification, press the select L button
(Cancel).
Restore Snapshot File
Slot
Slot1
Format
Hanc Mask
Audio Channel
Audio Group Swap
Test SG Mode
Video SG
Audio SG
Audio SG Out Select
Surround Mode
Modifying the comments
1
Auto Scan
On
1-8ch
Off
Off
Color Bar
1K1K
All ch On
On
Audio Delay
Off
Audio Delay (Audio Sample) 0
Press the Modify button under Comments on the
display.
The current comments appear.
2
Modify the filename using the keyboard on the
display.
3
Press the select R button (OK).
To cancel the modification, press the select L button
(Cancel).
Back
6
13:01:01
Operations
Execute
Press the select R button (Execute).
The data selected in step 5 are used as settings of the
HKSP-105.
7
Press the select R button (Done).
The Status display is retrieved.
34
Select
Note
Press the Modify button under File Name on the
display.
The characters of the current filename, excluding the
extension AVM, appear.
13:01:01
Lock Function
The lock function disables operation of the jog roller, the
jog L and R buttons, the control knobs, and the touch
panel.
To set the lock function
Hold the function 1 button pressed until it lights in red.
“Lock” will then appear on the task bar.
Notes
• You can display the Option Menu and Status Menu even
if the Lock function is set.
• The Option Menu is operable even if the function 1
button is lit in red.
• The Lock function cannot be released on the Option
Menu and Status Menu.
• When the numeric key display is displayed, the lock
function cannot be set.
To release the lock function
Hold the function 1 button pressed until it goes out, and
the lock function is released.
Error and Warning
Display
If you touch the status area in error or warning status, one
of the following icons will appear. If you touch the status
area, an error or warning code is displayed.
(communication error): A communication error has
been generated.
(warning): A warning message is posted.
(error): An error message is generated.
If a communication error has been generated, check the IP
address and the connections, and set the IP address
correctly.
For details on IP address setting, see “2. IP Address” on
page 31.
For details on the error and warning codes, refer to “6-1.
Error/Warning Code List” in the Installation Manual for
the HKSP-105.
When you press the select L button (Back) or touch the
status area, the display of the error or warning code is
terminated, and the operation display appears.
Error and Warning Display
35
Using a “Memory Stick”
Available types of “Memory Stick”
About a “Memory Stick”
You can use various of “Memory Stick,” “Memory Stick”
and “MagicGate Memory Stick” with your product.
However, because your product does not support the
MagicGate standards, data recorded with your product is
not subject to MagicGate copyright protection.
What is “Memory Stick”?
Note on “Memory Stick PRO”
“Memory Stick” is a new compact, portable and versatile
IC (Integrated Circuit) recording medium with a data
capacity that exceeds a floppy disk.
“Memory Stick” is specially designed for exchanging and
sharing digital data among “Memory Stick” compatible
products. Because it is removable, “Memory Stick” can
also be used for external data storage.
“Memory Stick” is available in two sizes: standard size
and compact “Memory Stick Duo” size. Once attached to
a Memory Stick Duo adapter, “Memory Stick Duo” turns
to the same size as standard “Memory Stick” and thus can
be used with products compliant with standard “Memory
Stick.”
You can use up to “Memory Stick PRO” (up to 1GB) with
your product.
Types of “Memory Stick”
“Memory Stick” is available in the following six types to
meet various requirements in functions.
• “Memory Stick-R”
Stored data are not overwritten. You can write data to
“Memory Stick-R” with “Memory Stick-R” compatible
products only. Copyright protected data that requires
MagicGate copyright protection technology cannot be
written to “Memory Stick-R.”
• “Memory Stick”
Stores any type of data except copyright-protected data
that requires the MagicGate copyright protection
technology.
• “MagicGate Memory Stick”
Equipped with the MagicGate copyright protection
technology.
Notes on “Memory Stick Duo”
• To use “Memory Stick Duo” with your product, attach
it to the Memory Stick Duo adapter before inserting it
into your product.
• Be sure to attach “Memory Stick Duo” to the adapter
with the correct orientation.
• Be sure to insert the Memory Stick Duo adapter with
the correct orientation. Otherwise, the product may be
damaged.
• Do not insert the Memory Stick Duo adapter without
“Memory Stick Duo” attached. Doing so may result in
malfunction of the product.
Note on data read/write speed
Data read/write speed may vary depending on the
combination of the “Memory Stick” and “Memory Stick”
compliant product you use.
What is MagicGate?
MagicGate is copyright protection technology that uses
encryption technology.
Before using a “Memory Stick”
Terminal
Write-protect tab
• “Memory Stick-ROM”
Stores pre-recorded, read-only data. You cannot record on
“Memory Stick-ROM” or erase the pre-recorded data.
• “Memory Stick PRO”
Equipped with the MagicGate copyright protection
technology, designed for use only with equipment
compatible with “Memory Stick PRO.”
• “Memory Stick” (with memory select function)
Equipped with the multiple memories (128 MB). You can
select the memory to use with the memory selects switch
on the back of the “Memory Stick.” You cannot use
different memories simultaneously or continuously.
36
Using a “Memory Stick”
Labeling position
• When you set the “Memory Stick” erasure prevention
switch to “ LOCK,” data cannot be recorded, edited, or
erased.
• The position and shape of the write-protect tab may
differ depending on the “Memory Stick” to be used.
• Use a sharp object, such as a ballpoint pen, to move the
“Memory Stick Duo” erasure prevention switch.
• Data may be damaged if:
– You remove the “Memory Stick” or turn off the unit
while it is reading or writing data.
– You use the “Memory Stick” in a location subject to
the effects of static electricity or electric noise.
• We recommend that you make a backup copy of
important data that you record on the “Memory Stick.”
Precautions
• To prevent data loss, make backups of data frequently.
In no event will Sony be liable for any loss of data.
• Unauthorized recording may be contrary to the
provisions of copyright law.
• The “Memory Stick” application software may be
modified or changed by Sony without prior notice.
Notes
• Do not attach anything other than the supplied label to
the “Memory Stick” labeling position.
• Attach the label so that it does not stick out beyond the
labeling position.
• Do not write forcefully on the “Memory Stick Duo”
memo area.
• Carry and store the “Memory Stick” in its case.
• Do not touch the connector of the “Memory Stick” with
anything, including your finger or metallic objects.
• Do not strike, bend, or drop the “Memory Stick.”
• Do not disassemble or modify the “Memory Stick.”
• Do not allow the “Memory Stick” to get wet.
• Do not use or store the “Memory Stick” in a location
that is:
– Extremely hot, such as in a car parked in the sun
– Under direct sunlight
– Very humid or subject to corrosive substances
“Memory Stick Duo” and
are the
trademarks of Sony Corporation.
“Memory Stick” and
are the trademarks of Sony
Corporation.
“MagicGate Memory Stick” and
the trademarks of Sony Corporation.
“Memory Stick-ROM” and
are
are the
trademarks of Sony Corporation.
“Memory Stick PRO” and
trademarks of Sony Corporation.
“Memory Stick R” and
trademarks of Sony Corporation.
are the
are the
About formatting “Memory Stick”
When “Memory Sticks” are shipped from the factory,
they are already formatted to a special standard. When
you format “Memory Stick,” we recommend formatting
them on this product.
Caution when formatting “Memory Stick”
on a personal computer
Pay attention on the following points when formatting
“Memory Stick” on a personal computer. Operation of
“Memory Stick” formatted on a personal computer is not
guaranteed on this product. To use a “Memory Stick” that
has been formatted on a personal computer, the “Memory
Stick” must be reformatted on this product. If it is not
reformatted, all data stored on the “Memory Stick” will
be lost.
For details on formatting a “Memory Stick,” refer to the
Operation Manual for the UCP-8060.
Status Indicator
If the status indicator is turned on or is flashing, data is
being read from or written to the “Memory Stick.” At this
time, do not shake the computer or product or subject
them to shock. Do not turn off the power of the computer
and product or remove the “Memory Stick.” This may
damage the data.
Using a “Memory Stick”
37
このマニュアルに記載されている事柄の著作権は当社にあり、説明
内容は機器購入者の使用を目的としています。
従って、当社の許可なしに無断で複写したり、説明内容 ( 操作、保
守等 ) と異なる目的で本マニュアルを使用することを禁止します。
The material contained in this manual consists of information
that is the property of Sony Corporation and is intended solely
for use by the purchasers of the equipment described in this
manual.
Sony Corporation expressly prohibits the duplication of any
portion of this manual or the use thereof for any purpose other
than the operation or maintenance of the equipment described
in this manual without the express written permission of Sony
Corporation.
HKSP-105
(UCP-8060) (SY)
3-776-981-01(2)
Sony Corporation
B & P Company
© 2003
© Copyright 2026 Paperzz