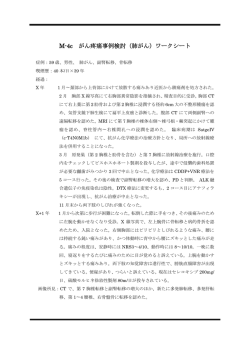
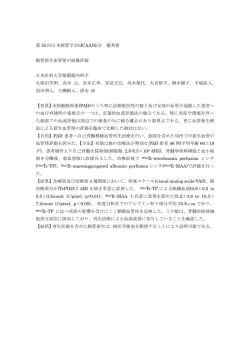
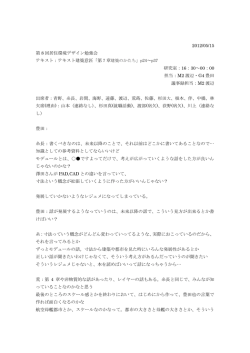
RHP80/100/
120/120SD
取扱説明書
はじめに
このたびはヤマハリアルヘッドパッド RHP80/100/120/120SD をお買い上げいただきまして、まこ
とにありがとうございます。ヤマハリアルヘッドパッドシリーズは、電子ドラムシステム用に開発さ
れたトリガーパッドです。打面にはヤマハアコースティックドラム用にラインナップされているコー
ティングヘッドを採用し、アコースティックなフィーリングをもつ豊かな演奏表現を可能にします。
シェルはバーチにクリア塗装を施した本格的アコースティックドラム仕様で、ステージで高い存在感
をアピールします。ヤマハリアルヘッドパッドシリーズの優れた機能を使いこなしていただくために、
本書をご活用いただきますようご案内申し上げます。また、ご一読いただいた後も不明な点が生じた
場合に備え、本書を大切に保管いただきますようお願い申し上げます。
■ 製品取扱上のご注意
● この製品を分解したり
(本取説に記載のヘッド、クッションの交換を除く)
、改造したりしないでください。故障や性
能劣化の原因になります。
● この製品の上に乗ったり、重いものを乗せたりしないでください。故障の原因になります。
● 温度が極端に高い場所
(直射日光の当たる場所、暖房器具の近く、閉めきった車内など)
や、湿気の多い場所
(風呂場、
雨天の屋外など)
での使用、保管はしないでください。変形、変色、故障や性能劣化の原因になります。
● お手入れの際は、やわらかい布で乾拭きするか、水を含ませて固く絞った布を用いて汚れをふき取ってください。汚
れがひどいときは、中性洗剤を含ませた布を固く絞って汚れを拭き取り、その後で水を含ませて固く絞った布を用い
て洗剤を拭き取ってください。ベンジンやシンナー、アルコール類は製品を変色、変形させる恐れがありますので、
使用しないでください。なお、この製品の内部に用いているクッション部品は、劣化の恐れがありますので、水や洗
剤に触れないよう注意してください。
● ケーブルの抜き差しは必ずプラグ部分を持って行なってください。また、ケーブルに重いものを乗せたり、とがったも
のが触れたりしないように注意してください。ケーブルに無理な力がかかると断線などのトラブルの原因になります。
■本書に取扱説明を記載している製品
● RHP80/100/120は、タムスタンドやラックにセットできるよう、ロッドクランプを設けたタムタイプ
(8”
/10”
/
12”
)
のトリガーパッドです。
● RHP120SDは、12”
スネアドラムタイプのトリガーパッドです。スネアスタンド
(YAMAHA:SS642等)
を用いて
セッティングします。
安全上のご注意 ご使用の前に、必ずこの「安全上のご注意」をよくお読みください。
ここに示した注意事項は、
製品を安全に正しくご使用いた
だき、
あなたや他の人々への危害や損害を未然に防止する
ためのものです。
注意事項は、
危害や損害の大きさと切迫の程度を明示する
ために、
誤った取り扱いをすると生じることが想定される
内容を
「警告」
と
「注意」
に区分しています。
いずれもお客様
の安全や機器の保全に関する重要な内容ですので、
必ずお
守りください。
記号表示について
RHP100
RHP120
RHP120SD
(8”)
(10”
)
(12”
)
(12”)
ロッドクランプ
ロッドクランプ
ロッドクランプ
この機器に表示されている記号や取扱説明書に表示さ
れている記号には、次のような意味があります。
記号は、危険、警告または注意を示しま
す。
記号は、禁止行為を示します。記号の中に具
体的な内容が描かれているものもあります。
* お読みになった後は、使用される方がいつでも見られる所に必ず保管してください。
警告
RHP80
この表示内容を無視した取り扱いをすると、
死亡や重傷を負う可能性が想定
されます。
この製品を、スタンドやラックを用いて設置される際、不安定な場所
(水平でない場所、ぐらつい
ている台の上など)
に設置しないでください。転倒、落下などにより、ケガの原因となります。
この製品を、スタンドやラックを用いて設置される際、固定用のボルト等はしっかり締め付けてく
ださい。また、固定用ボルトをゆるめる際は急激にゆるめないでください。この製品やラック、ス
タンドの部品の落下、転倒などにより、ケガの原因となります。
■ 同梱品確認のお願い
セッティングをはじめる前に、以下のものが同梱されているかどうか確認してください。万一不足のも
のがありましたら、お買い上げ店または本取扱説明書巻末に記載のヤマハ電気音響製品サービス拠点へ
ご連絡ください。
・パッド本体
(RHP80/100/120/120SD)
×1
パッド本体
・ステレオフォーンケーブル
(3m)×1
・波型クッション×1
プラグの黒い帯が2本
ケガをする恐れがありますので、小さいお子様が取り扱いされる際は十分注意してください。
ロッドクランプ
(RHP120SDにはありません。)
この製品を設置される際、接続ケーブルなどの引き回しには十分注意してください。足を掛けて転
倒するなど、ケガの原因となります。
次へ
■ ドラムヘッドの交換
リアルヘッドパッドのドラムヘッドは、アコースティックドラムの場合と同様、消耗品です。傷んできたら
ご自身で新しいものと交換してください(推奨:ヤマハ レモ アンバサダーコーテッド DH-AMCT08/10/
12)。ドラムヘッドには推奨のもの以外にもお好みのものをお使いいただけますが、使用されるドラムヘッ
ドによって、打感、打音、出力の大きさなどが異なる場合がありますので、あらかじめご了承ください。
■ クッションの交換
リアルヘッドパッドは、
センシング・消音のため、
パッド内部からドラムヘッド裏側全面をクッションで押
し付ける構造となっています。
工場出荷時組み込まれているクッションのほか、
付属の波型クッションも
使用していただけます。
波型クッションを使用されますと、
よりハードな打感が得られます。
ご使用される
ドラムヘッドと合わせ、
お好みのものをご使用ください。
NOTE : 波型クッションを利用される場合は、工場出荷
状態で組み込まれている黄色クッションを下に、
波型クッションを上に配置して、波型部がドラ
ムヘッドに接触するようにしてください(この
場合灰色平型クッションは用いません)
。
NOTE : 波型クッションを使用されない場合は、工場出
荷状態と同様に、
灰色平型クッションを下にし、
必ず黄色クッションがドラムヘッドに接触する
ようにしてください。逆に配置すると、クッ
ションの劣化が早まる場合があります。
要 因
確 認 事 項
リアルヘッドパッドのドラムヘッド
がゆるんでいませんか?
ドラムヘッドがゆるみすぎた状態では、
リムのセンサー出力
が小さくなることがあります。チューニングキーを使って
ヘッドの張り具合を調節しなおしてください。
(上記〔セッ
ティングのしかた〕参照)
。
DTXTREME/DTX/DTXPRESSと
ヘッドフォンやアンプ・スピーカな
どの外部機器との接続は正しくなさ
れていますか?
外部機器との接続、
外部機器の電源スイッチやボリュームの
位置などを確認してください。
DTXTREME/DTX/DTXPRESS側
の設定が正しくなされていますか?
DTXTREME/DTX/DTXPRESS で、各 INPUT 番号に設
定された音の音量設定が小さくなっていないか(上記〔音を
大きくしたいときは〕参照)
、ヘッドフォンのボリュームが
下がっていないかなど、確認してください。
波型クッションを使用しない場合 波型クッションを使用する場合
(工場出荷時)
● 1回の打撃に対し複数回音が出る
(ダブルトリガー)
要 因
灰色平型
クッション
(下)
黄色
クッション
(上)
波型
黄色
クッション クッション
(上)
(下)
■ 消耗部品(フープカバーゴム、クッション等)の交換について
リアルヘッドパッドのレベル調整つ
まみが必要以上に上げられていませ
んか?
確 認 事 項
レベル調整つまみが必要以上に上げられていると、大きな信
号が長く残ってしまい、DTXTREME/DTX/DTXPRESSを
複数回発音させてしまいます。上記〔出力調整〕により、適
正な出力が送られるよう、設定しなおしてください。
※ 上記再設定を行なっても、ダブルトリガーが十分改善されない場合には、DTXTREME/DTX/DTXPRESS のセルフリジェクション
機能を使って発生を抑えることもできます。
詳しくは DTXTREME/DTX/DTXPRESS に付属の取扱説明書を参照してください。
● 本部品には使用年月とともに消耗したり、性能が劣化したりする消耗部品
(ドラムヘッドのほか、クッション、フープ
カバーゴム、ボリューム、接続端子など)
が使用されています。消耗部品の消耗や劣化の進行度合いは、使用環境や使
用時間などによって異なります。
● 消耗部品の交換は、お買い上げ店または巻末のヤマハ電気音響製品サービス拠点へご相談ください。
■ 故障かな?と思ったら
リアルヘッドパットをご使用の際、次のようなトラブルが出たら、修理を依頼される前に、下記のよう
な確認を行なってください。
● パッドを叩いた際リムに設定した音も出る、
あるいはその逆(クロストーク)
要 因
リアルヘッドパッドのレベル調整つ
まみが必要以上に上げられていませ
んか?
確 認 事 項
例えば、
リムのレベル調整つまみが必要以上に上げられてい
ると、パッドを叩いた際、シェルなどを通じてわずかに伝わ
る振動が、リムのトリガーセンサーに大きく拾われてしま
い、リムに設定した音が発音されてしまいます。上記〔出力
調整〕により、適正な出力が送られるよう、設定しなおして
ください。
● 音が出ない、
小さい
要 因
確 認 事 項
リアルヘッドパッドの OUTPUT と
DTXTREME/DTX/DTXPRESSの
INPUTが、付属のステレオフォーン
ケーブル(プラグの黒い帯が2本)で
正しく接続されていますか?
モノラルフォーンケーブル(プラグの黒い帯が 1 本)で接続
すると、リムショットの音は発音されません。また DTX/
DTXPRESSでは、リムショットの音が発音されないINPUT
番号があります(上記〔接続のしかた〕参照)
。
リアルヘッドパッドのレベル調整つ
まみが、必要以上に絞られていませ
んか?
レベル調整つまみが必要以上に絞られていると、パッドを叩
いても小さい信号しか出力されず、DTXTREME/DTX/
DTXPRESSに内蔵されている音源が十分な音量で発音され
ません。
※ 上記再設定を行なっても、クロストークが十分改善されない場合には、DTXTREME/DTX/DTXPRESS のスペシファイドリジェク
ション機能を使って発生を抑えることもできます(DTXTREME:INPUT9/10 ∼ 15/16、DTX:INPUT9/10,11/12、
DTXPRESS:INPUT9/10 で可能)
。
詳しくは DTXTREME/DTX/DTXPRESS に付属の取扱説明書を参照してください。
■ 接続のしかた
■ 各部の名称
付属のステレオフォーンケーブルを使って、パッドの出力(OUTPUT)をDTXTREME/DTX/DTXPRESS
の入力(SNARE,TOM1 など)に接続します。ケーブルの L 字プラグ側をパッドに差し込んでください。
ロッドクランプ
クランプボルト
(RHP120SDにはありません。)
(RHP120SDにはありません。)
NOTE : リアルヘッドパッド RHP80/100/120/120SDはデュアルトリガータイ
プの電子ドラム用パッドです。
パッド部(ドラムヘッドが張られている部分)
、
リム部(フープ上でリムショットに用いる部分)それぞれにトリガーセン
サーが設置されており、リムショットの際にパッド部とは別な音色を設定し
て鳴らすことができます※。
ドラムヘッド
LE
PA
※ DTXTREME:INPUT1 ∼ 8,9/10 ∼15/16、DTX:INPUT9/10,11/12、DTXPRESS:INPUT9/10 で可能。その他の INPUT はパッド = トリガー / リム = スイッチタイプのパッド(TP80S
など)専用のため、リアルヘッドパッドを接続した場合はパッド部のみの音が発音されます。
シェル
フープカバー
ゴム
ボトムカバー
タムホルダー
ロッドクランプ
NOTE : リアルヘッドパッドをマウントするラックには、
Y A M A H A ラックシステム R S 1 0 0 または
RS95の使用をおすすめします。RS100では、
ボールクランプタイプのタムホルダーを採用し
ており、RHP120 までの大型パッドの取り付
けが可能です。RS95 では、シリンダータイプ
のタムホルダーを採用しており、RHP80 まで
の軽量パッドの取り付けが可能です。RS95 に
RHP100/120などの大型パッドを取り付ける
場合は、タムホルダー TPCL100(別売)の使
用をおすすめします。なお、RS60 やRS 80
では、リアルヘッドパッドの重量を支えきれな
い場合があります。RS80 をすでにお持ちの方
は、ラック強化部品キット VK80(別売)を利
:
NOTE :
NOTE :
● ラックにマウントした状態で、あるパッドを叩いた際、別なパッドに設定した音も出る(クロストーク)
要 因
確 認 事 項
ラックシステムの組立強度が不十分
で、ふらついている部分はありませ
んか?
ラックの組立時、クランプボルトなどの締め付けが不十分で、
ふらついている部分などがあると、パッドを叩いた際に、ラッ
クが大きく振動してしまい、
それが別なパッドのトリガーセン
サーに大きく伝わって、発音してしまう場合があります。ラッ
クやスタンドの組立は確実に行なってください。
ラックにマウントした各パッドのレ
ベル調整つまみが必要以上に上げら
れていませんか?
例えば、あるパッドのレベル調整つまみが必要以上に上げら
れていると、別なパッドを叩いた際、ラックパイプなどを通
じてわずかに伝わる振動が、そのパッドのトリガーセンサー
に大きく拾われてしまい、そのパッドに設定した音が発音さ
れてしまいます。上記〔出力調整〕により、適正な出力が送
られるよう、設定しなおしてください。
※ 異なるパッド間のクロストークについても、上記対策で改善が不十分な場合には、DTXTREME/DTX/DTXPRESS のスペシファイ
ドリジェクション機能を使って発生を抑えることができます。
詳しくは DTXTREME/DTX/DTXPRESS に付属の取扱説明書を参照してください。
● リムショットの際、
金属的な雑音が出る
要 因
リアルヘッドパッドのドラムヘッド
がゆるんでいませんか?
確 認 事 項
ドラムヘッドがゆるみすぎた状態では、リムショットの際金
属的な雑音が出る場合があります。チューニングキーを使っ
てヘッドの張り具合を調節しなおしてください。
(上記〔セッ
ティングのしかた〕参照)
。
上記トラブルや、その他のトラブルについては、DTXTREME/DTX/DTXPRESSに付属の取扱説明書も参照
してください。それでもトラブルが解消されない場合は、お買い上げ店または本取扱説明書巻末に記載のヤマ
ハ電気音響製品サービス拠点へご相談ください。
■ 仕様
● RHP80
パッド口径
● RHP120
8インチ
パッド口径
12インチ
外形寸法(突起部含む) 237(W)×291(D)×140(H)mm
外形寸法(突起部含む) 350(W)×392(D)×140(H)mm
重量
重量
1,740g
ロッドクランプ付き
L
L
RIM
LE
VE
D
PA
● リムショットの感度について
リアルヘッドパッド RHP80/100/120/120SD では、図の位置にリムショット用トリガーセン
サーが設置されています。リムショットの感度は、センサーの真上が最も高く、そこから外れるにし
たがって徐々に低くなっています。リムショットの際は、なるべく感度の高い範囲でお使いください。
RHP100
RHP80
OUTPUT
位置
OUTPUT
位置
OUTPUT
位置
センサー位置
RHP120SD
RHP120
センサー位置
センサー位置
OUTPUT
位置
センサー位置
音を大きくしたいときは
リアルヘッドパッドをDTXTREME/DTX/DTXPRESSで使用する場合、個々のパッドに設定した音の
音量を変えたいときは、上記の出力調整の後に、DTXTREME/DTX/DTXPRESSの(ボイス)エディッ
トモードで音量設定を行なってください。詳しくはDTXTREME/DTX/DTXPRESSに付属の取扱説明
書をご覧ください。
■ アフターサービス
サービスのご依頼、
お問い合わせは、
お買い上げ店、
またはお近くのヤマハ電気音響製品サービス拠点にご
連絡ください。
● 補修用性能部品の最低保有期間
製品の機能を維持するために必要な部品の最低保有期間は、製造打切後8年です。
● 持ち込み修理のお願い
まず本書をよくお読みのうえ、もう一度お調べください。それでも異常のあるときは、お買い上げの販売店、または
最寄りのヤマハ電気音響製品サービス拠点へ本機をご持参ください。 ● 製品の状態は詳しく
修理をご依頼いただくときは、製品名、モデル名などとあわせて、故障の状態をできるだけ詳しくお知らせください。
ヤマハ電気音響製品アフターサービス拠点
(修理、サービス問い合わせ先)
(修理受付および修理品お持込み窓口)
北海道サービスセンター
〒064-8543
札幌市中央区南10条西1丁目1-50 ヤマハセンター内
TEL(011)512-6108
仙台サービスステーション
〒984-0015
仙台市若林区卸町5-7 仙台卸商共同配送センター3F
TEL(022)236-0249
首都圏サービスセンター
〒211-0025
川崎市中原区木月1184
TEL(044)434-3100
浜松サービスステーション
〒435-0016
浜松市和田町200 ヤマハ(株)和田工場内
TEL(053)465-6711
名古屋サービスセンター
〒454-0058
名古屋市中川区玉川町2-1-2 ヤマハ(株)名古屋流通センター3F
TEL(052)652-2230
大阪サービスセンター
〒565-0803
吹田市新芦屋下1-16 ヤマハ(株)千里丘センター内
TEL(06)6877-5262
四国サービスステーション
〒760-0029
高松市丸亀町8-7 (株)ヤマハミュージック神戸 高松店内
TEL(087)822-3045
広島サービスステーション
〒731-0113
広島市安佐南区西原6-14-14
TEL(082)874-3787
九州サービスセンター
[本社]CSセンター
〒812-8508
福岡市博多区博多駅前2-11-4
TEL(092)472-2134
〒435-0016
浜松市和田町200 ヤマハ(株)和田工場内
TEL(053)465-1158
※住所及び電話番号は変更になる場合があります。
ヤマハ株式会社各事業所/営業所
(商品に関する問い合わせ先)
弦打楽器事業部
国内営業部 〒430-8650
浜松市中沢町10番1号 TEL(053)460-2433
EM営業統括部
北海道営業所 仙台営業所 東京・営業推進課 名古屋営業所 大阪営業所 九州営業所 〒064-8543
〒980-0804
〒108-8568
〒460-8588
〒542-0081
〒812-8508
札幌市中央区南10条西1丁目1-50 仙台市青葉区大町2-2-10 東京都港区高輪2-17-11 名古屋市中区錦1-18-28 大阪市中央区南船場3-12-9 福岡市博多区博多駅前2-11-4 TEL(011)512-6113
TEL(022)222-6147
TEL(03)5488-5476
TEL(052)201-5199
TEL(06)6252-5231
TEL(092)472-2130
※住所及び電話番号は変更になる場合があります。
2,390g
ロッドクランプ付き
● RHP100
パッド口径
RIM
用していただくことで、ラックの強度を RS95
と同程度までアップすることができます。
お手持ちのドラム用チューニングキーを使って、
フープ上に配置されているチューニングボルト
を締めたりゆるめたりすることにより、ドラム
ヘッドの張り具合を調節することができます。
ただしこの際DTXTREME/DTX/DTXPRESS
等から発音される音色自体は変化しません。
ラックやスタンドへのパッドのセッティングは
確実に行なってください。クランプボルト等の
締め付けが弱いと、パッドが落下し、ケガをする
危険があります。また、平らでない床の上などに
ラックやスタンドをセッティングすると、ラッ
クやスタンドが転倒し、ケガをする危険があり
ます。
ドラムヘッドは均一に張ってください。締め付
けの強さにムラがあるとシワが生じ、ドラム
ヘッドの寿命が短くなることがあります。
ドラムヘッドの張り具合の調整は適正な範囲で
行なってください。強く締め付けすぎると、ドラ
ムヘッドや胴体などが破損する場合があります。
ゆるめすぎると、ドラムヘッドやクッションの
寿命が短くなる場合があります。また、ゆるめす
ぎた状態では、リムショットの際に金属的な雑
音が発生したり、同じくリムショットの際リム
のセンサーからの出力が小さくなり、
DTXTREME/DTX/DTXPRESSから発音され
る音が鳴らないあるいは小さくなったりするこ
とがあります。なお、ドラムヘッドは使用してい
るうちにゆるんでくることがあります。適宜締
め付けなおしてください。
NOTE : リアルヘッドパッドをDTXTREME/DTX/DTXPRESSで使用する場
合、ff で演奏のとき、DTXTREME/DTX/DTXPRESS のトリガーエ レベル調整つまみ
ディットモードの、[PAD Gain]のインプットレベル表示が 90 ∼ 95
%になるように調節します(リムショットの際も同様に)。詳しくは
DTXTREME/DTX/DTXPRESSに付属の取扱説明書を参照してくだ
さい。出力が大きすぎると、ダイナミックレンジ(強弱の差)が狭く
なったり、ダブルトリガー(1 回の打撃に対し複数回音が出てしまう)
や、クロストーク(パッドを叩いた際にリムに設定した音が鳴ってし
まう、あるいはその逆)などのトラブルが起きやすくなったりします。
: 故障の原因になりますので、
レベル調節つまみに過大な力を加えない
でください。
VE
NOTE :
スネアスタンド(YAMAHA:SS642 等)を使っ
て、通常のスネアドラムと同様にセッティングし
ます。
■ 出力(LEVEL)調整
LE
ラックまたはタムスタンドのタムホルダー(6 角
棒)をパッドのロッドクランプに挿し込み、クラ
ンプボルトでしっかり締め付けて固定します。
〔RHP120SD〕の場合
(付属)
PA
D
〔RHP80/100/120〕の場合
差し込む
ステレオフォーンケーブル
リアルヘッドパッドからのトリガー出力の大きさを調整します。パッド部(ドラムヘッドが張られてい
る部分)を叩いた際の出力とリム部を叩いた際(リムショット)の出力を別々に調整できます。レベル
調整つまみを右(+)に回すと出力が上がり、左(−)に回すと下がります。パッドやリムを叩く強さや、必
要とされるダイナミックレンジ、またお使いになる機器などに応じて調節してください。
■ セッティングのしかた
クランプボルト
接続する
D
ラグ
チューニング
ボルト
RI
VE
L
M
出力端子
OUTPUT
フープ
●音を楽しむエチケット●
● RHP120SD
10インチ
パッド口径
12インチ
外形寸法(突起部含む) 299(W)×342(D)×140(H)mm
外形寸法(突起部含む) 350(W)×350(D)×94(H)mm
重量
重量
2,080g
1,990g
「音のエチケット」
ロッドクランプ付き
楽しい音楽も時と場所によっては、大変気になるものです。隣近所への配慮
を十分にいたしましょう。静かな夜間には小さな音でも良く通り、特に低音
は床や壁などを伝わりやすく、思わぬところで迷惑をかけてしまうことがあ
ります。夜間の演奏には特に気を配りましょう。お互いに心を配り、快い生
活環境を守りましょう。
※これは日本電子工業会『音のエチケット』
キャンペーンのマークです。
● 全機種共通
センサー方式
デュアルトリガータイプ(パッド/リム)
コントロール
出力調整ボリューム×2(パッド/リム)
出力端子
標準ステレオフォーンジャック
付属品
ステレオフォーンケーブル(3m)×1
波型クッション×1
取扱説明書(本書)×1
※製品の仕様および外観は、改良のため予告無く変更することがあります。
弦打楽器事業部 国内営業部 ギタードラム営業課
〒430-8650 浜松市中沢町10-1 TEL.(053)460-2433
RHP80/100/
120/120SD
■ What is Explained in this Manual
• The RHP80/100/120 are tom type (8”/10”/12”) trigger pads with rod clamps that can be
attached to a tom stand or rack.
• The RHP120SD is a 12” snare drum type trigger pad. It can be set on a snare stand
(YAMAHA:SS642, etc.).
RHP100 (10”)
RHP80 (8”)
OWNER’S MANUAL
Rod Clamp
Rod Clamp
RHP120SD (12”)
RHP120 (12”)
Rod Clamp
INTRODUCTION
Before setup, please make sure that all of the items listed below are present and accounted
for. If anything is missing, please contact the dealer from whom you purchased the unit.
(The RHP120SD is not
equipped with this clamp)
■ Part Names
Rod Clamp
Clamp Bolt
(The RHP120SD is not equipped with this clamp)
(The RHP120SD is not
equipped with this bolt)
Bottom Cover
OUTPUT Jack
VE
L
Drum Head
M
• To clean the product, please wipe with a soft cloth or a damp cloth that has been wrung out thoroughly. If the
product is soiled, use a neutral detergent on a cloth then wipe with a damp cloth that has been wrung out
thoroughly to remove any remaining detergent. Do not use benzine, thinner or alcohol as it may result in
discoloration or deformation. Also pay close attention so as not to let the water and detergent come into
contact with the cushions used in the product, it may result in deterioration.
RI
• Do not use or keep the product in places with extremely high temperature (places in direct sunlight, close to a
heater, in a closed car, etc.) or damp (bathroom, outside on a rainy day, etc.). It may result in deformation,
discoloration, damage or deterioration.
The plug with the
two black rings
LE
• Do not step on or place heavy objects on the product. It may result in damage.
• Corrugated
Cushion x1
Pad Unit
Rod Clamp
• Do not disassemble (except for when replacing the head or a cushion as described in this manual) or alter the
product. Doing so may result in damage or deterioration to the product.
• Stereo Phone Cable
(3m) x1
• Pad Units (RHP80/100/120/
120SD) x1
Lug
D
■ Handling Precautions
■ Inside This Package
PA
Thank you for purchasing the YAMAHA Real Head Pad RHP80/100/120/120SD. The
YAMAHA Real Head Pad series was developed as a trigger pad for use with an electric drum system. The pads utilize Remo Coated Ambassador heads. This system
delivers a richer, closer to acoustic feeling that extends greater expressive potential to
the drummer. Just like a real, high quality acoustic drum, the shell is made of birch
then covered with a clear finish.
To get the most out of your YAMAHA Real Head Pad Series, please read this manual
carefully. After reading, please keep it in a safe place for future reference.
Tuning Bolt
• When connecting or disconnecting cables, make sure to hold the cable by the plug. Also, make sure heavy or sharp
objects are not placed upon the cable. If excessive force is placed on the wire, it may result in the wire breaking.
Shell
Hoop
Next
■ Replacing the Drum Head
■ Troubleshooting
Like acoustic drums, the Real Head Pad’s drum head will wear over time. When it is time to
change the old head with a new one, please do so on your own. We recommend the use of
Remo Coated Ambassador 8", 10" and 12" drum heads, but you may use any other head that
you prefer. Just keep in mind that depending upon the drum head you use, the feel, sound,
output, etc. may be slightly different.
If the following trouble occurs when the Real Head Pad is used, please check the following
points before asking your dealer for assistance.
■ Replacing the Cushion
For sensing and sound deadening purposes,
the Real Head Pads utilize a cushion that provides support to the entire drum head from
within the pad. You can use the supplied corrugated cushion in place of the cushion that
was installed at the factory. Use of the corrugated cushion offers a firmer feeling head.
Select the best cushion according to the type
of drum head you use.
NOTE : When you use the corrugated cushion, put the
yellow cushion that was installed at the factory
on the bottom, then the corrugated cushion on
top with the corrugated side of the cushion in
contact with the drum head (in this case the
flat, gray cushion is not needed).
NOTE : When the corrugated cushion is not used, make
sure the other cushions are positioned in the
same manner as when the unit was shipped
from the factory, with the flat, gray cushion on
the bottom and the yellow cushion in contact
with the drum head. If the cushions are
reversed, it may result in deterioration of the
cushions.
When the corrugated cushion is not used.
(As shipped from the factory)
Gray Flat Cushion
(Bottom)
Yellow Cushion
(Top)
When the corrugated cushion is used.
Yellow Cushion
(Bottom)
● No Sound, Volume is Low
Problem
What to check.
Is the Real Head Pad’s OUTPUT
jack properly connected to the Input jack on the DTXTREME/DTX/
DTXPRESS with the supplied stereo phone cable (the plug with two
black rings)?
If the pad is connected with a monaural phone cable
(the plug with one black ring), the rim shot s o u n d
will not be produced. Also, if the Real Head Pad is connected to an INPUT number on the DTX/DTXPRESS
that is not capable of producing rim shots, the sound
will not be produced. (Refer to the “Connections” section above.)
Is the Real Head Pads Output
LEVEL Adjustment set too low?
If the level is set too low, the signal level sent when the pad
is hit will be very low so, the DTXTREME/DTX/DTXPRESS
will not be able to produce sufficient volume from this low
level signal.
Is the drum head on the real head
pad too loose?
If the drum head is too loose, the output from the rim sensor
may be reduced. Use a tuning key to adjust the tension on the
head. (Refer to the previous “Setting Up” section.)
Is the DTXTREME/DTX/DTXPRESS
properly connected to a pair of
headphones or the external audio
device?
Check connections, power switches or volume settings
on the external devices.
Is the DTXTREME/DTX/
DTXPRESS properly setup?
Check if the volume setting assigned to each of the
DTXTREME/DTX/DTXPRESS’s INPUT numbers is not
set too low (refer to the “To Increase the Sound Volume” section above).
Also, check to see if the headphone volume etc. is not
set too low.
Corrugated Cushion
(Top)
● Multiple sounds are produced when the pad is struck once (Double Trigger).
■ About Replacing Worn Parts
(Rubber Hoop Cover, Cushions, etc.)
• This product uses parts (drum head, cushion, rubber hoop cover, Output Level Adjustment
knob, output jacks, etc.) that will wear or deteriorate over time. How these parts wear or
deteriorate will depend upon the environment, length of time, etc., in which the device is
used.
• Please ask the dealer from whom you purchased the device about replacing worn parts.
Problem
Is the Real Head Pad’s Output
LEVEL adjustment knob set too
high?
What to check.
If the Output LEVEL knob is set too high, the large signal remains for a longer time causing the DTXTREME/
DTX/DTXPRESS to produce multiple triggers. Use the
previously explained Output LEVEL adjustment to set
the level to a proper level.
❇ If the double triggers continue even after you have tried the solutions listed above, use the DTXTREME/DTX/
DTXPRESS “Self Rejection” function to control the problem. Refer to the Owner’s Manual supplied with the
DTXTREME/DTX/DTXPRESS for more information.
■ Output Level (LEVEL) Adjustment
Rod Clamp
(RHP120SD)
The snare drum pad can setup on a snare
drum stand (YAMAHA: SS642, etc.) in the
same manner as a normal snare drum.
NOTE : Please make sure that head tension is even all
the way around the head. Uneven tension may
produce wrinkles, which may shorten the life of
the drum head.
NOTE : When attaching the Real Head Pads to a rack
system, we recommend that either the YAMAHA
Rack System RS100 or RS95 be used. Using a
ball clamp type tom holder like the RS100
allows the attachment of large pads like the
RHP120. A cylinder type tom holder like the
RS95 allows the attachment of lighter pads up
to the RHP80. When a large pad such as the
RHP100/120 is attached to the RS95, we
recommend that the tom holder TPCL100
(optional) be used. The RS60 and RS80 may
not provide adequate support for the Real Head
Pads. If you already own the RS80 rack
NOTE : Make sure the drum head is tightened within a
proper range. Over tightening may result in
damage to the drum head, shell, etc. An overly
loosened head may result in a shorter life of
the drum head, cushion, or noise. Also, when
the head is too loose a metallic noise may
occur when playing rim shots, likewise, the
output from the rim sensor may be reduced and
the sound produced by the DTXTREME/DTX/
DTXPRESS may be reduced or not sound at
all when playing rim shots. The head may also
become loose over time, so occasionally
retighten the head.
Is the Real Head Pad’s Output
LEVEL Adjustment knob set too
high?
OUTPUT Jack
Location
What to check.
If the rim’s Output LEVEL knob is set too high, sympathetic vibrations produced when the pad is hit may be transmitted through the shell, etc. and picked up by the sensor
located in the rim which in turn causes the sound assigned
to the rim to be produced. Use the previously explained
Output LEVEL Adjustment to set the level to a proper level.
● When mounted on the rack and a pad is hit, a sound that is assigned to
another pad is also produced (cross talk).
Is the rack system’s strength adequate, or are sections of the rack
loose?
Is the Output LEVEL Adjustment
knob on each of the pads connected to the rack system set too
high?
If the clamp bolts, etc. are not tightened firmly when the
rack is assembled, the unstable section of the rack will
move about when the pad is hit. Vibrations are then transmitted to sensors in the other pads resulting in other
sounds being produced. Please make sure that the rack
or stand is assembled firmly.
If the Output LEVEL knob on any of the pads is set too
high, sympathetic vibrations produced when another pad
is hit may be transmitted through the rack pipe, etc. and
picked up by the pad’s trigger sensor which in turn causes
the sound assigned to the pad to be produced. Use the
previously explained Output LEVEL Adjustment and set
the level to a proper level.
● When a rim shot is played, a metallic noise is produced.
Is the drum head on the Real Head
Pad too loose?
L
RIM
VE
RHP120SD
OUTPUT Jack
Location
OUTPUT Jack
Location
Sensor Location
Sensor Location
Sensor Location
To Increase the Sound Volume
To change the volume of the sound assigned to individual pads when the Real Head Pads are used
with the DTXTREME/DTX/DTXPRESS, first adjust the Output LEVEL as described previously,
then use the (VOICE) EDIT Mode to set the volume on the DTXTREME/DTX/DTXPRESS. Please
refer to the “Owner’s Manual” supplied with your DTXTREME/DTX/DTXPRESS.
■ Specifications
● RHP80
What to check.
● RHP120
Pad Diameter
8 inches
Pad Diameter
12 inches
Size (including protrusions)
237(W) x 291(D) x 140(H)mm
Size (including protrusions)
350(W) x 392(D) x 140(H)mm
Weight
1,740g
Weight
2,390g
Includes Rod Clamp
Includes Rod Clamp
● RHP100
● RHP120SD
Pad Diameter
10 inches
Pad Diameter
12 inches
Size (including protrusions)
299(W) x 342(D) x 140(H)mm
Size (including protrusions)
350(W) x 350(D) x 94(H)mm
Weight
2,080g
Weight
1,990g
Includes Rod Clamp
● For All types
Sensor System
Dual Trigger Type (Pad/Rim)
Control
Output LEVEL Volume x2 (Pad/Rim)
Output Jack
Standard Stereo Phone Jack (stereo)
Accessories
What to check.
❇ If the cross talk continues between other pads, even after you have tried the solutions listed above, use the
DTXTREME/DTX/DTXPRESS “Specified Rejection” function to control the problem. Refer to the Owner’s Manual
supplied with the DTXTREME/DTX/DTXPRESS for more information.
Problem
Sensor Location
RHP120
OUTPUT Jack
Location
3m Cable with Standard
Phone Plug (Stereo)
❇ If the cross talk continues even after you have tried the solutions listed above, use the DTXTREME/DTX/DTXPRESS
“Specified Rejection” function to control the problem (can be used on the following channels DTXTREME: INPUTS 9/
10-15/16, DTX: INPUTS 9/10, 11/12, DTXPRESS: INPUT 9/10). Refer to the Owner’s Manual supplied with the
DTXTREME/DTX/DTXPRESS for more information.
Problem
RHP100
RHP80
Connect
● When the pad is hit, the sound assigned to the rim is also produced, or
vice versa (cross talk).
Problem
LE
The locations of the RHP80/100/120/120SD’s trigger sensors are shown in the illustration.
The highest sensitivity can be found in the direct vicinity of the sensor and will decrease as
you move away from the sensor. If you are going to use rim shots, we recommend that the
area of highest sensitivity be placed in an optimum position when setting up the pad.
Use the supplied stereo phone cable to connect the pad’s output jack to the input (SNARE,
TOM1, etc.) of the DTXTREME/DTX/DTXPRESS. Connect the cable’s L-shaped plug to the pad.
* Only the following inputs can be used.
DTXTREME: INPUT 1-8, 9/10-15/16
DTX: INPUT 9/10, 11/12
DTXPRESS: INPUT 9/10
Since other INPUTS are designed for use with pad trigger/rim switch
type pads (TP-80S, etc.), only the pad will be able to produce sound
when a Real Head Pad is connected.
D
● About Rim Shot Sensitivity
■ Connections
NOTE : The RHP80/100/120/120SD Real Head Pads are dual trigger type electronic drum pads. Both the pad (the
drum head section) and the rim (the hoop section around the head that is used for rim shots) are individually
equipped with trigger sensors. A separate sound can be assigned to the rim to allow for rim shots *.
PA
Insert
LEVEL
Adjustment
Knob
L
Tom Holder
NOTE : When the Real Head Pad is used with the DTXTREME/DTX/
DTXPRESS, the value on the Input Level display, found in the
Trigger Edit Mode’s [PAD GAIN] page, should be set to a value
somewhere between 90% and 95% when the pad is struck at ff (the
rim should be set the same for rim shots). For more information,
please refer to the “Owner’s Manual” supplied with your DTXTREME/
DTX/DTXPRESS.
If the Output LEVEL is set too high, the dynamic range may be
reduced, or problems such as double triggers (when a single stroke
produces multiply triggered sounds), and cross talk (hitting the pad
causes the sound assigned to the rim to be produced or vice versa)
may occur.
: Do not put excessive pressure on the level adjustment knob, it may
result in damage.
RIM
Clamp Bolt
Controls the trigger output level produced by the Real Head Pads. Output produced by either the
pad section (the drum head section) or rim section (rim shot) can be controlled individually. Turn
the LEVEL adjustment knob to the right (+) to increase the level. Turn to the left (-) to decrease
the level. Adjust the level according to the amount of strength you use when playing the pad and
rim, the required dynamic range, or specific needs regarding the devices that you use.
VE
Insert the Tom Holder (6-sided), on a rack stand
or tom stand, into the Rod Clamp attached to
the Pad, and tighten the Clamp Bolt firmly.
system, adding the VK80 Rack Reinforcement
Kit (optional) will increase the strength of the
rack to that of the RS95.
NOTE : Drum head tension can be adjusted by
tightening or loosening the tuning bolts on the
hoop with a tuning key.However, there will be
no change in the tone produced by the
DTXTREME/DTX/DTXPRESS, etc.
: Make sure the pads are properly setup on the
rack or stand. If the clamp bolts, etc. are not
tightened sufficiently, the pad may fall off
resulting in injury. Also, if the rack or stand is
not setup on a flat surface, the rack or stand
may overturn resulting in injury.
LE
(RHP80/100/120)
PA
D
■ Setting Up
Stereo Phone Cable (3m) x1, Corrugated Cushion x1, Owner’s Manual (this booklet) x1
* Improvements may result in a change in the specifications and/or design of the product without notice.
SPECIAL MESSAGE SECTION
NOTICE: Service charges incurred due to a lack of knowledge relating to how a function or effect works (when the unit is operating as designed) are not covered by the
manufacturer’s warranty, and are therefore the owners responsibility. Please study this manual carefully and consult your dealer before requesting service.
ENVIRONMENTAL ISSUES: Yamaha strives to produce products that are both user safe and environmentally friendly. We sincerely believe that our products and the
production methods used to produce them, meet these goals. In keeping with both the letter and the spirit of the law, we want you to be aware of the following:
Battery Notice: This product MAY contain a small non-rechargeable battery which (if applicable) is soldered in place. The average life span of this type of battery is
approximately five years. When replacement becomes necessary, contact a qualified service representative to perform the replacement.
This product may also use “household” type batteries. Some of these may be rechargeable. Make sure that the battery being charged is a rechargeable type and that
the charger is intended for the battery being charged.
When installing batteries, do not mix batteries with new, or with batteries of a different type. Batteries MUST be installed correctly. Mismatches or incorrect installation
may result in overheating and battery case rupture.
Warning: Do not attempt to disassemble, or incinerate any battery. Keep all batteries away from children. Dispose of used batteries promptly and as regulated by the
laws in your area. Note: Check with any retailer of household type batteries in your area for battery disposal information.
Disposal Notice: Should this product become damaged beyond repair, or for some reason its useful life is considered to be at an end, please observe all local, state, and
federal regulations that relate to the disposal of products that contain lead, batteries, plastics, etc. If your dealer is unable to assist you, please contact Yamaha directly.
NAME PLATE LOCATION: The name plate is located on the bottom of the product. The model number, serial number, power requirements, etc., are located on this plate.
You should record the model number, serial number, and the date of purchase in the spaces provided below and retain this manual as a permanent record of your purchase.
Model
Purchase Date
Serial No.
PLEASE KEEP THIS MANUAL
When the drum head is too loose, a metallic noise may
be produced when a rim shot is played.
Use the tuning key to adjust head tension. (Refer to the
previous “Setting Up” section.)
For more information on the problems listed above and other problems, please refer to the “Owner’s Manual” supplied with
the DTXTREME/DTX/DTXPRESSS. If you can not solve the problem on your own, please contact the dealer from whom you
purchased the device.
Printed in Japan
© Copyright 2026 Paperzz