今日学ぶこと
ネットワークプログラミング
第三回
• 前回の積み残し
• 配列
• リスト
ポインタ、リスト
ポインタのまとめ(復習)
mallocとfree
• 変数の格納番地をポインタと呼び、その格
納している変数をポインタ変数と呼ぶ
・ char *c;
c
/*char型へのポインタ*/
char型へのデータ
・ float *a;
a
/*float型へのポインタ*/
float型へのデータ
• 動的な領域確保
• 引数で指定されたサイズのメモリの塊を確
保して、その先頭へのポインタを返す関数
• 典型的な使い方
– 構造体の領域を動的に確保
– 実行時まで大きさがわからない配列を確保
• メモリ確保に失敗(メモリが足りない)場合、
mallocはNullを返す
• p=malloc(size);
mallocとfreeの例
mallocとfreeその2
• mallocで確保した領域は、使い終わったら
freeにより解放
– free(p);
#include <stdio.h>
#include <string.h>
main(){
char *p;
p = (void *)malloc(8);
• 動的にメモリを割り当て、任意の順序で解
放できる記憶領域→ヒープ(heap)
/* 8バイト予約 */
strncpy(p,"hogehoge",4); /* "hogehoge" から4byte コピー */
printf("%s¥n",p);
/* "hoge" */
strncpy(p,"hogehoge",8); /* "hogehoge" から8byte コピー */
printf("%s¥n",p);
/* "hogehoge" */
free(p);
/* メモリ解放 */
}
1
配列
配列とポインタ
• 複数の同じ型のデータを一つにまとめて、最初
のデータから何個目のデータという使い方をでき
るようにしたもの
• 配列変数の宣言
int a[10];
char b[11];
** a[10];はa[0]…a[9]の10個の配列
**char b[11];は、11個の文字を格納することができるが、
一般的には文字列格納するのに使用される。文字列
の最後にはNullコードが必要なので、実際には11個
の配列に10個の文字しか格納できない。
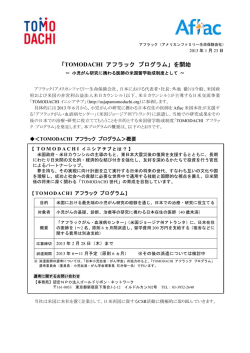
• char mojiretu[] = “ahoaho”;
アドレス
300
301
メモリ
•
•
•
•
302
303
304
305
306
307
a h o a
308
309
310
311
312
h o
mojiretu[0] の値は “a”
mojiretuの値はアドレス(303)
mojiretu[0]は*mojiretuと同じ
*(mojiretu+1)は、、、? → “h”
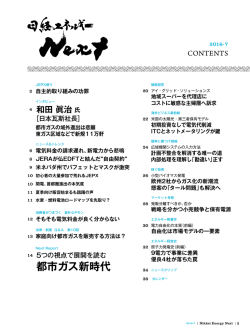
2次元配列データの取り扱い方
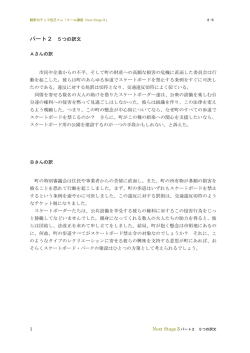
2次元配列で複数の文字列を設定
• 配列の添字を直接指定してデータをアクセスする
• 複数の文字列は2次元配列で表すことができる
6
1
int no[3][4];
no[0][0]=1;
no[1][2]=6;
no[2][3]=no[0][0]+no[1][2];
0
1
2
3
0
no[0][0]
no[0][1]
no[0][2]
no[0][3]
1
no[1][0]
no[1][1]
no[1][2]
no[1][3]
2
no[2][0]
no[2][1]
no[2][2]
no[2][3]
char str[3][7] = {
“ABC”, “DEFGHI”, “JK”
};
int i;
for (i = 0; i < 3; i++) {
printf(“%s¥n”, str[i]);
}
no[0][0]+no[1][2]
1 + 6
= 7
[1]
[2]
‘A’
‘B’
‘C’ ‘¥0’
[3]
[1]:
‘D’
‘E’
‘F’
[2]:
‘J’
‘K’ ‘¥0’
‘G’
[4]
[5]
[6]
‘H’
‘I’
‘¥0’
<実行結果>
ABC
DEFGHI
JK
リスト
プログラムの
スタック領域
[0]
[0]:
リストその2
A1
次のポインタ
プログラムの
スタック領域
A2
次のポインタ
A1のポインタ
A3
次のポインタ
A1
次のポインタ
前のポインタ
A2
次のポインタ
前のポインタ
最初のポインタ
最後のポインタ
A3
次のポインタ
前のポインタ
A4
次のポインタ
• データを保管する構造を線形リストという
– 上記の例は単方向リストという
A4
次のポインタ
前のポインタ
• 上記の例は双方向リストという
2
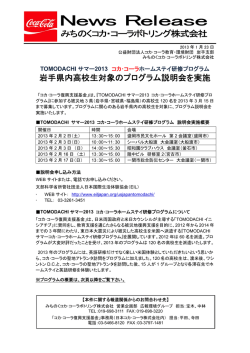
リンクトリスト(linked list)
リストの操作
• リンクトリストってなに?
– ポインタで連結されたリスト構造
• Add
struct tomodachi{
char full_name[30];
int year;
struct tomodachi *next;
};
– 新しいエントリを確保
– リストの最後のエントリから、新しいエントリに
ポインタを向ける
struct
tomodachi
struct
tomodachi
struct
tomodachi
struct
tomodachi
struct
tomodachi
struct
tomodachi
full_name
year
next
full_name
year
next
full_name
year
next
full_name
year
next
full_name
year
next
full_name
year
next
練習:
練習2:
• リストの先頭に追加するプログラムを
書いてみましょう。
• リストの末尾に追加するプログラム
– 先頭へのポインタ変数はheadとします
– 先頭へのポインタ変数はheadとします
先頭
a
b
c
NULL
先頭
a
b
c
NULL
d
NULL
新たに追加
d
新たに追加
リストの操作
リストの操作
• delete
• delete
– 消すエントリの一つ前のエントリのポインタを、
消すエントリの後ろのエントリに向ける
– 消したいエントリを削除する
– 消すエントリの一つ前のエントリのポインタを、
消すエントリの後ろのエントリに向ける
– 消したいエントリを削除する
struct
tomodachi
struct
tomodachi
struct
tomodachi
struct
tomodachi
struct
tomodachi
struct
tomodachi
full_name
year
next
full_name
year
next
full_name
year
next
full_name
year
next
full_name
year
next
full_name
year
next
3
練習3:
リストの操作
• delete
– 消すエントリの一つ前のエントリのポインタを、
消すエントリの後ろのエントリに向ける
– 消したいエントリを削除する
struct
tomodachi
struct
tomodachi
full_name
year
next
full_name
year
next
• 先頭のリストを削除するプログラムを書い
てみましょう
練習4:
リストの操作
• 末尾のリストを削除するプログラムを書い
てみましょう
• search
– リストから検索するには?
– リストのトップから順に辿っていく
?
struct
tomodachi
struct
tomodachi
struct
tomodachi
full_name
year
next
full_name
year
next
full_name
year
next
リストの操作
リストの操作
• search
• search
– リストから検索するには?
– リストのトップから順に辿っていく
– リストから検索するには?
– リストのトップから順に辿っていく
?
?
struct
tomodachi
struct
tomodachi
struct
tomodachi
struct
tomodachi
struct
tomodachi
struct
tomodachi
full_name
year
next
full_name
year
next
full_name
year
next
full_name
year
next
full_name
year
next
full_name
year
next
4
リスト上のデータの表示(サンプル)
void PrintList(List *list)
{
Node *ptr;
ptr = list -> head;
while (ptr ! = list -> tail) {
printf(“%s ¥n”, ptr -> data1, ptr -> data2);
ptr = ptr -> next;
}
}
課題1:
• リストの途中に追加するプログラム
(middle.c)
– 先頭のポインタ変数はheadとします。
先頭
a
b
d
c
NULL
新たに追加
課題2:
• 全リストを削除するプログラム(clearlist.c)
を書いてみましょう
5
© Copyright 2026 Paperzz