MLGW help
Bang & Olufsen Masterlink Gateway
Table of contents
Security considerations
Front panel operation
MLGW Setup user interface
System and project settings
Project information
Network configuration
Date and time
Adjusting web interface size
System password
MLGW protocol settings
Setting up users for MLGW Protocol and Web Panel access
Programming MLGW
Adding devices
Defining resources
Defining macros
Testing and activating a configuration
Programming reports
Defining sources for external applications
Virtual buttons
Setting up supported devices and systems
BeoLink products
Scheduler
Lauritz Knudsen, IHC/Schneider, LexControl
Lutron HomeWorks Interactive
Lutron Grafik Eye
Lutron Grafik QS
Lutron Radio RA
Lutron Homeworks QS / Radio RA2
KNX / EIB
Conson XP
Clipsal
Dynalite
Custom strings
Vantage
BTicino My Home
Smart-House
Custom strings
IP Camera
Velux
Tools
Loading and saving MLGW configuration
Monitoring system activity
System log messages
System error messages
MLGW software update
Web panel
Command Line interface
RS232 port pin assignment
Setting up BeoTime
Troubleshooting
Table of contents
MLGW help
Security considerations
Network access to MLGW
If MLGW is connected to the home network, care must be taken to avoid unauthorised access to MLGW functions.
Special care is required if this network is connected to a wireless access point, since access could be gained from
outside the property.
Securing the network itself should be coordinated with the corresponding contractor.
On MLGW, the following should be checked:
Always change the default password for the installer. The default combination is very easy to guess and
gives access to all functions. Use a strong password for admin access; if you forget this password, you can
always revert to default with the setup button.
Enable MLGW Protocol authentication if your applications support it.
Disable MLGW Protocol if you have no applications using it (neither mobile applications nor external
controllers).
Disable web panel access for the users dedicated to external controllers.
Avoid defining more users than necessary. Usually 2 or 3 users should be enough (e.g. one user for
parents, another for all kids). Use non trivial passwords. Explain this to the home owners.
Interacting with home security systems
If the security system is integrated with the home automation system, it is sometimes a good idea to arm the security
system from the home automation system.
However, never should the home automation system be allowed to disarm the security system. Otherwise,
someone hacking into the home automation system could break into the house (depending on the setup, hacking
could be done via the Internet, the house wireless network, a remote control, keypad, etc.).
Unattended home automation actions
There are many usual actions in home automation which can be dangerous if triggered remotely or automatically.
Such actions should only be available when the user is present.
Some examples:
Closing blinds, doors, gates or windows without checking if something or someone is obstructing the way.
Changing thermostat set-points beyond reasonable values.
Turning on a TV with motorised stand.
Switching on appliances or devices which handle power.
Opening exterior motorised sun shades or awnings without checking the weather conditions.
In any case, require user confirmation on such actions, and most importantly, discuss the whole issue with the home
owner.
Table of contents
MLGW help
Front panel
Front panel indicator
The front panel indicator provides feedback on the state of the system, and is also used for setup button operation
and MasterLink product assignment.
The normal start-up sequence shows up like this:
1.
2.
3.
4.
GREEN: system power up, approximately 2 seconds.
RED: system boot, approximately 1 minute.
Blink RED: MLGW application running, and MasterLink products discovery in progress, about 1 minute.
GREEN: MLGW application running.
If MLGW encounters an unrecoverable internal error, it will signal a critical error condition. In this case, the front
panel indicator will keep flashing RED and GREEN. The application will still be running, but the error and system logs
must be checked for diagnosis.
During software update of any of the two processor modules, the front panel indicator will flash GREEN.
Setup button
The setup button on the front panel provides several functions:
Function 1: optional user event
Function 2: reset password to factory default.
Function 3: reset network settings to factory default.
Function 4: erase all configuration, network and password to factory defaults.
Function 5: MasterLink product assignment on the active configuration.
To select a function, press and hold the setup button. This will cycle through all available functions, and the front
panel indicator will blink RED showing the current function. Release the button when you arrive to the desired
function number in order to execute it.
Holding the button past the last function will return to normal operation.
Also the setup button can be used during system power up for recalling the original factory installed software, as
described in the section on troubleshooting.
Table of contents
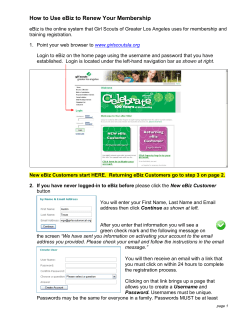
MLGW help
The web-based user interface
Setting up MLGW is done by means of a web user interface.
Accessing the interface
The default IP address for MLGW is 192.168.1.10. This setting can be later changed to suit the installation.
If MLGW is connected to a local area network:
1. Connect your computer to the local network.
2. Ensure that your computer can access the same subnetwork as MLGW (default 192.168.1.x).
3. Open a web browser and open MLGW by typing its IP address (default 192.168.1.10).
If MLGW is not connected to a network:
1. Connect an Ethernet patch cord between your computer and MLGW. Your computer may require that this be a
cross-wired patch cord.
2. Ensure that your computer can access the same subnetwork as MLGW (default 192.168.1.x).
3. On a web browser open MLGW by typing its IP address.
If your computer supports Multicast DNS (also known as mDNS or Bonjour), then you can browse directly to
mlgw.local instead of typing an IP address; or you can browse directly for mDNS services provided in the network.
When connecting, you should get a login dialog on the browser. Use "admin" for the user name, and MLGW
password for the password field. The default password is also "admin".
Navigation
The web interface is organised into a series of screens which can be selected by means of the navigation bars.
Try to avoid using the browser's back and forward navigation buttons, since you may lose the information you are
entering.
Also, note that changing to another screen does not save the modifications you have made. There are "Apply" or
"Save" buttons next to most controls and data fields.
Web Interface accessibility
The user interface is all implemented in plain XHTML and styled through Cascading Style Sheets (CSS).
In case of special accessibility requirements, an alternate style sheet can be selected on the web browser without loss
of functionality.
MLGW web interface also works on text-based browsers, or non-visual browsers.
Submit protection
Accessing MLGW Web Interface from several browsers at the same time should be avoided when applying changes
to the setup, since changes applied in one browser window will not be visible to the other until the page is reloaded
(F5 key in most browsers). The use of the browser's back button is also discouraged.
Doing the above will sometimes result in MLGW showing the following warning:
Data discarded. This can happen when you use two browsers simultaneously, press a button on a page
where you arrived using your browser's Back button or when you press the same submit button two
times in succession.
This means that the changes you were trying to make could overwrite changes already submitted (for example from
another browser window). The changes will not be applied. Instead, the page will be reloaded to show the latest
setup. You are required to make the changes on the new page and submit the data again.
Project information
[ Info ]
This screen allows to enter basic project identification information. Use these fields freely to identify the project, or
different versions of a project.
The project name will appear on the header of each screen, and will also be published as the Bonjour service name,
so chose a representative one.
Network settings
[ System | Network ]
MLGW comes with a default fixed IP address.
Network settings can be changed from the web interface, or from the command line. Moreover, they can be reset
using the setup button on the front panel.
Changing these settings takes place immediately, so change everything you need at once before applying the
changes.
The Hostname field defaults to "mlgw" and can be changed. This changes how to connect to MLGW using
multicast DNS (Bonjour). For example, you can change the default URL http://mlgw.local to something like
http://box3.local. This is useful in large installations where there is more than 1 MLGW unit. Use a single lowercase
ASCII word here.
You can select DHCP automatic configuration if the local network has a DHCP server running.
When DHCP is activated, the settings shown are the actual settings from the DHCP negotiation, so you can first use
DHCP to find out the subnet, gateway and DNS server, and then go back to a fixed IP address on that subnet.
Fixed IP configuration is preferable to DHCP whenever a controller needs to communicate with MLGW (e.g. for
establishing MLGW protocol connection).
Default gateway and DNS server must be correctly configured for MLGW to have access to the Internet; this is
needed for on-line software update.
The default network settings are:
IP address: 192.168.1.10
Subnet mask: 255.255.255.0
Default gateway: 192.168.1.1
DNS server: 192.168.1.1
Service discovery
MLGW publishes it's network services using Multicast DNS (also known as mDNS or Bonjour).
If your computer has this feature, then you should be able to connect to MLGW by using the address mlgw.local, or
directly select "Mlgw | Setup" from the web browser's mDNS (Bonjour) menu. The command line interface is
published similarly.
Auto IP address
If MLGW is configured for DHCP and finds no DHCP server, then it will assign itself a free IP address using the Auto
IP mechanism.
This way, if your computer supports mDNS, you should always be able to browse to mlgw.local.
Date and time settings
[ System | Date & Time ]
MLGW can get its system time from MasterLink, and this is the recommended option. In this case the time will be
constantly synchronised to the clock of the main MasterLink product.
Alternatively, the date and time can be set manually. Note that MLGW will lose it's time setting if powered down for
several hours.
System time is useful for monitoring events and for examining the system and error logs, but having the correct time
set is not critical to the system.
Text size configuration
[ System | Text Size ]
The web-based user interface may result too wide for low resolution screens such as those of mobile Internet
devices, subcompact laptop computers, or old laptop computers.
In this case, a more compact style for the user interface can be selected.
Note that most web browsers have text size and screen zoom options, which allow for further adjustment of the
interface.
System password
[ System | Password ]
The system password is used for accessing both the web user interface and the command line interface (CLI).
Logging in to the web interface requires entering "admin" for the user name, plus the password. The factory default
password is also "admin".
Logging into the CLI requires only entering the password.
This password can be changed on the web interface or using the CLI command password.
If you forget the password, it can always be reset to the default value by means of function 2 on the front panel.
MLGW protocol settings
[ System | MLGW protocol ]
MLGW protocol is available on RS232 connection and as TCP socket connections. Multiple simultaneous MLGW
protocol connections are supported.
The options available are:
Availability and bit rate on RS232 port.
Availability and TCP port number on the network connection.
If the RS232 port is already being configured for another device, a message will be shown and selection will be
disabled.
For information on using MLGW protocol, refer to the MLGW Protocol specification.
Table of contents
MLGW help
User management
[ System | Users ]
[ Web Panel | User management ]
MLGW keeps a list of users that can access the external control interfaces and services:
MLGW Protocol access
Web Panel and Publishing service access, together with a list of available rooms
Note: the list of available rooms is taken from the active configuration. Make sure that rooms are defined and
tested before setting up users.
MLGW Protocol access is necessary for external controllers and mobile applications for 2-way interaction with
MLGW. MLGW Protocol authentication can be disabled altogether to provide backward compatibility with software
version 1.2 and earlier (Settings | MLGW Protocol | Enable authentication over Ethernet).
MLGW Protocol over RS232 always has authentication disabled.
User properties
The properties for each user are:
User name
Password
Hidden user flag
User management flag
MLGW Protocol access flag
Web panel / publishing service access flag
List of rooms to access
User name and password are free text values. If using more than one word, or international characters, please
check that there are no encoding incompatibilities when accessing MLGW.
There is no default password for users, so a new password must be supplied at least once.
When modifying user properties, leaving the password field empty means no password change.
Hidden user flag: When an external controller is interacting with MLGW, a user can be assigned for authentication.
However, this is set-up during installation of both systems (MLGW and controller), and the users should not be able
to modify these settings. For example, if the user name of password are changed, the controller will no longer
interact with MLGW.
When this flag is set for a user, it will not appear on the web panel user management page.
User manager flag indicates whether this user can set up and configure other users accounts by means of the web
panel. The usual case is to give the home owner access to user management.
A user manager will have an extra option on the web panel for managing users, very similar to the user setup screen
for the installer. The differences are that users with hidden flag will not show, and the hidden property will not be
available.
It is important to have at least one user manager (e.g. the home owner) to avoid service calls for setting up
users.
MLGW Protocol access flag indicates whether the user can establish a MLGW Protocol connection (provided
MLGW Protocol authentication is enabled). This property is needed for mobile applications and external controllers.
Web panel / publishing service access flag indicates if the user can access the web panel, and if a mobile
application can get configuration information by means of the publishing service. Disable this property for external
controllers which only use MLGW Protocol.
List of rooms indicates which rooms the user will have access to on the web panel or on the mobile application. For
example, children should not have access to scenes/sources on the main bedroom, or scenes accessible from outside
the house (Global, Away).
Room access setting affects:
On mobile applications: scenes and sources available for control.
On the web panel: the rooms that can be selected for scene access.
Table of contents
MLGW help
Devices
[ Programming | Devices ]
Use the Devices screen to specify the devices connected to MLGW, and configure MLGW special devices (virtual
buttons, schedulers).
Use the list on the left of this screen to select or add devices.
Version 1.3 of MLGW supports communicating with 1 type of external system. For some specific drivers
(IHC/LexControl and Lutron GRX), more than 1 external system of the same type can be attached to MLGW.
Depending on the particular device selected, you may need to specify how MLGW will connect to the device. See the
notes on supported systems for information on setting up. Common connection settings are described below.
Common connection settings
Direct Ethernet connection
Use this option for systems with a network interface, and provide the IP address of the system.
The IP address has to be of the form xxx.xxx.xxx.xxx (for example: 192.168.1.200).
Some systems also require a TCP port number on which it expects incoming connections. Port 23 (Telnet port) is the
most usual default value.
Also, depending on the system, login and password information may be required. Default values will be suggested
when available.
Direct RS232 connection
MLGW has 1 RS232 interface for connecting to external systems.
Only one system can be connected to the interface at a time, so when configuring MLGW you will be only allowed
to set up one system on RS232. A notice will appear whenever this interface has already been reserved for another
system.
Some devices may require hardware flow control. In this case, verify that you are using a fully wired cable. Examples
are Lutron HomeWorks processors and Lutron Radio RA interface.
Also ensure that you use good quality cables, with proper shielding to avoid interference.
If the distance to cover is excessive, try using a lower bit rate, or try using an RS232 to Ethernet interface next to the
external system. This last recommendation also applies in case of interference or ground-loop problems.
For further reference, check the RS232 connector pin assignment.
Using RS232 to Ethernet interfaces
For systems with an RS232 interface, it is also possible to use an RS232 to Ethernet interface. This way, the network
installation can be used instead of having to run a long RS232 cable between the system and MLGW.
You should configure the interface for the correct RS232 parameters (bit rate, flow control, etc.).
Parameters to configure on MLGW are the IP address and TCP port number of the interface.
Resources
The resources section is where you identify all the necessary components with which MLGW will interact.
Here you define rooms and products on the BeoLink setup, events for the schedulers, virtual buttons for mobile
devices, and keypads or buttons for external systems.
See the notes on setting up external systems for setting up resources in each case.
Editing resources
All resources tables contain an empty last row. Use this row to define a new resource.
An exception is IHC/LexComm, where adding new resources has to be done from the list of all available resources.
Every change you make needs to be saved either by selecting the corresponding "Apply" button, or by pressing
Enter. The "Apply" button will be highlighted whenever changes are detected.
For removing resources, select the Delete check boxes before applying changes.
Automatically detecting and adding resources
Most drivers allow automatically detecting resources. The procedure is the following:
Add a driver with the relevant connection settings.
TEST the configuration.
Activate one or more of the resources (e.g. press a button on a keypad).
CANCEL the configuration.
Click on the Show detected button that appears below the resources table.
A new list will appear with the resources detected during TEST.
Select the resources to add to the resource tables and press Apply.
Drivers that do not have a Show detected button do not have this feature.
Macro programming
[ Programming | Macros ]
The interaction between the different devices connected to MLGW is defined by means of macros.
A macro consists of a set of events and a list of commands.
Whenever any of the events defined in a macro occurs (for example, a key press on a keypad, or a Control command
on Beo5), the macro is triggered. This means that all the commands in that macro will be executed in order.
To define a new macro, select the "Add macro" button that appears on the macro list.
Copying macro definitions
A complete macro can be duplicated using the "Clone" button. This will make an exact new copy of a macro.
Also, selected events or commands can be copied from one macro to another. Select a group of events or commands
using the check boxes, and use the "Copy" buttons. These copied events or commands can later be pasted on
another macro.
Copied events and commands are stored independently, so you can copy both events and commands and then paste
them to another macro.
Orphan commands and events
If commands and events are already defined for a resource, and then that resource is modified to another address,
then the events and commands will become orphan (without an associated resource).
Orphan events or commands will still be functional, and will refer to the original addressing of the resource.
The macro screen will signal the presence of orphan commands or events, and a report is available for listing them
all.
Configuration reports
[ Programming | Reports ]
Several reports are available that show the macros, commands and events defined on the current edit configuration.
Each report will open on a new browser window, and can be reloaded to reflect changes.
Testing and accepting a configuration
[ Programming | Configuration toolbar ]
MLGW keeps 3 independent versions of the configuration. Each configuration consists of the set of devices,
connection settings, resources and macros.
At all times, the active configuration is running. The user cannot modify this configuration directly, since it could
disrupt the behaviour of the installation.
Instead, what the user can change from the user interface is another configuration called the edit configuration.
So, all device settings, resources and macros modified by the user do not become active, but only change this edit
configuration.
The user can test if the modifications being made work as expected by selecting the "Test" button on the
configuration toolbar. This will momentarily stop the active configuration and run a copy of the edit configuration.
If everything runs as expected during the test, then the configuration can be accepted by selecting the "Save"
button. This way, the configuration being tested becomes the active configuration. Otherwise, the "Cancel" button
will restart the original active configuration.
During testing, the monitor and system log screens can be useful for checking if the new modifications are working
as expected.
The "Discard" button stops any testing, and reverts all changes to the edit configuration, making it equal to the
active configuration.
When accepting a configuration, the previously active configuration is not lost, but saved as the previous
configuration. Use the "Previous" button to return to this saved configuration.
All 3 versions of the configuration can be downloaded from MLGW for reference, backup, or uploading to another
MLGW unit.
Note that the edit configuration is not guaranteed to be recovered in it's latest version in case of a power failure. The
active and previous configurations are always stored on permanent memory. It is strongly recommended that you
accept changes to the configuration after testing, so that these changes are not lost.
Defining Sources
[ Programming | Sources ]
Note: This section is only relevant for supporting mobile applications, and has no effect on macro programming.
This screen allows to define sources for each BeoLink product. This information will be used by mobile applications to
generate a user interface where each product contains the relevant sources.
If BeoLink resources have been uploaded from a Beo5/Beo6 project file, then this screen should automatically contain
most of the necessary information (with a default UI type field according to the source).
Sources in NetworkLink products discovered by MLGW are not added automatically. In order to add the sources
defined in a NetworkLink said product must be present in the NetworkLink products list. To add its sources press
"Synchronize sources with product" in the product's sources list. This will add all sources not already in the list, and
update the name column for the ones already present. Keep in mind that in order for source synchronization to
work the product must be turned on, connected to the network and updated to the latest firmware version.
The list of sources can be customized for each product. The information to provide for each source is the following:
Source: This is the actual Beo4 command for selecting the source. The combination of values for common
sources is given in the table below.
Name: This is an optional label to show with the source. Try to use a short label (no more than 5 or 6
characters) so that it can fit on less space on the user interface. The recommendation is to leave this field empty
unless you need a specific description for this source (e.g. name of a set-top box or DTV service).
Dst: This is equivalent to the A/V button on Beo4, or the Destination field for BeoLink commands in macros.
This field should be filled in automatically depending on the source; you can also select AUTO in order to
retrieve the default setting for that source type. You can modify this setting if needed, such as selection of
audio sources on video products on Option 1 or Option 5 or vice versa.
Link: In the case of a link product having local sources, sources from the main products are selected using the
LINK modifier (just as with Beo4). This may also be necessary for products in OPTION 4. Important note: many
BeoLink products do not support this modifier.
UI type: This is an indication to the mobile application on what type of user interface is needed for operating
the product. Choose the type that most suits your specific source or set-top box.
Favourites list: This allows to select one of the favourite lists defined in Favourites. If something other than
"None" is selected, mobile applications will show a favourites button for this source allowing channel/station
selection.
Support for HDMI matrix
MLGW provides support for unconventional source selection commands where source selection is a sequence of
more than one command.
HDMI matrix sources 00 to 19 can be selected on the source drop-down menu.
These whole sequence of commands will be published to the mobile application.
Note that an updated version of the mobile applications must be used that fully support source selection sequences.
Favourites
This screen allows the definition of lists of favourite TV channels and radio stations. Favourite lists can then be
associated to one or more sources.
The mobile application will show channel/station logos to the user for easy channel selection, based on the selected
favourite list.
Favourite lists are identified by a name. This name will show up in the source configuration screen for list selection on
each source.
For each favourite list a global delay and end command can be set that will affect each favourite command. The end
command will be added at the end of each favourite command sequence and can be one of PLAY or SELECT. The
global delay will be added between all digits (CIFFER) and between digits and the end command for each favourite
command.
A new favourite list can be added using the "Add favourite list" button in the right panel or by using the clone
button under an existing favourite list. When a favourite list is not used by any source it can be removed.
When uploading BeoLink resources from a Beo5/Beo6 project file, favourite lists will be automatically imported and
associated with the corresponding sources.
For each channel/station in a list, the following information should be provided:
Caption: a short description for the favourite.
Path: the full URL of the logo image to show. It must point to a valid image as mobile applications will use it
periodically to retrieve the logo. It can be set manually or using the logo picker.
Command: the command to be executed once the logo is selected in mobile applications. Valid commands
consist of one or more of the following elements, separated by a plus sign (+), which can be omitted in case of
contiguous ciffers:
The digits CIFFER_0 to CIFFER_9, optionally shortened as 0 to 9.
Delay: Nms where N is a positive number indicating a delay in milliseconds.
PLAY or SELECT ending the sequence.
MENU.
CNTL_REWIND, CNTL_WIND, CNTL_STEP_UP and CNTL_STEP_DW, optionally shortened as GREEN,
YELLOW, BLUE and RED respectively.
For example:
CIFFER_1+Delay: 200ms+CIFFER_3+PLAY , or using the abbreviated form: 1+Delay: 200ms+3+PLAY .
12 , with the global delay set to 100ms and global end command set to SELECT,
is the same as 1+Delay: 100ms+2+Delay: 100ms+SELECT without global settings.
Logo picker
The logo picker shows as a pop-up window for selecting logos from the B&O repository. It shows up by clicking the
search button next to the path field or by clicking on the logo itself.
Available logos are shown in groups of 50. The most convenient way to search for a channel is by using the filter.
Typing a search string will immediately restrict the channels displayed to only the matching entries. For example,
typing music will show the channels that contain the word "music" in its name.
Regular expressions can also be used for filtering. For example, ^\d.*fm will show channels with names starting with
a number and containing "fm".
Clicking on a logo will close the picker window and complete the path and command fields, and show the selected
logo. The caption will be also updated except if it was edited explicitly: if the caption was empty, or it was the exact
name from the previous selection, it will be updated with the name of the new selected channel; in other cases, the
caption was edited and will be unmodified.
Note: The logo picker is only available if the browser has JavaScript enabled and an Internet connection is available.
Also, the complete list of channels must be retrieved the first time; this may take some seconds on a slow
connection.
Table of contents
MLGW help
Mobile applications
MLGW allows interaction with applications running on external devices via MLGW Protocol. Examples of devices are
mobile systems such as smart phones or wireless Internet devices.
In order to provide configuration information to these mobile applications, MLGW publishes all the relevant
configuration of rooms, sources and virtual buttons. Using this information, mobile applications can automatically
build a user interface coherent with the current setup.
The following MLGW configuration is only relevant for mobile applications or other external devices:
Virtual button configuration.
BeoLink source configuration (Programming/Sources) screen.
For more information, check the following documentation:
Masterlink Gateway Protocol specification.
Masterlink Gateway Publishing service specification.
Table of contents
MLGW help
Virtual buttons
[ Programming | Devices ]
External applications and the web panel can generate events on MLGW by means of virtual buttons.
Virtual buttons are called via MLGW Protocol and generate events on MLGW that can be used for macro
programming just like any other event.
In the Resources section, several virtual buttons can be defined. The attributes of a virtual button are the following:
Name: A name for the virtual button, used for monitoring and macro programming.
Id: This is a numeric value in the range 1 to 255. This is the identifier for the virtual button to be used on
MLGW Protocol.
Room: A room with which to associate the button (see below).
Presentation hints: Directives on how this button should be presented to the user by a mobile application
user interface:
Always visible: this is a higher priority button that should always be on-screen, whereas other buttons
could scroll off-screen on the mobile user interface
Require confirmation: ask the user for confirmation to avoid accidentally calling this action
Compact: the mobile application could represent this button using a smaller screen area (for example,
side by side with other buttons). See note below.
Room selection and presentation hints are only relevant for mobile applications which obtain their configuration
automatically from MLGW.
By default, virtual buttons are hidden: they can be activated by MLGW Protocol, but they will not be published for
mobile applications to show.
3 special extra rooms are shown as options: one for actions that affect the residence as a whole (global), another for
actions that are relevant near the residence (nearby), and another for actions only relevant from a remote location
(away). The name for each of these 3 special rooms can be configured on this same section.
Conventions on grouping compact scenes
Buttons with the compact hint allow for scenes with few text to be grouped together using less screen space on a
mobile device.
A typical example would be wanting to group together scenes for AC On and AC Off for controlling the air
conditioning (or, for example, all shades or lighting on/off).
In order to know which scene buttons will be grouped together, follow the guidelines below:
Virtual buttons with the compact hint will be grouped together as long as they have subsequent IDs (i.e. leave
a gap between IDs in order to separate different groups, or insert a non-compact button between two groups
of compact buttons).
Assume that compact buttons will be grouped in pairs: 2 buttons occupying the space of a non-compact
button.
The ID ordering still applies: lower IDs will be displayed first (in top-down, left-right ordering).
Virtual button events
Virtual buttons may generate 3 types of events: PRESS, HOLD and RELEASE. This allows for long press events such as
dimming lights.
The web panel will only generate PRESS events when the button is clicked.
Mobile applications may support long presses. 3 events will be generated in case of a long press: a PRESS event will
be fired immediately both for short or long presses; then a single HOLD event will be generated in case of a long
press; when the button is released, a single RELEASE event will be generated.
If the MLGW protocol connection is lost during a long press, MLGW will time out and generate the corresponding
RELEASE event automatically. This means that macros may rely on a RELEASE event always following a HOLD event.
Table of contents
MLGW help
Jump to:
BeoLink
Scheduler
Lauritz Knudsen, IHC/Schneider, LexControl
Lutron HomeWorks Interactive
Lutron Grafik Eye
Lutron Grafik QS
Lutron Radio RA
Lutron Homeworks QS / Radio RA2
KNX / EIB
Conson XP
Clipsal
Dynalite
Vantage
BTicino My Home
Smart-House
Custom strings
IP Camera
Velux
BeoLink
For the BeoLink setup, you have to define the products and the rooms they are in. You can enter this information
manually, or by uploading a Beo5 configuration XML file to MLGW (see Beo5 configuration loader).
Rooms are needed for receiving LIGHT and CONTROL events from Beo4 / Beo5. These events are associated to
rooms, where more than one product could eventually receive the same remote control command.
Also BeoTime can send LIGHT commands. Please see the section on setting up BeoTime.
There is support for both MasterLink and the newer NetworkLink products:
MasterLink products
MasterLink products have no fixed addressing, so you should provide an address yourself (on the column MLN
(Masterlink Node)). Once you finish addressing each product, you need to associate that address to the actual
products. This procedure is called product assignment.
Products which have not been yet assigned will show with a warning on the configuration screen.
There are 2 ways to assign products. Standalone product assignment consists of a single procedure which allows
assignment of all products in the installation. Single product assignment will assign or reassign products one at a
time, and can be useful for changes or for situations with just a couple of products.
During product assignment, you will need to go through all products, activating them in order of MLN. Instructions
will be provided on-screen.
Product assignment should be made once. If MasterLink products are added or replaced, then assignment for those
products (or a complete standalone assignment) should be repeated so that MLGW can identify the new products.
Notes:
There exists a limitation with BeoLink Wireless products. MLGW has no way of distinguishing between
different units in a wireless setup, so you will not be able to identify them individually.
During product activation, main products in link rooms (i.e. in Options 5 or 6) must be activated using a
source from the main room (not a source local to the product). Otherwise MLGW will not receive feedback
from that product.
If more products are activated during standalone product assignment than have been defined on the Resources
table, then these will be added as new resources automatically.
Standalone product assignment can be started from the front panel, without using the web interface. This can
be useful for MLGW protocol-only installations where no further setup is needed.
NetworkLink products
NetworkLink products are identified by their serial number. MLGW can detect NetworkLink products available in the
network, but these will not be added to the list by default. To add detected NetworkLink products press "Add
detected products" in the NetworkLink products list. This will add all products that have been detected and are not
already in the table. You can edit the product name, or add new products manually.
Detected NetworkLink products will be added without room number. You should manually assign them to the
corresponding room.
BeoLink Events
Events generating on Masterlink are LIGHT and CONTROL IR commands from Beo4 or Beo5. There may be more
than 1 product with IR receiver in a room. If room information for all products is correctly set up, MLGW will filter
out duplicate events generating from products in the same room. These events are therefore associated with a room
and not a particular product.
When an all product standby is performed on BeoLink, an event called ALL STANDBY is also generated on MLGW.
This event has no parameters.
CONTINUE and KEY_RELEASE functionality
Continue functionality refers to the way the products and terminals report a key-press being held for some seconds,
i.e. not immediately released.
When a key is pressed and held, the products will report a key-press event followed by a CONTINUE event. When the
key is released, a KEY_RELEASE event will be generated.
Several keys on the Beo4 or Beo5 terminals support continuous key presses which are reported in different ways:
The 4 colour keys, STEP_UP, STEP_DOWN, WIND and REWIND each report a specific CONTINUE event (e.g.
Continue STEP_UP).
Other keys send a generic CONTINUE event.
Other keys (such as digits) have no continue functionality.
You can use the monitoring tools in order to check for continue functionality on a specific key.
MLGW will keep track of which was the original key-press that lead to a CONTINUE - KEY_RELEASE sequence, so
that you may trigger different macros depending on which key was released.
This is done via the extra fields when defining a BeoLink event.
The typical usage is for a CONTINUE event to start a home-automation action like dimming the lights. The
KEY_RELEASE will stop dimming.
For example, in order to execute a macro when the GO key is released, you should define a BeoLink event for the
corresponding room, and for the KEY_RELEASE event. Then choose to also match against the original command, and
select GO from the original command list.
Short key-presses: Note that for short key presses (without holding the key), most products will add a
KEY_RELEASE for keys with continue functionality, but some older products (e.g. BlPassive) won't. So, for example, a
short key-press on PLAY will produce:
On BeoSystem 3: PLAY followed by KEY_RELEASE (PLAY)
On BlPassive: PLAY
So take this into account when designing your macros that respond to press, continue and release events.
BeoLink Commands
Commands to products are any Beo4/Beo5 command, the same way as when setting up Beo5.
BeoLink commands have an optional spacer measured in tenths of seconds after the command is transmitted.
Some products may fail to power up (via a source selection command) and immediately accept further commands
(for example, a program selection). If this happens, adding a small pause after the source selection command will
most likely solve the issue without the need to set up a scheduler. Another case where the spacer can help is when
controlling some set-top boxes which cannot handle a fast succession of commands.
BeoLink products supporting Beo4 navigation button commands can be configured for using either the new
commands (UP, DOWN, LEFT, RIGHT, SELECT and BACK), or the legacy alternatives (STEP_UP, STEP_DOWN, WIND,
REWIND, PLAY and EXIT). Mobile applications that control BeoLink products through MLGW need to know in which
of these modes the product is in order to send the right commands.
This configuration is done via the Beo4NavButton column in the BeoLink products list. If the checkbox is checked,
MLGW will tell the mobile application that the product is controlled via the Beo4 navigation button commands UP,
DOWN, LEFT, RIGHT, SELECT and BACK. Otherwise it will instruct the mobile application to use the legacy
commands previously mentioned.
Beo5 configuration loader
The setup for BeoLink products can be imported from the XML file produced by the Beo5 configuration tool. Rooms,
products, sources and favourite lists can be obtained this way.
On the BeoLink resources screen ( Programming / Devices / BeoLink ) select the file and press "Load Resources
from Beo5 project file". Once loaded, you will be shown a screen with choices on how to interpret the project
contents and how to merge it into the current MLGW configuration.
For each product in the Beo5 project file, the following options are available. Note that reasonable default selections
are already displayed.
Action: a drop menu down with the following options:
"Add product:" followed by the name of the product: adds a new product to the MLGW BeoLink
setup.
"Update product:" followed by the name of each of the existing products in the actual MLGW
configuration: updates the configuration of the product.
Ignore product: discards this product.
Action will default to "Update product" if a product by that name already exists; otherwise it will default to
"Add product".
MLGW room: a drop down menu which can be "New room:" followed by the name of the zone in which the
product was found in the Beo5 configuration, or one of the existing rooms in the actual edit configuration of
MLGW. In case the Add product option is selected in the Action field, it indicates the room into which the
product will be assigned. The default selection is "New room" unless a match is found for an existing room.
Sources table: shows the same options as in the sources configuration screen, plus an Ignore checkbox that
allows discarding particular sources.
New favourite lists will also be imported if no match is found in the current MLGW configuration, and the list is
selected for one of the imported products (i.e. lists not used will not be imported).
If an imported favourite list matches a current list but the contents are different, then the current list will not be
overwritten; a new list will be created from the imported file and it is up to the user to decide which list to keep.
BeoMaster5
A field is provided to configure the host name or IP address of the BeoMaster5. This field is used in mobile
applications for cover browsing on the N.MUSIC source. The value must be a valid hostname or IP address in dotdecimal notation.
MLGW will attempt to detect the host name of the BeoMaster5 automatically. A drop-down list to the right of the
host name / address field shows the detected BeoMaster5 products.
Scheduler
A scheduler generates a timed sequence of events which you can use to execute macros.
You can define more than one scheduler for your project.
When setting up a scheduler, enter a description in order to differentiate from other schedulers in the project.
On the resources list you should define a series of events for that scheduler, with the following information:
Event name: this is the name of the event that will be generated. Use the same name more than once if you
want the same event to be produced at different times.
Wait time: this is the absolute number of seconds since the scheduler was started (it is not relative to the
previous row).
Schedulers accept 2 commands: start and stop. Starting a scheduler will start to produce events at the set times.
The continuous option indicates whether the sequence of events are repeated automatically. Leave this option
unchecked for the scheduler to stop after the last event in the list. Checking this option will cause the scheduler to
loop indefinitely until stopped explicitly by a stop command.
Be careful to provide some way of stopping a continuous scheduler. For example, events from Beo5 or from a
keypad.
Lauritz Knudsen, IHC/Schneider, LexControl
IHC/LexControl programming model consists of physical input and output devices plus function blocks. Function
blocks implement the programming of the system, and the interface between the programming and the actual
components is done by linking physical input signals to function block inputs, and function block outputs to
actuators (dimmers, shade controllers, etc.).
The configuration tool for the controller (LK Visual) saves all the programming and setup in an XML file with
extension .VIS.
This file must be provided to MLGW in order to define the list of resources. Once this file is loaded into MLGW, all
relevant resources are selectable.
Resources available for generating events on MLGW are physical input signals and function block outputs.
Commands are always a logical pulse (True followed by False) on function block inputs. This way, all programming
(scenarios, etc.) is implemented by means of function blocks that can be executed by MLGW.
The Visual project file is absolutely necessary, since there is no way to inspect all of the events occurring on the
controller. Therefore, monitoring information will only be available for already defined resources.
Lutron HomeWorks Interactive
Connecting to a HomeWorks processor
Connections to a HomeWorks processor can be done directly on Ethernet, RS232, or indirectly with a RS232 to
Ethernet interface. This last option is only relevant for older HomeWorks generations that had no network interface.
For RS232, hardware flow control is recommended. Be sure to use a fully wired RS232 cable in this case.
Defining HomeWorks resources
Resources on HomeWorks are keypads (both physical and phantom keypads). Keypads are identified by processor
number, link number and keypad address. Use the monitor tool to verify keypad addresses and button numbering.
For wireless keypads, simply indicate link 8. In this case, it is assumed that the device type is 2 (keypad).
Events and commands
Events from HomeWorks include button activity and LED activity. Normally you should respond to keypad button
press only. The other options are provided for advanced use and need special care.
Commands to HomeWorks are keypad button presses. This is absolutely general since all buttons on HomeWorks are
completely programmable.
Setup on the HomeWorks project
For direct network access, a network account must be defined in the addressing section. This account is identified by
a user/password. Be sure to enable the necessary permissions for interaction with MLGW. MLGW will need full
keypad monitoring and executing button presses.
Define phantom keypads for integration with MLGW. MLGW can act on any keypad (physical or phantom), but it is
recommended to channel commands from MLGW to HomeWorks via phantom keypads, so the special functionality
for integration is not mixed with standard keypad functionality.
LED feedback
Advanced use only: MLGW can generate events from keypad LED state changes. This is provided only for advanced
use, where you want to generate MLGW events as a consequence of conditional, time-clock, or other non-user
generated actions on HomeWorks:
1. Define a state variable (or True/False variable) which you will use in your conditionals or time clock events to
signal MLGW.
2. Define a phantom keypad on the HomeWorks project, and choose a button for this purpose.
3. Set the button type to conditional.
4. Set the LED behaviour to conditional, on (for example) preset 5, type scene.
5. On Preset 5, add the state variable with a desired value.
6. Configure MLGW to respond to the LED of that button going ON or OFF, which will be an indication that the
state variable has the specified value.
For example, use the "Time of Day" variable with value "Day". The LED going ON will generate an event on sunrise,
and the LED going off will generate an event at sunset on MLGW.
Lutron Grafik Eye
Connecting to a Grafik Eye system
All Grafik Eye interfaces are supported: GRX-RS232, GRX-CI-RS232, and GRX-CI-NWK-E. Connection to the RS232
interfaces can be done directly using a 3-wire RS232 cable, or via an Ethernet to RS232 interface.
If using an Ethernet to RS232 interface, set it up for 9600 bps, no parity, no flow control, 1 stop bit.
Connection parameters are TCP port and IP address in case of using a network interface.
The password is only needed if using a direct network connection to GRX-CI-NWK-E. The default password for this
interface is 'nwk'.
Important note: Make sure that you enable scene status feedback and raw feedback on the Lutron interfaces. This
is done by setting the DIP switches 6 and 7 to ON on the interface itself.
Defining Grafik Eye resources
The resources you need to define are control units and accessory controls (e.g. keypads) with which you need to
interact. Each is determined by an address in the range 1 to 8 for control units, or 1 to 16 for accessory controls.
You can use the monitoring facilities to identify addresses.
Grafik Eye events and commands
Events from a Grafik Eye system can be lighting scene changes or individual key presses.
Possible commands are scene changes on control units.
Lutron Grafik QS
Connecting to a Grafik QS system
Connection to a Grafik QS system is done via a QSE-CI-NWK-E interface, which allows for Ethernet and RS232
connectivity.
For RS232 communications, set the same bit rate on the QSE-CI-NWK-E interface and on MLGW connection
settings.
Connection settings for Ethernet are the IP address of the interface and the password. The default password is 'nwk'.
Defining Grafik QS resources
The resources you need to define are control units and accessory controls (e.g. keypads) with which you need to
interact. Each is defined by a serial number which can be found on a label on each product, or from the control units
bus status information, or by inspecting MLGW monitoring information.
Grafik QS events and commands
Events from a Grafik QS system can be lighting scene changes on control units, or key presses.
Possible commands are scene changes on control units.
Lutron Radio RA
Connection to a Radio RA system
Communications with Radio RA is done via the Radio RA RS232 interface. Use a full RS232 cable between Radio RA
and MLGW. Hardware flow control is used, so a 3-wire connection will not work.
Alternatively, you can use an Ethernet to RS232 interface and connect via MLGW network port. In this case, it is
important to configure the Ethernet to RS232 interface to use hardware flow control, 9600 bps, no parity, 1 stop bit.
The only connection setting available is the TCP port number and IP address in case connecting via Ethernet.
Defining Radio RA resources
On the device setup screen, you should identify all of the buttons with which you need to interact. This includes:
Buttons on Master Control units.
Phantom buttons on the Radio RA RS232 interface.
Use the monitoring facilities, or the display on the Radio RA interface, in order to identify individual buttons.
Note: Master Control buttons that you intend only for integration (and not for lighting control) have a special
behaviour. Until they have been activated once, they will not produce a radio event. Therefore, it may happen at first
that you don't find monitoring information for these buttons. Once you define them in the project (and Test the
configuration), MLGW activates these buttons.
Note: Bridged installations are not supported. All interaction will be related to the section where the RS232 interface
is located.
Radio RA events and commands
You can define events for button presses on Master Control buttons .
For commands, you can execute a button press on a Phantom button.
Also, you can set the LED state on a Master Control button. Note that setting the LED state will only work if that
button has not been assigned to lighting control. If the button has lighting assigned to it, then the LED will always
show the lighting scene status regardless of any state change command sent by MLGW. Use this feature to provide
feedback on master control keypads.
Lutron Homeworks QS / Radio RA2
This driver is used to communicate with both Lutron HomeWorks QS and Lutron Radio RA2 systems.
Connection to a Radio RA2 system
Communication with Radio RA2 is done via the Radio RA2 Main Repeater, which allows interaction with the system
via 100 programmable virtual buttons ("phantom buttons"). This device provides both RS232 and Ethernet
interfaces.
Connection to the RS232 interface can be done directly using a 3-wire RS232 cable and it is fixed at 9600 bps, no
parity, 1 stop bit, 8 data bits, no flow control.
Connection settings for Ethernet consist of: IP address of the Main Repeater (default: 192.168.1.50), login (default:
lutron), password (default: integration) and telnet IP port (default: 23).
Connection to a Homeworks QS system
Communication with the Homeworks QS system is done via the Ethernet interface on the Homeworks QS Processor.
Connection settings consist of: IP address of the processor (default: 192.168.1.50), login (default: lutron), password
(default: integration) and telnet IP port (default: 23).
Defining resources
On the device setup screen, you should identify all the components with which you need to interact. These include:
Master Control units
Keypads
Interfaces
HVAC controllers
Individual zones, shades or outputs
Each resource should be given a name and an ID. The ID is the Integration ID as defined during setup of the Lutron
system. Use the MLGW monitoring or capturing facilities if you don't have the list of IDs at hand.
Events
MLGW will produce events on the following actions:
Press or close
Release or open
Hold
Multi-tap
Scene selection
LED state change
Raise, Lower or Stop
In all cases, a component number must be supplied. The component number identifies buttons, LEDs, etc. The list of
values depend on the type of device or keypad and are listed in Lutron Integration Protocol documentation. Possible
values are 1 to 2000.
Possible scene numbers are 0 (OFF) to 32.
Commands
3 types of commands are supported: device, output and HVAC commands.
Device commands require a component number (see the Events section above) and can be any of the following:
Press or close
Release or open
Hold
Multi-tap
Select scene
Set LED state
Set level
Raise, Lower or Stop
Possible scene numbers are 0 (OFF) to 32.
Setting levels require a level percentage in the range 0 to 100, and a corresponding fade time.
Valid formats for fade time are SS, SS.ss, MM:SS or HH:MM:SS.
Output commands control a particular zone or output. Note that in general, an ID must have been explicitly
assigned to that zone/output during Lutron system setup.
Output commands can be:
Set level
Raise, lower or stop
Pulse
Setting levels require a level percentage in the range 0 to 100, and a corresponding fade time.
Pulsing an output requires a pulse duration.
Valid formats for fade time and pulse duration are SS, SS.ss, MM:SS or HH:MM:SS.
HVAC commands can control the following parameters:
Heat and cool setpoints
Operation mode
Fan mode
Eco mode
Schedule (follow schedule or hold)
The setpoints require a temperature. The temperature can be given in Fahrenheit or Celsius (a value less than 40 is
interpreted as Celsius, above 40 as Fahrenheit). MLGW automatically converts Celsius to Fahrenheit internally when
communicating with the Lutron system.
KNX / EIB
MLGW can interact with KNX systems by means of shared variables (group addresses). The KNX bus supported is
twisted pair.
Connection to a KNX system
MLGW can connect to a KNX system by means of KNX data interfaces.
The supported interfaces are:
PEI type 10 (BCU2, with FT 1.2 protocol) over RS232 connection
IP tunnelling over Ethernet connection
PEI type 16 serial interfacing is not supported. PEI 10 bit rate is fixed at the default 19200 bps. The IP tunnelling
interface must provide bus monitor mode.
Note on IP tunnelling: It is usually necessary to disconnect the ETS software from the IP tunnelling interface before
MLGW can connect to the system. Also, after disconnecting ETS, the interface can take several minutes before it
accepts a new connection from MLGW. The same considerations apply when switching back to ETS.
You can configure the physical address (line/area/device) that MLGW will present on all outgoing KNX messages. The
default value should be OK in general. Large installations that include KNX routing may require a specific value here.
Group addresses
All the interaction between KNX and MLGW is by means of group addresses. Group addresses have an associated
datapoint type which identifies the type of data it holds (e.g. boolean, signed integer, etc.).
It is therefore necessary to define all the necessary group addresses required for integration with MLGW.
If this information is not readily available, the monitoring tools can be used to track for events.
KNX resources
On the device setup screen, you should add all necessary group addresses. Group addresses have the form a/b/c (3
level address) or a/b (2 level). The default is the 3 level addresses, but both formats are accepted.
Select for each group address, one of the supported datapoint types:
Datapoint type
Boolean
Range
0 .. 1
1 Byte unsigned integer 0 .. 255
1 Byte signed integer
-128 .. 127
2 Bytes unsigned integer 0 .. 65535
2 Bytes signed integer
-32768 .. 32767
3 bit Controlled
0 .. 15
Boolean values are coded as 0 for FALSE and 1 for TRUE.
3-bit Controlled values are coded from 0 (corresponding to 0000b) to 15 (corresponding to 1111b).
For datapoint type 3.007 (Control Dimmer), the coding is:
0: Decrease break.
1 .. 7: Decrease with step 1 to 7.
8: Increase break.
9 .. 15: Increase with step 1 to 7.
For datapoint type 3.008 (Control Blinds), the coding is similar but with Up and Down instead of Decrease and
Increase.
Importing and exporting KNX resources
KNX resources can be loaded to and exported from MLGW as a CSV (comma separated values) file. The file format is
according to RFC4180.
Valid lines in the file must contain at least 2 fields: name, group address. Optionally a third field could be added
defining the Data type.
This format is compatible with ETS3 Professional group address Export/Import 1/1 file.
Non-printable characters and reverse solidus (backslash) should be escaped. E.g. \01 for ASCII character SOH (values
are hexadecimal), \\ for backslash, \n for newline, \r for carriage return.
KNX events and commands
MLGW will generate an event whenever a group address is written to, provided the datapoint type written is 2 Bytes
or less in size.
An event can be defined for a specific value set to the group address.
Also, an event can be defined for any non-zero value set to the group address.
Commands can write to a group address any of the possible values.
Conson XP
Connection to a Conson system is done via an XP130 gateway module. This module provides an RS485 interface, so
a RS232 to RS485 converter is needed for connecting to MLGW.
Conson resources
On the device setup screen, define the modules you need to interact with. A module is identified by a module type
plus a link number. Use the monitoring tool to analyse the events on the bus.
Events and commands
Events occurring on the Conson bus are changes on a module's input. This is signaled as a circuit make or break
event.
Similarly, MLGW can send circuit make, break, or pulse (make followed by break) to any input of a module.
Clipsal
The Clipsal programming model defines trigger groups and trigger actions as a way to call lighting scenes. Any
scene defined by a trigger group/action pair can be called from MLGW.
Clipsal resources
Resources correspond to trigger groups. Usually a trigger group is shared by a set of mutually exclusive scenes, each
identified by a trigger action within the group.
Events and commands
Whenever a trigger group is set to a new action value, an event is generated on MLGW.
Similarly, commands on MLGW are setting an action value to a resource (trigger group).
Dynalite
Connection to Dynalite systems can be made via the RS232 interfaces, either using MLGW RS232 port or via a
Ethernet to RS232 interface. Native Dynalite Ethernet interfaces are not supported in the current software.
Dynalite resources
The resources for a Dynalite system correspond to areas in the Dynalite protocol and programming model. Add all
the necessary areas in the resources section of the GUI.
Events and commands
A preset selection can be detected by MLGW as an event. The parameters for the event are the Preset number and
the Bank number.
For setting up a Dynalite control to affect only MLGW, this control must be assigned an area number not used by any
dimmer or actuator.
The available commands are: Preset selection, Switch area off, and Area fade UP / DOWN / STOP.
The parameters for preset selection are area number and preset number. For area off and area fading, the only
parameter is the area number.
Vantage
Connection to a Vantage system
Communication with a Vantage system is done through an InFusion Dim Controller. This device has both RS232
and Ethernet interfaces.
Connection to the RS232 interface can be done directly using a fully wired RS232 cable and it is fixed at no parity, 1
stop bit, 8 data bits. Make sure to configure bit rate and flow control as needed.
Connection settings for Ethernet are the IP address of the InFusion Dim Controller and its telnet port.
Defining Vantage resources
To program the InFusion Dim Controller, the PC tool Design Center is needed. It lets you define all components of
your Vantage system, where each one has an address called vid (Vantage Identification Number).
On MLGW you can define as resources either a button on any control, or a task. To define a resource, you need to
know the Button or Task vid, which must be entered in the ID field.
Vantage events and commands
An event corresponds to a Button press or release, or a Task activation or deactivation.
Supported commands are Button press and release, Button press, Button release and Task activation.
BTicino
Connection to a BTicino system
Connection to a BTicino My Home system is made via an Ethernet connection to a My Home Gateway interface.
Both the IP address and the TCP port must be configured on MLGW. Note that in order to establish a
communication, MLGW must reside in an allowed IP range defined in the My Home project.
Defining Resources
Interaction between MLGW and BTicino is implemented via button presses and scenario selection. Therefore, both
command modules and scenario modules can be defined as resources.
Events and commands
Events can be either scenario selection events, or CEN events (only Basic CEN and Evolved CEN events are supported:
button press/release and extended press/release).
Commands to a BTicino system are scenario activations.
Smart-House
Connection to a Smart-House system
Connection to a Smart-House system is made via an Ethernet connection to a Smart-House controller.
Both the IP address and the TCP port must be configured on MLGW.
Defining Resources
Resources can be dupline input channels, dupline output channels or functions of type sequence. Interaction
between MLGW and the Smart-House system is implemented via changes in the status of channels and the start /
stop of sequences.
Events and commands
Events can be a dupline channel set, a dupline channel reset, a sequence start or a sequence stop.
Commands to a Smart-House system are set, reset or pulse a dupline channel and start or abort a sequence.
Custom strings
The Custom strings driver is intended to enable limited communication with unsupported home automation systems.
Use of this driver requires knowledge of the protocol for the external system.
Resources
This driver is based on matching incoming byte strings from the external system, and sending back byte strings to it.
Therefore resources are generic strings used for matching and for sending to the system.
There are 3 parameters to each resource:
Name for the resource.
Whether it should be available for matching (INPUT), for sending (OUTPUT), or for both (BOTH).
A generic character string.
In order to allow arbitrary byte values to be defined, the following coding is used:
Any character except for backslash (\) will be given it's corresponding value. Non-ASCII (international)
characters are interpreted as Unicode UTF-8 byte sequences.
Backslash is used as an escape character, which gives special meaning to the character o characters that
follow:
\\ (double backslash) is interpreted as a single backslash.
\r is interpreted as a carriage return character (0x0D). It will be immediately redisplayed as \0D.
\n is interpreted as a newline character (0x0A). It will be immediately redisplayed as \0A.
\" is equivalent to a double quote ("). This notation is required for import/export of resources in text
form.
\xx (where x is a hexadecimal digit [0-9, a-f, A-F]) is interpreted as a hexadecimal byte value. E.g. \0A is
equivalent to \n.
Any non-printable or non ASCII character entered by the user will be redisplayed as a hexadecimal sequence. Illegal
or truncated escape sequences will be marked as errors.
In order to ease the editing and sharing of string definitions, the list of resources can be exported to a text file, and
imported back from a text file. Imported resources can replace all defined resources, or be appended to the current
list.
The format for the text file is specified below. This format is compatible with the standard CSV or TSV (comma / tab
separated values) formatting, so it can be processed by spreadsheet software, text editors or command-line utilities.
Lines starting with # will not be interpreted.
Each valid line corresponds to one resource.
Lines must have at least 2 quoted fields. A quoted field consists of a starting double quote character (")
followed by escaped string data as defined above, followed by an end double quote character.
If a line contains only 2 quoted strings, they will be interpreted as name and match/command string, and the
resource type will default to BOTH.
If the line contains at least 3 quoted strings, the third will be interpreted as the type. Accepted values are
uppercase I for input, uppercase O for output, and uppercase B for both. Defaults to both.
Extra quoted fields, as well as any non-quoted data will be ignored.
Lines with no quoted fields will be ignored.
Examples of valid resources:
"Scene 3","ss3\r\n","O"
name "Login detected" value "login:\20" and all this is ignored
While quite free formatting is allowed for importing resources, the exported file always contains:
A commented header with information on the driver and minimum instructions.
The list of resources with the 3 fields (name, string, type), separated by commas.
If the imported file contains errors, a list of errors will appear on-screen. If too many errors are detected, import will
stop prematurely.
Events and commands
Resources marked for input (or both input + output) will be searched for in all incoming data. As soon as a match is
found, the corresponding event will be generated and search will continue after the match.
If the incoming channel becomes idle, then all partial matches will be discarded.
Also, whenever the channel is connected (or reconnected), a special CONNECT event will be generated in case some
session-setup is needed.
Commands are all resources marked as output (or both input + output) that can be transmitted to the channel.
TCP connection maintenance
Read this section if you experience periodic TCP reconnections.
In order to rapidly detect broken TCP connections, MLGW uses the standard TCP Keepalive probes mechanism:
when a TCP connection is idle, probe packets are sent periodically over the connection and an acknowledge is
expected. The probe is an empty TCP packet with the request for acknowledge flag set.
This method for detecting active connections is specified in RFC-1122 section 4.2.3.6.
There are products with non-compliant TCP implementations which do not respond to these acknowledge requests.
In such cases, MLGW will detect a broken TCP connection and reconnect. This may happen as frequent as every 20
seconds if there is no other data on the connection.
If you experience this problem, then you must somehow force some data to be sent back to MLGW periodically, so
as to keep the channel active.
For example, you can set up a scheduler loop to send a status request to the 3rd party product, or a ping/pong
message. On command-line based protocols that echo all characters typed, probably sending a carriage return
character is enough for getting data back to MLGW.
What to do strongly depends on the protocol of the 3rd party system.
IP Cameras
Future mobile applications may include live video streams from cameras in the home.
This driver provides access to IP cameras on mobile applications. Any IP camera able to stream MJPEG should be
supported.
Resources (cameras)
For each camera a name, a room, a high and a low resolution URLs should be provided.
The name is for identification. The room indicates the mobile application where to display the camera, and if Global
is selected, it will display the camera on every room.
The high resolution URL is for displaying the MJPEG in full size, and the low resolution URL is used for displaying
video from multiple cameras on the screen. Low resolution URL field should point to a low bandwidth video feed,
with resolution not exceeding 320x240px.
Authentication
Only http basic authentication is fully supported. Global authentication data can be set and will be used for each
camera for which no particular authentication data is set.
Per camera authentication can be used by setting user:password in the URL (e.g.
http://user:password@domain/camera). If no authentication is given as part of the URL, then global settings will be
used instead.
Both options work using http basic authentication. If a camera uses another authentication method, try to encode it
in the URL. Note that if global authentication is set, it can generate conflicts with your authentication method. In this
case, clear the global authentication settings and use only per-camera authentication.
Velux
This driver provides communication with Velux systems.
Connection to a Velux system
Communication with Velux is achieved via the Velux gateway. This device provides only an Ethernet interface.
Connection settings for Ethernet consist of: IP address of the Velux gateway (default: 192.168.0.2), and port number
(default: 51200).
Defining resources
The resources with which Masterlink Gateway can interact are the scenes defined within the Velux system.
Velux events and commands
An event corresponds to a scene selection from a source other than Masterlink Gateway.
Supported commands are scene selections.
Table of contents
MLGW help
Loading and saving configuration files
[ Tools | Configuration ]
You can transfer MLGW configuration to and from your computer. This way, you can make a backup archive of the
different versions of the configuration, or install the same configuration on several units.
There is a choice of downloading any of the 3 configurations on MLGW (edit, active and previous).
You can click on either the button or the link to download a configuration. The link can be useful for bookmarking
or adding to the browser's bookmark toolbar so you can backup the configuration frequently without navigating to
this page each time.
When uploading a configuration to MLGW, this configuration will become the edit configuration. You still
need to test and accept this configuration so that it becomes active.
By default, the network settings are not overwritten when uploading a configuration to MLGW.
Monitoring events and macro execution
[ Tools | Monitor ]
The monitoring screen shows the list of all events, macros and commands recently occurred.
Use this tool to:
find out the precise addressing of a specific component. Activate a keypad, sensor, etc. on a system and the
generated event will be recorded by the monitoring tool.
check that configured macros and their commands are working as expected.
Note that monitoring applies to the currently active configuration, or the edit configuration during Test.
This screen will show only the 100 most recent entries. If you need finer control over monitoring output, or prefer
real time display of events, then use the monitor command on the CLI.
System log
[ Tools | System log ]
This screen displays system messages regarding the interaction between MLGW and external devices, application
errors, and critical system errors.
Use this tool to:
verify connection to external devices (errors are reported here).
check for incoming MLGW protocol connections.
The total size of the system log is limited, so eventually old messages are discarded as new messages appear.
Error history
[ Tools | Error log ]
The error history screen displays important error conditions of the complete system (application and operating
system services).
These messages are saved into permanent memory so that they are not lost after restarting MLGW.
Use this information for diagnosing MLGW. Also the service counters (available from the command line interface)
could help determine error conditions on the unit.
MLGW software update
[ Tools | Software update ]
There are 2 methods for updating MLGW software.
If MLGW is configured to have Internet access, then it can check for new software on-line and download the newest
version.
Use the "Check available software on-line" button to check for the latest available software. The on-line version will
be displayed together with the currently running version. You can then select the "Update" button to effectively
download and install the new software.
Internet access of MLGW requires:
that the network has direct access to Internet (no proxies).
that MLGW network settings be correctly set up
If the network has a DHCP server, you can try connecting via DHCP in order to get all these settings automatically.
You can revert to static IP address later if needed, while keeping the other settings provided by the DHCP server.
Most DSL routers nowadays are DHCP servers by default.
If MLGW has no direct Internet access, you can upload and install a software image file previously stored on your
computer.
Do not power MLGW off during the installation of new software, since this can result in a corrupted system.
In case of the newly installed software failing to work properly, refer to the troubleshooting section for starting
MLGW on the factory installed software.
Table of contents
MLGW help
Web panel
The web panel allows users to interact with MLGW by means of a standard web browser.
Access to the web panel is the same as for the setup user interface: the user should browse to http://mlgw.local.
(or type in the IP address of MLGW if his platform does not have multicast DNS support).
The main screen will show buttons for accessing the web panel and the setup interface.
User name and password are required to access MLGW web panel. User setup is described here.
The web panel itself displays 4 different screens:
Room selection
Scene selection
Password change
User management
The room selection screen shows buttons for all rooms the user has access to. Also a button for password change
is displayed. If this user has the user management property, then an additional button for administration of user
accounts will show up.
Scene selection displays all the available scenes for the selected room. These scenes are configured on the virtual
buttons section.
Pressing on a button generates the corresponding event immediately, unless the virtual button has the require
confirmation property.
Screen format
The web panel has been dimensioned so that it will be usable and readable on most small-screen devices (Internetenabled mobile phones, etc.).
The user management screen, however, is best viewed on a larger screen as it conveys more information.
Admin access
Note that the admin user also has access to the web panel (with all rooms available and user management rights),
and also to MLGW Protocol.
This way, the installer can check the web panel or mobile applications without having to know the passwords set up
by the users.
Never ask the home owners for their passwords.
It is important to set up a strong password for admin and not give this password to the home owner.
Table of contents
MLGW help
Command line interface
In addition to the web-based interface, MLGW contains a command-line based interface (CLI).
Use CLI for:
Monitoring for events / macros / commands in real time, and without occupying the web-based interface.
Basic setup of MLGW: network settings, MLGW protocol availability, time and date settings.
Obtaining service information.
Automating configuration of multiple MLGW units.
To access the CLI, use any Telnet client to connect to MLGW.
The IP address or host name to use is the same as for the web-based interface: use the IP address of MLGW, or the
host name mlgw.local if your system implements multicast DNS.
Configure your telnet client for UTF-8 encoding to correctly show international characters.
On connection, you will get a log-in prompt. Type the MLGW password to proceed. Several CLI connections may be
active simultaneously.
Use the TAB key to check for available commands, automatically complete the commands, and getting help for a
command. Use the Escape key to cancel a command and get a new prompt.
Available commands
Commands have optional arguments, with the following properties:
Arguments between brackets ( '[' and ']' ) are optional.
Arguments separated by a vertical bar ( '|' ) are mutually exclusive.
Command names and arguments are case insensitive, except for passwords which are case sensitive.
Arguments shown in uppercase indicate a literal value.
Arguments shown in lowercase indicate values you should supply
HELP [ command ]
Provides usage information for a command.
With no arguments, provides help on using the command line interface.
LOGOUT [ ALL | OTHER ]
Terminates the CLI session. Ctrl-D can be used equivalently.
With an argument, terminates all, or all other CLI sessions.
The INFO command shows the number of active CLI sessions.
INFO
Displays product and status information of MLGW:
Serial number
Type number
MAC address
Network configuration
Software version
Hardware version
Number of CLI opened sessions
System time
DATE [ yyyy mm dd hh mm ]
DATE BEOLINK
Without arguments, displays the current system date and time.
With BEOLINK argument, system date is set to that of BeoLink (MasterLink) products.
For manual date setup, provide the 5 numeric values.
NETCONFIG [IP xxx.xxx.xxx.xxx] [GATEWAY xxx.xxx.xxx.xxx] [MASK xxx.xxx.xxx.xxx] [DNS
xxx.xxx.xxx.xxx]
NETCONFIG DHCP
Without arguments, shows current network setup.
With DHCP argument, gets configuration from DHCP server.
Providing one or more of the manual settings switches to manual IP configuration.
New settings apply immediately.
PASSWORD old_password new_password
Changes the system password.
MAC
Displays the Ethernet MAC address.
MLGWPROTO RS232 [ bitrate | OFF ]
MLGWPROTO IP [ port | OFF ]
Sets up MLGW protocol on RS232 or IP.
MONITOR
Starts a real-time monitoring application.
Use keys M, E, C, to toggle the display of macros, events and commands respectively.
Use the space bar to stop and resume monitoring.
Q quits the monitor application.
Any other key inserts a mark in the output.
ALLSTANDBY
Sends all BeoLink products to stand-by. Use to check BeoLink connectivity.
COUNTERS
Displays service counters.
Table of contents
MLGW help
RS232 port pin assignment
The RS232 port on MLGW is a standard DTE-side interface with the following pin assignment. Direction is indicated
as input to MLGW or output from MLGW.
Pin Direction
Signal
1
Input
DCD - data carrier detect
2
Input
RxD - received data
3
Output
TxD - transmitted data
4
Output
DTR - data terminal ready
5
-
GND - signal ground
6
Input
DSR - data set ready
7
Output
RTS - request to send
8
Input
CTS - clear to send
9
Input
RI - ring indicator
RxD, TxD and GND are always required. RTS and CTS are required when using hardware handshaking (e.g. Lutron
RadioRA, or Lutron HomeWorks).
In general, a fully wired RS232 cable should work with most systems.
The connector is type DE-9 (DB-9) male.
Table of contents
MLGW help
BeoTime
For MasterLink Gateway customers, BeoTime will ensure a complete and pleasant wake-up not only via the alarm,
audio or video sources, but also via a combination of home automation actions: different light settings, opening of
blinds, etc. - all controlled via MasterLink Gateway.
For busy mornings BeoTime can control selected sources and likewise at night ask MasterLink Gateway for a
predefined pleasant goodnight.
By offering these new functionalities, we extend the decentralised timer functionality offered by BeoTime in the
bedroom environment also to engage and activate home automation sources for the whole house.
BeoTime interacts with MLGW by sending infrared LIGHT commands together with the alarm and the chosen
audio/video sources.
This compatibility must be enabled on BeoTime.
Enabling MLGW compatibility on BeoTime
To enable or disable MLGW compatibility on BeoTime:
1. From idle state press and hold for at least 10 seconds.
2. While still holding toggle the alarm button 4 times (i.e. ON-OFF-ON-OFF-ON-OFF-ON-OFF or OFF-ON-OFFON-OFF-ON-OFF-ON).
3. Release .
When MLGW compatibility has been enabled the following features are available:
The menu contains an ALARM LIGHT option for selecting the light command for wake-up
A lights off sequence (see below) is transmitted at the alarm timeout event
A lights off sequence is transmitted at the sleep timer timeout event
Alarm LIGHT functionality
ALARM LIGHT will be added to the main menu - opening up for LIGHT commands used alongside audio/video
sources used for wake-up. In the ALARM LIGHT menu the following LIGHT commands can be selected: NONE, ON,
1, 2, 3, 4, 5, 6, 7, 8, 9, RED, GREEN, YELLOW or BLUE. Default is set to: NONE.
ALARM TIMEOUT
The sources activated by the ALARM LIGHT can now also switch off at the same time as the ALARM TIMEOUT
defined for the audio or video source in your bedroom area. BeoTime will transmit a lights off sequence at timeout.
SLEEP TIMER TIMEOUT
Likewise, the sources activated via the ALARM LIGHT command can now also switch off at the same time as the
SLEEP TIMER TIMEOUT defined for the audio or video source in your bedroom area. BeoTime will transmit a lights off
sequence at timeout.
Lights off is transmitted as the IR codes LIGHT 0 followed by LIGHT STOP.
The ALARM LIGHT menu also has a SUNRISE option for gradually raising the light level by sending LIGHT-STEP UP
commands periodically. This is intended for future use.
Checking BeoTime infrared commands
You can verify the exact sequence of infrared commands by setting up an alarm on BeoTime and then using the
monitoring tool on MasterLink Gateway (on the command line interface or the web interface) and checking for
LIGHT events in the room.
Table of contents
MLGW help
Troubleshooting
MLGW not working after software update
Detecting if MLGW is running
The following are signs that the MLGW application is not running:
The front panel indicator does not go green after approximately 1 minute of being powered up.
Briefly pressing the setup button produces no visible feedback on the front panel indicator.
The unit automatically reboots every minute or so (check for system boot indication on the front panel, or
critical error indication).
If the application seems to be running, but you cannot connect either via web or via telnet (command line interface),
first check that the network is working as usual; then try resetting the network settings through the front panel. See
the section on network connectivity.
Restarting MLGW on factory-installed software
If a software update causes MLGW to fail (for example due to power failure during flash update), the unit can be
restarted using the original factory-installed software.
To do this, switch MLGW off, and while pressing the setup-button, switch it back on. Release the setup button only
after 5 seconds. Now MLGW will start from the original software installed during production. The user-installed
software will no longer be available. You need to log in to the system and perform a software upgrade to try to fix
the broken software.
If you suspect that the failure is inherent to the latest software installed (and not a failure during the flash process),
then you can manually download an earlier software version from BeoWise to your computer, and perform a
software update from that file.
Erasing all configuration before application start
If the application fails to start even if restarting on factory-installed software, there is a method for erasing all
configuration from MLGW before the application starts up. This can be useful in case of a corrupt configuration, or a
configuration which causes the older factory-installed software to fail.
All configuration will be erased if the setup button is pressed when the application starts (front panel indicator goes
from RED to GREEN) and is released before 1 second. So the normal procedure for this is to power up MLGW with
the setup button pressed, and release it as soon as the front panel indicator goes from RED to GREEN (approximately
40 seconds after power-up).
"Not enough space transferring file" error
When uploading a file to MLGW, the file may be too large for the memory available. Examples of file upload are
software update, uploading IHC/LexControl or Beo5 project files.
It may happen that temporary information is using up the space required to accept the new file.
Try restarting MLGW (cycle power off/on) in order to clear most of the temporary information.
If uploading a Beo5 project file, check that this file is not excessively large (several megabytes).
If the failure is during software update, download the configuration to your computer and perform a Factory Reset
(front panel function 4) before retrying.
© Copyright 2026 Paperzz