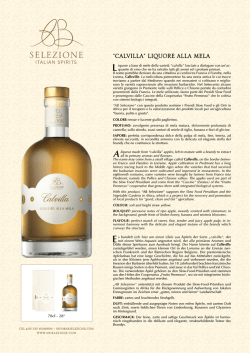
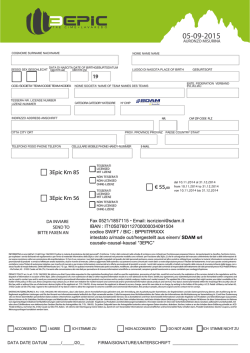
K.ZIP
MANUALE USO E MANUTENZIONE
USE AND MAINTENANCE
BEDIENUNGS-UND WARTUNGSANLEITUNG
ITALIANO
ENGLISH
DEUTSCH
PG. 1
PG. 6
PG. 12
BENVENUTO
PALAGINA Le dà il benvenuto nell’ampia gamma di protezioni da insetti e solari / luminose.
All’interno di questo manuale troverà tutte le informazioni relative alla Sua tenda K.zip.
IMPORTANTE: è necessario seguire le istruzioni di questo manuale affinché siano valide la rispondenza
alle norme, la classe di resistenza al vento certificata e la garanzia della K.Zip Palagina
K.ZIP
Le tende K.zip sono progettate per avere ottime performance di isolamento luminoso ai lati del telo
e una efficace tenuta al vento CLASSE 3 certificata.
L’utilizzo di schermature esterne come le K.zip con tessuto aiuta a diminuire i costi di condizionamento
nei mesi estivi mantenendo una piacevole visione verso l’esterno (se è stato installato un telo non
oscurante).
PALAGINA Vi augura una eccellente esperienza di comfort abitativo!
PALAGINA - MANUALE USO E MANUTENZIONE
VERSIONE IN LUCE
Lato ispezionabile
cassonetto
Cassonetto
Nottolini di
fermo
(se previsto dal
modello)
Possibile posizione
dell’etichetta con
marchio CE.
Guide laterali
contenenti i profili
in materiale a
basso attrito
Guide laterali
(parte fissa)
Guide laterali
(parte removibile)
Terminale dotato
di guarnizione o
spazzolino.
Vista da lato interno
Telo screen,
oscurante, oppure
rete da zanzariera.
Forme o caratteristiche possono
variare a seconda dei modelli.
VERSIONE INCASSO
Guide laterali
contenenti i profili
in materiale a
basso attrito.
(Possono
cambiare in base
al modello)
Cassonetto
Possibile posizione
dell’etichetta con
marchio CE.
Nottolini di
fermo
(se previsto dal
modello)
Guide laterali
(parte fissa)
Guide laterali
(parte removibile)
Terminale dotato
di guarnizione o
spazzolino.
Vista da lato interno
Telo screen,
oscurante, oppure
rete da zanzariera.
PALAGINA - MANUALE USO E MANUTENZIONE
Forme o caratteristiche possono
variare a seconda dei modelli.
1
CONTROLLO E AVVISI GENERICI
1.0 Si raccomanda di verificare l'integrità dell'imballo e del materiale contenuto all'interno prima di
effettuare il montaggio.
1.1 L'installatore è tenuto ad utilizzare tutte le precauzioni necessarie per effettuare il montaggio in
piena sicurezza utilizzando materiale idoneo alla propria sicurezza e a quella degli altri. (guanti,
caschetto, scarpe antinfortunistiche, imbragature, ecc.)
1.2 ATTENZIONE: nei modelli motorizzati, è necessario togliere l’alimentazione elettrica prima di
effettuare qualsiasi collegamento o manutenzione.
1.3 Verificare prima del montaggio la qualità delle pareti dove verrà installato il prodotto. Nel caso
che il montatore non ritenga sicura l'eventuale installazione deve rifiutarsi di effettuarla fino alla
sistemazione della sede.
1.4 Ogni uso diverso da quello previsto è vietato e solleva PALAGINA da ogni responsabilità.
1.5 L'installatore è tenuto a separare tutto il materiale d'imballo prima dello smaltimento nella raccolta differenziata (Cartone, Nylon)
1.6 Al termine dell'installazione è opportuno che il montatore verifichi la sicurezza del prodotto dal
fissaggio al funzionamento finale.
1.7 A fine vita il prodotto deve essere demolito separando parti plastiche, alluminio, parti in acciaio
(viti, barre, molle, staffe di ancoraggio, perni, ecc) e parti elettriche per il riciclo secondo le
norme vigenti.
MANUTENZIONE ORDINARIA
2.0 Qualsiasi intervento ordinario come pulizia o manutenzione deve essere effettuato prendendo
tutte le dovute precauzioni al fine di evitare cadute o qualsiasi altro tipo di incidente.
2.1 Il sistema K.zip è concepito per durare nel tempo: tuttavia, alcune precauzioni sono indispensabili per una perfetta durata nel tempo.
2.2 Pulire il terminale e le guide (solo esternamente) con un panno inumidito con acqua e sapone
neutro (evitare detersivi aggressivi, alcool o simili).
2.3 Non lubrificare nessuna parte della tenda per evitare il rischio di macchiare in modo irreparabile
il telo e/o di danneggiare la zip e le guide di scorrimento laterali.
2.4 Nel caso sia installato un telo pulirlo almeno 2 volte l’anno con un panno inumidito con acqua
e sapone neutro (evitare detersivi aggressivi, alcool o simili).
2.5 Nel caso sia installata la rete zanzariera pulirla almeno 2 volte l’anno con un panno inumidito
con acqua e sapone neutro (evitare detersivi aggressivi, alcool o simili).
2
PALAGINA - MANUALE USO E MANUTENZIONE
RISOLUZIONE DI EVENTUALI PROBLEMATICHE
3.0 La tabella sottostante ha lo scopo di identificare e risolvere le eventuali problematiche comuni. ATTENZIONE: per ragioni di sicurezza, non effettuare nessun tipo di intervento meccanico o
elettrico. Contattare se necessario l’installatore.
3.1 Dopo aver premuto i pulsanti non si sente il rumore del motore la tenda non
si muove (Versione motorizzata)
Causa
Tensione mancante
Batteria del radiocomando esaurita (solo modello con comando o pulsante radio)
Il motore è in protezione termica
Perdita della regolazione dei finecorsa
Perdita della memorizzazione del radiocomando (solo modello con comando o pulsante
radio)
Risoluzione
Se nell’ambiente è presente regolarmente la
corrente elettrica contattare l’installatore.
Sostituire la batteria
Attendere 15 minuti prima di riattivare la tenda,
se il problema si presenta frequentemente contattare l’installatore.
Contattare l’installatore
Contattare l’installatore.
3.2 Dopo aver premuto i pulsanti si sente il rumore del motore ma la tenda non
si muove / L’argano gira in folle o è eccessivamente frenato
Causa
Telo sganciato o rotto
Uscita della zip dalle guide interne
Presenza di forte vento
Guide laterali interne e/o zip sporche
Perdita della regolazione dei finecorsa
Un ostacolo blocca la corsa
Non è stata sbloccata la tenda, vedi 5.5
Risoluzione
Contattare l’installatore.
Contattare l’installatore.
Attendere che il vento si attenui.
Contattare l’installatore.
Contattare l’installatore.
Rimuovere l’ostacolo
Spingere verso l’interno i 2 nottolini
3.3 Il telo sale o scende in modo non regolare o l’argano è eccesivamente
frenato.
Causa
Guide laterali interne e/o zip sporche
Presenza di forte vento
Un ostacolo blocca la corsa
Risoluzione
Contattare l’installatore.
Attendere che il vento si attenui.
Rimuovere l’ostacolo
3.4 Il telo non rimane steso.
Causa
Fuoriuscita del telo dalle guide
Risoluzione
Contattare l’installatore.
La presenza di alcune grinze nel telo è possibile e non pregiudica il funzionamento né la sicurezza
del prodotto.
PALAGINA - MANUALE USO E MANUTENZIONE
3
GARANZIA
4.0 PALAGINA garantisce a norma di legge il perfetto funzionamento di tutte le parti meccaniche
della tenda e una resistenza al vento CLASSE 3 certificata, a patto che le seguenti norme vengano rispettate:
• L’installazione, regolazione e manutenzione straordinaria sia effettuata da personale autorizzato PALAGINA.
• L’allacciamento alla rete elettrica sia effettuato da un addetto competente.
• Nessuna operazione di taglio guide, cassonetto o telo vengano effettuate al di fuori degli
stabilimenti produttivi PALAGINA.
• Siano evitate cause esterne non imputabili a PALAGINA es: fulmini, eccessive pressioni sul telo,
azioni meccaniche sulla struttura o di taglio sul telo.
• Siano effettuate corrette e periodiche manutenzioni.
• La tensione elettrica alternata sia compresa fra 210 e 230 Volt.
Il mancato adempimento di una qualsiasi delle regole sopra indicate farà decadere immediatamente la garanzia
4.1 La durata della garanzia:
Telo e zip : 2 anni
Profili in alluminio verniciati: 5 anni
La durata della garanzia ha inizio al momento della posa, consegna prodotto e firma da parte
del posatore sul presente MANUALE DI USO E MANUTENZIONE.
4.2 PALAGINA garantisce l’integrità di tutti gli elementi della tenda e si assume la responsabilità di
tutte le spese necessarie alla sostituzione di elementi difettosi o della completa sostituzione del
prodotto se necessaria (spese spedizione e manodopera del posatore escluse).
4.3 Resistenza al vento certificata CLASSE 3 per tende di dimensioni massime di 300 x 250 cm (velocità vento 49 Km/h).
4.4 Eventuali reclami dovranno essere gestiti secondo le norme:
• Problema/vizio riscontrato alla ricezione del prodotto – Tramite comunicazione scritta entro 8
giorni dalla ricezione del materiale al rivenditore/posatore allegando descrizione fotografica
del difetto riscontrato
• Problema/vizio riscontrato alla consegna del prodotto installato – Tramite comunicazione
scritta entro 8 giorni dalla scoperta del vizio al rivenditore/posatore allegando descrizione
fotografica del difetto riscontrato
• Difetto di funzionamento del prodotto – Tramite comunicazione scritta entro 15 giorni dalla
scoperta del vizio al rivenditore/posatore allegando descrizione fotografica del difetto riscontrato
4
PALAGINA - MANUALE USO E MANUTENZIONE
UTILIZZO DELLA TENDA
5.0 TENDA MOTORIZZATA - Il controllo della tenda può avvenire con vari dispositivi radio e a filo.
5.1 Tutti i dispositivi radio sono alimentati da batteria: Attenzione anche alcuni modelli di interruttori
a muro sono di tipo radio, per cui sono soggetti a periodiche sostituzioni delle batterie.
5.2 Se le tende fanno parte di un sistema domotico, fare anche riferimento al manuale della centralina che le controlla.
5.3 La salita e la discesa sono avviate tramite le frecce “su” e “giù”, per arrestare la corsa premere
un attimo il pulsante centrale.
Per maggiori informazioni di uso, sostituzione batterie, ecc. far riferimento alla documentazione
fornita a parte.
5.4 TENDA ARGANO - Il controllo della tenda avviene tramilte l’uso dell’argano che può trovarsi sul
lato destro o sinistro della tenda, l’asta dell’argano è dotata di attacco magnetico per facilitarne la rimozione.
5.5 USO DEL BLOCCO - Se il modello lo prevede saranno presenti sulle estremità del terminale 2
nottolini. Per bloccare la tenda dopo averla interamente abbassata spingere verso l’esterno i 2
nottolini e se è necessario mettere in tensione leggermente la tenda.
Prima di riavvolgere la tenda, sbloccarla spingendo i 2 nottolini verso l’interno.
MARCATURA CE E POSA
6.0 PALAGINA dichiara che il prodotto è conforme alle norme CE secondo le classi dichiarate, a
patto che la posa sia stata effettuata seguendo tutte le indicazioni del MANUALE DI MONTAGGIO.
6.1 Una targhetta della marcatura CE è presente sul tubo di avvolgimento o sul retro di una delle
guide laterali di ogni tenda.
Conformità CE in linea con le seguenti direttive
Direttiva Macchine 2006/42/CE
Direttive compatibilità elettromagnetica 2004/108/CE
Direttiva prodotti da costruzione 89/106/CEE
Conformità verificata secondo le norme:
UNI EN 13561-2009 (prestazioni e sicurezza)
CLASSE 3 (resistenza al vento, conferma a cura del posatore)
PALAGINA dichiara che la tenda K.zip ha una resistenza al vento certificata CLASSE 3, corrispondente a una velocità di 49 km/h comprovata da test effetttuati presso l’Istituto Giordano su una
tenda di 300x250 cm
PALAGINA - MANUALE USO E MANUTENZIONE
5
WELCOME
PALAGINA welcomes you to its wide range of insect and solar/light protection devices.
Inside this manual you will find all the information on your K.zip blind.
IMPORTANT: You must follow the instructions in this manual to ensure that the PALAGINA K.Zip
conforms with the regulations, the certified wind-resistance class and the guarantee.
K.ZIP
K.zip blinds are designed for excellent light screening at the sides of the sheet and effective CLASS 3
certified wind resistance.
The use of external screens such as the K.zip with fabric helps reduce air conditioning costs in the
summer months while maintaining a pleasant view to the outside (as long as you have not installed
a blackout sheet).
hopes you have a delightful experience of living comfort!
6
PALAGINA - MANUALE USO E MANUTENZIONE
SURFACE-MOUNTED VERSION
Inspectable side
of box
Box
Locking pins (if
offered by the
model)
Possible location
of the label with
the CE mark
Side runners
containing the
profiles in lowfriction material
Side runners (fixed
part)
Side runners
(removable part)
Base bar with seal
or brush.
View from the inner side
Sheet screen,
blackout or insect
mesh
Forms or features may vary
depending on the models.
RECESSED VERSION
Side runners
containing the
profiles in lowfriction material.
(They can
change
depending on the
model)
Box
Possible location
of the label with
the CE mark
Locking pins (if
offered by the
model)
Side runners (fixed
part)
Side runners
(removable part)
Base bar with seal
or brush
View from the inner side
Sheet screen,
blackout or insect
mesh
PALAGINA - MANUALE USO E MANUTENZIONE
Forms or features may vary
depending on the models.
7
CHECKING AND GENERAL
RECOMMENDATIONS
1.0 It is recommended to check the integrity of the packaging and the equipment contained
inside before installation.
1.1 The installer is required to use all precautions necessary to perform the installation safely using
suitable equipment for their own safety and that of others (gloves, helmet, safety footwear,
harnesses, etc.).
1.2 WARNING: for motorised models, it is necessary to disconnect the power supply before making
any connections or carrying out maintenance.
1.3 Check the quality of the walls where you will install the product before mounting it. In the event
that the installer feels an installation would not be safe, he/she should refuse to do it until the
necessary corrections are made to the site.
1.4 Any use other than that for which the equipment is intended is prohibited and exonerates PALAGINA from all liability.
1.5 The installer is required to separate all packaging materials for subsequent recycling (Cardboard, Nylon).
1.6 After installation, the installer should check the safety of the product, from its fixings through to its
final operation.
1.7 At the end of its life, the product must be scrapped separating plastic parts, aluminium, steel
parts (screws, rods, springs, mounting brackets, bolts, etc.) and electrical parts for recycling in
accordance with regulations.
ROUTINE MAINTENANCE
2.0 Any routine intervention such as cleaning or maintenance must be carried out taking all the
necessary precautions to avoid falls or any other type of accident.
2.1 The K.zip system is designed for long life. However, certain precautions are necessary to ensure a
long, trouble-free lifespan.
2.2 Clean the base bar and runners (only externally) with a cloth dampened with water and neutral
soap (avoid harsh detergents, alcohol or similar).
2.3 Do not lubricate any part of the blind to avoid the risk of staining the sheet irreparably and/or
damaging the zip and side runners.
2.4 If a sheet is installed, clean it at least twice a year with a cloth dampened with water and neutral soap (avoid harsh detergents, alcohol or similar).
2.5 If a mosquito screen is installed, clean it at least twice a year with a cloth dampened with water
and neutral soap (avoid harsh detergents, alcohol or similar).
8
PALAGINA - MANUALE USO E MANUTENZIONE
RESOLUTION OF PROBLEMS
3.0 The table below is intended to identify and resolve common problems. WARNING: For safety
reasons, do not perform any type of electrical or mechanical intervention. Contact the installer if
necessary.
3.1 After pressing the buttons you do not hear the noise of the motor nor does
the blind move (motorised version)
Cause
No electrical power
Remote control battery exhausted (only model
with remote control or radio button)
The motor is in thermal cutout
Loss of limit switch control
Loss of memory of the remote control (only model with remote control or radio button)
Resolution
If electrical power is present in the area, contact the installer.
Replace the battery.
Wait 15 minutes before activating the blind.
If the problem occurs frequently, contact the
installer.
Contact the installer.
Contact the installer.
3.2 After pressing the buttons you can hear the noise of the motor but the blind
does not move / The winch turns in neutral or runs overbraked
Cause
Sheet is disconnected or broken
Exit of the zip from the internal runners
Strong wind
Dirty internal side runners and/or zip
Loss of limit switch control
Something is blocking the motion of the sheet
The blind was not unlocked, see 5.5
Resolution
Contact the installer.
Contact the installer.
Wait for the wind to die down.
Contact the installer.
Contact the installer.
Remove the obstacle.
Push the 2 pins inwards.
3.3 The screen runs not regularly up and down or the winch runs overbraked.
Cause
Dirty internal side runners and/or zip
Strong wind
Something is blocking the motion of the sheet
Resolution
Contact the installer.
Wait for the wind to die down.
Remove the obstacle.
3.4 The sheet is not stretched tight.
Cause
Exit of the sheet from the runners
Resolution
Contact the installer.
The presence of creases in the sheet can occur and does not affect the operation or safety of the
product.
PALAGINA - MANUALE USO E MANUTENZIONE
9
GUARANTEE
•
•
•
•
•
•
•
4.0 PALAGINA guarantees by law the proper functioning of all mechanical parts of the blind
and CLASS 3 certified wind resistance, provided that the following requirements are met:
The installation, adjustment and extraordinary maintenance is carried out by PALAGINA authorised personnel.
The main electric connection is performed by a competent technician.
No cutting of runners, box or sheet is carried out outside the PALAGINA factories.
External causes not attributable to PALAGINA, e.g. lightning, excessive pressure on the sheet,
mechanical action on the structure or in cutting the sheet, are avoided.
Proper periodic maintenance is carried out.
The AC voltage is between 210 and 230 volts.
The non-fulfillment of any of the rules above will void the warranty
4.1 The guarantee period:
Sheet and zip: 2 years
Painted aluminium profiles: 5 years
The guarantee period starts at the time of installation, product consignment and signature by the
installer on this USE AND MAINTENANCE MANUAL.
4.2 PALAGINA guarantees the integrity of all elements of the blind and assumes responsibility for
all expenses required to replace defective items or complete replacement of the product if
necessary (shipping and labour costs of the installer excluded).
4.3 CLASS 3 certified wind resistance for blinds to a maximum size of 300 x 250 cm (wind speed 49
km/h).
4.4 Any complaints should be effected according to these rules:
• Problem/fault identified upon receipt of the product – Written communication within 8 days of
receipt of the product to the dealer/installer enclosing photographic evidence of the defect.
• Problem/fault identified upon consignment of the installed product – Written communication
within 8 days of the discovery of the defect to the dealer/installer enclosing photographic
evidence of the defect.
• Malfunction of the product – Written communication within 15 days of the discovery of the
defect to the dealer/installer enclosing photographic evidence of the defect.
10
PALAGINA - MANUALE USO E MANUTENZIONE
USING THE BLIND
5.0 MOTORISED BLIND - Control of the blind can be effected with various wireless and wired devices.
5.1 All remote devices are powered by battery. Note that some wall-switch models are also remote
and are subject to periodic battery replacement.
5.2 If the blinds are part of a home automation system, refer also to the manual of the unit that
controls them.
5.3 Raising and lowering are initiated by the “up” and “down” arrows. To halt the movement, press
the central button for an instant.
For more information on use, battery replacement, etc., refer to the documentation supplied separately.
5.4 WINCH BLIND - The control of the blind takes place through the use of the winch that can be
on the right or the left side of the blind. The shaft of the winch is equipped with a magnetic attachment to facilitate its removal.
5.5 USE OF THE LOCK - If the model offers it, 2 pins will be present on the ends of the base bar. To
lock the blind after it is entirely lowered, push the 2 pins outwards, if necessary placing a little tension on the blind.
Prior to rewinding the blind, unlock it by pushing the 2 pins inwards.
CE MARKING AND INSTALLATION
6.0 PALAGINA declares that the product conforms to CE standards according to the classes declared, provided that the installation has been carried out following all the directions of the INSTALLATION MANUAL.
6.1 A plate bearing the CE marking is present on the winding tube or on the back of one of the side
runners of each blind.
EC Conformity in accordance with the following directives:
Machinery Directive 2006/42/EC
Electromagnetic Compatibility Directive 2004/108/EC
Construction Products Directive 89/106/EC
Conformity verified with the standards:
UNI EN 13561-2009 (performance and safety)
CLASS 3 (wind resistance, confirmation by the installer)
PALAGINA declares that the K.zip blind has CLASS 3 certified wind resistance, corresponding to a
speed of 49 km/h, proven by tests carried out at the Istituto Giordano on a blind of 300x250 cm.
PALAGINA - MANUALE USO E MANUTENZIONE
11
WILLKOMMEN
Palagina empfängt Sie in der breiten Palette von Insekten-Sonnen-und-Lichtstärke-Schutz.
Innerhalb dieses Handbuchs finden Sie alle auf Ihre K.zip Markise bezügliche Informationen.
WICHTIG: Sie müssen die Anweisungen des Handbuchs folgen, um die Normen, die zertifizierte
Windwiderstandsklasse und der Garantie von K.Zip Palagina gültig einzuhalten
K.ZIP
Die K.zip Markisen wurden für hervorragende Lichtdämmleistungen an den Seiten
der Stoffbahn und eine effektiven zertifizierte Windwiderstandsklasse 3 entworfen
Der Einsatz von äußeren Abschirmungen mit K.zip mit Stoff hilft bei der Reduzierung für die
Klimatisierungskosten in den Sommermonaten, während ein angenehmer Blick nach außen erhalten
wird (wenn Sie keinen Verdunklungstoff installiert haben).
Palagina wünscht Ihnen eine große Erfahrung in der Wohnkomfort!
12
PALAGINA - MANUALE USO E MANUTENZIONE
SICHTBARES MODELL
Prüfbare Seite der
Kassette
Kassette
Sperrklinken
(für einige
Modelle)
Mögliche Stellung
des CE-ZeichenEtiketts
Seitliche
Führungschiene
mit Profile
aus Material
geringerer
Reibung
Seitliche
Führungschiene
(Festteil)
Endstück mit
Dichtung oder
Bürste
Seitliche
Führungschiene
(abnehmbarer Teil)
Blick von innerer Seite
Screenstoff,
Verdunklungstoff oder
Insektenschutzgewebe
Formen oder Eigeheiten können
je nach Modell ändern
EINGEBAUTES MODEL
Seitliche
Führungschiene
mit Profile
aus Material
geringerer
Reibung
Kassette
Mögliche Stellung
des CE-ZeichenEtiketts
Sperrklinken
(für einige
Modelle)
Seitliche
Führungschiene
(Festteil)
Endstück mit
Dichtung oder
Bürste
Seitliche
Führungschiene
(abnehmbarer Teil)
Blick von innerer Seite
Screenstoff,
Verdunklungstoff oder
Insektenschutzgewebe
PALAGINA - MANUALE USO E MANUTENZIONE
Formen oder Eigeheiten können
je nach Modell ändern
13
KONTROLLE UND ALLGEMEINE EMPFEHLUNGEN
1.0 Bitte die Integrität der Verpackung und des im Inneren enthalten Materials vor der Montage zu
überprüfen.
1.1 Der Installateur ist verpflichtet, alle nötigen Vorkehrungen zu treffen, um die Installation mit
geeignetem Material für ihre eigene und der anderen Sicherheit durchzuführen. (Handschuhe,
Helm, Sicherheitsschuhe, Gurte, etc.).
1.2 ACHTUNG: im motorisierten Modelle, ist es notwendig, die Stromversorgung von jeder Schaltung
oder Wartung auszuschalten.
1.3 Überprüfen Sie vor der Montage die Qualität der Wände, wo Sie das Produkt installieren werden. In dem Fall, dass der Monteur nicht sicher fühlt, sollt er bis die Anordnung des Ortes keine
Installation durchführen .
1.4 Eine andere als die vorgesehenen Nutzung ist verboten und es befreit Palagina von jeglicher
Haftung.
1.5 Der Installateur ist verpflichtet, alle Verpackungen vor der Entsorgung in Abfalltrennung (Karton,
Nylon) zu sammeln
1.6Nach der Montage sollt der Installateur die Sicherheit des Endprodukts von der Befestigung bis
zum Betrieb überprüfen
1.7 Am Ende des Lebens, das Produkt muss durch der Teilung von Kunststoffteilen, Aluminium-und
Stahlteile (Schrauben, Stangen, Federn, Halterungen, Schrauben, usw.) und elektrische Teile für
das Recycling in Übereinstimmung mit den Vorschriften entsorgt werden.
ÜBLICHE WARTUNG
2.0 Jede regelmäßige Wartung wie Reinigungs-oder Wartungsarbeiten muß bei alle nötigen Vorkehrungen geführt werden, um Stürze oder jede andere Art von Unfall zu vermeiden
2.1 Das K-zip System ist entworfen, um im Laufe der Zeit zu dauern. Einige Vorkehrungen sind jedoch für einen perfekten Leben notwendig
2.2 Reinigen Sie die Endstange und die Führungen (nur von außen) mit einem mit Wasser und
Neutralseife gedämpftem Tuch (ohne aggressive Reinigungsmittel, Alkohol, usw.)
2.3 Bitte keinen Teil der Markise schmieren, um unersetzlichen Schäden an dem Stoff und / oder
an den Reißverschluss und seitlichen Führungschienen zu vermeiden.
2.4 Falls ein Stoffbahn aufgestellt wird , reinigen Sie sie mit einem mit Wasser und Neutralseife
gedämpftem Tuch mindestens 2 mal im Jahr (ohne aggressive Reinigungsmittel, Alkohol, usw.)
2.5 Falls ein Insektenschutzgewebe aufgestellt wird, reinigen Sie sie mit einem mit Wasser und
Neutralseife gedämpftem Tuch mindestens 2 mal im Jahr (ohne aggressive Reinigungsmittel,
Alkohol, usw.)
14
PALAGINA - MANUALE USO E MANUTENZIONE
LÖSUNG FÜR EVENTUELLE PROBLEME
3.0 Die folgende Tabelle ist für die Identifizierung und Lösung einiger gewöhnlichen Problemen.
WARNUNG: Aus Sicherheitsgründen, führen Sie keine elektrische oder mechanische Maßnahme
durch. Kontaktieren Sie der Installateur, wenn nötig.
3.1 Nach Drücken der Tasten man kann nicht das Motorsgeräusch hören, und
die Markise bewegt nicht (motorisierte Version)
Grund
Fehlende Spannung
Erschöpfte Funkbatterie (nur Modell mit Steueroder Radio-Schalter)
Motor in Wärmeschutz
Verlust der Endschaltereinstellung
Verlust der Fernbedienungsspeicherung (nur
Modell mit Steuer-oder Radio-Schalter)
Lösung
regelmäßige elektrische Strom in der Umgebung. Setzen Sie sich im Verbindung mit dem
Installateur
Batterie ersetzen
15 Minuten warten ,bevor Sie die Markise wieder
in Bewegung setzen. Wenn das Problem häufiger auftritt, wenden Sie sich an den Installatuer.
Wenden Sie sich an den Installatuer
Wenden Sie sich an den Installatuer
3.2 Nach Drücken der Tasten man kann das Motorsgeräusch hören, aber die
Markise bewegt nicht/ die Winde dreht im Leelauf oder übermäßig gebremst
Grund
Abgehangenes oder zerrissenes Sotffband
Herauskommen der Reißverschluss aus inneren
Führungschienen
Starkwind
Innere seitliche Führungschienen und / oder Zip
schmutzig
Verlust der Endschaltereinstellung
Ein Hinderniss blockiert das Laufen
Die Markise wurde nicht gelöst (sehen Sie 5.5)
Lösung
Wenden Sie sich an den Installatuer
Wenden Sie sich an den Installatuer
Warten bis der Wind schwindet
Wenden Sie sich an den Installatuer
Wenden Sie sich an den Installatuer
Nehmen Sie das Hinderniss weg
Drücken Sie die zwei Sperrklinken einwärts
3.3 Die Stoffbahn läuft nicht regelmäßig nach oben oder unten, oder die Winde
dreht übermäßig gebremst
Grund
Innere seitliche Führungschienen und / oder Zip
schmutzig
Starkwind
Ein Hinderniss blockiert das Laufen
Lösung
Wenden Sie sich an den Installatuer
Warten bis der Wind schwindet
Nehmen Sie das Hinderniss weg
3.4 Die Stoffbahn bleibt nicht gestreckt
Grund
Lösung
Herauskommen der Reißverschluss aus inneren
Wenden Sie sich an den Installatuer
Führungschienen
Mögliche einige Falten im Stoff werden nicht den Betrieb oder die Sicherheit des Produkts beeinträchtigen.
PALAGINA - MANUALE USO E MANUTENZIONE
15
GARANTIE
4.0 Palagina garantiert laut Gesetz die perfekte Funktionsweise aller mechanischen Teile der Markise und eine zertifizierte Windwiderstandsklasse 3, sofern die folgenden Normen erfüllt sind:
• Die Installation, Einstellung und die außerordentliche Wartung müssen durch autorisiertes Personal Palagina durchgeführt werden.
• Der Elektrische Netzanschluss muss von einem Fachkraft durchgeführt werden.
Kein Führungschiene-Kassette-oder-Stoffbahn-Schnitt sollen außerhalb der Palagina Fabrikgebäude ausgeführt weden
• Vermieden Sie äußere Ursachen, wofür Palagina nicht verantwortlich ist, zB Blitzschlag,
übermäßigen Druck auf die Stoffbahn, mechanische Einwirkungen auf die Struktur oder
Stoffbahnscnitt.
• Korrekte und regelmäßige Wartungen sollen durchgeführt werden.
• Das elektrische Wechselspannung muss zwischen 210 Volt und 230 Volt sein.
Die Nichterfüllung eines der oben genannten Regeln zum Soforterlöschen der Garantie.
4.1 Die Dauer der Garantie:
• Stoffbahn und Reißverschluss: 2 Jahre
• Lackierte Aluminiumprofile: 5 Jahre
• Die Gewährleistungsfrist beginnt mit dem Zeitpunkt der Installation, Produktlieferung und Unterschrift des Installateurs auf dieser BEDIENUNGS-UND WARTUNGSANLEITUNG
4.2 Palagina garantiert die Integrität aller Elemente der Markise, und hat die Verantwortung für alle
erforderliche Kosten, um defekte Einzelteile oder das ganze Produkt zu ersetzen, (außer Versandund Arbeitskosten des Installateurs enthalten).
4.3 Zertifizierte Windwiderstandklasse 3 für Markisen bis zur Maximalabmessungen von 300x250 cm
(Windgeschwindigkeit von 49 km/h);
4.4 Eventuelle Reklamationen sollten nach den Regeln behandelt werden:
Problem / bei Erhalt des Produktes identifizierter Defekt - Durch schriftliche Mitteilung an den
Händler / Installateur zusammen mit fotografischer Beschreibung des Defekts innerhalb von 8
Tagen nach Erhalt des Materials
• Problem /bei der Lieferung des installiertes Produkts identifizierter Defekt - Durch schriftliche
Mitteilung an den Händler / Installateur zusammen mit fotografischer Beschreibung des Defekts
innerhalb von 8 Tagen nach der Defektsentdeckung
• Funktionsdefekt des Produktes - Durch schriftliche Mitteilung an den Händler / Installateur
zusammen mit fotografischer Beschreibung des Defekts innerhalb von 15 Tagen nach der
Defektsentdeckung
•
16
PALAGINA - MANUALE USO E MANUTENZIONE
MARKISEBEDIENUNG
5.0 MARKISE MIT MOTOR – Die Markise kann mit verschiedene Geräte - sowohl mit Funksteuerung als
auch mit Kabel – gesteuert werden
5.1 Alle Funkgeräte sind batteriebetrieben. Achtung: auch einige Modelle der Wandschalter sind
Funk, also sie bauchen regelmäßigen periodischen Batterienaustausch
5.2 Wenn die Markisen Teil eines Home-Automation-System sind, nehmen Sie Bezug auch auf die
Bedienungsanleitung der Steuereinheit, die sie steuert.
5.3 Der Auf-und Abstieg läuft durch die Pfeiltasten “auf” und “ab”. Um das Laufen zu stoppen, drücken Sie für einen Moment die mittlere Taste.
Für weitere Bedienungsinformationen, Batterienaustausch, usw. nehmen Sie Bezug auf die separat
gelieferte Dokumentation.
5.4 WINDENSTEUERUNGSMARKISEN - Die Steuerung der Markise wird durch die Winde geführt, die
auf der rechten oder linken Seite Markise stehen kann. Die Welle der Winde ist mit einem Magnet ausgestattet, um das Entfernen zu erleichtern.
5.5 FESTMACHEN GEBRAUCH – Einige Modelle sind mit 2 Sperrklinke auf der Endstange ausgerüstet. Um die Markise festzumachen, nachdem sie vollständig nach unten ist, schieben Sie die 2
Sperrklinke nach außen, und wenn es notwendig ist, strecken Sie ein wenig den Markisenstoff.
Vor dem Rücklauf der Markise, lösen Sie sie beim einwärts Drücken der zwei Sperrklinken.
CE KENNZEICHNUNG UND INSTALLATION
6.0 Palagina behauptet, dass das Produkt der EG Normen nach den erklärten Klassen entspricht,
vorausgesetzt, dass die Installation gemäß den Angaben der MONTAGEANLEITUNG durchgeführt
wurde.
CE-Konformität gemäß den folgenden Richtlinien
Richtlinie 2006/42/EG
EMV-Richtlinien 2004/108/EG
Bauproduktenrichtlinie 89/106/EWG
Compliance-geprüft nach Normen:
UNI EN 13561-2009 (Performance und Sicherheit)
KLASSE 3 (Windwiderstand, durch den Installateur bestätigt)
Palagina behauptet, dass die K.zip Markise eine zertifizierte WindwiderstandKLASSE 3 (einer Windgeschwindigkeit von 49 km/h entsprechend) hat, die durch Tests am Instituto Giordano auf einer
Markise von 300x250 cm nachgewiesen wurden
PALAGINA - MANUALE USO E MANUTENZIONE
17
Palagina srl - Via Palagina, 39
Ponte a Cappiano - 50054 Fucecchio(FI)
12
EN 13561 - tenda per uso esterno
Resistenza al vento: Classe 3
Riportare la posizione all’interno dell’ambiente.
Report the position within the area.
Lage der Markise innerhalb der Umgebung
Note del posatore.
Installer’s notes.
Installateursanmerkungen
Il posatore dichiara che tutte le operazioni di montaggio sono state eseguite seguendo le indicazioni del MANUALE DI MONTAGGIO e di non aver riscontrato anomalie di nessuna sorta.
The installer states that all installation operations have been performed following the instructions of
the INSTALLATION MANUAL and that no anomalies of any kind have been encountered.
Der Installateur behauptet, dass alle Montagevorgänge gemäß den Anweisungen der Betriebsanleitung durchgeführt wurden, und dass er keine Anomalien jeglicher Art gefunden hat.
Timbro Data e firma del posatore
Date stamp and signature of the installer
Datum Stempel Unterschrift des
© Copyright 2026 Paperzz