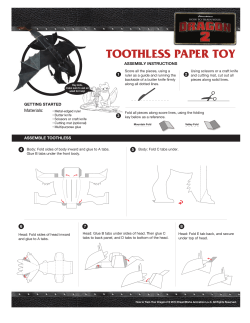
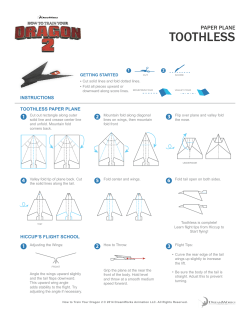
ASTRID PAPER TOY 1 ASSEMBLY INSTRUCTIONS Score all the pieces, using a ruler as a guide and running the backside of a butter knife firmly along all dotted lines. 2 Using scissors or a craft knife and cutting mat, cut out all pieces along solid lines. Hey kids, make sure to ask an adult for help! 3 GETTING STARTED Materials: Fold all pieces along score lines, using the folding key below as a reference. Mountain Fold Valley Fold • Metal-edged ruler • Butter knife • Scissors or craft knife • Cutting mat (optional) • Multipurpose glue ASSEMBLE ASTRID 4 5 Body: Poke holes in the X slits. Insert a pencil in each slit to make the holes wider. Body: Glue tab A, forming a cone shape. Let dry. A B B Add glue under tab B to attach to the inside of the cone. Hold until dry. 6 7 Arms & Cuffs: Fold in half and glue arm sides together. Then cut along solid lines and fold tabs Glue A tabs to the side of the body to attach each arm, lining up the tops of the arms with the top of the body. Armor: Add glue to wedge areas and fasten edge to create cone shapes. Let dry. Note: Seam side is back of body. After glue is dry, glue the middle of armor to the front of the body on the indicated mark. ASSEMBLY INSTRUCTIONS CONTINUED 8 Head: Starting with the back of the head, glue A tabs on the left side, let dry. Repeat on right side with B tabs, let dry. Glue the neck closed by securing C tabs. 9 10 Hood: Add glue to wedge areas and fasten edge to create a cone shape. HOOD: After glue is dry, glue A tab to the back of the neck, Matching the bottom of the tab with the bottom of the neck. 11 12 Head and Body: Glue front of neck to the front of the body. Head and Body: Glue hood skulls to the front of armor. Glue B tab on the back of the hood to to the back of the dress. 12 Legs: Using a pencil, roll leg piece to form a tight cylinder. Glue and hold until dry. Remove pencil. TIP: Add glue just before edge. How to Train Your Dragon 2 © 2014 DreamWorks Animation L.L.C. All Rights Reserved. ASSEMBLY INSTRUCTIONS CONTINUED 13 Boots: Glue A tabs to side panel. Close back of boot by folding side panel over B tabs. Glue to secure. 14 Boots: Glue C tab of the cuff to the inside of the top part of the boot, artwork facing out. Turn boot to face you. Glue D tabs to inside of side panel. Bend top of boot at score line towards the front of the boot. 15 Boots: Turn boot away from you. Curl and glue top of boot to E tab, starting with left side, then right side, creating a cylinder. When boots are dry, place them onto leg ends and glue to secure. Once boots are properly fastened, insert legs into body. Glue in place 16 Axe: Fold Axe in half, glue together and let dry. Cut along solid lines and glue Axe to inside of left hand. You’re done! How to Train Your Dragon 2 © 2014 DreamWorks Animation L.L.C. All Rights Reserved. ARMOR HEAD BOOT CUFF HOOD E BOOT 1 How to Train Your Dragon 2 © 2014 DreamWorks Animation L.L.C. All Rights Reserved. BODY T DO NO E. HER E U L G R UNDE GLUE AB. T IS TH BOOT 2 BOOT CUFF LEG 2 E How to Train Your Dragon 2 © 2014 DreamWorks Animation L.L.C. All Rights Reserved. LEG 1 AXE LEFT ARM RIGHT ARM How to Train Your Dragon 2 © 2014 DreamWorks Animation L.L.C. All Rights Reserved.
© Copyright 2026 Paperzz