Manual for version 1.8.7
Written by Dimitri van Heesch
В©1997-2014
Contents
I
User Manual
1
1
Introduction
3
2
Installation
7
2.1
Compiling from source on UNIX . . . . . . . . . . . . . . . . . . . . . . . . . . . . . . . . . . . . .
7
2.2
Installing the binaries on UNIX . . . . . . . . . . . . . . . . . . . . . . . . . . . . . . . . . . . . . .
8
2.3
Known compilation problems for UNIX
. . . . . . . . . . . . . . . . . . . . . . . . . . . . . . . . .
9
2.4
Compiling from source on Windows . . . . . . . . . . . . . . . . . . . . . . . . . . . . . . . . . . .
10
2.5
Installing the binaries on Windows . . . . . . . . . . . . . . . . . . . . . . . . . . . . . . . . . . . .
10
2.6
Tools used to develop doxygen . . . . . . . . . . . . . . . . . . . . . . . . . . . . . . . . . . . . .
11
3
Getting Started
13
3.1
Step 0: Check if doxygen supports your programming language . . . . . . . . . . . . . . . . . . . .
14
3.2
Step 1: Creating a configuration file . . . . . . . . . . . . . . . . . . . . . . . . . . . . . . . . . . .
14
3.3
Step 2: Running doxygen . . . . . . . . . . . . . . . . . . . . . . . . . . . . . . . . . . . . . . . .
15
3.3.1
HTML output
. . . . . . . . . . . . . . . . . . . . . . . . . . . . . . . . . . . . . . . . . .
15
3.3.2
LaTeX output . . . . . . . . . . . . . . . . . . . . . . . . . . . . . . . . . . . . . . . . . .
16
3.3.3
RTF output
. . . . . . . . . . . . . . . . . . . . . . . . . . . . . . . . . . . . . . . . . . .
16
3.3.4
XML output . . . . . . . . . . . . . . . . . . . . . . . . . . . . . . . . . . . . . . . . . . .
16
3.3.5
Man page output
. . . . . . . . . . . . . . . . . . . . . . . . . . . . . . . . . . . . . . . .
16
3.3.6
DocBook output . . . . . . . . . . . . . . . . . . . . . . . . . . . . . . . . . . . . . . . . .
16
Step 3: Documenting the sources . . . . . . . . . . . . . . . . . . . . . . . . . . . . . . . . . . . .
17
3.4
4
4.1
Documenting the code
19
Special comment blocks . . . . . . . . . . . . . . . . . . . . . . . . . . . . . . . . . . . . . . . . .
19
4.1.1
19
Comment blocks for C-like languages (C/C++/C#/Objective-C/PHP/Java) . . . . . . . . . . .
4.1.1.1
Putting documentation after members . . . . . . . . . . . . . . . . . . . . . . .
21
4.1.1.2
Examples
22
4.1.1.3
Documentation at other places
. . . . . . . . . . . . . . . . . . . . . . . . . . . . . . . . . . . . .
. . . . . . . . . . . . . . . . . . . . . . . . . .
24
4.1.2
Comment blocks in Python . . . . . . . . . . . . . . . . . . . . . . . . . . . . . . . . . . .
26
4.1.3
Comment blocks in VHDL . . . . . . . . . . . . . . . . . . . . . . . . . . . . . . . . . . . .
27
II
4.2
5
5.1
CONTENTS
4.1.4
Comment blocks in Fortran . . . . . . . . . . . . . . . . . . . . . . . . . . . . . . . . . . .
28
4.1.5
Comment blocks in Tcl . . . . . . . . . . . . . . . . . . . . . . . . . . . . . . . . . . . . .
28
Anatomy of a comment block . . . . . . . . . . . . . . . . . . . . . . . . . . . . . . . . . . . . . .
30
Markdown
31
Standard Markdown . . . . . . . . . . . . . . . . . . . . . . . . . . . . . . . . . . . . . . . . . . .
31
5.1.1
Paragraphs . . . . . . . . . . . . . . . . . . . . . . . . . . . . . . . . . . . . . . . . . . .
31
5.1.2
Headers . . . . . . . . . . . . . . . . . . . . . . . . . . . . . . . . . . . . . . . . . . . . .
31
5.1.3
Block quotes . . . . . . . . . . . . . . . . . . . . . . . . . . . . . . . . . . . . . . . . . . .
32
5.1.4
Lists . . . . . . . . . . . . . . . . . . . . . . . . . . . . . . . . . . . . . . . . . . . . . . .
32
5.1.5
Code Blocks . . . . . . . . . . . . . . . . . . . . . . . . . . . . . . . . . . . . . . . . . . .
32
5.1.6
Horizontal Rulers . . . . . . . . . . . . . . . . . . . . . . . . . . . . . . . . . . . . . . . .
33
5.1.7
Emphasis . . . . . . . . . . . . . . . . . . . . . . . . . . . . . . . . . . . . . . . . . . . .
33
5.1.8
code spans . . . . . . . . . . . . . . . . . . . . . . . . . . . . . . . . . . . . . . . . . . .
33
5.1.9
Links . . . . . . . . . . . . . . . . . . . . . . . . . . . . . . . . . . . . . . . . . . . . . . .
33
5.1.9.1
Inline Links . . . . . . . . . . . . . . . . . . . . . . . . . . . . . . . . . . . . .
33
5.1.9.2
Reference Links . . . . . . . . . . . . . . . . . . . . . . . . . . . . . . . . . .
34
. . . . . . . . . . . . . . . . . . . . . . . . . . . . . . . . . . . . . . . . . . . . .
34
5.1.11 Automatic Linking . . . . . . . . . . . . . . . . . . . . . . . . . . . . . . . . . . . . . . . .
35
Markdown Extensions . . . . . . . . . . . . . . . . . . . . . . . . . . . . . . . . . . . . . . . . . .
35
5.2.1
Table of Contents . . . . . . . . . . . . . . . . . . . . . . . . . . . . . . . . . . . . . . . .
35
5.2.2
Tables . . . . . . . . . . . . . . . . . . . . . . . . . . . . . . . . . . . . . . . . . . . . . .
35
5.2.3
Fenced Code Blocks
. . . . . . . . . . . . . . . . . . . . . . . . . . . . . . . . . . . . . .
35
5.2.4
Header Id Attributes . . . . . . . . . . . . . . . . . . . . . . . . . . . . . . . . . . . . . . .
36
Doxygen specifics . . . . . . . . . . . . . . . . . . . . . . . . . . . . . . . . . . . . . . . . . . . .
36
5.3.1
Including Markdown files as pages . . . . . . . . . . . . . . . . . . . . . . . . . . . . . . .
37
5.3.2
Treatment of HTML blocks
. . . . . . . . . . . . . . . . . . . . . . . . . . . . . . . . . . .
37
5.3.3
Code Block Indentation . . . . . . . . . . . . . . . . . . . . . . . . . . . . . . . . . . . . .
37
5.3.4
Emphasis limits . . . . . . . . . . . . . . . . . . . . . . . . . . . . . . . . . . . . . . . . .
38
5.3.5
Code Spans Limits . . . . . . . . . . . . . . . . . . . . . . . . . . . . . . . . . . . . . . .
38
5.3.6
Lists Extensions . . . . . . . . . . . . . . . . . . . . . . . . . . . . . . . . . . . . . . . . .
38
5.3.7
Use of asterisks . . . . . . . . . . . . . . . . . . . . . . . . . . . . . . . . . . . . . . . . .
39
5.3.8
Limits on markup scope . . . . . . . . . . . . . . . . . . . . . . . . . . . . . . . . . . . . .
39
Debugging of problems . . . . . . . . . . . . . . . . . . . . . . . . . . . . . . . . . . . . . . . . .
39
5.1.10 Images
5.2
5.3
5.4
6
Lists
41
7
Grouping
43
7.1
Modules . . . . . . . . . . . . . . . . . . . . . . . . . . . . . . . . . . . . . . . . . . . . . . . . .
43
7.2
Member Groups . . . . . . . . . . . . . . . . . . . . . . . . . . . . . . . . . . . . . . . . . . . . .
45
7.3
Subpaging . . . . . . . . . . . . . . . . . . . . . . . . . . . . . . . . . . . . . . . . . . . . . . . .
47
Generated by Doxygen
CONTENTS
III
8
Including Formulas
49
9
Graphs and diagrams
51
10 Preprocessing
55
11 Automatic link generation
59
11.1
Links to web pages and mail addresses . . . . . . . . . . . . . . . . . . . . . . . . . . . . . . . . .
59
11.2
Links to classes . . . . . . . . . . . . . . . . . . . . . . . . . . . . . . . . . . . . . . . . . . . . .
59
11.3
Links to files . . . . . . . . . . . . . . . . . . . . . . . . . . . . . . . . . . . . . . . . . . . . . . .
59
11.4
Links to functions
. . . . . . . . . . . . . . . . . . . . . . . . . . . . . . . . . . . . . . . . . . . .
59
11.5
Links to other members . . . . . . . . . . . . . . . . . . . . . . . . . . . . . . . . . . . . . . . . .
60
11.6
typedefs . . . . . . . . . . . . . . . . . . . . . . . . . . . . . . . . . . . . . . . . . . . . . . . . .
62
12 Output Formats
63
13 Searching
65
13.1
External Indexing and Searching . . . . . . . . . . . . . . . . . . . . . . . . . . . . . . . . . . . .
67
13.1.1 Introduction . . . . . . . . . . . . . . . . . . . . . . . . . . . . . . . . . . . . . . . . . . .
67
13.1.2 Configuring . . . . . . . . . . . . . . . . . . . . . . . . . . . . . . . . . . . . . . . . . . .
68
13.1.2.1 Single project index . . . . . . . . . . . . . . . . . . . . . . . . . . . . . . . .
69
13.1.2.2 Multi project index . . . . . . . . . . . . . . . . . . . . . . . . . . . . . . . . .
69
13.1.3 Updating the index
. . . . . . . . . . . . . . . . . . . . . . . . . . . . . . . . . . . . . . .
70
13.1.4 Programming interface . . . . . . . . . . . . . . . . . . . . . . . . . . . . . . . . . . . . .
70
13.1.4.1 Indexer input format . . . . . . . . . . . . . . . . . . . . . . . . . . . . . . . .
70
13.1.4.2 Search URL format
. . . . . . . . . . . . . . . . . . . . . . . . . . . . . . . .
71
13.1.4.3 Search results format . . . . . . . . . . . . . . . . . . . . . . . . . . . . . . .
71
14 Customizing the Output
73
14.1
Minor Tweaks . . . . . . . . . . . . . . . . . . . . . . . . . . . . . . . . . . . . . . . . . . . . . .
73
14.1.1 Overall Color
. . . . . . . . . . . . . . . . . . . . . . . . . . . . . . . . . . . . . . . . . .
73
14.1.2 Navigation . . . . . . . . . . . . . . . . . . . . . . . . . . . . . . . . . . . . . . . . . . . .
73
14.1.3 Dynamic Content . . . . . . . . . . . . . . . . . . . . . . . . . . . . . . . . . . . . . . . .
74
14.1.4 Header, Footer, and Stylesheet changes . . . . . . . . . . . . . . . . . . . . . . . . . . . .
74
14.2
Changing the layout of pages . . . . . . . . . . . . . . . . . . . . . . . . . . . . . . . . . . . . . .
75
14.3
Using the XML output . . . . . . . . . . . . . . . . . . . . . . . . . . . . . . . . . . . . . . . . . .
78
15 Custom Commands
79
15.1
Simple aliases . . . . . . . . . . . . . . . . . . . . . . . . . . . . . . . . . . . . . . . . . . . . . .
79
15.2
Aliases with arguments . . . . . . . . . . . . . . . . . . . . . . . . . . . . . . . . . . . . . . . . .
79
15.3
Nesting custom command . . . . . . . . . . . . . . . . . . . . . . . . . . . . . . . . . . . . . . . .
80
16 Link to external documentation
Generated by Doxygen
81
IV
CONTENTS
17 Frequently Asked Questions
83
18 Troubleshooting
87
18.1
Known Problems . . . . . . . . . . . . . . . . . . . . . . . . . . . . . . . . . . . . . . . . . . . . .
87
18.2
How to Help . . . . . . . . . . . . . . . . . . . . . . . . . . . . . . . . . . . . . . . . . . . . . . .
88
18.3
How to report a bug . . . . . . . . . . . . . . . . . . . . . . . . . . . . . . . . . . . . . . . . . . .
88
II
Reference Manual
89
19 Features
91
20 Doxygen usage
93
20.1
93
Fine-tuning the output . . . . . . . . . . . . . . . . . . . . . . . . . . . . . . . . . . . . . . . . . .
21 Doxywizard usage
22 Configuration
95
101
22.1
Format . . . . . . . . . . . . . . . . . . . . . . . . . . . . . . . . . . . . . . . . . . . . . . . . . . 101
22.2
Project related configuration options . . . . . . . . . . . . . . . . . . . . . . . . . . . . . . . . . . . 103
22.3
Build related configuration options . . . . . . . . . . . . . . . . . . . . . . . . . . . . . . . . . . . . 107
22.4
Configuration options related to warning and progress messages . . . . . . . . . . . . . . . . . . . 111
22.5
Configuration options related to the input files . . . . . . . . . . . . . . . . . . . . . . . . . . . . . . 112
22.6
Configuration options related to source browsing . . . . . . . . . . . . . . . . . . . . . . . . . . . . 113
22.7
Configuration options related to the alphabetical class index . . . . . . . . . . . . . . . . . . . . . . 115
22.8
Configuration options related to the HTML output . . . . . . . . . . . . . . . . . . . . . . . . . . . . 115
22.9
Configuration options related to the LaTeX output . . . . . . . . . . . . . . . . . . . . . . . . . . . . 123
22.10 Configuration options related to the RTF output . . . . . . . . . . . . . . . . . . . . . . . . . . . . . 125
22.11 Configuration options related to the man page output . . . . . . . . . . . . . . . . . . . . . . . . . . 126
22.12 Configuration options related to the XML output . . . . . . . . . . . . . . . . . . . . . . . . . . . . . 126
22.13 Configuration options related to the DOCBOOK output . . . . . . . . . . . . . . . . . . . . . . . . . 126
22.14 Configuration options for the AutoGen Definitions output . . . . . . . . . . . . . . . . . . . . . . . . 127
22.15 Configuration options related to the Perl module output . . . . . . . . . . . . . . . . . . . . . . . . . 127
22.16 Configuration options related to the preprocessor . . . . . . . . . . . . . . . . . . . . . . . . . . . . 127
22.17 Configuration options related to external references
. . . . . . . . . . . . . . . . . . . . . . . . . . 128
22.18 Configuration options related to the dot tool . . . . . . . . . . . . . . . . . . . . . . . . . . . . . . . 129
22.19 Examples
. . . . . . . . . . . . . . . . . . . . . . . . . . . . . . . . . . . . . . . . . . . . . . . . 132
23 Special Commands
135
23.1
Introduction
. . . . . . . . . . . . . . . . . . . . . . . . . . . . . . . . . . . . . . . . . . . . . . . 135
23.2
\addtogroup <name> [(title)] . . . . . . . . . . . . . . . . . . . . . . . . . . . . . . . . . . . . . . 136
23.3
\callgraph
23.4
\callergraph
. . . . . . . . . . . . . . . . . . . . . . . . . . . . . . . . . . . . . . . . . . . . . . . . 137
. . . . . . . . . . . . . . . . . . . . . . . . . . . . . . . . . . . . . . . . . . . . . . . 137
Generated by Doxygen
CONTENTS
V
23.5
\category <name> [<header-file>] [<header-name>] . . . . . . . . . . . . . . . . . . . . . . . . 138
23.6
\class <name> [<header-file>] [<header-name>] . . . . . . . . . . . . . . . . . . . . . . . . . . 138
23.7
\def <name> . . . . . . . . . . . . . . . . . . . . . . . . . . . . . . . . . . . . . . . . . . . . . . 138
23.8
\defgroup <name> (group title) . . . . . . . . . . . . . . . . . . . . . . . . . . . . . . . . . . . . . 139
23.9
\dir [<path fragment>] . . . . . . . . . . . . . . . . . . . . . . . . . . . . . . . . . . . . . . . . . . 139
23.10 \enum <name> . . . . . . . . . . . . . . . . . . . . . . . . . . . . . . . . . . . . . . . . . . . . . 139
23.11 \example <file-name>
. . . . . . . . . . . . . . . . . . . . . . . . . . . . . . . . . . . . . . . . . 139
23.12 \endinternal . . . . . . . . . . . . . . . . . . . . . . . . . . . . . . . . . . . . . . . . . . . . . . . 140
23.13 \extends <name> . . . . . . . . . . . . . . . . . . . . . . . . . . . . . . . . . . . . . . . . . . . . 140
23.14 \file [<name>] . . . . . . . . . . . . . . . . . . . . . . . . . . . . . . . . . . . . . . . . . . . . . . 140
23.15 \fn (function declaration) . . . . . . . . . . . . . . . . . . . . . . . . . . . . . . . . . . . . . . . . . 141
23.16 \headerfile <header-file> [<header-name>] . . . . . . . . . . . . . . . . . . . . . . . . . . . . . . 142
23.17 \hideinitializer
. . . . . . . . . . . . . . . . . . . . . . . . . . . . . . . . . . . . . . . . . . . . . . 142
23.18 \idlexcept <name> . . . . . . . . . . . . . . . . . . . . . . . . . . . . . . . . . . . . . . . . . . . 142
23.19 \implements <name> . . . . . . . . . . . . . . . . . . . . . . . . . . . . . . . . . . . . . . . . . . 142
23.20 \ingroup (<groupname> [<groupname> <groupname>])
23.21 \interface <name> [<header-file>] [<header-name>]
. . . . . . . . . . . . . . . . . . . . . . 143
. . . . . . . . . . . . . . . . . . . . . . . . 143
23.22 \internal . . . . . . . . . . . . . . . . . . . . . . . . . . . . . . . . . . . . . . . . . . . . . . . . . 143
23.23 \mainpage [(title)]
. . . . . . . . . . . . . . . . . . . . . . . . . . . . . . . . . . . . . . . . . . . . 143
23.24 \memberof <name> . . . . . . . . . . . . . . . . . . . . . . . . . . . . . . . . . . . . . . . . . . . 144
23.25 \name [(header)] . . . . . . . . . . . . . . . . . . . . . . . . . . . . . . . . . . . . . . . . . . . . . 144
23.26 \namespace <name> . . . . . . . . . . . . . . . . . . . . . . . . . . . . . . . . . . . . . . . . . . 144
23.27 \nosubgrouping
. . . . . . . . . . . . . . . . . . . . . . . . . . . . . . . . . . . . . . . . . . . . . 144
23.28 \overload [(function declaration)] . . . . . . . . . . . . . . . . . . . . . . . . . . . . . . . . . . . . . 144
23.29 \package <name>
. . . . . . . . . . . . . . . . . . . . . . . . . . . . . . . . . . . . . . . . . . . 145
23.30 \page <name> (title) . . . . . . . . . . . . . . . . . . . . . . . . . . . . . . . . . . . . . . . . . . 145
23.31 \private . . . . . . . . . . . . . . . . . . . . . . . . . . . . . . . . . . . . . . . . . . . . . . . . . . 146
23.32 \privatesection . . . . . . . . . . . . . . . . . . . . . . . . . . . . . . . . . . . . . . . . . . . . . . 146
23.33 \property (qualified property name) . . . . . . . . . . . . . . . . . . . . . . . . . . . . . . . . . . . 146
23.34 \protected . . . . . . . . . . . . . . . . . . . . . . . . . . . . . . . . . . . . . . . . . . . . . . . . 146
23.35 \protectedsection . . . . . . . . . . . . . . . . . . . . . . . . . . . . . . . . . . . . . . . . . . . . . 147
23.36 \protocol <name> [<header-file>] [<header-name>] . . . . . . . . . . . . . . . . . . . . . . . . . 147
23.37 \public . . . . . . . . . . . . . . . . . . . . . . . . . . . . . . . . . . . . . . . . . . . . . . . . . . 147
23.38 \publicsection
. . . . . . . . . . . . . . . . . . . . . . . . . . . . . . . . . . . . . . . . . . . . . . 147
23.39 \pure . . . . . . . . . . . . . . . . . . . . . . . . . . . . . . . . . . . . . . . . . . . . . . . . . . . 147
23.40 \relates <name> . . . . . . . . . . . . . . . . . . . . . . . . . . . . . . . . . . . . . . . . . . . . 148
23.41 \related <name> . . . . . . . . . . . . . . . . . . . . . . . . . . . . . . . . . . . . . . . . . . . . 148
23.42 \relatesalso <name> . . . . . . . . . . . . . . . . . . . . . . . . . . . . . . . . . . . . . . . . . . 148
23.43 \relatedalso <name> . . . . . . . . . . . . . . . . . . . . . . . . . . . . . . . . . . . . . . . . . . 148
23.44 \showinitializer . . . . . . . . . . . . . . . . . . . . . . . . . . . . . . . . . . . . . . . . . . . . . . 148
Generated by Doxygen
VI
CONTENTS
23.45 \static . . . . . . . . . . . . . . . . . . . . . . . . . . . . . . . . . . . . . . . . . . . . . . . . . . . 149
23.46 \struct <name> [<header-file>] [<header-name>] . . . . . . . . . . . . . . . . . . . . . . . . . . 149
23.47 \typedef (typedef declaration) . . . . . . . . . . . . . . . . . . . . . . . . . . . . . . . . . . . . . . 149
23.48 \union <name> [<header-file>] [<header-name>] . . . . . . . . . . . . . . . . . . . . . . . . . . 149
23.49 \var (variable declaration) . . . . . . . . . . . . . . . . . . . . . . . . . . . . . . . . . . . . . . . . 149
23.50 \vhdlflow [(title for the flow chart)] . . . . . . . . . . . . . . . . . . . . . . . . . . . . . . . . . . . . 149
23.51 \weakgroup <name> [(title)]
. . . . . . . . . . . . . . . . . . . . . . . . . . . . . . . . . . . . . . 150
23.52 \attention { attention text } . . . . . . . . . . . . . . . . . . . . . . . . . . . . . . . . . . . . . . . . 150
23.53 \author { list of authors } . . . . . . . . . . . . . . . . . . . . . . . . . . . . . . . . . . . . . . . . . 150
23.54 \authors { list of authors }
. . . . . . . . . . . . . . . . . . . . . . . . . . . . . . . . . . . . . . . . 150
23.55 \brief { brief description } . . . . . . . . . . . . . . . . . . . . . . . . . . . . . . . . . . . . . . . . . 150
23.56 \bug { bug description }
. . . . . . . . . . . . . . . . . . . . . . . . . . . . . . . . . . . . . . . . . 151
23.57 \cond [(section-label)] . . . . . . . . . . . . . . . . . . . . . . . . . . . . . . . . . . . . . . . . . . 151
23.58 \copyright { copyright description } . . . . . . . . . . . . . . . . . . . . . . . . . . . . . . . . . . . . 152
23.59 \date { date description } . . . . . . . . . . . . . . . . . . . . . . . . . . . . . . . . . . . . . . . . . 152
23.60 \deprecated { description } . . . . . . . . . . . . . . . . . . . . . . . . . . . . . . . . . . . . . . . . 152
23.61 \details { detailed description } . . . . . . . . . . . . . . . . . . . . . . . . . . . . . . . . . . . . . . 152
23.62 \else . . . . . . . . . . . . . . . . . . . . . . . . . . . . . . . . . . . . . . . . . . . . . . . . . . . 152
23.63 \elseif (section-label) . . . . . . . . . . . . . . . . . . . . . . . . . . . . . . . . . . . . . . . . . . . 152
23.64 \endcond . . . . . . . . . . . . . . . . . . . . . . . . . . . . . . . . . . . . . . . . . . . . . . . . . 153
23.65 \endif . . . . . . . . . . . . . . . . . . . . . . . . . . . . . . . . . . . . . . . . . . . . . . . . . . . 153
23.66 \exception <exception-object> { exception description } . . . . . . . . . . . . . . . . . . . . . . . . 153
23.67 \if (section-label) . . . . . . . . . . . . . . . . . . . . . . . . . . . . . . . . . . . . . . . . . . . . . 153
23.68 \ifnot (section-label) . . . . . . . . . . . . . . . . . . . . . . . . . . . . . . . . . . . . . . . . . . . 154
23.69 \invariant { description of invariant } . . . . . . . . . . . . . . . . . . . . . . . . . . . . . . . . . . . 154
23.70 \note { text } . . . . . . . . . . . . . . . . . . . . . . . . . . . . . . . . . . . . . . . . . . . . . . . 154
23.71 \par [(paragraph title)] { paragraph } . . . . . . . . . . . . . . . . . . . . . . . . . . . . . . . . . . . 155
23.72 \param [(dir)] <parameter-name> { parameter description } . . . . . . . . . . . . . . . . . . . . . . 155
23.73 \parblock . . . . . . . . . . . . . . . . . . . . . . . . . . . . . . . . . . . . . . . . . . . . . . . . . 156
23.74 \endparblock . . . . . . . . . . . . . . . . . . . . . . . . . . . . . . . . . . . . . . . . . . . . . . . 156
23.75 \tparam <template-parameter-name> { description } . . . . . . . . . . . . . . . . . . . . . . . . . . 156
23.76 \post { description of the postcondition } . . . . . . . . . . . . . . . . . . . . . . . . . . . . . . . . . 156
23.77 \pre { description of the precondition } . . . . . . . . . . . . . . . . . . . . . . . . . . . . . . . . . . 156
23.78 \remark { remark text } . . . . . . . . . . . . . . . . . . . . . . . . . . . . . . . . . . . . . . . . . . 157
23.79 \remarks { remark text } . . . . . . . . . . . . . . . . . . . . . . . . . . . . . . . . . . . . . . . . . 157
23.80 \result { description of the result value } . . . . . . . . . . . . . . . . . . . . . . . . . . . . . . . . . 157
23.81 \return { description of the return value } . . . . . . . . . . . . . . . . . . . . . . . . . . . . . . . . . 157
23.82 \returns { description of the return value } . . . . . . . . . . . . . . . . . . . . . . . . . . . . . . . . 157
23.83 \retval <return value> { description } . . . . . . . . . . . . . . . . . . . . . . . . . . . . . . . . . . 157
23.84 \sa { references } . . . . . . . . . . . . . . . . . . . . . . . . . . . . . . . . . . . . . . . . . . . . . 157
Generated by Doxygen
CONTENTS
VII
23.85 \see { references } . . . . . . . . . . . . . . . . . . . . . . . . . . . . . . . . . . . . . . . . . . . . 158
23.86 \short { short description } . . . . . . . . . . . . . . . . . . . . . . . . . . . . . . . . . . . . . . . . 158
23.87 \since { text } . . . . . . . . . . . . . . . . . . . . . . . . . . . . . . . . . . . . . . . . . . . . . . . 158
23.88 \test { paragraph describing a test case } . . . . . . . . . . . . . . . . . . . . . . . . . . . . . . . . 158
23.89 \throw <exception-object> { exception description } . . . . . . . . . . . . . . . . . . . . . . . . . . 158
23.90 \throws <exception-object> { exception description } . . . . . . . . . . . . . . . . . . . . . . . . . . 158
23.91 \todo { paragraph describing what is to be done } . . . . . . . . . . . . . . . . . . . . . . . . . . . . 158
23.92 \version { version number }
. . . . . . . . . . . . . . . . . . . . . . . . . . . . . . . . . . . . . . . 158
23.93 \warning { warning message } . . . . . . . . . . . . . . . . . . . . . . . . . . . . . . . . . . . . . . 159
23.94 \xrefitem <key> "(heading)" "(list title)" { text } . . . . . . . . . . . . . . . . . . . . . . . . . . . . . 159
23.95 \addindex (text)
. . . . . . . . . . . . . . . . . . . . . . . . . . . . . . . . . . . . . . . . . . . . . 160
23.96 \anchor <word> . . . . . . . . . . . . . . . . . . . . . . . . . . . . . . . . . . . . . . . . . . . . . 160
23.97 \cite <label> . . . . . . . . . . . . . . . . . . . . . . . . . . . . . . . . . . . . . . . . . . . . . . . 160
23.98 \endlink . . . . . . . . . . . . . . . . . . . . . . . . . . . . . . . . . . . . . . . . . . . . . . . . . . 160
23.99 \link <link-object> . . . . . . . . . . . . . . . . . . . . . . . . . . . . . . . . . . . . . . . . . . . . 160
23.100 \ref <name> ["(text)"] . . . . . . . . . . . . . . . . . . . . . . . . . . . . . . . . . . . . . . . . . . 160
23.101 \refitem <name> . . . . . . . . . . . . . . . . . . . . . . . . . . . . . . . . . . . . . . . . . . . . 161
23.102 \secreflist . . . . . . . . . . . . . . . . . . . . . . . . . . . . . . . . . . . . . . . . . . . . . . . . . 161
23.103 \endsecreflist . . . . . . . . . . . . . . . . . . . . . . . . . . . . . . . . . . . . . . . . . . . . . . . 161
23.104 \subpage <name> ["(text)"] . . . . . . . . . . . . . . . . . . . . . . . . . . . . . . . . . . . . . . . 161
23.105 \tableofcontents . . . . . . . . . . . . . . . . . . . . . . . . . . . . . . . . . . . . . . . . . . . . . 162
23.106 \section <section-name> (section title) . . . . . . . . . . . . . . . . . . . . . . . . . . . . . . . . . 162
23.107 \subsection <subsection-name> (subsection title) . . . . . . . . . . . . . . . . . . . . . . . . . . . 162
23.108 \subsubsection <subsubsection-name> (subsubsection title) . . . . . . . . . . . . . . . . . . . . . 162
23.109 \paragraph <paragraph-name> (paragraph title) . . . . . . . . . . . . . . . . . . . . . . . . . . . . 163
23.110 \dontinclude <file-name> . . . . . . . . . . . . . . . . . . . . . . . . . . . . . . . . . . . . . . . . 163
23.111 \include <file-name> . . . . . . . . . . . . . . . . . . . . . . . . . . . . . . . . . . . . . . . . . . 164
23.112 \includelineno <file-name> . . . . . . . . . . . . . . . . . . . . . . . . . . . . . . . . . . . . . . . 164
23.113 \line ( pattern ) . . . . . . . . . . . . . . . . . . . . . . . . . . . . . . . . . . . . . . . . . . . . . . 164
23.114 \skip ( pattern ) . . . . . . . . . . . . . . . . . . . . . . . . . . . . . . . . . . . . . . . . . . . . . . 164
23.115 \skipline ( pattern ) . . . . . . . . . . . . . . . . . . . . . . . . . . . . . . . . . . . . . . . . . . . . 165
23.116 \snippet <file-name> ( block_id ) . . . . . . . . . . . . . . . . . . . . . . . . . . . . . . . . . . . . 165
23.117 \until ( pattern ) . . . . . . . . . . . . . . . . . . . . . . . . . . . . . . . . . . . . . . . . . . . . . . 165
23.118 \verbinclude <file-name> . . . . . . . . . . . . . . . . . . . . . . . . . . . . . . . . . . . . . . . . 166
23.119 \htmlinclude <file-name> . . . . . . . . . . . . . . . . . . . . . . . . . . . . . . . . . . . . . . . . 166
23.120 \latexinclude <file-name> . . . . . . . . . . . . . . . . . . . . . . . . . . . . . . . . . . . . . . . . 166
23.121 \a <word> . . . . . . . . . . . . . . . . . . . . . . . . . . . . . . . . . . . . . . . . . . . . . . . . 166
23.122 \arg { item-description } . . . . . . . . . . . . . . . . . . . . . . . . . . . . . . . . . . . . . . . . . 166
23.123 \b <word> . . . . . . . . . . . . . . . . . . . . . . . . . . . . . . . . . . . . . . . . . . . . . . . . 167
23.124 \c <word> . . . . . . . . . . . . . . . . . . . . . . . . . . . . . . . . . . . . . . . . . . . . . . . . 167
Generated by Doxygen
VIII
CONTENTS
23.125 \code [ ’{’<word>’}’] . . . . . . . . . . . . . . . . . . . . . . . . . . . . . . . . . . . . . . . . . . . 167
23.126 \copydoc <link-object> . . . . . . . . . . . . . . . . . . . . . . . . . . . . . . . . . . . . . . . . . 168
23.127 \copybrief <link-object> . . . . . . . . . . . . . . . . . . . . . . . . . . . . . . . . . . . . . . . . . 168
23.128 \copydetails <link-object> . . . . . . . . . . . . . . . . . . . . . . . . . . . . . . . . . . . . . . . . 168
23.129 \docbookonly . . . . . . . . . . . . . . . . . . . . . . . . . . . . . . . . . . . . . . . . . . . . . . . 168
23.130 \dot . . . . . . . . . . . . . . . . . . . . . . . . . . . . . . . . . . . . . . . . . . . . . . . . . . . . 169
23.131 \msc . . . . . . . . . . . . . . . . . . . . . . . . . . . . . . . . . . . . . . . . . . . . . . . . . . . 169
23.132 \dotfile <file> ["caption"]
. . . . . . . . . . . . . . . . . . . . . . . . . . . . . . . . . . . . . . . . 170
23.133 \mscfile <file> ["caption"] . . . . . . . . . . . . . . . . . . . . . . . . . . . . . . . . . . . . . . . . 170
23.134 \diafile <file> ["caption"] . . . . . . . . . . . . . . . . . . . . . . . . . . . . . . . . . . . . . . . . . 170
23.135 \e <word> . . . . . . . . . . . . . . . . . . . . . . . . . . . . . . . . . . . . . . . . . . . . . . . . 170
23.136 \em <word> . . . . . . . . . . . . . . . . . . . . . . . . . . . . . . . . . . . . . . . . . . . . . . . 171
23.137 \endcode . . . . . . . . . . . . . . . . . . . . . . . . . . . . . . . . . . . . . . . . . . . . . . . . . 171
23.138 \enddocbookonly . . . . . . . . . . . . . . . . . . . . . . . . . . . . . . . . . . . . . . . . . . . . . 171
23.139 \enddot . . . . . . . . . . . . . . . . . . . . . . . . . . . . . . . . . . . . . . . . . . . . . . . . . . 171
23.140 \endmsc . . . . . . . . . . . . . . . . . . . . . . . . . . . . . . . . . . . . . . . . . . . . . . . . . 171
23.141 \endhtmlonly . . . . . . . . . . . . . . . . . . . . . . . . . . . . . . . . . . . . . . . . . . . . . . . 172
23.142 \endlatexonly . . . . . . . . . . . . . . . . . . . . . . . . . . . . . . . . . . . . . . . . . . . . . . . 172
23.143 \endmanonly . . . . . . . . . . . . . . . . . . . . . . . . . . . . . . . . . . . . . . . . . . . . . . . 172
23.144 \endrtfonly . . . . . . . . . . . . . . . . . . . . . . . . . . . . . . . . . . . . . . . . . . . . . . . . 172
23.145 \endverbatim . . . . . . . . . . . . . . . . . . . . . . . . . . . . . . . . . . . . . . . . . . . . . . . 172
23.146 \endxmlonly . . . . . . . . . . . . . . . . . . . . . . . . . . . . . . . . . . . . . . . . . . . . . . . 172
23.147 \f$ . . . . . . . . . . . . . . . . . . . . . . . . . . . . . . . . . . . . . . . . . . . . . . . . . . . . 173
23.148 \f[ . . . . . . . . . . . . . . . . . . . . . . . . . . . . . . . . . . . . . . . . . . . . . . . . . . . . . 173
23.149 \f] . . . . . . . . . . . . . . . . . . . . . . . . . . . . . . . . . . . . . . . . . . . . . . . . . . . . . 173
23.150 \f{environment}{ . . . . . . . . . . . . . . . . . . . . . . . . . . . . . . . . . . . . . . . . . . . . . 173
23.151 \f} . . . . . . . . . . . . . . . . . . . . . . . . . . . . . . . . . . . . . . . . . . . . . . . . . . . . . 173
23.152 \htmlonly ["[block]"] . . . . . . . . . . . . . . . . . . . . . . . . . . . . . . . . . . . . . . . . . . . . 173
23.153 \image <format> <file> ["caption"] [<sizeindication>=<size>]
. . . . . . . . . . . . . . . . . . . 174
23.154 \latexonly . . . . . . . . . . . . . . . . . . . . . . . . . . . . . . . . . . . . . . . . . . . . . . . . . 174
23.155 \manonly . . . . . . . . . . . . . . . . . . . . . . . . . . . . . . . . . . . . . . . . . . . . . . . . . 175
23.156 \li { item-description } . . . . . . . . . . . . . . . . . . . . . . . . . . . . . . . . . . . . . . . . . . . 175
23.157 \n . . . . . . . . . . . . . . . . . . . . . . . . . . . . . . . . . . . . . . . . . . . . . . . . . . . . . 175
23.158 \p <word> . . . . . . . . . . . . . . . . . . . . . . . . . . . . . . . . . . . . . . . . . . . . . . . . 175
23.159 \rtfonly . . . . . . . . . . . . . . . . . . . . . . . . . . . . . . . . . . . . . . . . . . . . . . . . . . 176
23.160 \verbatim . . . . . . . . . . . . . . . . . . . . . . . . . . . . . . . . . . . . . . . . . . . . . . . . . 176
23.161 \xmlonly . . . . . . . . . . . . . . . . . . . . . . . . . . . . . . . . . . . . . . . . . . . . . . . . . 176
23.162 \\ . . . . . . . . . . . . . . . . . . . . . . . . . . . . . . . . . . . . . . . . . . . . . . . . . . . . . 176
23.163 \@ . . . . . . . . . . . . . . . . . . . . . . . . . . . . . . . . . . . . . . . . . . . . . . . . . . . . 177
23.164 \в€ј[LanguageId] . . . . . . . . . . . . . . . . . . . . . . . . . . . . . . . . . . . . . . . . . . . . . 177
Generated by Doxygen
CONTENTS
IX
23.165 \& . . . . . . . . . . . . . . . . . . . . . . . . . . . . . . . . . . . . . . . . . . . . . . . . . . . . . 177
23.166 \$ . . . . . . . . . . . . . . . . . . . . . . . . . . . . . . . . . . . . . . . . . . . . . . . . . . . . . 177
23.167 \# . . . . . . . . . . . . . . . . . . . . . . . . . . . . . . . . . . . . . . . . . . . . . . . . . . . . . 177
23.168 \< . . . . . . . . . . . . . . . . . . . . . . . . . . . . . . . . . . . . . . . . . . . . . . . . . . . . 177
23.169 \> . . . . . . . . . . . . . . . . . . . . . . . . . . . . . . . . . . . . . . . . . . . . . . . . . . . . 177
23.170 \% . . . . . . . . . . . . . . . . . . . . . . . . . . . . . . . . . . . . . . . . . . . . . . . . . . . . 177
23.171 \" . . . . . . . . . . . . . . . . . . . . . . . . . . . . . . . . . . . . . . . . . . . . . . . . . . . . . 178
23.172 \. . . . . . . . . . . . . . . . . . . . . . . . . . . . . . . . . . . . . . . . . . . . . . . . . . . . . . 178
23.173 \:: . . . . . . . . . . . . . . . . . . . . . . . . . . . . . . . . . . . . . . . . . . . . . . . . . . . . . 178
23.174 \| . . . . . . . . . . . . . . . . . . . . . . . . . . . . . . . . . . . . . . . . . . . . . . . . . . . . . 178
23.175 \-- . . . . . . . . . . . . . . . . . . . . . . . . . . . . . . . . . . . . . . . . . . . . . . . . . . . . . 178
23.176 \--- . . . . . . . . . . . . . . . . . . . . . . . . . . . . . . . . . . . . . . . . . . . . . . . . . . . . 178
24 HTML commands
181
25 XML commands
191
III
Developers Manual
193
26 Doxygen’s internals
195
27 Perl Module Output format
199
27.1
Usage . . . . . . . . . . . . . . . . . . . . . . . . . . . . . . . . . . . . . . . . . . . . . . . . . . 199
27.2
Using the LaTeX generator. . . . . . . . . . . . . . . . . . . . . . . . . . . . . . . . . . . . . . . . 199
27.2.1 Creation of PDF and DVI output
. . . . . . . . . . . . . . . . . . . . . . . . . . . . . . . . 200
27.3
Documentation format. . . . . . . . . . . . . . . . . . . . . . . . . . . . . . . . . . . . . . . . . . . 201
27.4
Data structure . . . . . . . . . . . . . . . . . . . . . . . . . . . . . . . . . . . . . . . . . . . . . . 201
28 Internationalization
Generated by Doxygen
203
Part I
User Manual
Chapter 1
Introduction
Introduction
Doxygen is the de facto standard tool for generating documentation from annotated C++ sources, but it also supports
other popular programming languages such as C, Objective-C, C#, PHP, Java, Python, IDL (Corba, Microsoft, and
UNO/OpenOffice flavors), Fortran, VHDL, Tcl, and to some extent D.
Doxygen can help you in three ways:
1. It can generate an on-line documentation browser (in HTML) and/or an off-line reference manual (in LATEX)
from a set of documented source files. There is also support for generating output in RTF (MS-Word), Post←
Script, hyperlinked PDF, compressed HTML, and Unix man pages. The documentation is extracted directly
from the sources, which makes it much easier to keep the documentation consistent with the source code.
2. You can configure doxygen to extract the code structure from undocumented source files. This is very useful
to quickly find your way in large source distributions. Doxygen can also visualize the relations between the
various elements by means of include dependency graphs, inheritance diagrams, and collaboration diagrams,
which are all generated automatically.
3. You can also use doxygen for creating normal documentation (as I did for the doxygen user manual and
web-site).
Doxygen is developed under Mac OS X and Linux, but is set-up to be highly portable. As a result, it runs on most
other Unix flavors as well. Furthermore, executables for Windows are available.
This manual is divided into three parts, each of which is divided into several sections.
The first part forms a user manual:
• Section Installation discusses how to download, compile and install doxygen for your platform.
• Section Getting started tells you how to generate your first piece of documentation quickly.
• Section Documenting the code demonstrates the various ways that code can be documented.
• Section Markdown support show the Markdown formatting supported by doxygen.
• Section Lists shows how to create lists.
• Section Grouping shows how to group things together.
• Section Including formulas shows how to insert formulas in the documentation.
• Section Graphs and diagrams describes the diagrams and graphs that doxygen can generate.
4
Introduction
• Section Preprocessing explains how doxygen deals with macro definitions.
• Section Automatic link generation shows how to put links to files, classes, and members in the documentation.
• Section Output Formats shows how to generate the various output formats supported by doxygen.
• Section Searching shows various ways to search in the HTML documentation.
• Section External Indexing and Searching shows how use the external search and index tools
• Section Customizing the output explains how you can customize the output generated by doxygen.
• Section Custom Commands show how to define and use custom commands in your comments.
• Section Linking to external documentation explains how to let doxygen create links to externally generated
documentation.
• Section Frequently Asked Questions gives answers to frequently asked questions.
• Section Troubleshooting tells you what to do when you have problems.
The second part forms a reference manual:
• Section Features presents an overview of what doxygen can do.
• Section Doxygen usage shows how to use the doxygen program.
• Section Doxywizard usage shows how to use the doxywizard program.
• Section Configuration shows how to fine-tune doxygen, so it generates the documentation you want.
• Section Special Commands shows an overview of the special commands that can be used within the documentation.
• Section HTML Commands shows an overview of the HTML commands that can be used within the documentation.
• Section XML Commands shows an overview of the C# style XML commands that can be used within the
documentation.
The third part provides information for developers:
• Section Doxygen’s Internals gives a global overview of how doxygen is internally structured.
• Section Perl Module Output shows how to use the PerlMod output.
• Section Internationalization explains how to add support for new output languages.
Doxygen license
Copyright В© 1997-2014 by Dimitri van Heesch.
Permission to use, copy, modify, and distribute this software and its documentation under the terms of the GNU
General Public License is hereby granted. No representations are made about the suitability of this software for any
purpose. It is provided "as is" without express or implied warranty. See the GNU General Public License
for more details.
Documents produced by doxygen are derivative works derived from the input used in their production; they are not
affected by this license.
Generated by Doxygen
5
User examples
Doxygen supports a number of output formats where HTML is the most popular one. I’ve gathered some nice
examples of real-life projects using doxygen.
These are part of a larger list of projects that use doxygen. If you know other projects, let me know and
I’ll add them.
Future work
Although doxygen is successfully used by large number of companies and open source projects already, there is
always room for improvement.
You can submit enhancement requests in the bug tracker. Make sure the severity of the bug report is set to
"enhancement".
Acknowledgments
Thanks go to:
• Malte Zöckler and Roland Wunderling, authors of DOC++. The first version of doxygen borrowed some code
of an old version of DOC++. Although I have rewritten practically all code since then, DOC++ has still given
me a good start in writing doxygen.
• All people at Qt Software, for creating a beautiful GUI Toolkit (which is very useful as a Windows/Unix platform
abstraction layer :-)
• My brother Frank for rendering the logos.
• Harm van der Heijden for adding HTML help support.
• Wouter Slegers of Your Creative Solutions for registering the www.doxygen.org domain.
• Parker Waechter for adding the RTF output generator.
• Joerg Baumann, for adding conditional documentation blocks, PDF links, and the configuration generator.
• Tim Mensch for adding the todo command.
• Christian Hammond for redesigning the web-site.
• Ken Wong for providing the HTML tree view code.
• Talin for adding support for C# style comments with XML markup.
• Petr Prikryl for coordinating the internationalization support. All language maintainers for providing translations into many languages.
• The band Porcupine Tree for providing hours of great music to listen to while coding.
• many, many others for suggestions, patches and bug reports.
Generated by Doxygen
6
Introduction
Generated by Doxygen
Chapter 2
Installation
First go to the download page to get the latest distribution, if you have not downloaded doxygen already.
2.1
Compiling from source on UNIX
If you downloaded the source distribution, you need at least the following to build the executable:
• The GNU tools flex, bison, libiconv and GNU make, and strip
• In order to generate a Makefile for your platform, you need perl
• The configure script assume the availability of standard UNIX tools such as sed, date, find,
uname, mv, cp, cat, echo, tr, cd and rm.
To take full advantage of doxygen’s features the following additional tools should be installed.
• Qt Software’s GUI toolkit Qt version 4.3 or higher (but currently, Qt 5.x is not supported). This is needed to
build the GUI front-end doxywizard.
• A LATEX distribution: for instance TeX Live This is needed for generating LATEX, Postscript, and PDF output.
• the Graph visualization toolkit version 1.8.10 or higher Needed for the include
dependency graphs, the graphical inheritance graphs, and the collaboration graphs. If you compile graphviz
yourself, make sure you do include freetype support (which requires the freetype library and header files),
otherwise the graphs will not render proper text labels.
• For formulas or if you do not wish to use �pdflatex, the ghostscript interpreter is needed. You can find it at
www.ghostscript.com.
• In order to generate doxygen’s own documentation, Python is needed, you can find it at www.python.org.
Compilation is now done by performing the following steps:
1. Unpack the archive, unless you already have done that:
gunzip doxygen-$VERSION.src.tar.gz
tar xf doxygen-$VERSION.src.tar
# uncompress the archive
# unpack it
2. Run the configure script:
sh ./configure
The script tries to determine the platform you use, the make tool (which must be GNU make) and the perl
interpreter. It will report what it finds.
To override the auto detected platform and compiler you can run configure as follows:
8
Installation
configure --platform platform-type
See the PLATFORMS file for a list of possible platform options.
If you have Qt-4.3 or higher installed and want to build the GUI front-end, you should run the configure script
with the --with-doxywizard option:
configure --with-doxywizard
For an overview of other configuration options use
configure --help
3. Compile the program by running make:
make
The program should compile without problems and the binaries (doxygen and optionally doxywizard)
should be available in the bin directory of the distribution.
4. Optional: Generate the user manual.
make docs
To let doxygen generate the HTML documentation.
The HTML directory of the distribution will now contain the html documentation (just point a HTML browser to
the file index.html in the html directory). You will need the python interpreter for this.
5. Optional: Generate a PDF version of the manual (you will need pdflatex, makeindex, and egrep for
this).
make pdf
The PDF manual doxygen_manual.pdf will be located in the latex directory of the distribution. Just view
and print it via the acrobat reader.
2.2
Installing the binaries on UNIX
After the compilation of the source code do a make install to install doxygen. If you downloaded the binary
distribution for UNIX, type:
./configure
make install
Binaries are installed into the directory <prefix>/bin. Use make install_docs to install the documentation and examples into <docdir>/doxygen.
<prefix> defaults to /usr/local but can be changed with the --prefix option of the configure script.
The default <docdir> directory is <prefix>/share/doc/packages and can be changed with the
--docdir option of the configure script.
Alternatively, you can also copy the binaries from the bin directory manually to some bin directory in your search
path. This is sufficient to use doxygen.
Note
You need the GNU install tool for this to work (it is part of the coreutils package). Other install tools may put the
binaries in the wrong directory!
If you have a RPM or DEP package, then please follow the standard installation procedure that is required for these
packages.
Generated by Doxygen
2.3 Known compilation problems for UNIX
2.3
9
Known compilation problems for UNIX
Qt problems
The Qt include files and libraries are not a subdirectory of the directory pointed to by QTDIR on some systems (for
instance on Red Hat 6.0 includes are in /usr/include/qt and libs are in /usr/lib).
The solution: go to the root of the doxygen distribution and do:
mkdir qt
cd qt
ln -s your-qt-include-dir-here include
ln -s your-qt-lib-dir-here lib
ln -s your-qt-bin-dir-here bin
export QTDIR=$PWD
If you have a csh-like shell you should use setenv QTDIR $PWD instead of the export command above.
Now install doxygen as described above.
Bison problems
Versions 1.31 to 1.34 of bison contain a "bug" that results in a compiler errors like this:
ce_parse.cpp:348:
member �class CPPValue yyalloc::yyvs’ with
constructor not al-
lowed in union
This problem has been solved in version 1.35 (versions before 1.31 will also work).
Sun compiler problems
It appears that doxygen doesn’t work properly if it is compiled with Sun’s C++ WorkShop Compiler. I cannot verify
this myself as I do not have access to a Solaris machine with this compiler. With GNU compiler it does work and
installing Sun patch 111679-13 has also been reported as a way to fix the problem.
when configuring with --static I got:
Undefined
symbol
dlclose
dlsym
dlopen
first referenced
in file
/usr/lib/libc.a(nss_deffinder.o)
/usr/lib/libc.a(nss_deffinder.o)
/usr/lib/libc.a(nss_deffinder.o)
Manually adding -Bdynamic after the target rule in Makefile.doxygen will fix this:
$(TARGET): $(OBJECTS) $(OBJMOC)
$(LINK) $(LFLAGS) -o $(TARGET) $(OBJECTS) $(OBJMOC) $(LIBS) -Bdynamic
GCC compiler problems
Older versions of the GNU compiler have problems with constant strings containing characters with character codes
larger than 127. Therefore the compiler will fail to compile some of the translator_xx.h files. A workaround,
if you are planning to use the English translation only, is to configure doxygen with the --english-only option.
On some platforms (such as OpenBSD) using some versions of gcc with -O2 can lead to eating all memory during
the compilation of files such as config.cpp. As a workaround use --debug as a configure option or omit the -O2
for the particular files in the Makefile.
Gcc versions before 2.95 may produce broken binaries due to bugs in these compilers.
Dot problems
Due to a change in the way image maps are generated, older versions of doxygen (<=1.2.17) will not work correctly
with newer versions of graphviz (>=1.8.8). The effect of this incompatibility is that generated graphs in HTML are
not properly clickable. For doxygen 1.3 it is recommended to use at least graphviz 1.8.10 or higher. For doxygen
1.4.7 or higher it is recommended to use GraphViz 2.8 or higher to avoid font issues.
Red Hat 9.0 problems
If you get the following error after running make
Generated by Doxygen
10
Installation
tmake error: qtools.pro:70: Syntax error
then first type
export LANG=
before running make.
2.4
Compiling from source on Windows
From version 1.7.0 onwards, build files are provided for Visual Studio 2008. Also the free (as in beer) "Express"
version of Developer Studio can be used to compile doxygen. Alternatively, you can compile doxygen the UNIX way
using Cygwin or MinGW.
The next step is to install modern versions of bison and flex (see http://sourceforge.в†ђ
net/projects/winflexbison. After installation and adding them to your path rename win_flex.exe
to flex.exe and win_bison.exe to bison.exe) Furthermore you have to install python (version 2, see
http://www.python.org). These packages are needed during the compilation process if you use a GitHub
snapshot of doxygen (the official source releases come with pre-generated sources).
Download doxygen’s source tarball and put it somewhere (e.g. use c:\tools)
Now start a new command shell and type
cd c:\tools
tar zxvf doxygen-x.y.z.src.tar.gz
to unpack the sources (you can obtain tar from e.g. http://gnuwin32.sourceforge.net/packages.в†ђ
html). Alternatively you can use an unpack program, like 7-Zip (see http://www.7-zip.org) or use the
build in unpack feature of modern Windows systems).
Now your environment is setup to build doxygen.
Inside the doxygen-x.y.z directory you will find a winbuild directory containing a Doxygen.sln file. Open
this file in Visual Studio. You can now build the Release or Debug flavor of Doxygen by right-clicking the project in
the solutions explorer, and selecting Build.
Note that compiling Doxywizard currently requires Qt version 4 (see http://qt-project.org/).
Also read the next section for additional tools you may need to install to run doxygen with certain features enabled.
2.5
Installing the binaries on Windows
Doxygen comes as a self-installing archive, so installation is extremely simple. Just follow the dialogs.
After installation it is recommended to also download and install GraphViz (version 2.20 or better is highly recommended). Doxygen can use the dot tool of the GraphViz package to render nicer diagrams, see the HAVE_DOT
option in the configuration file.
If you want to produce compressed HTML files (see GENERATE_HTMLHELP) in the config file, then you need the
Microsoft HTML help workshop. You can download it from Microsoft.
If you want to produce Qt Compressed Help files (see QHG_LOCATION) in the config file, then you need qhelpgenerator which is part of Qt. You can download Qt from Qt Software Downloads.
In order to generate PDF output or use scientific formulas you will also need to install LaTeX and Ghostscript.
For LATEX a number of distributions exists. Popular ones that should work with doxygen are MikTex and proTeXt.
Ghostscript can be downloaded from Sourceforge.
After installing LATEX and Ghostscript you’ll need to make sure the tools latex.exe, pdflatex.exe, and gswin32c.exe are
present in the search path of a command box. Follow these instructions if you are unsure and run the commands
from a command box to verify it works.
Generated by Doxygen
2.6 Tools used to develop doxygen
2.6
Tools used to develop doxygen
Doxygen was developed and tested under Linux & MacOSX using the following open-source tools:
• GCC version 4.6.3 (Linux) and 4.2.1 (MacOSX)
• GNU flex version 2.5.35
• GNU bison version 2.5 (Linux) and 2.3 (MacOSX)
• GNU make version 3.81
• Perl version 5.12
• TeX Live 2009 (or later)
Generated by Doxygen
11
12
Installation
Generated by Doxygen
Chapter 3
Getting Started
The executable doxygen is the main program that parses the sources and generates the documentation. See
section Doxygen usage for more detailed usage information.
Optionally, the executable doxywizard can be used, which is a graphical front-end for editing the configuration
file that is used by doxygen and for running doxygen in a graphical environment. For Mac OS X doxywizard will be
started by clicking on the Doxygen application icon.
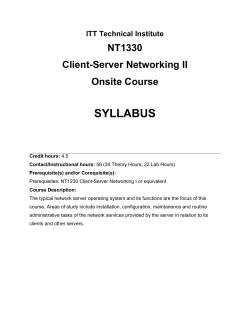
The following figure shows the relation between the tools and the flow of information between them (it looks complex
but that’s only because it tries to be complete):
Doxywizard
generate/edit
Your application
XML files
read
doxmlparser lib
Config file
Doxyfile
Layout file
make ps
generate
generate
update
read
Latex files
+
Makefile
postscript
latex
make pdf
PDF
read
Sources
custom
output
Doxygen
read
read
generate
Man pages
Custom
в€’ headers
в€’ footers
в€’ images
Tag file(s)
Windows only
refman.rtf
HTML
pages
import
read
Figure 3.1: Doxygen information flow
doc
MSв€’Word
chm
HTML Help Workshop
14
3.1
Getting Started
Step 0: Check if doxygen supports your programming language
First, assure that your programming language has a reasonable chance of being recognized by Doxygen. These
languages are supported by default: C, C++, C#, Objective-C, IDL, Java, VHDL, PHP, Python, Tcl, Fortran, and
D. It is possible to configure certain file type extensions to use certain parsers: see the Configuration/Extension←
Mappings for details. Also, completely different languages can be supported by using preprocessor programs: see
the Helpers page for details.
3.2
Step 1: Creating a configuration file
Doxygen uses a configuration file to determine all of its settings. Each project should get its own configuration file.
A project can consist of a single source file, but can also be an entire source tree that is recursively scanned.
To simplify the creation of a configuration file, doxygen can create a template configuration file for you. To do this
call doxygen from the command line with the -g option:
doxygen -g <config-file>
where <config-file> is the name of the configuration file. If you omit the file name, a file named Doxyfile will
be created. If a file with the name <config-file> already exists, doxygen will rename it to <config-file>.bak before
generating the configuration template. If you use - (i.e. the minus sign) as the file name then doxygen will try to
read the configuration file from standard input (stdin), which can be useful for scripting.
The configuration file has a format that is similar to that of a (simple) Makefile. It consists of a number of assignments
(tags) of the form:
TAGNAME = VALUE or
TAGNAME = VALUE1 VALUE2 ...
You can probably leave the values of most tags in a generated template configuration file to their default value. See
section Configuration for more details about the configuration file.
If you do not wish to edit the config file with a text editor, you should have a look at doxywizard, which is a GUI
front-end that can create, read and write doxygen configuration files, and allows setting configuration options by
entering them via dialogs.
For a small project consisting of a few C and/or C++ source and header files, you can leave INPUT tag empty and
doxygen will search for sources in the current directory.
If you have a larger project consisting of a source directory or tree you should assign the root directory or directories
to the INPUT tag, and add one or more file patterns to the FILE_PATTERNS tag (for instance в€—.cpp в€—.h). Only
files that match one of the patterns will be parsed (if the patterns are omitted a list of typical patterns is used for the
types of files doxygen supports). For recursive parsing of a source tree you must set the RECURSIVE tag to YES.
To further fine-tune the list of files that is parsed the EXCLUDE and EXCLUDE_PATTERNS tags can be used. To
omit all test directories from a source tree for instance, one could use:
EXCLUDE_PATTERNS = */test/*
Doxygen looks at the file’s extension to determine how to parse a file, using the following table:
Extension
.idl
.ddl
.odl
.java
.cs
Language
IDL
IDL
IDL
Java
C#
Generated by Doxygen
3.3 Step 2: Running doxygen
15
.d
.php
.php4
.php5
.inc
.phtml
.m
.M
.mm
.py
.f
.for
.f90
.vhd
.vhdl
.tcl
.ucf
.qsf
.md
.markdown
D
PHP
PHP
PHP
PHP
PHP
Objective-C
Objective-C
Objective-C
Python
Fortran
Fortran
Fortran
VHDL
VHDL
TCL
VHDL
VHDL
Markdown
Markdown
Any other extension is parsed as if it is a C/C++ file.
If you start using doxygen for an existing project (thus without any documentation that doxygen is aware of), you
can still get an idea of what the structure is and how the documented result would look like. To do so, you must
set the EXTRACT_ALL tag in the configuration file to YES. Then, doxygen will pretend everything in your sources
is documented. Please note that as a consequence warnings about undocumented members will not be generated
as long as EXTRACT_ALL is set to YES.
To analyze an existing piece of software it is useful to cross-reference a (documented) entity with its definition in the
source files. Doxygen will generate such cross-references if you set the SOURCE_BROWSER tag to YES. It can
also include the sources directly into the documentation by setting INLINE_SOURCES to YES (this can be handy
for code reviews for instance).
3.3
Step 2: Running doxygen
To generate the documentation you can now enter:
doxygen <config-file>
Depending on your settings doxygen will create html, rtf, latex, xml, man, and/or docbook directories inside
the output directory. As the names suggest these directories contain the generated documentation in HTML, RTF,
LATEX, XML, Unix-Man page, and DocBook format.
The default output directory is the directory in which doxygen is started. The root directory to which the output is
written can be changed using the OUTPUT_DIRECTORY. The format specific directory within the output directory
can be selected using the HTML_OUTPUT, RTF_OUTPUT, LATEX_OUTPUT, XML_OUTPUT, MAN_OUTPUT,
and DOCBOOK_OUTPUT. tags of the configuration file. If the output directory does not exist, doxygen will try to
create it for you (but it will not try to create a whole path recursively, like mkdir -p does).
3.3.1
HTML output
The generated HTML documentation can be viewed by pointing a HTML browser to the index.html file in the
html directory. For the best results a browser that supports cascading style sheets (CSS) should be used (I’m
using Mozilla Firefox, Google Chrome, Safari, and sometimes IE8, IE9, and Opera to test the generated output).
Some of the features the HTML section (such as GENERATE_TREEVIEW or the search engine) require a browser
that supports Dynamic HTML and Javascript enabled.
Generated by Doxygen
16
3.3.2
Getting Started
LaTeX output
The generated LATEX documentation must first be compiled by a LATEX compiler (I use a recent teTeX distribution for
Linux and MacOSX and MikTex for Windows). To simplify the process of compiling the generated documentation,
doxygen writes a Makefile into the latex directory (on the Windows platform also a make.bat batch file is
generated).
The contents and targets in the Makefile depend on the setting of USE_PDFLATEX. If it is disabled (set to NO),
then typing make in the latex directory a dvi file called refman.dvi will be generated. This file can then be
viewed using xdvi or converted into a PostScript file refman.ps by typing make ps (this requires dvips).
To put 2 pages on one physical page use make ps_2on1 instead. The resulting PostScript file can be send to a
PostScript printer. If you do not have a PostScript printer, you can try to use ghostscript to convert PostScript into
something your printer understands.
Conversion to PDF is also possible if you have installed the ghostscript interpreter; just type make pdf (or make
pdf_2on1).
To get the best results for PDF output you should set the PDF_HYPERLINKS and USE_PDFLATEX tags to YES.
In this case the Makefile will only contain a target to build refman.pdf directly.
3.3.3
RTF output
Doxygen combines the RTF output to a single file called refman.rtf. This file is optimized for importing into the
Microsoft Word. Certain information is encoded using so called fields. To show the actual value you need to select
all (Edit - select all) and then toggle fields (right click and select the option from the drop down menu).
3.3.4
XML output
The XML output consists of a structured "dump" of the information gathered by doxygen. Each compound (class/namespace/file/...) has its own XML file and there is also an index file called index.xml.
A file called combine.xslt XSLT script is also generated and can be used to combine all XML files into a single
file.
Doxygen also generates two XML schema files index.xsd (for the index file) and compound.xsd (for the
compound files). This schema file describes the possible elements, their attributes and how they are structured, i.e.
it the describes the grammar of the XML files and can be used for validation or to steer XSLT scripts.
In the addon/doxmlparser directory you can find a parser library for reading the XML output produced by
doxygen in an incremental way (see addon/doxmlparser/include/doxmlintf.h for the interface of the
library)
3.3.5
Man page output
The generated man pages can be viewed using the man program. You do need to make sure the man directory is
in the man path (see the MANPATH environment variable). Note that there are some limitations to the capabilities
of the man page format, so some information (like class diagrams, cross references and formulas) will be lost.
3.3.6
DocBook output
Doxygen can also generate output in the DocBook format. How to process the DocBook output is beyond the
scope of this manual.
Generated by Doxygen
3.4 Step 3: Documenting the sources
3.4
17
Step 3: Documenting the sources
Although documenting the sources is presented as step 3, in a new project this should of course be step 1. Here I
assume you already have some code and you want doxygen to generate a nice document describing the API and
maybe the internals and some related design documentation as well.
If the EXTRACT_ALL option is set to NO in the configuration file (the default), then doxygen will only generate
documentation for documented entities. So how do you document these? For members, classes and namespaces
there are basically two options:
1. Place a special documentation block in front of the declaration or definition of the member, class or namespace. For file, class and namespace members it is also allowed to place the documentation directly after the
member.
See section Special comment blocks to learn more about special documentation blocks.
2. Place a special documentation block somewhere else (another file or another location) and put a structural
command in the documentation block. A structural command links a documentation block to a certain entity
that can be documented (e.g. a member, class, namespace or file).
See section Documentation at other places to learn more about structural commands.
The advantage of the first option is that you do not have to repeat the name of the entity.
Files can only be documented using the second option, since there is no way to put a documentation block before
a file. Of course, file members (functions, variables, typedefs, defines) do not need an explicit structural command;
just putting a special documentation block in front or behind them will work fine.
The text inside a special documentation block is parsed before it is written to the HTML and/or LATEX output files.
During parsing the following steps take place:
• Markdown formatting is replaced by corresponding HTML or special commands.
• The special commands inside the documentation are executed. See section Special Commands for an
overview of all commands.
• If a line starts with some whitespace followed by one or more asterisks (∗) and then optionally more whitespace, then all whitespace and asterisks are removed.
• All resulting blank lines are treated as a paragraph separators. This saves you from placing new-paragraph
commands yourself in order to make the generated documentation readable.
• Links are created for words corresponding to documented classes (unless the word is preceded by a %; then
the word will not be linked and the % sign is removed).
• Links to members are created when certain patterns are found in the text. See section Automatic link generation for more information on how the automatic link generation works.
• HTML tags that are in the documentation are interpreted and converted to LATEX equivalents for the LATEX
output. See section HTML Commands for an overview of all supported HTML tags.
Generated by Doxygen
18
Getting Started
Generated by Doxygen
Chapter 4
Documenting the code
This chapter covers two topics:
1. How to put comments in your code such that doxygen incorporates them in the documentation it generates.
This is further detailed in the next section.
2. Ways to structure the contents of a comment block such that the output looks good, as explained in section
Anatomy of a comment block.
4.1
Special comment blocks
A special comment block is a C or C++ style comment block with some additional markings, so doxygen knows it
is a piece of structured text that needs to end up in the generated documentation. The next section presents the
various styles supported by doxygen.
For Python, VHDL, Fortran, and Tcl code there are different commenting conventions, which can be found in sections Comment blocks in Python, Comment blocks in VHDL, Comment blocks in Fortran, and Comment blocks in
Tcl respectively.
4.1.1
Comment blocks for C-like languages (C/C++/C#/Objective-C/PHP/Java)
For each entity in the code there are two (or in some cases three) types of descriptions, which together form
the documentation for that entity; a brief description and detailed description, both are optional. For methods
and functions there is also a third type of description, the so called in body description, which consists of the
concatenation of all comment blocks found within the body of the method or function.
Having more than one brief or detailed description is allowed (but not recommended, as the order in which the
descriptions will appear is not specified).
As the name suggest, a brief description is a short one-liner, whereas the detailed description provides longer, more
detailed documentation. An "in body" description can also act as a detailed description or can describe a collection
of implementation details. For the HTML output brief descriptions are also used to provide tooltips at places where
an item is referenced.
There are several ways to mark a comment block as a detailed description:
1. You can use the JavaDoc style, which consist of a C-style comment block starting with two ∗’s, like this:
/**
* ... text ...
*/
2. or you can use the Qt style and add an exclamation mark (!) after the opening of a C-style comment block,
as shown in this example:
20
Documenting the code
/*!
* ... text ...
*/
In both cases the intermediate ∗’s are optional, so
/*!
... text ...
*/
is also valid.
3. A third alternative is to use a block of at least two C++ comment lines, where each line starts with an additional
slash or an exclamation mark. Here are examples of the two cases:
///
/// ... text ...
///
or
//!
//!... text ...
//!
Note that a blank line ends a documentation block in this case.
4. Some people like to make their comment blocks more visible in the documentation. For this purpose you can
use the following:
/********************************************//**
* ... text
***********************************************/
(note the 2 slashes to end the normal comment block and start a special comment block).
or
/////////////////////////////////////////////////
/// ... text ...
/////////////////////////////////////////////////
For the brief description there are also several possibilities:
1. One could use the \brief command with one of the above comment blocks. This command ends at the end of
a paragraph, so the detailed description follows after an empty line.
Here is an example:
/*! \brief Brief description.
Brief description continued.
*
*
* Detailed description starts here.
*/
2. If JAVADOC_AUTOBRIEF is set to YES in the configuration file, then using JavaDoc style comment blocks
will automatically start a brief description which ends at the first dot followed by a space or new line. Here is
an example:
/** Brief description which ends at this dot. Details follow
* here.
*/
The option has the same effect for multi-line special C++ comments:
Generated by Doxygen
4.1 Special comment blocks
21
/// Brief description which ends at this dot. Details follow
/// here.
3. A third option is to use a special C++ style comment which does not span more than one line. Here are two
examples:
/// Brief description.
/** Detailed description. */
or
//! Brief description.
//! Detailed description
//! starts here.
Note the blank line in the last example, which is required to separate the brief description from the block
containing the detailed description. The JAVADOC_AUTOBRIEF should also be set to NO for this case.
As you can see doxygen is quite flexible. If you have multiple detailed descriptions, like in the following example:
//! Brief description, which is
//! really a detailed description since it spans multiple lines.
/*! Another detailed description!
*/
They will be joined. Note that this is also the case if the descriptions are at different places in the code! In this case
the order will depend on the order in which doxygen parses the code.
Unlike most other documentation systems, doxygen also allows you to put the documentation of members (including
global functions) in front of the definition. This way the documentation can be placed in the source file instead of the
header file. This keeps the header file compact, and allows the implementer of the members more direct access to
the documentation. As a compromise the brief description could be placed before the declaration and the detailed
description before the member definition.
4.1.1.1
Putting documentation after members
If you want to document the members of a file, struct, union, class, or enum, it is sometimes desired to place the
documentation block after the member instead of before. For this purpose you have to put an additional < marker
in the comment block. Note that this also works for the parameters of a function.
Here are some examples:
int var; /*!< Detailed description after the member */
This block can be used to put a Qt style detailed documentation block after a member. Other ways to do the same
are:
int var; /**< Detailed description after the member */
or
int var; //!< Detailed description after the member
//!<
or
int var; ///< Detailed description after the member
///<
Most often one only wants to put a brief description after a member. This is done as follows:
int var; //!< Brief description after the member
Generated by Doxygen
22
Documenting the code
or
int var; ///< Brief description after the member
For functions one can use the @param command to document the parameters and then use [in], [out],
[in,out] to document the direction. For inline documentation this is also possible by starting with the direction attribute, e.g.
void foo(int v /**< [in] docs for input parameter v. */);
Note that these blocks have the same structure and meaning as the special comment blocks in the previous section
only the < indicates that the member is located in front of the block instead of after the block.
Here is an example of the use of these comment blocks:
/*! A test class */
class Test
{
public:
/** An enum type.
* The documentation
*/
enum EnumType
{
int EVal1,
/**<
int EVal2
/**<
};
void member();
//!<
protected:
int value;
block cannot be put after the enum!
enum value 1 */
enum value 2 */
a member function.
/*!< an integer value */
};
Warning
These blocks can only be used to document members and parameters. They cannot be used to document files,
classes, unions, structs, groups, namespaces and enums themselves. Furthermore, the structural commands
mentioned in the next section (like \class) are not allowed inside these comment blocks.
4.1.1.2
Examples
Here is an example of a documented piece of C++ code using the Qt style:
//! A test class.
/*!
A more elaborate class description.
*/
class Test
{
public:
//! An enum.
/*! More detailed enum description.
enum TEnum {
TVal1, /*!< Enum value
TVal2, /*!< Enum value
TVal3 /*!< Enum value
}
//! Enum pointer.
/*! Details. */
*enumPtr,
//! Enum variable.
/*! Details. */
enumVar;
*/
TVal1. */
TVal2. */
TVal3. */
//! A constructor.
/*!
A more elaborate description of the constructor.
*/
Test();
//! A destructor.
Generated by Doxygen
4.1 Special comment blocks
23
/*!
A more elaborate description of the destructor.
*/
~Test();
//! A normal member taking two arguments and returning an integer value.
/*!
\param a an integer argument.
\param s a constant character pointer.
\return The test results
\sa Test(), ~Test(), testMeToo() and publicVar()
*/
int testMe(int a,const char *s);
//! A pure virtual member.
/*!
\sa testMe()
\param c1 the first argument.
\param c2 the second argument.
*/
virtual void testMeToo(char c1,char c2) = 0;
//! A public variable.
/*!
Details.
*/
int publicVar;
//! A function variable.
/*!
Details.
*/
int (*handler)(int a,int b);
};
The brief descriptions are included in the member overview of a class, namespace or file and are printed using
a small italic font (this description can be hidden by setting BRIEF_MEMBER_DESC to NO in the config file). By
default the brief descriptions become the first sentence of the detailed descriptions (but this can be changed by
setting the REPEAT_BRIEF tag to NO). Both the brief and the detailed descriptions are optional for the Qt style.
By default a JavaDoc style documentation block behaves the same way as a Qt style documentation block. This is
not according the JavaDoc specification however, where the first sentence of the documentation block is automatically treated as a brief description. To enable this behavior you should set JAVADOC_AUTOBRIEF to YES in the
configuration file. If you enable this option and want to put a dot in the middle of a sentence without ending it, you
should put a backslash and a space after it. Here is an example:
/** Brief description (e.g.\ using only a few words). Details follow. */
Here is the same piece of code as shown above, this time documented using the JavaDoc style and JAVADOC_в†ђ
AUTOBRIEF set to YES:
/**
* A test class. A more elaborate class description.
*/
class Test
{
public:
/**
* An enum.
* More detailed enum description.
*/
enum TEnum {
TVal1,
TVal2,
TVal3
}
*enumPtr,
enumVar;
/**< enum value TVal1. */
/**< enum value TVal2. */
/**< enum value TVal3. */
/**< enum pointer. Details. */
/**< enum variable. Details. */
/**
* A constructor.
* A more elaborate description of the constructor.
*/
Test();
/**
* A destructor.
Generated by Doxygen
24
Documenting the code
* A more elaborate description of the destructor.
*/
~Test();
/**
* a normal member taking two arguments and returning an integer value.
* @param a an integer argument.
* @param s a constant character pointer.
* @see Test()
* @see ~Test()
* @see testMeToo()
* @see publicVar()
* @return The test results
*/
int testMe(int a,const char *s);
/**
* A pure virtual member.
* @see testMe()
* @param c1 the first argument.
* @param c2 the second argument.
*/
virtual void testMeToo(char c1,char c2) = 0;
/**
* a public variable.
* Details.
*/
int publicVar;
/**
* a function variable.
* Details.
*/
int (*handler)(int a,int b);
};
Similarly, if one wishes the first sentence of a Qt style documentation block to automatically be treated as a brief
description, one may set QT_AUTOBRIEF to YES in the configuration file.
4.1.1.3
Documentation at other places
In the examples in the previous section the comment blocks were always located in front of the declaration or
definition of a file, class or namespace or in front or after one of its members. Although this is often comfortable,
there may sometimes be reasons to put the documentation somewhere else. For documenting a file this is even
required since there is no such thing as "in front of a file".
Doxygen allows you to put your documentation blocks practically anywhere (the exception is inside the body of a
function or inside a normal C style comment block).
The price you pay for not putting the documentation block directly before (or after) an item is the need to put a
structural command inside the documentation block, which leads to some duplication of information. So in practice
you should avoid the use of structural commands unless other requirements force you to do so.
Structural commands (like all other commands) start with a backslash (\), or an at-sign (@) if you prefer JavaDoc
style, followed by a command name and one or more parameters. For instance, if you want to document the class
Test in the example above, you could have also put the following documentation block somewhere in the input that
is read by doxygen:
/*! \class Test
\brief A test class.
A more detailed class description.
*/
Here the special command \class is used to indicate that the comment block contains documentation for the
class Test. Other structural commands are:
• \struct to document a C-struct.
• \union to document a union.
• \enum to document an enumeration type.
Generated by Doxygen
4.1 Special comment blocks
25
• \fn to document a function.
• \var to document a variable or typedef or enum value.
• \def to document a #define.
• \typedef to document a type definition.
• \file to document a file.
• \namespace to document a namespace.
• \package to document a Java package.
• \interface to document an IDL interface.
See section Special Commands for detailed information about these and many other commands.
To document a member of a C++ class, you must also document the class itself. The same holds for namespaces.
To document a global C function, typedef, enum or preprocessor definition you must first document the file that
contains it (usually this will be a header file, because that file contains the information that is exported to other
source files).
Let’s repeat that, because it is often overlooked: to document global objects (functions, typedefs, enum, macros,
etc), you must document the file in which they are defined. In other words, there must at least be a
/*! \file */
or a
/** @file */
line in this file.
Here is an example of a C header named structcmd.h that is documented using structural commands:
/*! \file structcmd.h
\brief A Documented file.
Details.
*/
/*! \def MAX(a,b)
\brief A macro that returns the maximum of \a a and \a b.
Details.
*/
/*! \var typedef unsigned int UINT32
\brief A type definition for a .
Details.
*/
/*! \var int errno
\brief Contains the last error code.
\warning Not thread safe!
*/
/*! \fn int open(const char *pathname,int flags)
\brief Opens a file descriptor.
\param pathname The name of the descriptor.
\param flags Opening flags.
*/
/*! \fn int close(int fd)
\brief Closes the file descriptor \a fd.
\param fd The descriptor to close.
*/
/*! \fn size_t write(int fd,const char *buf, size_t count)
\brief Writes \a count bytes from \a buf to the filedescriptor \a fd.
\param fd The descriptor to write to.
\param buf The data buffer to write.
Generated by Doxygen
26
Documenting the code
\param count The number of bytes to write.
*/
/*! \fn int read(int fd,char *buf,size_t count)
\brief Read bytes from a file descriptor.
\param fd The descriptor to read from.
\param buf The buffer to read into.
\param count The number of bytes to read.
*/
#define MAX(a,b) (((a)>(b))?(a):(b))
typedef unsigned int UINT32;
int errno;
int open(const char *,int);
int close(int);
size_t write(int,const char *, size_t);
int read(int,char *,size_t);
Because each comment block in the example above contains a structural command, all the comment blocks could be
moved to another location or input file (the source file for instance), without affecting the generated documentation.
The disadvantage of this approach is that prototypes are duplicated, so all changes have to be made twice! Because
of this you should first consider if this is really needed, and avoid structural commands if possible. I often receive
examples that contain \fn command in comment blocks which are place in front of a function. This is clearly a case
where the \fn command is redundant and will only lead to problems.
4.1.2
Comment blocks in Python
For Python there is a standard way of documenting the code using so called documentation strings. Such strings
are stored in doc and can be retrieved at runtime. Doxygen will extract such comments and assume they have to
be represented in a preformatted way.
1 """@package docstring
2 Documentation for this module.
3
4 More details.
5 """
6
7 def func():
8
"""Documentation for a function.
9
10
More details.
11
"""
12
pass
13
14 class PyClass:
15
"""Documentation for a class.
16
17
More details.
18
"""
19
20
def __init__(self):
21
"""The constructor."""
22
self._memVar = 0;
23
24
def PyMethod(self):
25
"""Documentation for a method."""
26
pass
27
Note that in this case none of doxygen’s special commands are supported.
There is also another way to document Python code using comments that start with "##". These type of comment
blocks are more in line with the way documentation blocks work for the other languages supported by doxygen and
this also allows the use of special commands.
Here is the same example again but now using doxygen style comments:
1
2
3
4
5
6
7
## @package pyexample
# Documentation for this module.
#
# More details.
## Documentation for a function.
#
Generated by Doxygen
4.1 Special comment blocks
27
8 # More details.
9 def func():
10
pass
11
12 ## Documentation for a class.
13 #
14 # More details.
15 class PyClass:
16
17
## The constructor.
18
def __init__(self):
19
self._memVar = 0;
20
21
## Documentation for a method.
22
# @param self The object pointer.
23
def PyMethod(self):
24
pass
25
26
## A class variable.
27
classVar = 0;
28
29
## @var _memVar
30
# a member variable
Since python looks more like Java than like C or C++, you should set OPTIMIZE_OUTPUT_JAVA to YES in the
config file.
4.1.3
Comment blocks in VHDL
For VHDL a comment normally start with "--". Doxygen will extract comments starting with "--!". There are only two
types of comment blocks in VHDL; a one line "--!" comment representing a brief description, and a multi-line "--!"
comment (where the "--!" prefix is repeated for each line) representing a detailed description.
Comments are always located in front of the item that is being documented with one exception: for ports the
comment can also be after the item and is then treated as a brief description for the port.
Here is an example VHDL file with doxygen comments:
1 ------------------------------------------------------2 --! @file
3 --! @brief 2:1 Mux using with-select
4 ------------------------------------------------------5
6 --! Use standard library
7 library ieee;
8 --! Use logic elements
9
use ieee.std_logic_1164.all;
10
11 --! Mux entity brief description
12
13 --! Detailed description of this
14 --! mux design element.
15 entity mux_using_with is
16
port (
17
din_0
: in std_logic; --! Mux first input
18
din_1
: in std_logic; --! Mux Second input
19
sel
: in std_logic; --! Select input
20
mux_out : out std_logic --! Mux output
21
);
22 end entity;
23
24 --! @brief Architecture definition of the MUX
25 --! @details More details about this mux element.
26 architecture behavior of mux_using_with is
27 begin
28
with (sel) select
29
mux_out <= din_0 when ’0’,
30
din_1 when others;
31 end architecture;
32
To get proper looking output you need to set OPTIMIZE_OUTPUT_VHDL to YES in the config file. This will also
affect a number of other settings. When they were not already set correctly doxygen will produce a warning telling
which settings where overruled.
Generated by Doxygen
28
Documenting the code
4.1.4
Comment blocks in Fortran
When using doxygen for Fortran code you should set OPTIMIZE_FOR_FORTRAN to YES.
The parser tries to guess if the source code is fixed format Fortran or free format Fortran code. This may not always
be correct. If not one should use EXTENSION_MAPPING to correct this. By setting EXTENSION_MAPPING =
f=FortranFixed f90=FortranFree files with extension f90 are interpreted as fixed format Fortran code
and files with extension f are interpreted as free format Fortran code.
For Fortran "!>" or "!<" starts a comment and "!!" or "!>" can be used to continue an one line comment into a
multi-line comment.
Here is an example of a documented Fortran subroutine:
!> Build the restriction matrix for the aggregation
!! method.
!! @param aggr information about the aggregates
!! @todo Handle special case
subroutine intrestbuild(A,aggr,Restrict,A_ghost)
implicit none
Type(spmtx), intent(in) :: a !< our fine level matrix
type(aggrs), intent(in) :: aggr
Type(spmtx), intent(out) :: restrict !< Our restriction matrix
!...
end subroutine
As an alternative you can also use comments in fixed format code:
C> Function comment
C> another line of comment
function a(i)
C> input parameter
integer i
end function A
4.1.5
Comment blocks in Tcl
Doxygen documentation can be included in normal Tcl comments.
To start a new documentation block start a line with ## (two hashes). All following comment lines and continuation
lines will be added to this block. The block ends with a line not starting with a # (hash sign).
A brief documentation can be added with ;#< (semicolon, hash and lower then sign). The brief documentation also
ends at a line not starting with a # (hash sign).
Inside doxygen comment blocks all normal doxygen markings are supported. The only exceptions are described in
the following two paragraphs.
If a doxygen comment block ends with a line containing only #\code or #@code all code until a line only containing
#\endcode or #@endcode is added to the generated documentation as code block.
If a doxygen comment block ends with a line containing only #\verbatim or #@verbatim all code until a line
only containing #\endverbatim or #@endverbatim is added verbatim to the generated documentation.
To detect namespaces, classes, functions and variables the following Tcl commands are recognized. Documentation blocks can be put on the lines before the command.
• namespace eval .. Namespace
• proc .. Function
• variable .. Variable
• common .. Common variable
• itcl::class .. Class
• itcl::body .. Class method body definition
Generated by Doxygen
4.1 Special comment blocks
• oo::class create .. Class
• oo::define .. OO Class definition
• method .. Class method definitions
• constructor .. Class constructor
• destructor .. Class destructor
• public .. Set protection level
• protected .. Set protection level
• private .. Set protection level
Following is an example using doxygen style comments:
1 ## \file tclexample.tcl
2 # File documentation.
3 #\verbatim
4
5 # Startup code:\
6 exec tclsh "$0" "$@"
7 #\endverbatim
8 ## Documented namespace \c ns .
9 # The code is inserted here:
10 #\code
11 namespace eval ns {
12
## Documented proc \c ns_proc .
13
# param[in] arg some argument
14
proc ns_proc {arg} {}
15
## Documented var \c ns_var .
16
# Some documentation.
17
variable ns_var
18
## Documented itcl class \c itcl_class .
19
itcl::class itcl_class {
20
## Create object.
21
constructor {args} {eval $args}
22
## Destroy object.
23
destructor {exit}
24
## Documented itcl method \c itcl_method_x .
25
# param[in] arg Argument
26
private method itcl_method_x {arg}{}
27
## Documented itcl method \c itcl_method_y .
28
# param[in] arg Argument
29
protected method itcl_method_y {arg} {}
30
## Documented itcl method \c itcl_method_z .
31
# param[in] arg Argument
32
public method itcl_method_z {arg} {}
33
## Documented common itcl var \c itcl_Var .
34
common itcl_Var
35
## \protectedsection
36
37
variable itcl_var1;#< Documented itcl var \c itcl_var1 .
38
variable itcl_var2}
39
## Documented oo class \c oo_class .
40
oo::class create oo_class {
41
## Create object.
42
# Configure with args
43
constructor {args} {eval $args}
44
## Destroy object.
45
# Exit.
46
destructor {exit}
47
## Documented oo var \c oo_var .
48
# Defined inside class
49
variable oo_var
50
## \private Documented oo method \c oo_method_x .
51
# param[in] arg Argument
52
method oo_method_x {arg} {}
53
## \protected Documented oo method \c oo_method_y .
54
# param[in] arg Argument
55
method oo_method_y {arg} {}
56
## \public Documented oo method \c oo_method_z .
57
# param[in] arg Argument
58
method oo_method_z {arg} {}
59
}
60 }
61 #\endcode
62
63 itcl::body ::ns::itcl_class::itcl_method_x {argx} {
64
puts "$argx OK"
Generated by Doxygen
29
30
65
66
67
68
69
70
71
72
73
74
75
76
77
78
79
80
81
Documenting the code
}
oo::define ns::oo_class {
## \public Outside defined variable \c oo_var_out .
# Inside oo_class
variable oo_var_out
}
## Documented global proc \c glob_proc .
# param[in] arg Argument
proc glob_proc {arg} {puts $arg}
variable glob_var;#< Documented global var \c glob_var\
with newline
#< and continued line
# end of file
4.2
Anatomy of a comment block
The previous section focused on how to make the comments in your code known to doxygen, it explained the
difference between a brief and a detailed description, and the use of structural commands.
In this section we look at the contents of the comment block itself.
Doxygen supports various styles of formatting your comments.
The simplest form is to use plain text. This will appear as-is in the output and is ideal for a short description.
For longer descriptions you often will find the need for some more structure, like a block of verbatim text, a list,
or a simple table. For this doxygen supports the Markdown syntax, including parts of the Markdown Extra
extension.
Markdown is designed to be very easy to read and write. It’s formatting is inspired by plain text mail. Markdown
works great for simple, generic formatting, like an introduction page for your project. Doxygen also supports reading
of markdown files directly. See here for more details regards Markdown support.
For programming language specific formatting doxygen has two forms of additional markup on top of Markdown
formatting.
1. Javadoc like markup. See here for a complete overview of all commands supported by doxygen.
2. XML markup as specified in the C# standard. See here for the XML commands supported by doxygen.
If this is still not enough doxygen also supports a subset of the HTML markup language.
Generated by Doxygen
Chapter 5
Markdown
Markdown support was introduced in doxygen version 1.8.0. It is a plain text formatting syntax written by John
Gruber, with the following underlying design goal:
The design goal for Markdown’s formatting syntax is to make it as readable as possible. The idea is
that a Markdown-formatted document should be publishable as-is, as plain text, without looking like it’s
been marked up with tags or formatting instructions. While Markdown’s syntax has been influenced by
several existing text-to-HTML filters, the single biggest source of inspiration for Markdown’s syntax is
the format of plain text email.
In the next section the standard Markdown features are briefly discussed. The reader is referred to the Markdown
site for more details.
Some enhancements were made, for instance PHP Markdown Extra, and GitHub flavored
Markdown. The section Markdown Extensions discusses the extensions that doxygen supports.
Finally section Doxygen specifics discusses some specifics for doxygen’s implementation of the Markdown standard.
5.1
Standard Markdown
5.1.1
Paragraphs
Even before doxygen had Markdown support it supported the same way of paragraph handling as Markdown: to
make a paragraph you just separate consecutive lines of text by one or more blank lines.
An example:
Here is text for one paragraph.
We continue with more text in another paragraph.
5.1.2
Headers
Just like Markdown, doxygen supports two types of headers
Level 1 or 2 headers can be made as the follows
This is a level 1 header
========================
This is a level 2 header
------------------------
A header is followed by a line containing only =’s or -’s. Note that the exact amount of =’s or -’s is not important as
long as there are at least two.
32
Markdown
Alternatively, you can use #’s at the start of a line to make a header. The number of #’s at the start of the line
determines the level (up to 6 levels are supported). You can end a header by any number of #’s.
Here is an example:
# This is a level 1 header
### This is level 3 header #######
5.1.3
Block quotes
Block quotes can be created by starting each line with one or more >’s, similar to what is used in text-only emails.
> This is a block quote
> spanning multiple lines
Lists and code blocks (see below) can appear inside a quote block. Quote blocks can also be nested.
Note that doxygen requires that you put a space after the (last) > character to avoid false positives, i.e. when writing
0 if OK\n
>1 if NOK
the second line will not be seen as a block quote.
5.1.4
Lists
Simple bullet lists can be made by starting a line with -, +, or в€—.
- Item 1
More text for this item.
- Item 2
+ nested list item.
+ another nested item.
- Item 3
List items can span multiple paragraphs (if each paragraph starts with the proper indentation) and lists can be
nested. You can also make a numbered list like so
1. First item.
2. Second item.
Make sure to also read Lists Extensions for doxygen specifics.
5.1.5
Code Blocks
Preformatted verbatim blocks can be created by indenting each line in a block of text by at least 4 extra spaces
This a normal paragraph
This is a code block
We continue with a normal paragraph again.
Doxygen will remove the mandatory indentation from the code block. Note that you cannot start a code block in the
middle of a paragraph (i.e. the line preceding the code block must be empty).
See section Code Block Indentation for more info how doxygen handles indentation as this is slightly different than
standard Markdown.
Generated by Doxygen
5.1 Standard Markdown
5.1.6
33
Horizontal Rulers
A horizontal ruler will be produced for lines containing at least three or more hyphens, asterisks, or underscores.
The line may also include any amount of whitespace.
Examples:
- - ______
Note that using asterisks in comment blocks does not work. See Use of asterisks for details.
5.1.7
Emphasis
To emphasize a text fragment you start and end the fragment with an underscore or star. Using two stars or
underscores will produce strong emphasis.
Examples:
single asterisks*
_single underscores_
double asterisks**
__double underscores__
See section Emphasis limits for more info how doxygen handles emphasis spans slightly different than standard
Markdown.
5.1.8
code spans
To indicate a span of code, you should wrap it in backticks (�). Unlike code blocks, code spans appear inline in a
paragraph. An example:
Use the �printf()� function.
To show a literal backtick inside a code span use double backticks, i.e.
To assign the output of command �ls� to �var� use ��var=�ls���.
See section Code Spans Limits for more info how doxygen handles code spans slightly different than standard
Markdown.
5.1.9
Links
Doxygen supports both styles of make links defined by Markdown: inline and reference.
For both styles the link definition starts with the link text delimited by [square brackets].
5.1.9.1
Inline Links
For an inline link the link text is followed by a URL and an optional link title which together are enclosed in a set of
regular parenthesis. The link title itself is surrounded by quotes.
Examples:
[The
[The
[The
[The
link
link
link
link
text](http://example.net/)
text](http://example.net/ "Link title")
text](/relative/path/to/index.html "Link title")
text](somefile.html)
Generated by Doxygen
34
Markdown
In addition doxygen provides a similar way to link a documented entity:
[The link text](@ref MyClass)
5.1.9.2
Reference Links
Instead of putting the URL inline, you can also define the link separately and then refer to it from within the text.
The link definition looks as follows:
[link name]: http://www.example.com "Optional title"
Instead of double quotes also single quotes or parenthesis can be used for the title part.
Once defined, the link looks as follows
[link text][link name]
If the link text and name are the same, also
[link name][]
or even
[link name]
can be used to refer to the link. Note that the link name matching is not case sensitive as is shown in the following
example:
I get 10 times more traffic from [Google] than from
[Yahoo] or [MSN].
[google]: http://google.com/
[yahoo]: http://search.yahoo.com/
[msn]:
http://search.msn.com/
"Google"
"Yahoo Search"
"MSN Search"
Link definitions will not be visible in the output.
Like for inline links doxygen also supports @ref inside a link definition:
[myclass]: @ref MyClass "My class"
5.1.10
Images
Markdown syntax for images is similar to that for links. The only difference is an additional ! before the link text.
Examples:


![Caption text][img def]
![img def]
[img def]: /path/to/img.jpg "Optional Title"
Also here you can use @ref to link to an image:

![img def]
[img def]: @ref image.png "Caption text"
The caption text is optional.
Generated by Doxygen
5.2 Markdown Extensions
5.1.11
35
Automatic Linking
To create a link to an URL or e-mail address Markdown supports the following syntax:
<http://www.example.com>
<https://www.example.com>
<ftp://www.example.com>
<mailto:[email protected]>
<[email protected]>
Note that doxygen will also produce the links without the angle brackets.
5.2
Markdown Extensions
5.2.1
Table of Contents
Doxygen supports a special link marker [TOC] which can be placed in a page to produce a table of contents at the
start of the page, listing all sections.
Note that using [TOC] is the same as using a \tableofcontents command.
5.2.2
Tables
Of the features defined by "Markdown Extra" is support for simple tables:
A table consists of a header line, a separator line, and at least one row line. Table columns are separated by the
pipe (|) character.
Here is an example:
First Header
------------Content Cell
Content Cell
|
|
|
|
Second Header
------------Content Cell
Content Cell
which will produce the following table:
First Header
Content Cell
Content Cell
Second Header
Content Cell
Content Cell
Column alignment can be controlled via one or two colons at the header separator line:
|
|
|
|
Right
----:
10
1000
|
|
|
|
Center
:----:
10
1000
|
|
|
|
Left
:---10
1000
|
|
|
|
which will look as follows:
Right
10
1000
5.2.3
Center
10
1000
Left
10
1000
Fenced Code Blocks
Another feature defined by "Markdown Extra" is support for fenced code blocks:
A fenced code block does not require indentation, and is defined by a pair of "fence lines". Such a line consists of
3 or more tilde (в€ј) characters on a line. The end of the block should have the same number of tildes. Here is an
example:
Generated by Doxygen
36
Markdown
This is a paragraph introducing:
~~~~~~~~~~~~~~~~~~~~~
a one-line code block
~~~~~~~~~~~~~~~~~~~~~
By default the output is the same as for a normal code block.
For languages supported by doxygen you can also make the code block appear with syntax highlighting. To do
so you need to indicate the typical file extension that corresponds to the programming language after the opening
fence. For highlighting according to the Python language for instance, you would need to write the following:
~~~~~~~~~~~~~{.py}
# A class
class Dummy:
pass
~~~~~~~~~~~~~
which will produce:
1 # A class
2 class Dummy:
3
pass
and for C you would write:
~~~~~~~~~~~~~~~{.c}
int func(int a,int b) { return a*b; }
~~~~~~~~~~~~~~~
which will produce:
int func(int a,int b) { return a*b; }
The curly braces and dot are optional by the way.
5.2.4
Header Id Attributes
Standard Markdown has no support for labeling headers, which is a problem if you want to link to a section.
PHP Markdown Extra allows you to label a header by adding the following to the header
Header 1
========
{#labelid}
## Header 2 ##
{#labelid2}
To link to a section in the same comment block you can use
[Link text](#labelid)
to link to a section in general, doxygen allows you to use @ref
[Link text](@ref labelid)
Note this only works for the headers of level 1 to 4.
5.3
Doxygen specifics
Even though doxygen tries to following the Markdown standard as closely as possible, there are couple of deviation
and doxygen specifics additions.
Generated by Doxygen
5.3 Doxygen specifics
5.3.1
37
Including Markdown files as pages
Doxygen can process files with Markdown formatting. For this to work the extension for such a file should be .md
or .markdown (see EXTENSION_MAPPING if your Markdown files have a different extension, and use md as the
name of the parser). Each file is converted to a page (see the page command for details).
By default the name and title of the page are derived from the file name. If the file starts with a level 1 header
however, it is used as the title of the page. If you specify a label for the header (as shown here) doxygen will use
that as the page name.
If the label is called index or mainpage doxygen will put the documentation on the front page (index.html).
Here is an example of a file README.md that will appear as the main page when processed by doxygen:
My Main Page
============
{#mainpage}
Documentation that will appear on the main page
If a page has a label you can link to it using @ref as is shown above. To refer to a markdown page without such
label you can simple use the file name of the page, e.g.
See [the other page](other.md) for more info.
5.3.2
Treatment of HTML blocks
Markdown is quite strict in the way it processes block-level HTML:
block-level HTML elements — e.g. <div>, <table>, <pre>, <p>, etc. — must be separated
from surrounding content by blank lines, and the start and end tags of the block should not be indented
with tabs or spaces.
Doxygen does not have this requirement, and will also process Markdown formatting inside such HTML blocks. The
only exception is <pre> blocks, which are passed untouched (handy for ASCII art).
Doxygen will not process Markdown formatting inside verbatim or code blocks, and in other sections that need to
be processed without changes (for instance formulas or inline dot graphs).
5.3.3
Code Block Indentation
Markdown allows both a single tab or 4 spaces to start a code block. Since doxygen already replaces tabs by
spaces before doing Markdown processing, the effect will only be same if TAB_SIZE in the config file has been set
to 4. When it is set to a higher value spaces will be present in the code block. A lower value will prevent a single tab
to be interpreted as the start of a code block.
With Markdown any block that is indented by 4 spaces (and 8 spaces inside lists) is treated as a code block. This
indentation amount is absolute, i.e. counting from the start of the line.
Since doxygen comments can appear at any indentation level that is required by the programming language, it uses
a relative indentation instead. The amount of indentation is counted relative to the preceding paragraph. In case
there is no preceding paragraph (i.e. you want to start with a code block), the minimal amount of indentation of the
whole comment block is used as a reference.
In most cases this difference does not result in different output. Only if you play with the indentation of paragraphs
the difference is noticeable:
text
text
text
code
Generated by Doxygen
38
Markdown
In this case Markdown will put the word code in a code block, whereas Doxygen will treat it as normal text, since
although the absolute indentation is 4, the indentation with respect to the previous paragraph is only 1.
Note that list markers are not counted when determining the relative indent:
1.
Item1
More text for item1
2.
Item2
Code block for item2
For Item1 the indentation is 4 (when treating the list marker as whitespace), so the next paragraph "More text..."
starts at the same indentation level and is therefore not seen as a code block.
5.3.4
Emphasis limits
Unlike standard Markdown, doxygen will not touch internal underscores or stars, so the following will appear as-is:
a_nice_identifier
Furthermore, a в€— or _ only starts an emphasis if
• it is followed by an alphanumerical character, and
• it is preceded by a space, newline, or one the following characters <{([,:;
An emphasis ends if
• it is not followed by an alphanumerical character, and
• it is not preceded by a space, newline, or one the following characters ({[<=+-\@
Lastly, the span of the emphasis is limited to a single paragraph.
5.3.5
Code Spans Limits
Note that unlike standard Markdown, doxygen leaves the following untouched.
A �cool’ word in a �nice’ sentence.
In other words; a single quote cancels the special treatment of a code span wrapped in a pair of backtick characters.
This extra restriction was added for backward compatibility reasons.
5.3.6
Lists Extensions
With Markdown two lists separated by an empty line are joined together into a single list which can be rather
unexpected and many people consider it to be a bug. Doxygen, however, will make two separate lists as you would
expect.
Example:
- Item1 of list 1
- Item2 of list 1
1. Item1 of list 2
2. Item2 of list 2
With Markdown the actual numbers you use to mark the list have no effect on the HTML output Markdown produces.
I.e. standard Markdown treats the following as one list with 3 numbered items:
Generated by Doxygen
5.4 Debugging of problems
39
1. Item1
1. Item2
1. Item3
Doxygen however requires that the numbers used as marks are in strictly ascending order, so the above example
would produce 3 lists with one item. An item with an equal or lower number than the preceding item, will start a new
list. For example:
1.
3.
2.
4.
Item1
Item2
Item1
Item2
of
of
of
of
list
list
list
list
1
1
2
2
will produce:
1. Item1 of list 1
2. Item2 of list 1
1. Item1 of list 2
2. Item2 of list 2
Historically doxygen has an additional way to create numbered lists by using -# markers:
-# item1
-# item2
5.3.7
Use of asterisks
Special care has to be taken when using ∗’s in a comment block to start a list or make a ruler.
Doxygen will strip off any leading ∗’s from the comment before doing Markdown processing. So although the
following works fine
/** A list:
* * item1
* * item2
*/
When you remove the leading ∗’s doxygen will strip the other stars as well, making the list disappear!
Rulers created with ∗’s will not be visible at all. They only work in Markdown files.
5.3.8
Limits on markup scope
To avoid that a stray в€— or _ matches something many paragraphs later, and shows everything in between with
emphasis, doxygen limits the scope of a в€— and _ to a single paragraph.
For a code span, between the starting and ending backtick only two new lines are allowed.
Also for links there are limits; the link text, and link title each can contain only one new line, the URL may not contain
any newlines.
5.4
Debugging of problems
When doxygen parses the source code it first extracts the comments blocks, then passes these through the Markdown preprocessor. The output of the Markdown preprocessing consists of text with special commands and HTML
commands. A second pass takes the output of the Markdown preprocessor and converts it into the various output
formats.
Generated by Doxygen
40
Markdown
During Markdown preprocessing no errors are produced. Anything that does not fit the Markdown syntax is simply
passed on as-is. In the subsequent parsing phase this could lead to errors, which may not always be obvious as
they are based on the intermediate format.
To see the result after Markdown processing you can run doxygen with the -d Markdown option. It will then print
each comment block before and after Markdown processing.
Generated by Doxygen
Chapter 6
Lists
Doxygen provides a number of ways to create lists of items.
Using dashes
By putting a number of column-aligned minus (-) signs at the start of a line, a bullet list will automatically be generated. Instead of the minus sign also plus (+) or asterisk (в€—) can be used.
Numbered lists can also be generated by using a minus followed by a hash or by using a number followed by a dot.
Nesting of lists is allowed and is based on indentation of the items.
Here is an example:
/*!
* A list of events:
- mouse events
*
-# mouse move event
*
-# mouse click event\n
*
More info about the click event.
*
-# mouse double click event
*
- keyboard events
*
1. key down event
*
2. key up event
*
*
* More text here.
*/
The result will be:
A list of events:
• mouse events
1. mouse move event
2. mouse click event
More info about the click event.
3. mouse double click event
• keyboard events
1. key down event
2. key up event
More text here.
If you use tabs for indentation within lists, please make sure that TAB_SIZE in the configuration file is set to the
correct tab size.
42
Lists
You can end a list by starting a new paragraph or by putting a dot (.) on an empty line at the same indentation level
as the list you would like to end.
Here is an example that speaks for itself:
/**
* Text before the list
* - list item 1
- sub item 1
*
- sub sub item 1
*
- sub sub item 2
*
.
*
The dot above ends the sub sub item list.
*
*
More text for the first sub item
*
.
*
The dot above ends the first sub item.
*
*
More text for the first list item
*
- sub item 2
*
- sub item 3
*
* - list item 2
* .
* More text in the same paragraph.
*
* More text in a new paragraph.
*/
Using HTML commands
If you like you can also use HTML commands inside the documentation blocks.
Here is the above example with HTML commands:
/*!
*
*
*
*
*
*
*
*
*
*
*
*
*
*
*
*
*/
A list of events:
<ul>
<li> mouse events
<ol>
<li>mouse move event
<li>mouse click event<br>
More info about the click event.
<li>mouse double click event
</ol>
<li> keyboard events
<ol>
<li>key down event
<li>key up event
</ol>
</ul>
More text here.
Note
In this case the indentation is not important.
Using \arg or \li
For compatibility with the Qt Software’s internal documentation tool qdoc and with KDoc, doxygen has two commands that can be used to create simple unnested lists.
See \arg and \li for more info.
Generated by Doxygen
Chapter 7
Grouping
Doxygen has three mechanisms to group things together. One mechanism works at a global level, creating a new
page for each group. These groups are called ’modules’ in the documentation. The second mechanism works
within a member list of some compound entity, and is referred to as a ’member groups’. For pages there is a third
grouping mechanism referred to as subpaging.
7.1
Modules
Modules are a way to group things together on a separate page. You can document a group as a whole, as well
as all individual members. Members of a group can be files, namespaces, classes, functions, variables, enums,
typedefs, and defines, but also other groups.
To define a group, you should put the \defgroup command in a special comment block. The first argument of the
command is a label that should uniquely identify the group. The second argument is the name or title of the group
as it should appear in the documentation.
You can make an entity a member of a specific group by putting a \ingroup command inside its documentation block.
To avoid putting \ingroup commands in the documentation for each member you can also group members together
by the open marker @{ before the group and the closing marker @} after the group. The markers can be put in the
documentation of the group definition or in a separate documentation block.
Groups themselves can also be nested using these grouping markers.
You will get an error message when you use the same group label more than once. If you don’t want doxygen to
enforce unique labels, then you can use \addtogroup instead of \defgroup. It can be used exactly like \defgroup, but
when the group has been defined already, then it silently merges the existing documentation with the new one. The
title of the group is optional for this command, so you can use
/** \addtogroup <label>
* @{
*/
...
/** @}*/
to add additional members to a group that is defined in more detail elsewhere.
Note that compound entities (like classes, files and namespaces) can be put into multiple groups, but members (like
variable, functions, typedefs and enums) can only be a member of one group (this restriction is in place to avoid
ambiguous linking targets in case a member is not documented in the context of its class, namespace or file, but
only visible as part of a group).
Doxygen will put members into the group whose definition has the highest "priority": e.g. An explicit \ingroup
overrides an implicit grouping definition via @{ @}. Conflicting grouping definitions with the same priority trigger a
warning, unless one definition was for a member without any explicit documentation.
The following example puts VarInA into group A and silently resolves the conflict for IntegerVariable by putting it into
44
Grouping
group IntVariables, because the second instance of IntegerVariable is undocumented:
/**
* \ingroup A
*/
extern int VarInA;
/**
* \defgroup IntVariables Global integer variables
* @{
*/
/** an integer variable */
extern int IntegerVariable;
/**@}*/
....
/**
* \defgroup Variables Global variables
*/
/**@{*/
/** a variable in group A */
int VarInA;
int IntegerVariable;
/**@}*/
The \ref command can be used to refer to a group. The first argument of the \ref command should be group’s label.
To use a custom link name, you can put the name of the links in double quotes after the label, as shown by the
following example
This is the \ref group_label "link" to this group.
The priorities of grouping definitions are (from highest to lowest): \ingroup, \defgroup, \addtogroup, \weakgroup.
The last command is exactly like \addtogroup with a lower priority. It was added to allow "lazy" grouping definitions:
you can use commands with a higher priority in your .h files to define the hierarchy and \weakgroup in .c files without
having to duplicate the hierarchy exactly.
Example:
/** @defgroup group1 The First Group
* This is the first group
* @{
*/
/** @brief class C1 in group 1 */
class C1 {};
/** @brief class C2 in group 1 */
class C2 {};
/** function in group 1 */
void func() {}
/** @} */ // end of group1
/**
* @defgroup group2 The Second Group
* This is the second group
*/
/** @defgroup group3 The Third Group
* This is the third group
*/
/** @defgroup group4 The Fourth Group
Generated by Doxygen
7.2 Member Groups
45
* @ingroup group3
* Group 4 is a subgroup of group 3
*/
/**
* @ingroup group2
* @brief class C3 in group 2
*/
class C3 {};
/** @ingroup group2
* @brief class C4 in group 2
*/
class C4 {};
/** @ingroup group3
* @brief class C5 in @link group3 the third group@endlink.
*/
class C5 {};
/** @ingroup group1 group2 group3 group4
* namespace N1 is in four groups
* @sa @link group1 The first group@endlink, group2, group3, group4
*
* Also see @ref mypage2
*/
namespace N1 {};
/** @file
* @ingroup group3
* @brief this file in group 3
*/
/** @defgroup group5 The Fifth Group
* This is the fifth group
* @{
*/
/** @page mypage1 This is a section in group 5
* Text of the first section
*/
/** @page mypage2 This is another section in group 5
* Text of the second section
*/
/** @} */ // end of group5
/** @addtogroup group1
*
* More documentation for the first group.
* @{
*/
/** another function in group 1 */
void func2() {}
/** yet another function in group 1 */
void func3() {}
/** @} */ // end of group1
7.2
Member Groups
If a compound (e.g. a class or file) has many members, it is often desired to group them together. Doxygen already
automatically groups things together on type and protection level, but maybe you feel that this is not enough or that
that default grouping is wrong. For instance, because you feel that members of different (syntactic) types belong to
the same (semantic) group.
Generated by Doxygen
46
Grouping
A member group is defined by a
///@{
...
///@}
block or a
/**@{*/
...
/**@}*/
block if you prefer C style comments. Note that the members of the group should be physically inside the member
group’s body.
Before the opening marker of a block a separate comment block may be placed. This block should contain the
@name (or \name) command and is used to specify the header of the group. Optionally, the comment block may
also contain more detailed information about the group.
Nesting of member groups is not allowed.
If all members of a member group inside a class have the same type and protection level (for instance all are static
public members), then the whole member group is displayed as a subgroup of the type/protection level group (the
group is displayed as a subsection of the "Static Public Members" section for instance). If two or more members
have different types, then the group is put at the same level as the automatically generated groups. If you want
to force all member-groups of a class to be at the top level, you should put a \nosubgrouping command inside the
documentation of the class.
Example:
/** A class. Details */
class Test
{
public:
//@{
/** Same documentation for both members. Details */
void func1InGroup1();
void func2InGroup1();
//@}
/** Function without group. Details. */
void ungroupedFunction();
void func1InGroup2();
protected:
void func2InGroup2();
};
void Test::func1InGroup1() {}
void Test::func2InGroup1() {}
/** @name Group2
* Description of group 2.
*/
///@{
/** Function 2 in group 2. Details. */
void Test::func2InGroup2() {}
/** Function 1 in group 2. Details. */
void Test::func1InGroup2() {}
///@}
/*! \file
* docs for this file
*/
//!@{
//! one description for all members of this group
//! (because DISTRIBUTE_GROUP_DOC is YES in the config file)
#define A 1
#define B 2
void glob_func();
//!@}
Generated by Doxygen
7.3 Subpaging
47
Here Group1 is displayed as a subsection of the "Public Members". And Group2 is a separate section because it
contains members with different protection levels (i.e. public and protected).
7.3
Subpaging
Information can be grouped into pages using the \page and \mainpage commands. Normally, this results in a flat
list of pages, where the "main" page is the first in the list.
Instead of adding structure using the approach described in section modules it is often more natural and convenient
to add additional structure to the pages using the \subpage command.
For a page A the \subpage command adds a link to another page B and at the same time makes page B a subpage
of A. This has the effect of making two groups GA and GB, where GB is part of GA, page A is put in group GA, and
page B is put in group GB.
Generated by Doxygen
48
Grouping
Generated by Doxygen
Chapter 8
Including Formulas
Doxygen allows you to put LATEX formulas in the output (this works only for the HTML and LATEX output, not for the
RTF nor for the man page output). To be able to include formulas (as images) in the HTML documentation, you will
also need to have the following tools installed
• latex: the LATEX compiler, needed to parse the formulas. To test I have used the teTeX 1.0 distribution.
• dvips: a tool to convert DVI files to PostScript files I have used version 5.92b from Radical Eye software
for testing.
• gs: the GhostScript interpreter for converting PostScript files to bitmaps. I have used Aladdin GhostScript
8.0 for testing.
For the HTML output there is also an alternative solution using MathJax which does not require the above tools.
If you enable USE_MATHJAX in the config then the latex formulas will be copied to the HTML "as is" and a client
side javascript will parse them and turn them into (interactive) images.
There are three ways to include formulas in the documentation.
1. Using in-text formulas that appear in the running text. These formulas should be put between a pair of \f$
commands, so
The distance between \f$(x_1,y_1)\f$ and \f$(x_2,y_2)\f$ is
\f$\sqrt{(x_2-x_1)^2+(y_2-y_1)^2}\f$.
results in:
The distance between (x1 , y1 ) and (x2 , y2 ) is
(x2 в€’ x1 )2 + (y2 в€’ y1 )2 .
2. Unnumbered displayed formulas that are centered on a separate line. These formulas should be put between
\f[ and \f] commands. An example:
\f[
|I_2|=\left| \int_{0}^T \psi(t)
\left\{
u(a,t)\int_{\gamma(t)}^a
\frac{d\theta}{k(\theta,t)}
\int_{a}^\theta c(\xi)u_t(\xi,t)\,d\xi
\right\} dt
\right|
\f]
results in:
T
|I2 | =
a
П€(t) u(a,t) в€’
0
dОё
Оі(t) k(Оё ,t)
Оё
a
c(Оѕ )ut (Оѕ ,t) dОѕ dt
3. Formulas or other latex elements that are not in a math environment can be specified using \f{environment},
where environment is the name of the LATEX environment, the corresponding end command is \f}. Here is
an example for an equation array
50
Including Formulas
\f{eqnarray*}{
g &=& \frac{Gm_2}{r^2} \\
&=& \frac{(6.673 \times 10^{-11}\,\mbox{m}^3\,\mbox{kg}^{-1}\,
\mbox{s}^{-2})(5.9736 \times 10^{24}\,\mbox{kg})}{(6371.01\,\mbox{km})^2} \\
&=& 9.82066032\,\mbox{m/s}^2
\f}
which results in:
g
=
=
Gm2
r2
(6.673 Г— 10в€’11 m3 kgв€’1 sв€’2 )(5.9736 Г— 1024 kg)
(6371.01 km)2
= 9.82066032 m/s2
For the first two commands one should make sure formulas contain valid commands in LATEX’s math-mode. For the
third command the section should contain valid command for the specific environment.
Warning
Currently, doxygen is not very fault tolerant in recovering from typos in formulas. It may be necessary to remove
the file formula.repository that is written to the html directory to get rid of an incorrect formula.
Generated by Doxygen
Chapter 9
Graphs and diagrams
Doxygen has built-in support to generate inheritance diagrams for C++ classes.
Doxygen can use the "dot" tool from graphviz to generate more advanced diagrams and graphs. Graphviz is an
open-source, cross-platform graph drawing toolkit and can be found at http://www.graphviz.org/
If you have the "dot" tool in the path, you can set HAVE_DOT to YES in the configuration file to let doxygen use it.
Doxygen uses the "dot" tool to generate the following graphs:
• A graphical representation of the class hierarchy will be drawn, along with the textual one. Currently this
feature is supported for HTML only.
Warning: When you have a very large class hierarchy where many classes derive from a common base
class, the resulting image may become too big to handle for some browsers.
• An inheritance graph will be generated for each documented class showing the direct and indirect inheritance
relations. This disables the generation of the built-in class inheritance diagrams.
• An include dependency graph is generated for each documented file that includes at least one other file. This
feature is currently supported for HTML and RTF only.
• An inverse include dependency graph is also generated showing for a (header) file, which other files include
it.
• A graph is drawn for each documented class and struct that shows:
– the inheritance relations with base classes.
– the usage relations with other structs and classes (e.g. class A has a member variable m_a of type
class B, then A has an arrow to B with m_a as label).
• if CALL_GRAPH is set to YES, a graphical call graph is drawn for each function showing the functions that
the function directly or indirectly calls.
• if CALLER_GRAPH is set to YES, a graphical caller graph is drawn for each function showing the functions
that the function is directly or indirectly called by.
Using a layout file you can determine which of the graphs are actually shown.
The options DOT_GRAPH_MAX_NODES and MAX_DOT_GRAPH_DEPTH can be used to limit the size of the
various graphs.
The elements in the class diagrams in HTML and RTF have the following meaning:
• A yellow box indicates a class. A box can have a little marker in the lower right corner to indicate that the
class contains base classes that are hidden. For the class diagrams the maximum tree width is currently 8
elements. If a tree is wider some nodes will be hidden. If the box is filled with a dashed pattern the inheritance
relation is virtual.
52
Graphs and diagrams
• A white box indicates that the documentation of the class is currently shown.
• A gray box indicates an undocumented class.
• A solid dark blue arrow indicates public inheritance.
• A dashed dark green arrow indicates protected inheritance.
• A dotted dark green arrow indicates private inheritance.
The elements in the class diagram in LATEX have the following meaning:
• A white box indicates a class. A marker in the lower right corner of the box indicates that the class has base
classes that are hidden. If the box has a dashed border this indicates virtual inheritance.
• A solid arrow indicates public inheritance.
• A dashed arrow indicates protected inheritance.
• A dotted arrow indicates private inheritance.
The elements in the graphs generated by the dot tool have the following meaning:
• A white box indicates a class or struct or file.
• A box with a red border indicates a node that has more arrows than are shown! In other words: the graph
is truncated with respect to this node. The reason why a graph is sometimes truncated is to prevent images
from becoming too large. For the graphs generated with dot doxygen tries to limit the width of the resulting
image to 1024 pixels.
• A black box indicates that the class’ documentation is currently shown.
• A dark blue arrow indicates an include relation (for the include dependency graph) or public inheritance (for
the other graphs).
• A dark green arrow indicates protected inheritance.
• A dark red arrow indicates private inheritance.
• A purple dashed arrow indicated a "usage" relation, the edge of the arrow is labeled with the variable(s)
responsible for the relation. Class A uses class B, if class A has a member variable m of type C, where B is a
subtype of C (e.g. C could be B, Bв€—, T<B>в€—).
Here are a couple of header files that together show the various diagrams that doxygen can generate:
diagrams_a.h
#ifndef _DIAGRAMS_A_H
#define _DIAGRAMS_A_H
class A { public: A *m_self; };
#endif
diagrams_b.h
#ifndef _DIAGRAMS_B_H
#define _DIAGRAMS_B_H
class A;
class B { public: A *m_a; };
#endif
diagrams_c.h
#ifndef _DIAGRAMS_C_H
#define _DIAGRAMS_C_H
#include "diagrams_c.h"
class D;
class C : public A { public: D *m_d; };
#endif
Generated by Doxygen
53
diagrams_d.h
#ifndef _DIAGRAM_D_H
#define _DIAGRAM_D_H
#include "diagrams_a.h"
#include "diagrams_b.h"
class C;
class D : virtual protected
#endif
diagrams_e.h
#ifndef _DIAGRAM_E_H
#define _DIAGRAM_E_H
#include "diagrams_d.h"
class E : public D {};
#endif
Generated by Doxygen
A, private B { public: C m_c; };
54
Graphs and diagrams
Generated by Doxygen
Chapter 10
Preprocessing
Source files that are used as input to doxygen can be parsed by doxygen’s built-in C-preprocessor.
By default doxygen does only partial preprocessing. That is, it evaluates conditional compilation statements (like
#if) and evaluates macro definitions, but it does not perform macro expansion.
So if you have the following code fragment
#define VERSION 200
#define CONST_STRING const char *
#if VERSION >= 200
static CONST_STRING version = "2.xx";
#else
static CONST_STRING version = "1.xx";
#endif
Then by default doxygen will feed the following to its parser:
#define VERSION
#define CONST_STRING
static CONST_STRING version = "2.xx";
You can disable all preprocessing by setting ENABLE_PREPROCESSING to NO in the configuration file. In the
case above doxygen will then read both statements, i.e.:
static CONST_STRING version = "2.xx";
static CONST_STRING version = "1.xx";
In case you want to expand the CONST_STRING macro, you should set the MACRO_EXPANSION tag in the
config file to YES. Then the result after preprocessing becomes:
#define VERSION
#define CONST_STRING
static const char * version = "1.xx";
Note that doxygen will now expand all macro definitions (recursively if needed). This is often too much. Therefore,
doxygen also allows you to expand only those defines that you explicitly specify. For this you have to set the
EXPAND_ONLY_PREDEF tag to YES and specify the macro definitions after the PREDEFINED or EXPAND_A←
S_DEFINED tag.
A typically example where some help from the preprocessor is needed is when dealing with the language extension
from Microsoft: __declspec. The same goes for GNU’s __attribute__ extension. Here is an example
function.
extern "C" void __declspec(dllexport) ErrorMsg( String aMessage,...);
56
Preprocessing
When nothing is done, doxygen will be confused and see __declspec as some sort of function. To help doxygen
one typically uses the following preprocessor settings:
ENABLE_PREPROCESSING
MACRO_EXPANSION
EXPAND_ONLY_PREDEF
PREDEFINED
=
=
=
=
YES
YES
YES
__declspec(x)=
This will make sure the __declspec(dllexport) is removed before doxygen parses the source code.
Similar settings can be used for removing __attribute__ expressions from the input:
ENABLE_PREPROCESSING
MACRO_EXPANSION
EXPAND_ONLY_PREDEF
PREDEFINED
=
=
=
=
YES
YES
YES
__attribute__(x)=
For a more complex example, suppose you have the following obfuscated code fragment of an abstract base class
called IUnknown:
/*! A reference to an IID */
#ifdef __cplusplus
#define REFIID const IID &
#else
#define REFIID const IID *
#endif
/*! The IUnknown interface */
DECLARE_INTERFACE(IUnknown)
{
STDMETHOD(HRESULT,QueryInterface) (THIS_ REFIID iid, void **ppv) PURE;
STDMETHOD(ULONG,AddRef) (THIS) PURE;
STDMETHOD(ULONG,Release) (THIS) PURE;
};
without macro expansion doxygen will get confused, but we may not want to expand the REFIID macro, because
it is documented and the user that reads the documentation should use it when implementing the interface.
By setting the following in the config file:
ENABLE_PREPROCESSING
MACRO_EXPANSION
EXPAND_ONLY_PREDEF
PREDEFINED
=
=
=
=
YES
YES
YES
"DECLARE_INTERFACE(name)=class name" \
"STDMETHOD(result,name)=virtual result name" \
"PURE= = 0" \
THIS_= \
THIS= \
__cplusplus
we can make sure that the proper result is fed to doxygen’s parser:
/*! A reference to an IID */
#define REFIID
/*! The IUnknown interface */
class IUnknown
{
virtual HRESULT
QueryInterface ( REFIID iid, void **ppv) = 0;
virtual ULONG
AddRef () = 0;
virtual ULONG
Release () = 0;
};
Note that the PREDEFINED tag accepts function like macro definitions (like DECLARE_INTERFACE ), normal
macro substitutions (like PURE and THIS) and plain defines (like __cplusplus).
Generated by Doxygen
57
Note also that preprocessor definitions that are normally defined automatically by the preprocessor (like __в†ђ
cplusplus), have to be defined by hand with doxygen’s parser (this is done because these defines are often
platform/compiler specific).
In some cases you may want to substitute a macro name or function by something else without exposing the result
to further macro substitution. You can do this but using the := operator instead of =
As an example suppose we have the following piece of code:
#define QList QListT
class QListT
{
};
Then the only way to get doxygen interpret this as a class definition for class QList is to define:
PREDEFINED = QListT:=QList
Here is an example provided by Valter Minute and Reyes Ponce that helps doxygen to wade through the boilerplate
code in Microsoft’s ATL & MFC libraries:
PREDEFINED
Generated by Doxygen
= "DECLARE_INTERFACE(name)=class name" \
"STDMETHOD(result,name)=virtual result name" \
"PURE= = 0" \
THIS_= \
THIS= \
DECLARE_REGISTRY_RESOURCEID=// \
DECLARE_PROTECT_FINAL_CONSTRUCT=// \
"DECLARE_AGGREGATABLE(Class)= " \
"DECLARE_REGISTRY_RESOURCEID(Id)= " \
DECLARE_MESSAGE_MAP= \
BEGIN_MESSAGE_MAP=/* \
END_MESSAGE_MAP=*/// \
BEGIN_COM_MAP=/* \
END_COM_MAP=*/// \
BEGIN_PROP_MAP=/* \
END_PROP_MAP=*/// \
BEGIN_MSG_MAP=/* \
END_MSG_MAP=*/// \
BEGIN_PROPERTY_MAP=/* \
END_PROPERTY_MAP=*/// \
BEGIN_OBJECT_MAP=/* \
END_OBJECT_MAP()=*/// \
DECLARE_VIEW_STATUS=// \
"STDMETHOD(a)=HRESULT a" \
"ATL_NO_VTABLE= " \
"__declspec(a)= " \
BEGIN_CONNECTION_POINT_MAP=/* \
END_CONNECTION_POINT_MAP=*/// \
"DECLARE_DYNAMIC(class)= " \
"IMPLEMENT_DYNAMIC(class1, class2)= " \
"DECLARE_DYNCREATE(class)= " \
"IMPLEMENT_DYNCREATE(class1, class2)= " \
"IMPLEMENT_SERIAL(class1, class2, class3)= " \
"DECLARE_MESSAGE_MAP()= " \
TRY=try \
"CATCH_ALL(e)= catch(...)" \
END_CATCH_ALL= \
"THROW_LAST()= throw"\
"RUNTIME_CLASS(class)=class" \
"MAKEINTRESOURCE(nId)=nId" \
"IMPLEMENT_REGISTER(v, w, x, y, z)= " \
"ASSERT(x)=assert(x)" \
"ASSERT_VALID(x)=assert(x)" \
"TRACE0(x)=printf(x)" \
"OS_ERR(A,B)={ #A, B }" \
__cplusplus \
"DECLARE_OLECREATE(class)= " \
"BEGIN_DISPATCH_MAP(class1, class2)= " \
"BEGIN_INTERFACE_MAP(class1, class2)= " \
"INTERFACE_PART(class, id, name)= " \
58
Preprocessing
"END_INTERFACE_MAP()=" \
"DISP_FUNCTION(class, name, function, result, id)=" \
"END_DISPATCH_MAP()=" \
"IMPLEMENT_OLECREATE2(class, name, id1, id2, id3, id4,\
id5, id6, id7, id8, id9, id10, id11)="
As you can see doxygen’s preprocessor is quite powerful, but if you want even more flexibility you can always write
an input filter and specify it after the INPUT_FILTER tag.
If you are unsure what the effect of doxygen’s preprocessing will be you can run doxygen as follows:
doxygen -d Preprocessor
This will instruct doxygen to dump the input sources to standard output after preprocessing has been done (Hint:
set QUIET = YES and WARNINGS = NO in the configuration file to disable any other output).
Generated by Doxygen
Chapter 11
Automatic link generation
Most documentation systems have special �see also’ sections where links to other pieces of documentation can be
inserted. Although doxygen also has a command to start such a section (See section \sa), it does allow you to
put these kind of links anywhere in the documentation. For LATEX documentation a reference to the page number
is written instead of a link. Furthermore, the index at the end of the document can be used to quickly find the
documentation of a member, class, namespace or file. For man pages no reference information is generated.
The next sections show how to generate links to the various documented entities in a source file.
11.1
Links to web pages and mail addresses
Doxygen will automatically replace any URLs and mail addresses found in the documentation by links (in HTML).
To manually specify link text, use the HTML ’a’ tag:
<a href="linkURL">link text</a>
which will be automatically translated to other output formats by Doxygen.
11.2
Links to classes
All words in the documentation that correspond to a documented class and contain at least one non-lower case
character will automatically be replaced by a link to the page containing the documentation of the class. If you want
to prevent that a word that corresponds to a documented class is replaced by a link you should put a % in front of
the word. To link to an all lower case symbol, use \ref.
11.3
Links to files
All words that contain a dot (.) that is not the last character in the word are considered to be file names. If the word
is indeed the name of a documented input file, a link will automatically be created to the documentation of that file.
11.4
Links to functions
Links to functions are created if one of the following patterns is encountered:
1. <functionName>"("<argument-list>")"
2. <functionName>"()"
60
Automatic link generation
3. "::"<functionName>
4. (<className>"::")n <functionName>"("<argument-list>")"
5. (<className>"::")n <functionName>"("<argument-list>")"<modifiers>
6. (<className>"::")n <functionName>"()"
7. (<className>"::")n <functionName>
where n>0.
Note 1:
Function arguments should be specified with correct types, i.e. ’fun(const std::string&,bool)’ or ’()’ to match any
prototype.
Note 2:
Member function modifiers (like ’const’ and ’volatile’) are required to identify the target, i.e. ’func(int) const’ and
’fun(int)’ target different member functions.
Note 3:
For JavaDoc compatibility a # may be used instead of a :: in the patterns above.
Note 4:
In the documentation of a class containing a member foo, a reference to a global variable is made using "::foo",
whereas #foo will link to the member.
For non overloaded members the argument list may be omitted.
If a function is overloaded and no matching argument list is specified (i.e. pattern 2 or 6 is used), a link will be
created to the documentation of one of the overloaded members.
For member functions the class scope (as used in patterns 4 to 7) may be omitted, if:
1. The pattern points to a documented member that belongs to the same class as the documentation block that
contains the pattern.
2. The class that corresponds to the documentation blocks that contains the pattern has a base class that
contains a documented member that matches the pattern.
11.5
Links to other members
All of these entities can be linked to in the same way as described in the previous section. For sake of clarity it is
advised to only use patterns 3 and 7 in this case.
Example:
/*! \file autolink.cpp
Testing automatic link generation.
A link to a member of the Test class: Test::member,
More specific links to the each of the overloaded members:
Test::member(int) and Test#member(int,int)
A link to a protected member variable of Test: Test#var,
A link to the global enumeration type #GlobEnum.
A link to the define #ABS(x).
Generated by Doxygen
11.5 Links to other members
61
A link to the destructor of the Test class: Test::~Test,
A link to the typedef ::B.
A link to the enumeration type Test::EType
A link to some enumeration values Test::Val1 and ::GVal2
*/
/*!
Since this documentation block belongs to the class Test no link to
Test is generated.
Two ways to link to a constructor are: #Test and Test().
Links to the destructor are: #~Test and ~Test().
A link to a member in this class: member().
More specific links to the each of the overloaded members:
member(int) and member(int,int).
A link to the variable #var.
A link to the global typedef ::B.
A link to the global enumeration type #GlobEnum.
A link to the define ABS(x).
A link to a variable \link #var using another text\endlink as a link.
A link to the enumeration type #EType.
A link to some enumeration values: \link Test::Val1 Val1 \endlink and ::GVal1.
And last but not least a link to a file: autolink.cpp.
\sa Inside a see also section any word is checked, so EType,
Val1, GVal1, ~Test and member will be replaced by links in HTML.
*/
class Test
{
public:
Test();
~Test();
void member(int);
void member(int,int);
//!<
//!<
/**<
/**<
constructor
destructor
A member function. Details. */
An overloaded member function. Details */
/** An enum type. More details */
enum EType {
Val1,
/**< enum value 1 */
Val2
/**< enum value 2 */
};
protected:
int var;
};
/**< A member variable */
/*! details. */
Test::Test() { }
/*! details. */
Test::~Test() { }
/*! A global variable. */
int globVar;
/*! A global enum. */
enum GlobEnum {
GVal1,
Generated by Doxygen
/*!< global enum value 1 */
62
Automatic link generation
GVal2
};
/*!< global enum value 2 */
/*!
* A macro definition.
*/
#define ABS(x) (((x)>0)?(x):-(x))
typedef Test B;
/*! \fn typedef Test B
* A type definition.
*/
11.6
typedefs
Typedefs that involve classes, structs and unions, like
typedef struct StructName TypeName
create an alias for StructName, so links will be generated to StructName, when either StructName itself or Type←
Name is encountered.
Example:
/*! \file restypedef.cpp
* An example of resolving typedefs.
*/
/*! \struct CoordStruct
* A coordinate pair.
*/
struct CoordStruct
{
/*! The x coordinate */
float x;
/*! The y coordinate */
float y;
};
/*! Creates a type name for CoordStruct */
typedef CoordStruct Coord;
/*!
* This function returns the addition of \a c1 and \a c2, i.e:
* (c1.x+c2.x,c1.y+c2.y)
*/
Coord add(Coord c1,Coord c2)
{
}
Generated by Doxygen
Chapter 12
Output Formats
The following output formats are directly supported by doxygen:
HTML Generated if GENERATE_HTML is set to YES in the configuration file.
LATEX Generated if GENERATE_LATEX is set to YES in the configuration file.
Man pages Generated if GENERATE_MAN is set to YES in the configuration file.
RTF Generated if GENERATE_RTF is set to YES in the configuration file.
Note that the RTF output probably only looks nice with Microsoft’s Word. If you have success with other
programs, please let me know.
XML Generated if GENERATE_XML is set to YES in the configuration file.
Docbook Generated if GENERATE_DOCBOOOK is set to YES in the configuration file.
The following output formats are indirectly supported by doxygen:
Compiled HTML Help (a.k.a. Windows 98 help) Generated by Microsoft’s HTML Help workshop from the HTML
output if GENERATE_HTMLHELP is set to YES.
Qt Compressed Help (.qch) Generated by Qt’s qhelpgenerator tool from the HTML output if GENERATE_QHP
is set to YES.
Eclipse Help Generated from HTML with a special index file that is generated when GENERATE_ECLIPSEHELP
is set to YES.
XCode DocSets Compiled from HTML with a special index file that is generated when GENERATE_DOCSET is
set to YES.
PostScript Generated from the LATEX output by running make ps in the output directory. For the best results
PDF_HYPERLINKS should be set to NO.
PDF Generated from the LATEX output by running make pdf in the output directory. To improve the PDF output, you typically would want to enable the use of pdflatex by setting USE_PDFLATEX to YES in the
configuration file. In order to get hyperlinks in the PDF file you also need to enable PDF_HYPERLINKS.
64
Output Formats
Generated by Doxygen
Chapter 13
Searching
Doxygen indexes your source code in various ways to make it easier to navigate and find what you are looking for.
There are also situations however where you want to search for something by keyword rather than browse for it.
HTML browsers by default have no search capabilities that work across multiple pages, so either doxygen or external
tools need to help to facilitate this feature.
Doxygen has 7 different ways to add searching to the HTML output, each of which has its own advantages and
disadvantages:
1. Client side searching
The easiest way to enable searching is to enable the built-in client side search engine. This engine is implemented
using Javascript and DHTML only and runs entirely on the clients browser. So no additional tooling is required to
make it work.
To enable it set SEARCHENGINE to YES in the config file and make sure SERVER_BASED_SEARCH is set to NO.
An additional advantage of this method is that it provides live searching, i.e. the search results are presented and
adapted as you type.
This method also has its drawbacks: it is limited to searching for symbols only. It does not provide full text search
capabilities, and it does not scale well to very large projects (then searching becomes very slow).
2. Server side searching
If you plan to put the HTML documentation on a web server, and that web server has the capability to process PHP
code, then you can also use doxygen’s built-in server side search engine.
To enable this set both SEARCHENGINE and SERVER_BASED_SEARCH to YES in the config file and set EXT←
ERNAL_SEARCH to NO.
Advantages over the client side search engine are that it provides full text search and it scales well to medium side
projects.
Disadvantages are that it does not work locally (i.e. using a "file://" URL) and that it does not provide live search
capabilities.
66
Searching
Note
In the future this option will probably be replaced by the next search option.
3. Server side searching with external indexing
With release 1.8.3 of doxygen, another server based search option has been added. With this option doxygen
generates the raw data that can be searched and leaves it up to external tools to do the indexing and searching,
meaning that you could use your own indexer and search engine of choice. To make life easier doxygen ships with
an example indexer (doxyindexer) and search engine (doxysearch.cgi) based on the Xapian open source search
engine library.
To enable this search method set SEARCHENGINE, SERVER_BASED_SEARCH and EXTERNAL_SEARCH all to
YES.
See External Indexing and Searching for configuration details.
Advantages over option 2 are that this method (potentially) scales to very large projects. It is also possible to
combine multiple doxygen projects and external data into one search index. The way the interaction with the search
engine is done, makes it possible to search from local HTML pages. Also the search results have better ranking
and show context information (if available).
Disadvantages are that is requires a web server that can execute a CGI binary, and an additional indexing step after
running doxygen.
4. Windows Compiled HTML Help
If you are running doxygen on Windows, then you can make a compiled HTML Help file (.chm) out of the HTML files
produced by doxygen. This is a single file containing all HTML files and it also includes a search index. There are
viewers for this format on many platforms, and Windows even supports it natively.
To enable this set GENERATE_HTMLHELP to YES in the config file. To let doxygen compile the HTML Help file
for you, you also need to specify the path to the HTML compiler (hhc.exe) using the HHC_LOCATION config option
and the name of the resulting CHM file using CHM_FILE.
An advantage of this method is that the result is a single file that can easily be distributed. It also provides full text
search.
Disadvantages are that compiling the CHM file only works on Windows and requires Microsoft’s HTML compiler,
which is not very actively supported by Microsoft. Although the tool works fine for most people, it can sometimes
crash for no apparent reason (how typical).
5. Mac OS X Doc Sets
If you are running doxygen on Mac OS X 10.5 or higher, then you can make a "doc set" out of the HTML files
produced by doxygen. A doc set consists of a single directory with a special structure containing the HTM←
L files along with a precompiled search index. A doc set can be embedded in Xcode (the integrated development
environment provided by Apple).
To enable the creation of doc sets set GENERATE_DOCSET to YES in the config file. There are a couple of other
doc set related options you may want to set. After doxygen has finished you will find a Makefile in the HTML output
directory. Running "make install" on this Makefile will compile and install the doc set. See this article for
more info.
Advantage of this method is that it nicely integrates with the Xcode development environment, allowing for instance
to click on an identifier in the editor and jump to the corresponding section in the doxygen documentation.
Disadvantage is that it only works in combination with Xcode on MacOSX.
Generated by Doxygen
13.1 External Indexing and Searching
67
6. Qt Compressed Help
If you develop for or want to install the Qt application framework, you will get an application called Qt assistant.
This is a help viewer for Qt Compressed Help files (.qch).
To enable this feature set GENERATE_QHP to YES. You also need to fill in the other Qt help related options, such
as QHP_NAMESPACE, QHG_LOCATION, QHP_VIRTUAL_FOLDER. See this article for more info.
Feature wise the Qt compressed help feature is comparable with the CHM output, with the additional advantage
that compiling the QCH file is not limited to Windows.
Disadvantage is that it requires setting up a Qt 4.5 (or better) for each user, or distributing the Qt help assistant
along with the documentation, which is complicated by the fact that it is not available as a separate package at this
moment.
7. Eclipse Help Plugin
If you use eclipse, you can embed the documentation generated by doxygen as a help plugin. It will then appear
as a topic in the help browser that can be started from "Help contents" in the Help menu. Eclipse will generate a
search index for the documentation when you first search for a keyword.
To enable the help plugin set GENERATE_ECLIPSEHELP to YES, and define a unique identifier for your project
via ECLIPSE_DOC_ID, i.e.:
GENERATE_ECLIPSEHELP = YES
ECLIPSE_DOC_ID
= com.yourcompany.yourproject
then create the com.yourcompany.yourproject directory (so with the same name as the value of ECLI←
PSE_DOC_ID) in the plugin directory of eclipse and after doxygen completes copy to contents of the help output
directory to the com.yourcompany.yourproject directory. Then restart eclipse to make let it find the new
plugin.
The eclipse help plugin provides similar functionality as the Qt compressed help or CHM output, but it does require
that Eclipse is installed and running.
13.1
External Indexing and Searching
13.1.1
Introduction
With release 1.8.3, doxygen provides the ability to search through HTML using an external indexing tool and search
engine. This has several advantages:
• For large projects it can have significant performance advantages over doxygen’s built-in search engine, as
doxygen uses a rather simple indexing algorithm.
• It allows combining the search data of multiple projects into one index, allowing a global search across multiple
doxygen projects.
• It allows adding additional data to the search index, i.e. other web pages not produced by doxygen.
• The search engine needs to run on a web server, but clients can still browse the web pages locally.
To avoid that everyone has to start writing their own indexer and search engine, doxygen provides an example tool
for each action: doxyindexer for indexing the data and doxysearch.cgi for searching through the index.
The data flow is shown in the following diagram:
Generated by Doxygen
68
Searching
doxygen
writes
searchdata.xml
reads
doxyindexer
writes
doxysearch.db
reads
doxysearch.cgi
get results query
HTML page
in browser
Figure 13.1: External Search Data Flow
• doxygen produces the raw search data
• doxyindexer indexes the data into a search database doxysearch.db
• when a user performs a search from a doxygen generated HTML page, the CGI binary doxysearch.cgi
will be invoked.
• the doxysearch.cgi tool will perform a query on the database and return the results.
• The browser will show the search results.
13.1.2
Configuring
The first step is to make the search engine available via a web server. If you use doxysearch.cgi this means
making the CGI binary available from the web server (i.e. be able to run it from a browser via an URL starting with
http:)
How to setup a web server is outside the scope of this document, but if you for instance have Apache installed, you
could simply copy the doxysearch.cgi file from doxygen’s bin dir to the cgi-bin of the Apache web server.
Read the apache documentation for details.
To test if doxysearch.cgi is accessible start your web browser and point to URL to the binary and add ?test
at the end
http://yoursite.com/path/to/cgi/doxysearch.cgi?test
You should get the following message:
Test failed: cannot find search index doxysearch.db
If you use Internet Explorer you may be prompted to download a file, which will then contain this message.
Since we didn’t create or install a doxysearch.db it is ok for the test to fail for this reason. How to correct this is
discussed in the next section.
Generated by Doxygen
13.1 External Indexing and Searching
69
Before continuing with the next section add the above URL (without the ?test part) to the SEARCHENGINE_URL
tag in doxygen’s configuration file:
SEARCHENGINE_URL = http://yoursite.com/path/to/cgi/doxysearch.cgi
13.1.2.1
Single project index
To use the external search option, make sure the following options are enabled in doxygen’s configuration file:
SEARCHENGINE
SERVER_BASED_SEARCH
EXTERNAL_SEARCH
= YES
= YES
= YES
This will make doxygen generate a file called searchdata.xml in the output directory (configured with OUTP←
UT_DIRECTORY). You can change the file name (and location) with the SEARCHDATA_FILE option.
The next step is to put the raw search data into an index for efficient searching. You can use doxyindexer for
this. Simply run it from the command line:
doxyindexer searchdata.xml
This will create a directory called doxysearch.db with some files in it. By default the directory will be created at
the location from which doxyindexer was started, but you can change the directory using the -o option.
Copy the doxysearch.db directory to the same directory as where the doxysearch.cgi is located and
rerun the browser test by pointing the browser to
http://yoursite.com/path/to/cgi/doxysearch.cgi?test
You should now get the following message:
Test successful.
Now you should be enable to search for words and symbols from the HTML output.
13.1.2.2
Multi project index
In case you have more than one doxygen project and these projects are related, it may be desirable to allow
searching for words in all projects from within the documentation of any of the projects.
To make this possible all that is needed is to combine the search data for all projects into a single index, e.g. for two
projects A and B for which the searchdata.xml is generated in directories project_A and project_B run:
doxyindexer project_A/searchdata.xml project_B/searchdata.xml
and then copy the resulting doxysearch.db to the directory where also doxysearch.cgi is located.
The searchdata.xml file doesn’t contain any absolute paths or links, so how can the search results from
multiple projects be linked back to the right documentation set? This is where the EXTERNAL_SEARCH_ID and
EXTRA_SEARCH_MAPPINGS options come into play.
To be able to identify the different projects, one needs to set a unique ID using EXTERNAL_SEARCH_ID for each
project.
To link the search results to the right project, you need to define a mapping per project using the EXTRA_SEAR←
CH_MAPPINGS tag. With this option to can define the mapping from IDs of other projects to the (relative) location
of documentation of those projects.
So for projects A and B the relevant part of the configuration file could look as follows:
project_A/Doxyfile
-----------------EXTERNAL_SEARCH_ID
= A
EXTRA_SEARCH_MAPPINGS = B=../../project_B/html
Generated by Doxygen
70
Searching
for project A and for project B
project_B/Doxyfile
-----------------EXTERNAL_SEARCH_ID
= B
EXTRA_SEARCH_MAPPINGS = A=../../project_A/html
with these settings, projects A and B can share the same search database, and the search results will link to the
right documentation set.
13.1.3
Updating the index
When you modify the source code, you should re-run doxygen to get up to date documentation again. When using
external searching you also need to update the search index by re-running doxyindexer. You could wrap the
call to doxygen and doxyindexer together in a script to make this process easier.
13.1.4
Programming interface
Previous sections have assumed you use the tools doxyindexer and doxysearch.cgi to do the indexing
and searching, but you could also write your own index and search tools if you like.
For this 3 interfaces are important
• The format of the input for the index tool.
• The format of the input for the search engine.
• The format of the output of search engine.
The next subsections describe these interfaces in more detail.
13.1.4.1
Indexer input format
The search data produced by doxygen follows the Solr XML index message format.
The input for the indexer is an XML file, which consists of one <add> tag containing multiple <doc> tags, which
in turn contain multiple <field> tags.
Here is an example of one doc node, which contains the search data and meta data for one method:
<add>
...
<doc>
<field
<field
<field
<field
<field
<field
<field
</doc>
...
</add>
name="type">function</field>
name="name">QXmlReader::setDTDHandler</field>
name="args">(QXmlDTDHandler *handler)=0</field>
name="tag">qtools.tag</field>
name="url">de/df6/class_q_xml_reader.html#a0b24b1fe26a4c32a8032d68ee14d5dba</field>
name="keywords">setDTDHandler QXmlReader::setDTDHandler QXmlReader</field>
name="text">Sets the DTD handler to handler DTDHandler()</field>
Each field has a name. The following field names are supported:
• type: the type of the search entry; can be one of: source, function, slot, signal, variable, typedef, enum,
enumvalue, property, event, related, friend, define, file, namespace, group, package, page, dir
• name: the name of the search entry; for a method this is the qualified name of the method, for a class it is the
name of the class, etc.
Generated by Doxygen
13.1 External Indexing and Searching
71
• args: the parameter list (in case of functions or methods)
• tag: the name of the tag file used for this project.
• url: the (relative) URL to the HTML documentation for this entry.
• keywords: important words that are representative for the entry. When searching for such keyword, this entry
should get a higher rank in the search results.
• text: the documentation associated with the item. Note that only words are present, no markup.
Note
Due to the potentially large size of the XML file, it is recommended to use a SAX based parser to process
it.
13.1.4.2
Search URL format
When the search engine is invoked from a doxygen generated HTML page, a number of parameters are passed to
via the query string.
The following fields are passed:
• q: the query text as entered by the user
• n: the number of search results requested.
• p: the number of search page for which to return the results. Each page has n values.
• cb: the name of the callback function, used for JSON with padding, see the next section.
From the complete list of search results, the range [nв€—p - nв€—(p+1)-1] should be returned.
Here is an example of how a query looks like.
http://yoursite.com/path/to/cgi/doxysearch.cgi?q=list&n=20&p=1&cb=dummy
It represents a query for the word ’list’ (q=list) requesting 20 search results (n=20), starting with the result
number 20 (p=1) and using callback ’dummy’ (cb=dummy):
Note
The values are URL encoded so they have to be decoded before they can be used.
13.1.4.3
Search results format
When invoking the search engine as shown in the previous subsection, it should reply with the results. The format
of the reply is JSON with padding, which is basically a javascript struct wrapped in a function call. The name
of function should be the name of the callback (as passed with the cb field in the query).
With the example query as shown the previous subsection the main structure of the reply should look as follows:
dummy({
"hits":179,
"first":20,
"count":20,
"page":1,
"pages":9,
"query": "list",
"items":[
...
]})
The fields have the following meaning:
Generated by Doxygen
72
Searching
• hits: the total number of search results (could be more than was requested).
• first: the index of first result returned: min(n ∗ p, hits).
• count: the actual number of results returned: min(n, hits − first)
• page: the page number of the result: p
• pages: the total number of pages: hits
n .
• items: an array containing the search data per result.
Here is an example of how the element of the items array should look like:
{"type": "function",
"name": "QDir::entryInfoList(const QString &nameFilter, int filterSpec=DefaultFilter, int sortSpec=DefaultSor
"tag": "qtools.tag",
"url": "d5/d8d/class_q_dir.html#a9439ea6b331957f38dbad981c4d050ef",
"fragments":[
"Returns a <span class=\"hl\">list</span> of QFileInfo objects for all files and directories...",
"... pointer to a QFileInfoList The <span class=\"hl\">list</span> is owned by the QDir object...",
"... to keep the entries of the <span class=\"hl\">list</span> after a subsequent call to this..."
]
},
The fields for such an item have the following meaning:
• type: the type of the item, as found in the field with name "type" in the raw search data.
• name: the name of the item, including the parameter list, as found in the fields with name "name" and "args"
in the raw search data.
• tag: the name of the tag file, as found in the field with name "tag" in the raw search data.
• url: the name of the (relative) URL to the documentation, as found in the field with name "url" in the raw
search data.
• "fragments": an array with 0 or more fragments of text containing words that have been search for. These
words should be wrapped in <span class="hl"> and </span> tags to highlight them in the output.
Generated by Doxygen
Chapter 14
Customizing the Output
Doxygen provides various levels of customization. The section Minor Tweaks discusses what to do if you want to
do minor tweaking to the look and feel of the output. The section Layout show how to reorder and hide certain
information on a page. The section XML output show how to generate whatever output you want based on the XML
output produced by doxygen.
14.1
Minor Tweaks
The next subsections describe some aspects that can be tweaked with little effort.
14.1.1
Overall Color
To change the overall color of the HTML output doxygen provides three options
• HTML_COLORSTYLE_HUE
• HTML_COLORSTYLE_SAT
• HTML_COLORSTYLE_GAMMA
to change the hue, saturation, and gamma correction of the colors respectively.
For your convenience the GUI frontend Doxywizard has a control that allows you to see the effect of changing the
values of these options on the output in real time.
14.1.2
Navigation
By default doxygen shows navigation tabs on top of every HTML page, corresponding with the following settings:
• DISABLE_INDEX = NO
• GENERATE_TREEVIEW = NO
you can switch to an interactive navigation tree as sidebar using
• DISABLE_INDEX = YES
• GENERATE_TREEVIEW = YES
or even have both forms of navigation:
74
Customizing the Output
• DISABLE_INDEX = NO
• GENERATE_TREEVIEW = YES
if you already use an external index (i.e. have one of the following options enabled GENERATE_HTMLHELP, GE←
NERATE_ECLIPSEHELP, GENERATE_QHP, or GENERATE_DOCSET) then you can also disable all indices, like
so:
• DISABLE_INDEX = YES
• GENERATE_TREEVIEW = NO
14.1.3
Dynamic Content
To make the HTML output more interactive, doxygen provides a number of options that are disabled by default:
• enabling HTML_DYNAMIC_SECTIONS will make doxygen hide certain content (like graphs) in the HTML by
default, and let the reader expand these sections on request.
• enabling HAVE_DOT along with INTERACTIVE_SVG while setting DOT_IMAGE_FORMAT to svg, will
make doxygen produce SVG images that will allow the user to zoom and pan (this only happens when the
size of the images exceeds a certain size).
14.1.4
Header, Footer, and Stylesheet changes
To tweak things like fonts or colors, margins, or other look & feel aspects of the HTML output in detail, you can
create a different cascading style sheet. You can also let doxygen use a custom header and footer for
each HTML page it generates, for instance to make the output conform to the style used on the rest of your web
site.
To do this first run doxygen as follows:
doxygen -w html header.html footer.html customdoxygen.css
This will create 3 files:
• header.html is a HTML fragment which doxygen normally uses to start a HTML page. Note that the fragment
ends with a body tag and that is contains a couple of commands of the form $word. These will be replaced
by doxygen on the fly.
• footer.html is a HTML fragment which doxygen normally uses to end a HTML page. Also here special commands can be used. This file contain the link to www.doxygen.org and the body and html end tags.
• customdoxygen.css is the default cascading style sheet used by doxygen. It is recommended only to look
into this file and overrule some settings you like by putting them in a separate stylesheet and referencing that
extra file via HTML_EXTRA_STYLESHEET.
You should edit these files and then reference them from the config file.
• HTML_HEADER = header.html
• HTML_FOOTER = footer.html
• HTML_STYLESHEET = customdoxygen.css ←obsolete
Generated by Doxygen
14.2 Changing the layout of pages
75
Note
it is not longer recommended to use HTML_STYLESHEET this way, as it make it difficult to upgrade to a newer
version of doxygen. Use HTML_EXTRA_STYLESHEET instead.
See the documentation of the HTML_HEADER tag for more information about the possible meta commands you
can use inside your custom header.
Note
You should not put the style sheet in the HTML output directory. Treat it as a source file. Doxygen will copy it
for you.
If you use images or other external content in a custom header you need to make sure these end up in the
HTML output directory yourself, for instance by writing a script that runs doxygen can then copies the images
to the output.
Warning
The structure of headers and footers may change after upgrading to a newer version of doxygen, so if you are
using a custom header or footer, it might not produce valid output anymore after upgrading.
14.2
Changing the layout of pages
In some cases you may want to change the way the output is structured. A different style sheet or custom headers
and footers do not help in such case.
The solution doxygen provides is a layout file, which you can modify and doxygen will use to control what information
is presented, in which order, and to some extent also how information is presented. The layout file is an XML file.
The default layout can be generated by doxygen using the following command:
doxygen -l
optionally the name of the layout file can be specified, if omitted DoxygenLayout.xml will be used.
The next step is to mention the layout file in the config file
LAYOUT_FILE = DoxygenLayout.xml
To change the layout all you need to do is edit the layout file.
The toplevel structure of the file looks as follows:
<doxygenlayout version="1.0">
<navindex>
...
</navindex>
<class>
...
</class>
<namespace>
...
</namespace>
<file>
...
</file>
<group>
...
</group>
<directory>
...
</directory>
</doxygenlayout>
Generated by Doxygen
76
Customizing the Output
The root element of the XML file is doxygenlayout, it has an attribute named version, which will be used in
the future to cope with changes that are not backward compatible.
The first section, identified by the navindex element, represents the layout of the navigation tabs displayed at the
top of each HTML page. At the same time it also controls the items in the navigation tree in case GENERATE_T←
REEVIEW is enabled. Each tab is represented by a tab element in the XML file.
You can hide tabs by setting the visible attribute to no. You can also override the default title of a tab by
specifying it as the value of the title attribute. If the title field is the empty string (the default) then doxygen will
fill in an appropriate language specific title.
You can reorder the tabs by moving the tab elements in the XML file within the navindex element and even
change the tree structure. Do not change the value of the type attribute however. Only a fixed set of types are
supported, each representing a link to a specific index.
You can also add custom tabs using a type with name "user". Here is an example that shows how to add a tab with
title "Google" pointing to www.google.com:
<navindex>
...
<tab type="user" url="http://www.google.com" title="Google"/>
...
</navindex>
The url field can also be a relative URL. If the URL starts with @ref the link will point to a documented entities,
such as a class, a function, a group, or a related page. Suppose we have defined a page using @page with label
mypage, then a tab with label "My Page" to this page would look as follows:
<navindex>
...
<tab type="user" url="@ref mypage" title="My Page"/>
...
</navindex>
You can also group tabs together in a custom group using a tab with type "usergroup". The following example puts
the above tabs in a user defined group with title "My Group":
<navindex>
...
<tab type="usergroup" title="My Group">
<tab type="user" url="http://www.google.com" title="Google"/>
<tab type="user" url="@ref mypage" title="My Page"/>
</tab>
...
</navindex>
Groups can be nested to form a hierarchy.
By default a usergroup entry in the navigation tree is a link to a landing page with the contents of the group. You
can link to a different page using the url attribute just like you can for the <tab> element and prevent any link
using url="[none]", i.e.
<tab type="usergroup" title="Group without link" url="[none]">
...
</tab>
The elements after navindex represent the layout of the different pages generated by doxygen:
• The class element represents the layout of all pages generated for documented classes, structs, unions,
and interfaces.
• The namespace element represents the layout of all pages generated for documented namespaces (and
also Java packages).
Generated by Doxygen
14.2 Changing the layout of pages
77
• The file element represents the layout of all pages generated for documented files.
• The group element represents the layout of all pages generated for documented groups (or modules).
• The directory element represents the layout of all pages generated for documented directories.
Each XML element within one of the above page elements represents a certain piece of information. Some pieces
can appear in each type of page, others are specific for a certain type of page. Doxygen will list the pieces in the
order in which they appear in the XML file.
The following generic elements are possible for each page:
briefdescription Represents the brief description on a page.
detaileddescription Represents the detailed description on a page.
authorsection Represents the author section of a page (only used for man pages).
memberdecl Represents the quick overview of members on a page (member declarations). This elements has
child elements per type of member list. The possible child elements are not listed in detail in the document,
but the name of the element should be a good indication of the type of members that the element represents.
memberdef Represents the detailed member list on a page (member definition). Like the memberdecl element, also this element has a number of possible child elements.
The class page has the following specific elements:
includes Represents the include file needed to obtain the definition for this class.
inheritancegraph Represents the inheritance relations for a class. Note that the CLASS_DIAGRAM option
determines if the inheritance relation is a list of base and derived classes or a graph.
collaborationgraph Represents the collaboration graph for a class.
allmemberslink Represents the link to the list of all members for a class.
usedfiles Represents the list of files from which documentation for the class was extracted.
The file page has the following specific elements:
includes Represents the list of #include statements contained in this file.
includegraph Represents the include dependency graph for the file.
includedbygraph Represents the included by dependency graph for the file.
sourcelink Represents the link to the source code of this file.
The group page has a specific groupgraph element which represents the graph showing the dependencies
between groups.
Similarly, the directory page has a specific directorygraph element which represents the graph showing the
dependencies between the directories based on the #include relations of the files inside the directories.
Some elements have a visible attribute which can be used to hide the fragment from the generated output, by
setting the attribute’s value to "no". You can also use the value of a configuration option to determine the visibility,
by using its name prefixed with a dollar sign, e.g.
...
<includes visible="$SHOW_INCLUDE_FILES"/>
...
This was mainly added for backward compatibility. Note that the visible attribute is just a hint for doxygen. If no
relevant information is available for a certain piece it is omitted even if it is set to yes (i.e. no empty sections are
generated).
Some elements have a title attribute. This attribute can be used to customize the title doxygen will use as a
header for the piece.
Generated by Doxygen
78
Customizing the Output
Warning
at the moment you should not remove elements from the layout file as a way to hide information. Doing so can
cause broken links in the generated output!
14.3
Using the XML output
If the above two methods still do not provide enough flexibility, you can also use the XML output produced by
doxygen as a basis to generate the output you like. To do this set GENERATE_XML to YES.
The XML output consists of an index file named index.xml which lists all items extracted by doxygen with
references to the other XML files for details. The structure of the index is described by a schema file index.xsd.
All other XML files are described by the schema file named compound.xsd. If you prefer one big XML file you
can combine the index and the other files using the XSLT file combine.xslt.
You can use any XML parser to parse the file or use the one that can be found in the addon/doxmlparser
directory of doxygen source distribution. Look at addon/doxmlparser/include/doxmlintf.h for the
interface of the parser and in addon/doxmlparser/example for examples.
The advantage of using the doxmlparser is that it will only read the index file into memory and then only those XML
files that you implicitly load via navigating through the index. As a result this works even for very large projects
where reading all XML files as one big DOM tree would not fit into memory.
See the Breathe project for an example that uses doxygen XML output from Python to bridge it with the
Sphinx document generator.
Generated by Doxygen
Chapter 15
Custom Commands
Doxygen provides a large number of special commands, XML commands, and HTML commands. that can be used
to enhance or structure the documentation inside a comment block. If you for some reason have a need to define
new commands you can do so by means of an alias definition.
The definition of an alias should be specified in the configuration file using the ALIASES configuration tag.
15.1
Simple aliases
The simplest form of an alias is a simple substitution of the form
name=value
For example defining the following alias:
ALIASES += sideeffect="\par Side Effects:\n"
will allow you to put the command \sideeffect (or @sideeffect) in the documentation, which will result in
a user-defined paragraph with heading Side Effects:.
Note that you can put \n’s in the value part of an alias to insert newlines.
Also note that you can redefine existing special commands if you wish.
Some commands, such as \xrefitem are designed to be used in combination with aliases.
15.2
Aliases with arguments
Aliases can also have one or more arguments. In the alias definition you then need to specify the number of
arguments between curly braces. In the value part of the definition you can place \x markers, where ’x’ represents
the argument number starting with 1.
Here is an example of an alias definition with a single argument:
ALIASES += l{1}="\ref \1"
Inside a comment block you can use it as follows
/** See \l{SomeClass} for more information. */
which would be the same as writing
/** See \ref SomeClass for more information. */
80
Custom Commands
Note that you can overload an alias by a version with multiple arguments, for instance:
ALIASES += l{1}="\ref \1"
ALIASES += l{2}="\ref \1 \"\2\""
Note that the quotes inside the alias definition have to be escaped with a backslash.
With these alias definitions, we can write
/** See \l{SomeClass,Some Text} for more information. */
inside the comment block and it will expand to
/** See \ref SomeClass "Some Text" for more information. */
where the command with a single argument would still work as shown before.
Aliases can also be expressed in terms of other aliases, e.g. a new command \reminder can be expressed as a
\xrefitem via an intermediate \xreflist command as follows:
ALIASES += xreflist{3}="\xrefitem \1 \"\2\" \"\3\" "
ALIASES += reminder="\xreflist{reminders,Reminder,Reminders}"
Note that if for aliases with more than one argument a comma is used as a separator, if you want to put a comma
inside the command, you will need to escape it with a backslash, i.e.
\l{SomeClass,Some text\, with an escaped comma}
given the alias definition of \l in the example above.
15.3
Nesting custom command
You can use commands as arguments of aliases, including commands defined using aliases.
As an example consider the following alias definitions
ALIASES += Bold{1}="<b>\1</b>"
ALIASES += Emph{1}="<em>\1</em>"
Inside a comment block you can now use:
/** This is a \Bold{bold \Emph{and} Emphasized} text fragment. */
which will expand to
/** This is a <b>bold <em>and</em> Emphasized</b> text fragment. */
Generated by Doxygen
Chapter 16
Link to external documentation
If your project depends on external libraries or tools, there are several reasons to not include all sources for these
with every run of doxygen:
Disk space: Some documentation may be available outside of the output directory of doxygen already, for instance
somewhere on the web. You may want to link to these pages instead of generating the documentation in your
local output directory.
Compilation speed: External projects typically have a different update frequency from your own project. It does
not make much sense to let doxygen parse the sources for these external project over and over again, even
if nothing has changed.
Memory: For very large source trees, letting doxygen parse all sources may simply take too much of your system’s
memory. By dividing the sources into several "packages", the sources of one package can be parsed by
doxygen, while all other packages that this package depends on, are linked in externally. This saves a lot of
memory.
Availability: For some projects that are documented with doxygen, the sources may just not be available.
Copyright issues: If the external package and its documentation are copyright someone else, it may be better - or
even necessary - to reference it rather than include a copy of it with your project’s documentation. When the
author forbids redistribution, this is necessary. If the author requires compliance with some license condition
as a precondition of redistribution, and you do not want to be bound by those conditions, referring to their
copy of their documentation is preferable to including a copy.
If any of the above apply, you can use doxygen’s tag file mechanism. A tag file is basically a compact representation
of the entities found in the external sources. Doxygen can both generate and read tag files.
To generate a tag file for your project, simply put the name of the tag file after the GENERATE_TAGFILE option in
the configuration file.
To combine the output of one or more external projects with your own project you should specify the name of the
tag files after the TAGFILES option in the configuration file.
A tag file typically only contains a relative location of the documentation from the point where doxygen was run.
So when you include a tag file in other project you have to specify where the external documentation is located
in relation this project. You can do this in the configuration file by assigning the (relative) location to the tag files
specified after the TAGFILES configuration option. If you use a relative path it should be relative with respect to the
directory where the HTML output of your project is generated; so a relative path from the HTML output directory of
a project to the HTML output of the other project that is linked to.
Example:
Suppose you have a project proj that uses two external projects called ext1 and ext2. The directory
structure looks as follows:
82
Link to external documentation
<root>
+- proj
|
+- html
|
+- src
|
|- proj.cpp
+- ext1
|
+- html
|
|- ext1.tag
+- ext2
|
+- html
|
|- ext2.tag
|- proj.cfg
|- ext1.cfg
|- ext2.cfg
HTML output directory for proj
sources for proj
HTML output directory for ext1
tag file for ext1
HTML output directory
tag file for ext2
doxygen configuration
doxygen configuration
doxygen configuration
for ext2
file for proj
file for ext1
file for ext2
Then the relevant parts of the configuration files look as follows:
proj.cfg:
OUTPUT_DIRECTORY
INPUT
TAGFILES
= proj
= proj/src
= ext1/ext1.tag=../../ext1/html \
ext2/ext2.tag=../../ext2/html
ext1.cfg:
OUTPUT_DIRECTORY
GENERATE_TAGFILE
= ext1
= ext1/ext1.tag
ext2.cfg:
OUTPUT_DIRECTORY
GENERATE_TAGFILE
= ext2
= ext2/ext2.tag
Generated by Doxygen
Chapter 17
Frequently Asked Questions
1. How to get information on the index page in HTML?
You should use the \mainpage command inside a comment block like this:
/*! \mainpage My Personal Index Page
*
* \section intro_sec Introduction
*
* This is the introduction.
*
* \section install_sec Installation
*
* \subsection step1 Step 1: Opening the box
*
* etc...
*/
2. Help, some/all of the members of my class / file / namespace are not documented?
Check the following:
(a) Is your class / file / namespace documented? If not, it will not be extracted from the sources unless
EXTRACT_ALL is set to YES in the config file.
(b) Are the members private? If so, you must set EXTRACT_PRIVATE to YES to make them appear in the
documentation.
(c) Is there a function macro in your class that does not end with a semicolon (e.g. MY_MACRO())? If so
then you have to instruct doxygen’s preprocessor to remove it.
This typically boils down to the following settings in the config file:
ENABLE_PREPROCESSING
MACRO_EXPANSION
EXPAND_ONLY_PREDEF
PREDEFINED
=
=
=
=
YES
YES
YES
MY_MACRO()=
Please read the preprocessing section of the manual for more information.
3. When I set EXTRACT_ALL to NO none of my functions are shown in the documentation.
In order for global functions, variables, enums, typedefs, and defines to be documented you should document
the file in which these commands are located using a comment block containing a \file (or @file) command.
Alternatively, you can put all members in a group (or module) using the \ingroup command and then document
the group using a comment block containing the \defgroup command.
For member functions or functions that are part of a namespace you should document either the class or
namespace.
4. How can I make doxygen ignore some code fragment?
The new and easiest way is to add one comment block with a \cond command at the start and one comment
block with a \endcond command at the end of the piece of code that should be ignored. This should be within
the same file of course.
But you can also use Doxygen’s preprocessor for this: If you put
84
Frequently Asked Questions
#ifndef DOXYGEN_SHOULD_SKIP_THIS
/* code that must be skipped by Doxygen */
#endif /* DOXYGEN_SHOULD_SKIP_THIS */
around the blocks that should be hidden and put:
PREDEFINED = DOXYGEN_SHOULD_SKIP_THIS
in the config file then all blocks should be skipped by Doxygen as long as ENABLE_PREPROCESSING is
set to YES.
5. How can I change what is after the #include in the class documentation?
In most cases you can use STRIP_FROM_INC_PATH to strip a user defined part of a path.
You can also document your class as follows
/*! \class MyClassName include.h path/include.h
*
* Docs for MyClassName
*/
To make doxygen put
#include <path/include.h>
in the documentation of the class MyClassName regardless of the name of the actual header file in which the
definition of MyClassName is contained.
If you want doxygen to show that the include file should be included using quotes instead of angle brackets
you should type:
/*! \class MyClassName myhdr.h "path/myhdr.h"
*
* Docs for MyClassName
*/
6. How can I use tag files in combination with compressed HTML?
If you want to refer from one compressed HTML file a.chm to another compressed HTML file called b.chm,
the link in a.chm must have the following format:
<a href="b.chm::/file.html">
Unfortunately this only works if both compressed HTML files are in the same directory.
As a result you must rename the generated index.chm files for all projects into something unique and put
all .chm files in one directory.
Suppose you have a project a referring to a project b using tag file b.tag, then you could rename the
index.chm for project a into a.chm and the index.chm for project b into b.chm. In the configuration
file for project a you write:
TAGFILES = b.tag=b.chm::
7. I don’t like the quick index that is put above each HTML page, what do I do?
You can disable the index by setting DISABLE_INDEX to YES. Then you can put in your own header file by
writing your own header and feed that to HTML_HEADER.
8. The overall HTML output looks different, while I only wanted to use my own html header file
You probably forgot to include the stylesheet doxygen.css that doxygen generates. You can include this
by putting
<LINK HREF="doxygen.css" REL="stylesheet" TYPE="text/css">
in the HEAD section of the HTML page.
Generated by Doxygen
85
9. Why does doxygen use Qt?
The most important reason is to have a platform abstraction for most Unices and Windows by means of the
QFile, QFileInfo, QDir, QDate, QTime and QIODevice classes. Another reason is for the nice and bug free
utility classes, like QList, QDict, QString, QArray, QTextStream, QRegExp, QXML etc.
The GUI front-end doxywizard uses Qt for... well... the GUI!
10. How can I exclude all test directories from my directory tree?
Simply put an exclude pattern like this in the configuration file:
EXCLUDE_PATTERNS = */test/*
11. Doxygen automatically generates a link to the class MyClass somewhere in the running text. How do
I prevent that at a certain place?
Put a % in front of the class name. Like this: %MyClass. Doxygen will then remove the % and keep the word
unlinked.
12. My favorite programming language is X. Can I still use doxygen?
No, not as such; doxygen needs to understand the structure of what it reads. If you don’t mind spending some
time on it, there are several options:
• If the grammar of X is close to C or C++, then it is probably not too hard to tweak src/scanner.l a bit
so the language is supported. This is done for all other languages directly supported by doxygen (i.e.
Java, IDL, C#, PHP).
• If the grammar of X is somewhat different than you can write an input filter that translates X into
something similar enough to C/C++ for doxygen to understand (this approach is taken for VB, Object
Pascal, and Javascript, see http://www.stack.nl/в€јdimitri/doxygen/download.в†ђ
html#helpers).
• If the grammar is completely different one could write a parser for X and write a backend that produces
a similar syntax tree as is done by src/scanner.l (and also by src/tagreader.cpp while reading tag files).
13. Help! I get the cryptic message "input buffer overflow, can’t enlarge buffer because scanner uses
REJECT"
This error happens when doxygen’s lexical scanner has a rule that matches more than 256K of input characters in one go. I’ve seen this happening on a very large generated file (>256K lines), where the built-in
preprocessor converted it into an empty file (with >256K of newlines). Another case where this might happen
is if you have lines in your code with more than 256K characters.
If you have run into such a case and want me to fix it, you should send me a code fragment that triggers the
message. To work around the problem, put some line-breaks into your file, split it up into smaller parts, or
exclude it from the input using EXCLUDE.
14. When running make in the latex dir I get "TeX capacity exceeded". Now what?
You can edit the texmf.cfg file to increase the default values of the various buffers and then run "texconfig init".
15. Why are dependencies via STL classes not shown in the dot graphs?
Doxygen is unaware of the STL classes, unless the option BUILTIN_STL_SUPPORT is turned on.
16. I have problems getting the search engine to work with PHP5 and/or windows
Please read this for hints on where to look.
17. Can I configure doxygen from the command line?
Not via command line options, but doxygen can read from stdin, so you can pipe things through it. Here’s
an example how to override an option in a configuration file from the command line (assuming a UNIX like
environment):
( cat Doxyfile ; echo "PROJECT_NUMBER=1.0" ) | doxygen -
For Windows the following would do the same:
Generated by Doxygen
86
Frequently Asked Questions
( type Doxyfile & echo PROJECT_NUMBER=1.0 ) | doxygen.exe -
If multiple options with the same name are specified then doxygen will use the last one. To append to an
existing option you can use the += operator.
18. How did doxygen get its name?
Doxygen got its name from playing with the words documentation and generator.
documentation -> docs -> dox
generator -> gen
At the time I was looking into lex and yacc, where a lot of things start with "yy", so the "y" slipped in and
made things pronounceable (the proper pronouncement is Docs-ee-gen, so with a long "e").
19. What was the reason to develop doxygen?
I once wrote a GUI widget based on the Qt library (it is still available at http://sourceforge.в†ђ
net/projects/qdbttabular/ but hasn’t been updated since 2002). Qt had nicely generated documentation (using an internal tool which they didn’t want to release) and I wrote similar docs
by hand. This was a nightmare to maintain, so I wanted a similar tool. I looked at Doc++ but that just wasn’t
good enough (it didn’t support signals and slots and did not have the Qt look and feel I had grown to like), so
I started to write my own tool...
Generated by Doxygen
Chapter 18
Troubleshooting
18.1
Known Problems
• If you have problems building doxygen from sources, please read this section first.
• Doxygen is not a real compiler, it is only a lexical scanner. This means that it can and will not detect errors in
your source code.
• Doxygen has a build in preprocessor, but this works slightly different than the C preprocessor. Doxygen
assumes a header file is properly guarded against multiple inclusion, and that each include file is standalone
(i.e. it could be placed at the top of a source file without causing compiler errors). As long as this is true (and
this is a good design practice) you should not encounter problems.
• Since it is impossible to test all possible code fragments, it is very well possible, that some valid piece of C/←
C++ code is not handled properly. If you find such a piece, please send it to me, so I can improve doxygen’s
parsing capabilities. Try to make the piece of code you send as small as possible, to help me narrow down
the search.
• Doxygen does not work properly if there are multiple classes, structs or unions with the same name in your
code. It should not crash however, rather it should ignore all of the classes with the same name except one.
• Some commands do not work inside the arguments of other commands. Inside a HTML link (i.←
e. <a href="...">...<a>) for instance other commands (including other HTML commands) do not work!
The sectioning commands are an important exception.
• Redundant braces can confuse doxygen in some cases. For example:
void f (int);
is properly parsed as a function declaration, but
const int (a);
is also seen as a function declaration with name int, because only the syntax is analyzed, not the semantics.
If the redundant braces can be detected, as in
int *(a[20]);
then doxygen will remove the braces and correctly parse the result.
• Not all names in code fragments that are included in the documentation are replaced by links (for instance
when using SOURCE_BROWSER = YES) and links to overloaded members may point to the wrong member.
This also holds for the "Referenced by" list that is generated for each function.
For a part this is because the code parser isn’t smart enough at the moment. I’ll try to improve this in
the future. But even with these improvements not everything can be properly linked to the corresponding
documentation, because of possible ambiguities or lack of information about the context in which the code
fragment is found.
88
Troubleshooting
• It is not possible to insert a non-member function f in a class A using the \relates or \relatesalso command, if
class A already has a member with name f and the same argument list.
• There is only very limited support for member specialization at the moment. It only works if there is a specialized template class as well.
• Not all special commands are properly translated to RTF.
• Version 1.8.6 of dot (and maybe earlier versions too) do not generate proper map files, causing the graphs
that doxygen generates not to be properly clickable.
• PHP only: Doxygen requires that all PHP statements (i.e. code) is wrapped in a functions/methods, otherwise
you may run into parse problems.
18.2
How to Help
The development of Doxygen highly depends on your input!
If you are trying Doxygen let me know what you think of it (do you miss certain features?). Even if you decide not to
use it, please let me know why.
18.3
How to report a bug
Bugs are tracked in GNOME’s bugzilla database. Before submitting a new bug, first search through the
database if the same bug has already been submitted by others (the doxygen product will be preselected). If you
believe you have found a new bug, please report it.
If you are unsure whether or not something is a bug, please ask help on the users mailing list first (subscription is required).
If you send only a (vague) description of a bug, you are usually not very helpful and it will cost me much more time
to figure out what you mean. In the worst-case your bug report may even be completely ignored by me, so always
try to include the following information in your bug report:
• The version of doxygen you are using (for instance 1.5.3, use doxygen --version if you are not sure).
• The name and version number of your operating system (for instance SuSE Linux 6.4)
• It is usually a good idea to send along the configuration file as well, but please use doxygen with the -s flag
while generating it to keep it small (use doxygen -s -u [configName] to strip the comments from
an existing config file).
• The easiest (and often the only) way for me to fix bugs is if you can attach a small example demonstrating the
problem you have to the bug report, so I can reproduce it on my machine. Please make sure the example is
valid source code (could potentially compile) and that the problem is really captured by the example (I often
get examples that do not trigger the actual bug!). If you intend to send more than one file please zip or tar the
files together into a single file for easier processing. Note that when reporting a new bug you’ll get a chance
to attach a file to it only after submitting the initial bug description.
You can (and are encouraged to) add a patch for a bug. If you do so please use PATCH as a keyword in the bug
entry form.
If you have ideas how to fix existing bugs and limitations please discuss them on the developers mailing
list (subscription required). Patches can also be sent directly to [email protected] if you prefer not to send
them via the bug tracker or mailing list.
For patches please use "diff -uN" or include the files you modified. If you send more than one file please tar or zip
everything, so I only have to save and download one file.
Generated by Doxygen
Part II
Reference Manual
Chapter 19
Features
• Requires very little overhead from the writer of the documentation. Plain text will do, Markdown is support,
and for more fancy or structured output HTML tags and/or some of doxygen’s special commands can be used.
• Cross platform: works on Windows and many Unix flavors (including Linux and MacOSX).
• Indexes, organizes and generates browsable and cross-referenced output even from undocumented code.
• Generates structured XML output for parsed sources, which can be used by external tools.
• Supports C/C++, Java, (Corba and Microsoft) Java, Python, VHDL, PHP IDL, C#, Fortran, TCL, Objective-C
2.0, and to some extent D sources.
• Supports documentation of files, namespaces, packages, classes, structs, unions, templates, variables, functions, typedefs, enums and defines.
• JavaDoc (1.1), qdoc3 (partially), and ECMA-334 (C# spec.) compatible.
• Comes with a GUI frontend (Doxywizard) to ease editing the options and run doxygen. The GUI is available
on Windows, Linux, and MacOSX.
• Automatically generates class and collaboration diagrams in HTML (as clickable image maps) and LATEX (as
Encapsulated PostScript images).
• Uses the dot tool of the Graphviz tool kit to generate include dependency graphs, collaboration diagrams,
call graphs, directory structure graphs, and graphical class hierarchy graphs.
• Allows grouping of entities in modules and creating a hierarchy of modules.
• Flexible comment placement: Allows you to put documentation in the header file (before the declaration of an
entity), source file (before the definition of an entity) or in a separate file.
• Generates a list of all members of a class (including any inherited members) along with their protection level.
• Outputs documentation in on-line format (XHTML and UNIX man page) and off-line format ( LATEX and RTF)
simultaneously (any of these can be disabled if desired). All formats are optimized for ease of reading.
Furthermore, compressed HTML can be generated from HTML output using Microsoft’s HTML Help Workshop (Windows only) and PDF can be generated from the LATEX output.
• Support for various third party help formats including HTML Help, docsets, Qt-Help, and eclipse help.
• Includes a full C preprocessor to allow proper parsing of conditional code fragments and to allow expansion
of all or part of macros definitions.
• Automatically detects public, protected and private sections, as well as the Qt specific signal and slots sections. Extraction of private class members is optional.
• Automatically generates references to documented classes, files, namespaces and members. Documentation
of global functions, global variables, typedefs, defines and enumerations is also supported.
92
Features
• References to base/super classes and inherited/overridden members are generated automatically.
• Includes a fast, rank based search engine to search for strings or words in the class and member documentation (PHP based).
• Includes an Javascript based live search feature to search for symbols as you type (for small to medium sized
projects).
• You can type normal HTML tags in your documentation. Doxygen will convert them to their equivalent LATEX,
RTF, and man-page counterparts automatically.
• Allows references to documentation generated for other (doxygen documented) projects (or another part of
the same project) in a location independent way.
• Allows inclusion of source code examples that are automatically cross-referenced with the documentation.
• Inclusion of undocumented classes is also supported, allowing to quickly learn the structure and interfaces of
a (large) piece of code without looking into the implementation details.
• Allows automatic cross-referencing of (documented) entities with their definition in the source code.
• All source code fragments are syntax highlighted for ease of reading.
• Allows inclusion of function/member/class definitions in the documentation.
• All options are read from an easy to edit and (optionally) annotated configuration file.
• Documentation and search engine can be transferred to another location or machine without regenerating the
documentation.
• Supports many different character encodings and uses UTF-8 internally and for the generated output.
• Doxygen can generate a layout which you can use and edit to change the layout of each page.
• There more than a 100 configurable options to fine-tune the output.
• Can cope with large projects easily.
Although doxygen can now be used in any project written in a language that is supported by doxygen, initially it was
specifically designed to be used for projects that make use of Qt Software’s Qt toolkit. I have tried to make
doxygen �Qt-compatible’. That is: Doxygen can read the documentation contained in the Qt source code and create
a class browser that looks quite similar to the one that is generated by Qt Software. Doxygen understands the C++
extensions used by Qt such as signals and slots and many of the markup commands used in the Qt sources.
Doxygen can also automatically generate links to existing documentation that was generated with Doxygen or with
Qt’s non-public class browser generator. For a Qt based project this means that whenever you refer to members or
classes belonging to the Qt toolkit, a link will be generated to the Qt documentation. This is done independent of
where this documentation is located!
Generated by Doxygen
Chapter 20
Doxygen usage
Doxygen is a command line based utility. Calling doxygen with the --help option at the command line will give
you a brief description of the usage of the program.
All options consist of a leading character -, followed by one character and one or more arguments depending on
the option.
To generate a manual for your project you typically need to follow these steps:
1. You document your source code with special documentation blocks (see section Special comment blocks).
2. You generate a configuration file (see section Configuration) by calling doxygen with the -g option:
doxygen -g <config_file>
3. You edit the configuration file so it matches your project. In the configuration file you can specify the input
files and a lot of optional information.
4. You let doxygen generate the documentation, based on the settings in the configuration file:
doxygen <config_file>
If you have a configuration file generated with an older version of doxygen, you can upgrade it to the current version
by running doxygen with the -u option.
doxygen -u <config_file>
All configuration settings in the original configuration file will be copied to the new configuration file. Any new options
will have their default value. Note that comments that you may have added in the original configuration file will be
lost.
20.1
Fine-tuning the output
If you want to fine-tune the way the output looks, doxygen allows you generate default style sheet, header, and
footer files that you can edit afterwards:
• For HTML output, you can generate the default header file (see HTML_HEADER), the default footer (see
HTML_FOOTER), and the default style sheet (see HTML_STYLESHEET), using the following command:
doxygen -w html header.html footer.html stylesheet.css <config_file>
The config_file is optional. When omitted doxygen will search for a file named Doxyfile and process
that. When this is also not found it will used the default settings.
• For LATEX output, you can generate the first and last part of refman.tex (see LATEX_HEADER and LA←
TEX_FOOTER) and the style sheet included by that header (normally doxygen.sty), using the following
command:
94
Doxygen usage
doxygen -w latex header.tex footer.tex doxygen.sty <config_file>
If you need non-default options (for instance to use extra LATEX packages) you need to make a config file with
those options set correctly and then specify that config file after the generated files (make a backup of the
configuration file first so you don’t loose it in case you forget to specify one of the output files).
• For RTF output, you can generate the default style sheet file (see RTF_STYLESHEET_FILE) using:
doxygen -w rtf rtfstyle.cfg
Warning
When using a custom header you are responsible for the proper inclusion of any scripts and style sheets that
doxygen needs, which is dependent on the configuration options and may changes when upgrading to a new
doxygen release.
Note
• If you do not want documentation for each item inside the configuration file then you can use the optional
-s option. This can use be used in combination with the -u option, to add or strip the documentation
from an existing configuration file. Please use the -s option if you send me a configuration file as part of
a bug report!
• To make doxygen read/write to standard input/output instead of from/to a file, use - for the file name.
Generated by Doxygen
Chapter 21
Doxywizard usage
Doxywizard is a GUI front-end for configuring and running doxygen.
Note it is possible to start the doxywizard with as argument the configuration file to be used.
When you start doxywizard it will display the main window (the actual look depends on the OS used).
Figure 21.1: Main window
The windows shows the steps to take to configure and run doxygen. The first step is to choose one of the ways to
configure doxygen.
96
Doxywizard usage
Wizard Click this button to quickly configure the most important settings and leave the rest of the options to their
defaults.
Expert Click this button to gain access to the full range of configuration options.
Load Click this button to load an existing configuration file from disk.
Note that you can select multiple buttons in a row, for instance to first configure doxygen using the Wizard and then
fine tune the settings via the Expert.
After doxygen is configured you need to save the configuration as a file to disk. This second step allows doxygen
to use the configuration and has the additional advantage that the configuration can be reused to run doxygen with
the same settings at a later point in time.
Since some configuration options may use relative paths, the next step is to select a directory from which to run
doxygen. This is typically the root of the source tree and will most of the time already be filled in correctly.
Once the configuration file is saved and the working directory is set, you can run doxygen based on the selected
settings. Do this by pressing the "Start" button. Once doxygen runs you can cancel it by clicking the same button
again. The output produced by doxygen is captured and shown in a log window. Once doxygen finishes, the log
can be saved as a text file.
The Wizard Dialog
If you select the Wizard button in step 1, then a dialog with a number of tabs will appear.
Figure 21.2: Wizard dialog: Project settings
The fields in the project tab speak for themselves. Once doxygen has finished the Destination directory is where to
look for the results. Doxygen will put each output format in a separate sub-directory.
Generated by Doxygen
97
Figure 21.3: Wizard dialog: Mode of operating
The mode tab allows you to select how doxygen will look at your sources. The default is to only look for things that
have been documented.
You can also select how doxygen should present the results. The latter does not affect the way doxygen parses
your source code.
Generated by Doxygen
98
Doxywizard usage
Figure 21.4: Wizard dialog: Output to produce
You can select one or more of the output formats that doxygen should produce. For HTML and LATEX there are
additional options.
Figure 21.5: Wizard dialog: Diagrams to generate
Generated by Doxygen
99
Doxygen can produce a number of diagrams. Using the diagrams tab you can select which ones to generate. For
most diagrams the dot tool of the GraphViz package is needed (if you use the binary packages for MacOSX this
tool is already included).
Expert dialog
The Expert dialog has a number of tab fields, one for each section in the configuration file. Each tab-field contains
a number of lines, one for each configuration option in that section.
The kind of input widget depends on the type of the configuration option.
• For each boolean option (those options that are answered with YES or NO in the configuration file) there is a
check-box.
• For items taking one of a fixed set of values (like OUTPUT_LANGUAGE) a combo box is used.
• For items taking an integer value from a range, a spinbox is used.
• For free form string-type options there is a one line edit field
• For options taking a lists of strings, a one line edit field is available, with a �+’ button to add this string to the
list and a �-’ button to remove the selected string from the list. There is also a �∗’ button that, when pressed,
replaces the selected item in the list with the string entered in the edit field.
• For file and folder entries, there are special buttons that start a file selection dialog.
Figure 21.6: Some options from the Expert dialog
The get additional information about the meaning of an option, click on the "Help" button at the bottom right of the
dialog and then on the item. A tooltip with additional information will appear.
Menu options
The GUI front-end has a menu with a couple of useful items
Generated by Doxygen
100
Doxywizard usage
Figure 21.7: File menu
Open... This is the same as the "Load" button in the main window and allows to open a configuration file from disk.
Save as.. This is the same as the "Save" button in the main window and can be used to save the current configuration settings to disk.
Recent configurations Allow to quickly load a recently saved configuration.
Set as default... Stores the current configuration settings as the default to use next time the GUI is started. You
will be asked to confirm the action.
Reset... Restores the factory defaults as the default settings to use. You will be asked to confirm the action.
Generated by Doxygen
Chapter 22
Configuration
22.1
Format
A configuration file is a free-form ASCII text file with a structure that is similar to that of a Makefile, with the default
name Doxyfile. It is parsed by doxygen. The file may contain tabs and newlines for formatting purposes. The
statements in the file are case-sensitive. Comments may be placed anywhere within the file (except within quotes).
Comments beginning with two hash characters (##) are kept when updating the configuration file and are placed in
front of the TAG are in front of. Comments beginning with two hash characters (##) at the end of the configuration
file are also kept and placed at the end of the file. Comments begin with the hash character (#) and ends at the end
of the line.
The file essentially consists of a list of assignment statements. Each statement consists of a TAG_NAME written in
capitals, followed by the equal sign (=) and one or more values. If the same tag is assigned more than once, the
last assignment overwrites any earlier assignment. For tags that take a list as their argument, the += operator can
be used instead of = to append new values to the list. Values are sequences of non-blanks. If the value should
contain one or more blanks it must be surrounded by quotes ("..."). Multiple lines can be concatenated by
inserting a backslash (\) as the last character of a line. Environment variables can be expanded using the pattern
$(ENV_VARIABLE_NAME).
You can also include part of a configuration file from another configuration file using a @INCLUDE tag as follows:
@INCLUDE = config_file_name
The include file is searched in the current working directory. You can also specify a list of directories that should
be searched before looking in the current working directory. Do this by putting a @INCLUDE_PATH tag with these
paths before the @INCLUDE tag, e.g.:
@INCLUDE_PATH = my_config_dir
The configuration options can be divided into several categories. Below is an alphabetical index of the tags that are
recognized followed by the descriptions of the tags grouped by category.
ABBREVIATE_BRIEF . . . .
ALIASES . . . . . . . . . .
ALLEXTERNALS . . . . . .
ALLOW_UNICODE_NAMES
ALPHABETICAL_INDEX . .
ALWAYS_DETAILED_SEC .
AUTOLINK_SUPPORT . . .
BINARY_TOC . . . . . . . .
BRIEF_MEMBER_DESC . .
BUILTIN_STL_SUPPORT . .
CALLER_GRAPH . . . . . .
CALL_GRAPH . . . . . . . .
CASE_SENSE_NAMES . . .
CHM_FILE . . . . . . . . . .
CHM_INDEX_ENCODING .
CITE_BIB_FILES . . . . . .
.
.
.
.
.
.
.
.
.
.
.
.
.
.
.
.
.
.
.
.
.
.
.
.
.
.
.
.
.
.
.
.
.
.
.
.
.
.
.
.
.
.
.
.
.
.
.
.
.
.
.
.
.
.
.
.
.
.
.
.
.
.
.
.
.
.
.
.
.
.
.
.
.
.
.
.
.
.
.
.
.
.
.
.
.
.
.
.
.
.
.
.
.
.
.
.
.
.
.
.
.
.
.
.
.
.
.
.
.
.
.
.
.
.
.
.
.
.
.
.
.
.
.
.
.
.
.
.
.
.
.
.
.
.
.
.
.
.
.
.
.
.
.
.
.
.
.
.
.
.
.
.
.
.
.
.
.
.
.
.
.
.
.
.
.
.
.
.
.
.
.
.
.
.
.
.
.
.
.
.
.
.
.
.
.
.
.
.
.
.
.
.
.
.
.
.
.
.
.
.
.
.
.
.
.
.
.
.
.
.
.
.
.
.
.
.
.
.
.
.
.
.
.
.
.
.
.
.
.
.
.
.
.
.
.
.
.
.
.
.
. 22.2
. 22.2
.22.17
. 22.2
. 22.7
. 22.2
. 22.2
. 22.8
. 22.2
. 22.2
.22.18
.22.18
. 22.3
. 22.8
. 22.8
. 22.3
CLANG_ASSISTED_PARSING
CLANG_OPTIONS . . . . . .
CLASS_DIAGRAMS . . . . . .
CLASS_GRAPH . . . . . . . .
COLLABORATION_GRAPH .
COLS_IN_ALPHA_INDEX . .
COMPACT_LATEX . . . . . .
COMPACT_RTF . . . . . . . .
CPP_CLI_SUPPORT . . . . .
CREATE_SUBDIRS . . . . . .
DIAFILE_DIRS . . . . . . . .
DIA_PATH . . . . . . . . . . .
DIRECTORY_GRAPH . . . . .
DISABLE_INDEX . . . . . . .
DISTRIBUTE_GROUP_DOC .
DOCBOOK_OUTPUT . . . . .
.
.
.
.
.
.
.
.
.
.
.
.
.
.
.
.
.
.
.
.
.
.
.
.
.
.
.
.
.
.
.
.
.
.
.
.
.
.
.
.
.
.
.
.
.
.
.
.
.
.
.
.
.
.
.
.
.
.
.
.
.
.
.
.
.
.
.
.
.
.
.
.
.
.
.
.
.
.
.
.
.
.
.
.
.
.
.
.
.
.
.
.
.
.
.
.
.
.
.
.
.
.
.
.
.
.
.
.
.
.
.
.
.
.
.
.
.
.
.
.
.
.
.
.
.
.
.
.
.
.
.
.
.
.
.
.
.
.
.
.
.
.
.
.
.
.
.
.
.
.
.
.
.
.
.
.
.
.
.
.
.
.
.
.
.
.
.
.
.
.
.
.
.
.
.
.
.
.
.
.
.
.
.
.
.
.
.
.
.
.
.
.
.
.
.
.
.
.
.
.
.
.
.
.
.
.
.
.
.
.
.
.
.
.
.
.
.
.
.
.
.
.
.
.
. 22.6
. 22.6
.22.18
.22.18
.22.18
. 22.7
. 22.9
.22.10
. 22.2
. 22.2
.22.18
.22.18
.22.18
. 22.8
. 22.2
.22.13
102
DOCSET_BUNDLE_ID . . . . . .
DOCSET_FEEDNAME . . . . . .
DOCSET_PUBLISHER_ID . . . .
DOCSET_PUBLISHER_NAME . .
DOTFILE_DIRS . . . . . . . . . .
DOT_CLEANUP . . . . . . . . . .
DOT_FONTNAME . . . . . . . . .
DOT_FONTPATH . . . . . . . . .
DOT_FONTSIZE . . . . . . . . .
DOT_GRAPH_MAX_NODES . . .
DOT_IMAGE_FORMAT . . . . . .
DOT_MULTI_TARGETS . . . . .
DOT_NUM_THREADS . . . . . .
DOT_PATH . . . . . . . . . . . .
DOT_TRANSPARENT . . . . . .
DOXYFILE_ENCODING . . . . .
ECLIPSE_DOC_ID . . . . . . . .
ENABLED_SECTIONS . . . . . .
ENABLE_PREPROCESSING . . .
ENUM_VALUES_PER_LINE . . .
EXAMPLE_PATH . . . . . . . . .
EXAMPLE_PATTERNS . . . . . .
EXAMPLE_RECURSIVE . . . . .
EXCLUDE . . . . . . . . . . . . .
EXCLUDE_PATTERNS . . . . . .
EXCLUDE_SYMBOLS . . . . . .
EXCLUDE_SYMLINKS . . . . . .
EXPAND_AS_DEFINED . . . . .
EXPAND_ONLY_PREDEF . . . .
EXTENSION_MAPPING . . . . .
EXTERNAL_GROUPS . . . . . .
EXTERNAL_PAGES . . . . . . .
EXTERNAL_SEARCH . . . . . . .
EXTERNAL_SEARCH_ID . . . . .
EXTRACT_ALL . . . . . . . . . .
EXTRACT_ANON_NSPACES . .
EXTRACT_LOCAL_CLASSES . .
EXTRACT_LOCAL_METHODS . .
EXTRACT_PACKAGE . . . . . .
EXTRACT_PRIVATE . . . . . . .
EXTRACT_STATIC . . . . . . . .
EXTRA_PACKAGES . . . . . . .
EXTRA_SEARCH_MAPPINGS . .
EXT_LINKS_IN_WINDOW . . . .
FILE_PATTERNS . . . . . . . . .
FILE_VERSION_FILTER . . . . .
FILTER_PATTERNS . . . . . . .
FILTER_SOURCE_FILES . . . . .
FILTER_SOURCE_PATTERNS . .
FORCE_LOCAL_INCLUDES . . .
FORMULA_FONTSIZE . . . . . .
FORMULA_TRANSPARENT . . .
FULL_PATH_NAMES . . . . . . .
GENERATE_AUTOGEN_DEF . .
GENERATE_BUGLIST . . . . . .
GENERATE_CHI . . . . . . . . .
GENERATE_DEPRECATEDLIST .
GENERATE_DOCBOOK . . . . .
GENERATE_DOCSET . . . . . .
GENERATE_ECLIPSEHELP . . .
GENERATE_HTML . . . . . . . .
GENERATE_HTMLHELP . . . . .
GENERATE_LATEX . . . . . . .
GENERATE_LEGEND . . . . . .
GENERATE_MAN . . . . . . . . .
GENERATE_PERLMOD . . . . .
GENERATE_QHP . . . . . . . . .
GENERATE_RTF . . . . . . . . .
GENERATE_TAGFILE . . . . . .
GENERATE_TESTLIST . . . . . .
GENERATE_TODOLIST . . . . .
GENERATE_TREEVIEW . . . . .
GENERATE_XML . . . . . . . . .
Configuration
.
.
.
.
.
.
.
.
.
.
.
.
.
.
.
.
.
.
.
.
.
.
.
.
.
.
.
.
.
.
.
.
.
.
.
.
.
.
.
.
.
.
.
.
.
.
.
.
.
.
.
.
.
.
.
.
.
.
.
.
.
.
.
.
.
.
.
.
.
.
.
.
.
.
.
.
.
.
.
.
.
.
.
.
.
.
.
.
.
.
.
.
.
.
.
.
.
.
.
.
.
.
.
.
.
.
.
.
.
.
.
.
.
.
.
.
.
.
.
.
.
.
.
.
.
.
.
.
.
.
.
.
.
.
.
.
.
.
.
.
.
.
.
.
.
.
.
.
.
.
.
.
.
.
.
.
.
.
.
.
.
.
.
.
.
.
.
.
.
.
.
.
.
.
.
.
.
.
.
.
.
.
.
.
.
.
.
.
.
.
.
.
.
.
.
.
.
.
.
.
.
.
.
.
.
.
.
.
.
.
.
.
.
.
.
.
.
.
.
.
.
.
.
.
.
.
.
.
.
.
.
.
.
.
.
.
.
.
.
.
.
.
.
.
.
.
.
.
.
.
.
.
.
.
.
.
.
.
.
.
.
.
.
.
.
.
.
.
.
.
.
.
.
.
.
.
.
.
.
.
.
.
.
.
.
.
.
.
.
.
.
.
.
.
.
.
.
.
.
.
.
.
.
.
.
.
.
.
.
.
.
.
.
.
.
.
.
.
.
.
.
.
.
.
.
.
.
.
.
.
.
.
.
.
.
.
.
.
.
.
.
.
.
.
.
.
.
.
.
.
.
.
.
.
.
.
.
.
.
.
.
.
.
.
.
.
.
.
.
.
.
.
.
.
.
.
.
.
.
.
.
.
.
.
.
.
.
.
.
.
.
.
.
.
.
.
.
.
.
.
.
.
.
.
.
.
.
.
.
.
.
.
.
.
.
.
.
.
.
.
.
.
.
.
.
.
.
.
.
.
.
.
.
.
.
.
.
.
.
.
.
.
.
.
.
.
.
.
.
.
.
.
.
.
.
.
.
.
.
.
.
.
.
.
.
.
.
.
.
.
.
.
.
.
.
.
.
.
.
.
.
.
.
.
.
.
.
.
.
.
.
.
.
.
.
.
.
.
.
.
.
.
.
.
.
.
.
.
.
.
.
.
.
.
.
.
.
.
.
.
.
.
.
.
.
.
.
.
.
.
.
.
.
.
.
.
.
.
.
.
.
.
.
.
.
.
.
.
.
.
.
.
.
.
.
.
.
.
.
.
.
.
.
.
.
.
.
.
.
.
.
.
.
.
.
.
.
.
.
.
.
.
.
.
.
.
.
.
.
.
.
.
.
.
.
.
.
.
.
.
.
.
.
.
.
.
.
.
.
.
.
.
.
.
.
.
.
.
.
.
.
.
.
.
.
.
.
.
.
.
.
.
.
.
.
.
.
.
.
.
.
.
.
.
.
.
.
.
.
.
.
.
.
.
.
.
.
.
.
.
.
.
.
.
.
.
.
.
.
.
.
.
.
.
.
.
.
.
.
.
.
.
.
.
.
.
.
.
.
.
.
.
.
.
.
.
.
.
.
.
.
.
.
.
.
.
.
.
.
.
.
.
.
.
.
.
.
.
.
.
.
.
.
.
.
.
.
.
.
.
.
.
.
.
.
.
.
.
.
.
.
.
.
.
.
.
.
.
.
.
.
.
.
.
.
.
.
.
.
.
.
.
.
.
.
.
.
.
.
.
.
.
.
.
.
.
.
.
.
.
.
.
.
.
.
.
.
.
.
.
.
.
.
.
.
.
.
.
.
.
.
.
.
.
.
.
.
.
.
.
.
.
.
.
.
.
.
.
.
.
.
.
.
.
.
.
.
.
.
.
.
.
.
.
.
.
.
.
.
.
.
.
.
.
.
.
.
.
.
.
.
.
.
.
.
.
.
.
.
.
.
.
.
.
.
.
.
.
.
.
.
.
.
.
.
.
. 22.8
. 22.8
. 22.8
. 22.8
.22.18
.22.18
.22.18
.22.18
.22.18
.22.18
.22.18
.22.18
.22.18
.22.18
.22.18
. 22.2
. 22.8
. 22.3
.22.16
. 22.8
. 22.5
. 22.5
. 22.5
. 22.5
. 22.5
. 22.5
. 22.5
.22.16
.22.16
. 22.2
.22.17
.22.17
. 22.8
. 22.8
. 22.3
. 22.3
. 22.3
. 22.3
. 22.3
. 22.3
. 22.3
. 22.9
. 22.8
. 22.8
. 22.5
. 22.3
. 22.5
. 22.5
. 22.5
. 22.3
. 22.8
. 22.8
. 22.2
.22.14
. 22.3
. 22.8
. 22.3
.22.13
. 22.8
. 22.8
. 22.8
. 22.8
. 22.9
.22.18
.22.11
.22.15
. 22.8
.22.10
.22.17
. 22.3
. 22.3
. 22.8
.22.12
GRAPHICAL_HIERARCHY . . .
GROUP_GRAPHS . . . . . . .
HAVE_DOT . . . . . . . . . . .
HHC_LOCATION . . . . . . . .
HIDE_FRIEND_COMPOUNDS .
HIDE_IN_BODY_DOCS . . . . .
HIDE_SCOPE_NAMES . . . . .
HIDE_UNDOC_CLASSES . . .
HIDE_UNDOC_MEMBERS . . .
HIDE_UNDOC_RELATIONS . .
HTML_COLORSTYLE_GAMMA
HTML_COLORSTYLE_HUE . .
HTML_COLORSTYLE_SAT . . .
HTML_DYNAMIC_SECTIONS .
HTML_EXTRA_FILES . . . . . .
HTML_EXTRA_STYLESHEET .
HTML_FILE_EXTENSION . . .
HTML_FOOTER . . . . . . . . .
HTML_HEADER . . . . . . . . .
HTML_INDEX_NUM_ENTRIES .
HTML_OUTPUT . . . . . . . . .
HTML_STYLESHEET . . . . . .
HTML_TIMESTAMP . . . . . . .
IDL_PROPERTY_SUPPORT . .
IGNORE_PREFIX . . . . . . . .
IMAGE_PATH . . . . . . . . . .
INCLUDED_BY_GRAPH . . . .
INCLUDE_FILE_PATTERNS . .
INCLUDE_GRAPH . . . . . . .
INCLUDE_PATH . . . . . . . .
INHERIT_DOCS . . . . . . . . .
INLINE_GROUPED_CLASSES .
INLINE_INFO . . . . . . . . . .
INLINE_INHERITED_MEMB . .
INLINE_SIMPLE_STRUCTS . .
INLINE_SOURCES . . . . . . .
INPUT . . . . . . . . . . . . . .
INPUT_ENCODING . . . . . . .
INPUT_FILTER . . . . . . . . .
INTERACTIVE_SVG . . . . . .
INTERNAL_DOCS . . . . . . .
JAVADOC_AUTOBRIEF . . . .
LATEX_BATCHMODE . . . . .
LATEX_BIB_STYLE . . . . . . .
LATEX_CMD_NAME . . . . . .
LATEX_EXTRA_FILES . . . . .
LATEX_FOOTER . . . . . . . .
LATEX_HEADER . . . . . . . .
LATEX_HIDE_INDICES . . . . .
LATEX_OUTPUT . . . . . . . .
LATEX_SOURCE_CODE . . . .
LAYOUT_FILE . . . . . . . . .
LOOKUP_CACHE_SIZE . . . .
MACRO_EXPANSION . . . . .
MAKEINDEX_CMD_NAME . . .
MAN_EXTENSION . . . . . . .
MAN_LINKS . . . . . . . . . . .
MAN_OUTPUT . . . . . . . . .
MAN_SUBDIR . . . . . . . . . .
MARKDOWN_SUPPORT . . . .
MATHJAX_CODEFILE . . . . .
MATHJAX_EXTENSIONS . . . .
MATHJAX_FORMAT . . . . . .
MATHJAX_RELPATH . . . . . .
MAX_DOT_GRAPH_DEPTH . .
MAX_INITIALIZER_LINES . . .
MSCFILE_DIRS . . . . . . . . .
MSCGEN_PATH . . . . . . . .
MULTILINE_CPP_IS_BRIEF . .
OPTIMIZE_FOR_FORTRAN . .
OPTIMIZE_OUTPUT_FOR_C . .
OPTIMIZE_OUTPUT_JAVA . . .
OPTIMIZE_OUTPUT_VHDL . .
.
.
.
.
.
.
.
.
.
.
.
.
.
.
.
.
.
.
.
.
.
.
.
.
.
.
.
.
.
.
.
.
.
.
.
.
.
.
.
.
.
.
.
.
.
.
.
.
.
.
.
.
.
.
.
.
.
.
.
.
.
.
.
.
.
.
.
.
.
.
.
.
.
.
.
.
.
.
.
.
.
.
.
.
.
.
.
.
.
.
.
.
.
.
.
.
.
.
.
.
.
.
.
.
.
.
.
.
.
.
.
.
.
.
.
.
.
.
.
.
.
.
.
.
.
.
.
.
.
.
.
.
.
.
.
.
.
.
.
.
.
.
.
.
.
.
.
.
.
.
.
.
.
.
.
.
.
.
.
.
.
.
.
.
.
.
.
.
.
.
.
.
.
.
.
.
.
.
.
.
.
.
.
.
.
.
.
.
.
.
.
.
.
.
.
.
.
.
.
.
.
.
.
.
.
.
.
.
.
.
.
.
.
.
.
.
.
.
.
.
.
.
.
.
.
.
.
.
.
.
.
.
.
.
.
.
.
.
.
.
.
.
.
.
.
.
.
.
.
.
.
.
.
.
.
.
.
.
.
.
.
.
.
.
.
.
.
.
.
.
.
.
.
.
.
.
.
.
.
.
.
.
.
.
.
.
.
.
.
.
.
.
.
.
.
.
.
.
.
.
.
.
.
.
.
.
.
.
.
.
.
.
.
.
.
.
.
.
.
.
.
.
.
.
.
.
.
.
.
.
.
.
.
.
.
.
.
.
.
.
.
.
.
.
.
.
.
.
.
.
.
.
.
.
.
.
.
.
.
.
.
.
.
.
.
.
.
.
.
.
.
.
.
.
.
.
.
.
.
.
.
.
.
.
.
.
.
.
.
.
.
.
.
.
.
.
.
.
.
.
.
.
.
.
.
.
.
.
.
.
.
.
.
.
.
.
.
.
.
.
.
.
.
.
.
.
.
.
.
.
.
.
.
.
.
.
.
.
.
.
.
.
.
.
.
.
.
.
.
.
.
.
.
.
.
.
.
.
.
.
.
.
.
.
.
.
.
.
.
.
.
.
.
.
.
.
.
.
.
.
.
.
.
.
.
.
.
.
.
.
.
.
.
.
.
.
.
.
.
.
.
.
.
.
.
.
.
.
.
.
.
.
.
.
.
.
.
.
.
.
.
.
.
.
.
.
.
.
.
.
.
.
.
.
.
.
.
.
.
.
.
.
.
.
.
.
.
.
.
.
.
.
.
.
.
.
.
.
.
.
.
.
.
.
.
.
.
.
.
.
.
.
.
.
.
.
.
.
.
.
.
.
.
.
.
.
.
.
.
.
.
.
.
.
.
.
.
.
.
.
.
.
.
.
.
.
.
.
.
.
.
.
.
.
.
.
.
.
.
.
.
.
.
.
.
.
.
.
.
.
.
.
.
.
.
.
.
.
.
.
.
.
.
.
.
.
.
.
.
.
.
.
.
.
.
.
.
.
.
.
.
.
.
.
.
.
.
.
.
.
.
.
.
.
.
.
.
.
.
.
.
.
.
.
.
.
.
.
.
.
.
.
.
.
.
.
.
.
.
.
.
.
.
.
.
.
.
.
.
.
.
.
.
.
.
.
.
.
.
.
.
.
.
.
.
.
.
.
.
.
.
.
.
.
.
.
.
.
.
.
.
.
.
.
.
.
.
.
.
.
.
.
.
.
.
.
.
.
.
.
.
.
.
.
.
.
.
.
.
.
.
.
.
.
.
.
.
.
.
.
.
.
.
.
.
.
.
.
.
.
.
.
.
.
.
.
.
.
.
.
.
.
.
.
.
.
.
.
.
.
.
.
.
.
.
.
.
.
.
.
.
.
.
.
.
.
.
.
.
.
.
.
.
.
.
.
.
.
.
.
.
.
.
.
.
.
.
.
.
.
.
.
.
.
.
.
.
.
.
.
.
.
.
.
.
.
.
.
.
.
.
.
.
.
.
.
.
.
.
.
.
.
.
.
.
.
.
.
.
.
.
.
.
.
.
.
.
.
.
.
.
.
.
.
.
.
.
.
.
.
.
.
.
.
.
.
.
.
.
.
.
.
.
.
.
.
.
.
.
.
.
.
.
.
.
.
.
.
.
.
.
.
.
.
.
.
.
.
.
.22.18
.22.18
.22.18
. 22.8
. 22.3
. 22.3
. 22.3
. 22.3
. 22.3
.22.18
. 22.8
. 22.8
. 22.8
. 22.8
. 22.8
. 22.8
. 22.8
. 22.8
. 22.8
. 22.8
. 22.8
. 22.8
. 22.8
. 22.2
. 22.7
. 22.5
.22.18
.22.16
.22.18
.22.16
. 22.2
. 22.2
. 22.3
. 22.2
. 22.2
. 22.6
. 22.5
. 22.5
. 22.5
.22.18
. 22.3
. 22.2
. 22.9
. 22.9
. 22.9
. 22.9
. 22.9
. 22.9
. 22.9
. 22.9
. 22.9
. 22.3
. 22.2
.22.16
. 22.9
.22.11
.22.11
.22.11
.22.11
. 22.2
. 22.8
. 22.8
. 22.8
. 22.8
.22.18
. 22.3
.22.18
.22.18
. 22.2
. 22.2
. 22.2
. 22.2
. 22.2
Generated by Doxygen
22.2 Project related configuration options
OUTPUT_DIRECTORY . . . . .
OUTPUT_LANGUAGE . . . . .
PAPER_TYPE . . . . . . . . . .
PDF_HYPERLINKS . . . . . . .
PERLMOD_LATEX . . . . . . .
PERLMOD_MAKEVAR_PREFIX
PERLMOD_PRETTY . . . . . .
PERL_PATH . . . . . . . . . .
PREDEFINED . . . . . . . . . .
PROJECT_BRIEF . . . . . . . .
PROJECT_LOGO . . . . . . . .
PROJECT_NAME . . . . . . . .
PROJECT_NUMBER . . . . . .
QCH_FILE . . . . . . . . . . . .
QHG_LOCATION . . . . . . . .
QHP_CUST_FILTER_ATTRS . .
QHP_CUST_FILTER_NAME . .
QHP_NAMESPACE . . . . . . .
QHP_SECT_FILTER_ATTRS . .
QHP_VIRTUAL_FOLDER . . . .
QT_AUTOBRIEF . . . . . . . .
QUIET . . . . . . . . . . . . . .
RECURSIVE . . . . . . . . . . .
REFERENCED_BY_RELATION
REFERENCES_LINK_SOURCE
REFERENCES_RELATION . . .
REPEAT_BRIEF . . . . . . . .
RTF_EXTENSIONS_FILE . . . .
RTF_HYPERLINKS . . . . . . .
RTF_OUTPUT . . . . . . . . . .
RTF_STYLESHEET_FILE . . .
SEARCHDATA_FILE . . . . . .
SEARCHENGINE . . . . . . . .
SEARCHENGINE_URL . . . . .
SEARCH_INCLUDES . . . . . .
SEPARATE_MEMBER_PAGES
SERVER_BASED_SEARCH . .
SHORT_NAMES . . . . . . . .
SHOW_FILES . . . . . . . . . .
SHOW_GROUPED_MEMB_INC
22.2
.
.
.
.
.
.
.
.
.
.
.
.
.
.
.
.
.
.
.
.
.
.
.
.
.
.
.
.
.
.
.
.
.
.
.
.
.
.
.
.
.
.
.
.
.
.
.
.
.
.
.
.
.
.
.
.
.
.
.
.
.
.
.
.
.
.
.
.
.
.
.
.
.
.
.
.
.
.
.
.
.
.
.
.
.
.
.
.
.
.
.
.
.
.
.
.
.
.
.
.
.
.
.
.
.
.
.
.
.
.
.
.
.
.
.
.
.
.
.
.
.
.
.
.
.
.
.
.
.
.
.
.
.
.
.
.
.
.
.
.
.
.
.
.
.
.
.
.
.
.
.
.
.
.
.
.
.
.
.
.
.
.
.
.
.
.
.
.
.
.
.
.
.
.
.
.
.
.
.
.
.
.
.
.
.
.
.
.
.
.
.
.
.
.
.
.
.
.
.
.
.
.
.
.
.
.
.
.
.
.
.
.
.
.
.
.
.
.
.
.
.
.
.
.
.
.
.
.
.
.
.
.
.
.
.
.
.
.
.
.
.
.
.
.
.
.
.
.
.
.
.
.
.
.
.
.
.
.
.
.
.
.
.
.
.
.
.
.
.
.
.
.
.
.
.
.
.
.
.
.
.
.
.
.
.
.
.
.
.
.
.
.
.
.
.
.
.
.
.
.
.
.
.
.
.
.
.
.
.
.
.
.
.
.
.
.
.
.
.
.
.
.
.
.
.
.
.
.
.
.
.
.
.
.
.
.
.
.
.
.
.
.
.
.
.
.
.
.
.
.
.
.
.
.
.
.
.
.
.
.
103
.
.
.
.
.
.
.
.
.
.
.
.
.
.
.
.
.
.
.
.
.
.
.
.
.
.
.
.
.
.
.
.
.
.
.
.
.
.
.
.
.
.
.
.
.
.
.
.
.
.
.
.
.
.
.
.
.
.
.
.
.
.
.
.
.
.
.
.
.
.
.
.
.
.
.
.
.
.
.
.
.
.
.
.
.
.
.
.
.
.
.
.
.
.
.
.
.
.
.
.
.
.
.
.
.
.
.
.
.
.
.
.
.
.
.
.
.
.
.
.
.
.
.
.
.
.
.
.
.
.
.
.
.
.
.
.
.
.
.
.
.
.
.
.
.
.
.
.
.
.
.
.
.
.
.
.
.
.
.
.
. 22.2
. 22.2
. 22.9
. 22.9
.22.15
.22.15
.22.15
.22.17
.22.16
. 22.2
. 22.2
. 22.2
. 22.2
. 22.8
. 22.8
. 22.8
. 22.8
. 22.8
. 22.8
. 22.8
. 22.2
. 22.4
. 22.5
. 22.6
. 22.6
. 22.6
. 22.2
.22.10
.22.10
.22.10
.22.10
. 22.8
. 22.8
. 22.8
.22.16
. 22.2
. 22.8
. 22.2
. 22.3
. 22.3
SHOW_INCLUDE_FILES . . . .
SHOW_NAMESPACES . . . . .
SHOW_USED_FILES . . . . . .
SIP_SUPPORT . . . . . . . . .
SKIP_FUNCTION_MACROS . .
SORT_BRIEF_DOCS . . . . . .
SORT_BY_SCOPE_NAME . . .
SORT_GROUP_NAMES . . . .
SORT_MEMBERS_CTORS_1ST
SORT_MEMBER_DOCS . . . .
SOURCE_BROWSER . . . . . .
SOURCE_TOOLTIPS . . . . . .
STRICT_PROTO_MATCHING .
STRIP_CODE_COMMENTS . .
STRIP_FROM_INC_PATH . . .
STRIP_FROM_PATH . . . . . .
SUBGROUPING . . . . . . . . .
TAB_SIZE . . . . . . . . . . . .
TAGFILES . . . . . . . . . . . .
TCL_SUBST . . . . . . . . . . .
TEMPLATE_RELATIONS . . . .
TOC_EXPAND . . . . . . . . .
TREEVIEW_WIDTH . . . . . . .
TYPEDEF_HIDES_STRUCT . .
UML_LIMIT_NUM_FIELDS . . .
UML_LOOK . . . . . . . . . . .
USE_HTAGS . . . . . . . . . .
USE_MATHJAX . . . . . . . . .
USE_MDFILE_AS_MAINPAGE .
USE_PDFLATEX . . . . . . . .
VERBATIM_HEADERS . . . . .
WARNINGS . . . . . . . . . . .
WARN_FORMAT . . . . . . . .
WARN_IF_DOC_ERROR . . . .
WARN_IF_UNDOCUMENTED .
WARN_LOGFILE . . . . . . . .
WARN_NO_PARAMDOC . . . .
XML_OUTPUT . . . . . . . . .
XML_PROGRAMLISTING . . . .
.
.
.
.
.
.
.
.
.
.
.
.
.
.
.
.
.
.
.
.
.
.
.
.
.
.
.
.
.
.
.
.
.
.
.
.
.
.
.
.
.
.
.
.
.
.
.
.
.
.
.
.
.
.
.
.
.
.
.
.
.
.
.
.
.
.
.
.
.
.
.
.
.
.
.
.
.
.
.
.
.
.
.
.
.
.
.
.
.
.
.
.
.
.
.
.
.
.
.
.
.
.
.
.
.
.
.
.
.
.
.
.
.
.
.
.
.
.
.
.
.
.
.
.
.
.
.
.
.
.
.
.
.
.
.
.
.
.
.
.
.
.
.
.
.
.
.
.
.
.
.
.
.
.
.
.
.
.
.
.
.
.
.
.
.
.
.
.
.
.
.
.
.
.
.
.
.
.
.
.
.
.
.
.
.
.
.
.
.
.
.
.
.
.
.
.
.
.
.
.
.
.
.
.
.
.
.
.
.
.
.
.
.
.
.
.
.
.
.
.
.
.
.
.
.
.
.
.
.
.
.
.
.
.
.
.
.
.
.
.
.
.
.
.
.
.
.
.
.
.
.
.
.
.
.
.
.
.
.
.
.
.
.
.
.
.
.
.
.
.
.
.
.
.
.
.
.
.
.
.
.
.
.
.
.
.
.
.
.
.
.
.
.
.
.
.
.
.
.
.
.
.
.
.
.
.
.
.
.
.
.
.
.
.
.
.
.
.
.
.
.
.
.
.
.
.
.
.
.
.
.
.
.
.
.
.
.
.
.
.
.
.
.
.
.
.
.
.
.
.
.
.
.
.
.
.
.
.
.
.
.
.
.
.
.
.
.
.
.
.
.
.
.
.
.
.
.
.
.
.
.
.
.
.
.
.
.
.
.
.
.
.
.
.
.
.
.
.
.
.
.
.
.
.
.
.
.
.
.
.
.
.
.
.
.
.
.
.
.
.
.
.
.
.
.
.
.
.
.
.
.
.
.
.
.
.
.
.
.
.
.
.
.
.
.
.
.
.
.
.
.
.
.
.
.
.
.
.
.
.
.
.
.
.
.
.
.
.
.
.
.
.
.
.
.
.
.
.
.
.
.
.
.
.
.
.
.
.
.
.
.
.
.
.
.
.
.
.
.
.
.
.
.
.
.
.
.
. 22.3
. 22.3
. 22.3
. 22.2
.22.16
. 22.3
. 22.3
. 22.3
. 22.3
. 22.3
. 22.6
. 22.6
. 22.3
. 22.6
. 22.2
. 22.2
. 22.2
. 22.2
.22.17
. 22.2
.22.18
. 22.8
. 22.8
. 22.2
.22.18
.22.18
. 22.6
. 22.8
. 22.5
. 22.9
. 22.6
. 22.4
. 22.4
. 22.4
. 22.4
. 22.4
. 22.4
.22.12
.22.12
Project related configuration options
DOXYFILE_ENCODING This tag specifies the encoding used for all characters in the config file that follow.
The default is UTF-8 which is also the encoding used for all text before the first occurrence of this tag.
Doxygen uses libiconv (or the iconv built into libc) for the transcoding. See http://www.gnu.в†ђ
org/software/libiconv for the list of possible encodings.
The default value is: UTF-8.
PROJECT_NAME The PROJECT_NAME tag is a single word (or a sequence of words surrounded by doublequotes, unless you are using Doxywizard) that should identify the project for which the documentation is
generated. This name is used in the title of most generated pages and in a few other places.
The default value is: My Project.
PROJECT_NUMBER The PROJECT_NUMBER tag can be used to enter a project or revision number. This could
be handy for archiving the generated documentation or if some version control system is used.
PROJECT_BRIEF Using the PROJECT_BRIEF tag one can provide an optional one line description for a project
that appears at the top of each page and should give viewer a quick idea about the purpose of the project.
Keep the description short.
PROJECT_LOGO With the PROJECT_LOGO tag one can specify an logo or icon that is included in the documentation. The maximum height of the logo should not exceed 55 pixels and the maximum width should not
exceed 200 pixels. Doxygen will copy the logo to the output directory.
Generated by Doxygen
104
Configuration
OUTPUT_DIRECTORY The OUTPUT_DIRECTORY tag is used to specify the (relative or absolute) path into
which the generated documentation will be written. If a relative path is entered, it will be relative to the
location where doxygen was started. If left blank the current directory will be used.
CREATE_SUBDIRS If the CREATE_SUBDIRS tag is set to YES, then doxygen will create 4096 sub-directories
(in 2 levels) under the output directory of each output format and will distribute the generated files over these
directories. Enabling this option can be useful when feeding doxygen a huge amount of source files, where
putting all generated files in the same directory would otherwise causes performance problems for the file
system.
The default value is: NO.
ALLOW_UNICODE_NAMES If the ALLOW_UNICODE_NAMES tag is set to YES, doxygen will allow non-ASCII
characters to appear in the names of generated files. If set to NO, non-ASCII characters will be escaped, for
example _xE3_x81_x84 will be used for Unicode U+3044.
The default value is: NO.
OUTPUT_LANGUAGE The OUTPUT_LANGUAGE tag is used to specify the language in which all documentation
generated by doxygen is written. Doxygen will use this information to generate all constant output in the
proper language.
Possible values are: Afrikaans, Arabic, Armenian, Brazilian, Catalan, Chinese,
Chinese-Traditional, Croatian, Czech, Danish, Dutch, English (United States),
Esperanto, Farsi (Persian), Finnish, French, German, Greek, Hungarian, Indonesian,
Italian, Japanese, Japanese-en (Japanese with English messages), Korean, Korean-en
(Korean with English messages), Latvian, Lithuanian, Macedonian, Norwegian, Persian
(Farsi), Polish, Portuguese, Romanian, Russian, Serbian, Serbian-Cyrillic, Slovak,
Slovene, Spanish, Swedish, Turkish, Ukrainian and Vietnamese.
The default value is: English.
BRIEF_MEMBER_DESC If the BRIEF_MEMBER_DESC tag is set to YES doxygen will include brief member
descriptions after the members that are listed in the file and class documentation (similar to Javadoc). Set
to NO to disable this.
The default value is: YES.
REPEAT_BRIEF If the REPEAT_BRIEF tag is set to YES doxygen will prepend the brief description of a member
or function before the detailed description
Note: If both HIDE_UNDOC_MEMBERS and BRIEF_MEMBER_DESC are set to NO, the brief descriptions
will be completely suppressed.
The default value is: YES.
ABBREVIATE_BRIEF This tag implements a quasi-intelligent brief description abbreviator that is used to form
the text in various listings. Each string in this list, if found as the leading text of the brief description, will be
stripped from the text and the result, after processing the whole list, is used as the annotated text. Otherwise,
the brief description is used as-is. If left blank, the following values are used ($name is automatically replaced with the name of the entity): The $name class, The $name widget, The $name file,
is, provides, specifies, contains, represents, a, an and the.
ALWAYS_DETAILED_SEC If the ALWAYS_DETAILED_SEC and REPEAT_BRIEF tags are both set to YES
then doxygen will generate a detailed section even if there is only a brief description.
The default value is: NO.
INLINE_INHERITED_MEMB If the INLINE_INHERITED_MEMB tag is set to YES, doxygen will show all
inherited members of a class in the documentation of that class as if those members were ordinary class
members. Constructors, destructors and assignment operators of the base classes will not be shown.
The default value is: NO.
FULL_PATH_NAMES If the FULL_PATH_NAMES tag is set to YES doxygen will prepend the full path before
files name in the file list and in the header files. If set to NO the shortest path that makes the file name unique
will be used
The default value is: YES.
Generated by Doxygen
22.2 Project related configuration options
105
STRIP_FROM_PATH The STRIP_FROM_PATH tag can be used to strip a user-defined part of the path. Stripping is only done if one of the specified strings matches the left-hand part of the path. The tag can be used
to show relative paths in the file list. If left blank the directory from which doxygen is run is used as the path
to strip.
Note that you can specify absolute paths here, but also relative paths, which will be relative from the directory
where doxygen is started.
This tag requires that the tag FULL_PATH_NAMES is set to YES.
STRIP_FROM_INC_PATH The STRIP_FROM_INC_PATH tag can be used to strip a user-defined part of the
path mentioned in the documentation of a class, which tells the reader which header file to include in order
to use a class. If left blank only the name of the header file containing the class definition is used. Otherwise
one should specify the list of include paths that are normally passed to the compiler using the -I flag.
SHORT_NAMES If the SHORT_NAMES tag is set to YES, doxygen will generate much shorter (but less readable)
file names. This can be useful is your file systems doesn’t support long names like on DOS, Mac, or CD-ROM.
The default value is: NO.
JAVADOC_AUTOBRIEF If the JAVADOC_AUTOBRIEF tag is set to YES then doxygen will interpret the first line
(until the first dot) of a Javadoc-style comment as the brief description. If set to NO, the Javadoc-style will
behave just like regular Qt-style comments (thus requiring an explicit @brief command for a brief description.)
The default value is: NO.
QT_AUTOBRIEF If the QT_AUTOBRIEF tag is set to YES then doxygen will interpret the first line (until the first
dot) of a Qt-style comment as the brief description. If set to NO, the Qt-style will behave just like regular
Qt-style comments (thus requiring an explicit \brief command for a brief description.)
The default value is: NO.
MULTILINE_CPP_IS_BRIEF The MULTILINE_CPP_IS_BRIEF tag can be set to YES to make doxygen
treat a multi-line C++ special comment block (i.e. a block of //! or /// comments) as a brief description.
This used to be the default behavior. The new default is to treat a multi-line C++ comment block as a detailed
description. Set this tag to YES if you prefer the old behavior instead.
Note that setting this tag to YES also means that rational rose comments are not recognized any more.
The default value is: NO.
INHERIT_DOCS If the INHERIT_DOCS tag is set to YES then an undocumented member inherits the documentation from any documented member that it re-implements.
The default value is: YES.
SEPARATE_MEMBER_PAGES If the SEPARATE_MEMBER_PAGES tag is set to YES, then doxygen will produce
a new page for each member. If set to NO, the documentation of a member will be part of the file/class/namespace that contains it.
The default value is: NO.
TAB_SIZE The TAB_SIZE tag can be used to set the number of spaces in a tab. Doxygen uses this value to
replace tabs by spaces in code fragments.
Minimum value: 1, maximum value: 16, default value: 4.
ALIASES This tag can be used to specify a number of aliases that act as commands in the documentation. An
alias has the form:
name=value
For example adding
"sideeffect=@par Side Effects:\n"
will allow you to put the command \sideeffect (or @sideeffect) in the documentation, which will
result in a user-defined paragraph with heading "Side Effects:". You can put \n’s in the value part of an alias
to insert newlines.
Generated by Doxygen
106
Configuration
TCL_SUBST This tag can be used to specify a number of word-keyword mappings (TCL only). A mapping has the
form "name=value". For example adding "class=itcl::class" will allow you to use the command
class in the itcl::class meaning.
OPTIMIZE_OUTPUT_FOR_C Set the OPTIMIZE_OUTPUT_FOR_C tag to YES if your project consists of C
sources only. Doxygen will then generate output that is more tailored for C. For instance, some of the names
that are used will be different. The list of all members will be omitted, etc.
The default value is: NO.
OPTIMIZE_OUTPUT_JAVA Set the OPTIMIZE_OUTPUT_JAVA tag to YES if your project consists of Java or
Python sources only. Doxygen will then generate output that is more tailored for that language. For instance,
namespaces will be presented as packages, qualified scopes will look different, etc.
The default value is: NO.
OPTIMIZE_FOR_FORTRAN Set the OPTIMIZE_FOR_FORTRAN tag to YES if your project consists of Fortran
sources. Doxygen will then generate output that is tailored for Fortran.
The default value is: NO.
OPTIMIZE_OUTPUT_VHDL Set the OPTIMIZE_OUTPUT_VHDL tag to YES if your project consists of VHDL
sources. Doxygen will then generate output that is tailored for VHDL.
The default value is: NO.
EXTENSION_MAPPING Doxygen selects the parser to use depending on the extension of the files it parses. With
this tag you can assign which parser to use for a given extension. Doxygen has a built-in mapping, but you
can override or extend it using this tag. The format is ext=language, where ext is a file extension, and
language is one of the parsers supported by doxygen: IDL, Java, Javascript, C#, C, C++, D, PHP, Objective-C,
Python, Fortran (fixed format Fortran: FortranFixed, free formatted Fortran: FortranFree, unknown formatted
Fortran: Fortran. In the later case the parser tries to guess whether the code is fixed or free formatted code,
this is the default for Fortran type files), VHDL.
For instance to make doxygen treat .inc files as Fortran files (default is PHP), and .f files as C (default is
Fortran), use: inc=Fortran f=C.
Note For files without extension you can use no_extension as a placeholder.
Note that for custom extensions you also need to set FILE_PATTERNS otherwise the files are not read by
doxygen.
MARKDOWN_SUPPORT If the MARKDOWN_SUPPORT tag is enabled then doxygen pre-processes all comments according to the Markdown format, which allows for more readable documentation. See http←
://daringfireball.net/projects/markdown/ for details. The output of markdown processing
is further processed by doxygen, so you can mix doxygen, HTML, and XML commands with Markdown formatting. Disable only in case of backward compatibilities issues.
The default value is: YES.
AUTOLINK_SUPPORT When enabled doxygen tries to link words that correspond to documented classes, or
namespaces to their corresponding documentation. Such a link can be prevented in individual cases by by
putting a % sign in front of the word or globally by setting AUTOLINK_SUPPORT to NO.
The default value is: YES.
BUILTIN_STL_SUPPORT If you use STL classes (i.e. std::string, std::vector, etc.) but do not want
to include (a tag file for) the STL sources as input, then you should set this tag to YES in order to let doxygen match functions declarations and definitions whose arguments contain STL classes (e.g. func(std←
::string); versus func(std::string) {}). This also make the inheritance and collaboration diagrams that involve STL classes more complete and accurate.
The default value is: NO.
CPP_CLI_SUPPORT If you use Microsoft’s C++/CLI language, you should set this option to YES to enable parsing support.
The default value is: NO.
Generated by Doxygen
22.3 Build related configuration options
107
SIP_SUPPORT Set the SIP_SUPPORT tag to YES if your project consists of sip sources only. Doxygen will
parse them like normal C++ but will assume all classes use public instead of private inheritance when no
explicit protection keyword is present.
The default value is: NO.
IDL_PROPERTY_SUPPORT For Microsoft’s IDL there are propget and propput attributes to indicate getter
and setter methods for a property. Setting this option to YES will make doxygen to replace the get and set
methods by a property in the documentation. This will only work if the methods are indeed getting or setting
a simple type. If this is not the case, or you want to show the methods anyway, you should set this option to
NO.
The default value is: YES.
DISTRIBUTE_GROUP_DOC If member grouping is used in the documentation and the DISTRIBUTE_GROU←
P_DOC tag is set to YES, then doxygen will reuse the documentation of the first member in the group (if any)
for the other members of the group. By default all members of a group must be documented explicitly.
The default value is: NO.
SUBGROUPING Set the SUBGROUPING tag to YES to allow class member groups of the same type (for instance
a group of public functions) to be put as a subgroup of that type (e.g. under the Public Functions section). Set
it to NO to prevent subgrouping. Alternatively, this can be done per class using the \nosubgrouping command.
The default value is: YES.
INLINE_GROUPED_CLASSES When the INLINE_GROUPED_CLASSES tag is set to YES, classes, structs
and unions are shown inside the group in which they are included (e.g. using \ingroup) instead of on a
separate page (for HTML and Man pages) or section (for LATEX and RTF).
Note that this feature does not work in combination with SEPARATE_MEMBER_PAGES.
The default value is: NO.
INLINE_SIMPLE_STRUCTS When the INLINE_SIMPLE_STRUCTS tag is set to YES, structs, classes, and
unions with only public data fields or simple typedef fields will be shown inline in the documentation of the
scope in which they are defined (i.e. file, namespace, or group documentation), provided this scope is documented. If set to NO, structs, classes, and unions are shown on a separate page (for HTML and Man pages)
or section (for LATEX and RTF).
The default value is: NO.
TYPEDEF_HIDES_STRUCT When TYPEDEF_HIDES_STRUCT tag is enabled, a typedef of a struct, union,
or enum is documented as struct, union, or enum with the name of the typedef. So typedef struct
TypeS {} TypeT, will appear in the documentation as a struct with name TypeT. When disabled the
typedef will appear as a member of a file, namespace, or class. And the struct will be named TypeS.
This can typically be useful for C code in case the coding convention dictates that all compound types are
typedef’ed and only the typedef is referenced, never the tag name.
The default value is: NO.
LOOKUP_CACHE_SIZE The size of the symbol lookup cache can be set using LOOKUP_CACHE_SIZE. This
cache is used to resolve symbols given their name and scope. Since this can be an expensive process and
often the same symbol appears multiple times in the code, doxygen keeps a cache of pre-resolved symbols.
If the cache is too small doxygen will become slower. If the cache is too large, memory is wasted. The
cache size is given by this formula: 2(16+LOOKUP_CACHE_SIZE) . The valid range is 0..9, the default is 0,
corresponding to a cache size of 216 = 65536 symbols. At the end of a run doxygen will report the cache
usage and suggest the optimal cache size from a speed point of view.
Minimum value: 0, maximum value: 9, default value: 0.
22.3
Build related configuration options
EXTRACT_ALL If the EXTRACT_ALL tag is set to YES doxygen will assume all entities in documentation are
documented, even if no documentation was available. Private class members and static file members will be
hidden unless the EXTRACT_PRIVATE respectively EXTRACT_STATIC tags are set to YES.
Generated by Doxygen
108
Configuration
Note
This will also disable the warnings about undocumented members that are normally produced when
WARNINGS is set to YES.
The default value is: NO.
EXTRACT_PRIVATE If the EXTRACT_PRIVATE tag is set to YES all private members of a class will be included
in the documentation.
The default value is: NO.
EXTRACT_PACKAGE If the EXTRACT_PACKAGE tag is set to YES all members with package or internal scope
will be included in the documentation.
The default value is: NO.
EXTRACT_STATIC If the EXTRACT_STATIC tag is set to YES all static members of a file will be included in
the documentation.
The default value is: NO.
EXTRACT_LOCAL_CLASSES If the EXTRACT_LOCAL_CLASSES tag is set to YES classes (and structs) defined locally in source files will be included in the documentation. If set to NO only classes defined in header
files are included. Does not have any effect for Java sources.
The default value is: YES.
EXTRACT_LOCAL_METHODS This flag is only useful for Objective-C code. When set to YES local methods,
which are defined in the implementation section but not in the interface are included in the documentation. If
set to NO only methods in the interface are included.
The default value is: NO.
EXTRACT_ANON_NSPACES If this flag is set to YES, the members of anonymous namespaces will be extracted
and appear in the documentation as a namespace called ’anonymous_namespace{file}’, where file will be
replaced with the base name of the file that contains the anonymous namespace. By default anonymous
namespace are hidden.
The default value is: NO.
HIDE_UNDOC_MEMBERS If the HIDE_UNDOC_MEMBERS tag is set to YES, doxygen will hide all undocumented
members inside documented classes or files. If set to NO these members will be included in the various
overviews, but no documentation section is generated. This option has no effect if EXTRACT_ALL is enabled.
The default value is: NO.
HIDE_UNDOC_CLASSES If the HIDE_UNDOC_CLASSES tag is set to YES, doxygen will hide all undocumented
classes that are normally visible in the class hierarchy. If set to NO these classes will be included in the various
overviews. This option has no effect if EXTRACT_ALL is enabled.
The default value is: NO.
HIDE_FRIEND_COMPOUNDS If the HIDE_FRIEND_COMPOUNDS tag is set to YES, doxygen will hide all friend
(class|struct|union) declarations. If set to NO these declarations will be included in the documentation.
The default value is: NO.
HIDE_IN_BODY_DOCS If the HIDE_IN_BODY_DOCS tag is set to YES, doxygen will hide any documentation
blocks found inside the body of a function. If set to NO these blocks will be appended to the function’s detailed
documentation block.
The default value is: NO.
INTERNAL_DOCS The INTERNAL_DOCS tag determines if documentation that is typed after a \internal command is included. If the tag is set to NO then the documentation will be excluded. Set it to YES to include the
internal documentation.
The default value is: NO.
Generated by Doxygen
22.3 Build related configuration options
109
CASE_SENSE_NAMES If the CASE_SENSE_NAMES tag is set to NO then doxygen will only generate file names
in lower-case letters. If set to YES upper-case letters are also allowed. This is useful if you have classes or
files whose names only differ in case and if your file system supports case sensitive file names. Windows and
Mac users are advised to set this option to NO.
The default value is: system dependent.
HIDE_SCOPE_NAMES If the HIDE_SCOPE_NAMES tag is set to NO then doxygen will show members with their
full class and namespace scopes in the documentation. If set to YES the scope will be hidden.
The default value is: NO.
SHOW_INCLUDE_FILES If the SHOW_INCLUDE_FILES tag is set to YES then doxygen will put a list of the
files that are included by a file in the documentation of that file.
The default value is: YES.
SHOW_GROUPED_MEMB_INC If the SHOW_GROUPED_MEMB_INC tag is set to YES then Doxygen will add for
each grouped member an include statement to the documentation, telling the reader which file to include in
order to use the member.
The default value is: NO.
FORCE_LOCAL_INCLUDES If the FORCE_LOCAL_INCLUDES tag is set to YES then doxygen will list include
files with double quotes in the documentation rather than with sharp brackets.
The default value is: NO.
INLINE_INFO If the INLINE_INFO tag is set to YES then a tag [inline] is inserted in the documentation for
inline members.
The default value is: YES.
SORT_MEMBER_DOCS If the SORT_MEMBER_DOCS tag is set to YES then doxygen will sort the (detailed) documentation of file and class members alphabetically by member name. If set to NO the members will appear
in declaration order.
The default value is: YES.
SORT_BRIEF_DOCS If the SORT_BRIEF_DOCS tag is set to YES then doxygen will sort the brief descriptions
of file, namespace and class members alphabetically by member name. If set to NO the members will appear
in declaration order. Note that this will also influence the order of the classes in the class list.
The default value is: NO.
SORT_MEMBERS_CTORS_1ST If the SORT_MEMBERS_CTORS_1ST tag is set to YES then doxygen will sort
the (brief and detailed) documentation of class members so that constructors and destructors are listed first.
If set to NO the constructors will appear in the respective orders defined by SORT_BRIEF_DOCS and SO←
RT_MEMBER_DOCS.
Note
If SORT_BRIEF_DOCS is set to NO this option is ignored for sorting brief member documentation.
If SORT_MEMBER_DOCS is set to NO this option is ignored for sorting detailed member documentation.
The default value is: NO.
SORT_GROUP_NAMES If the SORT_GROUP_NAMES tag is set to YES then doxygen will sort the hierarchy of
group names into alphabetical order. If set to NO the group names will appear in their defined order.
The default value is: NO.
SORT_BY_SCOPE_NAME If the SORT_BY_SCOPE_NAME tag is set to YES, the class list will be sorted by fullyqualified names, including namespaces. If set to NO, the class list will be sorted only by class name, not
including the namespace part.
Generated by Doxygen
110
Configuration
Note
This option is not very useful if HIDE_SCOPE_NAMES is set to YES.
This option applies only to the class list, not to the alphabetical list.
The default value is: NO.
STRICT_PROTO_MATCHING If the STRICT_PROTO_MATCHING option is enabled and doxygen fails to do
proper type resolution of all parameters of a function it will reject a match between the prototype and the
implementation of a member function even if there is only one candidate or it is obvious which candidate to
choose by doing a simple string match. By disabling STRICT_PROTO_MATCHING doxygen will still accept
a match between prototype and implementation in such cases.
The default value is: NO.
GENERATE_TODOLIST The GENERATE_TODOLIST tag can be used to enable (YES) or disable (NO) the todo
list. This list is created by putting \todo commands in the documentation.
The default value is: YES.
GENERATE_TESTLIST The GENERATE_TESTLIST tag can be used to enable (YES) or disable (NO) the test
list. This list is created by putting \test commands in the documentation.
The default value is: YES.
GENERATE_BUGLIST The GENERATE_BUGLIST tag can be used to enable (YES) or disable (NO) the bug list.
This list is created by putting \bug commands in the documentation.
The default value is: YES.
GENERATE_DEPRECATEDLIST The GENERATE_DEPRECATEDLIST tag can be used to enable (YES) or
disable (NO) the deprecated list. This list is created by putting \deprecated commands in the documentation.
The default value is: YES.
ENABLED_SECTIONS The ENABLED_SECTIONS tag can be used to enable conditional documentation sections, marked by \if <section_label> ... \endif and \cond <section_label> ... \endcond blocks.
MAX_INITIALIZER_LINES The MAX_INITIALIZER_LINES tag determines the maximum number of
lines that the initial value of a variable or macro / define can have for it to appear in the documentation.
If the initializer consists of more lines than specified here it will be hidden. Use a value of 0 to hide initializers
completely. The appearance of the value of individual variables and macros / defines can be controlled using
\showinitializer or \hideinitializer command in the documentation regardless of this setting.
Minimum value: 0, maximum value: 10000, default value: 30.
SHOW_USED_FILES Set the SHOW_USED_FILES tag to NO to disable the list of files generated at the bottom
of the documentation of classes and structs. If set to YES the list will mention the files that were used to
generate the documentation.
The default value is: YES.
SHOW_FILES Set the SHOW_FILES tag to NO to disable the generation of the Files page. This will remove the
Files entry from the Quick Index and from the Folder Tree View (if specified).
The default value is: YES.
SHOW_NAMESPACES Set the SHOW_NAMESPACES tag to NO to disable the generation of the Namespaces
page. This will remove the Namespaces entry from the Quick Index and from the Folder Tree View (if specified).
The default value is: YES.
FILE_VERSION_FILTER The FILE_VERSION_FILTER tag can be used to specify a program or script that
doxygen should invoke to get the current version for each file (typically from the version control system).
Doxygen will invoke the program by executing (via popen()) the command command input-file,
where command is the value of the FILE_VERSION_FILTER tag, and input-file is the name of an
input file provided by doxygen. Whatever the program writes to standard output is used as the file version.в†ђ
Example of using a shell script as a filter for Unix:
FILE_VERSION_FILTER = "/bin/sh versionfilter.sh"
Generated by Doxygen
22.4 Configuration options related to warning and progress messages
111
Example shell script for CVS:
#!/bin/sh
cvs status $1 | sed -n ’s/^[ \]*Working revision:[ \t]*\([0-9][0-9\.]*\).*/\1/p’
Example shell script for Subversion:
#!/bin/sh
svn stat -v $1 | sed -n ’s/^[ A-Z?\*|!]\{1,15\}/r/;s/ \{1,15\}/\/r/;s/ .*//p’
Example filter for ClearCase:
FILE_VERSION_INFO = "cleartool desc -fmt \%Vn"
LAYOUT_FILE The LAYOUT_FILE tag can be used to specify a layout file which will be parsed by doxygen.
The layout file controls the global structure of the generated output files in an output format independent
way. To create the layout file that represents doxygen’s defaults, run doxygen with the -l option. You can
optionally specify a file name after the option, if omitted DoxygenLayout.xml will be used as the name
of the layout file.
Note that if you run doxygen from a directory containing a file called DoxygenLayout.xml, doxygen will
parse it automatically even if the LAYOUT_FILE tag is left empty.
CITE_BIB_FILES The CITE_BIB_FILES tag can be used to specify one or more bib files containing the
reference definitions. This must be a list of .bib files. The .bib extension is automatically appended if omitted. This requires the bibtex tool to be installed. See also http://en.wikipedia.org/wiki/в†ђ
BibTeX for more info. For LATEX the style of the bibliography can be controlled using LATEX_BIB_STYLE.
To use this feature you need bibtex and perl available in the search path. Do not use file names with
spaces, bibtex cannot handle them. See also \cite for info how to create references.
22.4
Configuration options related to warning and progress messages
QUIET The QUIET tag can be used to turn on/off the messages that are generated to standard output by doxygen.
If QUIET is set to YES this implies that the messages are off.
The default value is: NO.
WARNINGS The WARNINGS tag can be used to turn on/off the warning messages that are generated to standard
error (stderr) by doxygen. If WARNINGS is set to YES this implies that the warnings are on.
Tip: Turn warnings on while writing the documentation.
The default value is: YES.
WARN_IF_UNDOCUMENTED If the WARN_IF_UNDOCUMENTED tag is set to YES, then doxygen will generate
warnings for undocumented members. If EXTRACT_ALL is set to YES then this flag will automatically be
disabled.
The default value is: YES.
WARN_IF_DOC_ERROR If the WARN_IF_DOC_ERROR tag is set to YES, doxygen will generate warnings for
potential errors in the documentation, such as not documenting some parameters in a documented function,
or documenting parameters that don’t exist or using markup commands wrongly.
The default value is: YES.
WARN_NO_PARAMDOC This WARN_NO_PARAMDOC option can be enabled to get warnings for functions that are
documented, but have no documentation for their parameters or return value. If set to NO doxygen will only
warn about wrong or incomplete parameter documentation, but not about the absence of documentation.
The default value is: NO.
Generated by Doxygen
112
Configuration
WARN_FORMAT The WARN_FORMAT tag determines the format of the warning messages that doxygen can produce. The string should contain the $file, $line, and $text tags, which will be replaced by the file
and line number from which the warning originated and the warning text. Optionally the format may contain
$version, which will be replaced by the version of the file (if it could be obtained via FILE_VERSION_FI←
LTER)
The default value is: $file:$line:
$text.
WARN_LOGFILE The WARN_LOGFILE tag can be used to specify a file to which warning and error messages
should be written. If left blank the output is written to standard error (stderr).
22.5
Configuration options related to the input files
INPUT The INPUT tag is used to specify the files and/or directories that contain documented source files. You
may enter file names like myfile.cpp or directories like /usr/src/myproject. Separate the files or
directories with spaces.
Note
If this tag is empty the current directory is searched.
INPUT_ENCODING This tag can be used to specify the character encoding of the source files that doxygen
parses. Internally doxygen uses the UTF-8 encoding. Doxygen uses libiconv (or the iconv built into
libc) for the transcoding. See the libiconv documentation for the list of possible encodings.
The default value is: UTF-8.
FILE_PATTERNS If the value of the INPUT tag contains directories, you can use the FILE_PATTERNS tag
to specify one or more wildcard patterns (like в€—.cpp and в€—.h) to filter out the source-files in the directories. If left blank the following patterns are tested: в€—.c, в€—.cc, в€—.cxx, в€—.cpp, в€—.c++, в€—.java, в€—.ii,
в€—.ixx, в€—.ipp, в€—.i++, в€—.inl, в€—.idl, в€—.ddl, в€—.odl, в€—.h, в€—.hh, в€—.hxx, в€—.hpp, в€—.h++, в€—.cs,
в€—.d, в€—.php, в€—.php4, в€—.php5, в€—.phtml, в€—.inc, в€—.m, в€—.markdown, в€—.md, в€—.mm, в€—.dox, в€—.py,
в€—.f90, в€—.f, в€—.for, в€—.tcl, в€—.vhd, в€—.vhdl, в€—.ucf, в€—.qsf, в€—.as and в€—.js.
RECURSIVE The RECURSIVE tag can be used to specify whether or not subdirectories should be searched for
input files as well.
The default value is: NO.
EXCLUDE The EXCLUDE tag can be used to specify files and/or directories that should be excluded from the IN←
PUT source files. This way you can easily exclude a subdirectory from a directory tree whose root is specified
with the INPUT tag.
Note that relative paths are relative to the directory from which doxygen is run.
EXCLUDE_SYMLINKS The EXCLUDE_SYMLINKS tag can be used to select whether or not files or directories
that are symbolic links (a Unix file system feature) are excluded from the input.
The default value is: NO.
EXCLUDE_PATTERNS If the value of the INPUT tag contains directories, you can use the EXCLUDE_PATTE←
RNS tag to specify one or more wildcard patterns to exclude certain files from those directories.
Note that the wildcards are matched against the file with absolute path, so to exclude all test directories for
example use the pattern в€—/test/в€—
EXCLUDE_SYMBOLS The EXCLUDE_SYMBOLS tag can be used to specify one or more symbol names (namespaces, classes, functions, etc.) that should be excluded from the output. The symbol name can be a fully
qualified name, a word, or if the wildcard ∗ is used, a substring. Examples: ANamespace, AClass, A←
Class::ANamespace, ANamespace::в€—Test
Note that the wildcards are matched against the file with absolute path, so to exclude all test directories use
the pattern в€—/test/в€—
EXAMPLE_PATH The EXAMPLE_PATH tag can be used to specify one or more files or directories that contain
example code fragments that are included (see the \include command).
Generated by Doxygen
22.6 Configuration options related to source browsing
113
EXAMPLE_PATTERNS If the value of the EXAMPLE_PATH tag contains directories, you can use the EXAMPL←
E_PATTERNS tag to specify one or more wildcard pattern (like в€—.cpp and в€—.h) to filter out the source-files
in the directories. If left blank all files are included.
EXAMPLE_RECURSIVE If the EXAMPLE_RECURSIVE tag is set to YES then subdirectories will be searched for
input files to be used with the \include or \dontinclude commands irrespective of the value of the RECURSIVE
tag.
The default value is: NO.
IMAGE_PATH The IMAGE_PATH tag can be used to specify one or more files or directories that contain images
that are to be included in the documentation (see the \image command).
INPUT_FILTER The INPUT_FILTER tag can be used to specify a program that doxygen should invoke to filter
for each input file. Doxygen will invoke the filter program by executing (via popen()) the command:
<filter> <input-file>
where <filter> is the value of the INPUT_FILTER tag, and <input-file> is the name of an input
file. Doxygen will then use the output that the filter program writes to standard output. If FILTER_PATTERNS
is specified, this tag will be ignored.
Note that the filter must not add or remove lines; it is applied before the code is scanned, but not when the
output code is generated. If lines are added or removed, the anchors will not be placed correctly.
FILTER_PATTERNS The FILTER_PATTERNS tag can be used to specify filters on a per file pattern basis.
Doxygen will compare the file name with each pattern and apply the filter if there is a match. The filters are a
list of the form: pattern=filter (like в€—.cpp=my_cpp_filter). See INPUT_FILTER for further information
on how filters are used. If the FILTER_PATTERNS tag is empty or if none of the patterns match the file
name, INPUT_FILTER is applied.
FILTER_SOURCE_FILES If the FILTER_SOURCE_FILES tag is set to YES, the input filter (if set using IN←
PUT_FILTER ) will also be used to filter the input files that are used for producing the source files to browse
(i.e. when SOURCE_BROWSER is set to YES).
The default value is: NO.
FILTER_SOURCE_PATTERNS The FILTER_SOURCE_PATTERNS tag can be used to specify source filters
per file pattern. A pattern will override the setting for FILTER_PATTERN (if any) and it is also possible to
disable source filtering for a specific pattern using в€—.ext= (so without naming a filter).
This tag requires that the tag FILTER_SOURCE_FILES is set to YES.
USE_MDFILE_AS_MAINPAGE If the USE_MDFILE_AS_MAINPAGE tag refers to the name of a markdown
file that is part of the input, its contents will be placed on the main page (index.html). This can be useful
if you have a project on for instance GitHub and want to reuse the introduction page also for the doxygen
output.
22.6
Configuration options related to source browsing
SOURCE_BROWSER If the SOURCE_BROWSER tag is set to YES then a list of source files will be generated.
Documented entities will be cross-referenced with these sources.
Note: To get rid of all source code in the generated output, make sure that also VERBATIM_HEADERS is set
to NO.
The default value is: NO.
INLINE_SOURCES Setting the INLINE_SOURCES tag to YES will include the body of functions, classes and
enums directly into the documentation.
The default value is: NO.
STRIP_CODE_COMMENTS Setting the STRIP_CODE_COMMENTS tag to YES will instruct doxygen to hide any
special comment blocks from generated source code fragments. Normal C, C++ and Fortran comments will
always remain visible.
The default value is: YES.
Generated by Doxygen
114
Configuration
REFERENCED_BY_RELATION If the REFERENCED_BY_RELATION tag is set to YES then for each documented function all documented functions referencing it will be listed.
The default value is: NO.
REFERENCES_RELATION If the REFERENCES_RELATION tag is set to YES then for each documented function all documented entities called/used by that function will be listed.
The default value is: NO.
REFERENCES_LINK_SOURCE If the REFERENCES_LINK_SOURCE tag is set to YES and SOURCE_BRO←
WSER tag is set to YES, then the hyperlinks from functions in REFERENCES_RELATION and REFEREN←
CED_BY_RELATION lists will link to the source code. Otherwise they will link to the documentation.
The default value is: YES.
SOURCE_TOOLTIPS If SOURCE_TOOLTIPS is enabled (the default) then hovering a hyperlink in the source
code will show a tooltip with additional information such as prototype, brief description and links to the definition and documentation. Since this will make the HTML file larger and loading of large files a bit slower, you
can opt to disable this feature.
The default value is: YES.
This tag requires that the tag SOURCE_BROWSER is set to YES.
USE_HTAGS If the USE_HTAGS tag is set to YES then the references to source code will point to the HTML
generated by the htags(1) tool instead of doxygen built-in source browser. The htags tool is part of
GNU’s global source tagging system (see http://www.gnu.org/software/global/global.←
html). You will need version 4.8.6 or higher.
To use it do the following:
1. Install the latest version of global
2. Enable SOURCE_BROWSER and USE_HTAGS in the config file
3. Make sure the INPUT points to the root of the source tree
4. Run doxygen as normal
Doxygen will invoke htags (and that will in turn invoke gtags), so these tools must be available from
the command line (i.e. in the search path).
The result: instead of the source browser generated by doxygen, the links to source code will now point
to the output of htags.
The default value is: NO.
This tag requires that the tag SOURCE_BROWSER is set to YES.
VERBATIM_HEADERS If the VERBATIM_HEADERS tag is set the YES then doxygen will generate a verbatim
copy of the header file for each class for which an include is specified. Set to NO to disable this.
See also
Section \class.
The default value is: YES.
CLANG_ASSISTED_PARSING If the CLANG_ASSISTED_PARSING tag is set to YES, then doxygen will use
the clang parser for more accurate parsing at the cost of reduced performance. This can be particularly
helpful with template rich C++ code for which doxygen’s built-in parser lacks the necessary type information.
Note
The availability of this option depends on whether or not doxygen was compiled with the
--with-libclang option.
The default value is: NO.
CLANG_OPTIONS If clang assisted parsing is enabled you can provide the compiler with command line options
that you would normally use when invoking the compiler. Note that the include paths will already be set by
doxygen for the files and directories specified with INPUT and INCLUDE_PATH.
This tag requires that the tag CLANG_ASSISTED_PARSING is set to YES.
Generated by Doxygen
22.7 Configuration options related to the alphabetical class index
22.7
115
Configuration options related to the alphabetical class index
ALPHABETICAL_INDEX If the ALPHABETICAL_INDEX tag is set to YES, an alphabetical index of all compounds will be generated. Enable this if the project contains a lot of classes, structs, unions or interfaces.
The default value is: YES.
COLS_IN_ALPHA_INDEX The COLS_IN_ALPHA_INDEX tag can be used to specify the number of columns
in which the alphabetical index list will be split.
Minimum value: 1, maximum value: 20, default value: 5.
This tag requires that the tag ALPHABETICAL_INDEX is set to YES.
IGNORE_PREFIX In case all classes in a project start with a common prefix, all classes will be put under the
same header in the alphabetical index. The IGNORE_PREFIX tag can be used to specify a prefix (or a list
of prefixes) that should be ignored while generating the index headers.
This tag requires that the tag ALPHABETICAL_INDEX is set to YES.
22.8
Configuration options related to the HTML output
GENERATE_HTML If the GENERATE_HTML tag is set to YES doxygen will generate HTML output
The default value is: YES.
HTML_OUTPUT The HTML_OUTPUT tag is used to specify where the HTML docs will be put. If a relative path is
entered the value of OUTPUT_DIRECTORY will be put in front of it.
The default directory is: html.
This tag requires that the tag GENERATE_HTML is set to YES.
HTML_FILE_EXTENSION The HTML_FILE_EXTENSION tag can be used to specify the file extension for
each generated HTML page (for example: .htm, .php, .asp).
The default value is: .html.
This tag requires that the tag GENERATE_HTML is set to YES.
HTML_HEADER The HTML_HEADER tag can be used to specify a user-defined HTML header file for each generated HTML page. If the tag is left blank doxygen will generate a standard header.
To get valid HTML the header file that includes any scripts and style sheets that doxygen needs, which is
dependent on the configuration options used (e.g. the setting GENERATE_TREEVIEW). It is highly recommended to start with a default header using
doxygen -w html new_header.html new_footer.html new_stylesheet.css YourConfigFile
and then modify the file new_header.html.
See also section Doxygen usage for information on how to generate the default header that doxygen normally
uses.
Note
The header is subject to change so you typically have to regenerate the default header when upgrading
to a newer version of doxygen. The following markers have a special meaning inside the header and
footer:
$title will be replaced with the title of the page.
$datetime will be replaced with current the date and time.
$date will be replaced with the current date.
$year will be replaces with the current year.
$doxygenversion will be replaced with the version of doxygen
$projectname will be replaced with the name of the project (see PROJECT_NAME)
$projectnumber will be replaced with the project number (see PROJECT_NUMBER)
$projectbrief will be replaced with the project brief description (see PROJECT_BRIEF)
Generated by Doxygen
116
Configuration
$projectlogo will be replaced with the project logo (see PROJECT_LOGO)
$treeview will be replaced with links to the javascript and style sheets needed for the navigation tree
(or an empty string when GENERATE_TREEVIEW is disabled).
$search will be replaced with a links to the javascript and style sheets needed for the search engine
(or an empty string when SEARCHENGINE is disabled).
$mathjax will be replaced with a links to the javascript and style sheets needed for the MathJax feature
(or an empty string when USE_MATHJAX is disabled).
$relpath∧ If CREATE_SUBDIRS is enabled, the command $relpath∧ can be used to produce
a relative path to the root of the HTML output directory, e.g. use $relpath∧ doxygen.css, to
refer to the standard style sheet.
To cope with differences in the layout of the header and footer that depend on configuration settings, the
header can also contain special blocks that will be copied to the output or skipped depending on the configuration. Such blocks have the following form:
<!--BEGIN BLOCKNAME-->
Some context copied when condition BLOCKNAME holds
<!--END BLOCKNAME-->
<!--BEGIN !BLOCKNAME-->
Some context copied when condition BLOCKNAME does not hold
<!--END !BLOCKNAME-->
The following block names are supported:
DISABLE_INDEX Content within this block is copied to the output when the DISABLE_INDEX option is
enabled (so when the index is disabled).
GENERATE_TREEVIEW Content within this block is copied to the output when the GENERATE_TREEVI←
EW option is enabled.
SEARCHENGINE Content within this block is copied to the output when the SEARCHENGINE option is
enabled.
PROJECT_NAME Content within the block is copied to the output when the PROJECT_NAME option is not
empty.
PROJECT_NUMBER Content within the block is copied to the output when the PROJECT_NUMBER option
is not empty.
PROJECT_BRIEF Content within the block is copied to the output when the PROJECT_BRIEF option is
not empty.
PROJECT_LOGO Content within the block is copied to the output when the PROJECT_LOGO option is not
empty.
TITLEAREA Content within this block is copied to the output when a title is visible at the top of each page.
This is the case if either PROJECT_NAME, PROJECT_BRIEF, PROJECT_LOGO is filled in or if both
DISABLE_INDEX and SEARCHENGINE are enabled.
This tag requires that the tag GENERATE_HTML is set to YES.
HTML_FOOTER The HTML_FOOTER tag can be used to specify a user-defined HTML footer for each generated
HTML page. If the tag is left blank doxygen will generate a standard footer.
See HTML_HEADER for more information on how to generate a default footer and what special commands
can be used inside the footer.
See also section Doxygen usage for information on how to generate the default footer that doxygen normally
uses.
This tag requires that the tag GENERATE_HTML is set to YES.
HTML_STYLESHEET The HTML_STYLESHEET tag can be used to specify a user-defined cascading style sheet
that is used by each HTML page. It can be used to fine-tune the look of the HTML output. If left blank doxygen
will generate a default style sheet.
See also section Doxygen usage for information on how to generate the style sheet that doxygen normally
uses.
Generated by Doxygen
22.8 Configuration options related to the HTML output
117
Note
It is recommended to use HTML_EXTRA_STYLESHEET instead of this tag, as it is more robust and this
tag (HTML_STYLESHEET) will in the future become obsolete.
This tag requires that the tag GENERATE_HTML is set to YES.
HTML_EXTRA_STYLESHEET The HTML_EXTRA_STYLESHEET tag can be used to specify an additional userdefined cascading style sheet that is included after the standard style sheets created by doxygen. Using this
option one can overrule certain style aspects. This is preferred over using HTML_STYLESHEET since it does
not replace the standard style sheet and is therefor more robust against future updates. Doxygen will copy
the style sheet file to the output directory. Here is an example stylesheet that gives the contents area a fixed
width:
body {
background-color: #CCC;
color: black;
margin: 0;
}
div.contents {
margin-bottom: 10px;
padding: 12px;
margin-left: auto;
margin-right: auto;
width: 960px;
background-color: white;
border-radius: 8px;
}
#titlearea {
background-color: white;
}
hr.footer {
display: none;
}
.footer {
background-color: #AAA;
}
This tag requires that the tag GENERATE_HTML is set to YES.
HTML_EXTRA_FILES The HTML_EXTRA_FILES tag can be used to specify one or more extra images or
other source files which should be copied to the HTML output directory. Note that these files will be copied to
the base HTML output directory. Use the $relpath∧ marker in the HTML_HEADER and/or HTML_FOO←
TER files to load these files. In the HTML_STYLESHEET file, use the file name only. Also note that the files
will be copied as-is; there are no commands or markers available.
This tag requires that the tag GENERATE_HTML is set to YES.
HTML_COLORSTYLE_HUE The HTML_COLORSTYLE_HUE tag controls the color of the HTML output. Doxygen
will adjust the colors in the stylesheet and background images according to this color. Hue is specified as
an angle on a colorwheel, see http://en.wikipedia.org/wiki/Hue for more information. For
instance the value 0 represents red, 60 is yellow, 120 is green, 180 is cyan, 240 is blue, 300 purple, and 360
is red again.
Minimum value: 0, maximum value: 359, default value: 220.
This tag requires that the tag GENERATE_HTML is set to YES.
HTML_COLORSTYLE_SAT The HTML_COLORSTYLE_SAT tag controls the purity (or saturation) of the colors
in the HTML output. For a value of 0 the output will use grayscales only. A value of 255 will produce the most
vivid colors.
Minimum value: 0, maximum value: 255, default value: 100.
This tag requires that the tag GENERATE_HTML is set to YES.
Generated by Doxygen
118
Configuration
HTML_COLORSTYLE_GAMMA The HTML_COLORSTYLE_GAMMA tag controls the gamma correction applied to
the luminance component of the colors in the HTML output. Values below 100 gradually make the output
lighter, whereas values above 100 make the output darker. The value divided by 100 is the actual gamma
applied, so 80 represents a gamma of 0.8, The value 220 represents a gamma of 2.2, and 100 does not
change the gamma.
Minimum value: 40, maximum value: 240, default value: 80.
This tag requires that the tag GENERATE_HTML is set to YES.
HTML_TIMESTAMP If the HTML_TIMESTAMP tag is set to YES then the footer of each generated HTML page
will contain the date and time when the page was generated. Setting this to NO can help when comparing the
output of multiple runs.
The default value is: YES.
This tag requires that the tag GENERATE_HTML is set to YES.
HTML_DYNAMIC_SECTIONS If the HTML_DYNAMIC_SECTIONS tag is set to YES then the generated HTML
documentation will contain sections that can be hidden and shown after the page has loaded.
The default value is: NO.
This tag requires that the tag GENERATE_HTML is set to YES.
HTML_INDEX_NUM_ENTRIES With HTML_INDEX_NUM_ENTRIES one can control the preferred number of
entries shown in the various tree structured indices initially; the user can expand and collapse entries dynamically later on. Doxygen will expand the tree to such a level that at most the specified number of entries are
visible (unless a fully collapsed tree already exceeds this amount). So setting the number of entries 1 will
produce a full collapsed tree by default. 0 is a special value representing an infinite number of entries and will
result in a full expanded tree by default.
Minimum value: 0, maximum value: 9999, default value: 100.
This tag requires that the tag GENERATE_HTML is set to YES.
GENERATE_DOCSET If the GENERATE_DOCSET tag is set to YES, additional index files will be generated
that can be used as input for Apple’s Xcode 3 integrated development environment,
introduced with OSX 10.5 (Leopard).
To create a documentation set, doxygen will generate a
Makefile in the HTML output directory.
Running make will produce the docset in that directory
and running make install will install the docset in в€ј/Library/Developer/Shared/в†ђ
Documentation/DocSets so that Xcode will find it at startup. See http://developer.apple.в†ђ
com/tools/creatingdocsetswithdoxygen.html for more information.
The default value is: NO.
This tag requires that the tag GENERATE_HTML is set to YES.
DOCSET_FEEDNAME This tag determines the name of the docset feed. A documentation feed provides an umbrella under which multiple documentation sets from a single provider (such as a company or product suite)
can be grouped.
The default value is: Doxygen generated docs.
This tag requires that the tag GENERATE_DOCSET is set to YES.
DOCSET_BUNDLE_ID This tag specifies a string that should uniquely identify the documentation set bundle. This
should be a reverse domain-name style string, e.g. com.mycompany.MyDocSet. Doxygen will append
.docset to the name.
The default value is: org.doxygen.Project.
This tag requires that the tag GENERATE_DOCSET is set to YES.
DOCSET_PUBLISHER_ID The DOCSET_PUBLISHER_ID tag specifies a string that should uniquely identify
the documentation publisher. This should be a reverse domain-name style string, e.g. com.mycompany.в†ђ
MyDocSet.documentation.
The default value is: org.doxygen.Publisher.
This tag requires that the tag GENERATE_DOCSET is set to YES.
Generated by Doxygen
22.8 Configuration options related to the HTML output
119
DOCSET_PUBLISHER_NAME The DOCSET_PUBLISHER_NAME tag identifies the documentation publisher.
The default value is: Publisher.
This tag requires that the tag GENERATE_DOCSET is set to YES.
GENERATE_HTMLHELP If the GENERATE_HTMLHELP tag is set to YES then doxygen generates three additional HTML index files: index.hhp, index.hhc, and index.hhk. The index.hhp is a project file
that can be read by Microsoft’s HTML Help Workshop on Windows.
The HTML Help Workshop contains a compiler that can convert all HTML output generated by doxygen into
a single compiled HTML file (.chm). Compiled HTML files are now used as the Windows 98 help format,
and will replace the old Windows help format (.hlp) on all Windows platforms in the future. Compressed
HTML files also contain an index, a table of contents, and you can search for words in the documentation.
The HTML workshop also contains a viewer for compressed HTML files.
The default value is: NO.
This tag requires that the tag GENERATE_HTML is set to YES.
CHM_FILE The CHM_FILE tag can be used to specify the file name of the resulting .chm file. You can add a
path in front of the file if the result should not be written to the html output directory.
This tag requires that the tag GENERATE_HTMLHELP is set to YES.
HHC_LOCATION The HHC_LOCATION tag can be used to specify the location (absolute path including file
name) of the HTML help compiler (hhc.exe). If non-empty doxygen will try to run the HTML help compiler
on the generated index.hhp.
The file has to be specified with full path.
This tag requires that the tag GENERATE_HTMLHELP is set to YES.
GENERATE_CHI The GENERATE_CHI flag controls if a separate .chi index file is generated (YES) or that it
should be included in the master .chm file (NO).
The default value is: NO.
This tag requires that the tag GENERATE_HTMLHELP is set to YES.
CHM_INDEX_ENCODING The CHM_INDEX_ENCODING is used to encode HtmlHelp index (hhk), content
(hhc) and project file content.
This tag requires that the tag GENERATE_HTMLHELP is set to YES.
BINARY_TOC The BINARY_TOC flag controls whether a binary table of contents is generated (YES) or a normal
table of contents (NO) in the .chm file. Furthermore it enables the Previous and Next buttons.
The default value is: NO.
This tag requires that the tag GENERATE_HTMLHELP is set to YES.
TOC_EXPAND The TOC_EXPAND flag can be set to YES to add extra items for group members to the table of
contents of the HTML help documentation and to the tree view.
The default value is: NO.
This tag requires that the tag GENERATE_HTMLHELP is set to YES.
GENERATE_QHP If the GENERATE_QHP tag is set to YES and both QHP_NAMESPACE and QHP_VIRTUAL←
_FOLDER are set, an additional index file will be generated that can be used as input for Qt’s qhelpgenerator
to generate a Qt Compressed Help (.qch) of the generated HTML documentation.
The default value is: NO.
This tag requires that the tag GENERATE_HTML is set to YES.
QCH_FILE If the QHG_LOCATION tag is specified, the QCH_FILE tag can be used to specify the file name of
the resulting .qch file. The path specified is relative to the HTML output folder.
This tag requires that the tag GENERATE_QHP is set to YES.
Generated by Doxygen
120
Configuration
QHP_NAMESPACE The QHP_NAMESPACE tag specifies the namespace to use when generating Qt Help Project
output. For more information please see Qt Help Project / Namespace.
The default value is: org.doxygen.Project.
This tag requires that the tag GENERATE_QHP is set to YES.
QHP_VIRTUAL_FOLDER The QHP_VIRTUAL_FOLDER tag specifies the namespace to use when generating
Qt Help Project output. For more information please see Qt Help Project / Virtual Folders.
The default value is: doc.
This tag requires that the tag GENERATE_QHP is set to YES.
QHP_CUST_FILTER_NAME If the QHP_CUST_FILTER_NAME tag is set, it specifies the name of a custom
filter to add. For more information please see Qt Help Project / Custom Filters.
This tag requires that the tag GENERATE_QHP is set to YES.
QHP_CUST_FILTER_ATTRS The QHP_CUST_FILTER_ATTRS tag specifies the list of the attributes of the
custom filter to add. For more information please see Qt Help Project / Custom Filters.
This tag requires that the tag GENERATE_QHP is set to YES.
QHP_SECT_FILTER_ATTRS The QHP_SECT_FILTER_ATTRS tag specifies the list of the attributes this
project’s filter section matches. Qt Help Project / Filter Attributes.
This tag requires that the tag GENERATE_QHP is set to YES.
QHG_LOCATION The QHG_LOCATION tag can be used to specify the location of Qt’s qhelpgenerator. If nonempty doxygen will try to run qhelpgenerator on the generated .qhp file.
This tag requires that the tag GENERATE_QHP is set to YES.
GENERATE_ECLIPSEHELP If the GENERATE_ECLIPSEHELP tag is set to YES, additional index files will be
generated, together with the HTML files, they form an Eclipse help plugin.
To install this plugin and make it available under the help contents menu in Eclipse, the contents of the
directory containing the HTML and XML files needs to be copied into the plugins directory of eclipse. The
name of the directory within the plugins directory should be the same as the ECLIPSE_DOC_ID value.
After copying Eclipse needs to be restarted before the help appears.
The default value is: NO.
This tag requires that the tag GENERATE_HTML is set to YES.
ECLIPSE_DOC_ID A unique identifier for the Eclipse help plugin. When installing the plugin the directory
name containing the HTML and XML files should also have this name. Each documentation set should have
its own identifier.
The default value is: org.doxygen.Project.
This tag requires that the tag GENERATE_ECLIPSEHELP is set to YES.
DISABLE_INDEX If you want full control over the layout of the generated HTML pages it might be necessary
to disable the index and replace it with your own. The DISABLE_INDEX tag can be used to turn on/off
the condensed index (tabs) at top of each HTML page. A value of NO enables the index and the value YES
disables it. Since the tabs in the index contain the same information as the navigation tree, you can set this
option to YES if you also set GENERATE_TREEVIEW to YES.
The default value is: NO.
This tag requires that the tag GENERATE_HTML is set to YES.
GENERATE_TREEVIEW The GENERATE_TREEVIEW tag is used to specify whether a tree-like index structure
should be generated to display hierarchical information. If the tag value is set to YES, a side panel will be
generated containing a tree-like index structure (just like the one that is generated for HTML Help). For this
to work a browser that supports JavaScript, DHTML, CSS and frames is required (i.e. any modern browser).
Windows users are probably better off using the HTML help feature.
Via custom stylesheets (see HTML_EXTRA_STYLESHEET) one can further fine-tune the look of the index.
As an example, the default style sheet generated by doxygen has an example that shows how to put an image
at the root of the tree instead of the PROJECT_NAME.
Generated by Doxygen
22.8 Configuration options related to the HTML output
121
Since the tree basically has the same information as the tab index, you could consider setting DISABLE_I←
NDEX to YES when enabling this option.
The default value is: NO.
This tag requires that the tag GENERATE_HTML is set to YES.
ENUM_VALUES_PER_LINE The ENUM_VALUES_PER_LINE tag can be used to set the number of enum
values that doxygen will group on one line in the generated HTML documentation.
Note that a value of 0 will completely suppress the enum values from appearing in the overview section.
Minimum value: 0, maximum value: 20, default value: 4.
This tag requires that the tag GENERATE_HTML is set to YES.
TREEVIEW_WIDTH If the treeview is enabled (see GENERATE_TREEVIEW) then this tag can be used to set
the initial width (in pixels) of the frame in which the tree is shown.
Minimum value: 0, maximum value: 1500, default value: 250.
This tag requires that the tag GENERATE_HTML is set to YES.
EXT_LINKS_IN_WINDOW When the EXT_LINKS_IN_WINDOW option is set to YES doxygen will open links
to external symbols imported via tag files in a separate window.
The default value is: NO.
This tag requires that the tag GENERATE_HTML is set to YES.
FORMULA_FONTSIZE Use this tag to change the font size of LATEX formulas included as images in the HTML
documentation. When you change the font size after a successful doxygen run you need to manually remove
any form_в€—.png images from the HTML output directory to force them to be regenerated.
Minimum value: 8, maximum value: 50, default value: 10.
This tag requires that the tag GENERATE_HTML is set to YES.
FORMULA_TRANSPARENT Use the FORMULA_TRANPARENT tag to determine whether or not the images generated for formulas are transparent PNGs. Transparent PNGs are not supported properly for IE 6.0, but are
supported on all modern browsers.
Note that when changing this option you need to delete any form_в€—.png files in the HTML output directory
before the changes have effect.
The default value is: YES.
This tag requires that the tag GENERATE_HTML is set to YES.
USE_MATHJAX Enable the USE_MATHJAX option to render LATEX formulas using MathJax (see http←
://www.mathjax.org) which uses client side Javascript for the rendering instead of using prerendered
bitmaps. Use this if you do not have LATEX installed or if you want to formulas look prettier in the HTML output. When enabled you may also need to install MathJax separately and configure the path to it using the
MATHJAX_RELPATH option.
The default value is: NO.
This tag requires that the tag GENERATE_HTML is set to YES.
MATHJAX_FORMAT When MathJax is enabled you can set the default output format to be used for the MathJax
output. See the MathJax site for more details.
Possible values are: HTML-CSS (which is slower, but has the best compatibility), NativeMML (i.e. MathML)
and SVG.
The default value is: HTML-CSS.
This tag requires that the tag USE_MATHJAX is set to YES.
MATHJAX_RELPATH When MathJax is enabled you need to specify the location relative to the HTML output
directory using the MATHJAX_RELPATH option. The destination directory should contain the MathJax.js
script. For instance, if the mathjax directory is located at the same level as the HTML output directory, then
MATHJAX_RELPATH should be ../mathjax. The default value points to the MathJax Content Delivery
Network so you can quickly see the result without installing MathJax. However, it is strongly recommended to
install a local copy of MathJax from http://www.mathjax.org before deployment.
Generated by Doxygen
122
Configuration
The default value is: http://cdn.mathjax.org/mathjax/latest.
This tag requires that the tag USE_MATHJAX is set to YES.
MATHJAX_EXTENSIONS The MATHJAX_EXTENSIONS tag can be used to specify one or more MathJax extension names that should be enabled during MathJax rendering. For example
MATHJAX_EXTENSIONS
= TeX/AMSmath TeX/AMSsymbols
This tag requires that the tag USE_MATHJAX is set to YES.
MATHJAX_CODEFILE The MATHJAX_CODEFILE tag can be used to specify a file with javascript pieces of
code that will be used on startup of the MathJax code. See the MathJax site for more details. As an
example to disable the "Math Renderer" menu item in the "Math Settings" menu of MathJax:
MATHJAX_CODEFILE = disableRenderer.js
with in the file disableRenderer.js:
MathJax.Hub.Config({
menuSettings: {
showRenderer: false,
}
});
This tag requires that the tag USE_MATHJAX is set to YES.
SEARCHENGINE When the SEARCHENGINE tag is enabled doxygen will generate a search box for the HTML
output. The underlying search engine uses javascript and DHTML and should work on any modern browser.
Note that when using HTML help (GENERATE_HTMLHELP), Qt help (GENERATE_QHP), or docsets (G←
ENERATE_DOCSET) there is already a search function so this one should typically be disabled. For large
projects the javascript based search engine can be slow, then enabling SERVER_BASED_SEARCH may
provide a better solution.
It is possible to search using the keyboard; to jump to the search box use <access key> + S (what the
<access key> is depends on the OS and browser, but it is typically <CTRL>, <ALT>/<option>, or
both). Inside the search box use the <cursor down key> to jump into the search results window, the
results can be navigated using the <cursor keys>. Press <Enter> to select an item or <escape>
to cancel the search. The filter options can be selected when the cursor is inside the search box by pressing
<Shift>+<cursor down>. Also here use the <cursor keys> to select a filter and <Enter> or
<escape> to activate or cancel the filter option.
The default value is: YES.
This tag requires that the tag GENERATE_HTML is set to YES.
SERVER_BASED_SEARCH When the SERVER_BASED_SEARCH tag is enabled the search engine will be implemented using a web server instead of a web client using Javascript.
There are two flavors of web server based searching depending on the EXTERNAL_SEARCH setting. When
disabled, doxygen will generate a PHP script for searching and an index file used by the script. When EX←
TERNAL_SEARCH is enabled the indexing and searching needs to be provided by external tools. See the
section External Indexing and Searching for details.
The default value is: NO.
This tag requires that the tag SEARCHENGINE is set to YES.
EXTERNAL_SEARCH When EXTERNAL_SEARCH tag is enabled doxygen will no longer generate the PHP script
for searching. Instead the search results are written to an XML file which needs to be processed by an external
indexer. Doxygen will invoke an external search engine pointed to by the SEARCHENGINE_URL option to
obtain the search results.
Doxygen ships with an example indexer (doxyindexer) and search engine (doxysearch.cgi) which
are based on the open source search engine library Xapian.
See the section External Indexing and Searching for details.
The default value is: NO.
This tag requires that the tag SEARCHENGINE is set to YES.
Generated by Doxygen
22.9 Configuration options related to the LaTeX output
123
SEARCHENGINE_URL The SEARCHENGINE_URL should point to a search engine hosted by a web server
which will return the search results when EXTERNAL_SEARCH is enabled.
Doxygen ships with an example indexer (doxyindexer) and search engine (doxysearch.cgi) which
are based on the open source search engine library Xapian. See the section External Indexing and Searching for details.
This tag requires that the tag SEARCHENGINE is set to YES.
SEARCHDATA_FILE When SERVER_BASED_SEARCH and EXTERNAL_SEARCH are both enabled the unindexed search data is written to a file for indexing by an external tool. With the SEARCHDATA_FILE tag the
name of this file can be specified.
The default file is: searchdata.xml.
This tag requires that the tag SEARCHENGINE is set to YES.
EXTERNAL_SEARCH_ID When SERVER_BASED_SEARCH and EXTERNAL_SEARCH are both enabled the
EXTERNAL_SEARCH_ID tag can be used as an identifier for the project. This is useful in combination with
EXTRA_SEARCH_MAPPINGS to search through multiple projects and redirect the results back to the right
project.
This tag requires that the tag SEARCHENGINE is set to YES.
EXTRA_SEARCH_MAPPINGS The EXTRA_SEARCH_MAPPINGS tag can be used to enable searching through
doxygen projects other than the one defined by this configuration file, but that are all added to the same
external search index. Each project needs to have a unique id set via EXTERNAL_SEARCH_ID. The search
mapping then maps the id of to a relative location where the documentation can be found.
The format is:
EXTRA_SEARCH_MAPPINGS = tagname1=loc1 tagname2=loc2 ...
This tag requires that the tag SEARCHENGINE is set to YES.
22.9
Configuration options related to the LaTeX output
GENERATE_LATEX If the GENERATE_LATEX tag is set to YES doxygen will generate LATEX output.
The default value is: YES.
LATEX_OUTPUT The LATEX_OUTPUT tag is used to specify where the LATEX docs will be put. If a relative path
is entered the value of OUTPUT_DIRECTORY will be put in front of it.
The default directory is: latex.
This tag requires that the tag GENERATE_LATEX is set to YES.
LATEX_CMD_NAME The LATEX_CMD_NAME tag can be used to specify the LATEX command name to be invoked.
Note that when enabling USE_PDFLATEX this option is only used for generating bitmaps for formulas in the
HTML output, but not in the Makefile that is written to the output directory.
The default file is: latex.
This tag requires that the tag GENERATE_LATEX is set to YES.
MAKEINDEX_CMD_NAME The MAKEINDEX_CMD_NAME tag can be used to specify the command name to
generate index for LATEX.
The default file is: makeindex.
This tag requires that the tag GENERATE_LATEX is set to YES.
COMPACT_LATEX If the COMPACT_LATEX tag is set to YES doxygen generates more compact LATEX documents. This may be useful for small projects and may help to save some trees in general.
The default value is: NO.
This tag requires that the tag GENERATE_LATEX is set to YES.
Generated by Doxygen
124
Configuration
PAPER_TYPE The PAPER_TYPE tag can be used to set the paper type that is used by the printer.
Possible values are: a4 (210 x 297 mm), letter (8.5 x 11 inches), legal (8.5 x 14 inches) and
executive (7.25 x 10.5 inches).
The default value is: a4.
This tag requires that the tag GENERATE_LATEX is set to YES.
EXTRA_PACKAGES The EXTRA_PACKAGES tag can be used to specify one or more LATEX package names that
should be included in the LATEX output. To get the times font for instance you can specify
EXTRA_PACKAGES=times
If left blank no extra packages will be included.
This tag requires that the tag GENERATE_LATEX is set to YES.
LATEX_HEADER The LATEX_HEADER tag can be used to specify a personal LATEX header for the generated
LATEX document. The header should contain everything until the first chapter.
If it is left blank doxygen will generate a standard header. See section Doxygen usage for information on how
to let doxygen write the default header to a separate file.
Note: Only use a user-defined header if you know what you are doing!
The following commands have a special meaning inside the header: $title, $datetime, $date,
$doxygenversion, $projectname, $projectnumber. Doxygen will replace them by respectively
the title of the page, the current date and time, only the current date, the version number of doxygen, the
project name (see PROJECT_NAME), or the project number (see PROJECT_NUMBER).
This tag requires that the tag GENERATE_LATEX is set to YES.
LATEX_FOOTER The LATEX_FOOTER tag can be used to specify a personal LATEX footer for the generated LATEX
document. The footer should contain everything after the last chapter. If it is left blank doxygen will generate
a standard footer.
Note: Only use a user-defined footer if you know what you are doing!
This tag requires that the tag GENERATE_LATEX is set to YES.
LATEX_EXTRA_FILES The LATEX_EXTRA_FILES tag can be used to specify one or more extra images or
other source files which should be copied to the LATEX_OUTPUT output directory. Note that the files will be
copied as-is; there are no commands or markers available.
This tag requires that the tag GENERATE_LATEX is set to YES.
PDF_HYPERLINKS If the PDF_HYPERLINKS tag is set to YES, the LATEX that is generated is prepared for
conversion to PDF (using ps2pdf or pdflatex). The PDF file will contain links (just like the HTML output)
instead of page references. This makes the output suitable for online browsing using a PDF viewer.
The default value is: YES.
This tag requires that the tag GENERATE_LATEX is set to YES.
USE_PDFLATEX If the LATEX_PDFLATEX tag is set to YES, doxygen will use pdflatex to generate the PDF
file directly from the LATEX files. Set this option to YES to get a higher quality PDF documentation.
The default value is: YES.
This tag requires that the tag GENERATE_LATEX is set to YES.
LATEX_BATCHMODE If the LATEX_BATCHMODE tag is set to YES, doxygen will add the \batchmode command to the generated LATEX files. This will instruct LATEX to keep running if errors occur, instead of asking the
user for help. This option is also used when generating formulas in HTML.
The default value is: NO.
This tag requires that the tag GENERATE_LATEX is set to YES.
Generated by Doxygen
22.10 Configuration options related to the RTF output
125
LATEX_HIDE_INDICES If the LATEX_HIDE_INDICES tag is set to YES then doxygen will not include the
index chapters (such as File Index, Compound Index, etc.) in the output.
The default value is: NO.
This tag requires that the tag GENERATE_LATEX is set to YES.
LATEX_SOURCE_CODE If the LATEX_SOURCE_CODE tag is set to YES then doxygen will include source code
with syntax highlighting in the LATEX output.
Note that which sources are shown also depends on other settings such as SOURCE_BROWSER.
The default value is: NO.
This tag requires that the tag GENERATE_LATEX is set to YES.
LATEX_BIB_STYLE The LATEX_BIB_STYLE tag can be used to specify the style to use for the bibliography,
e.g. plainnat, or ieeetr. See http://en.wikipedia.org/wiki/BibTeX and \cite for more
info.
The default value is: plain.
This tag requires that the tag GENERATE_LATEX is set to YES.
22.10
Configuration options related to the RTF output
GENERATE_RTF If the GENERATE_RTF tag is set to YES doxygen will generate RTF output. The RTF output is
optimized for Word 97 and may not look too pretty with other RTF readers/editors.
The default value is: NO.
RTF_OUTPUT The RTF_OUTPUT tag is used to specify where the RTF docs will be put. If a relative path is
entered the value of OUTPUT_DIRECTORY will be put in front of it.
The default directory is: rtf.
This tag requires that the tag GENERATE_RTF is set to YES.
COMPACT_RTF If the COMPACT_RTF tag is set to YES doxygen generates more compact RTF documents. This
may be useful for small projects and may help to save some trees in general.
The default value is: NO.
This tag requires that the tag GENERATE_RTF is set to YES.
RTF_HYPERLINKS If the RTF_HYPERLINKS tag is set to YES, the RTF that is generated will contain hyperlink
fields. The RTF file will contain links (just like the HTML output) instead of page references. This makes the
output suitable for online browsing using Word or some other Word compatible readers that support those
fields.
Note: WordPad (write) and others do not support links.
The default value is: NO.
This tag requires that the tag GENERATE_RTF is set to YES.
RTF_STYLESHEET_FILE Load stylesheet definitions from file. Syntax is similar to doxygen’s config file, i.e.
a series of assignments. You only have to provide replacements, missing definitions are set to their default
value.
See also section Doxygen usage for information on how to generate the default style sheet that doxygen
normally uses.
This tag requires that the tag GENERATE_RTF is set to YES.
RTF_EXTENSIONS_FILE Set optional variables used in the generation of an RTF document. Syntax is
similar to doxygen’s config file. A template extensions file can be generated using doxygen -e rtf
extensionFile.
This tag requires that the tag GENERATE_RTF is set to YES.
Generated by Doxygen
126
Configuration
22.11
Configuration options related to the man page output
GENERATE_MAN If the GENERATE_MAN tag is set to YES doxygen will generate man pages for classes and
files.
The default value is: NO.
MAN_OUTPUT The MAN_OUTPUT tag is used to specify where the man pages will be put. If a relative path is
entered the value of OUTPUT_DIRECTORY will be put in front of it. A directory man3 will be created inside
the directory specified by MAN_OUTPUT.
The default directory is: man.
This tag requires that the tag GENERATE_MAN is set to YES.
MAN_EXTENSION The MAN_EXTENSION tag determines the extension that is added to the generated man
pages. In case the manual section does not start with a number, the number 3 is prepended. The dot (.) at
the beginning of the MAN_EXTENSION tag is optional.
The default value is: .3.
This tag requires that the tag GENERATE_MAN is set to YES.
MAN_SUBDIR The MAN_SUBDIR tag determines the name of the directory created within MAN_OUTPUT in
which the man pages are placed. If defaults to man followed by MAN_EXTENSION with the initial . removed.
This tag requires that the tag GENERATE_MAN is set to YES.
MAN_LINKS If the MAN_LINKS tag is set to YES and doxygen generates man output, then it will generate one
additional man file for each entity documented in the real man page(s). These additional files only source the
real man page, but without them the man command would be unable to find the correct page.
The default value is: NO.
This tag requires that the tag GENERATE_MAN is set to YES.
22.12
Configuration options related to the XML output
GENERATE_XML If the GENERATE_XML tag is set to YES doxygen will generate an XML file that captures the
structure of the code including all documentation.
The default value is: NO.
XML_OUTPUT The XML_OUTPUT tag is used to specify where the XML pages will be put. If a relative path is
entered the value of OUTPUT_DIRECTORY will be put in front of it.
The default directory is: xml.
This tag requires that the tag GENERATE_XML is set to YES.
XML_PROGRAMLISTING If the XML_PROGRAMLISTING tag is set to YES doxygen will dump the program
listings (including syntax highlighting and cross-referencing information) to the XML output. Note that enabling
this will significantly increase the size of the XML output.
The default value is: YES.
This tag requires that the tag GENERATE_XML is set to YES.
22.13
Configuration options related to the DOCBOOK output
GENERATE_DOCBOOK If the GENERATE_DOCBOOK tag is set to YES doxygen will generate Docbook files that
can be used to generate PDF.
The default value is: NO.
Generated by Doxygen
22.14 Configuration options for the AutoGen Definitions output
127
DOCBOOK_OUTPUT The DOCBOOK_OUTPUT tag is used to specify where the Docbook pages will be put. If a
relative path is entered the value of OUTPUT_DIRECTORY will be put in front of it.
The default directory is: docbook.
This tag requires that the tag GENERATE_DOCBOOK is set to YES.
22.14
Configuration options for the AutoGen Definitions output
GENERATE_AUTOGEN_DEF If the GENERATE_AUTOGEN_DEF tag is set to YES doxygen will generate an
AutoGen Definitions (see http://autogen.sf.net) file that captures the structure of the code including all documentation. Note that this feature is still experimental and incomplete at the moment.
The default value is: NO.
22.15
Configuration options related to the Perl module output
GENERATE_PERLMOD If the GENERATE_PERLMOD tag is set to YES doxygen will generate a Perl module file
that captures the structure of the code including all documentation.
Note that this feature is still experimental and incomplete at the moment.
The default value is: NO.
PERLMOD_LATEX If the PERLMOD_LATEX tag is set to YES doxygen will generate the necessary Makefile
rules, Perl scripts and LATEX code to be able to generate PDF and DVI output from the Perl module output.
The default value is: NO.
This tag requires that the tag GENERATE_PERLMOD is set to YES.
PERLMOD_PRETTY If the PERLMOD_PRETTY tag is set to YES the Perl module output will be nicely formatted
so it can be parsed by a human reader. This is useful if you want to understand what is going on. On the
other hand, if this tag is set to NO the size of the Perl module output will be much smaller and Perl will parse
it just the same.
The default value is: YES.
This tag requires that the tag GENERATE_PERLMOD is set to YES.
PERLMOD_MAKEVAR_PREFIX The names of the make variables in the generated doxyrules.make file
are prefixed with the string contained in PERLMOD_MAKEVAR_PREFIX. This is useful so different
doxyrules.make files included by the same Makefile don’t overwrite each other’s variables.
This tag requires that the tag GENERATE_PERLMOD is set to YES.
22.16
Configuration options related to the preprocessor
ENABLE_PREPROCESSING If the ENABLE_PREPROCESSING tag is set to YES doxygen will evaluate all Cpreprocessor directives found in the sources and include files.
The default value is: YES.
MACRO_EXPANSION If the MACRO_EXPANSION tag is set to YES doxygen will expand all macro names in the
source code. If set to NO only conditional compilation will be performed. Macro expansion can be done in a
controlled way by setting EXPAND_ONLY_PREDEF to YES.
The default value is: NO.
This tag requires that the tag ENABLE_PREPROCESSING is set to YES.
EXPAND_ONLY_PREDEF If the EXPAND_ONLY_PREDEF and MACRO_EXPANSION tags are both set to YES
then the macro expansion is limited to the macros specified with the PREDEFINED and EXPAND_AS_DE←
FINED tags.
Generated by Doxygen
128
Configuration
The default value is: NO.
This tag requires that the tag ENABLE_PREPROCESSING is set to YES.
SEARCH_INCLUDES If the SEARCH_INCLUDES tag is set to YES the includes files in the INCLUDE_PATH will
be searched if a #include is found.
The default value is: YES.
This tag requires that the tag ENABLE_PREPROCESSING is set to YES.
INCLUDE_PATH The INCLUDE_PATH tag can be used to specify one or more directories that contain include
files that are not input files but should be processed by the preprocessor.
This tag requires that the tag SEARCH_INCLUDES is set to YES.
INCLUDE_FILE_PATTERNS You can use the INCLUDE_FILE_PATTERNS tag to specify one or more wildcard patterns (like в€—.h and в€—.hpp) to filter out the header-files in the directories. If left blank, the patterns
specified with FILE_PATTERNS will be used.
This tag requires that the tag ENABLE_PREPROCESSING is set to YES.
PREDEFINED The PREDEFINED tag can be used to specify one or more macro names that are defined before
the preprocessor is started (similar to the -D option of e.g. gcc). The argument of the tag is a list of macros
of the form: name or name=definition (no spaces). If the definition and the "=" are omitted, "=1" is
assumed. To prevent a macro definition from being undefined via #undef or recursively expanded use the
:= operator instead of the = operator.
This tag requires that the tag ENABLE_PREPROCESSING is set to YES.
EXPAND_AS_DEFINED If the MACRO_EXPANSION and EXPAND_ONLY_PREDEF tags are set to YES then
this tag can be used to specify a list of macro names that should be expanded. The macro definition that is
found in the sources will be used. Use the PREDEFINED tag if you want to use a different macro definition
that overrules the definition found in the source code.
This tag requires that the tag ENABLE_PREPROCESSING is set to YES.
SKIP_FUNCTION_MACROS If the SKIP_FUNCTION_MACROS tag is set to YES then doxygen’s preprocessor
will remove all references to function-like macros that are alone on a line, have an all uppercase name, and
do not end with a semicolon. Such function macros are typically used for boiler-plate code, and will confuse
the parser if not removed.
The default value is: YES.
This tag requires that the tag ENABLE_PREPROCESSING is set to YES.
22.17
Configuration options related to external references
TAGFILES The TAGFILES tag can be used to specify one or more tag files.
For each tag file the location of the external documentation should be added. The format of a tag file without
this location is as follows:
TAGFILES = file1 file2 ...
Adding location for the tag files is done as follows:
TAGFILES = file1=loc1 "file2 = loc2" ...
where loc1 and loc2 can be relative or absolute paths or URLs. See the section Linking to external
documentation for more information about the use of tag files.
Generated by Doxygen
22.18 Configuration options related to the dot tool
129
Note
Each tag file must have a unique name (where the name does NOT include the path). If a tag file is not
located in the directory in which doxygen is run, you must also specify the path to the tagfile here.
GENERATE_TAGFILE When a file name is specified after GENERATE_TAGFILE, doxygen will create a tag file
that is based on the input files it reads. See section Linking to external documentation for more information
about the usage of tag files.
ALLEXTERNALS If the ALLEXTERNALS tag is set to YES all external class will be listed in the class index. If
set to NO only the inherited external classes will be listed.
The default value is: NO.
EXTERNAL_GROUPS If the EXTERNAL_GROUPS tag is set to YES all external groups will be listed in the modules index. If set to NO, only the current project’s groups will be listed.
The default value is: YES.
EXTERNAL_PAGES If the EXTERNAL_PAGES tag is set to YES all external pages will be listed in the related
pages index. If set to NO, only the current project’s pages will be listed.
The default value is: YES.
PERL_PATH The PERL_PATH should be the absolute path and name of the perl script interpreter (i.e. the result
of ’which perl’).
The default file (with absolute path) is: /usr/bin/perl.
22.18
Configuration options related to the dot tool
CLASS_DIAGRAMS If the CLASS_DIAGRAMS tag is set to YES doxygen will generate a class diagram (in HTML
and LATEX) for classes with base or super classes. Setting the tag to NO turns the diagrams off. Note that this
option also works with HAVE_DOT disabled, but it is recommended to install and use dot, since it yields
more powerful graphs.
The default value is: YES.
MSCGEN_PATH You can define message sequence charts within doxygen comments using the \msc command.
Doxygen will then run the mscgen tool) to produce the chart and insert it in the documentation. The
MSCGEN_PATH tag allows you to specify the directory where the mscgen tool resides. If left empty the tool
is assumed to be found in the default search path.
DIA_PATH You can include diagrams made with dia in doxygen documentation. Doxygen will then run dia to
produce the diagram and insert it in the documentation. The DIA_PATH tag allows you to specify the directory
where the dia binary resides. If left empty dia is assumed to be found in the default search path.
HIDE_UNDOC_RELATIONS If set to YES, the inheritance and collaboration graphs will hide inheritance and
usage relations if the target is undocumented or is not a class.
The default value is: YES.
HAVE_DOT If you set the HAVE_DOT tag to YES then doxygen will assume the dot tool is available from the
path. This tool is part of Graphviz, a graph visualization toolkit from AT&T and Lucent Bell Labs. The
other options in this section have no effect if this option is set to NO
The default value is: NO.
DOT_NUM_THREADS The DOT_NUM_THREADS specifies the number of dot invocations doxygen is allowed to
run in parallel. When set to 0 doxygen will base this on the number of processors available in the system. You
can set it explicitly to a value larger than 0 to get control over the balance between CPU load and processing
speed.
Minimum value: 0, maximum value: 32, default value: 0.
This tag requires that the tag HAVE_DOT is set to YES.
Generated by Doxygen
130
Configuration
DOT_FONTNAME When you want a differently looking font n the dot files that doxygen generates you can specify
the font name using DOT_FONTNAME. You need to make sure dot is able to find the font, which can be
done by putting it in a standard location or by setting the DOTFONTPATH environment variable or by setting
DOT_FONTPATH to the directory containing the font.
The default value is: Helvetica.
This tag requires that the tag HAVE_DOT is set to YES.
DOT_FONTSIZE The DOT_FONTSIZE tag can be used to set the size (in points) of the font of dot graphs.
Minimum value: 4, maximum value: 24, default value: 10.
This tag requires that the tag HAVE_DOT is set to YES.
DOT_FONTPATH By default doxygen will tell dot to use the default font as specified with DOT_FONTNAME. If
you specify a different font using DOT_FONTNAME you can set the path where dot can find it using this tag.
This tag requires that the tag HAVE_DOT is set to YES.
CLASS_GRAPH If the CLASS_GRAPH tag is set to YES then doxygen will generate a graph for each documented
class showing the direct and indirect inheritance relations. Setting this tag to YES will force the CLASS_DI←
AGRAMS tag to NO.
The default value is: YES.
This tag requires that the tag HAVE_DOT is set to YES.
COLLABORATION_GRAPH If the COLLABORATION_GRAPH tag is set to YES then doxygen will generate a
graph for each documented class showing the direct and indirect implementation dependencies (inheritance,
containment, and class references variables) of the class with other documented classes.
The default value is: YES.
This tag requires that the tag HAVE_DOT is set to YES.
GROUP_GRAPHS If the GROUP_GRAPHS tag is set to YES then doxygen will generate a graph for groups, showing the direct groups dependencies.
The default value is: YES.
This tag requires that the tag HAVE_DOT is set to YES.
UML_LOOK If the UML_LOOK tag is set to YES doxygen will generate inheritance and collaboration diagrams in
a style similar to the OMG’s Unified Modeling Language.
The default value is: NO.
This tag requires that the tag HAVE_DOT is set to YES.
UML_LIMIT_NUM_FIELDS If the UML_LOOK tag is enabled, the fields and methods are shown inside the
class node. If there are many fields or methods and many nodes the graph may become too big to be useful.
The UML_LIMIT_NUM_FIELDS threshold limits the number of items for each type to make the size more
manageable. Set this to 0 for no limit. Note that the threshold may be exceeded by 50% before the limit is
enforced. So when you set the threshold to 10, up to 15 fields may appear, but if the number exceeds 15, the
total amount of fields shown is limited to 10.
Minimum value: 0, maximum value: 100, default value: 10.
This tag requires that the tag HAVE_DOT is set to YES.
TEMPLATE_RELATIONS If the TEMPLATE_RELATIONS tag is set to YES then the inheritance and collaboration graphs will show the relations between templates and their instances.
The default value is: NO.
This tag requires that the tag HAVE_DOT is set to YES.
INCLUDE_GRAPH If the INCLUDE_GRAPH, ENABLE_PREPROCESSING and SEARCH_INCLUDES tags are
set to YES then doxygen will generate a graph for each documented file showing the direct and indirect
include dependencies of the file with other documented files.
The default value is: YES.
This tag requires that the tag HAVE_DOT is set to YES.
Generated by Doxygen
22.18 Configuration options related to the dot tool
131
INCLUDED_BY_GRAPH If the INCLUDED_BY_GRAPH, ENABLE_PREPROCESSING and SEARCH_INCLU←
DES tags are set to YES then doxygen will generate a graph for each documented file showing the direct and
indirect include dependencies of the file with other documented files.
The default value is: YES.
This tag requires that the tag HAVE_DOT is set to YES.
CALL_GRAPH If the CALL_GRAPH tag is set to YES then doxygen will generate a call dependency graph for
every global function or class method.
Note that enabling this option will significantly increase the time of a run. So in most cases it will be better to
enable call graphs for selected functions only using the \callgraph command.
The default value is: NO.
This tag requires that the tag HAVE_DOT is set to YES.
CALLER_GRAPH If the CALLER_GRAPH tag is set to YES then doxygen will generate a caller dependency graph
for every global function or class method.
Note that enabling this option will significantly increase the time of a run. So in most cases it will be better to
enable caller graphs for selected functions only using the \callergraph command.
The default value is: NO.
This tag requires that the tag HAVE_DOT is set to YES.
GRAPHICAL_HIERARCHY If the GRAPHICAL_HIERARCHY tag is set to YES then doxygen will graphical hierarchy of all classes instead of a textual one.
The default value is: YES.
This tag requires that the tag HAVE_DOT is set to YES.
DIRECTORY_GRAPH If the DIRECTORY_GRAPH tag is set to YES then doxygen will show the dependencies
a directory has on other directories in a graphical way. The dependency relations are determined by the
#include relations between the files in the directories.
The default value is: YES.
This tag requires that the tag HAVE_DOT is set to YES.
DOT_IMAGE_FORMAT The DOT_IMAGE_FORMAT tag can be used to set the image format of the images generated by dot.
Note
If you choose svg you need to set HTML_FILE_EXTENSION to xhtml in order to make the SVG files
visible in IE 9+ (other browsers do not have this requirement).
Possible values are: png, jpg, gif and svg.
The default value is: png.
This tag requires that the tag HAVE_DOT is set to YES.
INTERACTIVE_SVG If DOT_IMAGE_FORMAT is set to svg, then this option can be set to YES to enable
generation of interactive SVG images that allow zooming and panning.
Note that this requires a modern browser other than Internet Explorer. Tested and working are Firefox,
Chrome, Safari, and Opera.
Note
For IE 9+ you need to set HTML_FILE_EXTENSION to xhtml in order to make the SVG files visible.
Older versions of IE do not have SVG support.
The default value is: NO.
This tag requires that the tag HAVE_DOT is set to YES.
DOT_PATH The DOT_PATH tag can be used to specify the path where the dot tool can be found. If left blank, it
is assumed the dot tool can be found in the path.
This tag requires that the tag HAVE_DOT is set to YES.
Generated by Doxygen
132
Configuration
DOTFILE_DIRS The DOTFILE_DIRS tag can be used to specify one or more directories that contain dot files
that are included in the documentation (see the \dotfile command).
This tag requires that the tag HAVE_DOT is set to YES.
MSCFILE_DIRS The MSCFILE_DIRS tag can be used to specify one or more directories that contain msc files
that are included in the documentation (see the \mscfile command).
DIAFILE_DIRS The DIAFILE_DIRS tag can be used to specify one or more directories that contain dia files
that are included in the documentation (see the \diafile command).
DOT_GRAPH_MAX_NODES The DOT_GRAPH_MAX_NODES tag can be used to set the maximum number of
nodes that will be shown in the graph. If the number of nodes in a graph becomes larger than this value,
doxygen will truncate the graph, which is visualized by representing a node as a red box. Note that doxygen
if the number of direct children of the root node in a graph is already larger than DOT_GRAPH_MAX_NO←
DES then the graph will not be shown at all. Also note that the size of a graph can be further restricted by
MAX_DOT_GRAPH_DEPTH.
Minimum value: 0, maximum value: 10000, default value: 50.
This tag requires that the tag HAVE_DOT is set to YES.
MAX_DOT_GRAPH_DEPTH The MAX_DOT_GRAPH_DEPTH tag can be used to set the maximum depth of the
graphs generated by dot. A depth value of 3 means that only nodes reachable from the root by following a
path via at most 3 edges will be shown. Nodes that lay further from the root node will be omitted. Note that
setting this option to 1 or 2 may greatly reduce the computation time needed for large code bases. Also note
that the size of a graph can be further restricted by DOT_GRAPH_MAX_NODES. Using a depth of 0 means
no depth restriction.
Minimum value: 0, maximum value: 1000, default value: 0.
This tag requires that the tag HAVE_DOT is set to YES.
DOT_TRANSPARENT Set the DOT_TRANSPARENT tag to YES to generate images with a transparent background. This is disabled by default, because dot on Windows does not seem to support this out of the box.
Warning: Depending on the platform used, enabling this option may lead to badly anti-aliased labels on the
edges of a graph (i.e. they become hard to read).
The default value is: NO.
This tag requires that the tag HAVE_DOT is set to YES.
DOT_MULTI_TARGETS Set the DOT_MULTI_TARGETS tag to YES allow dot to generate multiple output files
in one run (i.e. multiple -o and -T options on the command line). This makes dot run faster, but since only
newer versions of dot (>1.8.10) support this, this feature is disabled by default.
The default value is: NO.
This tag requires that the tag HAVE_DOT is set to YES.
GENERATE_LEGEND If the GENERATE_LEGEND tag is set to YES doxygen will generate a legend page explaining the meaning of the various boxes and arrows in the dot generated graphs.
The default value is: YES.
This tag requires that the tag HAVE_DOT is set to YES.
DOT_CLEANUP If the DOT_CLEANUP tag is set to YES doxygen will remove the intermediate dot files that are
used to generate the various graphs.
The default value is: YES.
This tag requires that the tag HAVE_DOT is set to YES.
22.19
Examples
Suppose you have a simple project consisting of two files: a source file example.cc and a header file
example.h. Then a minimal configuration file is as simple as:
Generated by Doxygen
22.19 Examples
INPUT
133
= example.cc example.h
Assuming the example makes use of Qt classes and perl is located in /usr/bin, a more realistic configuration
file would be:
PROJECT_NAME
INPUT
WARNINGS
TAGFILES
PERL_PATH
SEARCHENGINE
=
=
=
=
=
=
Example
example.cc example.h
YES
qt.tag
/usr/local/bin/perl
NO
To generate the documentation for the QdbtTabular package I have used the following configuration file:
PROJECT_NAME
OUTPUT_DIRECTORY
WARNINGS
INPUT
FILE_PATTERNS
INCLUDE_PATH
TAGFILES
PERL_PATH
SEARCHENGINE
=
=
=
=
=
=
=
=
=
QdbtTabular
html
YES
examples/examples.doc src
*.cc *.h
examples
qt.tag
/usr/bin/perl
YES
To regenerate the Qt-1.44 documentation from the sources, you could use the following config file:
PROJECT_NAME
OUTPUT_DIRECTORY
HIDE_UNDOC_MEMBERS
HIDE_UNDOC_CLASSES
ENABLE_PREPROCESSING
MACRO_EXPANSION
EXPAND_ONLY_PREDEF
SEARCH_INCLUDES
FULL_PATH_NAMES
STRIP_FROM_PATH
PREDEFINED
=
=
=
=
=
=
=
=
=
=
=
INPUT
=
FILE_PATTERNS
INCLUDE_PATH
RECURSIVE
=
=
=
Qt
qt_docs
YES
YES
YES
YES
YES
YES
YES
$(QTDIR)/
USE_TEMPLATECLASS Q_EXPORT= \
QArrayT:=QArray \
QListT:=QList \
QDictT:=QDict \
QQueueT:=QQueue \
QVectorT:=QVector \
QPtrDictT:=QPtrDict \
QIntDictT:=QIntDict \
QStackT:=QStack \
QDictIteratorT:=QDictIterator \
QListIteratorT:=QListIterator \
QCacheT:=QCache \
QCacheIteratorT:=QCacheIterator \
QIntCacheT:=QIntCache \
QIntCacheIteratorT:=QIntCacheIterator \
QIntDictIteratorT:=QIntDictIterator \
QPtrDictIteratorT:=QPtrDictIterator
$(QTDIR)/doc \
$(QTDIR)/src/widgets \
$(QTDIR)/src/kernel \
$(QTDIR)/src/dialogs \
$(QTDIR)/src/tools
*.cpp *.h q*.doc
$(QTDIR)/include
YES
For the Qt-2.1 sources I recommend to use the following settings:
PROJECT_NAME
PROJECT_NUMBER
HIDE_UNDOC_MEMBERS
HIDE_UNDOC_CLASSES
SOURCE_BROWSER
INPUT
FILE_PATTERNS
Generated by Doxygen
=
=
=
=
=
=
=
Qt
2.1
YES
YES
YES
$(QTDIR)/src
*.cpp *.h q*.doc
134
RECURSIVE
EXCLUDE_PATTERNS
ALPHABETICAL_INDEX
COLS_IN_ALPHA_INDEX
IGNORE_PREFIX
ENABLE_PREPROCESSING
MACRO_EXPANSION
INCLUDE_PATH
PREDEFINED
EXPAND_ONLY_PREDEF
EXPAND_AS_DEFINED
Configuration
=
=
=
=
=
=
=
=
=
YES
*codec.cpp moc_* */compat/* */3rdparty/*
YES
3
Q
YES
YES
$(QTDIR)/include
Q_PROPERTY(x)= \
Q_OVERRIDE(x)= \
Q_EXPORT= \
Q_ENUMS(x)= \
"QT_STATIC_CONST=static const " \
_WS_X11_ \
INCLUDE_MENUITEM_DEF
= YES
= Q_OBJECT_FAKE Q_OBJECT ACTIVATE_SIGNAL_WITH_PARAM \
Q_VARIANT_AS
Here doxygen’s preprocessor is used to substitute some macro names that are normally substituted by the C
preprocessor, but without doing full macro expansion.
Generated by Doxygen
Chapter 23
Special Commands
23.1
Introduction
All commands in the documentation start with a backslash (\) or an at-sign (@). If you prefer you can replace all
commands starting with a backslash below by their counterparts that start with an at-sign.
Some commands have one or more arguments. Each argument has a certain range:
• If <sharp> braces are used the argument is a single word.
• If (round) braces are used the argument extends until the end of the line on which the command was found.
• If {curly} braces are used the argument extends until the next paragraph. Paragraphs are delimited by a blank
line or by a section indicator.
If in addition to the above argument specifiers [square] brackets are used the argument is optional.
Here is an alphabetically sorted list of all commands with references to their documentation:
\a . . . . . .
\addindex . .
\addtogroup .
\anchor . . .
\arg . . . . .
\attention . . .
\author . . . .
\authors . . .
\b . . . . . .
\brief . . . . .
\bug . . . . .
\c . . . . . . .
\callgraph . .
\callergraph .
\category . . .
\cite . . . . .
\class . . . .
\code . . . . .
\cond . . . . .
\copybrief . .
\copydetails .
\copydoc . . .
\copyright . .
\date . . . . .
\def . . . . .
\defgroup . .
\deprecated .
\details . . . .
\diafile . . . .
\dir . . . . . .
\docbookonly
.
.
.
.
.
.
.
.
.
.
.
.
.
.
.
.
.
.
.
.
.
.
.
.
.
.
.
.
.
.
.
.
.
.
.
.
.
.
.
.
.
.
.
.
.
.
.
.
.
.
.
.
.
.
.
.
.
.
.
.
.
.
.
.
.
.
.
.
.
.
.
.
.
.
.
.
.
.
.
.
.
.
.
.
.
.
.
.
.
.
.
.
.
.
.
.
.
.
.
.
.
.
.
.
.
.
.
.
.
.
.
.
.
.
.
.
.
.
.
.
.
.
.
.
.
.
.
.
.
.
.
.
.
.
.
.
.
.
.
.
.
.
.
.
.
.
.
.
.
.
.
.
.
.
.
.
.
.
.
.
.
.
.
.
.
.
.
.
.
.
.
.
.
.
.
.
.
.
.
.
.
.
.
.
.
.
.
.
.
.
.
.
.
.
.
.
.
.
.
.
.
.
.
.
.
.
.
.
.
.
.
.
.
.
.
.
.
.
.
.
.
.
.
.
.
.
.
.
.
.
.
.
.
.
.
.
.
.
.
.
.
.
.
.
.
.
.
.
.
.
.
.
.
.
.
.
.
.
.
.
.
.
.
.
.
.
.
.
.
.
.
.
.
.
.
.
.
.
.
.
.
.
.
.
.
.
.
.
.
.
.
.
.
.
.
.
.
.
.
.
.
.
.
.
.
.
.
.
.
.
.
.
.
.
.
.
.
.
.
.
.
.
.
.
.
.
.
.
.
.
.
.
.
.
.
.
.
.
.
.
.
.
.
.
.
.
.
.
.
.
.
.
.
.
.
.
.
.
.
.
.
.
.
.
.
.
.
.
.
.
.
.
.
.
.
.
.
.
.
.
.
.
.
.
.
.
.
.
.
.
.
.
.
.
.
.
.
.
.
.
.
.
.
.
.
.
.
.
.
.
.
.
.
.
.
.
.
.
.
.
.
.
.
.
.
.
.
.
.
.
.
.
.
.
.
.
.
.
.
.
.
.
.
.
.
.
.
.
.
.
.
.
.
.
.
.
.
.
.
.
.
.
.
.
.
.
.
.
.
.
.
.
.
.
.
.
.
.
.
.
.
.
.
.
.
.
.
.
.
.
.
.
.
.
.
.
.
.
.
.
.
.
.
.
.
.
.
.
.
.
.
.
.
.
.
.
.
.
.
.
.
.
.
.
.
.
.
.
.
.
.
.
.
.
.
.
.
.
.
.
.
.
.
.
.
.
.
.
.
.
.
.
.
.
.
.
.
.
.
.
.
.
.
.
.
.
.
.
.
.
.
.
.
.
.
.
.
.
.
.
.
.
.
.
.
.
.
.
.
.
.
.
.
.
.
.
.
.
.
.
.
.
.
.
.
.
.
.
.
.
.
.
.
.
.
.
.
.
.
.
.
.
.
.
.
.
.
.
.
.
.
.
.
.
.
.
.
.
.
.
.
.
.
.
.
.
.
.
.
.
.
.
.
.
.
.
.
.
.
.
.
.
.
.
.
.
.
.
.
.
.
.
.
.
.
.
.
.
.
.
.
.
.
.
.
.
.
.
.
.
.
.
.
.
.
.
.
.
.
.
.
.
.
.
.
.
.
.
.
.
.
.
.
23.121
.
.23.95
. 23.2
.23.96
23.122
.
.23.52
.23.53
.23.54
23.123
.
.23.55
.23.56
23.124
.
. 23.3
. 23.4
. 23.5
.23.97
. 23.6
23.125
.
.23.57
23.127
.
23.128
.
23.126
.
.23.58
.23.59
. 23.7
. 23.8
.23.60
.23.61
23.134
.
. 23.9
23.129
.
\dontinclude . . .
\dot . . . . . . .
\dotfile . . . . . .
\e . . . . . . . .
\else . . . . . . .
\elseif . . . . . .
\em . . . . . . . .
\endcode . . . . .
\endcond . . . . .
\enddocbookonly
\enddot . . . . .
\endhtmlonly . . .
\endif . . . . . . .
\endinternal . . .
\endlatexonly . .
\endlink . . . . .
\endmanonly . . .
\endmsc . . . . .
\endparblock . . .
\endrtfonly . . . .
\endsecreflist . .
\endverbatim . . .
\endxmlonly . . .
\enum . . . . . .
\example . . . . .
\exception . . . .
\extends . . . . .
\f$ . . . . . . . .
\f[ . . . . . . . .
\f] . . . . . . . .
\f{ . . . . . . . .
.
.
.
.
.
.
.
.
.
.
.
.
.
.
.
.
.
.
.
.
.
.
.
.
.
.
.
.
.
.
.
.
.
.
.
.
.
.
.
.
.
.
.
.
.
.
.
.
.
.
.
.
.
.
.
.
.
.
.
.
.
.
.
.
.
.
.
.
.
.
.
.
.
.
.
.
.
.
.
.
.
.
.
.
.
.
.
.
.
.
.
.
.
.
.
.
.
.
.
.
.
.
.
.
.
.
.
.
.
.
.
.
.
.
.
.
.
.
.
.
.
.
.
.
.
.
.
.
.
.
.
.
.
.
.
.
.
.
.
.
.
.
.
.
.
.
.
.
.
.
.
.
.
.
.
.
.
.
.
.
.
.
.
.
.
.
.
.
.
.
.
.
.
.
.
.
.
.
.
.
.
.
.
.
.
.
.
.
.
.
.
.
.
.
.
.
.
.
.
.
.
.
.
.
.
.
.
.
.
.
.
.
.
.
.
.
.
.
.
.
.
.
.
.
.
.
.
.
.
.
.
.
.
.
.
.
.
.
.
.
.
.
.
.
.
.
.
.
.
.
.
.
.
.
.
.
.
.
.
.
.
.
.
.
.
.
.
.
.
.
.
.
.
.
.
.
.
.
.
.
.
.
.
.
.
.
.
.
.
.
.
.
.
.
.
.
.
.
.
.
.
.
.
.
.
.
.
.
.
.
.
.
.
.
.
.
.
.
.
.
.
.
.
.
.
.
.
.
.
.
.
.
.
.
.
.
.
.
.
.
.
.
.
.
.
.
.
.
.
.
.
.
.
.
.
.
.
.
.
.
.
.
.
.
.
.
.
.
.
.
.
.
.
.
.
.
.
.
.
.
.
.
.
.
.
.
.
.
.
.
.
.
.
.
.
.
.
.
.
.
.
.
.
.
.
.
.
.
.
.
.
.
.
.
.
.
.
.
.
.
.
.
.
.
.
.
.
.
.
.
.
.
.
.
.
.
.
.
.
.
.
.
.
.
.
.
.
.
.
.
.
.
.
.
.
.
.
.
.
.
.
.
.
.
.
.
.
.
.
.
.
.
.
.
.
.
.
.
.
.
.
.
.
.
.
.
.
.
.
.
.
.
.
.
.
.
.
.
.
.
.
.
.
.
.
.
.
.
.
.
.
.
.
.
.
.
.
.
.
.
.
.
.
.
.
.
.
.
.
.
.
.
.
.
.
.
.
.
.
.
.
.
.
.
.
.
.
.
.
.
.
.
.
.
.
.
.
.
.
.
.
.
.
.
.
.
.
.
.
.
.
.
.
.
.
.
.
.
.
.
.
.
.
.
.
.
.
.
.
.
.
.
.
.
.
.
.
.
.
.
.
.
.
.
.
.
.
.
.
.
.
.
.
.
.
.
.
.
.
.
.
.
.
.
.
.
.
.
.
.
.
.
.
.
.
.
.
.
.
.
.
.
.
.
.
.
.
.
.
.
.
23.110
.
23.130
.
23.132
.
23.135
.
.23.62
.23.63
23.136
.
23.137
.
.23.64
23.138
.
23.139
.
23.141
.
.23.65
.23.12
23.142
.
.23.98
23.143
.
23.140
.
.23.74
23.144
.
23.103
.
23.145
.
23.146
.
.23.10
.23.11
.23.66
.23.13
23.147
.
23.148
.
23.149
.
23.150
.
136
\f} . . . . . . . .
\file . . . . . . . .
\fn . . . . . . . .
\headerfile . . . .
\hideinitializer . .
\htmlinclude . . .
\htmlonly . . . . .
\idlexcept . . . .
\if . . . . . . . . .
\ifnot . . . . . . .
\image . . . . . .
\implements . . .
\include . . . . .
\includelineno . .
\ingroup . . . . .
\internal . . . . .
\invariant . . . . .
\interface . . . . .
\latexinclude . . .
\latexonly . . . .
\li . . . . . . . . .
\line . . . . . . .
\link . . . . . . .
\mainpage . . . .
\manonly . . . . .
\memberof . . . .
\msc . . . . . . .
\mscfile . . . . .
\n . . . . . . . .
\name . . . . . .
\namespace . . .
\nosubgrouping .
\note . . . . . . .
\overload . . . . .
\p . . . . . . . .
\package . . . . .
\page . . . . . .
\par . . . . . . .
\paragraph . . . .
\param . . . . . .
\parblock . . . . .
\post . . . . . . .
\pre . . . . . . .
\private . . . . . .
\privatesection . .
\property . . . . .
\protected . . . .
\protectedsection
\protocol . . . . .
\public . . . . . .
\publicsection . .
\pure . . . . . . .
\ref . . . . . . . .
\refitem . . . . . .
\related . . . . .
\relates . . . . . .
Special Commands
.
.
.
.
.
.
.
.
.
.
.
.
.
.
.
.
.
.
.
.
.
.
.
.
.
.
.
.
.
.
.
.
.
.
.
.
.
.
.
.
.
.
.
.
.
.
.
.
.
.
.
.
.
.
.
.
.
.
.
.
.
.
.
.
.
.
.
.
.
.
.
.
.
.
.
.
.
.
.
.
.
.
.
.
.
.
.
.
.
.
.
.
.
.
.
.
.
.
.
.
.
.
.
.
.
.
.
.
.
.
.
.
.
.
.
.
.
.
.
.
.
.
.
.
.
.
.
.
.
.
.
.
.
.
.
.
.
.
.
.
.
.
.
.
.
.
.
.
.
.
.
.
.
.
.
.
.
.
.
.
.
.
.
.
.
.
.
.
.
.
.
.
.
.
.
.
.
.
.
.
.
.
.
.
.
.
.
.
.
.
.
.
.
.
.
.
.
.
.
.
.
.
.
.
.
.
.
.
.
.
.
.
.
.
.
.
.
.
.
.
.
.
.
.
.
.
.
.
.
.
.
.
.
.
.
.
.
.
.
.
.
.
.
.
.
.
.
.
.
.
.
.
.
.
.
.
.
.
.
.
.
.
.
.
.
.
.
.
.
.
.
.
.
.
.
.
.
.
.
.
.
.
.
.
.
.
.
.
.
.
.
.
.
.
.
.
.
.
.
.
.
.
.
.
.
.
.
.
.
.
.
.
.
.
.
.
.
.
.
.
.
.
.
.
.
.
.
.
.
.
.
.
.
.
.
.
.
.
.
.
.
.
.
.
.
.
.
.
.
.
.
.
.
.
.
.
.
.
.
.
.
.
.
.
.
.
.
.
.
.
.
.
.
.
.
.
.
.
.
.
.
.
.
.
.
.
.
.
.
.
.
.
.
.
.
.
.
.
.
.
.
.
.
.
.
.
.
.
.
.
.
.
.
.
.
.
.
.
.
.
.
.
.
.
.
.
.
.
.
.
.
.
.
.
.
.
.
.
.
.
.
.
.
.
.
.
.
.
.
.
.
.
.
.
.
.
.
.
.
.
.
.
.
.
.
.
.
.
.
.
.
.
.
.
.
.
.
.
.
.
.
.
.
.
.
.
.
.
.
.
.
.
.
.
.
.
.
.
.
.
.
.
.
.
.
.
.
.
.
.
.
.
.
.
.
.
.
.
.
.
.
.
.
.
.
.
.
.
.
.
.
.
.
.
.
.
.
.
.
.
.
.
.
.
.
.
.
.
.
.
.
.
.
.
.
.
.
.
.
.
.
.
.
.
.
.
.
.
.
.
.
.
.
.
.
.
.
.
.
.
.
.
.
.
.
.
.
.
.
.
.
.
.
.
.
.
.
.
.
.
.
.
.
.
.
.
.
.
.
.
.
.
.
.
.
.
.
.
.
.
.
.
.
.
.
.
.
.
.
.
.
.
.
.
.
.
.
.
.
.
.
.
.
.
.
.
.
.
.
.
.
.
.
.
.
.
.
.
.
.
.
.
.
.
.
.
.
.
.
.
.
.
.
.
.
.
.
.
.
.
.
.
.
.
.
.
.
.
.
.
.
.
.
.
.
.
.
.
.
.
.
.
.
.
.
.
.
.
.
.
.
.
.
.
.
.
.
.
.
.
.
.
.
.
.
.
.
.
.
.
.
.
.
.
.
.
.
.
.
.
.
.
.
.
.
.
.
.
.
.
.
.
.
.
.
.
.
.
.
.
.
.
.
.
.
.
.
.
.
.
.
.
.
.
.
.
.
.
.
.
.
.
.
.
.
.
.
.
.
.
.
.
.
.
.
.
.
.
.
.
.
.
.
.
.
.
.
.
.
.
.
.
.
.
.
.
.
.
.
.
.
.
.
.
.
.
.
.
.
.
.
.
.
.
.
.
.
.
.
.
.
.
.
.
.
.
.
.
.
.
.
.
.
.
.
.
.
.
.
.
.
.
.
.
.
.
.
.
.
.
.
.
.
.
.
.
.
.
.
.
.
.
.
.
.
.
.
.
.
.
.
.
.
.
.
.
.
.
.
.
.
.
.
.
.
.
.
.
.
.
.
.
.
.
.
.
.
.
.
.
.
.
.
.
.
.
.
.
.
.
.
.
.
.
.
.
.
.
.
.
.
.
.
.
.
.
.
.
.
.
.
.
.
.
.
.
.
.
.
.
.
.
.
.
.
.
.
.
.
.
.
.
.
.
.
.
.
.
.
.
.
.
.
.
.
.
.
.
.
.
.
.
.
.
.
.
.
.
.
.
.
.
.
.
.
.
.
.
.
.
.
.
.
.
.
.
.
.
.
.
.
.
.
.
.
.
.
.
.
.
.
.
.
.
.
.
.
.
.
.
.
.
.
.
.
.
.
.
.
.
.
.
.
.
.
.
.
.
.
.
.
.
.
.
.
.
.
.
.
.
.
.
.
.
.
.
.
.
.
.
.
.
.
.
.
.
.
.
.
.
.
.
.
.
.
.
.
.
.
.
.
.
.
.
.
.
.
.
.
.
.
.
.
.
.
.
.
.
.
.
.
.
.
.
.
.
.
.
.
.
.
.
.
.
.
.
.
.
.
.
.
.
.
.
.
.
.
.
.
.
.
.
.
.
.
.
.
.
.
.
.
.
.
.
.
.
.
.
.
.
.
.
.
.
.
.
23.151
.
.23.14
.23.15
.23.16
.23.17
23.119
.
23.152
.
.23.18
.23.67
.23.68
23.153
.
.23.19
23.111
.
23.112
.
.23.20
.23.22
.23.69
.23.21
23.120
.
23.154
.
23.156
.
23.113
.
.23.99
.23.23
23.155
.
.23.24
23.131
.
23.133
.
23.157
.
.23.25
.23.26
.23.27
.23.70
.23.28
23.158
.
.23.29
.23.30
.23.71
23.109
.
.23.72
.23.73
.23.76
.23.77
.23.31
.23.32
.23.33
.23.34
.23.35
.23.36
.23.37
.23.38
.23.39
23.100
.
23.101
.
.23.41
.23.40
\relatedalso . .
\relatesalso . .
\remark . . . .
\remarks . . . .
\result . . . . .
\return . . . . .
\returns . . . .
\retval . . . . .
\rtfonly . . . . .
\sa . . . . . . .
\secreflist . . .
\section . . . .
\see . . . . . .
\short . . . . .
\showinitializer .
\since . . . . .
\skip . . . . . .
\skipline . . . .
\snippet . . . .
\struct . . . . .
\subpage . . . .
\subsection . .
\subsubsection
\tableofcontents
\test . . . . . .
\throw . . . . .
\throws . . . . .
\todo . . . . . .
\tparam . . . .
\typedef . . . .
\union . . . . .
\until . . . . . .
\var . . . . . . .
\verbatim . . . .
\verbinclude . .
\version . . . .
\vhdlflow . . . .
\warning . . . .
\weakgroup . .
\xmlonly . . . .
\xrefitem . . . .
\$ . . . . . . .
\@ . . . . . . .
\\ . . . . . . . .
\& . . . . . . .
\в€ј . . . . . . .
\< . . . . . . .
\> . . . . . . .
\# . . . . . . .
\% . . . . . . .
\" . . . . . . . .
\. . . . . . . . .
\:: . . . . . . .
\| . . . . . . . .
\-- . . . . . . .
\--- . . . . . . .
.
.
.
.
.
.
.
.
.
.
.
.
.
.
.
.
.
.
.
.
.
.
.
.
.
.
.
.
.
.
.
.
.
.
.
.
.
.
.
.
.
.
.
.
.
.
.
.
.
.
.
.
.
.
.
.
.
.
.
.
.
.
.
.
.
.
.
.
.
.
.
.
.
.
.
.
.
.
.
.
.
.
.
.
.
.
.
.
.
.
.
.
.
.
.
.
.
.
.
.
.
.
.
.
.
.
.
.
.
.
.
.
.
.
.
.
.
.
.
.
.
.
.
.
.
.
.
.
.
.
.
.
.
.
.
.
.
.
.
.
.
.
.
.
.
.
.
.
.
.
.
.
.
.
.
.
.
.
.
.
.
.
.
.
.
.
.
.
.
.
.
.
.
.
.
.
.
.
.
.
.
.
.
.
.
.
.
.
.
.
.
.
.
.
.
.
.
.
.
.
.
.
.
.
.
.
.
.
.
.
.
.
.
.
.
.
.
.
.
.
.
.
.
.
.
.
.
.
.
.
.
.
.
.
.
.
.
.
.
.
.
.
.
.
.
.
.
.
.
.
.
.
.
.
.
.
.
.
.
.
.
.
.
.
.
.
.
.
.
.
.
.
.
.
.
.
.
.
.
.
.
.
.
.
.
.
.
.
.
.
.
.
.
.
.
.
.
.
.
.
.
.
.
.
.
.
.
.
.
.
.
.
.
.
.
.
.
.
.
.
.
.
.
.
.
.
.
.
.
.
.
.
.
.
.
.
.
.
.
.
.
.
.
.
.
.
.
.
.
.
.
.
.
.
.
.
.
.
.
.
.
.
.
.
.
.
.
.
.
.
.
.
.
.
.
.
.
.
.
.
.
.
.
.
.
.
.
.
.
.
.
.
.
.
.
.
.
.
.
.
.
.
.
.
.
.
.
.
.
.
.
.
.
.
.
.
.
.
.
.
.
.
.
.
.
.
.
.
.
.
.
.
.
.
.
.
.
.
.
.
.
.
.
.
.
.
.
.
.
.
.
.
.
.
.
.
.
.
.
.
.
.
.
.
.
.
.
.
.
.
.
.
.
.
.
.
.
.
.
.
.
.
.
.
.
.
.
.
.
.
.
.
.
.
.
.
.
.
.
.
.
.
.
.
.
.
.
.
.
.
.
.
.
.
.
.
.
.
.
.
.
.
.
.
.
.
.
.
.
.
.
.
.
.
.
.
.
.
.
.
.
.
.
.
.
.
.
.
.
.
.
.
.
.
.
.
.
.
.
.
.
.
.
.
.
.
.
.
.
.
.
.
.
.
.
.
.
.
.
.
.
.
.
.
.
.
.
.
.
.
.
.
.
.
.
.
.
.
.
.
.
.
.
.
.
.
.
.
.
.
.
.
.
.
.
.
.
.
.
.
.
.
.
.
.
.
.
.
.
.
.
.
.
.
.
.
.
.
.
.
.
.
.
.
.
.
.
.
.
.
.
.
.
.
.
.
.
.
.
.
.
.
.
.
.
.
.
.
.
.
.
.
.
.
.
.
.
.
.
.
.
.
.
.
.
.
.
.
.
.
.
.
.
.
.
.
.
.
.
.
.
.
.
.
.
.
.
.
.
.
.
.
.
.
.
.
.
.
.
.
.
.
.
.
.
.
.
.
.
.
.
.
.
.
.
.
.
.
.
.
.
.
.
.
.
.
.
.
.
.
.
.
.
.
.
.
.
.
.
.
.
.
.
.
.
.
.
.
.
.
.
.
.
.
.
.
.
.
.
.
.
.
.
.
.
.
.
.
.
.
.
.
.
.
.
.
.
.
.
.
.
.
.
.
.
.
.
.
.
.
.
.
.
.
.
.
.
.
.
.
.
.
.
.
.
.
.
.
.
.
.
.
.
.
.
.
.
.
.
.
.
.
.
.
.
.
.
.
.
.
.
.
.
.
.
.
.
.
.
.
.
.
.
.
.
.
.
.
.
.
.
.
.
.
.
.
.
.
.
.
.
.
.
.
.
.
.
.
.
.
.
.
.
.
.
.
.
.
.
.
.
.
.
.
.
.
.
.
.
.
.
.
.
.
.
.
.
.
.
.
.
.
.
.
.
.
.
.
.
.
.
.
.
.
.
.
.
.
.
.
.
.
.
.
.
.
.
.
.
.
.
.
.
.
.
.
.
.
.
.
.
.
.
.
.
.
.
.
.
.
.
.
.
.
.
.
.
.
.
.
.
.
.
.
.
.
.
.
.
.
.
.
.
.
.
.
.
.
.
.
.
.
.
.
.
.
.
.
.
.
.
.
.
.
.
.
.
.
.
.
.
.
.
.
.
.
.
.
.
.
.
.
.
.
.
.
.
.
.
.
.
.
.
.
.
.
.
.
.
.
.
.
.
.
.
.
.
.
.
.
.
.
.
.
.
.
.
.
.
.
.
.
.
.
.
.
.
.
.
.
.
.
.
.
.
.
.
.
.
.
.
.
.
.
.
.
.
.
.
.
.
.
.
.
.
.
.
.
.
.
.
.
.
.
.
.
.
.
.
.
.
.
.
.
.
.
.
.
.
.
.
.
.
.
.
.
.
.
.
.
.
.
.
.
.
.
.
.
.
.
.
.
.
.
.
.
.
.
.
.
.
.
.
.
.
.
.
.
.
.
.
.
.
.
.
.
.
.
.
.
.
.
.
.
.
.
.
.
.
.
.
.
.
.
.
.
.
.
.
.
.
.
.
.
.
.
.
.
.
.
.
.
.
.
.
.
.
.
.
.
.
.
.
.
.
.
.
.
.
.
.
.
.23.43
.23.42
.23.78
.23.79
.23.80
.23.81
.23.82
.23.83
23.159
.
.23.84
23.102
.
23.106
.
.23.85
.23.86
.23.44
.23.87
23.114
.
23.115
.
23.116
.
.23.46
23.104
.
23.107
.
23.108
.
23.105
.
.23.88
.23.89
.23.90
.23.91
.23.75
.23.47
.23.48
23.117
.
.23.49
23.160
.
23.118
.
.23.92
.23.50
.23.93
.23.51
23.161
.
.23.94
23.166
.
23.163
.
23.162
.
23.165
.
23.164
.
23.168
.
23.169
.
23.167
.
23.170
.
23.171
.
23.172
.
23.173
.
23.174
.
23.175
.
23.176
.
The following subsections provide a list of all commands that are recognized by doxygen. Unrecognized commands
are treated as normal text.
Structural indicators
23.2 \addtogroup <name> [(title)]
Defines a group just like \defgroup, but in contrast to that command using the same <name> more than once will
not result in a warning, but rather one group with a merged documentation and the first title found in any of the
commands.
Generated by Doxygen
23.3 \callgraph
137
The title is optional, so this command can also be used to add a number of entities to an existing group using @{
and @} like this:
/*! \addtogroup mygrp
* Additional documentation for group ’mygrp’
* @{
*/
/*!
* A function
*/
void func1()
{
}
/*! Another function */
void func2()
{
}
/*! @} */
See also
page Grouping, sections \defgroup, \ingroup, and \weakgroup.
23.3 \callgraph
When this command is put in a comment block of a function or method and HAVE_DOT is set to YES, then
doxygen will generate a call graph for that function (provided the implementation of the function or method calls
other documented functions). The call graph will be generated regardless of the value of CALL_GRAPH.
Note
The completeness (and correctness) of the call graph depends on the doxygen code parser which is not perfect.
See also
section \callergraph.
23.4 \callergraph
When this command is put in a comment block of a function or method and HAVE_DOT is set to YES, then doxygen
will generate a caller graph for that function (provided the implementation of the function or method calls other
documented functions). The caller graph will be generated regardless of the value of CALLER_GRAPH.
Note
The completeness (and correctness) of the caller graph depends on the doxygen code parser which is not
perfect.
See also
section \callgraph.
Generated by Doxygen
138
Special Commands
23.5 \category <name> [<header-file>] [<header-name>]
For Objective-C only: Indicates that a comment block contains documentation for a class category with name
<name>. The arguments are equal to the \class command.
See also
section \class.
23.6 \class <name> [<header-file>] [<header-name>]
Indicates that a comment block contains documentation for a class with name <name>. Optionally a header file
and a header name can be specified. If the header-file is specified, a link to a verbatim copy of the header will
be included in the HTML documentation. The <header-name> argument can be used to overwrite the name of
the link that is used in the class documentation to something other than <header-file>. This can be useful if the
include name is not located on the default include path (like <X11/X.h>). With the <header-name> argument you
can also specify how the include statement should look like, by adding either quotes or sharp brackets around the
name. Sharp brackets are used if just the name is given. Note that the last two arguments can also be specified
using the \headerfile command.
Example:
/* A dummy class */
class Test
{
};
/*! \class Test class.h "inc/class.h"
* \brief This is a test class.
*
* Some details about the Test class
*/
23.7 \def <name>
Indicates that a comment block contains documentation for a #define macro.
Example:
/*! \file define.h
\brief testing defines
This is to test the documentation of defines.
*/
/*!
\def MAX(x,y)
Computes the maximum of \a x and \a y.
*/
/*!
Computes the absolute value of its argument \a x.
*/
#define ABS(x) (((x)>0)?(x):-(x))
#define MAX(x,y) ((x)>(y)?(x):(y))
#define MIN(x,y) ((x)>(y)?(y):(x))
/*!< Computes the minimum of \a x and \a y. */
Generated by Doxygen
23.8 \defgroup <name> (group title)
139
23.8 \defgroup <name> (group title)
Indicates that a comment block contains documentation for a group of classes, files or namespaces. This can be
used to categorize classes, files or namespaces, and document those categories. You can also use groups as
members of other groups, thus building a hierarchy of groups.
The <name> argument should be a single-word identifier.
See also
page Grouping, sections \ingroup, \addtogroup, and \weakgroup.
23.9 \dir [<path fragment>]
Indicates that a comment block contains documentation for a directory. The "path fragment" argument should
include the directory name and enough of the path to be unique with respect to the other directories in the project.
The STRIP_FROM_PATH option determines what is stripped from the full path before it appears in the output.
23.10 \enum <name>
Indicates that a comment block contains documentation for an enumeration, with name <name>. If the enum is a
member of a class and the documentation block is located outside the class definition, the scope of the class should
be specified as well. If a comment block is located directly in front of an enum declaration, the \enum comment
may be omitted.
Note:
The type of an anonymous enum cannot be documented, but the values of an anonymous enum can.
Example:
class Test
{
public:
enum TEnum { Val1, Val2 };
/*! Another enum, with inline docs */
enum AnotherEnum
{
V1, /*!< value 1 */
V2 /*!< value 2 */
};
};
/*! \class Test
* The class description.
*/
/*! \enum Test::TEnum
* A description of the enum type.
*/
/*! \var Test::TEnum Test::Val1
* The description of the first enum value.
*/
23.11 \example <file-name>
Indicates that a comment block contains documentation for a source code example. The name of the source file is
<file-name>. The text of this file will be included in the documentation, just after the documentation contained in
Generated by Doxygen
140
Special Commands
the comment block. All examples are placed in a list. The source code is scanned for documented members and
classes. If any are found, the names are cross-referenced with the documentation. Source files or directories can
be specified using the EXAMPLE_PATH tag of doxygen’s configuration file.
If <file-name> itself is not unique for the set of example files specified by the EXAMPLE_PATH tag, you can include
part of the absolute path to disambiguate it.
If more than one source file is needed for the example, the \include command can be used.
Example:
/** A Test class.
* More details about this class.
*/
class Test
{
public:
/** An example member function.
* More details about this function.
*/
void example();
};
void Test::example() {}
/** \example example_test.cpp
* This is an example of how to use the Test class.
* More details about this example.
*/
Where the example file example_test.cpp looks as follows:
void main()
{
Test t;
t.example();
}
See also
section \include.
23.12 \endinternal
This command ends a documentation fragment that was started with a \internal command. The text between
\internal and \endinternal will only be visible if INTERNAL_DOCS is set to YES.
23.13 \extends <name>
This command can be used to manually indicate an inheritance relation, when the programming language does not
support this concept natively (e.g. C).
The file manual.c in the example directory shows how to use this command.
See also
section \implements and section \memberof
23.14 \file [<name>]
Indicates that a comment block contains documentation for a source or header file with name <name>. The file
name may include (part of) the path if the file-name alone is not unique. If the file name is omitted (i.e. the line after
Generated by Doxygen
23.15 \fn (function declaration)
141
\file is left blank) then the documentation block that contains the \file command will belong to the file it is
located in.
Important:
The documentation of global functions, variables, typedefs, and enums will only be included in the output if the
file they are in is documented as well.
Example:
/** \file file.h
* A brief file description.
* A more elaborated file description.
*/
/**
* A global integer value.
* More details about this value.
*/
extern int globalValue;
Note
In the above example JAVADOC_AUTOBRIEF has been set to YES in the configuration file.
23.15 \fn (function declaration)
Indicates that a comment block contains documentation for a function (either global or as a member of a class). This
command is only needed if a comment block is not placed in front (or behind) the function declaration or definition.
If your comment block is in front of the function declaration or definition this command can (and to avoid redundancy
should) be omitted.
A full function declaration including arguments should be specified after the \fn command on a single line, since
the argument ends at the end of the line!
This command is equivalent to \var, \typedef, and \property.
Warning
Do not use this command if it is not absolutely needed, since it will lead to duplication of information and thus
to errors.
Example:
class Test
{
public:
const char *member(char,int) throw(std::out_of_range);
};
const char *Test::member(char c,int n) throw(std::out_of_range) {}
/*! \class Test
* \brief Test class.
*
* Details about Test.
*/
/*!
*
*
*
*
*
*/
\fn const char *Test::member(char c,int n)
\brief A member function.
\param c a character.
\param n an integer.
\exception std::out_of_range parameter is out of range.
\return a character pointer.
Generated by Doxygen
142
Special Commands
See also
sections \var, \property, and \typedef.
23.16 \headerfile <header-file> [<header-name>]
Intended to be used for class, struct, or union documentation, where the documentation is in front of the definition.
The arguments of this command are the same as the second and third argument of \class. The <header-file> name
refers to the file that should be included by the application to obtain the definition of the class, struct, or union. The
<header-name> argument can be used to overwrite the name of the link that is used in the class documentation
to something other than <header-file>. This can be useful if the include name is not located on the default include
path (like <X11/X.h>).
With the <header-name> argument you can also specify how the include statement should look like, by adding
either double quotes or sharp brackets around the name. By default sharp brackets are used if just the name is
given.
If a pair of double quotes is given for either the <header-file> or <header-name> argument, the current file (in
which the command was found) will be used but with quotes. So for a comment block with a \headerfile
command inside a file test.h, the following three commands are equivalent:
\headerfile test.h "test.h"
\headerfile test.h ""
\headerfile ""
To get sharp brackets you do not need to specify anything, but if you want to be explicit you could use any of the
following:
\headerfile test.h <test.h>
\headerfile test.h <>
\headerfile <>
To globally reverse the default include representation to local includes you can set FORCE_LOCAL_INCLUDES to
YES.
To disable the include information altogether set SHOW_INCLUDE_FILES to NO.
23.17 \hideinitializer
By default the value of a define and the initializer of a variable are displayed unless they are longer than 30 lines.
By putting this command in a comment block of a define or variable, the initializer is always hidden. The maximum
number of initialization lines can be changed by means of the configuration parameter MAX_INITIALIZER_LINES,
the default value is 30.
See also
section \showinitializer.
23.18 \idlexcept <name>
Indicates that a comment block contains documentation for a IDL exception with name <name>.
23.19 \implements <name>
This command can be used to manually indicate an inheritance relation, when the programming language does not
support this concept natively (e.g. C).
The file manual.c in the example directory shows how to use this command.
Generated by Doxygen
23.20 \ingroup (<groupname> [<groupname> <groupname>])
143
See also
section \extends and section \memberof
23.20 \ingroup (<groupname> [<groupname> <groupname>])
If the \ingroup command is placed in a comment block of a class, file or namespace, then it will be added to the
group or groups identified by <groupname>.
See also
page Grouping, sections \defgroup, \addtogroup, and \weakgroup
23.21 \interface <name> [<header-file>] [<header-name>]
Indicates that a comment block contains documentation for an interface with name <name>. The arguments are
equal to the arguments of the \class command.
See also
section \class.
23.22 \internal
This command starts a documentation fragment that is meant for internal use only. The fragment naturally ends
at the end of the comment block. You can also force the internal section to end earlier by using the \endinternal
command.
If the \internal command is put inside a section (see for example \section) all subsections after the command
are considered to be internal as well. Only a new section at the same level will end the fragment that is considered
internal.
You can use INTERNAL_DOCS in the config file to show (YES) or hide (NO) the internal documentation.
See also
section \endinternal.
23.23 \mainpage [(title)]
If the \mainpage command is placed in a comment block the block is used to customize the index page (in HTML)
or the first chapter (in LATEX).
The title argument is optional and replaces the default title that doxygen normally generates. If you do not want any
title you can specify notitle as the argument of \mainpage.
Here is an example:
/*! \mainpage My Personal Index Page
*
* \section intro_sec Introduction
*
* This is the introduction.
*
* \section install_sec Installation
*
* \subsection step1 Step 1: Opening the box
*
Generated by Doxygen
144
Special Commands
* etc...
*/
You can refer to the main page using: \ref index.
See also
section \section, section \subsection, and section \page.
23.24 \memberof <name>
This command makes a function a member of a class in a similar way as \relates does, only with this command the
function is represented as a real member of the class. This can be useful when the programming language does
not support the concept of member functions natively (e.g. C).
It is also possible to use this command together with \public, \protected or \private.
The file manual.c in the example directory shows how to use this command.
See also
sections \extends, \implements, \public, \protected and \private.
23.25 \name [(header)]
This command turns a comment block into a header definition of a member group. The comment block should be
followed by a //@{ ... //@} block containing the members of the group.
See section Member Groups for an example.
23.26 \namespace <name>
Indicates that a comment block contains documentation for a namespace with name <name>.
23.27 \nosubgrouping
This command can be put in the documentation of a class. It can be used in combination with member grouping to
avoid that doxygen puts a member group as a subgroup of a Public/Protected/Private/... section.
See also
sections \publicsection, \protectedsection and \privatesection.
23.28 \overload [(function declaration)]
This command can be used to generate the following standard text for an overloaded member function:
This is an overloaded member function, provided for convenience. It differs from the above function
only in what argument(s) it accepts.
If the documentation for the overloaded member function is not located in front of the function declaration or definition, the optional argument should be used to specify the correct function.
Any other documentation that is inside the documentation block will by appended after the generated message.
Generated by Doxygen
23.29 \package <name>
145
Note 1:
You are responsible that there is indeed an earlier documented member that is overloaded by this one. To
prevent that document reorders the documentation you should set SORT_MEMBER_DOCS to NO in this case.
Note 2:
The \overload command does not work inside a one-line comment.
Example:
class Test
{
public:
void drawRect(int,int,int,int);
void drawRect(const Rect &r);
};
void Test::drawRect(int x,int y,int w,int h) {}
void Test::drawRect(const Rect &r) {}
/*! \class Test
* \brief A short description.
*
* More text.
*/
/*! \fn void Test::drawRect(int x,int y,int w,int h)
* This command draws a rectangle with a left upper corner at ( \a x , \a y ),
* width \a w and height \a h.
*/
/*!
* \overload void Test::drawRect(const Rect &r)
*/
23.29 \package <name>
Indicates that a comment block contains documentation for a Java package with name <name>.
23.30 \page <name> (title)
Indicates that a comment block contains a piece of documentation that is not directly related to one specific class,
file or member. The HTML generator creates a page containing the documentation. The LATEX generator starts a
new section in the chapter ’Page documentation’.
Example:
/*! \page page1 A documentation page
\tableofcontents
Leading text.
\section sec An example section
This page contains the subsections \ref subsection1 and \ref subsection2.
For more info see page \ref page2.
\subsection subsection1 The first subsection
Text.
\subsection subsection2 The second subsection
More text.
*/
/*! \page page2 Another page
Even more info.
*/
Generated by Doxygen
146
Special Commands
Note:
The <name> argument consists of a combination of letters and number digits. If you wish to use upper case
letters (e.g. MYPAGE1), or mixed case letters (e.g. MyPage1) in the <name> argument, you should set
CASE_SENSE_NAMES to YES. However, this is advisable only if your file system is case sensitive. Otherwise
(and for better portability) you should use all lower case letters (e.g. mypage1) for <name> in all references
to the page.
See also
section \section, section \subsection, and section \ref.
23.31 \private
Indicates that the member documented by the comment block is private, i.e., should only be accessed by other
members in the same class.
Note that Doxygen automatically detects the protection level of members in object-oriented languages. This command is intended for use only when the language does not support the concept of protection level natively (e.g. C,
PHP 4).
For starting a section of private members, in a way similar to the "private:" class marker in C++, use \privatesection.
See also
sections \memberof, \public, \protected and \privatesection.
23.32 \privatesection
Starting a section of private members, in a way similar to the "private:" class marker in C++. Indicates that the
member documented by the comment block is private, i.e., should only be accessed by other members in the same
class.
See also
sections \memberof, \public, \protected and \private.
23.33 \property (qualified property name)
Indicates that a comment block contains documentation for a property (either global or as a member of a class).
This command is equivalent to \fn, \typedef, and \var.
See also
sections \fn, \typedef, and \var.
23.34 \protected
Indicates that the member documented by the comment block is protected, i.e., should only be accessed by other
members in the same or derived classes.
Note that Doxygen automatically detects the protection level of members in object-oriented languages. This command is intended for use only when the language does not support the concept of protection level natively (e.g. C,
PHP 4).
For starting a section of protected members, in a way similar to the "protected:" class marker in C++, use \protectedsection.
Generated by Doxygen
23.35 \protectedsection
147
See also
sections \memberof, \public, \private and \protectedsection.
23.35 \protectedsection
Starting a section of protected members, in a way similar to the "protected:" class marker in C++. Indicates that the
member documented by the comment block is protected, i.e., should only be accessed by other members in the
same or derived classes.
See also
sections \memberof, \public, \private and \protected.
23.36 \protocol <name> [<header-file>] [<header-name>]
Indicates that a comment block contains documentation for a protocol in Objective-C with name <name>. The
arguments are equal to the \class command.
See also
section \class.
23.37 \public
Indicates that the member documented by the comment block is public, i.e., can be accessed by any other class or
function.
Note that Doxygen automatically detects the protection level of members in object-oriented languages. This command is intended for use only when the language does not support the concept of protection level natively (e.g. C,
PHP 4).
For starting a section of public members, in a way similar to the "public:" class marker in C++, use \publicsection.
See also
sections \memberof, \protected, \private and \publicsection.
23.38 \publicsection
Starting a section of public members, in a way similar to the "public:" class marker in C++. Indicates that the member
documented by the comment block is public, i.e., can be accessed by any other class or function.
See also
sections \memberof, \protected, \private and \public.
23.39 \pure
Indicates that the member documented by the comment block is pure virtual, i.e., it is abstract and has no implementation associated with it.
This command is intended for use only when the language does not support the concept of pure virtual methods
natively (e.g. C, PHP 4).
Generated by Doxygen
148
Special Commands
23.40 \relates <name>
This command can be used in the documentation of a non-member function <name>. It puts the function inside the
’related function’ section of the class documentation. This command is useful for documenting non-friend functions
that are nevertheless strongly coupled to a certain class. It prevents the need of having to document a file, but only
works for functions.
Example:
/*!
* A String class.
*/
class String
{
friend int strcmp(const String &,const String &);
};
/*!
* Compares two strings.
*/
int strcmp(const String &s1,const String &s2)
{
}
/*! \relates String
* A string debug function.
*/
void stringDebug()
{
}
23.41 \related <name>
Equivalent to \relates
23.42 \relatesalso <name>
This command can be used in the documentation of a non-member function <name>. It puts the function both
inside the ’related function’ section of the class documentation as well as leaving it at its normal file documentation
location. This command is useful for documenting non-friend functions that are nevertheless strongly coupled to a
certain class. It only works for functions.
23.43 \relatedalso <name>
Equivalent to \relatesalso
23.44 \showinitializer
By default the value of a define and the initializer of a variable are only displayed if they are less than 30 lines long.
By putting this command in a comment block of a define or variable, the initializer is shown unconditionally. The
maximum number of initialization lines can be changed by means of the configuration parameter MAX_INITIALIZ←
ER_LINES, the default value is 30.
Generated by Doxygen
23.45 \static
149
See also
section \hideinitializer.
23.45 \static
Indicates that the member documented by the comment block is static, i.e., it works on a class, instead of on an
instance of the class.
This command is intended for use only when the language does not support the concept of static methods natively
(e.g. C).
23.46 \struct <name> [<header-file>] [<header-name>]
Indicates that a comment block contains documentation for a struct with name <name>. The arguments are equal
to the arguments of the \class command.
See also
section \class.
23.47 \typedef (typedef declaration)
Indicates that a comment block contains documentation for a typedef (either global or as a member of a class). This
command is equivalent to \fn, \property, and \var.
See also
section \fn, \property, and \var.
23.48 \union <name> [<header-file>] [<header-name>]
Indicates that a comment block contains documentation for a union with name <name>. The arguments are equal
to the arguments of the \class command.
See also
section \class.
23.49 \var (variable declaration)
Indicates that a comment block contains documentation for a variable or enum value (either global or as a member
of a class). This command is equivalent to \fn, \property, and \typedef.
See also
section \fn, \property, and \typedef.
23.50 \vhdlflow [(title for the flow chart)]
This is a VHDL specific command, which can be put in the documentation of a process to produce a flow chart of
the logic in the process. Optionally a title for the flow chart can be given.
Generated by Doxygen
150
Special Commands
Note
Currently the flow chart will only appear in the HTML output.
23.51 \weakgroup <name> [(title)]
Can be used exactly like \addtogroup, but has a lower priority when it comes to resolving conflicting grouping
definitions.
See also
page Grouping and section \addtogroup.
Section indicators
23.52 \attention { attention text }
Starts a paragraph where a message that needs attention may be entered. The paragraph will be indented. The
text of the paragraph has no special internal structure. All visual enhancement commands may be used inside the
paragraph. Multiple adjacent \attention commands will be joined into a single paragraph. The \attention
command ends when a blank line or some other sectioning command is encountered.
23.53 \author { list of authors }
Starts a paragraph where one or more author names may be entered. The paragraph will be indented. The text
of the paragraph has no special internal structure. All visual enhancement commands may be used inside the
paragraph. Multiple adjacent \author commands will be joined into a single paragraph. Each author description
will start a new line. Alternatively, one \author command may mention several authors. The \author command
ends when a blank line or some other sectioning command is encountered.
Example:
/*!
Pretty nice class.
* \brief
This class is used to demonstrate a number of section commands.
* \details
John Doe
* \author
Jan Doe
* \author
4.1a
* \version
1990-2011
* \date
First initialize the system.
* \pre
Not all memory is freed when deleting an object of this class.
* \bug
Improper use can crash your application
* \warning
* \copyright GNU Public License.
*/
class SomeNiceClass {};
23.54 \authors { list of authors }
Equivalent to \author.
23.55 \brief { brief description }
Starts a paragraph that serves as a brief description. For classes and files the brief description will be used in lists
and at the start of the documentation page. For class and file members, the brief description will be placed at the
Generated by Doxygen
23.56 \bug { bug description }
151
declaration of the member and prepended to the detailed description. A brief description may span several lines
(although it is advised to keep it brief!). A brief description ends when a blank line or another sectioning command
is encountered. If multiple \brief commands are present they will be joined. See section \author for an example.
Synonymous to \short.
23.56 \bug { bug description }
Starts a paragraph where one or more bugs may be reported. The paragraph will be indented. The text of the
paragraph has no special internal structure. All visual enhancement commands may be used inside the paragraph.
Multiple adjacent \bug commands will be joined into a single paragraph. Each bug description will start on a new
line. Alternatively, one \bug command may mention several bugs. The \bug command ends when a blank line or
some other sectioning command is encountered. See section \author for an example.
23.57 \cond [(section-label)]
Starts a conditional section that ends with a corresponding \endcond command, which is typically found in another
comment block. The main purpose of this pair of commands is to (conditionally) exclude part of a file from processing
(in older version of doxygen this could only be achieved using C preprocessor commands).
The section between \cond and \endcond can be included by adding its section label to the ENABLED_SECTIO←
NS configuration option. If the section label is omitted, the section will be excluded from processing unconditionally.
The section label can be a logical expression build of section labels, round brackets, && (AND), || (OR) and ! (NOT).
If you use an expression you need to wrap it in round brackets, i.e \cond (!LABEL1 && LABEL2).
For conditional sections within a comment block one should use a \if ... \endif block.
Conditional sections can be nested. In this case a nested section will only be shown if it and its containing section
are included.
Here is an example showing the commands in action:
/** An interface */
class Intf
{
public:
/** A method */
virtual void func() = 0;
/// @cond TEST
/** A method used for testing */
virtual void test() = 0;
/// @endcond
};
/// @cond DEV
/*
* The implementation of the interface
*/
class Implementation : public Intf
{
public:
void func();
/// @cond TEST
void test();
/// @endcond
/// @cond
/** This method is obsolete and does
* not show up in the documentation.
*/
Generated by Doxygen
152
Special Commands
void obsolete();
/// @endcond
};
/// @endcond
The output will be different depending on whether or not ENABLED_SECTIONS contains TEST, or DEV
See also
sections \endcond and ENABLED_SECTIONS.
23.58 \copyright { copyright description }
Starts a paragraph where the copyright of an entity can be described. This paragraph will be indented. The text of
the paragraph has no special internal structure. See section \author for an example.
23.59 \date { date description }
Starts a paragraph where one or more dates may be entered. The paragraph will be indented. The text of the
paragraph has no special internal structure. All visual enhancement commands may be used inside the paragraph.
Multiple adjacent \date commands will be joined into a single paragraph. Each date description will start on a new
line. Alternatively, one \date command may mention several dates. The \date command ends when a blank
line or some other sectioning command is encountered. See section \author for an example.
23.60 \deprecated { description }
Starts a paragraph indicating that this documentation block belongs to a deprecated entity. Can be used to describe
alternatives, expected life span, etc.
23.61 \details { detailed description }
Just like \brief starts a brief description, \details starts the detailed description. You can also start a new
paragraph (blank line) then the \details command is not needed.
23.62 \else
Starts a conditional section if the previous conditional section was not enabled. The previous section should have
been started with a \if, \ifnot, or \elseif command.
See also
\if, \ifnot, \elseif, \endif.
23.63 \elseif (section-label)
Starts a conditional documentation section if the previous section was not enabled. A conditional section is disabled
by default. To enable it you must put the section-label after the ENABLED_SECTIONS tag in the configuration
file. The section label can be a logical expression build of section names, round brackets, && (AND), || (OR) and !
(NOT). Conditional blocks can be nested. A nested section is only enabled if all enclosing sections are enabled as
well.
Generated by Doxygen
23.64 \endcond
153
See also
sections \endif, \ifnot, \else, and \elseif.
23.64 \endcond
Ends a conditional section that was started by \cond.
See also
section \cond.
23.65 \endif
Ends a conditional section that was started by \if or \ifnot For each \if or \ifnot one and only one matching \endif must
follow.
See also
sections \if and \ifnot.
23.66 \exception <exception-object> { exception description }
Starts an exception description for an exception object with name <exception-object>. Followed by a description
of the exception. The existence of the exception object is not checked. The text of the paragraph has no special internal structure. All visual enhancement commands may be used inside the paragraph. Multiple adjacent
\exception commands will be joined into a single paragraph. Each exception description will start on a new
line. The \exception description ends when a blank line or some other sectioning command is encountered.
See section \fn for an example.
23.67 \if (section-label)
Starts a conditional documentation section. The section ends with a matching \endif command. A conditional
section is disabled by default. To enable it you must put the section-label after the ENABLED_SECTIONS tag in the
configuration file.
The section label can be a logical expression build of section names, round brackets, && (AND), || (OR) and !
(NOT). If you use an expression you need to wrap it in round brackets, i.e \cond (!LABEL1 && LABEL2).
Conditional blocks can be nested. A nested section is only enabled if all enclosing sections are enabled as well.
Example:
/*!
*
*
*
*
*
*
*
*
*
*
*
*/
Unconditionally shown documentation.
\if Cond1
Only included if Cond1 is set.
\endif
\if Cond2
Only included if Cond2 is set.
\if Cond3
Only included if Cond2 and Cond3 are set.
\endif
More text.
\endif
Unconditional text.
Generated by Doxygen
154
Special Commands
You can also use conditional commands inside aliases. To document a class in two languages you could for instance
use:
Example 2:
/*! \english
* This is English.
* \endenglish
* \dutch
* Dit is Nederlands.
* \enddutch
*/
class Example
{
};
Where the following aliases are defined in the configuration file:
ALIASES
= "english=\if english" \
"endenglish=\endif" \
"dutch=\if dutch" \
"enddutch=\endif"
and ENABLED_SECTIONS can be used to enable either english or dutch.
See also
sections \endif, \ifnot, \else, \elseif, and ENABLED_SECTIONS.
23.68 \ifnot (section-label)
Starts a conditional documentation section. The section ends with a matching \endif command. This conditional
section is enabled by default. To disable it you must put the section-label after the ENABLED_SECTIONS tag in the
configuration file. The section label can be a logical expression build of section names, round brackets, && (AND),
|| (OR) and ! (NOT).
See also
sections \endif, \if, \else, and \elseif, and ENABLED_SECTIONS.
23.69 \invariant { description of invariant }
Starts a paragraph where the invariant of an entity can be described. The paragraph will be indented. The text of the
paragraph has no special internal structure. All visual enhancement commands may be used inside the paragraph.
Multiple adjacent \invariant commands will be joined into a single paragraph. Each invariant description will
start on a new line. Alternatively, one \invariant command may mention several invariants. The \invariant
command ends when a blank line or some other sectioning command is encountered.
23.70 \note { text }
Starts a paragraph where a note can be entered. The paragraph will be indented. The text of the paragraph has no
special internal structure. All visual enhancement commands may be used inside the paragraph. Multiple adjacent
\note commands will be joined into a single paragraph. Each note description will start on a new line. Alternatively,
one \note command may mention several notes. The \note command ends when a blank line or some other
sectioning command is encountered. See section \par for an example.
Generated by Doxygen
23.71 \par [(paragraph title)] { paragraph }
155
23.71 \par [(paragraph title)] { paragraph }
If a paragraph title is given this command starts a paragraph with a user defined heading. The heading extends until
the end of the line. The paragraph following the command will be indented.
If no paragraph title is given this command will start a new paragraph. This will also work inside other paragraph
commands (like \param or \warning) without ending that command.
The text of the paragraph has no special internal structure. All visual enhancement commands may be used inside
the paragraph. The \par command ends when a blank line or some other sectioning command is encountered.
Example:
/*! \class Test
* Normal text.
*
* \par User defined paragraph:
* Contents of the paragraph.
*
* \par
* New paragraph under the same heading.
*
* \note
* This note consists of two paragraphs.
* This is the first paragraph.
*
* \par
* And this is the second paragraph.
*
* More normal text.
*/
class Test {};
23.72 \param [(dir)] <parameter-name> { parameter description }
Starts a parameter description for a function parameter with name <parameter-name>, followed by a description
of the parameter. The existence of the parameter is checked and a warning is given if the documentation of this (or
any other) parameter is missing or not present in the function declaration or definition.
The \param command has an optional attribute, (dir), specifying the direction of the parameter. Possible values
are "[in]", "[in,out]", and "[out]", note the [square] brackets in this description. When a parameter is both input and
output, [in,out] is used as attribute. Here is an example for the function memcpy:
/*!
* Copies bytes from a source memory area to a destination memory area,
* where both areas may not overlap.
* @param[out] dest The memory area to copy to.
* @param[in] src The memory area to copy from.
The number of bytes to copy
* @param[in] n
*/
void memcpy(void *dest, const void *src, size_t n);
The parameter description is a paragraph with no special internal structure. All visual enhancement commands may
be used inside the paragraph.
Multiple adjacent \param commands will be joined into a single paragraph. Each parameter description will start
on a new line. The \param description ends when a blank line or some other sectioning command is encountered.
See section \fn for an example.
Note that you can also document multiple parameters with a single \param command using a comma separated
list. Here is an example:
/** Sets the position.
* @param x,y,z Coordinates of the position in 3D space.
*/
Generated by Doxygen
156
Special Commands
void setPosition(double x,double y,double z,double t)
{
}
Note that for PHP one can also specify the type (or types if you separate them with a pipe symbol) which are allowed
for a parameter (as this is not part of the definition). The syntax is the same as for phpDocumentor, i.e.
@param
datatype1|datatype2 $paramname description
23.73 \parblock
For commands that expect a single paragraph as argument (such as \par, \param and \warning), the \parblock
command allows to start a description that covers multiple paragraphs, which then ends with \endparblock.
Example:
/**
*
*
*
*
*
*
*
*/
Example of a param command with a description consisting of two paragraphs
\param p
\parblock
First paragraph of the param description.
Second paragraph of the param description.
\endparblock
Rest of the comment block continues.
Note that the \parblock command may also appear directly after \param’s first argument.
23.74 \endparblock
This ends a block of paragraphs started with \parblock.
23.75 \tparam <template-parameter-name> { description }
Starts a template parameter for a class or function template parameter with name <template-parameter-name>,
followed by a description of the template parameter.
Otherwise similar to \param.
23.76 \post { description of the postcondition }
Starts a paragraph where the postcondition of an entity can be described. The paragraph will be indented. The
text of the paragraph has no special internal structure. All visual enhancement commands may be used inside the
paragraph. Multiple adjacent \post commands will be joined into a single paragraph. Each postcondition will start
on a new line. Alternatively, one \post command may mention several postconditions. The \post command
ends when a blank line or some other sectioning command is encountered.
23.77 \pre { description of the precondition }
Starts a paragraph where the precondition of an entity can be described. The paragraph will be indented. The
text of the paragraph has no special internal structure. All visual enhancement commands may be used inside the
paragraph. Multiple adjacent \pre commands will be joined into a single paragraph. Each precondition will start
on a new line. Alternatively, one \pre command may mention several preconditions. The \pre command ends
when a blank line or some other sectioning command is encountered.
Generated by Doxygen
23.78 \remark { remark text }
157
23.78 \remark { remark text }
Starts a paragraph where one or more remarks may be entered. The paragraph will be indented. The text of the
paragraph has no special internal structure. All visual enhancement commands may be used inside the paragraph.
Multiple adjacent \remark commands will be joined into a single paragraph. Each remark will start on a new line.
Alternatively, one \remark command may mention several remarks. The \remark command ends when a blank
line or some other sectioning command is encountered.
23.79 \remarks { remark text }
Equivalent to \remark.
23.80 \result { description of the result value }
Equivalent to \return.
23.81 \return { description of the return value }
Starts a return value description for a function. The text of the paragraph has no special internal structure. All visual
enhancement commands may be used inside the paragraph. Multiple adjacent \return commands will be joined
into a single paragraph. The \return description ends when a blank line or some other sectioning command is
encountered. See section \fn for an example.
23.82 \returns { description of the return value }
Equivalent to \return.
23.83 \retval <return value> { description }
Starts a description for a function’s return value with name <return value>, followed by a description of the return
value. The text of the paragraph that forms the description has no special internal structure. All visual enhancement
commands may be used inside the paragraph. Multiple adjacent \retval commands will be joined into a single
paragraph. Each return value description will start on a new line. The \retval description ends when a blank line
or some other sectioning command is encountered.
23.84 \sa { references }
Starts a paragraph where one or more cross-references to classes, functions, methods, variables, files or URL may
be specified. Two names joined by either :: or # are understood as referring to a class and one of its members.
One of several overloaded methods or constructors may be selected by including a parenthesized list of argument
types after the method name.
Synonymous to \see.
See also
section autolink for information on how to create links to objects.
Generated by Doxygen
158
Special Commands
23.85 \see { references }
Equivalent to \sa. Introduced for compatibility with Javadoc.
23.86 \short { short description }
Equivalent to \brief.
23.87 \since { text }
This command can be used to specify since when (version or time) an entity is available. The paragraph that follows
\since does not have any special internal structure. All visual enhancement commands may be used inside the
paragraph. The \since description ends when a blank line or some other sectioning command is encountered.
23.88 \test { paragraph describing a test case }
Starts a paragraph where a test case can be described. The description will also add the test case to a separate
test list. The two instances of the description will be cross-referenced. Each test case in the test list will be preceded
by a header that indicates the origin of the test case.
23.89 \throw <exception-object> { exception description }
Synonymous \exception.
Note:
the command \throws is a synonym for this command.
See also
section \exception
23.90 \throws <exception-object> { exception description }
Equivalent to \throw.
23.91 \todo { paragraph describing what is to be done }
Starts a paragraph where a TODO item is described. The description will also add an item to a separate TODO
list. The two instances of the description will be cross-referenced. Each item in the TODO list will be preceded by a
header that indicates the origin of the item.
23.92 \version { version number }
Starts a paragraph where one or more version strings may be entered. The paragraph will be indented. The
text of the paragraph has no special internal structure. All visual enhancement commands may be used inside the
Generated by Doxygen
23.93 \warning { warning message }
159
paragraph. Multiple adjacent \version commands will be joined into a single paragraph. Each version description
will start on a new line. Alternatively, one \version command may mention several version strings. The \version
command ends when a blank line or some other sectioning command is encountered. See section \author for an
example.
23.93 \warning { warning message }
Starts a paragraph where one or more warning messages may be entered. The paragraph will be indented. The
text of the paragraph has no special internal structure. All visual enhancement commands may be used inside
the paragraph. Multiple adjacent \warning commands will be joined into a single paragraph. Each warning
description will start on a new line. Alternatively, one \warning command may mention several warnings. The
\warning command ends when a blank line or some other sectioning command is encountered. See section
\author for an example.
23.94 \xrefitem <key> ”(heading)” ”(list title)” { text }
This command is a generalization of commands such as \todo and \bug. It can be used to create user-defined text
sections which are automatically cross-referenced between the place of occurrence and a related page, which will
be generated. On the related page all sections of the same type will be collected.
The first argument <key> is an identifier uniquely representing the type of the section. The second argument is a
quoted string representing the heading of the section under which text passed as the fourth argument is put. The
third argument (list title) is used as the title for the related page containing all items with the same key. The keys
"todo", "test", "bug" and "deprecated" are predefined.
To get an idea on how to use the \xrefitem command and what its effect is, consider the todo list, which (for
English output) can be seen an alias for the command
\xrefitem todo "Todo" "Todo List"
Since it is very tedious and error-prone to repeat the first three parameters of the command for each section, the
command is meant to be used in combination with the ALIASES option in the configuration file. To define a new
command \reminder, for instance, one should add the following line to the configuration file:
ALIASES += "reminder=\xrefitem reminders \"Reminder\" \"Reminders\""
Note the use of escaped quotes for the second and third argument of the \xrefitem command.
In case parameter "(heading)" is the empty string no heading is generated. This can be useful when used in
combination with the \page command e.g.
/** @page my_errors My Errors
* @brief Errors page
*
* Errors page contents.
*/
/** \error ERROR 101: in case a file can not be opened.
Check about file system read/write access. */
#define MY_ERR_CANNOT_OPEN_FILE
101
/** \error ERROR 102: in case a file can not be closed.
Check about file system read/write access. */
#define MY_ERR_CANNOT_CLOSE_FILE
102
with \error defined as
ALIASES += "error=\xrefitem my_errors \"\" \"\""
Generated by Doxygen
160
Special Commands
Commands to create links
23.95 \addindex (text)
This command adds (text) to the LATEX index.
23.96 \anchor <word>
This command places an invisible, named anchor into the documentation to which you can refer with the \ref command.
Note
Anchors can currently only be put into a comment block that is marked as a page (using \page) or mainpage
(\mainpage).
See also
section \ref.
23.97 \cite <label>
Adds a bibliographic reference in the text and in the list of bibliographic references. The <label> must be a valid
BibTeX label that can be found in one of the .bib files listed in CITE_BIB_FILES. For the LATEX output the formatting of
the reference in the text can be configured with LATEX_BIB_STYLE. For other output formats a fixed representation
is used. Note that using this command requires the bibtex tool to be present in the search path.
23.98 \endlink
This command ends a link that is started with the \link command.
See also
section \link.
23.99 \link <link-object>
The links that are automatically generated by doxygen always have the name of the object they point to as link-text.
The \link command can be used to create a link to an object (a file, class, or member) with a user specified linktext. The link command should end with an \endlink command. All text between the \link and \endlink commands
serves as text for a link to the <link-object> specified as the first argument of \link.
See also
Section autolink for more information on automatically generated links and valid link-objects.
23.100 \ref <name> [”(text)”]
Creates a reference to a named section, subsection, page or anchor. For HTML documentation the reference
command will generate a link to the section. For a section or subsection the title of the section will be used as the
Generated by Doxygen
23.101 \refitem <name>
161
text of the link. For an anchor the optional text between quotes will be used or <name> if no text is specified. For
LATEX documentation the reference command will generate a section number for sections or the text followed by a
page number if <name> refers to an anchor.
See also
Section \page for an example of the \ref command.
23.101 \refitem <name>
Just like the \ref command, this command creates a reference to a named section, but this reference appears in a
list that is started by \secreflist and ends with \endsecreflist. An example of such a list can be seen at the top of the
page.
23.102 \secreflist
Starts an index list of item, created with \refitem that each link to a named section.
23.103 \endsecreflist
End an index list started with \secreflist.
23.104 \subpage <name> [”(text)”]
This command can be used to create a hierarchy of pages. The same structure can be made using the \defgroup
and \ingroup commands, but for pages the \subpage command is often more convenient. The main page (see
\mainpage) is typically the root of hierarchy.
This command behaves similar as \ref in the sense that it creates a reference to a page labeled <name> with the
optional link text as specified in the second argument.
It differs from the \ref command in that it only works for pages, and creates a parent-child relation between pages,
where the child page (or sub page) is identified by label <name>.
See the \section and \subsection commands if you want to add structure without creating multiple pages.
Note
Each page can be the sub page of only one other page and no cyclic relations are allowed, i.e. the page
hierarchy must have a tree structure.
Here is an example:
/*! \mainpage A simple manual
Some general info.
This manual is divided in the following sections:
- \subpage intro
- \subpage advanced "Advanced usage"
*/
//----------------------------------------------------------/*! \page intro Introduction
This page introduces the user to the topic.
Now you can proceed to the \ref advanced "advanced section".
Generated by Doxygen
162
Special Commands
*/
//----------------------------------------------------------/*! \page advanced Advanced Usage
This page is for advanced users.
Make sure you have first read \ref intro "the introduction".
*/
23.105 \tableofcontents
Creates a table of contents at the top of a page, listing all sections and subsections in the page.
Warning
This command only works inside related page documentation and not in other documentation blocks and only
has effect in the HTML output!
23.106 \section <section-name> (section title)
Creates a section with name <section-name>. The title of the section should be specified as the second argument
of the \section command.
Warning
This command only works inside related page documentation and not in other documentation blocks!
See also
Section \page for an example of the \section command.
23.107 \subsection <subsection-name> (subsection title)
Creates a subsection with name <subsection-name>. The title of the subsection should be specified as the second
argument of the \subsection command.
Warning
This command only works inside a section of a related page documentation block and not in other documentation blocks!
See also
Section \page for an example of the \subsection command.
23.108 \subsubsection <subsubsection-name> (subsubsection title)
Creates a subsubsection with name <subsubsection-name>. The title of the subsubsection should be specified as
the second argument of the \subsubsection command.
Warning
This command only works inside a subsection of a related page documentation block and not in other documentation blocks!
Generated by Doxygen
23.109 \paragraph <paragraph-name> (paragraph title)
163
See also
Section \page for an example of the \section command and \subsection command.
23.109 \paragraph <paragraph-name> (paragraph title)
Creates a named paragraph with name <paragraph-name>. The title of the paragraph should be specified as the
second argument of the \paragraph command.
Warning
This command only works inside a subsubsection of a related page documentation block and not in other
documentation blocks!
Commands for displaying examples
23.110 \dontinclude <file-name>
This command can be used to parse a source file without actually verbatim including it in the documentation (as the
\include command does). This is useful if you want to divide the source file into smaller pieces and add documentation between the pieces. Source files or directories can be specified using the EXAMPLE_PATH tag of doxygen’s
configuration file.
The class and member declarations and definitions inside the code fragment are ’remembered’ during the parsing
of the comment block that contained the \dontinclude command.
For line by line descriptions of source files, one or more lines of the example can be displayed using the \line, \skip,
\skipline, and \until commands. An internal pointer is used for these commands. The \dontinclude command
sets the pointer to the first line of the example.
Example:
/*! A test class. */
class Test
{
public:
/// a member function
void example();
};
/*!
*
*
*
*
*
*
*
*
*
*
*/
\page example
\dontinclude example_test.cpp
Our main function starts like this:
\skip main
\until {
First we create an object \c t of the Test class.
\skipline Test
Then we call the example member function
\line example
After that our little test routine ends.
\line }
Where the example file example_test.cpp looks as follows:
void main()
{
Test t;
t.example();
}
Alternatively, the \snippet command can be used to include only a fragment of a source file. For this to work the
fragment has to be marked.
Generated by Doxygen
164
Special Commands
See also
sections \line, \skip, \skipline, \until, and \include.
23.111 \include <file-name>
This command can be used to include a source file as a block of code. The command takes the name of an include
file as an argument. Source files or directories can be specified using the EXAMPLE_PATH tag of doxygen’s
configuration file.
If <file-name> itself is not unique for the set of example files specified by the EXAMPLE_PATH tag, you can include
part of the absolute path to disambiguate it.
Using the \include command is equivalent to inserting the file into the documentation block and surrounding it
with \code and \endcode commands.
The main purpose of the \include command is to avoid code duplication in case of example blocks that consist
of multiple source and header files.
For a line by line description of a source files use the \dontinclude command in combination with the \line, \skip,
\skipline, and \until commands.
Alternatively, the \snippet command can be used to include only a fragment of a source file. For this to work the
fragment has to be marked.
Note
Doxygen’s special commands do not work inside blocks of code. It is allowed to nest C-style comments inside
a code block though.
See also
sections \example, \dontinclude, and \verbatim.
23.112 \includelineno <file-name>
This command works the same way as \include, but will add line numbers to the included file.
See also
section \include.
23.113 \line ( pattern )
This command searches line by line through the example that was last included using \include or \dontinclude until
it finds a non-blank line. If that line contains the specified pattern, it is written to the output.
The internal pointer that is used to keep track of the current line in the example, is set to the start of the line following
the non-blank line that was found (or to the end of the example if no such line could be found).
See section \dontinclude for an example.
23.114 \skip ( pattern )
This command searches line by line through the example that was last included using \include or \dontinclude until
it finds a line that contains the specified pattern.
Generated by Doxygen
23.115 \skipline ( pattern )
165
The internal pointer that is used to keep track of the current line in the example, is set to the start of the line that
contains the specified pattern (or to the end of the example if the pattern could not be found).
See section \dontinclude for an example.
23.115 \skipline ( pattern )
This command searches line by line through the example that was last included using \include or \dontinclude until
it finds a line that contains the specified pattern. It then writes the line to the output.
The internal pointer that is used to keep track of the current line in the example, is set to the start of the line following
the line that is written (or to the end of the example if the pattern could not be found).
Note:
The command:
\skipline pattern
is equivalent to:
\skip pattern
\line pattern
See section \dontinclude for an example.
23.116 \snippet <file-name> ( block id )
Where the \include command can be used to include a complete file as source code, this command can be used to
quote only a fragment of a source file.
For example, the putting the following command in the documentation, references a snippet in file example.cpp
residing in a subdirectory which should be pointed to by EXAMPLE_PATH.
\snippet snippets/example.cpp Adding a resource
The text following the file name is the unique identifier for the snippet. This is used to delimit the quoted code in the
relevant snippet file as shown in the following example that corresponds to the above \snippet command:
QImage image(64, 64, QImage::Format_RGB32);
image.fill(qRgb(255, 160, 128));
//! [Adding a resource]
document->addResource(QTextDocument::ImageResource,
QUrl("mydata://image.png"), QVariant(image));
//! [Adding a resource]
...
Note that the lines containing the block markers will not be included, so the output will be:
document->addResource(QTextDocument::ImageResource,
QUrl("mydata://image.png"), QVariant(image));
Note also that the [block_id] markers should appear exactly twice in the source file.
see section \dontinclude for an alternative way to include fragments of a source file that does not require markers.
23.117 \until ( pattern )
This command writes all lines of the example that was last included using \include or \dontinclude to the output, until
it finds a line containing the specified pattern. The line containing the pattern will be written as well.
Generated by Doxygen
166
Special Commands
The internal pointer that is used to keep track of the current line in the example, is set to the start of the line following
last written line (or to the end of the example if the pattern could not be found).
See section \dontinclude for an example.
23.118 \verbinclude <file-name>
This command includes the file <file-name> verbatim in the documentation. The command is equivalent to pasting
the file in the documentation and placing \verbatim and \endverbatim commands around it.
Files or directories that doxygen should look for can be specified using the EXAMPLE_PATH tag of doxygen’s
configuration file.
23.119 \htmlinclude <file-name>
This command includes the file <file-name> as is in the HTML documentation. The command is equivalent to
pasting the file in the documentation and placing \htmlonly and \endhtmlonly commands around it.
Files or directories that doxygen should look for can be specified using the EXAMPLE_PATH tag of doxygen’s
configuration file.
23.120 \latexinclude <file-name>
This command includes the file <file-name> as is in the LATEX documentation. The command is equivalent to
pasting the file in the documentation and placing \latexonly and \endlatexonly commands around it.
Files or directories that doxygen should look for can be specified using the EXAMPLE_PATH tag of doxygen’s
configuration file.
Commands for visual enhancements
23.121 \a <word>
Displays the argument <word> in italics. Use this command to emphasize words. Use this command to refer to
member arguments in the running text.
Example:
... the \a x and \a y coordinates are used to ...
This will result in the following text:
... the x and y coordinates are used to ...
Equivalent to \e and \em. To emphasize multiple words use <em>multiple words</em>.
23.122 \arg { item-description }
This command has one argument that continues until the first blank line or until another \arg is encountered. The
command can be used to generate a simple, not nested list of arguments. Each argument should start with a \arg
command.
Generated by Doxygen
23.123 \b <word>
167
Example:
Typing:
\arg \c AlignLeft left alignment.
\arg \c AlignCenter center alignment.
\arg \c AlignRight right alignment
No other types of alignment are supported.
will result in the following text:
• AlignLeft left alignment.
• AlignCenter center alignment.
• AlignRight right alignment
No other types of alignment are supported.
Note:
For nested lists, HTML commands should be used.
Equivalent to \li
23.123 \b <word>
Displays the argument <word> using a bold font. Equivalent to <b>word</b>. To put multiple words in bold use
<b>multiple words</b>.
23.124 \c <word>
Displays the argument <word> using a typewriter font. Use this to refer to a word of code. Equivalent to
<tt>word</tt>.
Example:
Typing:
... This function returns \c void and not \c int ...
will result in the following text:
... This function returns void and not int ...
Equivalent to \p To have multiple words in typewriter font use <tt>multiple words</tt>.
23.125 \code [ ’{’<word>’}’]
Starts a block of code. A code block is treated differently from ordinary text. It is interpreted as source code.
The names of classes and members and other documented entities are automatically replaced by links to the
documentation.
By default the language that is assumed for syntax highlighting is based on the location where the \code block
was found. If this part of a Python file for instance, the syntax highlight will be done according to the Python syntax.
If it unclear from the context which language is meant (for instance the comment is in a .txt or .markdown file)
then you can also explicitly indicate the language, by putting the file extension typically that doxygen associated with
the language in curly brackets after the code block. Here is an example:
Generated by Doxygen
168
Special Commands
\code{.py}
class Python:
pass
\endcode
\code{.cpp}
class Cpp {};
\endcode
See also
section \endcode and section \verbatim.
23.126 \copydoc <link-object>
Copies a documentation block from the object specified by <link-object> and pastes it at the location of the command. This command can be useful to avoid cases where a documentation block would otherwise have to be
duplicated or it can be used to extend the documentation of an inherited member.
The link object can point to a member (of a class, file or group), a class, a namespace, a group, a page, or a
file (checked in that order). Note that if the object pointed to is a member (function, variable, typedef, etc), the
compound (class, file, or group) containing it should also be documented for the copying to work.
To copy the documentation for a member of a class one can, for instance, put the following in the documentation:
/*! @copydoc MyClass::myfunction()
* More documentation.
*/
if the member is overloaded, you should specify the argument types explicitly (without spaces!), like in the following:
//! @copydoc MyClass::myfunction(type1,type2)
Qualified names are only needed if the context in which the documentation block is found requires them.
The \copydoc command can be used recursively, but cycles in the \copydoc relation will be broken and flagged
as an error.
Note that \copydoc foo() is roughly equivalent to doing:
\brief
\details
See \copybrief and \copydetails for copying only the brief or detailed part of the comment block.
23.127 \copybrief <link-object>
Works in a similar way as \copydoc but will only copy the brief description, not the detailed documentation.
23.128 \copydetails <link-object>
Works in a similar way as \copydoc but will only copy the detailed documentation, not the brief description.
23.129 \docbookonly
Starts a block of text that will be verbatim included in the generated docbook documentation only. The block ends
with a \enddocbookonly command.
Generated by Doxygen
23.130 \dot
169
See also
section \manonly, \latexonly, \rtfonly, \xmlonly, and \htmlonly.
23.130 \dot
Starts a text fragment which should contain a valid description of a dot graph. The text fragment ends with \enddot.
Doxygen will pass the text on to dot and include the resulting image (and image map) into the output. The nodes
of a graph can be made clickable by using the URL attribute. By using the command \ref inside the URL value you
can conveniently link to an item inside doxygen. Here is an example:
/*! class B */
class B {};
/*! class C */
class C {};
/*! \mainpage
*
*
*
*
*
*
*
*
*
*
*
*/
Class relations expressed via an inline dot graph:
\dot
digraph example {
node [shape=record, fontname=Helvetica, fontsize=10];
b [ label="class B" URL="\ref B"];
c [ label="class C" URL="\ref C"];
b -> c [ arrowhead="open", style="dashed" ];
}
\enddot
Note that the classes in the above graph are clickable
(in the HTML output).
23.131 \msc
Starts a text fragment which should contain a valid description of a message sequence chart. See http←
://www.mcternan.me.uk/mscgen/ for examples. The text fragment ends with \endmsc.
Note
The text fragment should only include the part of the message sequence chart that is within the msc {...}
block.
You need to install the mscgen tool, if you want to use this command.
Here is an example of the use of the \msc command.
/** Sender class. Can be used to send a command to the server.
* The receiver will acknowledge the command by calling Ack().
* \msc
Sender,Receiver;
*
Sender->Receiver [label="Command()", URL="\ref Receiver::Command()"];
*
Sender<-Receiver [label="Ack()", URL="\ref Ack()", ID="1"];
*
* \endmsc
*/
class Sender
{
public:
/** Acknowledgment from server */
void Ack(bool ok);
};
/** Receiver class. Can be used to receive and execute commands.
* After execution of a command, the receiver will send an acknowledgment
* \msc
Receiver,Sender;
*
Receiver<-Sender [label="Command()", URL="\ref Command()"];
*
Receiver->Sender [label="Ack()", URL="\ref Sender::Ack()", ID="1"];
*
* \endmsc
*/
class Receiver
{
public:
Generated by Doxygen
170
Special Commands
/** Executable a command on the server */
void Command(int commandId);
};
See also
section \mscfile.
23.132 \dotfile <file> [”caption”]
Inserts an image generated by dot from <file> into the documentation.
The first argument specifies the file name of the image. doxygen will look for files in the paths (or files) that you
specified after the DOTFILE_DIRS tag. If the dot file is found it will be used as an input file to the dot tool. The
resulting image will be put into the correct output directory. If the dot file name contains spaces you’ll have to put
quotes ("...") around it.
The second argument is optional and can be used to specify the caption that is displayed below the image. This
argument has to be specified between quotes even if it does not contain any spaces. The quotes are stripped before
the caption is displayed.
23.133 \mscfile <file> [”caption”]
Inserts an image generated by mscgen from <file> into the documentation. See http://www.mcternan.в†ђ
me.uk/mscgen/ for examples.
The first argument specifies the file name of the image. doxygen will look for files in the paths (or files) that you
specified after the MSCFILE_DIRS tag. If the msc file is found it will be used as an input file to the mscgen tool.
The resulting image will be put into the correct output directory. If the msc file name contains spaces you’ll have to
put quotes ("...") around it.
The second argument is optional and can be used to specify the caption that is displayed below the image. This
argument has to be specified between quotes even if it does not contain any spaces. The quotes are stripped before
the caption is displayed.
See also
section \msc.
23.134 \diafile <file> [”caption”]
Inserts an image made in dia from <file> into the documentation.
The first argument specifies the file name of the image. doxygen will look for files in the paths (or files) that you
specified after the DIAFILE_DIRS tag. If the dia file is found it will be used as an input file dia. The resulting image
will be put into the correct output directory. If the dia file name contains spaces you’ll have to put quotes ("...")
around it.
The second argument is optional and can be used to specify the caption that is displayed below the image. This
argument has to be specified between quotes even if it does not contain any spaces. The quotes are stripped before
the caption is displayed.
23.135 \e <word>
Displays the argument <word> in italics. Use this command to emphasize words.
Generated by Doxygen
23.136 \em <word>
Example:
Typing:
... this is a \e really good example ...
will result in the following text:
... this is a really good example ...
Equivalent to \a and \em. To emphasize multiple words use <em>multiple words</em>.
23.136 \em <word>
Displays the argument <word> in italics. Use this command to emphasize words.
Example:
Typing:
... this is a \em really good example ...
will result in the following text:
... this is a really good example ...
Equivalent to \a and \e. To emphasize multiple words use <em>multiple words</em>.
23.137 \endcode
Ends a block of code.
See also
section \code
23.138 \enddocbookonly
Ends a block of text that was started with a \docbookonly command.
See also
section \docbookonly.
23.139 \enddot
Ends a block that was started with \dot.
23.140 \endmsc
Ends a block that was started with \msc.
Generated by Doxygen
171
172
Special Commands
23.141 \endhtmlonly
Ends a block of text that was started with a \htmlonly command.
See also
section \htmlonly.
23.142 \endlatexonly
Ends a block of text that was started with a \latexonly command.
See also
section \latexonly.
23.143 \endmanonly
Ends a block of text that was started with a \manonly command.
See also
section \manonly.
23.144 \endrtfonly
Ends a block of text that was started with a \rtfonly command.
See also
section \rtfonly.
23.145 \endverbatim
Ends a block of text that was started with a \verbatim command.
See also
section \verbatim.
23.146 \endxmlonly
Ends a block of text that was started with a \xmlonly command.
See also
section \xmlonly.
Generated by Doxygen
23.147 \f$
173
23.147 \f$
Marks the start and end of an in-text formula.
See also
section formulas for an example.
23.148 \f[
Marks the start of a long formula that is displayed centered on a separate line.
See also
section \f] and section formulas.
23.149 \f]
Marks the end of a long formula that is displayed centered on a separate line.
See also
section \f[ and section formulas.
23.150 \f{environment}{
Marks the start of a formula that is in a specific environment.
Note
The second { is optional and is only to help editors (such as Vim) to do proper syntax highlighting by making
the number of opening and closing braces the same.
See also
section \f} and section formulas.
23.151 \f}
Marks the end of a formula that is in a specific environment.
See also
section \f{ and section formulas.
23.152 \htmlonly [”[block]”]
Starts a block of text that will be verbatim included in the generated HTML documentation only. The block ends with
a \endhtmlonly command.
This command can be used to include HTML code that is too complex for doxygen (i.e. applets, java-scripts, and
HTML tags that require specific attributes).
Generated by Doxygen
174
Special Commands
Normally the contents between \htmlonly and \endhtmlonly is inserted as-is. When you want to insert a HTML
fragment that has block scope like a table or list which should appear outside <p>..</p>, this can lead to invalid
HTML. You can use \htmlonly[block] to make doxygen end the current paragraph and restart it after \endhtmlonly.
Note
environment variables (like $(HOME) ) are resolved inside a HTML-only block.
See also
section \manonly, \latexonly, \rtfonly, \xmlonly, and \docbookonly.
23.153 \image <format> <file> [”caption”] [<sizeindication>=<size>]
Inserts an image into the documentation. This command is format specific, so if you want to insert an image for
more than one format you’ll have to repeat this command for each format.
The first argument specifies the output format. Currently, the following values are supported: html, latex and
rtf.
The second argument specifies the file name of the image. doxygen will look for files in the paths (or files) that
you specified after the IMAGE_PATH tag. If the image is found it will be copied to the correct output directory. If
the image name contains spaces you’ll have to put quotes ("...") around it. You can also specify an absolute URL
instead of a file name, but then doxygen does not copy the image nor check its existence.
The third argument is optional and can be used to specify the caption that is displayed below the image. This
argument has to be specified on a single line and between quotes even if it does not contain any spaces. The
quotes are stripped before the caption is displayed.
The fourth argument is also optional and can be used to specify the width or height of the image. This is only useful
for LATEX output (i.e. format=latex). The sizeindication can be either width or height. The size should
be a valid size specifier in LATEX (for example 10cm or 6in or a symbolic width like \textwidth).
Here is example of a comment block:
/*! Here is a snapshot of my new application:
* \image html application.jpg
* \image latex application.eps "My application" width=10cm
*/
And this is an example of how the relevant part of the configuration file may look:
IMAGE_PATH
= my_image_dir
Warning
The image format for HTML is limited to what your browser supports. For LATEX, the image format must be
Encapsulated PostScript (eps).
Doxygen does not check if the image is in the correct format. So you have to make sure this is the case!
23.154 \latexonly
Starts a block of text that will be verbatim included in the generated LATEX documentation only. The block ends with
a \endlatexonly command.
This command can be used to include LATEX code that is too complex for doxygen (i.e. images, formulas, special
characters). You can use the \htmlonly and \endhtmlonly pair to provide a proper HTML alternative.
Note: environment variables (like $(HOME) ) are resolved inside a LATEX-only block.
Generated by Doxygen
23.155 \manonly
175
See also
sections \rtfonly, \xmlonly, \manonly, \htmlonly, and \docbookonly.
23.155 \manonly
Starts a block of text that will be verbatim included in the generated MAN documentation only. The block ends with
a \endmanonly command.
This command can be used to include groff code directly into MAN pages. You can use the \htmlonly and \endhtmlonly and \latexonly and \endlatexonly pairs to provide proper HTML and LATEX alternatives.
See also
sections \htmlonly, \xmlonly, \rtfonly, \latexonly, and \docbookonly.
23.156 \li { item-description }
This command has one argument that continues until the first blank line or until another \li is encountered. The
command can be used to generate a simple, not nested list of arguments. Each argument should start with a \li
command.
Example:
Typing:
\li \c AlignLeft left alignment.
\li \c AlignCenter center alignment.
\li \c AlignRight right alignment
No other types of alignment are supported.
will result in the following text:
• AlignLeft left alignment.
• AlignCenter center alignment.
• AlignRight right alignment
No other types of alignment are supported.
Note:
For nested lists, HTML commands should be used.
Equivalent to \arg
23.157 \n
Forces a new line. Equivalent to <br> and inspired by the printf function.
23.158 \p <word>
Displays the parameter <word> using a typewriter font. You can use this command to refer to member function
parameters in the running text.
Generated by Doxygen
176
Special Commands
Example:
... the \p x and \p y coordinates are used to ...
This will result in the following text:
... the x and y coordinates are used to ...
Equivalent to \c To have multiple words in typewriter font use <tt>multiple words</tt>.
23.159 \rtfonly
Starts a block of text that will be verbatim included in the generated RTF documentation only. The block ends with
a \endrtfonly command.
This command can be used to include RTF code that is too complex for doxygen.
Note: environment variables (like $(HOME) ) are resolved inside a RTF-only block.
See also
sections \manonly, \xmlonly, \latexonly, \htmlonly, and \docbookonly.
23.160 \verbatim
Starts a block of text that will be verbatim included in the documentation. The block should end with a \endverbatim
command. All commands are disabled in a verbatim block.
Warning
Make sure you include a \endverbatim command for each \verbatim command or the parser will get confused!
See also
sections \code, \endverbatim, and \verbinclude.
23.161 \xmlonly
Starts a block of text that will be verbatim included in the generated XML output only. The block ends with a
\endxmlonly command.
This command can be used to include custom XML tags.
See also
sections \manonly, \rtfonly, \latexonly, \htmlonly, and \docbookonly.
23.162 \\
This command writes a backslash character (\) to the output. The backslash has to be escaped in some cases
because doxygen uses it to detect commands.
Generated by Doxygen
23.163 \@
177
23.163 \@
This command writes an at-sign (@) to the output. The at-sign has to be escaped in some cases because doxygen
uses it to detect JavaDoc commands.
23.164 \в€ј[LanguageId]
This command enables/disables a language specific filter. This can be used to put documentation for different
language into one comment block and use the OUTPUT_LANGUAGE tag to filter out only a specific language. Use
\в€јlanguage_id to enable output for a specific language only and \в€ј to enable output for all languages (this is
also the default mode).
Example:
/*! \~english This is English \~dutch Dit is Nederlands \~german Dies ist
Deutsch. \~ output for all languages.
*/
23.165 \&
This command writes the & character to the output. This character has to be escaped because it has a special
meaning in HTML.
23.166 \$
This command writes the $ character to the output. This character has to be escaped in some cases, because it is
used to expand environment variables.
23.167 \#
This command writes the # character to the output. This character has to be escaped in some cases, because it is
used to refer to documented entities.
23.168 \<
This command writes the < character to the output. This character has to be escaped because it has a special
meaning in HTML.
23.169 \>
This command writes the > character to the output. This character has to be escaped because it has a special
meaning in HTML.
23.170 \%
This command writes the % character to the output. This character has to be escaped in some cases, because it is
used to prevent auto-linking to word that is also a documented class or struct.
Generated by Doxygen
178
Special Commands
23.171 \”
This command writes the " character to the output. This character has to be escaped in some cases, because it is
used in pairs to indicate an unformatted text fragment.
23.172 \.
This command writes a dot (.) to the output. This can be useful to prevent ending a brief description when JAVA←
DOC_AUTOBRIEF is enabled or to prevent starting a numbered list when the dot follows a number at the start of a
line.
23.173 \::
This command writes a double colon (::) to the output. This character sequence has to be escaped in some cases,
because it is used to reference to documented entities.
23.174 \|
This command writes a pipe symbol (|) to the output. This character has to be escaped in some cases, because it
is used for Markdown tables.
23.175 \-This command writes two dashes (--) to the output. This allows writing two consecutive dashes to the output instead
of one n-dash character (–).
23.176 \--This command writes three dashes (---) to the output. This allows writing three consecutuve dashes to the output
instead of one m-dash character (—).
Commands included for Qt compatibility
The following commands are supported to remain compatible to the Qt class browser generator. Do not use these
commands in your own documentation.
• \annotatedclasslist
• \classhierarchy
• \define
• \functionindex
• \header
• \headerfilelist
• \inherit
• \l
Generated by Doxygen
23.176 \---
• \postheader
Generated by Doxygen
179
180
Special Commands
Generated by Doxygen
Chapter 24
HTML commands
Here is a list of all HTML commands that may be used inside the documentation. Note that although these HTML
tags are translated to the proper commands for output formats other than HTML, all attributes of a HTML tag are
passed on to the HTML output only (the HREF and NAME attributes for the A tag are the only exception).
• <A HREF="..."> Starts a hyperlink (if supported by the output format).
• <A NAME="..."> Starts a named anchor (if supported by the output format).
• </A> Ends a link or anchor
• <B> Starts a piece of text displayed in a bold font.
• </B> Ends a <B> section.
• <BLOCKQUOTE> Starts a quotation block.
• </BLOCKQUOTE> Ends the quotation block.
• <BODY> Does not generate any output.
• </BODY> Does not generate any output.
• <BR> Forces a line break.
• <CENTER> starts a section of centered text.
• </CENTER> ends a section of centered text.
• <CAPTION> Starts a caption. Use within a table only.
• </CAPTION> Ends a caption. Use within a table only.
• <CODE> Starts a piece of text displayed in a typewriter font. Note that only for C# code, this command is
equivalent to \code.
• </CODE> Ends a <CODE> section. Note that only for C# code, this command is equivalent to \endcode.
• <DD> Starts an item description.
• </DD> Ends an item description.
• <DFN> Starts a piece of text displayed in a typewriter font.
• </DFN> Ends a <DFN> section.
• <DIV> Starts a section with a specific style (HTML only)
• </DIV> Ends a section with a specific style (HTML only)
• <DL> Starts a description list.
182
HTML commands
• </DL> Ends a description list.
• <DT> Starts an item title.
• </DT> Ends an item title.
• <EM> Starts a piece of text displayed in an italic font.
• </EM> Ends a <EM> section.
• <FORM> Does not generate any output.
• </FORM> Does not generate any output.
• <HR> Writes a horizontal ruler.
• <H1> Starts an unnumbered section.
• </H1> Ends an unnumbered section.
• <H2> Starts an unnumbered subsection.
• </H2> Ends an unnumbered subsection.
• <H3> Starts an unnumbered subsubsection.
• </H3> Ends an unnumbered subsubsection.
• <I> Starts a piece of text displayed in an italic font.
• <INPUT> Does not generate any output.
• </I> Ends a <I> section.
• <IMG> This command is written with attributes to the HTML output only.
• <LI> Starts a new list item.
• </LI> Ends a list item.
• <META> Does not generate any output.
• <MULTICOL> ignored by doxygen.
• </MUTLICOL> ignored by doxygen.
• <OL> Starts a numbered item list.
• </OL> Ends a numbered item list.
• <P> Starts a new paragraph.
• </P> Ends a paragraph.
• <PRE> Starts a preformatted fragment.
• </PRE> Ends a preformatted fragment.
• <SMALL> Starts a section of text displayed in a smaller font.
• </SMALL> Ends a <SMALL> section.
• <SPAN> Starts an inline text fragment with a specific style (HTML only)
• </SPAN> Ends an inline text fragment with a specific style (HTML only)
• <STRONG> Starts a section of bold text.
• </STRONG> Ends a section of bold text.
• <SUB> Starts a piece of text displayed in subscript.
Generated by Doxygen
183
• </SUB> Ends a <SUB> section.
• <SUP> Starts a piece of text displayed in superscript.
• </SUP> Ends a <SUP> section.
• <TABLE> starts a table.
• </TABLE> ends a table.
• <TD> Starts a new table data element.
• </TD> Ends a table data element.
• <TH> Starts a new table header.
• </TH> Ends a table header.
• <TR> Starts a new table row.
• </TR> Ends a table row.
• <TT> Starts a piece of text displayed in a typewriter font.
• </TT> Ends a <TT> section.
• <KBD> Starts a piece of text displayed in a typewriter font.
• </KBD> Ends a <KBD> section.
• <UL> Starts an unnumbered item list.
• </UL> Ends an unnumbered item list.
• <VAR> Starts a piece of text displayed in an italic font.
• </VAR> Ends a <VAR> section.
The special HTML4 character entities.
The list of entities with their descriptions has been taken from Character entity references in HTML
4. ( Portions В© International Organization for Standardization 1986 Permission to copy in any form is granted for
use with conforming SGML systems and applications as defined in ISO 8879, provided this notice is included in all
copies.)
•
no-break space = non-breaking space:
• ¡
inverted exclamation mark: ВЎ
• ¢
cent sign: Вў
• £
pound sign: ВЈ
• ¤
currency sign: В¤
• ¥
yen sign = yuan sign:
• ¦
broken bar = broken vertical bar: В¦
• §
section sign: В§
• ¨
diaeresis = spacing diaeresis: ВЁ
• ©
copyright sign: В©
• ª
feminine ordinal indicator: ВЄ
• «
left-pointing double angle quotation mark = left pointing guillemet: В«
• ¬
not sign: В¬
Generated by Doxygen
184
HTML commands
• ­
soft hyphen = discretionary hyphen:
• ®
registered sign = registered trade mark sign: В®
• ¯
macron = spacing macron = overline = APL overbar: ВЇ
• °
degree sign: В°
• ±
plus-minus sign = plus-or-minus sign: В±
• ²
superscript two = superscript digit two = squared: ВІ
• ³
superscript three = superscript digit three = cubed: Ві
• ´
acute accent = spacing acute: Вґ
• µ
micro sign: Вµ
• ¶
pilcrow sign = paragraph sign: В¶
• ·
middle dot = Georgian comma = Greek middle dot: В·
• ¸
cedilla = spacing cedilla: Вё
• ¹
superscript one = superscript digit one: В№
• º
masculine ordinal indicator: Вє
• »
right-pointing double angle quotation mark = right pointing guillemet: В»
• ¼
vulgar fraction one quarter = fraction one quarter: 41
• ½
vulgar fraction one half = fraction one half: 12
• ¾
vulgar fraction three quarters = fraction three quarters: 43
• ¿
inverted question mark = turned question mark: Вї
• À
latin capital letter A with grave = latin capital letter A grave: ГЂ
• Á
latin capital letter A with acute: ГЃ
• Â
latin capital letter A with circumflex: Г‚
• Ã
latin capital letter A with tilde: Гѓ
• Ä
latin capital letter A with diaeresis: Г„
• Å
latin capital letter A with ring above = latin capital letter A ring: Г…
• Æ
latin capital letter AE = latin capital ligature AE: Г†
• Ç
latin capital letter C with cedilla: Г‡
• È
latin capital letter E with grave: Г€
• É
latin capital letter E with acute: Г‰
• Ê
latin capital letter E with circumflex: ГЉ
• Ë
latin capital letter E with diaeresis: Г‹
• Ì
latin capital letter I with grave: ГЊ
• Í
latin capital letter I with acute: ГЌ
• Î
latin capital letter I with circumflex: ГЋ
• Ï
latin capital letter I with diaeresis: ГЏ
• Ð
latin capital letter ETH: Гђ
Generated by Doxygen
185
• Ñ
latin capital letter N with tilde: Г‘
• Ò
latin capital letter O with grave: Г’
• Ó
latin capital letter O with acute: Г“
• Ô
latin capital letter O with circumflex: Г”
• Õ
latin capital letter O with tilde: Г•
• Ö
latin capital letter O with diaeresis: Г–
• ×
multiplication sign: Г—
• Ø
latin capital letter O with stroke = latin capital letter O slash: Г�
• Ù
latin capital letter U with grave: Г™
• Ú
latin capital letter U with acute: Гљ
• Û
latin capital letter U with circumflex: Г›
• Ü
latin capital letter U with diaeresis: Гњ
• Ý
latin capital letter Y with acute: Гќ
• Þ
latin capital letter THORN: Гћ
• ß
latin small letter sharp s = ess-zed: Гџ
• à
latin small letter a with grave = latin small letter a grave: à • á
latin small letter a with acute: ГЎ
• â
latin small letter a with circumflex: Гў
• ã
latin small letter a with tilde: ГЈ
• ä
latin small letter a with diaeresis: Г¤
• å
latin small letter a with ring above = latin small letter a ring: ГҐ
• æ
latin small letter ae = latin small ligature ae: Г¦
• ç
latin small letter c with cedilla: Г§
• è
latin small letter e with grave: ГЁ
• é
latin small letter e with acute: Г©
• ê
latin small letter e with circumflex: ГЄ
• ë
latin small letter e with diaeresis: Г«
• ì
latin small letter i with grave: Г¬
• í
latin small letter i with acute: Г
• î
latin small letter i with circumflex: Г®
• ï
latin small letter i with diaeresis: ГЇ
• ð
latin small letter eth: Г°
• ñ
latin small letter n with tilde: Г±
• ò
latin small letter o with grave: ГІ
• ó
latin small letter o with acute: Гі
• ô
latin small letter o with circumflex: Гґ
Generated by Doxygen
186
HTML commands
• õ
latin small letter o with tilde: Гµ
• ö
latin small letter o with diaeresis: Г¶
• ÷
division sign: Г·
• ø
latin small letter o with stroke, = latin small letter o slash: Гё
• ù
latin small letter u with grave: Г№
• ú
latin small letter u with acute: Гє
• û
latin small letter u with circumflex: Г»
• ü
latin small letter u with diaeresis: Гј
• ý
latin small letter y with acute: ГЅ
• þ
latin small letter thorn: Гѕ
• ÿ
latin small letter y with diaeresis: Гї
• ƒ
latin small f with hook = function = florin: Ж’
• Α
greek capital letter alpha: A
• Β
greek capital letter beta: B
• Γ
greek capital letter gamma: О“
• Δ
greek capital letter delta: ∆
• Ε greek capital letter epsilon: E
• Ζ
greek capital letter zeta: Z
• Η
greek capital letter eta: H
• Θ
greek capital letter theta: О�
• Ι
greek capital letter iota: I
• Κ
greek capital letter kappa: K
• Λ
greek capital letter lambda: О›
• Μ
greek capital letter mu: M
• Ν
greek capital letter nu: N
• Ξ
greek capital letter xi: Оћ
• Ο greek capital letter omicron: O
• Π
greek capital letter pi: Π• Ρ
greek capital letter rho: P
• Σ
greek capital letter sigma: ОЈ
• Τ
greek capital letter tau: T
• Υ greek capital letter upsilon: П’
• Φ
greek capital letter phi: О¦
• Χ
greek capital letter chi: X
• Ψ
greek capital letter psi: ОЁ
• Ω
greek capital letter omega: Ω
Generated by Doxygen
187
• α
greek small letter alpha: О±
• β
greek small letter beta: ОІ
• γ
greek small letter gamma: Оі
• δ
greek small letter delta: Оґ
• ε greek small letter epsilon: Оµ
• ζ
greek small letter zeta: О¶
• η
greek small letter eta: О·
• θ
greek small letter theta: Оё
• ι
greek small letter iota: О№
• κ
greek small letter kappa: Оє
• λ
greek small letter lambda: О»
• μ
greek small letter mu: Вµ
• ν
greek small letter nu: ОЅ
• ξ
greek small letter xi: Оѕ
• ο greek small letter omicron: o
• π
greek small letter pi: ПЂ
• ρ
greek small letter rho: ПЃ
• ς
greek small letter final sigma: П‚
• σ
greek small letter sigma: Пѓ
• τ
greek small letter tau: П„
• υ greek small letter upsilon: П…
• φ
greek small letter phi: П•
• χ
greek small letter chi: П‡
• ψ
greek small letter psi: П€
• ω
greek small letter omega: П‰
• ϑ greek small letter theta symbol: П‘
• ϒ
greek upsilon with hook symbol: П’
• ϖ
greek pi symbol: П–
• •
bullet = black small circle: •
• …
horizontal ellipsis = three dot leader: В· В· В·
• ′
prime = minutes = feet: ’
• ″
double prime = seconds = inches: ”
• ‾
overline = spacing overscore:
• ⁄
fraction slash: /
• ℘
script capital P = power set = Weierstrass p: �
• ℑ
blackletter capital I = imaginary part: в„‘
Generated by Doxygen
188
HTML commands
• ℜ
blackletter capital R = real part symbol: в„њ
• ™
trade mark sign: в„ў
• ℵ alef symbol = first transfinite cardinal: в„µ
• ←
leftwards arrow: в†ђ
• ↑
upwards arrow: ↑
• →
rightwards arrow: в†’
• ↓
downwards arrow: ↓
• ↔
left right arrow: ↔
• ↵
downwards arrow with corner leftwards = carriage return: в†ђ
• ⇐
leftwards double arrow: в‡ђ
• ⇑
upwards double arrow: ⇑
• ⇒
rightwards double arrow: в‡’
• ⇓
downwards double arrow: ⇓
• ⇔
left right double arrow: ⇔
• ∀
for all: в€Ђ
• ∂
partial differential: ∂
• ∃
there exists: в€ѓ
• ∅
empty set = null set = diameter: 0/
• ∇
nabla = backward difference: ∇
• ∈
element of: в€€
• ∉
not an element of: в€€
/
• ∋
contains as member:
• ∏
n-ary product = product sign: в€Џ
• ∑
n-ary sumation: ∑
• −
minus sign: -
• ∗
asterisk operator: в€—
• √
square root = radical sign:
• ∝
proportional to: в€ќ
• ∞
infinity: в€ћ
• ∠
angle: ∠• ∧
logical and = wedge: ∧
• ∨
logical or = vee: в€Ё
• ∩
intersection = cap: ∩
• ∪
union = cup: в€Є
• ∫
integral:
• ∴
therefore: ∴
в€љ
Generated by Doxygen
189
• ∼
tilde operator = varies with = similar to: в€ј
• ≅
approximately equal to: в€ј
=
• ≈
almost equal to = asymptotic to: ≈
• ≠
not equal to: =
• ≡
identical to: в‰Ў
• ≤
less-than or equal to: ≤
• ≥
greater-than or equal to: ≥
• ⊂
subset of: вЉ‚
• ⊃
superset of: вЉѓ
• ⊄
not a subset of: вЉ‚
• ⊆
subset of or equal to: вЉ†
• ⊇
superset of or equal to: вЉ‡
• ⊕
circled plus = direct sum: вЉ•
• ⊗
circled times = vector product: вЉ—
• ⊥
up tack = orthogonal to = perpendicular: вЉҐ
• ⋅
dot operator: В·
• ⌈
left ceiling = apl upstile:
• ⌉
right ceiling:
• ⌊
left floor = apl downstile:
• ⌋
right floor:
• ⟨
left-pointing angle bracket = bra:
• ⟩
right-pointing angle bracket = ket:
• ◊
lozenge: ♦
• ♠
black spade suit: ♠• ♣
black club suit = shamrock: в™Ј
• ♥
black heart suit = valentine: ♥
• ♦
black diamond suit: ♦
• "
quotation mark = APL quote: "
• &
ampersand: &
• <
less-than sign: <
• >
greater-than sign: >
• Œ
latin capital ligature OE: Е’
• œ
latin small ligature oe: Е“
• Š
latin capital letter S with caron: Š• š
latin small letter s with caron: ЕЎ
• Ÿ
latin capital letter Y with diaeresis: Её
Generated by Doxygen
190
HTML commands
• ˆ
modifier letter circumflex accent: в—¦
• ˜
small tilde: Лњ
•  
en space:
•  
em space:
•  
thin space:
• ‌
zero width non-joiner:
• ‍
zero width joiner:
• ‎
left-to-right mark:
• ‏
right-to-left mark:
• –
en dash: –
• —
em dash: —
• ‘
left single quotation mark: �
• ’
right single quotation mark: ’
• ‚
single low-9 quotation mark: ‚
• “
left double quotation mark: “
• ”
right double quotation mark: ”
• „
double low-9 quotation mark: „
• †
dagger: †• ‡
double dagger: ‡
• ‰
per mille sign:
• ‹
single left-pointing angle quotation mark: ‹
• ›
single right-pointing angle quotation mark: ›
• €
euro sign: C
Doxygen extensions:
• &tm;
trade mark sign: в„ў
• '
apostrophe: ’
Finally, to put invisible comments inside comment blocks, HTML style comments can be used:
/*! <!-- This is a comment with a comment block --> Visible text */
Generated by Doxygen
Chapter 25
XML commands
Doxygen supports most of the XML commands that are typically used in C# code comments. The XML tags are
defined in Appendix E of the ECMA-334 standard, which defines the C# language. Unfortunately, the specification
is not very precise and a number of the examples given are of poor quality.
Here is the list of tags supported by doxygen:
• <c> Identifies inline text that should be rendered as a piece of code. Similar to using <tt>text</tt>.
• <code> Set one or more lines of source code or program output. Note that this command behaves like
\code ... \endcode for C# code, but it behaves like the HTML equivalent <code>...</code> for other
languages.
• <description> Part of a <list> command, describes an item.
• <example> Marks a block of text as an example, ignored by doxygen.
• <exception cref="member"> Identifies the exception a method can throw.
• <include> Can be used to import a piece of XML from an external file. Ignored by doxygen at the moment.
• <inheritdoc> Can be used to insert the documentation of a member of a base class into the documentation of a member of a derived class that reimplements it.
• <item> List item. Can only be used inside a <list> context.
• <list type="type"> Starts a list, supported types are bullet or number and table. A list consists of a number of <item> tags. A list of type table, is a two column table which can have a header.
• <listheader> Starts the header of a list of type "table".
• <para> Identifies a paragraph of text.
• <param name="paramName"> Marks a piece of text as the documentation for parameter "param←
Name". Similar to using \param.
• <paramref name="paramName"> Refers to a parameter with name "paramName". Similar to using
\a.
• <permission> Identifies the security accessibility of a member. Ignored by doxygen.
• <remarks> Identifies the detailed description.
• <returns> Marks a piece of text as the return value of a function or method. Similar to using \return.
• <see cref="member"> Refers to a member. Similar to \ref.
• <seealso cref="member"> Starts a "See also" section referring to "member". Similar to using \sa
member.
192
XML commands
• <summary> Identifies the brief description. Similar to using \brief.
• <term> Part of a <list> command.
• <typeparam name="paramName"> Marks a piece of text as the documentation for type parameter
"paramName". Similar to using \param.
• <typeparamref name="paramName"> Refers to a parameter with name "paramName". Similar to
using \a.
• <value> Identifies a property. Ignored by doxygen.
Here is an example of a typical piece of code using some of the above commands:
/// <summary>
/// A search engine.
/// </summary>
class Engine
{
/// <summary>
/// The Search method takes a series of parameters to specify the search criterion
/// and returns a dataset containing the result set.
/// </summary>
/// <param name="connectionString">the connection string to connect to the
/// database holding the content to search</param>
/// <param name="maxRows">The maximum number of rows to
/// return in the result set</param>
/// <param name="searchString">The text that we are searching for</param>
/// <returns>A DataSet instance containing the matching rows. It contains a maximum
/// number of rows specified by the maxRows parameter</returns>
public DataSet Search(string connectionString, int maxRows, int searchString)
{
DataSet ds = new DataSet();
return ds;
}
}
Generated by Doxygen
Part III
Developers Manual
Chapter 26
Doxygen’s internals
Doxygen’s internals
Note that this section is still under construction!
The following picture shows how source files are processed by doxygen.
config file
Config parser
XML
get settings
HTML
input files
drives
C Preprocessor
Language parser
input
string
Data organiser
Output generators
entry
tree
LaTeX
RTF
entry
tree
drives
drives
Man
Doc Parser
tag file parser
drives
Source Parser
drives
Figure 26.1: Data flow overview
The following sections explain the steps above in more detail.
Config parser
The configuration file that controls the settings of a project is parsed and the settings are stored in the singleton
class Config in src/config.h. The parser itself is written using flex and can be found in src/config.l.
This parser is also used directly by doxywizard, so it is put in a separate library.
Each configuration option has one of 5 possible types: String, List, Enum, Int, or Bool. The values of these
196
Doxygen’s internals
options are available through the global functions Config_getXXX(), where XXX is the type of the option.
The argument of these function is a string naming the option as it appears in the configuration file. For instance:
Config_getBool("GENERATE_TESTLIST") returns a reference to a boolean value that is TRUE if the test list
was enabled in the config file.
The function readConfiguration() in src/doxygen.cpp reads the command line options and then calls
the configuration parser.
C Preprocessor
The input files mentioned in the config file are (by default) fed to the C Preprocessor (after being piped through a
user defined filter if available).
The way the preprocessor works differs somewhat from a standard C Preprocessor. By default it does not do macro
expansion, although it can be configured to expand all macros. Typical usage is to only expand a user specified set
of macros. This is to allow macro names to appear in the type of function parameters for instance.
Another difference is that the preprocessor parses, but not actually includes code when it encounters a #include
(with the exception of #include found inside { ... } blocks). The reasons behind this deviation from the standard
is to prevent feeding multiple definitions of the same functions/classes to doxygen’s parser. If all source files would
include a common header file for instance, the class and type definitions (and their documentation) would be present
in each translation unit.
The preprocessor is written using flex and can be found in src/pre.l. For condition blocks (#if) evaluation of
constant expressions is needed. For this a yacc based parser is used, which can be found in src/constexp.y
and src/constexp.l.
The preprocessor is invoked for each file using the preprocessFile() function declared in src/pre.h, and
will append the preprocessed result to a character buffer. The format of the character buffer is
0x06
0x06
...
0x06
0x06
file name 1
preprocessed contents of file 1
file name n
preprocessed contents of file n
Language parser
The preprocessed input buffer is fed to the language parser, which is implemented as a big state machine using
flex. It can be found in the file src/scanner.l. There is one parser for all languages (C/C++/Java/IDL). The
state variables insideIDL and insideJava are uses at some places for language specific choices.
The task of the parser is to convert the input buffer into a tree of entries (basically an abstract syntax tree). An entry
is defined in src/entry.h and is a blob of loosely structured information. The most important field is section
which specifies the kind of information contained in the entry.
Possible improvements for future versions:
• Use one scanner/parser per language instead of one big scanner.
• Move the first pass parsing of documentation blocks to a separate module.
• Parse defines (these are currently gathered by the preprocessor, and ignored by the language parser).
Data organizer
This step consists of many smaller steps, that build dictionaries of the extracted classes, files, namespaces, variables, functions, packages, pages, and groups. Besides building dictionaries, during this step relations (such as
inheritance relations), between the extracted entities are computed.
Each step has a function defined in src/doxygen.cpp, which operates on the tree of entries, built during
language parsing. Look at the "Gathering information" part of parseInput() for details.
Generated by Doxygen
197
The result of this step is a number of dictionaries, which can be found in the Doxygen "namespace" defined in
src/doxygen.h. Most elements of these dictionaries are derived from the class Definition; The class
MemberDef, for instance, holds all information for a member. An instance of such a class can be part of a file (
class FileDef ), a class ( class ClassDef ), a namespace ( class NamespaceDef ), a group ( class Group←
Def ), or a Java package ( class PackageDef ).
Tag file parser
If tag files are specified in the configuration file, these are parsed by a SAX based XML parser, which can be found
in src/tagreader.cpp. The result of parsing a tag file is the insertion of Entry objects in the entry tree. The
field Entry::tagInfo is used to mark the entry as external, and holds information about the tag file.
Documentation parser
Special comment blocks are stored as strings in the entities that they document. There is a string for the brief
description and a string for the detailed description. The documentation parser reads these strings and executes
the commands it finds in it (this is the second pass in parsing the documentation). It writes the result directly to the
output generators.
The parser is written in C++ and can be found in src/docparser.cpp. The tokens that are eaten by the parser come
from src/doctokenizer.l. Code fragments found in the comment blocks are passed on to the source parser.
The main entry point for the documentation parser is validatingParseDoc() declared in src/docparser.в†ђ
h. For simple texts with special commands validatingParseText() is used.
Source parser
If source browsing is enabled or if code fragments are encountered in the documentation, the source parser is
invoked.
The code parser tries to cross-reference to source code it parses with documented entities. It also does syntax
highlighting of the sources. The output is directly written to the output generators.
The main entry point for the code parser is parseCode() declared in src/code.h.
Output generators
After data is gathered and cross-referenced, doxygen generates output in various formats. For this it uses the
methods provided by the abstract class OutputGenerator. In order to generate output for multiple formats at
once, the methods of OutputList are called instead. This class maintains a list of concrete output generators,
where each method called is delegated to all generators in the list.
To allow small deviations in what is written to the output for each concrete output generator, it is possible to temporarily disable certain generators. The OutputList class contains various disable() and enable() methods
for this. The methods OutputList::pushGeneratorState() and OutputList::popGenerator←
State() are used to temporarily save the set of enabled/disabled output generators on a stack.
The XML is generated directly from the gathered data structures. In the future XML will be used as an intermediate
language (IL). The output generators will then use this IL as a starting point to generate the specific output formats.
The advantage of having an IL is that various independently developed tools written in various languages, could
extract information from the XML output. Possible tools could be:
• an interactive source browser
• a class diagram generator
• computing code metrics.
Generated by Doxygen
198
Doxygen’s internals
Debugging
Since doxygen uses a lot of flex code it is important to understand how flex works (for this one should read
the man page) and to understand what it is doing when flex is parsing some input. Fortunately, when flex is used
with the -d option it outputs what rules matched. This makes it quite easy to follow what is going on for a particular
input fragment.
To make it easier to toggle debug information for a given flex file I wrote the following perl script, which automatically
adds or removes -d from the correct line in the Makefile:
#!/usr/bin/perl
$file = shift @ARGV;
print "Toggle debugging mode for $file\n";
# add or remove the -d flex flag in the makefile
unless (rename "Makefile.libdoxygen","Makefile.libdoxygen.old") {
print STDERR "Error: cannot rename Makefile.libdoxygen!\n";
exit 1;
}
if (open(F,"<Makefile.libdoxygen.old")) {
unless (open(G,">Makefile.libdoxygen")) {
print STDERR "Error: opening file Makefile.libdoxygen for writing\n";
exit 1;
}
print "Processing Makefile.libdoxygen...\n";
while (<F>) {
if ( s/\(LEX\) (-i )?-P([a-zA-Z]+)YY -t $file/(LEX) -d \1-P\2YY -t $file/g ) {
print "Enabling debug info for $file\n";
}
elsif ( s/\(LEX\) -d (-i )?-P([a-zA-Z]+)YY -t $file/(LEX) \1-P\2YY -t $file/g ) {
print "Disabling debug info for $file\n";
}
print G "$_";
}
close F;
unlink "Makefile.libdoxygen.old";
}
else {
print STDERR "Warning file Makefile.libdoxygen.old does not exist!\n";
}
# touch the file
$now = time;
utime $now, $now, $file
Another way to get rules matching / debugging information from the flex code is in the following way:
touch src/<flex code file>.l
make LEX="flex -d"
to remove the rules / debug information again:
touch src/<flex codefile>.l
make
Note that by running doxygen with -d lex you get information about which flex codefile is used.
Generated by Doxygen
Chapter 27
Perl Module Output format
Since version 1.2.18, Doxygen can generate a new output format we have called the "Perl Module output format".
It has been designed as an intermediate format that can be used to generate new and customized output without
having to modify the Doxygen source. Therefore, its purpose is similar to the XML output format that can be also
generated by Doxygen. The XML output format is more standard, but the Perl Module output format is possibly
simpler and easier to use.
The Perl Module output format is still experimental at the moment and could be changed in incompatible ways
in future versions, although this should not be very probable. It is also lacking some features of other Doxygen
backends. However, it can be already used to generate useful output, as shown by the Perl Module-based LATEX
generator.
Please report any bugs or problems you find in the Perl Module backend or the Perl Module-based LATEX generator
to the doxygen-develop mailing list. Suggestions are welcome as well.
27.1
Usage
When the GENERATE_PERLMOD tag is enabled in the Doxyfile, running Doxygen generates a number of files in
the perlmod/ subdirectory of your output directory. These files are the following:
• DoxyDocs.pm: This is the Perl module that actually contains the documentation, in the Perl Module format
described below.
• DoxyModel.pm: This Perl module describes the structure of DoxyDocs.pm, independently of the actual
documentation. See below for details.
• doxyrules.make: This file contains the make rules to build and clean the files that are generated from
the Doxyfile. Also contains the paths to those files and other relevant information. This file is intended to be
included by your own Makefile.
• Makefile: This is a simple Makefile including doxyrules.make.
To make use of the documentation stored in DoxyDocs.pm you can use one of the default Perl Module-based
generators provided by Doxygen (at the moment this includes the Perl Module-based LATEX generator, see below) or
write your own customized generator. This should not be too hard if you have some knowledge of Perl and it’s the
main purpose of including the Perl Module backend in Doxygen. See below for details on how to do this.
<– want to use LATEX but not possible in headings –>
27.2
Using the LaTeX generator.
The Perl Module-based LATEX generator is pretty experimental and incomplete at the moment, but you could find it
useful nevertheless. It can generate documentation for functions, typedefs and variables within files and classes
200
Perl Module Output format
and can be customized quite a lot by redefining TEX macros. However, there is still no documentation on how to do
this.
Setting the PERLMOD_LATEX tag to YES in the Doxyfile enables the creation of some additional files in the
perlmod/ subdirectory of your output directory. These files contain the Perl scripts and LATEX code necessary to
generate PDF and DVI output from the Perl Module output, using pdflatex and latex respectively. Rules to
automate the use of these files are also added to doxyrules.make and the Makefile.
The additional generated files are the following:
• doxylatex.pl: This Perl script uses DoxyDocs.pm and DoxyModel.pm to generate doxydocs.tex,
a TEX file containing the documentation in a format that can be accessed by LATEX code. This file is not directly
LaTeXable.
• doxyformat.tex: This file contains the LATEX code that transforms the documentation from doxydocs.tex
into LATEX text suitable to be LATEX’ed and presented to the user.
• doxylatex-template.pl: This Perl script uses DoxyModel.pm to generate doxytemplate.←
tex, a TEX file defining default values for some macros. doxytemplate.tex is included by doxyformat.tex to
avoid the need of explicitly defining some macros.
• doxylatex.tex: This is a very simple LATEX document that loads some packages and includes
doxyformat.tex and doxydocs.tex. This document is LATEX’ed to produce the PDF and DVI documentation
by the rules added to doxyrules.make.
27.2.1
Creation of PDF and DVI output
To try this you need to have installed latex, pdflatex and the packages used by doxylatex.tex.
1. Update your Doxyfile to the latest version using:
doxygen -u Doxyfile
2. Set both GENERATE_PERLMOD and PERLMOD_LATEX tags to YES in your Doxyfile.
3. Run Doxygen on your Doxyfile:
doxygen Doxyfile
4. A perlmod/ subdirectory should have appeared in your output directory. Enter the perlmod/ subdirectory
and run:
make pdf
This should generate a doxylatex.pdf with the documentation in PDF format.
5. Run:
make dvi
This should generate a doxylatex.dvi with the documentation in DVI format.
Generated by Doxygen
27.3 Documentation format.
27.3
201
Documentation format.
The Perl Module documentation generated by Doxygen is stored in DoxyDocs.pm. This is a very simple Perl
module that contains only two statements: an assignment to the variable $doxydocs and the customary 1;
statement which usually ends Perl modules. The documentation is stored in the variable $doxydocs, which can
then be accessed by a Perl script using DoxyDocs.pm.
$doxydocs contains a tree-like structure composed of three types of nodes: strings, hashes and lists.
• Strings: These are normal Perl strings. They can be of any length can contain any character. Their
semantics depends on their location within the tree. This type of node has no children.
• Hashes: These are references to anonymous Perl hashes. A hash can have multiple fields, each with a
different key. The value of a hash field can be a string, a hash or a list, and its semantics depends on the key
of the hash field and the location of the hash within the tree. The values of the hash fields are the children of
the node.
• Lists: These are references to anonymous Perl lists. A list has an undefined number of elements, which
are the children of the node. Each element has the same type (string, hash or list) and the same semantics,
depending on the location of the list within the tree.
As you can see, the documentation contained in $doxydocs does not present any special impediment to be
processed by a simple Perl script.
27.4
Data structure
You might be interested in processing the documentation contained in DoxyDocs.pm without needing to take into
account the semantics of each node of the documentation tree. For this purpose, Doxygen generates a Doxy←
Model.pm file which contains a data structure describing the type and children of each node in the documentation
tree.
The rest of this section is to be written yet, but in the meantime you can look at the Perl scripts generated by Doxygen
(such as doxylatex.pl or doxytemplate-latex.pl) to get an idea on how to use DoxyModel.pm.
Generated by Doxygen
202
Perl Module Output format
Generated by Doxygen
Chapter 28
Internationalization
Support for multiple languages
Doxygen has built-in support for multiple languages. This means that the text fragments, generated by doxygen, can
be produced in languages other than English (the default). The output language is chosen through the configuration
option OUTPUT_LANGUAGE in the configuration file (with default name and known as Doxyfile).
Currently (version 1.8.6), 40 languages are supported (sorted alphabetically): Afrikaans, Arabic, Armenian, Brazilian
Portuguese, Catalan, Chinese, Chinese Traditional, Croatian, Czech, Danish, Dutch, English, Esperanto, Finnish,
French, German, Greek, Hungarian, Indonesian, Italian, Japanese (+En), Korean (+En), Latvian, Lithuanian, Macedonian, Norwegian, Persian, Polish, Portuguese, Romanian, Russian, Serbian, SerbianCyrillic, Slovak, Slovene,
Spanish, Swedish, Turkish, Ukrainian, and Vietnamese..
The table of information related to the supported languages follows. It is sorted by language alphabetically. The
Status column was generated from sources and shows approximately the last version when the translator was
updated.
Language
Afrikaans
Arabic
Armenian
Brazilian Portuguese
Catalan
Chinese
Chinese Traditional
Croatian
Czech
Danish
Dutch
English
Esperanto
Finnish
French
German
Greek
Hungarian
Indonesian
Italian
Japanese
Maintainer
Johan Prinsloo
Moaz Reyad
Muhammad Bashir Al-Noimi
Armen Tangamyan
Fabio "FJTC" Jun Takada Chino
Maximiliano Pin
Albert Mora
Lian Yang
Li Daobing
Wei Liu
Daniel YC Lin
Gary Lee
Boris Bralo
Petr Pˇrikryl
Poul-Erik Hansen
Erik SГёe SГёrensen
Dimitri van Heesch
Dimitri van Heesch
Ander MartГnez
Antti Laine
David Martinet
Xavier Outhier
BenoГ®t BROSSE
Peter Grotrian
Jens Seidel
Paul Gessos
ГЃkos Kiss
Földvári György
Hendy Irawan
Alessandro Falappa
Ahmed Aldo Faisal
Suzumizaki-Kimikata
Hiroki Iseri
Contact address
johan at zippysnoek dot com
[resigned] moazreyad at yahoo dot com
Status
1.6.0
1.4.6
mbnoimi at gmail dot com
armen dot tangamyan at anu dot edu dot au
jun-chino at uol dot com dot br
max dot pin at bitroit dot com
1.8.0
1.8.0
1.8.0
[unreachable] amora at iua dot upf dot es
lian dot yang dot cn at gmail dot com
1.8.2
lidaobing at gmail dot com
liuwei at asiainfo dot com
dlin dot tw at gmail dot com
almost up-to-date
garywlee at gmail dot com
boris dot bralo at gmail dot com
prikryl at atlas dot cz
pouhan at gnotometrics dot dk
1.8.2
up-to-date
1.8.0
eriksoe+doxygen at daimi dot au dot dk
dimitri at stack dot nl
dimitri at stack dot nl
ander dot basaundi at gmail dot com
antti dot a dot laine at tut dot fi
contact at e-concept-applications dot fr
up-to-date
up-to-date
1.8.4
1.6.0
up-to-date
xouthier at yahoo dot fr
Benoit dot BROSSE at ingenico dot com
Peter dot Grotrian at pdv-FS dot de
1.8.4
jensseidel at users dot sf dot net
gessos dot paul at yahoo dot gr
akiss at users dot sourceforge dot net
1.8.4
1.4.6
[unreachable] foldvari lost at cyberspace
ceefour at gauldong dot net
alessandro at falappa dot net
1.8.0
1.8.2
aaf23 at cam dot ac dot uk
szmml at h12u.com
goyoki at gmail dot com
up-to-date
204
Internationalization
JapaneseEn
Korean
KoreanEn
Latvian
Lithuanian
Macedonian
Norwegian
Persian
Polish
Portuguese
Romanian
Russian
Serbian
SerbianCyrillic
Slovak
Slovene
Spanish
Swedish
Turkish
Ukrainian
Vietnamese
Ryunosuke Satoh
Kenji Nagamatsu
Iwasa Kazmi
see the Japanese language
Kim Taedong
SooYoung Jung
Richard Kim
see the Korean language
Lauris
Tomas Simonaitis
Mindaugas Radzius
Aidas Berukstis
– searching for the maintainer –
Slave Jovanovski
Lars Erik Jordet
Ali Nadalizadeh
Piotr Kaminski
Grzegorz Kowal
Krzysztof Kral
Rui Godinho Lopes
Fabio "FJTC" Jun Takada Chino
Ionut Dumitrascu
Alexandru Iosup
Brilliantov Kirill Vladimirovich
Alexandr Chelpanov
Dejan Milosavljevic
Nedeljko Stefanovic
Kali+Laco Е vec
Petr Pˇrikryl
MatjaЕѕ OstroverЕЎnik
Bartomeu
Francisco Oltra Thennet
David Vaquero
Björn Palmqvist
Emin Ilker Cetinbas
Olexij Tkatchenko
Petro Yermolenko
Dang Minh Tuan
sun594 at hotmail dot com
[unreachable] naga at joyful dot club dot ne dot jp
[unreachable] iwasa at cosmo-system dot jp
fly1004 at gmail dot com
English based
up-to-date
jung5000 at gmail dot com
[unreachable] ryk at dspwiz dot com
lauris at nix.lv
[unreachable] haden at homelan dot lt
English based
1.8.4
1.4.6
[unreachable] mindaugasradzius at takas dot lt
[unreachable] aidasber at takas dot lt
[Please, try to help to find someone.]
slavejovanovski at yahoo dot com
lejordet at gmail dot com
nadalizadeh at gmail dot com
[unreachable] Piotr dot Kaminski at ctm dot gdynia dot pl
1.6.0
1.4.6
1.7.5
1.8.2
[unreachable] g_kowal at poczta dot onet dot pl
krzysztof dot kral at gmail dot com
[resigned] rgl at ruilopes dot com
1.8.0
jun-chino at uol dot com dot br
reddumy at yahoo dot com
almost up-to-date
aiosup at yahoo dot com
brilliantov at byterg dot ru
almost up-to-date
cav at cryptopro dot ru
[unreachable] dmilos at email dot com
stenedjo at yahoo dot com
[the Slovak language advisors]
1.6.0
1.6.0
up-to-date
prikryl at atlas dot cz
matjaz dot ostroversnik at ostri dot org
bartomeu at loteria3cornella dot com
1.4.6
up-to-date
[unreachable] foltra at puc dot cl
david at grupoikusnet dot com
bjorn.palmqvist at aidium.se
niw3 at yahoo dot com
[resigned] olexij at tkatchenko dot com
almost up-to-date
1.7.5
1.8.4
python at i dot ua
tuanvietkey at gmail dot com
1.6.0
Most people on the list have indicated that they were also busy doing other things, so if you want to help to speed
things up please let them (or me) know.
If you want to add support for a language that is not yet listed please read the next section.
Adding a new language to doxygen
This short HOWTO explains how to add support for the new language to doxygen:
Just follow the following steps:
1. Tell me for which language you want to add support. If no one else is already working on support for that
language, you will be assigned as the maintainer for the language.
2. Create a copy of doxygen/src/translator_en.h and name it doxygen/src/translator_в†ђ
<your_2_letter_country_code>.h I’ll use xx in the rest of this document (and XX for the uppercase version).
3. Edit doxygen/src/language.cpp: Add the following code:
#ifdef LANG_XX
#include<translator_xx.h>
#endif
Remember to use the same symbol LANG_XX that was added to doxygen/src/lang_cfg.h.
Now, in setTranslator() add
Generated by Doxygen
205
#ifdef LANG_XX
else if (L_EQUAL("your_language_name"))
{
theTranslator = new TranslatorYourLanguage;
}
#endif
after the if { ... }. I.e., it must be placed after the code for creating the English translator at the
beginning, and before the else { ... } part that creates the translator for the default language (English
again).
4. Edit doxygen/src/translator_xx.h:
• Use the UTF-8 capable editor and open the file using the UTF-8 mode.
• Rename TRANSLATOR_EN_H to TRANSLATOR_XX_H twice (i.e. in the #ifndef and #define
preprocessor commands at the beginning of the file).
• Rename TranslatorEnglish to TranslatorYourLanguage
• In the member idLanguage() change "english" into the name of your language (use lower case characters only). Depending on the language you may also wish to change the member functions latex←
LanguageSupportCommand() and other (you will recognize them when you start the work).
• Edit all the strings that are returned by the member functions that start with tr. Try to match punctuation
and capitals! To enter special characters (with accents) you can:
– Enter them directly if your keyboard supports that. Recall that the text is expected to be saved using
the UTF-8 encoding. Doxygen will translate the characters to proper LATEX and leaves the HTML
and man output in UTF-8.
– Use HTML codes like ä for an a with an umlaut (i.e. Г¤). See the HTML specification for
the codes.
5.
• On ∗nix systems:
– Rerun the configure script from the root (i.e. in the doxygen directory) so that it generates
doxygen/src/lang_cfg.h. This file should now contain a #define for your language
code.
– Run make again from the root (i.e. in the doxygen directory) of the distribution, in order to
regenerate the Makefiles.
• On Windows:
– stop Visual Stdio
– open a command window
– goto the directory doxygen\src
– give the command python languages.py > ..\winbuild\Languages.rules
– close the command window
– start Visual Studio again
– Your language should now be selectable in the General part of the Settings of the
Properties window of lang_cfg.py, by default Your language will be on. Rebuild
doxygen (and doxywizard) now.
6. Now you can use OUTPUT_LANGUAGE = your_language_name in the config file to generate output
in your language.
7. Send translator_xx.h to me so I can add it to doxygen. Send also your name and e-mail address to
be included in the maintainers.txt list. You can also clone the doxygen repository at GitHub and make
a Pull Request later.
Generated by Doxygen
206
Internationalization
Maintaining a language
New versions of doxygen may use new translated sentences. In such situation, the Translator class requires
implementation of new methods – its interface changes. Of course, the English sentences need to be translated
to the other languages. At least, new methods have to be implemented by the language-related translator class;
otherwise, doxygen wouldn’t even compile. Waiting until all language maintainers have translated the new sentences
and sent the results would not be very practical. The following text describes the usage of translator adapters to
solve the problem.
The role of Translator Adapters. Whenever the Translator class interface changes in the new release, the
new class TranslatorAdapter_x_y_z is added to the translator_adapter.h file (here x, y, and z are
numbers that correspond to the current official version of doxygen). All translators that previously derived from the
Translator class now derive from this adapter class.
The TranslatorAdapter_x_y_z class implements the new, required methods. If the new method replaces
some similar but obsolete method(s) (e.g. if the number of arguments changed and/or the functionality of the older
method was changed or enriched), the TranslatorAdapter_x_y_z class may use the obsolete method to
get the result which is as close as possible to the older result in the target language. If it is not possible, the result
(the default translation) is obtained using the English translator, which is (by definition) always up-to-date.
For example, when the new trFile() method with parameters (to determine the capitalization of the first letter
and the singular/plural form) was introduced to replace the older method trFiles() without arguments, the
following code appeared in one of the translator adapter classes:
/*! This is the default implementation of the obsolete method
* used in the documentation of a group before the list of
* links to documented files. This is possibly localized.
*/
virtual QCString trFiles()
{ return "Files"; }
/*! This is the localized implementation of newer equivalent
* using the obsolete method trFiles().
*/
virtual QCString trFile(bool first_capital, bool singular)
{
if (first_capital && !singular)
return trFiles(); // possibly localized, obsolete method
else
return english.trFile(first_capital, singular);
}
The trFiles() is not present in the TranslatorEnglish class, because it was removed as obsolete. However, it was used until now and its call was replaced by
trFile(true, false)
in the doxygen source files. Probably, many language translators implemented the obsolete method, so it perfectly
makes sense to use the same language dependent result in those cases. The TranslatorEnglish does not
implement the old method. It derives from the abstract Translator class. On the other hand, the old translator
for a different language does not implement the new trFile() method. Because of that it is derived from another
base class – TranslatorAdapter_x_y_z. The TranslatorAdapter_x_y_z class has to implement
the new, required trFile() method. However, the translator adapter would not be compiled if the trFiles()
method was not implemented. This is the reason for implementing the old method in the translator adapter class
(using the same code, that was removed from the TranslatorEnglish).
The simplest way would be to pass the arguments to the English translator and to return its result. Instead, the
adapter uses the old trFiles() in one special case – when the new trFile(true, false) is called. This
is the mostly used case at the time of introducing the new method – see above. While this may look too complicated,
the technique allows the developers of the core sources to change the Translator interface, while the users may not
even notice the change. Of course, when the new trFile() is used with different arguments, the English result
is returned and it will be noticed by non English users. Here the maintainer of the language translator should
implement at least that one particular method.
Generated by Doxygen
207
What says the base class of a language translator? If the language translator class inherits from any adapter
class then maintenance is needed. In such case, the language translator is considered not up-to-date. On the other
hand, if the language translator derives directly from the abstract class Translator, the language translator is
up-to-date.
The translator adapter classes are chained so that the older translator adapter class uses the one-step-newer
translator adapter as the base class. The newer adapter does less adapting work than the older one. The oldest
adapter class derives (indirectly) from all of the adapter classes. The name of the adapter class is chosen so that
its suffix is derived from the previous official version of doxygen that did not need the adapter. This way, one can
say approximately, when the language translator class was last updated – see details below.
The newest translator adapter derives from the abstract TranslatorAdapterBase class that derives directly
from the abstract Translator class. It adds only the private English-translator member for easy implementation
of the default translation inside the adapter classes, and it also enforces implementation of one method for notifying
the user that the language translation is not up-to-date (because of that some sentences in the generated files may
appear in English).
Once the oldest adapter class is not used by any of the language translators, it can be removed from the doxygen
project. The maintainers should try to reach the state with the minimal number of translator adapter classes.
To simplify the maintenance of the language translator classes for the supported languages, the
translator.py Python script was developed (located in doxygen/doc directory). It extracts the important information about obsolete and new methods from the source files for each of the languages. The information
is stored in the translator report ASCII file (translator_report.txt).
Looking at the base class of the language translator, the script guesses also the status of the translator – see the
last column of the table with languages above. The translator.py is called automatically when the doxygen
documentation is generated. You can also run the script manually whenever you feel that it can help you. Of course,
you are not forced to use the results of the script. You can find the same information by looking at the adapter class
and its base classes.
How should I update my language translator? First, you should be the language maintainer, or you should
let him/her know about the changes. The following text was written for the language maintainers as the primary
audience.
There are several approaches to be taken when updating your language. If you are not extremely busy, you should
always chose the most radical one. When the update takes much more time than you expected, you can always
decide use some suitable translator adapter to finish the changes later and still make your translator working.
The most radical way of updating the language translator is to make your translator class derive directly from
the abstract class Translator and provide translations for the methods that are required to be implemented – the
compiler will tell you if you forgot to implement some of them. If you are in doubt, have a look at the Translator←
English class to recognize the purpose of the implemented method. Looking at the previously used adapter class
may help you sometimes, but it can also be misleading because the adapter classes do implement also the obsolete
methods (see the previous trFiles() example).
In other words, the up-to-date language translators do not need the TranslatorAdapter_x_y_z classes at
all, and you do not need to implement anything else than the methods required by the Translator class (i.e. the pure
virtual methods of the Translator – they end with =0;).
If everything compiles fine, try to run translator.py, and have a look at the translator report (ASCII file) at
the doxygen/doc directory. Your translator is marked as up-to-date only if the script does not detect anything
special. If the translator uses the Translator base class, there still may be some remarks related to your source
code. In the case, the translator is marked as almost up-to-date. Namely, the obsolete methods–that are not used
at all–may be listed in the section for your language. Simply, remove their code (and run the translator.py
again). Also, you will be informed when you forgot to change the base class of your translator class to some newer
adapter class or directly to the Translator class.
If you do not have time to finish all the updates you should still start with the most radical approach as described
above. You can always change the base class to the translator adapter class that implements all of the not-yetimplemented methods.
If you prefer to update your translator gradually, have a look at TranslatorEnglish (the translator←
_en.h file). Inside, you will find the comments like new since 1.2.4 that separate always a number of
methods that were implemented in the stated version. Do implement the group of methods that are placed below
Generated by Doxygen
208
Internationalization
the comment that uses the same version numbers as your translator adapter class. (For example, your translator
class have to use the TranslatorAdapter_1_2_4, if it does not implement the methods below the comment
new since 1.2.4. When you implement them, your class should use a newer translator adapter.
Run the translator.py script occasionally and give it your xx identification (from translator_xx.h) to
create the translator report shorter (also produced faster) – it will contain only the information related to your translator. Once you reach the state when the base class should be changed to some newer adapter, you will see the
note in the translator report.
Warning: Don’t forget to compile doxygen to discover, whether it is compilable. The translator.py does not
check if everything is correct with respect to the compiler. Because of that, it may lie sometimes about the necessary
base class.
The most obsolete language translators would lead to implementation of too complicated adapters. Because of
that, doxygen developers may decide to derive such translators from the TranslatorEnglish class, which is
by definition always up-to-date.
When doing so, all the missing methods will be replaced by the English translation. This means that notimplemented methods will always return the English result. Such translators are marked using the word obsolete.
You should read it really obsolete. No guess about the last update can be done.
Often, it is possible to construct better result from the obsolete methods. Because of that, the translator adapter
classes should be used if possible. On the other hand, implementation of adapters for really obsolete translators
brings too much maintenance and run-time overhead.
Generated by Doxygen
Index
\", 178
\#, 177
\$, 177
\&, 177
\--, 178
\---, 178
\., 178
\::, 178
\<, 177
\>, 177
\\, 176
\%, 177
\|, 178
\в€ј, 177
\a, 166
\addindex, 160
\addtogroup, 136, 150
\anchor, 160
\arg, 166
\attention, 150
\author, 150
\authors, 150
\b, 167
\brief, 150
\bug, 151
\c, 167
\callergraph, 137
\callgraph, 137
\category, 138
\cite, 160
\class, 138
\code, 167
\cond, 151
\copybrief, 168
\copydetails, 168
\copydoc, 168
\copyright, 152
\date, 152
\def, 138
\defgroup, 139
\deprecated, 152
\details, 152
\diafile, 170
\dir, 139
\docbookonly, 168
\dontinclude, 163
\dot, 169
\dotfile, 170
\e, 170
\else, 152
\elseif, 152
\em, 171
\endcode, 171
\endcond, 153
\enddocbookonly, 171
\enddot, 171
\endhtmlonly, 172
\endif, 153
\endinternal, 140
\endlatexonly, 172
\endlink, 160
\endmanonly, 172
\endmsc, 171
\endparblock, 156
\endrtfonly, 172
\endsecreflist, 161
\endverbatim, 172
\endxmlonly, 172
\enum, 139
\example, 139
\exception, 153
\extends, 140
\f$, 173
\f[, 173
\f{, 173
\f}, 173
\f], 173
\file, 140
\fn, 141
\headerfile, 142
\hideinitializer, 142
\htmlinclude, 166
\htmlonly, 173
\idlexcept, 142
\if, 153
\ifnot, 154
\image, 174
\implements, 142
\include, 164
\includelineno, 164
\ingroup, 143
\interface, 143
\internal, 143
\invariant, 154
\latexinclude, 166
\latexonly, 174
\li, 175
\line, 164
210
\link, 160
\mainpage, 143
\manonly, 175
\memberof, 144
\msc, 169
\mscfile, 170
\n, 175
\name, 144
\namespace, 144
\nosubgrouping, 144
\note, 154
\overload, 144
\p, 175
\package, 145
\page, 145
\par, 155
\paragraph, 163
\param, 155
\parblock, 156
\post, 156
\pre, 156
\private, 146
\privatesection, 146
\property, 146
\protected, 146
\protectedsection, 147
\protocol, 147
\public, 147
\publicsection, 147
\pure, 147
\ref, 160
\refitem, 161
\related, 148
\relatedalso, 148
\relates, 148
\relatesalso, 148
\remark, 157
\remarks, 157
\result, 157
\return, 157
\returns, 157
\retval, 157
\rtfonly, 176
\sa, 157
\secreflist, 161
\section, 162
\see, 158
\short, 158
\showinitializer, 148
\since, 158
\skip, 164
\skipline, 165
\snippet, 165
\static, 149
\struct, 149
\subpage, 161
\subsection, 162
\subsubsection, 162
INDEX
\tableofcontents, 162
\test, 158
\throw, 158
\throws, 158
\todo, 158
\tparam, 156
\typedef, 149
\union, 149
\until, 165
\var, 149
\verbatim, 176
\verbinclude, 166
\version, 158
\vhdlflow, 149
\warning, 159
\xmlonly, 176
\xrefitem, 159
ABBREVIATE_BRIEF, 104
acknowledgments, 5
ALIASES, 105
ALLEXTERNALS, 129
ALLOW_UNICODE_NAMES, 104
ALPHABETICAL_INDEX, 115
ALWAYS_DETAILED_SEC, 104
AUTOLINK_SUPPORT, 106
BINARY_TOC, 119
bison, 7
BRIEF_MEMBER_DESC, 104
browser, 15
BUILTIN_STL_SUPPORT, 106
CALL_GRAPH, 131
CALLER_GRAPH, 131
CASE_SENSE_NAMES, 109
CHM_FILE, 119
CHM_INDEX_ENCODING, 119
CITE_BIB_FILES, 111
CLANG_ASSISTED_PARSING, 114
CLANG_OPTIONS, 114
CLASS_DIAGRAMS, 129
CLASS_GRAPH, 130
COLLABORATION_GRAPH, 130
COLS_IN_ALPHA_INDEX, 115
COMPACT_LATEX, 123
COMPACT_RTF, 125
CPP_CLI_SUPPORT, 106
CREATE_SUBDIRS, 104
DIA_PATH, 129
DIAFILE_DIRS, 132
DIRECTORY_GRAPH, 131
DISABLE_INDEX, 120
DISTRIBUTE_GROUP_DOC, 107
Doc++, 5
docbook, 16
DOCBOOK_OUTPUT, 127
DOCSET_BUNDLE_ID, 118
Generated by Doxygen
INDEX
DOCSET_FEEDNAME, 118
DOCSET_PUBLISHER_ID, 118
DOCSET_PUBLISHER_NAME, 119
DOT_CLEANUP, 132
DOT_FONTNAME, 130
DOT_FONTPATH, 130
DOT_FONTSIZE, 130
DOT_GRAPH_MAX_NODES, 132
DOT_IMAGE_FORMAT, 131
DOT_MULTI_TARGETS, 132
DOT_NUM_THREADS, 129
DOT_PATH, 131
DOT_TRANSPARENT, 132
DOTFILE_DIRS, 132
DOXYFILE_ENCODING, 103
ECLIPSE_DOC_ID, 120
ENABLE_PREPROCESSING, 127
ENABLED_SECTIONS, 110
ENUM_VALUES_PER_LINE, 121
EXAMPLE_PATH, 112
EXAMPLE_PATTERNS, 113
EXAMPLE_RECURSIVE, 113
EXCLUDE, 112
EXCLUDE_PATTERNS, 112
EXCLUDE_SYMBOLS, 112
EXCLUDE_SYMLINKS, 112
EXPAND_AS_DEFINED, 128
EXPAND_ONLY_PREDEF, 127
EXT_LINKS_IN_WINDOW, 121
EXTENSION_MAPPING, 106
EXTERNAL_GROUPS, 129
EXTERNAL_PAGES, 129
EXTERNAL_SEARCH, 122
EXTERNAL_SEARCH_ID, 123
EXTRA_PACKAGES, 124
EXTRA_SEARCH_MAPPINGS, 123
EXTRACT_ALL, 107
EXTRACT_ANON_NSPACES, 108
EXTRACT_LOCAL_CLASSES, 108
EXTRACT_LOCAL_METHODS, 108
EXTRACT_PACKAGE, 108
EXTRACT_PRIVATE, 108
EXTRACT_STATIC, 108
features, 91
FILE_PATTERNS, 112
FILE_VERSION_FILTER, 110
FILTER_PATTERNS, 113
FILTER_SOURCE_FILES, 113
FILTER_SOURCE_PATTERNS, 113
flex, 7
FORCE_LOCAL_INCLUDES, 109
FORMULA_FONTSIZE, 121
FORMULA_TRANSPARENT, 121
FULL_PATH_NAMES, 104
GENERATE_AUTOGEN_DEF, 127
GENERATE_BUGLIST, 110
Generated by Doxygen
211
GENERATE_CHI, 119
GENERATE_DEPRECATEDLIST, 110
GENERATE_DOCBOOK, 126
GENERATE_DOCSET, 118
GENERATE_ECLIPSEHELP, 120
GENERATE_HTML, 115
GENERATE_HTMLHELP, 119
GENERATE_LATEX, 123
GENERATE_LEGEND, 132
GENERATE_MAN, 126
GENERATE_PERLMOD, 127
GENERATE_QHP, 119
GENERATE_RTF, 125
GENERATE_TAGFILE, 129
GENERATE_TESTLIST, 110
GENERATE_TODOLIST, 110
GENERATE_TREEVIEW, 120
GENERATE_XML, 126
GPL, 4
GRAPHICAL_HIERARCHY, 131
GROUP_GRAPHS, 130
HAVE_DOT, 129
HHC_LOCATION, 119
HIDE_FRIEND_COMPOUNDS, 108
HIDE_IN_BODY_DOCS, 108
HIDE_SCOPE_NAMES, 109
HIDE_UNDOC_CLASSES, 108
HIDE_UNDOC_MEMBERS, 108
HIDE_UNDOC_RELATIONS, 129
HTML_COLORSTYLE_GAMMA, 118
HTML_COLORSTYLE_HUE, 117
HTML_COLORSTYLE_SAT, 117
HTML_DYNAMIC_SECTIONS, 118
HTML_EXTRA_FILES, 117
HTML_EXTRA_STYLESHEET, 117
HTML_FILE_EXTENSION, 115
HTML_FOOTER, 116
HTML_HEADER, 115
HTML_INDEX_NUM_ENTRIES, 118
HTML_OUTPUT, 115
HTML_STYLESHEET, 116
HTML_TIMESTAMP, 118
IDL_PROPERTY_SUPPORT, 107
IGNORE_PREFIX, 115
IMAGE_PATH, 113
INCLUDE_FILE_PATTERNS, 128
INCLUDE_GRAPH, 130
INCLUDE_PATH, 128
INCLUDED_BY_GRAPH, 131
INHERIT_DOCS, 105
INLINE_GROUPED_CLASSES, 107
INLINE_INFO, 109
INLINE_INHERITED_MEMB, 104
INLINE_SIMPLE_STRUCTS, 107
INLINE_SOURCES, 113
INPUT, 112
INPUT_ENCODING, 112
212
INDEX
INPUT_FILTER, 113
installation, 7
INTERACTIVE_SVG, 131
INTERNAL_DOCS, 108
PROJECT_BRIEF, 103
PROJECT_LOGO, 103
PROJECT_NAME, 103
PROJECT_NUMBER, 103
JAVADOC_AUTOBRIEF, 105
QCH_FILE, 119
QHG_LOCATION, 120
QHP_CUST_FILTER_ATTRS, 120
QHP_CUST_FILTER_NAME, 120
QHP_NAMESPACE, 120
QHP_SECT_FILTER_ATTRS, 120
QHP_VIRTUAL_FOLDER, 120
Qt, 7
QT_AUTOBRIEF, 105
QUIET, 111
LaTeX, 16
LATEX_BATCHMODE, 124
LATEX_BIB_STYLE, 125
LATEX_CMD_NAME, 123
LATEX_EXTRA_FILES, 124
LATEX_FOOTER, 124
LATEX_HEADER, 124
LATEX_HIDE_INDICES, 125
LATEX_OUTPUT, 123
LATEX_SOURCE_CODE, 125
LAYOUT_FILE, 111
libiconv, 7
license, 4
LOOKUP_CACHE_SIZE, 107
MACRO_EXPANSION, 127
make, 7
MAKEINDEX_CMD_NAME, 123
man, 16
MAN_EXTENSION, 126
MAN_LINKS, 126
MAN_OUTPUT, 126
MAN_SUBDIR, 126
MARKDOWN_SUPPORT, 106
MATHJAX_CODEFILE, 122
MATHJAX_EXTENSIONS, 122
MATHJAX_FORMAT, 121
MATHJAX_RELPATH, 121
MAX_DOT_GRAPH_DEPTH, 132
MAX_INITIALIZER_LINES, 110
MSCFILE_DIRS, 132
MSCGEN_PATH, 129
MULTILINE_CPP_IS_BRIEF, 105
OPTIMIZE_FOR_FORTRAN, 106
OPTIMIZE_OUTPUT_FOR_C, 106
OPTIMIZE_OUTPUT_JAVA, 106
OPTIMIZE_OUTPUT_VHDL, 106
output formats, 63
OUTPUT_DIRECTORY, 104
OUTPUT_LANGUAGE, 104
PAPER_TYPE, 124
parsing, 17
PDF_HYPERLINKS, 124
perl, 7
PERL_PATH, 129
perlmod, 199
PERLMOD_LATEX, 127
PERLMOD_MAKEVAR_PREFIX, 127
PERLMOD_PRETTY, 127
PREDEFINED, 128
RECURSIVE, 112
REFERENCED_BY_RELATION, 114
REFERENCES_LINK_SOURCE, 114
REFERENCES_RELATION, 114
REPEAT_BRIEF, 104
RTF, 16
RTF_EXTENSIONS_FILE, 125
RTF_HYPERLINKS, 125
RTF_OUTPUT, 125
RTF_STYLESHEET_FILE, 125
SEARCH_INCLUDES, 128
SEARCHDATA_FILE, 123
SEARCHENGINE, 122
SEARCHENGINE_URL, 123
SEPARATE_MEMBER_PAGES, 105
SERVER_BASED_SEARCH, 122
SHORT_NAMES, 105
SHOW_FILES, 110
SHOW_GROUPED_MEMB_INC, 109
SHOW_INCLUDE_FILES, 109
SHOW_NAMESPACES, 110
SHOW_USED_FILES, 110
SIP_SUPPORT, 107
SKIP_FUNCTION_MACROS, 128
SORT_BRIEF_DOCS, 109
SORT_BY_SCOPE_NAME, 109
SORT_GROUP_NAMES, 109
SORT_MEMBER_DOCS, 109
SORT_MEMBERS_CTORS_1ST, 109
SOURCE_BROWSER, 113
SOURCE_TOOLTIPS, 114
STRICT_PROTO_MATCHING, 110
strip, 7
STRIP_CODE_COMMENTS, 113
STRIP_FROM_INC_PATH, 105
STRIP_FROM_PATH, 105
SUBGROUPING, 107
TAB_SIZE, 105
TAGFILES, 128
TCL_SUBST, 106
TEMPLATE_RELATIONS, 130
Generated by Doxygen
INDEX
TOC_EXPAND, 119
TREEVIEW_WIDTH, 121
TYPEDEF_HIDES_STRUCT, 107
UML_LIMIT_NUM_FIELDS, 130
UML_LOOK, 130
USE_HTAGS, 114
USE_MATHJAX, 121
USE_MDFILE_AS_MAINPAGE, 113
USE_PDFLATEX, 124
VERBATIM_HEADERS, 114
WARN_FORMAT, 112
WARN_IF_DOC_ERROR, 111
WARN_IF_UNDOCUMENTED, 111
WARN_LOGFILE, 112
WARN_NO_PARAMDOC, 111
WARNINGS, 111
XML, 16
XML_OUTPUT, 126
XML_PROGRAMLISTING, 126
Generated by Doxygen
213
© Copyright 2026 Paperzz