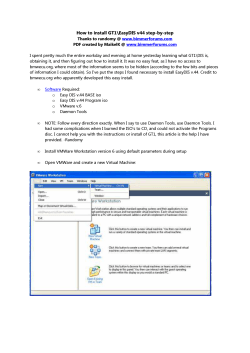
OpusFSI
Flight Simulator Interface for FSX & Prepar3D
Getting Started - Single PC
November 11, 2014
Opus Software Limited
Email: [email protected] Website: www.opussoftware.co.uk/opusfsi.htm
Contents
System Requirements........................................................................................................................................ 2
Simulator Recommendations ............................................................................................................................ 2
Software Installation ......................................................................................................................................... 2
Installing the Demo version of OpusFSI......................................................................................................... 3
Purchasing OpusFSI ....................................................................................................................................... 3
Upgrading OpusFSX to OpusFSI ..................................................................................................................... 3
Upgrading OpusFSI ........................................................................................................................................ 4
Installing the Beta version of OpusFSI ........................................................................................................... 4
Create Desktop Shortcuts .................................................................................................................................. 4
Automatically Selecting the Simulator Type ................................................................................................. 5
Specifying the View Mode ............................................................................................................................. 5
Sharing and Security .......................................................................................................................................... 5
Installation Log File ............................................................................................................................................ 7
Error Messages ................................................................................................................................................. 8
Initial Set Up and Configuration ........................................................................................................................ 8
Weather ....................................................................................................................................................... 10
Cameras ....................................................................................................................................................... 11
Spy ............................................................................................................................................................... 11
General Operation ........................................................................................................................................... 12
Starting the OpusFSI Software Automatically with FSX and P3D .................................................................... 12
Turn off User Account Control (UAC) ......................................................................................................... 13
Running the software automatically via FSUIPC4 ....................................................................................... 14
FSX Computer System Settings ........................................................................................................................ 14
Recommended Settings and Practice for Dynamic Live Weather ................................................................... 19
Ensuring AI Traffic uses the Correct Runway .................................................................................................. 20
FSUIPC4 Settings .............................................................................................................................................. 20
TrackIR Settings ............................................................................................................................................... 21
Using FS2Crew with OpusFSI ........................................................................................................................... 24
Uninstalling OpusFSI ........................................................................................................................................ 24
FAQ and Troubleshooting ................................................................................................................................ 25
System Requirements
п‚·
п‚·
п‚·
п‚·
п‚·
Microsoft Simulator X with SP2 or Acceleration Pack.
Windows 8/7/XP/Vista (32 or 64-bit version) operating systems.
Microsoft .NET Framework Version 2.
FSUIPC4 (see note below).
90 MB hard disk space.
You need FSX/P3D, Microsoft .NET version 2 and SimConnect to be installed on your server (and
optional client) systems for OpusFSI to work.
Microsoft.NET
You can check what versions of .NET you have installed by checking your
c:\Windows\Microsoft.NET\Framework or Framework64 folders. You should see a v2.0.xxxxx
folder in addition to the v4.0.xxxxx folder.
FSUIPC4
FSUIPC4 is not required on the FSISERVER system unless you intend to run FSX at increased
simulation rates or enable the CPFlight MCP737/EFIS device driver. FSUIPC4 is required on Live
View clients that are used to display camera views.
You can download a free copy from http://www.schiratti.com/dowson.html
SimConnect
In the case of SimConnect, first make sure you have installed FSX or P3D along with its SP2 or
installed the FSX Acceleration version, SimConnect is usually installed automatically with it. If you
have mislaid or corrupted your SimConnect then you can try re-installing it using the
SimConnect.msi file within your OpusFSI folder.
Simulator Recommendations
Ideally your simulator should be installed on a dedicated SSD or HDD, at the very least try and
install your simulator on a different drive to your Addons, this will ensure the simulator runs more
smoothly. Avoid installing the simulator in Program Files since this causes permission problems.
Software Installation
Ensure Microsoft .NET version 2, SimConnect and FSUIPC4 (if required) are installed on your PC.
-2-
Installing the Demo version of OpusFSI
1. Click on the OpusFSI Demo or Upgrade button on our downloads webpage and download (save)
the OpusFSI.msi file.
2. Double click on the downloaded OpusFSI.msi file and follow the instructions to install the
software into the standard OpusFSI directory. You may install the software onto any drive
provided its folder name is OpusFSI with the exception that you must not install OpusFSI in the
Opus Software, FSX, Prepar3D or Program Files folders, and don't install in more than one folder
on your PC.
Purchasing OpusFSI
1. Click on the Purchase OpusFSI button on our downloads webpage and download (save) the
OpusFSI_Flight1_Purchase.exe file. You may get some warning messages from your virus checker
at this point which is quite normal for this file type and as a result the installation window may be
hidden behind your browser window.
2. If you have previously installed the Demo then uninstall it via Control Panel, Uninstall a
program. Do not delete your OpusFSI folder containing your camera and system configuration
files.
3. Run the OpusFSI_Flight1_Purchase.exe file.
4. You will now find the OpusFSI.msi installation file in your 'unwrapped' C:\Opus Software folder.
N.B. You need to keep your Flight1 key and licence files on drive C in the C:\Opus Software folder
but can move the msi file to another drive.
Double click on the OpusFSI.msi file and follow the instructions to install the software into the
OpusFSI directory. You may install the software onto any drive provided its folder name is OpusFSI
with the exception that you must not install OpusFSI in the Opus Software, FSX or Program Files
folders, and don't install in more than one folder on your PC.
Upgrading OpusFSX to OpusFSI
1. Click on the Upgrade OpusFSX to OpusFSI button on our downloads webpage and download
(save) the OpusFSI_Upgrade_Purchase.exe file. You may get some warning messages from your
virus checker at this point which is quite normal for this file type and as a result the installation
window may be hidden behind your browser window.
2. If you have previously installed the OpusFSI Demo then uninstall it via Control Panel, Uninstall a
program. Do not delete your OpusFSX or OpusFSI folder containing your camera and system
configuration files.
-3-
3. Run the OpusFSI_Upgrade_Purchase.exe file.
4. You will now find the OpusFSI.msi installation file in your 'unwrapped' C:\Opus Software folder.
N.B. You need to keep your Flight1 key and licence files on drive C in the C:\Opus Software folder
but can move the msi file to another drive.
Double click on the OpusFSI.msi file and follow the instructions to install the software into the
OpusFSI directory. You may install the software onto any drive provided its folder name is OpusFSI
with the exception that you must not install OpusFSI in the Opus Software, FSX or Program Files
folders, and don't install in more than one folder on your PC.
Upgrading OpusFSI
1. Click on the OpusFSI Demo or Upgrade link on our downloads webpage and download (save)
the OpusFSI.msi file.
2. Uninstall the existing version prior to upgrading via Control Panel, Uninstall a Program. Do not
delete your OpusFSI folder. Double click on the OpusFSI.msi file and follow the instructions to
install the software. All your original configuration (DAT and CMD) and camera definition (CAM,
LIM and CDF) files will remain intact (in the OpusFSI folder) but it is a good idea to take a backup of
your camera files anyway in case they get corrupted (this may happen when you revert to a
previous version with a different CAM format).
Installing the Beta version of OpusFSI
1. Click on the OpusFSI Beta link on our downloads webpage and download (save) the
OpusFSI.msi file.
2. Double click on the downloaded OpusFSI.msi file and follow the instructions to install the
software into the standard OpusFSI directory. You may install the software onto any drive
provided its folder name is OpusFSI with the exception that you must not install OpusFSI in the
Opus Software, FSX, Prepar3D or Program Files folders, and don't install in more than one folder
on your PC.
Create Desktop Shortcuts
After installing the software we recommend you create a shortcut on your desktop for the server
program. This shortcut will allow you to manually start your FSX/P3D system without too much
fuss.
1. In Windows Explorer, navigate to your installation folder (OpusFSI) and right-click on the
FSISERVER.EXE program.
2. Select the Send to - Desktop (create shortcut) option.
-4-
3. Right-click on the new desktop icon, select Properties, rename to OpusFSI SERVER and check
the program is configured to Start In: your installation folder (OpusFSI). Select the compatibility
tab (if available) and "Run as Administrator".
You will find alternative program icons in the OpusFSI installation folder should you wish to change
the existing icon.
Automatically Selecting the Simulator Type
The FSISERVER program will accept an optional FSX or P3D argument to automatically select the
simulator type when it runs. So if you have both FSX and P3D you can create two desktop
shortcuts, one running 'c:\OpusFSI\FSISERVER.EXE FSX' for Microsoft FSX, the other running
'c:\OpusFSI\FSISERVER.EXE P3D' for Lockheed Martin Prepar3D.
Specifying the View Mode
FSISERVER program arguments allow you to specify the number of available view modes in the
simulator (default 5). Running the program with a VM3, VM4, or a VM6 argument (e.g. FSISERVER
VM4) will set the number of available view modes available within the simulator to 3, 4, or 6
respectively. The default number is 5. The number of available view modes can be determined
simply by pressing the 'S' key and counting the total number of view modes that can be cycled.
The normal sequence in the simulator is,
VC - Spot - Tower - Aircraft - External
Giving a total of five (5) different view modes. If you for example have the Tower view disabled,
the VM4 argument can be used to reduce the available view modes and allow the correct
selection of the external aircraft cameras.
Sharing and Security
Firewall
You may need to allow OpusFSI through your firewall. In Control Panel select System and Security,
Windows Firewall, Allow a Program or feature through Windows Firewall. Click on Allow
another program and browse to FSISERVER (or FSICLIENT on a client PC) in the OpusFSI installation
folder.
Sharing
You may need to set sharing and security permissions on both your OpusFSI and your FSX (or
Prepar3D) folder in order for OpusFSI to write the necessary weather files into the
FSX\Weather\themes (or Prepar3D\Weather\themes) folder. This is usually necessary if you have
installed the simulator in the Program Files folder, for this reason it is advisable to install FSX in a
folder outside Program Files. If this does not work then set sharing and security permissions on
your whole drive. Be aware that if you set permissions and sharing on the whole drive then you
may have different permissions and sharing on subfolders so make sure you check the OpusFSI
and FSX\Weather\themes folders.
-5-
Absolute worst case, just install FSX or Prepar3D in its own folder (e.g. d:\Prepar3D), moving
outside the secured Program Files folder. If OpusFSI still doesn't work correctly after setting
sharing and security permissions a re-install may be necessary.
To set up Sharing on a folder/drive run Windows Explorer, right click on the folder/drive you wish
to share, select Properties, select the Sharing tab, select Advanced Sharing, tick the checkbox to
share the drive and enter a share name, make sure you use the single letter code, e.g. C, not
'Drive C' for instance. Click on Permissions, enter Everyone in the Group or user names box and
tick the checkboxes to allow Full Control for Everyone.
Security
To set up Security Permissions run Windows Explorer, right click on the folder/drive you wish to set
Security settings for, select Properties, select the Security tab, select Everyone in the Group or
user names box and ensure the Permissions are Full Control, if not click on the Edit button and
tick the Permissions checkboxes to allow Full Control for Everyone. If Everyone does not exist click
Advanced, click Change Permissions, click Add, type in the name Everyone and click OK. Then
specify Full Control for your newly created Everyone group. Click OK.
-6-
Also select Authenticated Users in the Group or user names box and tick the checkboxes to allow
Full Control.
Installation Log File
The FSISERVER program will create an FSISERVER.log file in the OpusFSI installation folder.
The log file is used to log the installation details along with any installation errors that are
detected when the program is activated. Refer to this file and send it to Opus Software if there are
any problems encountered when running the software.
Example content of the \OpusFSI\FSISERVER.log file ...
OpusFSI Flight Simulator Interface
Log Generated 24 May 2014, 11:07 Hrs
Installed Folder: C:\OpusFSI
No Errors Detected.
Installed Files:
OPUSFSI.DLL
Version: 4.0.0.7 , 24
FSISYSTEM.DLL Version: 4.0.0.7 , 24
FSISERVER.EXE Version: 4.0.0.7 , 24
FSDECODER.EXE Version: 4.0.0.7 , 24
May
May
May
May
2014,
2014,
2014,
2014,
-7-
07:30
07:30
07:30
07:31
Hrs
Hrs
Hrs
Hrs
Error Messages
OpusFSI tries to copy the OpusWeather.WT weather file into the FSX\Weather\themes (or
Prepar3D\Weather\themes) folder and will display this error message if it cannot do this.
If you see the above error message then it is essential that you check your installation folder is
specified correctly in the Configuration dialog. Try reconfiguring the sim location again. If the
dialog to enter the sim location does not appear then check it is not hidden behind another
window and also ensure OpusFSI is set to Run as Administrator.
Also check your sharing and permissions, it is important to set permissions as well as sharing as
described in the section above.
Initial Set Up and Configuration
Run the FSISERVER program on your FSX/Prepar3D system.
The FSISERVER program MUST be started in its local installation folder, in other words it MUST be
started in OpusFSI.
N.B. Do not run the FSICLIENT program on your server PC since it will cause FSX to freeze, it is only
used on networked client PCs.
You do not need to run the flight simulator at this time since we are just going to configure the
system.
Click on the Configure button to display the Opus FSX Server - Configuration dialog.
-8-
Figure 1 - FSI Server's Main Form
Figure 2 - FSI Server's Configuration Dialog
The number of (Live View) client computers should be configured to zero.
-9-
Live Traffic has not been implemented yet.
Enable Live Weather Engine if required.
Enable Live Camera unless you want to control the views manually using Live Camera Control and
use General DHM Options.
If you enable TrackIR please refer to the TrackIR section of this document for important initial set
up and configuration details.
Enable the CPFlight driver if you have a CPFlight MCP737/EFIS panel and specify a COM port.
The Live View Scan Rate (0 to 60ms) adjustment is for networked systems and controls the
position update rate communicated to the server enabling you to match the preferred rate found
using the Live View Test.
Click on the appropriate radio button to select a flight simulator type, and click on the Browse
button and locate your simulator installation folder. N.B. Any time you change this folder location
you must restart the FSISERVER program. If you fail to do this correctly you will be unable to select
and activate any dynamic weather or weather themes.
Close OpusFSI.
Run FSX/P3D.
Run OpusFSI.
Weather
Click the Weather button on the main server's form and select either,
п‚· Dynamic Live Weather - enable Adjust Options Automatically and set your Destination
and Max Cruise Altitude if known, no need to set anything else unless you wish to tweak
the settings.
п‚· METAR File Import - if you wish to import METAR data from a text file then tick the Import
METAR Data From File checkbox and browse to the required file you have created.
п‚· Static Weather Themes - choose your required theme from the list or load one you saved
yourself previously (using the Save Current Weather as Static Theme button) by selecting
'User Specified ...' and clicking on Browse. Static Weather Themes will be greyed out if the
Live Weather is enabled in the Server Configuration dialog.
- 10 -
Figure 3 - FSI Server's Weather Options Dialog
Click OK, and you are ready to fly.
For further details please refer to the OpusFSI_Live_Weather pdf guide which can be found in the
OpusFSI installation folder, also available from our download page.
Cameras
Please refer to the OpusFSI_Live_Camera pdf guide which can be found in the OpusFSI installation
folder, also available from our download page.
Spy
If you run the simulator in windowed mode you can click on the OpusFSI server program's Spy
button and monitor its progress. If you have enabled Dynamic Weather then you should witness
the server programming initiating the live weather METAR download culminating in creating and
updating the Dynamic Weather. The Spy window is automatically cleared after ten minutes.
- 11 -
General Operation
If you are using TrackIR then run TrackIR and FSX before running OpusFSI.
If you are not using TrackIR then the FSISERVER program should be run after FSX/Prepar3D, or you
may configure your system to run the server program automatically each time you start
FSX/Prepar3D.
When the FSISERVER program is activated it will resume its previous minimized or visible state,
and will be displayed in its last known location on the screen. The FSISERVER program will
automatically abort when FSX is shutdown.
To ensure optimum performance, the settings within FSX/Prepar3D on your FSX system should be
configured in accordance with the instructions in FSX Computer System Settings section at the end
of this guide.
Starting the OpusFSI Software Automatically with FSX and P3D
The FSISERVER program can be started automatically each time FSX/P3D is run, simply by editing
the content of the standard FSX exe.xml file.
The FSX exe.xml file can be found within the
c:\Users\username\AppData\Roaming\Microsoft\FSX\ directory where 'username' identifies
your login account name, or for XP in
c:\Documents and Settings\Application Data\Microsoft\FSX\
- 12 -
The P3D exe.xml file can be found within the c:\Users\username\AppData\Roaming\Lockheed
Martin\ Prepar3D\ directory where 'username' identifies your login account name.
If the file doesn't exist then you can create it using Notepad, just remember the xml file extension
when saving the file.
Edit the xml file using Notepad. Paste the contents of the OpusFSI _ExeXml_Server.txt file at the
end of the xml content. You should paste the content in just before the closing
</SimBase.Document> statement.
For example, after editing the content of the xml file, the content should look something like this,
<?xml version='1.0' encoding='Windows-1252'?>
<SimBase.Document Type='Launch' version='1,0'>
<Descr>Launch</Descr>
<Filename>exe.xml</Filename>
<Disabled>False</Disabled>
<Launch.ManualLoad>False</Launch.ManualLoad>
<Launch.Addon>
<Name>OpusFSI Flight Simulator Server for FSX</Name>
<Disabled>false</Disabled>
<Path>c:\OpusFSI\FSISERVER.EXE</Path>
</Launch.Addon>
</SimBase.Document>
Of course you may already have several Addons listed in the xml file. In which case you will find
each Addon specified within a separate <Launch.Addon> .. </Launch.Addon> block.
You will need to edit the c:\OpusFSI\FSISERVER.EXE entry and specify the correct drive location if
you have installed it anywhere other than the standard C drive.
When you next run FSX if you are prompted to trust OpusFSI then confirm Yes.
Turn off User Account Control (UAC)
User Account Control (UAC) can prevent OpusFSI from running automatically with FSX and P3D on
Windows 7/8 systems. If this happens turn off UAC as follows,
1. Open User Accounts by clicking the Start button , clicking Control Panel, clicking User
Accounts and Family Safety (or clicking User Accounts, if you are connected to a network
domain), and then clicking User Accounts.
2. Click Change User Account Control settings (or Turn User Account Control on or off ). If you
are prompted for an administrator password or confirmation, type the password or provide
confirmation.
3. Move the slider bar to Never notify (or clear the Use User Account Control (UAC) to help
protect your computer check box) to turn off UAC, and then click OK.
- 13 -
Running the software automatically via FSUIPC4
FSUIPC4.ini can be found in the FSX or P3D Modules folder.
You can add the following lines in FSUIPC4.INI (registered version) to run OpusFSX automatically,
[Programs]
Run1=READY,CLOSE,C:\OpusFSX\FSXServer.exe FSX
Specify the location of your FSXServer.exe file.
Run1 is a logical number/line sequence (in case you have/want more instructions).
The suffix FSX can be changed to P3D in the corresponding Prepar3D FSUIPC4.ini.
FSX Computer System Settings
fsx.cfg File Settings
You must edit your fsx.cfg file, this file can be found in,
c:\Users\<your account name>\AppData\Roaming\Microsoft\FSX
If you can't see the AppData folder within Windows Explorer then you will need to change the
View settings as follows,
Organize - Folder and Search Options - View - Enable the 'Show hidden files, folders, and drives'
option.
On all FSX systems we recommend you specify the following fields within in the fsx.cfg file,
[GRAPHICS]
HIGHMEMFIX=1
[DISPLAY]
WideViewAspect=True
These settings will allow FSX to make better use of the 64-bit memory environment with >2GB
memory, and also support modern day wide aspect screens for addons such as PMDG 737NGX.
We also recommend you optimize all of your fsx.cfg files using,
http://www.simforums.com/forums/setting-up-fsx-and-how-to-tune-it_topic29041.html
FSX Settings
FSX menu option - Options, Settings, Weather, set to Custom (set slider bar to left).
Click on the Customize button. Select the Weather tab.
- 14 -
We recommend you set the Cloud draw distance to between 80mi/128km and 100mi/160km. If
you generally fly at a higher altitudes then the higher setting is preferable but if you fly at lower
altitudes then the lower setting is preferable.
Untick Download winds aloft data with real-world weather.
Tick Disable turbulence and thermal effects on the aircraft unless you wish to see wing flex and
ASI movement in turbulence. To see wing flex you must also select FSX turbulence and advanced
animations which is set via the Graphics tab. For turbulence on the aircraft itself select both the
Bump Aircraft and Turbulence effects options (Turbulent Motion and/or Turbulent Bump) within
DHM.
Set the Rate at which weather changes over time to No change (set slider bar to left).
FSX menu option - Options, Settings, Display, Graphics
- 15 -
Set the Target frame rate on the server PC to Unlimited. A word of caution, if you set your target
frame rate too high then you may experience problems with the snow and rain effects. That is, you
may see some snow and rain falling vertically whilst moving. This is an FSX problem and the only
solution we've found so far is to restrict the machine's frame rate. If this is a problem then a
setting of 20fps to 60fps should result in a smooth operation. On slower systems, or systems with
slow hard disk drives, you may also notice the occasional screen flicker. Once again lowering the
target frame rate should help.
To see wing flex you must select Advanced Animations and FSX turbulence (Weather tab).
- 16 -
FSX menu option - Options, Settings, click on the Realism button.
Disable Aircraft stress causes damage.
- 17 -
FSX Free Flight, Weather
Set your FSX Current Weather to any weather theme, just don't enable the real world weather
options unless you are using AI aircraft.
If you are using AI aircraft then select RW Weather in the FSX Weather settings, update the FSX
weather and ensure at least the correct wind has been injected. This requires that your point of
departure is a met station and has a valid METAR in the Jeppesen database. This procedure will set
the wind BEFORE the flight is even loaded. Now you can take your time, process your flight plan,
specify your intended destination and cruise altitude and finally instruct Opus to generate and
load the weather. The Opus LWE will automatically put the sim back into custom weather mode.
Using this simple procedure will always ensure your AI traffic start out using the correct runway.
FSX Fixes
To stop FSX crashing on menu access, download this version of uiautomationcore.dll;
http://gex.flight1.net/UIAutomationCore.zip
Unzip it and copy Uiautomationcore.dll into the main FSX installation folder.
To stop clouds being turned off and back on apply this fix;
http://www.simforums.com/forums/how-to-get-rid-of-annoying-flashing-clouds_topic24830.html
- 18 -
Virus Scanners
We recommend turning off all virus scanners whilst running FSX since they can have a serious
effect on performance.
Recommended Settings and Practice for Dynamic Live Weather
п‚·
п‚·
п‚·
п‚·
п‚·
п‚·
Upgrade to the latest Version.
Set all Defaults in all weather dialogs. *
Specify your Destination.
Specify your Max Cruise Altitude. **
Update the Weather. ***
Check the Weather ****
* This should enable the Adjust Options Automatically and the Adjust Sim Friendly options in the
Weather dialog.
** If you specify a Max Cruise Altitude of 6000 feet or more the LWE will download and process
the GRIB forecast data from NOAA.
*** If GRIB data is downloaded then the Opus Upper Atmosphere Report will be automatically
displayed showing the progress of your GRIB data download and processing. If you have specified
Background GRIB Processing in the Downloads dialog then the GRIB data extraction and lengthy
decoding will proceed at a slower pace and can take several minutes. Otherwise the processing
will be done as fast as possible at the expense of FSX performance or frame rates. The GRIB data is
only downloaded once before flight and the decoded data will be valid all day or at least for nine
hours so this is normally not a concern or problem. However, most users need GRIB data for flight
planning and preparation.
**** Before flight you should get into the habit of checking the weather. At the very least display
and check the Opus Local, Lower, Upper, and Destination Weather reports. You may also like to
examine the various Opus text reports accessed via the FSX Add-on menu. There are separate
reports showing the downloaded METARs, all the GRIB wind and temperature targets from 4000
feet up to FL540, all the en route weather for any specified flight plan including TAFs if you have
enabled them, and finally an easy reference to all relevant SIDs and STARs. This report gives a
handy direction and bearing for each listed SID and STAR.
The Opus weather reports (e.g. the Destination Weather) should be checked during climb and
descent to monitor all wind and temperature targets, compared with the actual FSX ambient
conditions. This way you will know that your sim is operating as expected.
Never disable weather updates, FSX will NOT cope on its own it simply cannot contain all the
necessary data.
- 19 -
Text Weather Reports, located in the OpusFSI\Themes folder and accessed via the FSX Add-on
menu ...
OpusWeather.txt ... The downloaded METARs
OpusWeatherReport.txt ... The GRIB data report
OpusFlightReport.txt ... The flight plan en route weather report
OpusSIDSTARReport.txt ... The relevant SIDs and STARs
Live Weather Assistant (LWA) and Weather Map data ...
Surface QNH
Surface Winds
Surface Temperatures
Surface Visibility
Cruise Level Winds
Cruise Level Temperatures
Precipitation
Lower Level Cloud Cover
Met Station Cover
The LWA and up to six weather maps can be displayed on the server or a networked client.
Ensuring AI Traffic uses the Correct Runway
To ensure your AI traffic uses the correct runway you can do one of two things,
1. Check the current wind and specify that wind manually within FSX before loading the flight. It
doesn't matter about any other weather parameters since Opus will update it, but it will allow you
to stipulate what the wind is going to be (matching the RW) BEFORE the flight is loaded.
2. Simply select RW Weather in the FSX Weather settings, update the FSX weather and ensure at
least the correct wind has been injected. This requires that your point of departure is a met station
and has a valid METAR in the now almost defunct Jeppesen database. Again this will set the wind
BEFORE the flight is even loaded.
Now you can take your time, process your flight plan, specify your intended destination and cruise
altitude and finally instruct Opus to generate and load the weather. The Opus LWE will
automatically put the sim back into custom weather mode.
Using this simple procedure will always ensure your AI traffic start out using the correct runway.
FSUIPC4 Settings
FSUIPC4 is not required on the FSISERVER system unless you intend to enable the CPFlight
MCP737/EFIS device driver within the FSISERVER Configuration. FSUIPC4 is required on Live View
FSXCLIENTs that are connected to the simulator and used to display camera views.
- 20 -
You can download a free copy from http://www.schiratti.com/dowson.html
Turn everything off in FSUIPC4, we recommend disabling all settings. We do not use FSUIPC4 for
any weather or turbulence related effects.
If you choose not to install/activate FSUIPC4 then at the moment Opus will not be able to pause
the sim, it is normally paused when opening certain Opus dialogs. Hence you will have to pause
and unpause the sim manually.
To disable FSUIPC4 simply remove the associated <Launch.Addon>...</Launch.Addon> entries
within the simulator's dll.xml file.
<Launch.Addon>
<Name>FSUIPC 4</Name>
<Disabled>False</Disabled>
<Path>Modules\FSUIPC4.dll</Path>
</Launch.Addon>
TrackIR Settings
Before using the interface you MUST 'Check For Game Updates' within your TrackIR5 and ensure
OpusFSI is listed in Titles under the Advanced Settings tab, then restart TrackIR.
Prior to using the TrackIR5 device via OpusFSI you must ensure TrackIR5 does not directly connect
to the FSX/P3D simulator. To accomplish this you MUST rename the two SimConnect manifest files
within the TrackIR5 installation folder. The folder is usually located in either,
c:\Program Files\NaturalPoint\TrackIR5 (Win 7 32-bit)
or, c:\Program Files (x86)\NaturalPoint\TrackIR5 (Win 7 64-bit)
BEFORE using the Opus TrackIR interface the files you MUST rename are simconnect.manifest and
simconnectSP2.manifest. We recommend renaming these files to
simconnect_RENAMED.manifest and simconnectSP2_RENAMED.manifest
If you wish to revert back to using TrackIR without the OpusFSI interface then you will have to
change these files back to their original names.
Check your TIR manifest files after any TIR update, the TIR software can create new files after the
upgrade.
Do not copy SimConnect.dll to your root directory otherwise TrackIR will find it and connect
directly to FSX instead of OpusFSI.
Run TrackIR and FSX before running OpusFSI. Minimise the TrackIR program to prevent FPS loss.
- 21 -
Do not run any other program that controls the camera views, creates camera shake effects or
interfaces to TrackIR. Make sure no such program or subordinate task is running, do not allow any
other program to connect to TrackIR prior to OpusFSI.
TrackIR Tuning
TrackIR effects must be tuned using the TrackIR program. TrackIR can be used with the default
TrackClip, or it can be used with TrackClipPro. The latter has its own LED emitters and its setup is
very different from TrackClip, refer to the TrackClipPro and TrackClipPro sections below.
Make sure you have Video Processing Mode set to Precision or Standard with a Precision Mode
Smoothing of 100. It has been brought to our attention that on some systems TrackIR can become
very jerky if 'precision' is disabled, its default key assignment is F7 so it's possible to inadvertently
change its setting if you use F7 to increase flaps.
TrackClip
We would advise initially setting the Speed to 1 and the Smoothness to 50. You should experiment
on your system and set values your PC is happy with to avoid any jerky DHM movements. Use the
test options within the DHM dialog to see what the DHM should look like on your system, then try
taxiing up and down in windowed mode and adjust your TrackIR smoothness to give you the
optimum effect.
Make sure your Light Filter Threshold isn't set too high, try setting 70, and adjusting from there,
with a max setting of 12 for your IR Brightness. Light pollution and an incorrect Light Filter
Threshold setting are the number one main causes of flicker.
TrackClipPro
It has been reported that for TrackClipPro the Camera IR brightness should be zero and Light Filter
Threshold should be set to a high value. The easiest way to get the correct settings is to click the
TrackClipPro button in the TrackIR window and it will reset the Camera settings automatically.
Troubleshooting
TrackIR Flickering or Erratic Movement
Problems arise when the light threshold is wrong. If it is too low, extraneous lightsources in the
room will falsely trigger TIR into seeing that other lightsource as one of the TrackClipPro's beams.
This causes all kinds of false head-rotation issues, which show up as flickering.
The easiest way to solve the problem is to go into the TrackIR main view, right-click on the headgraph window, and choose Camera View, and then tweak the Light Threshold to a point where
there is NO red 'false light sources' visible anywhere during the full range of head movement. This
can even change during the course of a day (depending on the intensity of reflected light from
windows, eye glasses, items in the room etc.).
Your IR brightness levels should be zero. Try selecting the old Trackclip momentarily and then reselect TrackClipPro, and this should clear the IR settings back to zero (off). The TrackClipPro does
- 22 -
NOT require the camera to send out IR signals (which are normally reflected off the front of the
old Trackclip for the camera to pick up). Instead, the TrackClipPro generates its own light beams
directly (that's why it's connected by wire and powered) - but of course, the camera can still get
confused if there are large alternate light sources in the room competing with it.
Here is a handy little tip for fixing TrackIR jerkiness, http://airdailyx.blogspot.co.uk/2012/09/spf100track-ir-adx-tutorial.html
Make sure you don't have any monitoring programs (e.g. FSUIPC autosave) running since they can
cause TrackIR to become jerky.
Try enabling the Run TrackIR High Priority option in the Server Configuration dialog if TrackIR is
not operating smoothly. You may need to try different versions of the TrackIR drivers to get it
working smoothly on your system.
TrackIR will not Connect to OpusFSI
If you update the TrackIR software remember to rename the two SimConnect manifest files within
the TrackIR5 installation folder.
Search your system and make sure there are no more manifest files located anywhere. Check your
root directory and in fact search the entire PC for them. If TIR finds any manifest file it will not
attempt to connect to Opus or anything else apart from the sim direct.
Try running everything manually and don't use any automated method. Run TrackIR manually
after FSX, then finally run FSISERVER, in other words do not run TrackIR and FSISERVER
automatically via FSX or FSUIPC.
OpusFSI TrackIR Settings
Within OpusFSI set the TrackIR scan speed to 25 initially, the XYZ scaling to 1 and PBY scaling to
0.75. These can be adjusted on the fly from within the Configuration dialog.
The TrackIR scan speed can be altered from 6ms to 60ms. If TrackIR is jerky then adjust this setting
(try 25-30) in conjunction with your TIR device Speed and Smoothness settings to reach an
optimum effect. If you set the scan rate too high it stutters, if you set it too low it jumps.
The PBY setting should be adjusted in conjunction with the TIR device speed settings to determine
the range of head movement and how far you can see behind you.
You may need to try different versions of the TrackIR drivers to get it working smoothly on your
system.
If you are still having problems with jerkiness after setting the TIR light levels then you can try
enabling Run TrackIR High Priority in the Server Configuration dialog.
- 23 -
TrackIR Operation
TrackIR can be enabled or disabled for each camera view within Live Camera, this is useful for
instance when you want to adjust the GPS via a small click spot, if TrackIR (and DHM) movement is
frozen you can operate the click spot no matter how unsteady your head is.
The TrackIR interface can be toggled on/off within the Cameras dialog (Toggle TrackIR On/Off
button), allowing camera configuration and editing with the TrackIR device either on or off.
TrackIR Cockpit Limits
To set up TrackIR cockpit limits refer to the OpusFSI_Live_Camera.pdf document.
TrackIR Updates
Check your TIR manifest files after any TIR update, the TIR software can create new files after the
upgrade which you will need to rename again (see above for details).
Using FS2Crew with OpusFSI
There can be an issue using FS2Crew since it relies on the 2D Panel initially being loaded. You can
work around this by creating a 2D default camera view for your aircraft and follow the procedure
below. Note this example procedure uses the NGX aircraft.
1. Start OpusFSI, enter Destination, Cruise level and any Alternates.
2. Start FSX, select Free Flight, setup flight then fly now.
3. Wait for NGX to initialize in 2D mode (20 second countdown).
4. Switch to 3D VC
5. Start FS2Crew.
6. Commence Preflight.
Uninstalling OpusFSI
If you wish to uninstall OpusFSI prior to an upgrade then uninstall via Control Panel, Uninstall a
Program. Do not delete your OpusFSI folder (containing your configuration files) or Opus Software
folder (containing your licence files).
Alternatively if you wish to remove OpusFSI completely from your system and have used Live
Camera then first restore your aircraft.cfg files by disabling Live Camera in the Configuration dialog.
A message box informs you that Live Camera is removing the Camera Definitions from all
aircraft.cfg files for you. These changes will NOT be noticeable until you either restart FSX/P3D, or
reload a completely different aircraft type forcing FSX/ P3D to reload the modified cfg file.
Uninstall OpusFSI via Control Panel, Uninstall a Program.
- 24 -
FAQ and Troubleshooting
Can I use other software packages with OpusFSI?
We strongly recommend the use of 3rd party packages such as FEX for their sky and cloud
textures, or HDEv2 (freeware) for clouds with the sky upgraded by Danny Glover. You will really
see the benefit of using the OpusFSI Live Weather Engine with these textures loaded. We do not
include or load any sky and cloud textures, we just create and load the most detailed and realistic
weather. However, if you rely on the default sky and cloud textures within FSX/P3D then no
matter how detailed the weather is it will not look very impressive. Disable the weather update in
3rd party packages to prevent conflict with the OpusFSI weather engine.
If your aircraft doesn't include sounds then we would also recommend the use of packages such as
Accu-Feel for the sound effects but with the Accu-Feel global turbulence, chop, gusts, and clear air
turbulence aircraft movement options disabled since they conflict with OpusFSI.
TrackIR can be used with OpusFSI but Automatic Head Movement will be automatically disabled.
My virus scanner gives me a warning for the Flight1 downloaded application
Unfortunately, one of the most common issues when people can't get software to run is
interference from a Virus or Spyware scanner. Although they do good things, in many cases they
can interrupt programs you may want to run. If you get an error message that does not appear to
be from the downloaded EXE, you need to make sure your virus or spyware scanner is disabled
prior to running the EXE. If you are concerned about this, you can scan the file prior to running it,
and then after your purchase, if you are prompted to automatically run the setup application,
select No, then manually scan the setup application. This is usually extracted right after your
purchase is made. False-Positive reports with software is common.
'The cabinet file is corrupt' error message
If you see the error message,
The cabinet file '_xxx' required for this installation is corrupt and cannot be used. This could
indicate a network error, an error reading from the CD-ROM, or a problem with this package
then it is most probably a corrupted msi file so just download it again. If you are using Chrome
then try another browser.
'There is a problem with the windows installer package. A DLL required for this install to
complete could not be run... ' error message
The installer doesn't have permissions to access the folder
C:\Users\<name>\AppData\Local\Temp. Go to Properties > Security on the folder and give
Everyone the Full control permission.
- 25 -
System.TypeInitialisationException error
You need .NET version 2 and SimConnect to be installed for OpusFSI and its SimConnect links to
work.
You can check what versions of .NET you have installed by checking your
c:\Windows\Microsoft.NET\Framework or Framework64 folders. You should see a v2.0.xxxxx
folder in addition to the v4.0.xxxxx folder.
In the case of SimConnect, first make sure you have installed FSX or P3D along with its SP2 or
installed the FSX Acceleration version, SimConnect is usually installed automatically with it. If you
have mislaid or corrupted your SimConnect or are using OpusFSI on a client PC only for Client Side
Weather Control (where FSX is not installed) then you can try installing it using the
SimConnect.msi file within your OpusFSI folder.
Spy Error Messages
FSX Failed to establish link 1 with FSX
Error HRESULT E_FAIL has been returned from a call to a COM component.
This usually does not indicate a serious error, it usually means FSX is not running and hence, the
software cannot connect to SimConnect. If you are running FSX it could mean you do not have
SimConnect installed, or SimConnect is not functioning correctly.
You must have FSX installed on the main 'flying' server and each client computer system. You
should also install the same scenery and aircraft addon packages. The aircraft addon packages
need only be installed however if you want to use external 'aircraft' views on the client system. If
this happens to be one particular client PC or laptop then install the aircraft addon just on that
machine.
Note, you do not need to run FSX if you just wish to test the network connections or set up the
FSISERVER and FSICLIENT programs.
Failed to establish link with FSUIPC
Error code 8
Error code 8 means you have the wrong Flight Simulator system for FSUIPC4. Have you selected
the correct simulator (FSX or P3D) in the OpusFSI configuration dialog and located its installation
folder? If you have not then OpusFSI will be trying to connect to the wrong sim type!
FSX freezes or my aircraft will not move
If you have a standalone system you must only run the FSISERVER program, do not run the client
program that will freeze your sim (it is only intended to be run on networked client machines).
Before disabling 3rd party camera packages their configuration utility must be run and the
"Restore" function selected to restore all camera views to FSX default, otherwise 3rd party camera
definitions are not removed from the aircraft config files and can cause problems.
- 26 -
When I install and run FSISERVER it runs in demonstration mode
OpusFSI can only be installed on one drive in one folder. Uninstall any old versions of OpusFSI
using Control Panel, Uninstall a Program. Do not delete your OpusFSI folder though since your
configuration (DAT and CMD) and camera (CAM, LIM and CDF) files are stored there, assuming you
want to keep them.
Your system will require a valid OpusFSI licence, internet access and the computer clock must have
the correct time.
Opus won't run or aborts
If Opus won't run or immediately aborts then reboot your PC, this is probably due to a windows
update which needs a reboot of your PC. If this doesn't work then reinstall SimConnect by running
the SimConnect.msi in the Opus folder and then reboot your PC.
The master battery and parking brake indications aren't correct
You need to install FSUIPC4 on the OpusFSI client PCs. You can download a free copy from
http://www.schiratti.com/dowson.html. FSUIPC4 is used for the following functions;
setting the sim clock, master battery and parking brake, and pausing the sim.
Reinstalling OpusFSI on a new or reformatted PC
If you have your licence and key files on drive C in the C:\Opus Software folder then download
and run the Flight1 purchase file
(http://www.opussoftware.co.uk/opusfsi/OpusFSI_Flight1_Purchase.exe) and choose the option
to reinstall using the key file (http://www.flight1.com/view.asp?page=wrapperinfo#usekey). If you
purchased via credit card use the last four digits of the credit card as your password, otherwise use
your order password, you can request your order password
(https://www.flight1.com/view.asp?page=lostorder) from Flight1 if you have forgotten it, there
are different passwords for each order.
If you have lost your licence and key files then download and run the Flight1 purchase file
(http://www.opussoftware.co.uk/opusfsi/OpusFSI_Flight1_Purchase.exe) and choose the option
to reinstall using your Flight1 account,
(http://www.flight1.com/view.asp?page=wrapperinfo#useaccount) you will need your email and
order password, you can request your order password
(https://www.flight1.com/view.asp?page=lostorder) from Flight1 if you have forgotten it, there
are different passwords for each order. You can request your account password
(http://www.flight1.com/view.asp?page=acctpwd) from Flight1 if you have forgotten it.
If you don't have a Flight1 account then you can create one
(http://www.flight1.com/login.asp?mode=new) and assign
(http://www.flight1.com/view.asp?page=assign) previous purchases to your account.
If you still can't reinstall then request a new key file
(http://www.flight1.com/view.asp?page=wrapperservice) from Flight1.
- 27 -
FSX CPFlight MCP/EFIS 737PRO/EL (Device Driver No.1)
TOGA button
The TOGA button has been added to the CPFlight MCP737 panel driver on auxiliary input K121.
A/T Arm switch
The A/T Arm switch on the CPFlight MCP737 is automatically disengaged 2 to 3 seconds after
landing.
Unable to Open COMn serial port !
Have you configured the wrong serial port number or forgot to connect power to the panel?
CPFlight MCP controls have stopped working with PMDG 737 NGX
There is a problem with PMDG's FSXPMDG.EXE software when you open an FSX dialog. If you have
paused the sim then you must unpause it before any MCP changes will be effective.
Also if you stop OpusFSI and restart it, then after the panel is initialised you must make a change
on the sim's MCP to kick the PMDG connection back into life.
Additional FAQs regarding weather, camera and network issues can be found in the relevant
Weather, Camera and Getting Started user guides.
- 28 -
© Copyright 2026 Paperzz