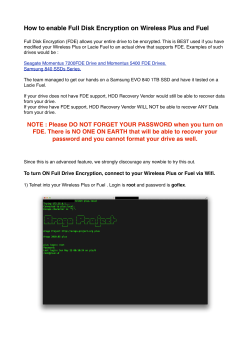
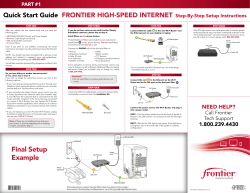
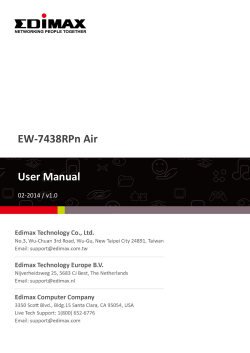
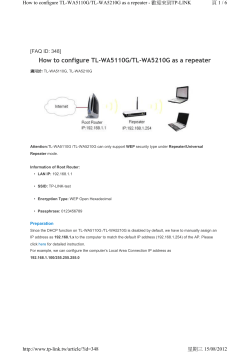
Connecting your DStv Explora to the internet
using the DStv WiFi Connector
(manual setup)
If you want to connect your DStv Explora to your router in your home, it’s best to use
the DStv WiFi Connector if your router’s in another room or when you don’t want to run
cables. WiFi signal must be available in the room your DStv Explora is in.
There are two options:
• Automatic setup (if your router has a WPS button)
• Manual setup (if your router does not have a WPS button, or if you are unable
to set it up using the automatic setup)
These are the steps for the MANUAL setup
Step 1
Place your computer close to your router.
PC (Side / Back)
DStv WIFI Connector (Back)
Turn WiFi off on your computer.
Using the supplied power cable, connect one end
into the USB port on your computer and the other
end into the power input on the back of the
DStv WiFi Connector.
Using the supplied Ethernet cable, insert the one
end into the Ethernet port on your computer.
Now insert the other end into the Ethernet port
on the back of the DStv WiFi Connector.
For more information, including Terms and Conditions, go to
www.dstv.com/getconnected
5 V DC
ETHERNET
PC (Side / Back)
RESET
DStv WIFI Connector (Back)
5 V DC
ETHERNET
RESET
V1.0 Nov 2014
Step 2
Open the web browser on your computer
and type http://dstvwifi.local/ into the
address bar.
dstvwifi.local/
dstvwifi.local/
Step 3
Select your router from the list, enter your wireless
password and click on “Connect”.
Select your wireless network from the list
by clicking on the network name (SSID)
MY HOME
TROUBLESHOOTING
•
•
MYHOME
JAMES HOME
MY OFFICE
"WLAN" - network could not be found - your DStv WiFi
Connector may be too far from your router or your router
may be off. Please move the DStv WiFi Connector closer to
your router and ensure that the router is switched on.
Wireless Password:
••••••••••|
UNIVERSITY
Show Password
Connect
"Wrong password" - you entered the wrong WLAN password.
Please enter the correct password and try again.
Step 4
Disconnect the DStv WiFi Connector from your computer.
Step 5
DStv WIFI Connector (Back)
Using the supplied Ethernet cable,
insert the one end into the green
Ethernet port on the back of the
DStv Explora. Now insert the other
end into the Ethernet port on the
back of the DStv WiFi Connector.
DStv Explora (Back)
DIGITAL
AUDIO OUT
COAXIAL
5 V DC
ETHERNET
For more information, including Terms and Conditions, go to
www.dstv.com/getconnected
ETHERNET
RESET
UNICABLE IN
POWER IN
13V 1A
V1.0 Nov 2014
Step 5 (cont.)
Using the supplied power cable,
connect one end into the USB port
on the back of the DStv Explora
and the other end into the power
input on the back of the
DStv WiFi Connector.
DStv WIFI Connector (Back)
DStv Explora (Back)
DIGITAL
AUDIO OUT
COAXIAL
5 V DC
ETHERNET
ETHERNET
RESET
UNICABLE IN
POWER IN
13V 1A
The Power LED on the front of the DStv WiFi connector
should light up (solid amber) and then change to solid white,
confirming the DStv WiFi Connector has power.
WPS
POWER
WPS
POWER
WIRELESS
Step 6
Wait two minutes.
The Wireless LED on the front of the DStv WiFi Connector
should light up (solid white) once an internet connection
has been established.
WPS
POWER
WIRELESS
WPS
WPS
POWER
POWER
WIRELESS
WIRELESS
TROUBLESHOOTING
•
If the Wireless LED on the front of the DStv WiFi Connector is solid amber, the internet connection is weak. To fix this, move the
DStv WiFi Connector closer to the router and try again.
For more information, including Terms and Conditions, go to
www.dstv.com/getconnected
V1.0 Nov 2014
WIRELESS
Step 7
You can now check the connectivity
on your DStv Explora.
Central
Help
Contact Us
Press HELP on the remote.
Select “Tools”.
Mail Messages
General Information
Tools
Connectivity Checker
Select “Connectivity Checker”
and press OK.
Central
Help
Select OK
Just Added
Contact Us
Connectivity Checker
Mail Messages
Router connection successful
Watch Now
Return BACK
Internet connection successful
General Information
Tools
Return BACK
Select OK
Return BACK
Step 8
The default setting for all Connected
Services on your DStv Explora is set
to “Off”. You can manually select which
of the services you want enabled.
Central
Settings
User Preferences
Parental Control
System Settings
Satellite Settings
Video & Audio
Recording
Channel Groups
Connected Services
Press the blue DStv button.
Select “Settings”.
Select “User Preferences”.
General
Central
Select OK
Select “Connected Services”.
Connected Services
Return BACK
Remote Recordings
Off
DStv Catch Up Plus
Off
Remote Recording allows
you to schedule recordings
via our TV Guides when
you’re away from home.
Visit
dstv.com/GetConnected for
more info, including steps on
how to connect your DStv
Explora to the internet. Terms
& Condition apply.
You can then set each of the Connected Services
“On” or “Off” individually.
Press BACK to save your setting.
Select OK
For more information, including Terms and Conditions, go to
www.dstv.com/getconnected
Return BACK
V1.0 Nov 2014
© Copyright 2026 Paperzz