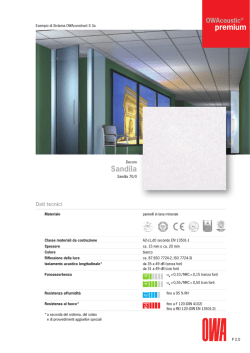
Pareti in muratura Utilizzare due scatole per installazione incassata a muro con interasse dei fori di fissaggio pari a 60 mm. Scegliere l’orientamento orizzontale o verticale per affiancare i due prodotti. Individuare le coppie di fori da utilizzare per l’orientamento scelto e avvitare le due scatole alla dima. Solidificata la malta, rimuovere la dima e applicare lo strato di intonaco. IT - EN Once solidified the mortar, remove the template and apply the layer of plaster. Dima per montaggio affiancato Template for side mounting Brickwork walls Use two wall boxes with distance between fixing holes of 60 mm. Choose horizontal or vertical orientation for the side mounting of the two devices. Identify the pairs of holes to be used for the chosen orientation and tighten the two boxes to the template. EK-DFO (serie form / form series) 153 86 34 4 34 3 H H H Procedere con il montaggio dei prodotti ekinex® seguendo le istruzioni contenute nell’imballo degli apparecchi. V EK-DFO Proceed with the mounting of the ekinex® devices by following the instructions included in the packaging. C2 V 1 67 V C1 60 C2 4 C1 H V è un marchio registrato da is a registered brand of Disporre l’assieme dima/scatole nello scasso a parete e posizionarlo tenendo conto dello spessore di intonaco che verrà applicato successivamente. Riempire gli interstizi con malta a presa rapida. Verificare con l’utensile a bolla il corretto allineamento orizzontale del bordo superiore della dima. Place the set of template / boxes in the wall break and position it considering the thickness of plaster that will be applied later. Fill the gaps with quick-setting mortar. Check with a bubble level the correct horizontal alignment of the upper edge of the template. SBS S.p.A. 4 HQ Via Circonvallazione s/n I-28010 Miasino (NO), Italia Tel. +39 0322 980909 Fax +39 0322 980910 R&D Via Novara 35 I-28010 Vaprio d’Agogna (NO), Italia Tel. +39 0321 966740/1 Fax +39 0321 966997 2 [email protected] www.ekinex.com FISPDIMAEKDFOX0 Pareti a pannelli Utilizzare due scatole per installazione incassata a pannello con interasse dei fori di fissaggio pari a 60 mm. Tracciare sul pannello una linea di riferimento orizzontale per l’altezza di installazione e una verticale per la centratura dei due prodotti. Posizionare la dima sul pannello in modo da allineare i fori centrali (C1, C2) alla linea verticale od orizzontale. Verificare con l’utensile a bolla il corretto allineamento orizzontale del bordo superiore della dima. Rimuovere la dima. Remove the template. 3 Realizzare i fori per le due scatole mediante una fresa a tazza (verificare il diametro della tazza da utilizzare riportato sulla scatola da incasso o sulla relativa documentazione). The template EK-DFO allows the side mounting in horizontal or vertical of two ekinex® devices equipped with square frames of the form series. It is made of galvanized coil with 1 mm thickness. The use of the template depends on the type of wall (brickwork or panel). Make the holes for the two boxes with a hole saw (check the diameter of the cup to be used printed on the wall box or its documentation). 1 Procedere con il montaggio dei prodotti ekinex® seguendo le istruzioni contenute nell’imballo degli apparecchi. Con la punta di una matita segnale sul pannello la posizione dei fori C1 e C2. With the tip of a pencil sign on the panel the position of the holes C1 and C2. Importante! Per un corretto montaggio è indispensabile non lasciare gioco tra foro e scatola. 4 Fissare le scatole nei rispettivi fori. C1 H Proceed with the mounting of the ekinex® devices by following the instructions included in the packaging. Important! For a correct installation it is essential not to leave clearance between the hole and the wall box. Fix the boxes in the corresponding holes. C2 v 2 La dima EK-DFO serve al montaggio affiancato in orizzontale o in verticale di due prodotti ekinex® equipaggiati con cornici quadrate della serie form. E’ realizzata in lamiera zincata con spessore 1 mm. L’impiego della dima dipende dal tipo di parete (muratura o pannelli). Description Panel walls Use two wall boxes for panel installation with 60 mm distance between the mounting holes. Draw a horizontal line on the panel as a reference for the height of installation and a vertical line for centering the two devices. Place the template on the panel aligning the central holes (C1, C2) to the vertical or horizontal line. Check with a bubble level the correct horizontal alignment of the upper edge of the template. Descrizione C1 v C2 H v v 5 6
© Copyright 2026 Paperzz