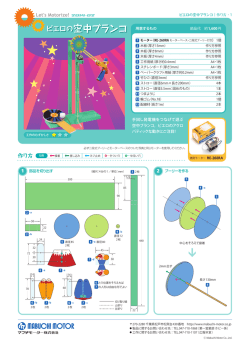
HM-9164-2 ユニットタイプスピードコントロールモーター USシリーズ ●110V/115Vタイプ ●220V/230Vタイプ 取扱説明書 C English version follows Japanese version. もくじ 1.安全上のご注意.................................................2ページ 2.現品到着時の確認 .............................................4ページ 3.取り付け ...........................................................6ページ 4.接続.................................................................11ページ 5.運転.................................................................12ページ 6.特性.................................................................15ページ 7.拘束時のモーター焼損保護について ..............15ページ 8.正常に動作しない場合のチェックポイント ...16ページ お買い上げいただきありがとうございます。 この取扱説明書には、製品の取り扱いかたや安全上の注意事項を示しています。 ・取扱説明書をよくお読みになり、製品を安全にお使いください。 ・お読みになったあとは、いつでも見られるところに必ず保管してください。 1.安全上のご注意 製品の取り扱いは、適切な資格を有する人が行なってください。 お使いになる前に、「安全上のご注意」をよくお読みのうえ、製品を正しくお使いください。 ここに示した注意事項は、製品を安全に正しくお使いいただき、お客様や他の人々への危害や損傷を未然に防止するためのもの です。内容をよく理解してから製品をお使いください。 警告 この警告事項に反した取り扱いをすると、死亡または重傷を負う場合がある内容を示しています。 注意 この注意事項に反した取り扱いをすると、損害を負うまたは物的損害が発生する場合がある内容を示しています。 重要 製品を正しくお使いいただくために、お客様に必ず守っていただきたい事項を本文中の関連する取り扱い項目に記載しています。 警告 全般 ● 爆発性雰囲気、引火性ガスの雰囲気、腐食性の雰囲気、水のかかる場所、可燃物のそばでは使用しないでください。 火災・感電・けがの原因になります。 ● 接地、接続、運転・操作、点検・故障診断の作業は、適切な資格を有する人が行なってください。 火災・感電・けがの原因になります。 ● 通電状態で移動、設置、接続、点検の作業をしないでください。電源を切ってから作業してください。 感電の原因になります。 ● モーターの過熱保護装置(サーマルプロテクタ)がはたらいたときは、電源を切ってください。過熱保護装置が自動復帰した ときにモーターが突然起動して、けが・装置破損の原因になります。 設置 ● モーターはクラス 機器のみに使用してください。感電の原因になります。 ● モーターは筐体内に設置してください。感電・けがの原因になります。 ● 設置するときは、モーター、コントロールユニットに手が触れないようにするか、接地してください。感電の原因になります。 接続 ● コントロールユニットの電源入力電圧は、定格値を必ず守ってください。火災・感電の原因になります。 ● 接続は接続図にもとづき、確実に行なってください。火災・感電の原因になります。 ● ケーブルを無理に曲げたり、引っ張ったり、はさみ込んだりしないでください。火災・感電の原因になります。 ● 接続終了後は、コントロールユニットの端子部に端子カバー(付属)を取り付けてください。感電の原因になります。 ● 60W, 90Wタイプのコンデンサに付いているカバーは取り外さないでください。感電の原因になります。 ● コントロールユニットには過電流保護のヒューズがありません。電源との接続には過電流保護装置(サーキットブレーカー など)を取り付けてください。火災の原因になります。 運転 ● 停電したときは、コントロールユニットの電源を切ってください。停電復旧時にモーターが突然起動して、けが・装置破損の 原因になります。 保守・点検 ● 電源を切った直後(10秒以内)は、コントロールユニット、コンデンサの接続端子に触れないでください。残留電圧により、 感電の原因になります。 修理・分解・改造 ● モーター、コントロールユニットを分解・改造しないでください。感電・けがの原因になります。内部の点検や修理は、 お買い上げになった支店または営業所に連絡してください。 2 注意 全般 ● モーター、コントロールユニットの仕様値を超えて使用しないでください。感電・けが・装置破損の原因になります。 ● モーターの開口部に指や物を入れないでください。火災・感電・けがの原因になります。 ● 運転中および停止後しばらくの間は、モーターに触れないでください。モーターの表面が高温のため、やけどの原因になり ます。 運搬 ● モーター出力軸、モーターケーブルを持たないでください。けがの原因になります。 設置 ● モーター、コントロールユニットの周囲には、可燃物を置かないでください。火災・やけどの原因になります。 ● モーター、コントロールユニットの周囲には、通風を妨げる障害物を置かないでください。装置破損の原因になります。 ● モーターは金属板に確実に固定してください。けが・装置破損の原因になります。 ● モーターの回転部(出力軸)に、カバーを設けてください。けがの原因になります。 接続 ● 漏電遮断機を設置してください。火災の原因になります。 運転 ● モーターとコントロールユニットは、指定された組み合わせで使用してください。火災の原因になります。 ● 装置の故障や動作の異常が発生したときは、装置全体が安全な方向へはたらくよう非常停止装置、または非常停止回路を外部 に設置してください。けがの原因になります。 ● 異常が発生したときは、ただちに運転を停止して、ドライバの電源を切ってください。火災・感電・けがの原因になります。 ● 電源を投入するときは、コントロールユニットのRUN/STAND-BYスイッチをSTAND-BY、および回転速度設定器をLOWに 設定してから行なってください。モーターが起動し、けが・装置破損の原因になります。 ● 運転中は回転部(出力軸、冷却ファン)に触れないでください。けがの原因になります。 ● モーターは、正常な運転状態でも、表面温度が70°Cを超えることがあります。運転中のモーターに接近できるときは、図の 警告ラベルをはっきり見える位置に貼ってください。やけどの原因になります。 警告ラベル 廃棄 ● モーター、コントロールユニットを廃棄するときは、産業廃棄物として処理してください。 3 2.現品到着時の確認 2.1 現品の確認 以下のものがすべて揃っているか確認してください。 もし、不足している場合や破損している場合は、最寄りの支店・営業所にご連絡ください。 ・モーター ・・・・・・・・・・・・・・・・・・・・・・・・・・・・・・・・・・1台 ・コントロールユニット ・・・・・・・・・・・・・・・・・・・・・・1台 ・コントロールユニット取付用M3ねじセット ・・・1 ねじ ・・・・・・・・・・・・・・・・・・・・・・・・・・・・・・4個 ワッシャー ・・・・・・・・・・・・・・・・・・・・・・・・4個 ナット ・・・・・・・・・・・・・・・・・・・・・・・・・・・・4個 ・取扱説明書(本書)・・・・・・・・・・・・・・・・・・・・・・・・・1部 モーターおよびコントロールユニットは下記の規格に従って設計、検査を行ない、認定を取得しています。 認定品名は、モーター品名およびコントロールユニット品名です。 モーター 認定規格 適合規格 認定機関 設置条件 コントロールユニット UL2111, UL1004 CSA C22.2 No.100, CSA C22.2 No.77 EN60950-1 EN60034-1, EN60034-5 IEC60034-11 (15W∼90Wタイプ), IEC60664-1 UL File No.E64199 (6Wタイプ) E64197 (15W∼90Wタイプ) VDE UL508 CSA C22.2 No.14 EN60950-1 EN50178 UL File No. E91291 設置カテゴリー 、汚損度2、クラス 機器(適用規格 EN/IEC規格) 機器によって設置カテゴリー 、汚損度3の規定値が要求される場合は、モーターおよび コントロールユニットをIP54相当のキャビネットに収納し、絶縁トランスを介して 給電してください。 ※ モーター、コントロールユニットは低電圧指令に適合しています。 ※ VDE認定はモーター単体での認定となります。 上記規格で要求される過負荷運転試験および拘束温度上昇試験は、歯切シャフトタイプはギヤヘッド付、 丸シャフトタイプは放熱板付の状態で行なっています。放熱板のサイズ、材質は以下の通りです。 モーター取付角寸法 □60mm □70mm □80mm □90mm(40W ) □90mm(60W, 90W ) 重要 サイズ(mm) 115×115 125×125 135×135 165×165 200×200 厚さ(mm) 材質 5 アルミ ・ ユニット品名の末尾が “E” の製品については、EMC指令に適合しています。 EMC指令への対応が必要なときは、必ず9ページの「EMC指令に対する設置・配線方法」をご覧になり、お客様 の装置に組み込んだ状態で、EMC測定を行なってください。 ・ EN50178規格で要求される過電圧保護試験は行なっていません。 最終製品として組み込んだ状態にて試験を実施してください。 4 2.2 品名および組み合わせの確認 この製品はモーターとコントロールユニットをセットでお届けしています。 製品がお手元に届きましたら、モーターとコントロールユニットの組み合わせ、およびコンデンサ(内蔵または外付け)の タイプをお確かめください。 ※1 ユニット品名は安全規格認定登録品名ではありません。 安全規格の認定は、モーター品名およびコントロールユニット品名でそれぞれ取得しています。 ※2 適合ギヤヘッド品名の□には、減速比の数字が入ります。 ■110V/115Vタイプ ユニット品名 ※1 モーター品名 US206-401U USM206-401W US206-001U USM206-001W US315-401U USM315-401W US315-001U USM315-001W US425-401U USM425-401W US425-001U USM425-001W US540-401U USM540-401W US540-001U USM540-001W US560-501U USM560-501W US560-001U USM560-001W US590-501U USM590-501W US590-001U USM590-001W コントロールユニット品名 コンデンサのタイプ 適合ギヤヘッド品名 ※2 (別売) 2GN□K USP206-1U 3GN□K USP315-1U 内蔵 USP425-1U 4GN□K, 4GN□RH, 4GN□RA 5GN□K, 5GN□RH, 5GN□RA USP540-1U 5GU□KB, 5GU□RH, 5GU□RA USP560-1U 外付け USP590-1U 5GU□KB,5GU□KBH,5GU□RH,5GU□RA ■220V/230Vタイプ ユニット品名 ※1 モーター品名 US206-402E USM206-402W US206-002E USM206-002W US315-402E USM315-402W US315-002E USM315-002W US425-402E USM425-402W US425-002E USM425-002W US540-402E USM540-402W US540-002E USM540-002W US560-502E USM560-502W US560-002E USM560-002W US590-502E USM590-502W US590-002E USM590-002W コントロールユニット品名 コンデンサのタイプ 2GN□K USP206-2E 3GN□K USP315-2E 内蔵 USP425-2E 4GN□K, 4GN□RH, 4GN□RA 5GN□K, 5GN□RH, 5GN□RA USP540-2E 5GU□KB, 5GU□RH, 5GU□RA USP560-2E 外付け USP590-2E 適合ギヤヘッド品名 ※2 (別売) 5GU□KB,5GU□KBH,5GU□RH,5GU□RA 5 3. 取り付け 取付条件 モーター、コントロールユニットは以下の条件のところに取り付けてください。 この範囲外で使用すると製品が破損するおそれがあります。 ・屋内(この製品は機器組込用に設計、製造されたものです) ・周囲温度 モーター:-10°C∼+40°C(凍結しないこと) コントロールユニット:0°C∼+40°C(凍結しないこと) ・周囲湿度 85%以下(結露しないこと) ・爆発性ガス、引火性ガス、腐食性ガスがないこと ・直射日光が当たらないこと ・ほこりがかからないこと ・水、油などがかからないこと ・放熱しやすいこと ・連続的な振動、過度の衝撃が加わらないこと ・標高1,000m以下の場所 ・設置カテゴリー 、汚損度2、クラス 機器(適用規格 EN/IEC規格) 機器によって設置カテゴリー 、汚損度3の規定値が要求される場合は、モーターおよびコントロールユニットを IP54相当のキャビネットに収納し、絶縁トランスを介して給電してください。 3.1 モーターの取り付け ■丸シャフトタイプ 1.取付板にねじ、モーター寸法にあった穴をあけてください。 ナット ワッシャ 2.ねじ、ナット、座金を使用し、モーターを取付板に 固定してください。この時、モーター取付面と取付板に すきまがないようにしてください。 また、ねじは適切な長さのものを用意して取り付けてください。 モーター 取付板 取付用ねじ 重要 取付ねじ モーター取付角寸法 ねじサイズ 締付トルク □60mm □70mm □80mm □90mm M4 M5 M5 M6 2.0N·m (20kgfcm) 2.5N·m (25kgfcm) 2.5N·m (25kgfcm) 3.0N·m (30kgfcm) 取付穴にモーターを斜めに挿入したり、無理に組み付けたりしないでください。 フランジインロー部に傷が付き、 モーターが破損する恐れがあります。 ■歯切りシャフトタイプ 1.取付板にねじ、モーター寸法にあった穴をあけてください。 2.別売のギヤヘッド付属のねじを使用し、 ナット モーター 平ワッシャ ギヤヘッド 取付板 ギヤヘッド付属のねじ モーターとギヤヘッドを組み付けてください。 組み付けは、それぞれのインロー部を案内として シャフト歯切部をギヤヘッド側板(金属板)やギヤに 強く当てないよう、ギヤヘッドを静かに左右に回しながら 行なってください。 3.ギヤヘッド付属のねじで取付板に固定してください。 この時、モーターフランジ面とギヤヘッドインロー端面に すきまがないように取り付けてください。 5GU□K、5GU□KBH、5GN□RA、5GU□RAタイプは装置 への取り付けねじは付属していませんので、M6(GNタイプ) またはM8(GUタイプ)のねじを別途ご用意ください。 オプションで取付金具(別売)をご用意しております。 取り付けの詳細については、別売のギヤヘッドの取扱説明書を ご参照ください。 重要 6 ・ ギヤヘッドはモーターと同じ歯切りタイプのものを使用してください。 適合ギヤヘッドは、「2.2 品名および組み合わせの確認」(P.5) の表で確認してください。 ・ モーターインロー部、ギヤヘッドインロー部にはゴミなどを付着させないでください。 組み付けが不十分となり、ギヤヘッド内のグリスが漏れることがあります。 ・ 歯にキズが付くと異音の原因になることがあります。 ■冷却ファン付きタイプ 装置 吸込 冷却ファン付きモーターを装置に取り付ける場合には、 モーター後部の冷却用吸込口をふさがないように、 ファンカバーの後ろを10mm以上あけるか、 換気穴をあけてください。 冷却ファンは、モーター運転中常時回転するわけではありません。 モーターへの入力電圧に応じて回転します。 吐出 10 3.2 コントロールユニットの取り付け コントロールユニットを機器に取り付ける際には、2通りの方法があります。 取り付けは、以下の方法を参考にしてください。 M4のねじは付属しておりませんので、ご用意ください。 重要 ねじの締付トルクは0.7N·m (7kgfcm) 未満としてください。 0.7N·m (7kgfcm) を超えるトルクで締め付けると、コントロールユニットが破損する場合があります。 ■四角い穴をあけて取り付ける方法 1. 取付板 81 +10 90 ±0.2 2−φ4.5 1.左図のように取付板に穴をあけてください。 2.取付板の前面からコントロールユニットを挿入し、 ねじとナットを用意して固定してください。 取付ねじ、ナット 53 +10 2. サイズ 数 M4 各2個 2-M4ナット コントロールユニット 2-M4ねじ 取付板 7 ■四角い穴をあけずに取り付ける方法 1. 1.左図のように取付板に穴をあけてください。 50 ±0.2 13.2 ±0.2 15 ±0.2 取付板 4 -φ3.5 (断面図A) 90° 取り外してください。(フロントパネルだけを 持って手前に引くと外れます。) φ6.5 φ28 2.コントロールユニット本体からフロントパネルを (断面図A) φ3.5 15 ±0.2 26 ±0.2 90 ±0.2 φ23 φ7 3.付属のM3のねじとナット各4個を使用し、取付板に 2 -φ7.5 コントロールユニット本体を固定してください。 2., 3., 4. 2-M4ナット 4.以下のねじとナットを用意して、取付板の前面から 4-M3ナット(付属) フロントパネルをかぶせて固定してください。 コントロールユニット 取付ねじ、ナット サイズ 数 M4 各2個 4-M3ねじ(付属) 重要 2-M4ねじ 取付板をコントロールユニットと フロントパネルではさみつけるため、 取付板の厚みは2mm以下にしてください。 取付板 フロントパネル 3.3 コンデンサの取り付け(コンデンサ外付けタイプの場合) コンデンサの取り付けには、M4のねじを使用してください。 (取付用のねじは付属していません。) コンデンサキャップ φ4.3 重要 ・ コンデンサに付いているコンデンサキャップは外さないでください。 ・ ねじの締付トルクは、取付足の破損防止のため、1N·m(10kgfcm)以下としてください。 ・ モーターから10cm以上離して取り付けてください。 モーターの熱により、コンデンサの寿命が低減します。 コンデンサ用リード線 (黄) の長さは約30cmです。 8 3.4 EMC指令に対する設置・配線方法 ■はじめに ◆EMC指令 (89/336/EEC、92/31/EEC) USシリーズは、ユニット品名の末尾が “E” の製品についてEMC指令に適合しています。 USシリーズは、機器組み込み用の部品として設計・製造されています。EMC指令では、この製品が組み込まれたお客様の機械装 置での適合が要求されます。 これからご紹介するモーター/コントロールユニットの設置・配線方法は、お客様の機械装置のEMC指令への適合に有効な基本 的な設置・配線方法について説明したものです。 最終的な機械装置のEMC指令への適合性は、モーター/コントロールユニットと一緒に使用される他の制御システム機器、電気 部品の構成、配線、配置状態、危険度などによって変わってきますので、お客様ご自身で機械装置のEMC試験を行 なって確認していただく必要があります。 ◆適用規格 EMI Emission Tests Radiated Emission Test Conducted Emission Test EN61000-6-4 EN55011 EN55011 Immunity Tests Radiation Field Immunity Test Electrostatic Discharge Immunity Test Fast Transient/Burst Immunity Test Conductive Noise Immunity Test Surge Immunity Test Voltage Dip Immunity Test Voltage Interruption Immunity Test EN61000-6-2 IEC61000-4-3 IEC61000-4-2 IEC61000-4-4 IEC61000-4-6 IEC61000-4-5 IEC61000-4-11 IEC61000-4-11 EMS ■EMC指令に対する設置・配線方法 USシリーズから周辺の制御システム機器へのEMIと、USシリーズのEMSに対し有効な対策をとらなければ、機械装置の機能に 重大な傷害を招くおそれがあります。 USシリーズは、次の装置・配線方法を施すことで、EMC指令(適用規格は前述によります)への適合が可能になります。 ◆ACラインフィルタの接続 コントロールユニットで発生したノイズが電源ラインを介して外部へ伝ぱんするのを防止するため、AC入力ラインにはACライン フィルタを接続してください。 ACラインフィルタには、下表の製品または相当品を使用してください。 TDK株式会社 ZAG2210-11S EPCOS AG B84112-B-B110 Schaffner EMC AG FN2330Y-10-06、FN2310X-10-06 Tyco Electronics CORCOM 10ESK1 ACラインフィルタは、できるだけコントロールユニットの近くに取り付け、入力ケーブルと出力ケーブルは筐体の盤面から浮か ないように、ケーブルクランプなどを使用して確実に固定してください。ACラインフィルタの接地端子は、できるだけ太く、最 短距離で接地ポイントに接地してください。 なお、AC入力側のケーブル(AWG18 : 0.75mm2以上)とACラインフィルタの出力ケーブル(AWG18 : 0.75mm2以上)は平行して 配線しないでください。平行して配線されると、筐体内のノイズが浮遊容量を介して直接電源ケーブルに結合し、ACラインフィ ルタの効果が低減することがあります。 ◆接地方法 接地した箇所に電位差が生じないよう、コントロールユニット、モーター、ACラインフィルタを接地するケーブルは、できるだ け太く、最短距離で接地ポイントに接地してください。接地ポイントには広く、太く、均一な導電面を使用してください。 コントロールユニットの接地 コントロールユニットのアース用リード線を接地してください。 モーターの接地 モーターを接地するときは、取り付けフランジの塗装をはがし、菊座ワッシャを使用して、固定ねじと一緒に接地ケーブルを 接地ポイントに接地してください。 9 ◆モーターケーブルの接続 モーターケーブルを延長するときは、オプション(別売り)の延長ケーブルを使用してください。 詳細は14ページの「5.5 モーターを遠隔操作する場合」をご覧ください。 ◆その他 ・モーター/コントロールユニットと周辺の制御システム機器のアース間に電位差が生じないように、直接接地ポイントに 接地してください。 ・リレーや電磁スイッチを一緒に使用するときは、ACラインフィルタやCR回路でサージを吸収してください。 ◆モーター、コントロールユニットの接地・配線例 モーター D コントロールユニット SPEED CONTROL UNIT USP560-2E A POWER HIGH LOW RUN STAND-BY ORIENTAL MOTOR C D B コンデンサ A L N C 入力電源 Grounded Panel A : アース用リード線 B : ACラインフィルタ C : 電源ケーブル D : モーターケーブル (4.75 m) ■静電気についての注意事項 静電気によって、コントロールユニットが誤動作したり破損することがあります。コントロールユニットに電源を投入した状態 でのドライバの取り扱いには気をつけてください。 重要 電源を投入した状態のコントロールユニットに近づいたり、触れたりしないでください。 10 4.接続 4.1 接続手順 以下の説明は、出荷時の設定のまま使用する場合です。 回転方向は、モーター出力軸側からみて時計方向に回転するように設定してあります。 回転方向を変える場合は、「5.運転」の項を参照してください。 ※図は110V/115V コンデンサ外付けタイプです。 1. 緑のアース用リード線を接地して ください。 このアースはノイズ除去用の機能アース です。 2. モーター部のコネクタと コントロールユニット部のコネクタを 接続してください。このとき、コネクタは 「カチッ」という音がするまで差し込んで、 確実に接続してください。 3. コントロールユニットの モーター コントロールユニット 「RUN/STAND-BY」スイッチが 「STAND-BY」 、回転速度設定器のツマミが 「LOW」になっていることを確認してから、 電源コードを電源に接続してください。 電源を投入するとコントロールユニットの POWER LED(緑)が点灯します。 2. 11 5.運転 重要 ・ このモーターはB種絶縁モーターです。 モーター運転中は、モーターケースの温度が90°Cを超えないことを確認してください。 90°Cを超える温度でモーターを運転すると、巻線、ボールベアリングの寿命を短くします。 モーターケースの温度は、モーター表面に温度計を固定して計測できます。また、サーモテープまたは熱電対を 使用しても計測できます。 ・ 60W、90Wタイプの場合、低速、軽負荷で運転するとモーターの発熱が少ないため、 モーター後部の冷却ファンは回転しない設定になっています。 ・ コントロールユニット内部には、外部からのノイズに対するフィルタを内蔵しておりますが、 ノイズのレベルによっては設定回転速度と異なる回転速度で回るなどの誤動作を招く場合があります。 機器に取り付け後、実機にて確認してください。 誤動作する場合は、ノイズフィルタ、フェライトコアなどを取り付けることにより防止することができます。 ・ コントロールユニットの電源コード端子台のリード線を差し替える場合は、電源をOFFにしてから 行なってください。 5.1 モーターの運転・変速・停止 ■運転 コントロールユニット正面 回転速度設定器 POWER LED コントロールユニットの「RUN/STAND-BY」スイッチを 「RUN」側に倒します。 回転速度設定器で設定した速度で回転し始めます。 ■停止 POWER RUN/STAND-BY スイッチ 最高速度 調整用トリマ (調整するときは フロントパネル を外します。) LOW HIGH RUN フロントパネル (取り外し可能) STAND-BY 重要 ・「RUN/STAND-BY」スイッチは、電源の ON/OFFスイッチではありません。 モーターを長時間停止する場合には、別に 電源スイッチを設けてください。 ・最高速度調整用トリマを使用して調整する 場合、使用する電源周波数が変わるときは、 再度調整してください。 コントロールユニットの「RUN/STAND-BY」スイッチを 「STAND-BY」側に倒すと、モーターは停止します。 ■変速 回転速度設定器のツマミを時計方向(HIGH側)に回すと、モーターの スピードが速くなり、反時計方向(LOW側)に回すと遅くなります。 50Hzでは90∼1400r/min、60Hzでは90∼1600r/minの範囲で モーターのスピードを調整、設定することができます。 電源周波数が変わっても、90∼1400r/minの範囲では設定回転速度 は変わりません。 ※回転速度設定器のツマミを最大(HIGH側)にする前に、 回転速度が可変速範囲の上限を超えることがあります。 最高速度調整用トリマを使用すると回転速度設定器の ツマミを全域で使用できます。 <最高速度調整方法> フロントパネルを外して、以下の手順で調整してください。 1.「RUN/STAND-BY」スイッチを「RUN」側に倒します。 2. 回転速度設定器のツマミを最大まで回します。 3. 最高速度調整用トリマを回し、50Hz: 1400r/min、 60Hz: 1600r/minになるように調整してください。 左へ回すと速くなり、右へ回すと遅くなります。 + 調整には絶縁された の精密ドライバを使用してください。 12 5.2 一方向運転で使用する場合 コントロールユニットのコンデンサが内蔵タイプか外付けタイプかにより接続が異なります。 お求めのタイプがどのタイプかは「2.2 品名および組み合わせの確認」(P.5)の表でご確認ください。 回転方向は、モーター出力軸側から見て時計方向をCW、反時計方向をCCWとしています。 出荷時は時計方向に回転するように設定されているため、電源コード端子台のリード線はN(CW)に接続されています。 反時計方向に回転させる場合は、N(CCW)に接続してください。 ※図は110V/115Vタイプです。 出荷時の設定「CW」を「CCW」に変える場合 ■コンデンサ内蔵タイプ 1.コントロールユニット後部の 電源コード端子台のプラスチックカバーを 外してください。 2.電源コード端子に接続されている 黒のリード線を、N(CW)からN(CCW)に 差し替えてください。 出荷時は電源コード端子はLとN(CW)に 接続されています。 3.電源コード端子台にプラスチックカバーを 取り付けてください。 ■コンデンサ外付けタイプ 1.コントロールユニット後部の 電源コード端子台のプラスチックカバーを 外してください。 2.電源コード端子N(COM),N(CW)に 接続されている黒のリード線を、 N(CW)からN(CCW)に差し替えてください。 その際、コンデンサのリード線(黄色)は 動かさないでください。 出荷時は電源コード端子に接続されている 黒のリード線はN(COM),N(CW)に 接続されています。 3.電源コード端子台にプラスチックカバーを 取り付けてください。 13 5.3 正逆運転する場合 電源用スイッチと正逆転切替スイッチを設けて、回転方向を切り替えてください。 重要 モーターの回転方向の切り替えは、モーターが完全に停止してから行なってください。 回転方向が切り替わらなかったり時間がかかったりする場合があります。 ■コンデンサ内蔵タイプ 1. 電源用スイッチ「SW1」と正逆転切替スイッチ 「SW2」を接続してください。 SW1 2.「RUN/STAND-BY」スイッチをSTAND-BY側に L CW N(CW) 倒し、モーターが完全に停止するのを 確認してください。 3. モーター停止後、電源スイッチ「SW1」を切り、 「SW2」を切り替えてください。 4. 電源スイッチ「SW1」をON側にしてください。 AC電源 SW2 CCW N(CCW) ■コンデンサ外付けタイプ 1. 電源コード端子台のN(COM),N(CW)に 接続されている黒のリード線を外してください。 SW1 L 2. 電源用スイッチ「SW1」と正逆転切替スイッチ ON N(CW) AC電源 「SW2」を接続してください。 3.「RUN/STAND-BY」スイッチをSTAND-BY側に N(COM) CW N(CCW) SW2 ON 倒し、モーターが完全に停止するのを 確認してください。 4. モーター停止後、電源スイッチ「SW1」を切り、 「SW2」を切り替えてください。 5. 電源スイッチ「SW1」をON側にしてください。 CCW コンデンサ ■スイッチの接点容量 AC250V 5A以上の容量のものをお使いください。 5.4 モーターの回転速度を確認する場合 オプションのデジタル表示型回転計SDM496(別売)をご使用ください。 コントロールユニット裏面 電源コード端子のSPEED OUTを 1 、11 デジタル回転計の 端子に接続してください。 モーターが回転すると、回転速度を表示します。 デジタル回転計 SDM496 ピン番号 接続の詳細は、デジタル表示回転計SDM496の 取扱説明書を参照してください。 9 1 SPEED OUT 接地 11 重要 デジタル表示型回転計SDM496は安全規格 認定品ではありません。USシリーズと 組み合わせて使用したときは、USシリーズ も安全規格には適合しません。 5.5 モーターを遠隔操作する場合 モーターとコントロールユニット間は標準で0.75mですが、さらに離してお使いになりたい場合は、 オプションの延長コードをご使用ください。コードは、最大4.75mまで延長できます。 ■US206,US315,US425,US540タイプ用 品 名 ケーブル長さ(m) 品 名 ケーブル長さ(m) CC01SS052 1 CC01SS2 1 CC02SS052 2 CC02SS2 2 CC03SS052 3 CC03SS2 3 CC04SS052 4 CC04SS2 4 重要 延長ケーブルを使用する場合には、複数の延長ケーブルを継ぎ足しての延長はしないでください。 誤動作の原因となります。 14 ■US560,US590タイプ用 6.特性 [N・m] [kgfcm] ■使用限界線について 1.2 10 1.0 8 0.8 6 0.6 4 0.4 2 0.2 0 0 トルク 12 スピードコントロールモーターは、負荷と回転速度に対応して 入力が変わります。負荷が大きいほど、また回転速度が遅いほど 温度上昇は高くなります。 ACスピードコントロールモーターの回転速度−トルク特性の グラフには、図のように「使用限界線」が記入されており、 この斜線部を連続運転領域と言います。 「使用限界線」はモーターの許容最高温度を超えずに連続で 運転できる限界で、モーターの温度から決められます。 実際の負荷と回転速度で連続で使えるかどうかは、モーターケース の温度を測定し判断します。モーターケース温度90°C以下であれば、 50Hz 60Hz 60Hz使用限界線 50Hz使用限界線 500 1000 回転速度[r/min] 1500 1800 その条件にて連続使用可能です。 ギヤヘッド使用の場合、ギヤヘッドの許容トルク以下のトルクで お使いください。ギヤヘッドを使用して、このトルクを超えて 運転すると寿命が短くなったり、破損することがあります。 7.拘束時のモーター焼損保護について 警告 ●モーターの過熱保護装置(サーマルプロテクタ)がはたらいたときは、電源を切ってください。過熱保護装置が 自動復帰したときにモーターが突然起動して、けが・装置破損の原因になります。 このモーターは、モーターが何らかの原因で異常発熱し、焼損に至るのを防止するための機能を備えています。 保護方式には次の2通りがあります。 ■サーマルプロテクタ方式(モーター銘板に「TP」 「TP211」と記載されています) 規定の温度になると、内蔵サーマルプロテクタが働いてモーターは停止します。 自動復帰型のため、モーターの温度が下がると自動的に運転を再開します。 点検作業は必ず電源を切ってから行なってください。 サーマルプロテクタ動作温度 開(電源を遮断する)………130°C±5°C 閉(電源をつなぐ) ……… 82°C±15°C ■インピーダンスプロテクト方式(モーター銘板に「ZP」と記載されています) 異常時に拘束状態になった場合、巻線インピーダンスが大きくなり、モーターへの入力を抑制し、 モーター巻線が焼損に至らないようになっています。 15 8.正常に動作しない場合のチェックポイント モーターが正常に動作しない場合は、下の表に従って点検してください。 点検の結果、すべて正常であるにもかかわらずモーターおよび、コントロールユニットが正しく動作しない場合は、 お客様ご相談センター、または最寄りの支店・営業所にご連絡ください。 確認内容 現 象 コントロールユニットに正規の電圧が加えられていますか? モーターとコントロールユニットのコネクタが外れていませんか? 負荷が大きすぎませんか? モーターが回転しない コントロールユニットの「RUN/STAND-BY」スイッチがSTAND-BY側に なっていませんか? モーターとコントロールユニットの組合せは合っていますか? コントロールユニットの速度設定用ボリュームがLOWになっていませんか? サーマルプロテクタが働いていませんか? コンデンサ外付けタイプの場合、コンデンサが「4. 接続」または「5.運転」の 接続方法通りに接続されていますか? 接続方法と違う接続をしていませんか? 「4.接続」または、「5.運転」をもう一度見てください。 逆方向に回転する ギヤヘッドの減速比によっては、ギヤヘッド出力軸の回転方向が異なります。 ギヤヘッドの取扱説明書を参照してください。 コンデンサ外付けタイプの場合、コンデンサが「4. 接続」または「5.運転」の 接続方法通りに接続されていますか? 見る方向が違っていませんか? モーター出力軸側から見て回転方向を時計方向、反時計方向としています。 モーターが異常に熱くなる (モーターケース温度が90°Cを超えている) POWER LEDが点灯しない 異音がする コントロールユニットに正規の電圧が加えられていますか? 周囲温度範囲の上限を超えていませんか? モーターとコントロールユニットの組合せは合っていますか? 電源コードが電源に正しく接続されていますか? モーターとギヤヘッドを正しく組み付けていますか? ギヤヘッドの取扱説明書を参照してください。 モーターと同じ歯切りタイプのギヤヘッドを組み付けていますか? 冷却ファンが回転しない 負荷を付けずに低速で運転していませんか? 速度設定器のツマミをHIGHにして冷却ファンが回転すれば正常です。 ・この取扱説明書の一部または全部を無断で転載、複製することは、禁止されています。 損傷や紛失などにより、取扱説明書が必要なときは、最寄りの支店または営業所に請求してください。 ・取扱説明書に記載されている情報、回路、機器、および装置の利用に関して産業財産権上の問題が生じても、当社は一切の責任を 負いません。 ・製品の性能、仕様および外観は改良のため予告なく変更することがありますのでご了承ください。 ・取扱説明書には正確な情報を記載するよう努めていますが、万一ご不審な点や誤り、記載もれなどにお気づきの点がありましたら、 最寄りのお客様ご相談センターまでご連絡ください。 ・ は、日本その他の国におけるオリエンタルモーター株式会社の登録商標または商標です。 その他の製品名、会社名は各社の登録商標または商標です。この取扱説明書に記載の他社製品名は推奨を目的としたもので、それ らの製品の性能を保証するものではありません。オリエンタルモーター株式会社は、他社製品の性能につきましては一切の責任を 負いません。 © Copyright ORIENTAL MOTOR CO., LTD. 2008 http://www.orientalmotor.co.jp/ 䕹㻃⿿ဗ䛱䛪䛊䛬䛴䛚㈹ၡ䚮䛚┞ㄧ䛵䛐ᐂᵕ䛚┞ㄧ䜿䝷䝃䞀䛾䛐ၡ䛊ྙ䜕䛡䛕䛦䛛䛊䚯 㻃 䝙䝮䞀䜷䞀䝯㻋↋ᩩ㻌䛭䛟䚯ᦘᖈ㞹ヨ䝿PHS䛑䜏䜈䛚ฺ⏕䛒ྊ⬗䛭䛟䚯 㻃 ུ㛣㻃 㻃 㻃 ᮶㻃 ா㻃 ྞཿ㻃ᒁ㻃 ኬ㻃 㜨㻃 16 ᖲ㻃 9:00ࠤ18:30 ᅰ᭑㻃 9:00ࠤ17:30 TEL 0120-925-410 FAX 0120-925-601 TEL 0120-925-420 FAX 0120-925-602 TEL 0120-925-430 FAX 0120-925-603 䛙䛴ཱིㄕ᪺᭡䛵්⏍⣤䜘⏕䛝䛬䛊䜄䛟䚯 HM-9164-2 Unit Type Speed Control Motor US Series ●110V/115V type ●220V/230V type OPERATING MANUAL C Table of Contents 1. Precautions .............................................................Page 2 2. Checking the package contents..............................Page 4 3. Installation...............................................................Page 6 4. Connection..............................................................Page11 5. Operation ................................................................Page12 6. Characteristics ........................................................Page15 7. Locked rotor burnout protection of motor ...............Page15 8. Troubleshooting ......................................................Page16 Thank you for purchasing an Oriental Motor product. This Operating Manual describes product handling procedures and safety precautions. • Please read it thoroughly to ensure safe operation. • Always keep the manual where it is readily available. 1. Precautions Only qualified personnel should work with the product. Use the product correctly after thoroughly reading the section “Safety precautions.” The precautions described below are intended to prevent danger or injury to the user and other personnel through safe, correct use of the product. Use the product only after carefully reading and fully understanding these instructions. Warning Handling the product without observing the instructions that accompany a “Warning” symbol may result in serious injury or death. Caution Handling the product without observing the instructions that accompany a “Caution” symbol may result in injury or property damage. Note The items under this heading contain important handling instructions that the user should observe to ensure safe use of the product. Warning General • Do not use the product in explosive or corrosive environments, in the presence of flammable gases, locations subjected to splashing water, or near combustibles. Doing so may result in fire, electric shock or injury. • Assign qualified personnel the task of installing, wiring, operating/controlling, inspecting and troubleshooting the product. Failure to do so may result in fire, electric shock or injury. • Do not transport, install the product, perform connections or inspections when the power is on. Always turn the power off before carrying out these operations. Failure to do so may result in electric shock. • Turn off the power in the event the overheat protection device (thermal protector) is triggered. Failure to do so may result in injury or damage to equipment, since the fan will start abruptly when the overheat protection device (thermal protector) is automatically reset. Installation • To prevent the risk of electric shock, use the motor for class equipment only. • Install the motor in an enclosure in order to prevent electric shock or injury. • Install the motor and control unit so as to avoid contact with hands, or ground it to prevent the risk of electric shock. Connection • Keep the control unit’s input-power voltage within the specification to avoid fire and electric shock. • Connect the cables securely according to the wiring diagram in order to prevent fire and electric shock. • Do not forcibly bend, pull or pinch the cable. Doing so may fire and electric shock. • To prevent electric shock, be sure to install the terminal cover over the control unit’s terminals after making connections. • Do not remove the covers attached to the 60 W-type and 90 W-type capacitors. • The control unit is not equipped with overcurrent protection. Install a device for overcurrent protection (e.g. circuit breaker) before connecting the unit to the power source. Failure to do so may result in fire. Operation • Turn off the control unit power in the event of a power failure, or the motor may suddenly start when the power is restored and may cause injury or damage to equipment. Maintenance and inspection • Do not touch the connection terminals of the control unit and capacitor immediately after the power is turned off (for a period of 10 seconds). The residual voltage may cause electric shock. Repair, disassembly and modification • Do not disassemble or modify the motor or control unit. This may cause electric shock or injury. Refer all such internal inspections and repairs to the branch or sales office from which you purchased the product. 2 Caution General • Do not use the motor and control unit beyond their specifications, or electric shock, injury or damage to equipment may result. • Keep your fingers and objects out of the openings in the motor, or electric shock, injury or damage to equipment may result. • Do not touch the motor during operation or immediately after stopping. The surface is hot and may cause a burn. Transportation • Do not hold the motor output shaft or motor cable. This may cause injury. Installation • Keep the area around the motor and control unit free of combustible materials in order to prevent fire or a burn. • To prevent the risk of damage to equipment, leave nothing around the motor and control unit that would obstruct ventilation. • The motor should be firmly secured on the metallic plate in order to prevent injury and damage to the equipment. • Provide a cover over the rotating parts (output shaft) of the motor to prevent injury. Connection • Install a ground-leakage breaker. Failure to do so may result in fire. Operation • Use a motor and control unit only in the specified combination. An incorrect combination may cause a fire. • Provide an emergency-stop device or emergency-stop circuit external to the equipment so that the entire equipment will operate safely in the event of a system failure or malfunction. Failure to do so may result in injury. • Immediately when trouble has occurred, stop running and turn off the control unit power. Failure to do so may result in fire, electric shock or injury. • Before turning on the power to the control unit, set the RUN/STAND-BY switch to STAND-BY and the speed potentiometer to LOW. • To prevent bodily injury, do not touch the rotating parts (output shaft and cooling fan) of the motor during operation. • The motor’s surface temperature may exceed 70 °C, even under normal operating conditions. If a motor is accessible during operation, post the warning label shown in the figure in a conspicuous position to prevent the risk of burns. Warning label Disposal • When disposing of the motor or control unit, treat them as ordinary industrial waste. 3 2. Checking the package contents 2.1 Checking the contents Make sure that you have received all of the items listed below. If an accessory is missing or damaged,contact the nearest ORIENTAL MOTOR office. Motor...............................................................1 Control unit .....................................................1 Control unit mounting screw (M3) set .............1 Screws ......................................................4 Washers....................................................4 Nuts...........................................................4 This operation manual ....................................1 Motors and Control units have been designed and inspected according to the following standards. Recognized name is motor model name and control unit name. Motors Control units Standards UL2111, UL1004 CSA C22.2 No.100, CSA C22.2 No.77 EN60950-1 UL508 CSA C22.2 No.14 Applications for Standards EN60034-1, EN60034-5 IEC60034-11 (15 W∼90 W type), IEC60664-1 EN60950-1 EN50178 Certification Body UL File No.E64199 (6 W type) E64197 (15 W∼90 W type) VDE UL File No. E91291 Installation Conditions Installation category , Pollution degree 2, Class (For EN/IEC Standards) When the machinery to which the motor is mounted requires installation category and pollution degree 3 specifications, install the motor in a cabinet that comply with IP54 and connect to power supply via an isolation transformer. ※ Voluntary display of the CE mark conforming to the Low Voltage Directives. ※ The certificate by VDE is valid only for the motor assembly itself. The capacitor is not included in the certificate. A Running Heating Test and a Locked-Rotor Test has been conducted with a aluminum radiation plate of size indicated below. For the motor with a gear head, tests has been conducted with a gear head instead of the radiation plate. Motor Frame size size thickness material □60 (□2.36) □70 (□2.76) □80 (□3.15) □90 : 40W type (□3.54) □90 : 60W, 90Wtype (□3.54) 115×115 (4.53×4.53) 125×125 (4.92×4.92) 135×135 (5.31×5.31) 165×165 (6.50×6.50) 200×200 (7.87×7.87) 5 (0.20) aluminum ※ Dimensions in millimeters (inches). Note: • Units with model numbers ending in “E” are in conformance with the EMC directive. To ensure conformance with EMC directive be sure to conduct EMC measures with the product assembled in your equipment by referring to “Installing and wiring in compliance with EMC directive” on page 9. • The EMC measurements required under standard EN50178 are not performed separately for motors and control units. Perform the EMC test when they are incorporated into the final product. The over-voltage protection test required under standard EN50178 is not performed. Perform the test when incorporated into the final product. 4 2.2 Checking the product name and motor-control unit combination This product comes in a combined set consisting of a motor and a control unit. When the product first arrives, check the name plates to confirm that you have received the correct motor and control unit combination and the correct type of capacitor. ※1 Unit Model name is not the recognized name under the various safety standards. Recognized name is motor model name and control unit name. ※2 The gear ratio appears at the position in the model number indicated by the box (□). ■110V/115V Type Unit ※1 Motor US206-401U USM206-401W US206-001U USM206-001W US315-401U USM315-401W US315-001U USM315-001W US425-401U USM425-401W US425-001U USM425-001W US540-401U USM540-401W US540-001U USM540-001W US560-501U USM560-501W US560-001U USM560-001W US590-501U USM590-501W US590-001U USM590-001W Control unit Capacitor type Compatible gearhead ※2 (sold separately) 2GN□KA USP206-1U 3GN□KA USP315-1U Internal USP425-1U 4GN□KA 5GN□KA,5GN□RAA USP540-1U 5GU□KA,5GU□RAA USP560-1U External USP590-1U 5GU□KA,5GU□KBH,5GU□RAA ■220V/230V Type Unit ※1 Motor US206-402E USM206-402W US206-002E USM206-002W US315-402E USM315-402W US315-002E USM315-002W US425-402E USM425-402W US425-002E USM425-002W US540-402E USM540-402W US540-002E USM540-002W US560-502E USM560-502W US560-002E USM560-002W US590-502E USM590-502W US590-002E USM590-002W Control unit Capacitor type 2GN□K USP206-2E 3GN□K USP315-2E Internal USP425-2E 4GN□K,4GN□RA 5GN□K,5GN□RA USP540-2E 5GU□KB,5GU□RA USP560-2E External USP590-2E Compatible gearhead ※2 (sold separately) 5GU□KB,5GU□KBH,5GU□RA 5 3. Installation Installation conditions Install the motor and control unit in a location that meets the following conditions. Using the unit in a location that does not satisfy these conditions could damage it. • Indoors (this product is designed and manufactured to be installed within another device) • Ambient temperature Motor: -10 °C (14 °F) ∼ +40 °C (104 °F) (avoid freezing) Control unit: 0 °C (32 °F) ∼ +40 °C (104 °F) (avoid freezing) • Ambient humidity: 85 % max. (avoid condensation) • Not exposed to explosive, flammable, or corrosive gas • Not exposed to direct sunlight • Not exposed to dust • Not exposed to water or oil • A place where heat can escape easily • Not exposed to continuous vibration or excessive impact • 1,000 meters or less above sea level • Installation category , Pollution degree 2, Class (For EN/IEC Standards) When the machinery to which the motor is mounted requires installation category and pollution degree 3 specifications, install the motor in a cabinet that comply with IP54 and connect to power supply via an isolation transformer. 3.1 Mounting the motor ■Round shaft motors 1. Drill holes in the mounting plate that match the screws and the motor’s dimensions. Motor 2. Use screws, washers, and nuts listed below to fasten Mounting Plate the motor to the mounting plate. Make sure that no gaps are left between the motor and the surface of the mounting plate. Use screws of an appropriate length. Mounting Screws (not provided) Mounting screws Note: Do not insert the motor into the mounting hole at an angle or force it in, as this could scratch the flange and damage the motor. ■Pinion shaft motor Motor Frame size Screw size Tightening torque □60mm □70mm □80mm □90mm M4 M5 M5 M6 2.0N・m(20kgfcm) 2.5N・m(25kgfcm) 2.5N・m(25kgfcm) 3.0N・m(30kgfcm) 1. Drill holes in the mounting plate that match the screws and the motor’s dimensions. 2. Attach the motor and gearhead using the screws supplied with Motor Gearhead Mounting Plate Screws provided with gearhead 3. the gearhead (sold separately). Attach by using the pilot section as a guide and rotating the gearhead gently left and right, being careful that the shaft’s gear pinion section does not strike the gearhead side plate (metal plate) or gears strongly. Fasten the screws supplied with the gearhead to the mounting plate. Attach so that no gaps are left between the motor flange surface and the gearhead pilot section end surface. For 5GU□K, 5GU□KBH, 5GN□RA, 5GU□RA types, screws for mounting to machinery are not provided. M6 screws (for GN type) or M8 (for GU type) must be provided separately. Refer to the gearhead operation manual for further details concerning mounting (gearhead sold separately). Note: • Confirm gearhead compatibility by checking the table in section 2.2: “Checking the product name and motor-control unit combination”. • Keep the motor and gearhead’s pilot section free of dirt, as the presence of dirt can result in inadequate fastening and cause grease to leak from the gearhead. • Scratches and dents on the gears can cause unusual sounds. ■Motor with cooling fan Equipment Inflow When mounting a motor with a cooling fan onto a device, open a ventilation hole or leave 10 millimeters (0.4 inches) or more behind the fan cover so that the cooling inlet on the back of the motor cover is not blocked. The cooling fan does not always operate while the motor is running. It operates depending the input voltage supplied to the motor. Outflow 10 6 (0.4) ※Dimensions in millimeters (inches). 3.2 Installing the control unit There are two methods for mounting the control unit onto a machine. Refer to the mounting methods described below. M4 screws are not provided with the control unit. Users must supply these screws on their own. Note: Use a tightening torque of 0.7 N·m (7 kgfcm) or less for the screws. Tightening them at a torque above 0.7 N·m (7 kgfcm) could damage the control unit. ■Installing by opening a square hole 1. Cut a hole in the mounting plate as indicated in the 1. diagram to the left. Mounting Plate 2−φ4.5 81 +10 (3.19) 90 ±0.2 (3.54) (.177DIA) 2. Insert the control unit from the front of the mounting plate and fasten with screws and nuts. Mounting screws and nuts 53 +10 Size M4 (2.09) Number 2 of each Dimensions in millimeters (inches). 2. 2-M4 Nut Control Unit 2-M4 Screw Mounting Plate 7 ■Installing without opening a square hole 1. 1. Cut holes in the mounting plate as indicated in the 50 ±0.2 (1.97) 13.2 ±0.2 diagram to the left. Mounting Plate 2. Remove the front panel from the control unit. (Grasp 4−φ3.5 90° φ6.5 (.138DIA.) φ3.5 the front panel alone and pull forward to remove.) (.256DIA.) (.906DIA.) (0.59) φ28 15 ±0.2 (1.02) (3.54) ※Cross Section A (.276DIA.) 26 ±0.2 90 ±0.2 φ23 (1.102DIA.) φ7 (0.59) 15 ±0.2 (0.52) 3. Fasten the control unit to the mounting plate using 2−φ7.5 (.138DIA.) (.295DIA.) ※Cross Section A the 4 M3 screws and nuts provided. Dimensions in millimeters (inches). 4. Fasten the front panel onto the front of the mounting 2., 3., 4. 2-M4 Nut plate using the screws and nuts listed below (not Nut (4 nuts are provided) provided). Control Unit Mounting screws and nuts Size M4 Mounting Screw (4 screws are provided with units) Number 2 of each 2-M4 Screw Note:Use a plate 2 millimeters (0.08 inches) or less in thickness when the mounting plate sandwiched between the control unit and the front panel. Mounting Plate Front Panel 3.3 Installing the capacitor (when using a motor with a capacitor) Use M4 screws to mount the capacitor (screws not provided). Capacitor Cap φ4.3 (.169DIA.) ※Dimensions in millimeters(inches). Note: • Do not remove the capacitor cap from the capacitor. • Do not let the screw fastening torque exceed 1 N·m (10 kgfcm) to prevent damage to the mounting feet. Mount capacitor at least 10 cm (3.94 inches) away from the motor. If it is located closer, he life of the capacitor will be shorterd. • The lead wire (yellow) for capacitor should be about 30 cm (11.81 inches) long. 8 3.4 Installing and wiring in compliance with EMC directive ■General ◆EMC directive (89/336/EEC, 92/31/EEC) The US series units with model numbers ending in “E” are in conformance with the EMC directive. The US series has been designed and manufactured for incorporation in general industrial machinery. The EMC directive requires that the equipment incorporating this product comply with these directives. The installation and wiring method is the basic methods that would effectively allow the customer’s equipment to be compliant with the EMC directive. At Oriental Motor EMC measures are performed with the optional extension cables connected. The compliance of the final machinery with the EMC directive will depend on such factors as configuration, wiring, layout and risk involved in the control-system equipment and electrical parts. It therefore must be verified through EMC measures by the customer of the machinery. ◆Applicable standards EMI Emission Tests Radiated Emission Test Conducted Emission Test EMS Immunity Tests Radiation Field Immunity Test Electrostatic Discharge Immunity Test Fast Transient / Burst Immunity Test Conductive Noise Immunity Test Surge Immunity Test Voltage Dip Immunity Test Voltage Interruption Immunity Test EN61000-6-4 EN55011 EN55011 EN61000-6-2 IEC61000-4-3 IEC61000-4-2 IEC61000-4-4 IEC61000-4-6 IEC61000-4-5 IEC61000-4-11 IEC61000-4-11 ■Installing and wiring Effective measures must be taken against the EMI that the US series may give to adjacent control-system equipment, as well as the EMS of the US series itself, in order to prevent a serious functional impediment in the machinery. The use of the following installation and wiring methods will enable the US series to be compliant with the EMC directive (the aforementioned compliance standards). ◆Connecting mains filter Install a mains filter in the power source line in order to prevent the noise generated within the control unit from propagating outside via the power source line. For mains filters, use the products are shown in the below chart, or an equivalent. Manufacturer Model number TDK Corporation ZAG2210-11S EPCOS AG B84112-B-B110 Schaffner EMC AG FN2330Y-10-06, FN2310X-10-06 Tyco Electronics CORCOM 10ESK1 Install the mains filter as close to the AC input terminal as possible, and use cable clamps and other means to secure the input and output cables firmly to the surface of the enclosure. Connect the ground terminal of the mains filter to the grounding point, using as thick and short a wire as possible. Do not place the AC input cable (AWG18: 0.75 mm2 or more) parallel with the mains-filter output cable (AWG18: 0.75 mm2 or more). Parallel placement will reduce mains-filter effectiveness if the enclosure’s internal noise is directly coupled to the power-supply cable by means of stray capacitance. ◆Grounding procedure The cable used to ground the motor must be as thick and short to the grounding point as possible so that no potential difference is generated. Choose a large, thick and uniformly conductive surface for the grounding point. How to ground the control unit Ground the ground terminal of the control unit. How to ground the motor Scrape the paint away from the mounting flange and connect the grounding cable along with a set screw to the grounding point, using an inner-clip washer. 9 ◆Motor cable connection When the motor cable is extended, use the optional extension cables. Refer to the table of “5.5 Extension cables” on page 14. ◆Others • Connect the motor and other peripheral control equipment directly to the grounding point so as to prevent a potential difference from developing between grounds. • When relays or electromagnetic switches are used together with the system, use mains filters and CR circuits to suppress surges generated by them. ◆Example of motor and control unit installation and wiring Motor D Control unit SPEED CONTROL UNIT USP560-2E A POWER HIGH LOW RUN STAND-BY ORIENTAL MOTOR C D B Capacitor A L N C Power input Grounded Panel A : Ground wire B : Mains filter C : Power cable D : Motor cable (4.75 m) ■Precautions about static electricity Static electricity may cause the control unit to malfunction or become damaged. Be careful when handling the control unit with the power on. Note: Do not come close to or touch the control unit while the power is on. 10 4. Connection 4.1 Connection steps Below is an explanation of how to use the unit as it was set up at the factory. The motors direction of rotation is set in a clockwise direction viewing the motor from the side with the output shaft. When changing the motors direction,refer to section “5.Operation”. ※ Motor in illustration is one with a capacitor. 1. Ground the green ground wire to ground. The function of this ground is for eliminating noise. 2. Connect the motor connector to the control unit connector. Make sure the connection is secure by inserting the connectors until you hear the sound of them coupling. 3. Connect the power cord to the power supply after confirming that the control unit’s RUN/STAND-BY switch is set to STAND-BY, and that the speed potentiometer’s knob is set Motor Control Unit to LOW. The control unit’s green power light goes on when the power is turned on. 2. 11 5. Operation Note: • This motor is B type insulation motor. Make sure that the motor case temperature does not exceed 90 °C (194 °F) during motor operation. Operating the motor above 90 °C (194 °F) will shorten the life of the coil and the ball bearings. Motor case temperature can be measured by fastening a thermometer to the motor’s surface, or with thermo-tape. • When operating the motor of 60 W and 90 W type at the low speed with light load,the cooling fan on the back of the motor will not to rotate because the heating of the motor is low. • A filter for external noise is built into the control unit . However variations from the desired speed may occur depending on the noise level. Test your control unit after installing. Faulty operation can be prevented by installing a noise filter and ferrite core. • Only after turning the power OFF can the lead wires of the power cord terminal block be changed. 5.1 Starting, Changing speeds, Stopping ■Starting POWER LED POWER Maximum-speed adjustment potentiometer (remove front panel before adjustment) LOW Speed Potentiometer Flip the control unit’s RUN/STAND-BY switch to the STAND-BY position. The motor will begin rotating at the speed set with the rotation speed potentiometer. RUN/STAND-BY Switch ■Stopping HIGH RUN STAND-BY Note: • The STAND-BY/STOP switch does not turn the power on and off. Install a separate power switch for situations where the motor is to be stopped for extended periods of time. • When the maximum-speed adjustment potentiometer was used to adjust the maximum speed, readjustment will be necessary if the power-source frequency has been changed. Flip the control unit’s RUN/STAND-BY switch to the STAND-BY position to stop the motor. ■Changing speeds Turning the rotation speed potentiometer’s knob clockwise (toward HIGH) makes the motor go faster, turning it counterclockwise (toward LOW) makes the motor go slower. The motor can be set to rotate at a speed of between 90 to 1400 r/min (50 Hz) or 90 to 1600 r/min (60 Hz). The set speed does not change in the range of 90 to 1400 r/min, even when the power-source frequency changes. *The speed may exceed the upper limit of the variable-speed range before the speed potentiometer is turned to the maximum level (HIGH side). When the maximum-speed adjustment potentiometer is used, the entire range of the speed potentiometer can be used. <How to adjust maximum speed> Remove the front panel and adjust the maximum speed according to the following procedure: 1. Set the “RUN/STANDBY” switch to “RUN.” 2. Turn the speed potentiometer to the maximum level. 3. Turn the maximum-speed adjustment potentiometer until 1400 r/min (50 Hz) or 1600 r/min (60 Hz) is reached. Turning the potentiometer counterclockwise increases the maximum speed, while turning it clockwise decreases the speed. Use an insulated precision Phillips screwdriver for the adjustment. 12 5.2 Operating the motor in one direction Connections differ depending on the type of capacitor,internal or external. To identify the capacitor type, refer to the table in section 2: “Checking the package contents” (page 2). The motor rotates in a clockwise (CW) and counterclockwise (CCW) direction (viewing the motor from the side with the output shaft). Because the motor’s direction of rotation is set in a clockwise direction when shipping,the lead wires of the power cord terminal block are connected to N (CW). When operating the motor in a counterclockwise direction,connect the lead wires to N (CCW). ※ Motor in illustration is the 110V/115V type. Changing the motor's rotation direction “CW” (set at the factory) to “CCW” ■Motor with internal capacitor 1. Remove the plastic cover over the power cord terminal block on the rear of the control unit. 2. Disconnect the black lead wire connected to the power cord terminal from N (CW) and reconnect it to N (CCW). When the control unit is shipped from the factory, lead wires are connected to power cord terminals L and N (CW). 3. Replace the plastic cover over the power cord terminal block. ■Motor with external capacitor 1. Remove the plastic cover over the power cord terminal block on the rear of the control unit. 2. Disconnect the black lead wire connected to the power cord terminal fromN (CW) and reconnect it to N (CCW). Do not change the capacitor’s lead wire (the yellow wire). When the control unit is shipped from the factory,the black lead wire connected to the power cord terminal is connected to N (COM ) and N (CW). 3. Replace the plastic cover over the power cord terminal block. 13 5.3 Switching between rotation directions Users must provide a power switch and a forward/reverse switch. Note: Change the motor’s direction of rotation only after the motor has come to a complete stop. If you try to change direction before it has stopped, you may be unsuccessful or it may take extra time. ■Motor with internal capacitor 1. Connect a power switch (SW1) and a forward/reverse switch (SW2). SW1 2. Flip the RUN/STAND-BY switch to STAND-BY and L CW N(CW) make sure that the motor comes to a complete stop. AC Power Supply SW2 3. After the motor stops, turn off the power switch CCW N(CCW) (SW1) and turn SW2 to CW/CCW. 4. Flip the power switch (SW1) toON. ■Motor with external capacitor 1. Disconnect the black lead wire connected to SW1 L ON AC Power Supply N(CW) N(COM) CW N(CCW) ON SW2 CCW Capacitor N (COM) and N (CW) of the power cord terminal block. 2. Connect a power switch (SW1) and a forward/reverse switch (SW2). 3. Flip the RUN/STAND-BY switch to STAND-BY and make sure that the motor comes to a complete stop. 4. After the motor stops, turn off the power switch (SW1) and turn SW2 to CW/CCW. 5. Flip the power switch (SW1) to ON. ■Contact capacity of the switch Use the switch of AC 250 V,5 A or more capacity. 5.4 Checking the motor’s speed Control Unit Rear Panel Speed Indicator SDM496 Pin No. 9 1 SPEED OUT Ground Use the SDM496 digital display model (sold separately) . Connect the power cord SPEED OUT terminals to 1 and 11 on the digital tachometer and the motor’s speed will be displayed once the motor begins rotating. Refer to the SDM496 digital display model operation manual for connection details. 11 Note: The digital speed indicator SDM496 is not certified by the recognized safety standards. When the digital speed indicator is used with the US series, which is certified by the recognized safety standards and/or the conformed safety standards, the US series itself is not in conformance with the safety standards. 5.5 Extension cables The distance between the motor and control unit is 0.75 meters (29.53 inches) normally, use an extension cord (sold separately) in situations where the motor and control unit are to be used apart from each other. Using the longest cord, the distance can be extended up to 4.5 meters (177.17 inches). ■US206, US315, US425, and US540 models ■US560 and US590 models Model CC01SS052 Cord length meters (inches) 1 (39.37) 2 (78.74) 3 (118.11) 4 (157.48) Model Cord length meters (inches) 1 (39.37) CC01SS2 2 (78.74) CC02SS2 CC03SS052 3 (118.11) CC03SS2 4 (157.48) CC04SS052 CC04SS2 Note: Do not use multiple extension cords connected to each other, as this could result in faulty operation. CC02SS052 14 6. Characteristics [N・m] [kgfcm] ■Safe-Operation Line 1.2 10 1.0 8 0.8 6 0.6 4 0.4 2 0.2 0 0 Torque 12 50 Hz 60 Hz 50 Hz Safe-Operation Line 60 Hz Safe-Operation Line 500 1000 Speed [r/min] 1500 1800 Input power to the speed control motor varies with the load and the speed. The greater the load, and the lower the speed, the higher the motor’s temperature will rise. The graph left displays the relationship between the speed and the torque characteristics of the AC speed control motor. The line is referred to as the safe-operation line and the shaded area is called the continuous operation area. The safe-operation line, measured by motor’s temperature, indicates its operational limit for continuous usage with the temperature level below the permissible maximum. Whether the motor can be operated continuously or not is judged by measuring the temperature of the motor case. When the temperature of the case is below 90 °C (194 °F), the motor is capable of continuous operation. When using a gearhead, be aware that it is necessary to operate below the maximum permissible torque. If the actual torque required should exceed the maximum permissible torque, it may cause possible damage to the motor and/or shorten its life. 7. Locked rotor burnout protection of motor Warning ・Turn off the power in the event the overheat protection device (thermal protector) is triggered. Failure to do so may result in injury or damage to equipment, since the fan will start abruptly when the overheat protection device (thermal protector) is automatically reset. This motor is equipped with the function to prevent the motor from burning out as a result of abnormal heating caused by some reasons, which protects the motor in two ways. ■Thermal protection (“TP” “TP211” is stamped on the motor name plate) When the motor reaches a predetermined temperature, the internal thermal protector is activated and the motor is stopped. With the automatic resume feature, the motor automatically begins operating again as soon as the motor temperature falls. Always turn the power off before performing inspections. Thermal protector activation range: Power is turned off at 130 °C (266 °F) ± 5 °C (9 °F) Power is turned back on at 82 °C (180 °F) ± 15 °C (27 °F) ■Impedance protection (“ZP” is stamped on the motor name plate) When the motor goes into locked rotor condition due to a malfunction, coil impedance rises, suppressing input to the motor and protecting the motor coil from burnout. 15 8. Troubleshooting When the motor is not functioning normally, perform an inspection covering the points listed in the table below. If the inspection shows that everything is normal but the motor and control unit still are not functioning normally, contact the nearest ORIENTAL MOTOR office. Things to check Problem Is the correct voltage being supplied to the control unit? Have the motor and control unit become disconnected? Is the load too large? The motor does not rotate Is the control unit’s RUN/STAND-BY switch set to STAND-BY? Do you have the right motor-control unit combination? Is the control unit’s speed knob turned to LOW? Was the thermal protector activated? Are the connections right? Check “4:Connecting” or “5:Operating” The gearhead output shaft’s rotation direction differs depending on the gearhead’s deceleration ratio. Refer to the gearhead operation manual. The motor rotates in the wrong direction If you are using a motor with an external capacitor, is it connected as indicated in “4:Connecting” or “5:Operating” ? Are you looking at the motor from the wrong side? Rotation is defined as being clockwise and counterclockwise when viewing the motor from the side with the output shaft. The motor becomes extraordinarily Is the correct voltage being supplied to the control unit? hot ( motor case temperature Does the ambient temperature exceed the permissible range? exceeds 90°C (194°F) ) Do you have the right motor-control unit combination? The power lamp does not go on Is the power cord correctly connected to the power supply? Are the motor and gearhead correctly fastened? Refer to the gearhead operation The motor makes a strange noise manual. Is the coupled gearhead the same pinion type as the motor shaft? The cooling fan does not rotate Are you operating the motor at low speed without a load? If turning the speed potentiometer’s knob to HIGH causes the cooling fan to begin rotating, it is operating normally. • Unauthorized reproduction or copying of all or part of this manual is prohibited. If a new copy is required to replace an original manual that has been damaged or lost, please contact your nearest Oriental Motor branch or sales office. • Oriental Motor shall not be liable whatsoever for any problems relating to industrial property rights arising from use of any information, circuit, equipment or device provided or referenced in this manual. • Characteristics, specifications and dimensions are subject to change without notice. • While we make every effort to offer accurate information in the manual, we welcome your input. Should you find unclear descriptions, errors or omissions, please contact the nearest office. • is a registered trademark or trademark of Oriental Motor Co., Ltd., in Japan and other countries. Other product names and company names mentioned in this manual may be registered trademarks or trademarks of their respective companies and are hereby acknowledged. The third-party products mentioned in this manual are recommended products, and references to their names shall not be construed as any form of performance guarantee. Oriental Motor is not liable whatsoever for the performance of these third-party products. © Copyright ORIENTAL MOTOR CO., LTD. 2008 ïPlease contact your nearest Oriental Motor office for further information. Technical Support Tel:(800)468-3982 8:30 A.M. to 5:00 P.M., P.S.T. (M-F) 7:30 A.M. to 5:00 P.M., C.S.T. (M-F) E-mail: [email protected] www.orientalmotor.com 16 Headquarters and D¸sseldorf Office Tel:0211-52067-00 Fax:0211-52067-099 Munich Office Tel:089-3181225-00 Fax:089-3181225-25 Hamburg Office Tel:040-76910443 Fax:040-76910445 Tel:(02)8228-0707 Fax:(02)8228-0708 Tel:(6745)7344 Fax:(6745)9405 Tel:(03)22875778 Fax:(03)22875528 Tel:01256-347090 Fax:01256-347099 Tel:66-2-254-6113 Fax:66-2-254-6114 Tel:01 47 86 97 50 Fax:01 47 82 45 16 KOREA Tel:(032)822-2042~3 Fax:(032)819-8745 Tel:02-93906346 Fax:02-93906348 Headquarters Tokyo, Japan Tel:(03)3835-0684 Fax:(03)3835-1890 Printed on Recycled Paper
© Copyright 2026 Paperzz