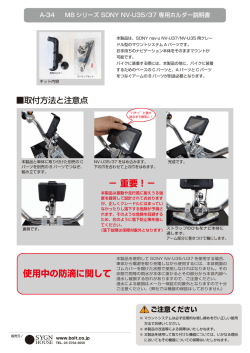
RACK MOUNT KIT BKM-31E14 警告 安全のための注意事項を守らないと、人身事故になるこ とがあります。 このインストレーションマニュアルには、 事故を防ぐための重要な注意事項 と製品の取り扱いかたを示してあります。 このマニュアルをよくお読みのう え、製品を安全にお使いください。お読みになったあとは、いつでも見られ るように必ず保管してください。 INSTALLATION MANUAL 1st Edition [Japanese/English] 安全のために 警告表示の意味 注意を促す記号 このインストレーションマニュアルおよび製品では、次のような表示を しています。表示の内容をよく理解してから本文をお読みください。 注意 注意 指挟み 行為を禁止する記号 この表示の注意事項を守らないと、 事故によりけがをしたり周辺の物品に 損害を与えたりすることがあります。 禁止 注意 下記の注意を守らないと、 けがをしたり周辺の物品に損害を与えることがあります。 ラックマウントは二人以上で行う 注意 モニターをラックにマウントするときは、二人以上で行ってください。一人 で行うと、腰を痛めたり、けがの原因となることがあります。 安定した姿勢で作業する 注意 ラックマウントするとき、またラックからモニターを取り外すときに、バラ ンスを崩すとモニターが落下して、けがの原因となることがあります。安定 した姿勢で注意深く作業してください。 14 型以外のモニターには使わない 禁止 本機は 14 型モニター用です。これ以外の大型モニターにこのラックマウン トキットを使うと、レールの強度不足などにより、モニターが落下して、け がの原因となることがあります。 手や指をはさまない 指挟み モニターをラックに収納するとき・引き出すとき、ラックマウントレールな どに手や指をはさまないようにご注意ください。はさむと、けがをすること があります。 目次 概要 .......................................................................................................................... 2(J) 部品構成 ................................................................................................................ 2(J) 組み立て ...................................................................................................................... 3(J) 1(J) 日 本 語 概要 ラックマウントキットBKM-31E14は、ソニーBVMシリーズの 部品 14型モニター(BVM-14F1J/14E1J)をEIA規格の19インチ標準 J 連結金具 4 4-052-059-01 K 幅広フランジ 2 4-052-060-01 L ハンドル 2 4-337-212-12 M スプリングワッシャー 4 7-623-212-22 N ネジ ‘M5×14 4 7-682-177-01 O ネジ ‘PSW4×12 6 7-682-963-09 数量 部品番号 ラックに収納するためのマウントキットです。 部品構成 BKM-31E14は以下の部品で構成されています。組み立てを始 める前に、部品がすべてそろっていることをお確かめくださ い。 表中のA∼Oは後続ページのイラスト中のA∼Oに対応しま す。 部品 数量 部品番号 A レール A 2 B レール B 2-378-217-02 (出荷時は AをB に差し込んだ状 態になっていま す。) 2 C 取り付け金具 (前) 2 4-051-611-01 D 取り付け金具 (後) 2 4-051-612-01 E 板ナット 4 4-051-259-01 板ナットの上下 は、図のように ネジ穴の位置で 確認してくださ い 長い 上 短い 下 F ネジ ‘PSW4×8 16 7-682-961-01 G ネジ ‘PSW4×20 8 7-682-966-01 H ネジ ‘M4×10 8 7-682-162-01 I フランジナット M4 4 4-304-749-01 2(J) 組み立て 1 モニター底面の足 4 個を外す。 足 2 幅広フランジにハンドルを取り付ける。 N ネジ‘M5 ×14 M N ネジ‘M5 ×14 K L 3 幅広フランジをモニターに取り付ける。 O ネジ‘PSW4×12 O ネジ‘PSW4×12 4 連結金具をモニターに取り付ける。 F ネジ‘PSW4×8 J (続く) 3(J) 組み立て 5 レール B からレール Aを外す。 ご注意 板バネを指で押さえ ながら引き抜く。 レールに指をはさまないように 板バネ ご注意ください。 B A 6 レール Aをモニターに取り付ける。 モニター A H ネジ‘M4 ×10 7 レールBの両端に取り付け金具をネ B ジ止めする。 C D I B I H ネジ‘M4 ×10 H ネジ‘M4 ×10 後ろのネジは仮止めに しておく。 前のネジ止めにはこの 穴を使用する。 8 G ネジ‘PSW4×20 ラック 取り付け金具を取り付けたレールBを ラックに取り付ける。 後ろ側 E E E B E 長い 前側 G ネジ‘PSW4×20 4(J) 短い 仮止めしたネジを しっかり締める。 9 ラックにモニターを取り付ける。 B 注意 モニターをラックに完全に押し込 んでください。レールAの板バネが カチッと音を立てて固定されるま で、 手を離さずに確実に押し込ん でください。 さもないとモニター が落下するおそれがあります。 A モニター ラック 10モニターをラックに固定する。 ラックのネジ穴に合った市販のネジ を使用してください。 市販のネジ ラック モニターからラックを取り出すときは 板バネ 板バネを指で押さえな がら引き抜く。 5(J) Contents 1(E) English Overview ............................................................................................... 2(E) Components .......................................................................... 2(E) Assembly ............................................................................................... 3(E) Overview The BKM-31E14 is a rack mount kit for mounting a Sony BVM series 14-inch monitors (BVM-14F1/14E1 series) in an EIA standard 19-inch rack. Part Qty Part no. I Flange nut M4 4 4-304-749-01 J Bracket 4 4-052-059-01 K Wide flange 2 4-052-060-01 L Handle 2 4-337-212-12 M Spring washer 4 7-623-212-22 N Screw M5×14 4 7-682-177-01 O Screw PSW4×12 6 7-682-963-09 Components The BKM-31E14 consists of the following components. Check to make sure that you have all the components before beginning assembly. The circled letters A to O in the table below correspond to those in the illustrations on the subsequent pages. Part Qty Part no. A Rail A 2 2-378-217-02 (Shipped with rail A inserted in rail B.) B Rail B 2 C Front bracket 2 4-051-611-01 D Rear bracket 2 4-051-612-01 E Plate nut 4 4-051-259-01 Judge, from Long the position of the screw holes (as shown in the Short figure), which side is the top. Top Bottom F Screw PSW4×8 16 7-682-961-01 G Screw PSW4×20 8 7-682-966-01 H Screw M4×10 8 7-682-162-01 2(E) Assembly 1 Remove the four feet from the bottom of the monitor. Feet 2 Attach the handle to the wide flange. N Screw M5×14 M N Screw M5×14 K L 3 Attach the wide flanges to the monitor. O Screws PSW4×12 O Screws PSW4×12 4 Attach the brackets to the monitor. F Screws PSW4× 8 J (continued) 3(E) Assembly 5 Pull out rail A from rail B. Note Take care not to get your fingers caught between the rails. Hold the plate spring with your finger and pull out. Plate spring B A 6 Attach rail A to the monitor. Monitor A H Screws M4×10 7 Attach the front bracket and rear bracket to rail B. D I B C B I H Screw M4×10 H Screw M4×10 Leave the rear screw loose. Use this hole to secure the front bracket. 8 Attach rails B to the rack. G Screws PSW4×20 Rack Rear E E E B E Long Front G Screws PSW4×20 4(E) Short Tighten the rear screw left loose. 9 Insert rails A attached to the monitor into rails B. B Note Push the monitor all the way into the rack, without releasing your grip until you hear an audible click as the plate springs of rails A are fixed in place. Unless they are fixed in place, there is a danger that the monitor might fall out of the rack. A Monitor Rack 10Using screws appropriate for the rack’s screw holes, secure the monitor to the rack. Appropriate screws Rack Removing the monitor from the rack Plate spring Hold the plate spring with your finger and pull out. 5(E) The material contained in this manual consists of information that is the property of Sony Corporation and is intended solely for use by the purchasers of the equipment described in this manual. Sony Corporation expressly prohibits the duplication of any portion of this manual or the use thereof for any purpose other than the operation or maintenance of the equipment described in this manual without the express written permission of Sony Corporation. Le matériel contenu dans ce manuel consiste en informations qui sont la propriété de Sony Corporation et sont destinées exclusivement à l’usage des acquéreurs de l’équipement décrit dans ce manuel. Sony Corporation interdit formellement la copie de quelque partie que ce soit de ce manuel ou son emploi pour tout autre but que des opérations ou entretiens de l’équipement à moins d’une permission écrite de Sony Corporation. Das in dieser Anleitung enthaltene Material besteht aus Informationen, die Eigentum der Sony Corporation sind, und ausschließlich zum Gebrauch durch den Käufer der in dieser Anleitung beschriebenen Ausrüstung bestimmt sind. Die Sony Corporation untersagt ausdrücklich die Vervielfältigung jeglicher Teile dieser Anleitung oder den Gebrauch derselben für irgendeinen anderen Zweck als die Bedienung oder Wartung der in dieser Anleitung beschriebenen Ausrüstung ohne ausdrückliche schriftliche Erlaubnis der Sony Corporation. Sony Corporation BKM-31E14 (WW, 和, 英) 3-810-522- 01 (1) B & I Systems Company Published by B & I Systems Company Printed in Japan 1995.09.08 1995
© Copyright 2026 Paperzz