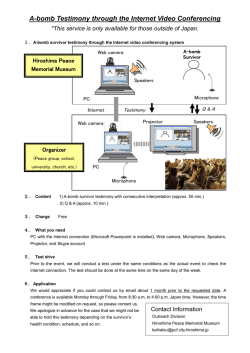
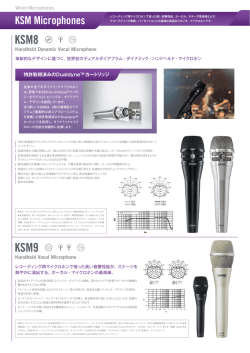
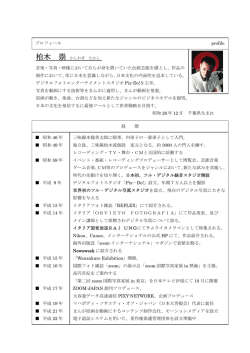
2-514-994-03(1) 日本語 前 指向特性図 Precautions 前 ガンズームマイクロホン Gun Zoom Microphone Microphone zoom à directivité variable L このマークの商品は、ソニー(株)のビデオ機器の アクティブインターフェース シュー システムに対応しています。このシステムを搭載したビデオ機器とアクセ サリーを組み合わせることにより、目的に合わせた効果的な撮影が簡単に行えま す。 取扱説明書 Operating Instructions Mode d’emploi Manual de instrucciones この取扱説明書の注意事項をよくお読みください。お読みになったあとは、いつで もみられるところに必ず保管してください。 ECM-HGZ1 • ECM-HGZ1は電源供給タイプのアクティブインターフェースシューを持つビデ 1 4 2 保証書とアフターサービス 保証書 • この製品には保証書が添付されていますので、お買い上げの際お買い上げ店でお • 所定事項の記入および記載内容をお確かめのうえ、大切に保存してください。 • 保証期間は、お買い上げ日より1年間です。 Sound source Source sonore Fuente de sonido B (See illustration A) Set the power switch of the microphone to “OFF” before attaching or removing it from the video camera. 保証期間中の修理は 保証書の記載内容に基づいて修理させていただきます。 詳しくは保証書をご覧ください。 Removing the microphone • • • • マイクロホンを落としたり、たたいたり、強い衝撃を与えないでください。 高温多湿の場所での保存は避けてください。 屋外で使うとき、雨や海水にぬれないようにしてください。 汚れたとき、乾いた布で拭いてください。 アフターサービス この取扱説明書をもう一度ご覧になってお調べください。 それでも具合の悪いときは テクニカルインフォメーションセンターにご相談ください。 保証期間経過後の修理は 修理によって機能が維持できる場合は、ご要望により有料修理させてい ただきます。 1 マイクの固定つまみが「RELEASE」方向1に回りきっているか確認をす る。(イラストA-1参照) 2 マイクの裏面にある矢印2とビデオカメラにある矢印3の方向を合わせ る。(イラストA-1参照) 3 マイクの端子部をビデオカメラのコネクタ凹部4にはめ込み、矢印3方向 お問い合わせ 窓口のご案内 4 固定つまみをカチッと音がするまで、「LOCK」方向へ回す。 (イラストA-2参照) 5 マイクの先端を、被写体方向に回転させる。 マイクは180度以上回転します。 ■テクニカルインフォメーションセンター ご使用上での不明な点や技術的なご質問のご相談、 および修理受付の窓口です。 製品の品質には万全を期しておりますが、万一不具合が生じ た場合は、「テクニカルインフォメーションセンター」まで ご連絡ください。 修理に関するご案内をさせていただきます。また修理が必要 な場合は、お客様のお宅まで指定宅配便にて集荷にうかがい ますので、まずお電話ください。 にスライドさせる。 音源 Attaching the microphone ご注意 ビデオカメラに取り付ける/取りはずす際は、マイクの電源スイッチが「OFF」の 状態で行なってください。 2 本機装着時 調子が悪いときはまずチェックを 取り付けかた(イラストA参照) 3 後 マイクへの電源供給や信号の伝達は、アクティブインターフェースシューの端子 で行います。わずらわしい接続コードはありません。 • 映像のズーミングに連動して指向角(ステレオ拡がり角)が変化するズームマイ クモードと、ズーミングに連動しない鋭指向性のガンマイクモードの切り替えが できます。 オカメラ専用の鋭指向性マイクです。 1 ビデオカメラマイクの場合 • The microphone should never be dropped or subjected to extreme shock. • Keep the microphone away from extremely high temperatures and humidity. • When using outdoors, never let the microphone become wet with rain or saltwater. • When the unit become soiled, wipe them with a dry cloth. 1 Make sure that you completely turn the lock knob towards “RELEASE” 1 . (See illustration A-1) 2 Align the arrow on the rear of the microphone 2 with the arrow on the video camera 3. (See illustration A-1) 3 Insert the terminal of the microphone into the convex connector 4 of the video camera. Then slide the microphone in the direction of the arrow on the video camera 3. 4 Turn the lock knob towards “LOCK” until it clicks into place. (See illustration A-2) 5 Turn the tip of the microphone towards the subject. • アクティブインターフェースシューに取り付けるだけのワンタッチ接続。 A 後 R 受け取りください。 主な特長 2005 Sony Corporation Printed in Japan R L 電話のおかけ間 違いにご注意く ださい。 ●ナビダイヤル・・・ 0570-00-0066 (全国どこからでも市内通話料でご利用いただけます) 取りはずすとき ●携帯電話・PHSでのご利用は・・・ 0466-38-0253 (ナビダイヤルが使用できない場合はこちらをご利用 ください) 1 固定つまみを「RELEASE」方向に回してゆるめる。 2 上から押しながら取り付けた方向と反対に引き出してはずす。 受付時間:月〜金曜日 午前9時〜午後8時 土、日曜日、祝日 午前9時〜午後5時 ご注意 お電話される際に、本機の型名(ECM-HGZ1)をお知らせ ください。 より迅速な対応が可能になります。 マイクが差し込めないときは、固定つまみを止まるまで「RELEASE」方向に回して ください。固定ロックが解除されます。 ソニー株式会社 〒108-0075 東京都港区港南1-7-1 使いかた(イラストB参照) 目的 スイッチの位置 ズームマイクとして使うとき ZOOM ビデオカメラ側のマイクを使うとき OFF ズームと連動させないで使うとき GUN ご注意 • 取り付けたマイクを持ってビデオカメラを持ち上げないでください。 • ご使用にならないときは、ビデオカメラから取りはずし、付属のポーチに収納し てください。また、マイクのみを持ち運ぶときも、付属のポーチに収納してくだ さい。 • ビデオカメラからカセットを出し入れしにくい場合は、マイクを回転させてくだ さい。 エレクトレットコンデンサー型 鋭指向性 約50 g 約6 mW(無音時) ガンズームマイクロホン(1)、ポーチ(1)、 印刷物一式 1 Loosen the lock knob by turning it towards “RELEASE.” 2 Press the microphone down while sliding it out in the opposite direction of the arrow to remove it. Note If you cannot insert the microphone, turn the lock knob towards “RELEASE” until it reaches the end to cancel the lock. Using the microphone (See illustration B) Purpose Switch position To use as a zoom microphone ZOOM To use the microphone of the video camera OFF To use not in sync with the zoom GUN Notes • Do not lift the video camera by the microphone. • Remove and store the microphone in the supplied carrying case when not in use. Also store it in the supplied carrying case when carrying it separately from the video camera. • When the presence of microphone prevents you from inserting or ejecting the cassette, turn the microphone. Specifications Model Directivity Mass Power consumption Electric condenser microphone Super-directional Approx. 50 g (1.8 oz.) Approx. 6 mW (when generating no sound) Gun Zoom Microphone (1), Case (1), Set of printed documentation Included items Directivity Diagram Front This mark indicates the Active Interface Shoe System for use with Sony video products. Video components and accessories equipped with this system are designed to make effective recording simple. Before operating the unit, please read this instructions thoroughly, and retain it for future reference. Main Features 主な仕様 形式 指向性 質量 消費電力 同梱物 English The microphone can rotate more than 180 degrees. • The ECM-HGZ1 is a super-directional microphone specially designed for video cameras equipped with an active interface shoe. • One-touch attachment by the active interface shoe The active interface shoe terminal supplies the power and relays the signals from the microphone doing away with the need for cumbersome cables. • Switchable between ZOOM microphone mode that synchronizes directional sensitivity (stereo panorama) with the video zoom feature and the unsynchronized GUN microphone mode for a super-directional pattern. Front L R Rear When using the microphone of video camera L R Rear When using this unit Français Illustration de la directivité Notas Avant Avant Ce label indique le système de griffe Active interface shoe conçu pour les produits vidéo Sony. Les composants et accessoires munis de ce label permettent une prise de vues plus simple et efficace. L R Arrière Quand le microphone de la caméra vidéo est utilisé L R Arrière Quand cet appareil est utilisé Avant d’utiliser ce produit, veuillez lire attentivement cette notice et la garder pour toute référence future. Caractéristiques principales Précautions Esta marca indica el sistema de zapata de interfaz activa para utilizarse con productos de vídeo Sony. Los componentes y los accesorios de vídeo provistos de este sistema han sido diseñados para facilitar la videofilmación efectiva. Antes de utilizar la unidad, lea detenidamente este manual de instrucciones, y consérvelo para futuras referencias. Fixation du microphone (Voir l’illustration A) Mettez l’interrupteur d’alimentation en position « OFF » avant de fixer ou de détacher le microphone de la caméra vidéo. 1 Veillez à tourner le verrou complètement dans le sens de « RELEASE » 1. (Voir l’illustration A-1) 2 Alignez la flèche à l’arrière du microphone 2 et la flèche sur la caméra vidéo 3. (Voir l’illustration A-1) 3 Insérez la borne du microphone dans le connecteur convexe 4 de la caméra vidéo, puis faites glisser le microphone dans le sens de la flèche sur la caméra vidéo 3. 4 Tournez le verrou vers « LOCK » jusqu’à ce qu’il s’encliquette. (Voir l’illustration A-2) 5 Tournez l’extrémité du microphone vers le sujet. Le microphone peut tourner à 180 degrés. Retrait du microphone 1 Desserrer le verrou en le tournant vers « RELEASE ». 2 Faites glisser le microphone dans le sens opposé à la flèche tout en appuyant dessus pour le retirer. Remarque Si vous ne parvenez pas à retirer le microphone, tournez le verrou complètement vers « RELEASE » pour désenclencher le verrou. Utilisation du microphone (Vor l’illustration B) Position du commutateur But Características principales • El ECM-HGZ1 es un micrófono superdireccional especialmente diseñado para videocámaras equipadas con zapata de interfaz activa. • Instalación con un toque mediante la zapata de interfaz activa El terminal de zapata de interfaz activa suministra alimentación y transmite las señales procedentes del micrófono evitando la necesidad de cables molestos. • Conmutable entre el modo de micrófono ZOOM, que sincroniza la sensibilidad direccional (panorama estéreo) con la función de zoom de vídeo, y el modo de micrófono GUN sin sincronizar para ofrecer un patrón superdireccional. Precauciones • No deje caer ni someta nunca el micrófono a golpes extremados. • Mantenga el micrófono alejado de temperaturas y humedad extremadamente altas. • Cuando utilice el micrófono en exteriores, no permita nunca que se humedezca con la lluvia ni el agua del mar. • Si el micrófono se ensucia, frótelo con un paño seco. Instalación del micrófono (Consulte la ilustración A) Ponga el interruptor de la alimentación del micrófono en “OFF” antes de instalarlo en la videocámara o desinstalarlo de ella. 1 Cerciórese de haber girado el mando de bloqueo completamente hasta “RELEASE” 1. (Consulte la ilustración A-1) 2 Alinee la flecha de la parte posterior del micrófono 2 con la flecha de la videocámara 3. (Consulte la ilustración A-1) 3 Inserte el terminal del micrófono en el conector convexo 4 de la videocámara. Después deslice el micrófono en el sentido de la flecha de la videocámara 3. 4 Gire el mando de bloqueo hacia “LOCK” hasta que chasquee en su lugar. (Consulte la ilustración A-2) 5 Gire la punta del micrófono hacia el motivo. El micrófono puede girar más de 180 grados. Utilisation combinée du microphone et du zoom ZOOM Desinstalación del micrófono Utilisation du microphone de la caméra vidéo OFF Utilisation indépendante du zoom GUN 1 Afloje el mando de bloqueo girándolo hacia “RELEASE”. 2 Presione el micrófono hacia abajo mientras lo desliza hacia fuera en sentido opuesto al de la flecha para desinstalarlo. Remarques • Ne saisissez pas de la caméra vidéo par le microphone. • Enlevez et rangez le microphone dans l’étui de transport fourni guand vous ne l’utilisez pas. Rangez-le aussi dans cat étui quand vous transportez séparément de la caméra vidéo et le microphone. • Quand le microphone vous empêche d’insérer ou d’éjecter la cassette, tournez-le. Nota Si no puede insertar el micrófono, gire el mando de bloqueo hacia “RELEASE” hasta que alcance el extremo para cancelar el bloqueo. Utilización del micrófono (Consulte la ilustración B) Spécifications Finalidad Microphone à condensateur Super-directionnelle Env. 50 g (1,8 on.) Env. 6 mW (quand aucun son n’est produit) Microphone zoom à directivité variable (1), Etui (1), Jeu de documents imprimés Posición del selector Para utilizarlo como micrófono zoom ZOOM Para utilizar el micrófono de la videocámara OFF Para utilizarlo sin sincronización con el zoom GUN Micrófono electrostático Superdireccional Aprox. 50 g Aprox. 6 mW (cuando no genere sonido) Micrófono zoom de pistola (1), Estuche (1), Juego de documentación impresa Diagrama de directividad Delante Delante L R Detrás • Ne pas laisser tomber le microphone et ne pas le soumettre à des chocs. • Ne pas exposer le microphone à des températures ou une humidité élevées. • Ne pas exposer le microphone à la pluie ou à l’eau de mer lorsqu’il est utilisé à l’extérieur. • Lorsque le microphone est sale, le nettoyer avec un chiffon sec. Modèle Directivité Poids Consommation Articles inculs Especificaciones Modelo Directividad Masa Consumo de energía Elementos incluidos Español • Le ECM-HGZ1 est un microphone super-directionnel spécialement conçu pour les caméras vidéo munies d’une griffe active. • Fixation instantanée par la griffe active La borne de la griffe fournit l’alimentation nécessaire et transmet les signaux du microphone sans câbles encombrants. • Commutation entre le mode ZOOM qui synchronise la sensibilité du son (panorama stéréo) sur le zoom vidéo et le mode GUN sans synchronisation pour améliorer la directivité. • No levante la videocámara por el micrófono. • Cuando no vaya a utilizar el micrófono, desinstálelo y guárdelo en el estuche de transporte suministrado. Guárdelo también el estuche de transporte suministrado cuando lo lleve separado de la videocámara. • Cuando la presencia del micrófono le impida insertar o extraer el videocasete, gírelo. Cuando utilice el micrófono de la videocámara L R Detrás Cuando utilice esta unidad
© Copyright 2026 Paperzz