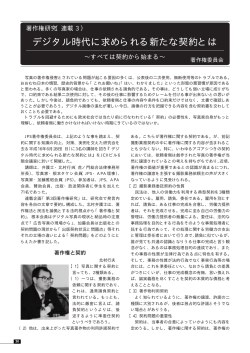
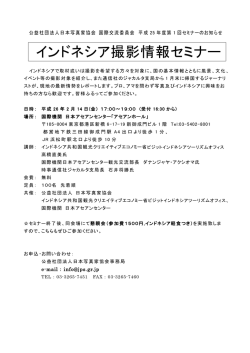
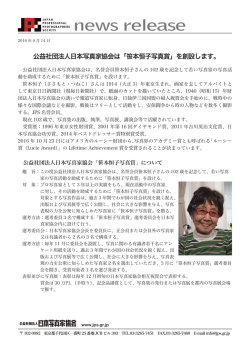
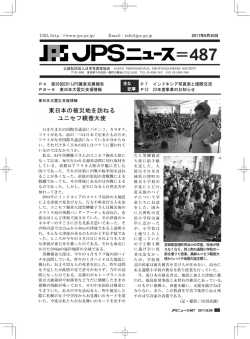
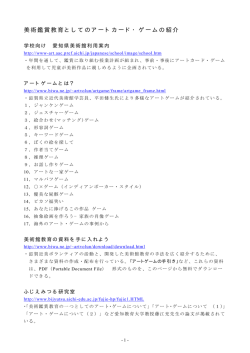
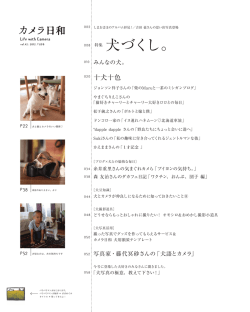
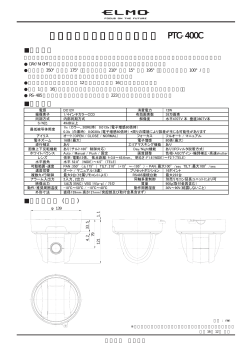
OPTICAL-BENCH MODULAR CAMERA
オプチカルベンチ・モジュールカメラ
OWNER'S MANUAL
取扱説明書
この度は L シリーズビューカメラをお買い上げ頂き、ありがとうございました。
ご使用の前に必ずこの取扱説明書をよく読み、正しくお使いください。
Thank you for your purchase of the L-series View Cameras.
Before oprating the L-series View Cameras, give this Instruction Manual a careful reading.
目次
1
2
3
4
5
6
7
8
9
TABLE OF CONTENTS
性能表/ SPECIFICATIONS ------------------------------------------------------ 3
各部の名称/ NOMENCLATURES ---------------------------------------------- 4-7
カメラの組立/ ASSEMBLING CAMERA -------------------------------------- 8-9
カメラの操作/ OPERATING CAMERA ---------------------------------------- 10-11
フィルムホルダーの取付け/ ATTACHING FILM HOLDERS -------------- 12-13
アオリ操作/ CAMERA MOVEMENTS ----------------------------------------- 14
チルト軸の移動 (LX/L45 Pro) / VARIABLE AXIS TILT(LX/L45 Pro) ---- 15-17
被写界深度スケール (LX) / DEPTH OF FIELD SCALE (LX) ---------------- 18
その他の操作/ OTHERS --------------------------------------------------------- 19
ご注意
Important
●各可動部の操作の前には、必ずロックを解除し
1. Be sure to release the appropriate lock before
てください。ロックが効いている状態で無理な
operating each camera movement. Forced
操作を行うと、駆動機構やロック機構に悪影響
operation in the locked position may damage the
を与えることがあります。
driving and locking mechanisms.
●この取扱説明書に述べた各モジュールの分解組
2. Refrain from disassembly beyond the limits
立は、簡単にできる設計になっていますが、そ
of assembly and disassembly of each module as
れ以上の分解再組立は精度保持上高度の技術を
described in the instructions.
必要としますので、分解はしないでください。
3. Refrain from using organic solvents such as
●ノブ関係とフレネルレンズには、樹脂成型部品
lacquer thinner and acetone in cleansing Knobs
を使っていますので、ラッカーシンナーやアセ
and Fresnel Lens, because they are made of
トン等の有機溶剤は使用しないで、柔らかい布
molded resins which are easily damaged. Use only
に少量の洗剤を付けて清掃してください。
a mild soap and soft cloth.
●ピントガラスのマット面の清掃は、柔らかい布
4. In cleansing the mat surface of the Groundglass,
に少量のアルコールを含ませて軽く拭きとって
wipe gently with a soft cloth wet with a small
ください。水を使ったり息を吹きかけたりはし
amount of alcohol. Do not use water or blow on
ないでください。
the groundglass.
2
SPECIFICATIONS
性 能 表
型式
Type
材質
Material
カメラバック
Camera back
焦点調整
Focusing
ピントガラス
Ground glass
ホースマン L45
HORSEMAN L45
オプチカルベンチモジュールカメラ
Optical bench modular camera
軽合金ダイカスト
Die-cast and machined aluminium alloy
4×5″判国際規格
4×5″ international standard
モノレール上でラックピニオンによる調整
Rack and pinion drive system on H-shaped monorail
10mm方眼・6×7/6×9/6×12cmマーク・センターアオリ軸+マーク
(L45ProおよびLXはV.A.T.スケール入り)
10mm grid, 6×7/6×9/6×12cm markings (L45 Pro/LX : +V.A.T. scale)
レンズパネル
Lens panel
140mm x 140mm
フレネルレンズ
Fresnel lens
標準装備
Standard equipment
ライズ/フォール
Rise/Fall
上下各30mm(ラックピニオン)
30mm each
アオリ機構 Camera Movements
M.F.D.ライズ
F.P.R.
主体枠部・画面(LXはレンズ面も)に平行にライズ
40mm(スピンドルギア)
40mm parallel to the focal plane(LX : + lens plane)
シフト
Shift
左右各30mm(ラックピニオン)
30mm L/R
スイング
Swing
センターチルト
Center tilt
360゚/ 画面中心(シフトにより移動)
360゚/ optical axis
360゚/ レンズ中心から40mm下方まで
連続可変(V.A.T.)※L45プロは後部のみ
360゚/Variable between lens optical axis center
and 40mm below *L45 Pro : Rear Only
360゚/ 画面中心
360゚/ Optical axis
ヨーフリーベースチルト
Yaw-free base tilt
前後各40゚
40゚forward / backward
最短フランジバック
Minimum Flange Distance
モノレール
Monorail
60mm(袋蛇腹使用時)
60mm (wideangle bellows)
400 mm
外形寸法 / 重量
External Dimensions /Weight
460 〜 700mm
エクスパンダブルモノレール
Expandable
標準装備
Standard equipment
被写界深度スケールノブ
Depth of Field Scale knob
基台部
Tripod Base
ホースマン LX
HORSEMAN LX
ホースマン L45 プロ
HORSEMAN L45 Pro
ラックピニオン
Rack and pinion drive system
325x245x420mm(H / W / L)
約 4.6kg
3
380x245x480mm(H/ W/L)
約 6.9kg
NOMENCLATURES
各 部 の 名 称 (LX)
LX
基台部
シフトロックノブ
つなぎ枠
フォーカシングロックノブ
ライズ/フォール
(垂直移動)
ノブ
ピントガラス枠
フォーカシングノブ
モノレール
モノレールストッパー
フォーカシングスケール
スタンダード受台
スイングロックレバー
スイングスケール
スイング及びシフト指標
L型アーム
シフト
(平行移動)
ノブ
シフトスケール
ライズ/フォールロックノブ
ライズ/フォールスケール
ライズ/フォール指標
チルトロックノブ
チルトスケール
アクセサリーキャッチ
ヒンジ
標準蛇腹
M.F.D.ノブ
M.F.D.スケール
ベースチルトロックレバー
エクスパンダブルモノレール
ロックノブ
チルト指標
主体枠
水準器
(LXのみ)
スライドロック
4
主体枠ロックレバー
Tripod Base
Locking Knob for Lateral Shift
Supporting Frame
Focusing Lock Knobs
Knob for Rise/Fall(Vertical shift)
Groundglass Frame
Focusing Knobs
Scale for Lateral Shift
Monorail
Locking Knob for Rise/Fall
Focusing Scale
Indicator for Rise/Fall
Monorail Stopper Plate
Scale for Rise/Fall
Standard Base
Locking Knob for Tilt
Scale for Swing
Indicator for Tilt
Locking Lever for Swing
Indicator for Swing and
Lateral Shift
L-Support
Knob for Lateral Shift
Scale for Tilt
Accessory Holder
Spring Latch
Standard Bellows
V.A.T. Knob
V.A.T. Scales
Base Tilt Lock Lever
Monorail Extension Lock Knob
Locking Lever for Main Frame
Main Frame
Spirit Level
Slide Locks
5
NOMENCLATURES
各 部 の 名 称 (L45/L45Pro)
L45
基台部
シフトロックノブ
つなぎ枠
フォーカシングロックノブ
ライズ/フォール
(垂直移動)
ノブ
ピントガラス枠
フォーカシングノブ
モノレール
モノレールストッパー
フォーカシングスケール
スタンダード受台
スイングロックレバー
スイングスケール
スイング及びシフト指標
L型アーム
シフト
(平行移動)
ノブ
シフトスケール
ライズ/フォールロックノブ
ライズ/フォールスケール
ライズ/フォール指標
チルトロックノブ
チルトスケール
アクセサリーキャッチ
ヒンジ
標準蛇腹
M.F.D.ノブ
(L45 Proのみ)
M.F.D.スケール
(L45 Proのみ)
主体枠ロックレバー
(L45 Proのみ)
主体枠固定ノブ
(L45 Proのみ)
チルト指標
主体枠
水準器
スライドロック
6
L45Pro
Tripod Base
Locking Knob for Lateral Shift
Slide Locks
Focusing Lock Knobs
Knob for Rise/Fall( Vertical
Accessory Holder
Focusing Knobs
Monorail
Monorail Stopper Plate
Focusing Scale
Standard Base
Locking Lever for Swing
Scale for Swing
Indicator for Swing and Lateral Shift
L-Support
Knob for Lateral Shift
Scale for Lateral Shift
shift)
Locking Knob for Rise/Fall
Scale for Rise/Fall
Indicator for Rise/Fall
Locking Knob for Tilt
Scale for Tilt
Indicator for Tilt
Main Frame
Spirit Level (LX only)
7
Supporting Frame
Groundglass Frame
Spring Latch
Standard Bellows
V.A.T. Knob ( L45 Pro only)
V.A.T. Scales (L45 Pro only)
Locking Lever for Main Frame
(L45 Pro only)
Locking Knob for Main Frame
(L45 Pro only)
ASSEMBLING CAMERA
カ メ ラ の 組 立
カメラの組み立て
Assembling Camera
カメラを三脚、またはスタンドに
Fix the camera on a tripod or a
stand. Use either the larger (3/8")
or smaller (1/4") taphole on the
camera base according to the
screw diameter of your tripod.
しっ かりと固定します。 基台部
には太ネジ穴(3/8″)と細ネジ穴
(1/4″)の両方が備えられていま
す。
1
There are a number of ways
of assembling the camera as
the camera may be assembled
freely to meet any photographic
requirement. The following is the
standard method of assembly.
ホースマンのLシリーズは、幾通
りもの組み合わせが自由にできま
す。標準的な組み立て方は以下の
要領で行います。
スイングロックレバー
を解除します。
でロック
Release the locks for the swing
movement on both the front
LX
and rear L-Supports
L 型アームの操作ノブが、左側に
. Turn the
L-Supports 90゚.
The operating knobs for camera
movements should be on the
くるように90度回転させ、クリッ
クがカチッと入ったところでロッ
クします。
left and the swing indicator
at the “0” position. Lock both
Lock Levers for swing to secure
L-Support .
L45/L45Pro
8
2
Extend the bellows rearward
and afix it to the Main Frame on
the Rear Stand by using Slide
蛇腹を後方へ伸ばし、これを後部
スタンダード部の主体枠へ上下の
スライドロック
す。
で取り付けま
Locks
主体枠の取外し
(L45、L45 プロ / 前部)
Detaching Main Frame
(L45, L45 Pro / Front)
L45およびL45プロ前部の
Loosen two locking knobs
and detach the Main frame from
L-support.
主体枠部を取り外す場合、
2個の主体枠固定ノブ
.
を緩め
てカメラサポートを後側Lアー
ムのスライド部から上に引き抜
きます。
主体枠の取外し
(LX、L45 プロ / 後部)
Detaching Main Frame
(LX, L45 Pro / Rear)
取り外す場合、主体枠ロックレ
detach the Main frame from rear
L-support.
LX、LX45プロ後部の主体枠部を
バー
Unlock the locking lever
を緩め、主体枠をLアーム
から取り外します。
9
and
OPERATING CAMERA
カ メ ラ の 操 作
レンズの取り付け
Attaching Lens
レンズを直接パネルに取り付ける場合、そのシャッ
The Lensbord should be bored to match the shutter diameter of the lens that you want to use.
For using lenses already mounted on Horseman 80×80mm lensbords or Linhof Technika
lensboards, use an Adapter Lens Panel (Code
No.23517 or 23516).
ター径に合った加工済レンズパネル(別売)に取り
付けてください。ホースマン用レンズパネル、また
はリンホフパネルに装着されたレンズの場合は、別
売のダブルパネルホースマン用、ダブルパネルリン
ホフ用をそれぞれご使用ください。
画面のタテ/ヨコ位置の
切り換え
Vertical/Horizontal
Conversion of the format
主体枠の上下のスライドロック
を解除し、つなぎ枠
Release the Slide Locks
を取りはず
and
detach the Supporting Frame
し、タテ、またはヨコ位置に切り換
.
えて、再びスライドロックで固定
します。
Turn the frame to the vertical or
horizontal position and attach it
again by working the Slide Locks.
ピント合わせ操作
Focusing Operation
Focusing is done by working the
ピント合わせは、スタンダード受
台
のフォーカシングノブ
Focusing Knobs
で
dard Base
操作します。前後どちらのスタン
には後部スタンダードを移動して
also be accomplished by moving
the front standard.
For closeups and copying, set the
magnification by moving either
of the standards, and focus by
moving the entire camera assem-
行います。
接写や複写の際は、スタンダード
部の移動により倍率を決め、基台
のフォーカシングノブ
. The usual method
of focusing is to move the rear
standard, however focusing can
ダード部でも行えますが、一般的
部
on the Stan-
で
本体を移動させると、容易に作画
- ピント合わせができます。
bly with the Focusing Knob
10
the Base
.
on
水準器
Spirit Level
LXには固定式の二方向水準器が備
LX is specially equipped with a
えられています。
2-way spirit level on both the
front and rear Standards.
Main Frame Displacement
(LX/L45Pro)
主体枠の変位操作
(LX/L45Pro)
MFDノブ
To raise the Main Frame, turn the
を反時計方向に回転
すると主体枠は上方に変位し、同
V.A.T. Knob
す。移動量はMFDスケール
The amount the Main Frame
に表
is raised will be indicated on
示されます。ロック操作は不要で
す。
MFDノブ
counter-clockwise
and the tilt axis will be lowerd.
時にチルト軸は下方に移動しま
the millimeter scale. Locking is
unnecessary.
を時計方向に回転す
ると主体枠は下方に変位し、同時
To lower the Main Frame, turn
にチルト軸は上方に移動します。
the V.A.T. Knob
clockwise and
the tilt axis will be raised.
11
ATTACHING FILM HOLDERS
フィルムホルダー の取付
フィルムホルダーの装着
Attaching Film Holders
シートフィルムホルダー、※フジ
Lift the edge of the Groundglass
ドランドフィルムホルダー 545と
sheet film holder until it stops.
クイックチェンジャ ー、ポラロイ
Frame slightly and insert the
550等は、ピントガラス枠の端を
The Polaroid 545 and 550 Film
少し持ち上げ、突きあたるところ
Holders, the Horseman Optical
まで挿入します。
Exposure Meter may also be
(エクスポージャ ーメーターも同
inserted in the same manner.
様に挿入します。)
When attaching the Polaroid 405
Film Holder*, simultaneously
push the two Spring Latches
※ポラロイドランドフィルムホル
to detach the Frame by sliding
ダー 405の装着は、ピントガラス
枠の二つのヒンジ
it. Then, attach the film holder
を同時に押し
using the two Accessory Holders
ながら、ピントガラス枠をずらし
.
てはずし、つなぎ枠の二つのアク
セサリーキャッチ
固定します。
でホルダーを
12
6x7cm / 6x9cm / 6x12cm の
撮影
T a k i n g 6x9c m , 6x7c m ,
6x12cm Photographs
7/6×9/6×12cm判の撮影をする
6x12cm photographs on roll
ロールフィルムを使用して、6×
When taking 6x9cm, 6x7cm or
場合、 別売のホースマンロール
film, attach Horseman Roll Film
フィルムホルダー 451〜454/612
Holders 451 〜 454/612 directly
型を使用してください。
to the camera or attach the
Horseman Rortary Back 2* and
※ホースマンロータリーバック2
3*.
型/3型を使用する場合は、ホース
In attaching these to the camera,
マンロールフィルムホルダー 1〜
detach the Groundglass Frame
4型(6×7/6×9cm)を取りつけて
and affix the film holder or Rotary
ご使用ください。
Back using the two Accessory
これらの装着は、ピントガラス枠
Holders
をはずし、つなぎ枠の二つのアク
Frame.
セサリーキャ ッチ によりフィ
ルムホルダーを固定します。ロー
on the Supporting
タリーバック3型の場合は、主体
枠に直接取り付けることができ
ます。
※印のホースマンロータリーバッ
※Remark : When attaching the
使用する際は、後部主体枠を180度
the Main Frame 180 ゚ .
ク、フジクイックチェンジャ ーを
accessories indicated by*, turn
回転させ、後方オフセットにしま
す。ポラロイドランドフィルムホ
ルダー 405はどちらでも使えます
が、後方オフセットの時の方が容
易に、
引板を操作できます。
13
CAMERA MOVEMENTS
アオリ操作
YAW-FREE BASE TILT
ヨーフリーベースチルト
※ベースチルトスケールは図の裏側にあります。
Release the Base Tilt Lock Lever
to the UNLOCK position. Manually
adjust the L-support until you get
the desired tilt angle and then
return the Lock Lever to the LOCK
position. The operating angle will
be indicated on the Base Tilt Scale.
センターチルト
Center Tilt
ベースチルトロックレバー を
UNLOCK側にゆるめ、手でLアームを
操作して必要な角度が得られたとこ
ろでロックレバーをLOCK側に締め
てロックします。作動角はベースチ
ルトスケール上に示されます。
チルトロックノブ をゆるめ、手
で主体枠を回転させ必要な角度が
得られたところでロックします。
回転角はチルトスケール
されます。
,
Loosen the Lock Knob for Tilt
turn the Main Frame and lock it in
position when the desired angle is
set. Amount of rotation is indicated
上に示
on the Scale for Tilt
.
Swing
スイング
スイングロックレバー をゆる
め、手でL型アームを回転させ、必
要な角度が得られたところでロッ
クします。 回転角はスイングス
Loosen the Lock Lever for Swing
ライズ / フォール
Rise/Fall
ケール
, turn the L-support and lock
it in position when the desired
angle is set. Amount of rotation is
上に示されます。
shown on the Scale for Swing
Loosen the Lock Knob for Rise/
ライズ/フォ ールロックノブ を
ゆるめ、ライズ/フォ ールノブ
を回して行ないます。
移動量はライズ/フォ ールスケー
ル
Fall
and turn the Knob for
.
Rise/Fall
Amount of movement is
indicated in mm on the Scale for
m
上に /mで示されます。
Rise/Fall
シフト
.
Lateral Shift
Loosen the Lock Knob for Lateral
シフトロックノブ をゆるめ、シ
フトノブ を回して行ないます。
移動量はシフトスケール 上に
m/ で示されます。
m
Shift
and turn the Knob for
.
Lateral Shift
Amount of movement is
indicated in mm on the Scale for
Lateral Shift
14
.
.
VARIABLE AXIS TILT (LX/L45 Pro)
チルト軸の移動 (LX/L45Pro)
1
チルト軸の移動と
撮影の実際
Variable Axis Tilt
This feature is useful when
rear tilt is required to achieve
1. MFD スケールが “0” の位置に
best focus by the Scheimpflug
くるようセットします。基準と
Method, but the relevant subject
なる被写体(この例では矢印の
matter does not lie on the central
球に設定)にピントを合わせま
film plane axis. By means of the
す。
variable axis mechanism the tilt
これは画面中心線から下方
axis can be placed anywhere
40mm の範囲であればどこで
between the screen center and
も自由に設定できます。
40mm below the center.
The V.A.T. System is used in
the following way:
←
図1
Fig. 1
1. Assume the crucial plane lies
some 30mm below the central
tilt axis. (fig.1)
2
2. ライズ/フォールノブの操作
2. Then, lower the camera back
により主体枠をフォールさせ、
using the normal fall control on
基準被写体が画面中心線上に
the L Standard to 30mm below
来るようにします。
the zero position. The tilt axis
30mm 以上の調整が必要な場
has therefore been lowered
合はフロントライズを併用し
and placed where it is needed
ます。
for making the tilt adjustment.
(Since the normal range of rise
and fall is 30mm each side of
the zero point, if for instance
40mm of drop is required, this
can be achieved by dropping
the rear frame by its full 30mm
and rising the front frame
図2
Fig. 2
15
by 10mm making a total
difference of 40mm. (fig.2)
3. MFD ノブ
3
を回転させて図
3. The variable axis mechanism
can now be employed to raise
1-A の フ レ ー ミ ン グ に 戻 し ま
the ground glass frame by
す。
the same 30mm in order to
ライズ/フォールスケールの読
取量を MFD スケールに置き換
give the same view point as
により、チルト軸は基準被写体
however remains 30mm below
えれば簡単に行なえます。これ
before - the horizontal tilt axis
上に設定されます。
the center line of the screen.
The tilt correction can now be
undertaken remembering that
the tilt axis is now situated
30mm below the screen center
line. See also milimeters scale
図3
Fig.3
4
4. チルトを行なって画面上の他
at the left hand side of the
lower screen half. (fig.3)
4. General focus may be obtained
over an inclined surface by
の部分にピントが合うように
appropriate tilting of the rear
します。(図 4)
main frame. (fig.4)
後部チルトによる画像の変
形が気になる場合はチルトス
In this case some slight
ケールの読取量をフロントチ
perspective distortion will occur
ルトに移し、後部は“0”に戻し
- this may be eliminated in the
ます。(図 5)
following way:
この場合、多少のピントの微
調整が必要です。
a) Read the number of degrees
図4
Fig.4
on the rear Main Frame Tilt
Scale.
b) Place the same number of
degrees on the front Main
Frame Tilt Scale, but on the
opposite side of the scale.
c) Place the rear Main Frame
Tilt Scale at “0”. Thus, any
undesirable distortion is
eliminated. Make small focus
adjustment, always required
after transferring swing or
tilt movement to the front
図5
Fig.5
16
standard. (fig. 5 )
FPR
(フォーカスプレーンライ
MFD は、チルト操作によりピン
ト面を設定した後のフレーミング
Focal Plane Rise (F.P.R.)
通常のライズ方向
Direction of rise (conventional)
The V.A.T. feature can also be
used to adjust the final framing
with “focal plane rise” (F.P.R.). As
the front can be raised in parallel
の微調整に使用しますと、フロン
with the lens plane, and the rear,
トではレンズ面に、リヤではピン
in parallel with the focal plane,
トガラス面に平行に移動しますの
the picture can be reframed
で、ピントのズレを生じません。
without the focusing being
F.P.R. によるライズ方向
Direction of rise with F.P.R.
affected.
Note
※ MFD 部のライズ機構にはビス
が 4 箇所に備えられていますが、
The V.A.T. mechanism is properly
長年にわたる使用で調整が必要に
adjusted at the factory. It should
なった時にのみ使用するものです
need no further attention at this
ので、通常は回転させないで下さ
time. After long years of use an
い。調整が必要な場合は、4 本の
adjustment may be desired, this
ビスを均等に少しづつ締めて下さ
may be accomplished by using
い。
the four adjustment screws.
17
DEPTH OF FIELD SCALE (LX)
被写界深度スケール
(LX)
被写界深度スケールの使い方
1
Using The Depth of Field Scale
1. 被写体のピントを合わせた
1. Focus on the FARTHEST point
of the subject that you wish to
render sharply. Then position the
begining of the rotating scale
opposite the fixed zero mark.
い範囲のうち、最も遠い部分に
ピントを合わせます。そこでス
ケールリングを回転し、基準線
を指標に合わせます。
2. 繰り出しノブを回転して、被
2
2. Focus on the NEAREST point
you require sharp. As you focus
the depth of field scale will
rotate and indicate an f stop or
fractional f stop. This Value is the
aperture that needs to be set on
the iris in order to encompass
sharply the zone that you have
defined by the FARTHEST and
NEAREST sharp points.
写体のピントを合わせたい範
囲のうち最も近い部分にピン
トを合わせます。このとき指標
に示された数字が、必要な被写
界深度を得るための絞り値(こ
の場合F45)です。
3. 2で得られた数字を半分にし
3
た目盛まで繰り出しノブを戻
します(この場合22まで )。この
位置がピントをあわせるべき
位置です。この状態でF45まで
絞り込めば全体にピントが合
います。
Notes
LXの被写界深度スケールは4×5"用の目盛(黒)の他に6
×9cm用の目盛(赤)が刻まれています。
6×7/6×9cm判での撮影には赤色の目盛をお使い下さ
い。
この被写界深度スケールは使用するレンズの焦点距離
に無関係に使用できます。また、チルトやスイングのア
オリを使用した際にも同様に使用できます。
3. Next take the indicated f stop,
for example f45 and cut it in
half, in this case f22. Carefully
rotate focusing knob backwards
until the depth of field scale
indicates f22. (You are actually
halving the distance between
the two measuring points.) This
is the correct focus point so
that at f45 sharpness extends
precisely between the two
extreme points chosen above.
A. The focusing knob on 4x5" cameras is provided
with two scales; one to be used when using 4x5”
format and the other when using the reduced 6x7
or 6x9cm format.
B. The scale for any particular format can be used
with any focal length of lens.
C. The depth of field scale can equally be used when
tilt and/or swing movements are employed.
18
OTHERS
その他の操作
フォーカシングノブの
力量調整
Adjustment of
Focusing Torque
スタンダード受台 のノブ側にあ
る 3 本の 6 角ビスに、6 角レンチ
を差し込み、左または右へ回して
力量を調整します。
ゆるめすぎると、モノレールとの
間にガタを生じますのでご注意く
ださい。
Adjust focusing torque by
rotating the three hexagonal
bolts on the Knob side of the
ピントガラス枠の
ヒンジバネの力量調整
Adjustment of Groundglass
Back Spring Arm Torque
(see diagram)
standard base
using the hexagonal wrench.
※Do not loosen the bolts too
much, as the L-support could then
move even when the focusing
lock is applied.
ヒンジバネの取り付け部分にある
6 角ビスを 6 角レンチで、回して
力量を調整します。
締め付けると力量が増し、ゆるめ
ると力量が減ります。ゆるめすぎ
ると、ピントガラス枠にレフレッ
クスビュワー等のアクセサリーを
取り付ける際、ピントガラス枠が
浮き上がってしまうことがありま
すのでご注意ください。
Place the groundglass back as
shown in the diagram and then
fit the hexagonal wrench over the
hexagonal bolt on the spring plate.
Rotate the wrench a little to the
right or left to increase or decrease
the torque of the spring.
※Do not loosen the hexagonal bolt too much, as
the ground glass back could be displaced slightly
when a reflex viewer or other accessory is attached.
エクスパンダブル
モノレール使用法
Special Instruction for use
of the Expandable Monorail
1. モノレールの底部にあるロッ
クノブをゆるめ、モノレール上
部を前後にスライドさせれば、
クイックフォ ーカシングがで
きます。この手順でモノレール
の長さを調節した後、底部の
ロックノブで再びモノレール
上部を固定します。
1. Quick focusing may be
accomplished by releasing
the locking knob located on
the bottom of the expandable
monorail and sliding the upper
portion foward or backward
manually as desired. After the
approximate location has been
found, be sure to tighten the
lower locking knob.
2. Fine focusing may be
accomplished by using the rack
2. つぎに、フォーカシングノブ
を回せば、ラックピニオンの作
動により正確なピント合わせ
ができます。
19
and pinion focusing knobs
.
株式会社ケンコープロフェショナルイメージング
〒164-0001 東京都中野区中野5-68-10 KT中野ビル
TEL.03-6840-3622 FAX.03-6840-3861
● "HORSEMAN"" ホースマン " は株式会社ケンコー プロ
フェショナル イメージングの登録商標です。
●この取扱説明書は 2015 年 5 月現在のものです。
●この取扱説明書に記載の製品に関する外観・仕様など
は予告無しに変更する場合があります。
5-68-10 Nakano, Nakano-ku, Tokyo 164-0001, Japan
E-mail . [email protected]
www. k enk o - p i .c o.jp
● "HORSEMAN" is a registered tredemark of Kenko
Professional Imaging, Tokyo, Japan.
● Specifications are subject to change without notice.
© Copyright 2026 Paperzz